1
1
2
a
3
a
F
C
C
B
G
D
B
C
b
C
2
c
eve
D
190 mm
4
86 mm
9 mm
E
A
5
2
D
6
7
for
installing the iPad
34 mm
iPad 2
J
98 mm
I
1
8
1
K
2
2
1
eve
61 mm
26 mm
removing the iPad
H
48 mm
267 mm
spacer required
1
1
Identification of the parts
a 'eve' frame
(productnumber: 600-xx)
b 'eve' cover
(productnumber: 601-xx)
c spacer for iPad 2
Dimensions:
'eve' frame: 265 mm x 190 mm x 13 mm
'eve' cover: 23 mm x 190 mm x 13 mm
'eve' set: 267 mm x 190 mm x 13 mm
3
Direction of the frame
'eve' frame can be mounted horizontally or vertically.
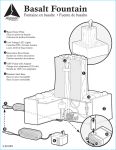
Please take care to mount the frame in the correct direction according to the drawing (3). Placing the frame in the wrong direction can damage the iPad.
4
Position of the wallbox (H) (not included)
Please use a 2-gang wallbox which is big enough for the USB Power Adapter
supplied with the iPad.
The wallbox can be installed according to the dimensions on the drawing (4).
5
USB Power Adapter (I) (not included)
To use the USB Power Adapter (I) please remove the AC Plug Adapter (J) and plug in a cable with an Euro IEC 60320 C7 connector (K) (not included) according to the drawing (5) to connect to the mainpower according to electrical regulations.
6
Spacer for iPad 2
Since the iPad 3 is thicker than the iPad 2, we provide a spacer to be installed on the frame. By using this spacer the iPad 2 will be flush with the frame the same way as the iPad 3.
For the iPad 3, the spacer is not required.
eve
2 Installation
A space for connector
Dmagnets
B openings for mounting the E space for removing the iPad
F opening for microphone
frame
C do not use for mounting
Ggroove
Please use the correct openings (B) for the mounting of the frame.
Do not use openings (C) when installing the frame.
Please be sure you install the screws according to the drawing (2a) to prevent the iPad from being damaged.
Made in Belgium
basalte is a registered trademark of Basalte bvba.
eve is a registered trademark of Basalte bvba.
eve is a registered design of Basalte bvba.
iPad is a registered trademark of Apple Inc.
The iPad 2 can also be installed without the spacer. In that case the iPad 2 will sit a little bit deeper within the frame.
7 Installing the iPad
1. Plug the power connector in the iPad.
2. Place the iPad with its side in the small groove (drawing 2, detail G).
3. Gently push the iPad in the frame so that it's being held by the magnets.
4. Place the 'eve' cover making sure that the cover is not squeezing the power cable.
8 Removing the iPad
1. Remove the 'eve' cover.
2. Place one finger in the appropriate space (drawing 2, detail E) and another one on the iPad as shown in the drawing (7).
3. Gently pull it out of the frame making sure the iPad cannot fall.
4. Remove the power connector.
Basalte bvba
Hundelgemsesteenweg 1a
9820 Merelbeke
Belgium
tel +32 9 385 78 38
fax +32 9 329 66 95
[email protected]
www.basalte.be
v1.0 © 2012 basalte