1
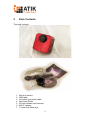
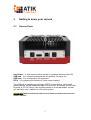
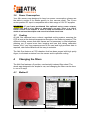
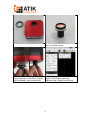
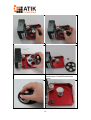
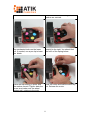
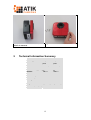
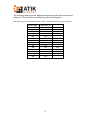
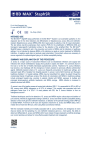
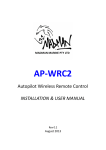
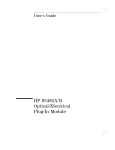
Atik One User Manual
Version 1.0 – March 2014
1
1Introduction .................................................................................................................. 3
1.1Further information ............................................................................................... 3
2Pack Contents............................................................................................................... 4
3Getting to know your camera ....................................................................................... 5
3.1Camera Ports ......................................................................................................... 5
3.2Mounting options .................................................................................................. 5
3.3Sensor .................................................................................................................... 6
3.4Optical Window .................................................................................................... 6
3.5Analog to Digital Converter (ADC) ..................................................................... 6
3.6Power Consumption .............................................................................................. 6
3.7Cooling.................................................................................................................. 7
4Changing the filters ...................................................................................................... 7
4.1Method 1 ............................................................................................................... 7
4.2Method 2 ............................................................................................................... 8
5Technical Information Summary ............................................................................... 12
6Declaration of Conformity ......................................................................................... 13
6.1Disposal of the camera ........................................................................................ 13
7Servicing .................................................................................................................... 14
8Warranty ..................................................................................................................... 14
2
1
Introduction
Congratulations on your purchase of an Atik One camera. This manual will
help you get the most out of your Atik camera: please take the time to read it
thoroughly, and you will be ready to discover new worlds.
Atik cameras provide superior performance and unrivalled ease of use. Our
cameras are the result of extensive research and development, each one
having been designed and built with the requirements of the most demanding
astro-imager in mind. Your Atik camera incorporates state-of-the-art design
and materials, and it will be your trusted astro-photography companion for a
long time to come.
1.1
Further information
For installation instructions and other useful information please refer to the
Quick start guide which was shipped with the camera. Information on the
software is given in the Artemis Capture guide, a PDF file of which is copied to
your computer hard drive by the software installer. Further information is
available on our website at http://www.atik-cameras.com.
3
2
Pack Contents
This pack includes:
1.
2.
3.
4.
5.
6.
7.
Atik One camera
USB cable
Car lighter type power cable
Quick start Guide
CD with software and manuals
M42-2” adapter
1.5 and 2mm Allen keys
4
3
Getting to know your camera
3.1
Camera Ports
Aux Power – 2.1mm center positive socket, for external devices (Max 2A)
USB hub – For connecting accessories like guiders, focusers, etc.
USB port – For connecting to the computer.
DC in – For powering the camera (2.1mm center positive)
The USB hub is capable of powering a USB 2.0 class device, like a small
guider camera, so that cables are kept to a minimum. Aux power can be used
to power a 12V DC device, like a guide camera or a focuser/rotator, so that
you can have only 2 cables for your entire system.
WARNING: Make sure that the total current drawn on the Aux port does not
exceed 2 Amps!
5
3.2
Mounting options
There are two possibilities connecting the camera to a telescope. The M42 “Tthread” adapter in the front, which is compatible with any T threaded device
(like reducers or flatteners), or with the supplied T to 2”
adapter, which can be used on any 2” focuser. Smaller
1.25” adapters are not recommended, because they
might vignette with faster telescopes, and the
attachment will be weaker.
There are 1/4” tripod threaded holes on each side of
the camera. These can be used to mount the camera
on a tripod, or as cable fixing points.
3.3
Sensor
The sensors available in the Atik One cameras are listed below:
Black and White
Atik One 6.0
SONY ICX694/5AL
Atik One 9.0
SONY ICX814/5AL
As these CCD typically have few hot pixels and relatively low dark current,
dark frames are unnecessary in many cases. The low noise, which stands at
an amazing 5 electrons RMS typical, allows the camera to image very faint
objects.
3.4
Optical Window
The optical window used in front of the CCD is a 2mm BK7 with BBAR
coatings on both sides to minimize reflection artifacts in your images.
3.5
Analog to Digital Converter (ADC)
The Analog to Digital Converter (ADC) has a 16-bit dynamic range. This
means that your Atik camera will allow you to record subtle levels of gray,
providing you with detail in both the faint and bright parts of an image.
6
3.6
Power Consumption
Your Atik camera was designed to have low power consumption: please see
the table in section 5 for details specific to your camera model. The 2.1mm
centre-positive DC input is compatible with a wide range of 12V DC supplies.
WARNING: If you have purchased the optional mains power adaptor,
please note that it is for indoor or observatory use only. There is a risk of
electric shock if the adaptor is used in damp environments or outside. If in
doubt do not use the adaptor and consult a trained electrician.
3.7
Cooling
All Atik One cameras have a robust, regulated cooling system, ensuring the
CCD is kept at the desired temperature throughout the observing session. The
efficient cooling, means that dark frames are not necessary in most situations,
allowing you to spend more time imaging and less time taking calibration
frames, but if very long exposures are to be used and high precision data is
required, dark frame libraries will be easy to maintain.
The Atik One features a CCD chamber that has been purged with high purity
Argon, to eliminate moisture from the sensor and to optimize cooling.
4
Changing the filters
The Atik One features a 5 position, mechanically indexed filter wheel. The
wheel was designed to be simple to use, and changing the filters can be done
in one of 2 ways:
4.1
Method 1
Connect camera to computer
Open Artemis Capture. Disk will reset
to position 1.
7
Unscrew the M42 adapter
Using the supplied tool, place the
filter on tool as shown.
Insert tool in the opening and gently
tighten the filter. It may help to catch
the first thread if you unscrew first.
On Artemis Capture wheel control,
move to filter 2 and repeat the
previous step. Repeat for all filters.
8
4.2
Method 2
On a clean table, unscrew the 4 front
screws.
Place the camera sideways and
gently separate the wheel module.
Turn down the wheel module onto the Lock the motor with the supplied
table.
1.5mm Allen key.
9
Unscrew the central holding screw.
Take the washer off.
Take the disk off.
Remove the bearing by turning disk
upside down. Parts should look as
above.
10
Install filters on disk
Make sure the lower bearing and
washer are centred.
Install disk. Make sure the disk clears
the mechanical index on the lower
left. If needed, use a pen tip to lower
the blade.
Gently push down the disk, while
rotating to the right. You should feel
the force of the spring below.
Place the top bearing in place and
the washer as well. Tighten back the
screw, and make sure the wheel
rotates well, rotating to the right.
Hold the motor and take the allen key
out. Release the motor.
11
Rotate the wheel module back, and
attach to camera.
5
Tighten back the screws.
Technical Information Summary
Sensor Type
Resolution
Atik One 6.0
Atik One 9.0
Sony ICX694/5
2750x2200
pixels
Sony ICX814/5
3380x2704
pixels
Pixel Size
4.54x4.54μm
ADC
16 bit
Readout Noise (typical) 5 eInterface
USB 2.0
Power
12V DC 2A
Maximum Exposure
Unlimited
Minimum Exposure
1/1000s
Cooling
Thermoelectric
Delta T = -38ºC
Weight
Approx. 990g
Backfocus (no adapter) 24mm
Backfocus (T-thread)
28mm
12
3.69x3.69μm
16 bit
5 eUSB 2.0
12V DC 2A
Unlimited
1/1000s
Thermoelectric
Delta T = -38ºC
Approx. 990g
24mm
28mm
The following table gives the angular resolution per pixel with certain focal
distances. The formula to calculate any other focal length is:
(Pixel Size (μm) / Focal Distance (mm)) * 206.3 = angular resolution (arcseconds/pixel)
Focal Length
250
300
350
400
450
500
550
600
650
700
750
800
850
900
Atik One 6.0
3,75
3,12
2,68
2,34
2,08
1,87
1,70
1,56
1,44
1,34
1,25
1,17
1,10
1,04
13
Atik One 9.0
3,04
2,54
2,17
1,90
1,69
1,52
1,38
1,27
1,17
1,09
1,01
0,95
0,90
0,85
6
Declaration of Conformity
EU Declaration of Conformity.
This product carries the CE Mark in accordance with the related European Directive. CE
Marking is the responsibility of:
Perseu, SA
R. Dr. Agostinho Neto, 1D
2690-576 Sta Iria da Azoia
Portugal
Critical Applications.
This product is not designed for any “critical applications”. “Critical applications” means life
support systems, medical applications, connections to medical devices, commercial
transportations, nuclear facilities or systems or any other applications where product failure
could lead to injury to persons or loss of life or catastrophic property damage.
This product is not a toy.
This is a class A product. In a domestic environment this product may cause radio
interference in which case the user may be required to take adequate measures.
6.1
Disposal of the camera
When no longer required do not dispose of this electronic device with general
household waste. To minimise pollution and protect the environment the camera
should be recycled. Local recycling drop off points available under the Waste from
Electrical and Electronic Equipment (WEEE) regulations which will accept the
camera. For further information contact Perseu SA at the above address, or the shop
from which the camera was bought.
14
7
Servicing
Repairs, servicing and upgrades are available through your local dealer or at
[email protected]
Please note that modifications to the camera and/or accessories which are
undertaken without the manufacturer’s written permission will void the
warranty.
8
Warranty
The equipment is guaranteed against defective design, manufacture or
materials for a period of one year from the date of purchase.
This means that Atik Cameras will repair or replace the equipment at its sole
option, at no charge to the purchaser for parts or for labour, if the fault is
reported within the guarantee period, provided however that Atik Cameras is
able to duplicate the defect or problem at its facilities. This warranty does not
apply to damage that occurred as a result of abuse or misuse, abnormal
service or handling, damage which may have been caused either directly or
indirectly by another product, or if the equipment has been altered or modified
in any way, or if the damage was caused by repairs or service provided or
attempted by anyone other than Atik Cameras. This warranty does not include
or provide for incidental or consequential damages.
To exercise your rights under this warranty, you must return the equipment to
the dealer from whom it was purchased together with proof of purchase and a
clear description of the fault. If it’s not possible to return the equipment to your
dealer, you should contact Atik Cameras. Equipment returned to Atik Cameras
must be sent in appropriate packaging and at your expense (insurance is
recommended), together with proof of purchase, a return address and a clear
description of the fault.
This does not affect your statutory rights.
15