1
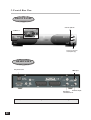
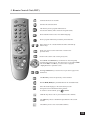
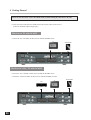
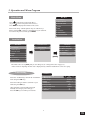
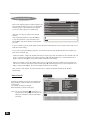
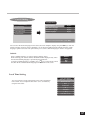
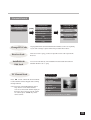
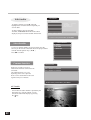
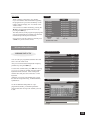
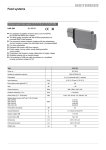
BEDIENUNGSANLEITUNG
USER MANUAL
PA G E 2 9
Digital
SatellitenReceiver
SKYMASTER
DCI 9210
User Manual
DIGITAL SATELLITE RECEIVER
DCI 9210
29
CONTENTS
1. Features
__________________________________________________ 31
2. Front & Rear View ___________________________________________ 32
3. Remote Control Unit (RCU) ____________________________________ 33
4. Getting Started _______________________________________________ 34
5. Operation and Menu Program __________________________________ 35
6. Specifications ________________________________________________ 45
Trade Mark of the DVB Digital Video Broadcasting Project (1700)
30
1. Features
1. MPEG-II video(MP@ML)
2. MPEG-I audio Layer 1, Layer 2
3. MPEG-II digital & fully DVB compliant
4. Capable of scanning the frequency for SMATV –IF system
5. Plug & Play installing program set-up
6. On-screen display with 256-color full resolution
7. LD quality video, CD quality audio
8. Compatible with DiSEqC 1.2
9. RS232C port for additional information service and updating IRD control software
10. Displays signal level to set-up the satellite antenna with ease
11. Power recovery function
12. 64-Step Volume control
13. Powerful editing facilities
(PIDs, TV or Radio Channel, Channel Name, Satellite Name/Transponders)
14. Teletext supported(your TV needs teletext for this)
15. Subtitle supported (with optional background)
16. S/PDIF(Sony/Philips Digital Interface) for digital audio
17. Favorite channel function (up to 96 channels)
18. SCPC/MCPC receivable from Ku-Band satellites
19. Capable of receiving unencrypted free digital programs
20. User-friendly OSG menu with full function
21. IR remote control unit (RCU)
22. Last channel memory function
23. Variable aspect ratio (4:3, 16:9) with pan vector
24. EPG for on screen channel information
25. Parental lock / Installation Lock / Receiver Lock
26. Multi-lingual function according to the satellite and program provider
27. Total 2,000 Channels programmable (TV: 1,500 CH. & Radio : 500 CH.)
28. Over-the-Air software program downloadable
29. 2 x Common Interface for taking up PCMCIA modules.
31
2. Front & Rear View
FRONT PANEL
Channel Up/Down
2 CAM slot
To turn the receiver
on/off (stand by)
REAR PANEL
AC power cord
LNB input
Antenna input
RF output
connector to TV
Note) All cables used for connecting the receiver should be well-shielded type cable.
32
3. Remote Control Unit (RCU)
Switches the Receiver ON/OFF.
Switches the sound ON/OFF.
The EPG key shows program information of
the selected channel. (EPG : Electronic Program Guide)
Shows Subtitle menu to select the subtitle language.
Shows program information provided by the broadcaster.
~
Direct choice of TV / Radio channel and other commands by
numeric keys.
When you want to see the main menu or return to the
previous menu.
Return to the current video viewing at any time.
The Volume and Channel keys control the two most frequently
used functions of the receiver. The cursor keys are for channel G H
and volume F E. The OK key is used to select a program,
a highlighted line or parameter value.
The Page UP/Down key is used to move up or down a page in the
channel list.
The Recall key selects the previously viewed channel.
The TV/RAD (Radio) key switches between TV and radio mode.
Select the audio language or the sound track you want
among data to be transmitted from the satellite.
To return to current channel, press
or EXIT.
The FAV key shows a list of your selected favorite channels.
The VIEW key shows a thumbnail representation of the current
channel.
The SAT key shows a list of selectable satellites.
33
4. Getting Started
Please do NOT PLUG the receiver into Mains until you finish making all connections to the unit.
Connect the coaxial cable from the satellite dish to the LNB IN socket of the receiver.
(Connector should be adapted finger-tight.)
Receiver to TV with SCART
• Connect the “TV” SCART on the receiver with the SCART of TV.
TV
SATELLITE DISH
SCART
Receiver to VCR, TV with SCART
• Connect the “TV” SCART on the receiver with the SCART of TV.
• Connect the “VCR” SCART on the receiver with the SCART of VCR.
TV
VCR
SCART
34
SCART
SATELLITE DISH
5. Operation and Menu Program
Main Menu
Main Menu
1. TV Channels
Press
on the remote control unit (RCU).
(or press /I on the front panel of the receiver)
2. Radio Channels
3. Parental Control
Press MENU to display Main Menu on the screen.
4. Timer
Select menu using channel up/down keys or numeric keys.
Please note that OK is always a confirmation of your selection.
To return to the previous menu, press MENU.
5. Edit
6. Installation
7. Select Satellite
8. Common Interface
Installation
Main Menu
Installation
Installation Lock
1. TV Channels
2. Radio Channels
1. Program Satellites
Enter PIN code
2. SMATV Configuration
[????]
3. User’s Setting
3. Parental Control
4. LNB Setting
4. Timer
[0000]
5. Edit
6. Installation
5. Advanced Installation
7. Select Satellite
The initial code is set as [0000] and you can change it (see “Change PIN code” in page 39).
• Above menu for inputting the PIN code is displayed only when the Installation Lock is set as [ON].
LNB Setting
Select the “LNB Setting” menu in the “Installation”
menu using the G H keys.
Select the LNB type which is conforms to your
LNB using the F E keys.
Other parameter values should be changed
manually according to your LNB type.
Press the OK key to confirm your selection.
LNB Setting
LNB Type Index (1..8)
LNB Freq. Low
LNB Freq. High
DiSEqC
DiSEqC Port
Polarity Control
LNB Freq. Band Control
0/22kHz Control
LNB Power
F
Type 1
E
Universal
Universal
DiSEqC 1…4
1
13/18V
0/22kHz
Off
On
6
35
Program Satellites
Program Satellites
Satellite
Refer to the Signal Quality bar and the Signal Level
bar at the bottom of the screen. It is recommended
that the signal is at the Medium level or higher.
If it is not , please adjust your satellite dish.
This menu is to align your dish to the selected
satellite.
After setting the parameters, press the OK key
to store the parameter values. And Start earch
(Press OK) to search the channels of transponder
you want.
019.2E
LNB Type
ASTRA 1
F
E
Type 1
TP/POL
1023/H
Position
NO Set
Symbol Rate
27500
Step Move
E
Search Type
Start Search (Press OK)
W
Auto Search
Signal Level
05%
Signal Quality
12%
If you are unable to get any signal quality, please check the LNB Setting to ensure you have selected the correct
LNB and switch settings.
In case you are using the DiSEqC positioner, you should set the most east satellite and most west satellite you
want on the “Position” bar.
- Most East satellite : change the satellite name into you want by the most east satellite on the “Satellite” bar and
move to “Position” bar and press the Volume down key (F) until the Signal Level is at the medium level or
higher. And press the OK key to store this satellite as the most east satellite.
- Most West satellite : change the satellite name into you want by the most west satellite on the “Satellite” bar
and move to “Position” bar and press the Volume up key (E) until the Signal Level is at the medium level or
higher. And press the OK key to store this satellite as the most west satellite.
Then, start the “Auto Search” to search and store the TV channels and Radio channels of the satellite
automatically.
Auto Search
Auto Search
ASTRA 1
TV Channels
Searches the satellite selected for TV channels and
Radio channels, which are then stored and shown
on the screen.
TV channels are shown on the left.
Radio channels are shown on the right.
Note) Do not press POWER ( ) on the RCU or
on the receiver while doing Auto Search. All
other keys of the RCU will not work during
searching.
153. ARTE
41. MUSICALS
42. REQQA E
43. COUNTRY
44. NEW CNTRY
45. LA TIN
46. KL. SYMPHON
47. KLASSIK
48. OPER
154. CARSAT
155. Beta BC
156. BD1
157. TA QUILLA 6
158. TA QUILLA 7
159. TA QUILLA 8
160. ESTILO
Channel Searching Status
0%
Index
28
36
Radio Channels
Freq.
4007
50%
SR
5632
100%
FEC
3/4
Polarity
Vertical
User’s Setting
Language Setting
User’s Setting
1.Language Setting
2 Local Time Setting
3. A/V Output Setting
4.Unit Information
Menu Language
English
English
Main Audio Language
English
2nd Audio Language
Subtitle Language
English
To return to the previous Menu, press MENU
You can select the desired language for the OSG (On-Screen Graphics) display using the F E keys when the
“Menu Language” option is selected. Similarly you can selected a different audio channel when the “Audio
Language” option is selected. This option allows you to select a different language to listen to if supported.
Subtitle
Select “Subtitle language” at “Select Language Setting” menu.
While watching your wanted channel, the subtitle shall be displayed only when
the selected subtitling language is provided by the broadcaster.
To check if subtitle language is available, press “ ” key on the remote control
unit, then all the available subtitle languages will be shown on the screen.
Subtitle
None
Eng
Ita
Local Time Setting
You can set the area of the selected place (time zone) and summer
time On/Off. You can adjust the time from +59 to -59 minutes by
using the Time offset.
Local Time Setting
GMT usage
F [ Yes ] E
Selected time zone
[
Berlin
]
Summer time
[ Off ]
Time offset
[ +00 ]
Local Time = 01 : 27
37
A/V Output Setting
Aspect
A/V Output Setting
Please select your TV format.
4:3 for normal screen TV
16:9 for wide screen TV
Aspect
Banner
You can select OSG viewing time of the information
about the current channel & program among
2/3/4/5/6/8/10secs by using volume up/down keys.
Sub.backg.
Select ‘On’ for Subtitle background on TV
(Subtitle background).
AC 3 Out
If this parameter is set as [ON], you can enjoy the Dolby
Digital sound on the channel provided this function.
F[
4:3
]E
Banner
[ 3sec ]
Sub.backg.
[
On
]
AC 3 Out
[
Off
]
Note: To enjoy this sound, you should first connect the S/PDIF socket of the receiver
to Digital Audio Amplifier.
Unit Information
You can see the detailed information of this
receiver on this menu.
Unit Information
Model Name
S/W Version
H/W Version
Company Name
:
: XXXXXXXX
: XXXXXXXX
: XXXXXXXX
To return to the previous Menu, press MENU
SMATV Configuration
A Satellite Master Antenna Television (SMATV) system
which is intended for the distribution of television and
sound signals to household in one or
6 more adjacent buildings.
A SMATV System represents a means for sharing
the same resources among several users for satellite and
terrestrial reception, and it is designed to perform
the adaptation of the satellite TV signals to the SMATV
channel characteristics.
SMATV Configuration
Symbol rate alternative 1
Symbol rate alternative 2
27500
F
Symbol rate alternative 3
FEC
Start Auto Search
?
?
Auto
To return to the previous Menu, press MENU
This receiver has a SMATV-IF facility to operate this SMATV.
This configuration allows the direct distribution of the QPSK signal received from the satellite
to the SMATV-IF distribution network in the extended IF band (above 950 MHz).
Before you start, you have to check your condition whether it is possible to use this facility or not in your
households. (You can ask your household supervisor.)
If this receiver is connected to a SMATV network, select "SMATV Configuration".
The most common alternatives for "Symbol rate" and "FEC" are already preprogrammed.
(When you need to change the "Symbol rate" for the exceptional frequency, select as you know.)
Move to ”Start Auto Search" and just press "OK".
Then, the “Auto Search” procedure will start.
38
E
Parental Control
Parental Control
Parental Control
Enter PIN code
[????]
[ 0000 ]
1. Change PIN Code
2. TV Channel Lock
3. Radio Channel Lock
4. Receiver Lock
Change PIN Code
Current PIN code
[????]
New PIN code
[????]
[ Off ]
5. Installation & Edit Lock
Verify PIN code
[????]
[ On ]
Change PIN Code
Receiver Lock
Installation &
Edit Lock
Preprogrammed PIN (Personal Identification Number) code is set as [0000].
If you want to change it, please follow the procedure shown above.
If Receiver Lock is [On], you have to input the correct code to operate the
Receiver.
You can not enter directly into installation menu and Edit menu when In
stallation & Edit Lock is [On].
TV Channel Lock
Press OK to lock / unlock the selected channel.
Locked channels will be skipped when scrolling
through channels.
Note) The color of the highlighted bar turns to
Grey when it is on a locked channel.
You can see the current channel display on
this menu. If you want to view the current
TV channel, press “VIEW” key on the
remote control.
TV Channel Lock
ASTRA 1
TV Channels
33. PARIS PREMIERE
34. VOYAGE
35. CONTACT TV
36. LC I
37. Canal J
38. DF1 Info-Kanal
39. Star Kino
40. CNN
Channel Unlocked
To return to the previous Menu, press MENU
39
TV Channels
You can select the channel you would like to watch either
by pressing the numeric keys for the channel number or by
moving the highlighted bar to the channel of your choice
using the G H keys. Press the OK key to select the channel.
* Press the F E keys to move one page up or down.
+ : to High channel, - : to Low channel
Radio Channels
You can select the channel you would like to watch either
by pressing the numeric keys for the channel number or by m
oving the highlighted bar to the channel of your choice
using the G H keys. Press the OK key to select the channel.
* Press the F E keys to move one page up or down.
+ : to High channel, - : to Low channel
Timer
You can reserve the Turn On, Turn Off time of the receiver
and sleep time on this menu
TV CH : A SIASAT2
1. Saudi CH1 1
2. Henan 1
3. Henan 2
4. Hubei 1
5. Hubei 2
6. Fujian 1
7. Fujian 2
8. JX SA T TV
Radio CH : ASIA SAT2
1. Al-Quran A lk-Kar
2. VoiceOfTheKingd
3. DW1
4. DW2
5. DW8
6. YLE
7. WRN
Timer
Turn on
F [ Off ] E
[ --:-- ]
Turn off
F [ Off ] E
[ --:-- ]
Sleep time (Minute)
F [
Off
] E
Local Time = - - : - -
Edit
You can edit the TV channels and Radio channels, TP and Satellites
on this menu. If the Installation&Edit Lock is ON, enter the PIN code.
For more information, refer the page No. 10.
40
Edit
1. Edit TV Channel
2. Edit Radio Channel
3. Edit Transponder
4. Edit Satellite
Edit TV Channel
Edit TV Channel
ASTRA
TV Channels
11. Paris Premere
You can move to the channel that you want to edit by
using the G H keys.
Also you can move to the highlighted bar directly by
inputting the channel number.
Press the OK key to select the channel you want to edit,
and then you can move the channel to the position you
want or delete it. If you want to view the current TV
channel, press “VIEW” key on the remote control.
12. Voyage
13. Contact TV
14 .LC I
15. Canal J
16. DF 1 Info-Kanal
[ Status ]
17. Star Kino
18. CNN
E
Delete
F
Cancel
OK
Select
FAV
Favorite
VIEW
CH View
To return to the previous Menu, press MENU
FAV Channels
You can create a group of up to 96 channels in the “Edit TV Channel” or “Edit Radio Channel” menu.
To include a channel in the FAV list, select a channel and press the blue key on the remote control.
To select a favorite channel from the FAV list, press the FAV key.
To view a thumb nail representation of the currently selected channel, press the VIEW key on the remote control.
Edit Radio Channel
Edit Radio Channel
ASTRA
Radio Channels
11. Hit Liste
12. Blues
Use the same procedure for the Radio Channel
s as used for editing the TV Channels as above.
13. Classic Rock
14. Soft Rock
15. Generation Lock
16. Love songs
[ Status ]
17. Dance
18. REE
E
Delete
F
Cancel
OK
Select
FAV
Favorite
To return to the previous Menu, press MENU
Edit Transponder
Edit Transponder
Transponder List
ASTRA
Channel List
To delete a transponder, press the E when the
highlighted bar is located at the transponder you
want to delete.
To add a transponder, press SAT key.
And then, “Edit/Add SAT or TP” menu will be display
ed, and you can add a transponder in that menu.
E
Delete
SAT
Add TP
To be deleted Transponder
To return to the previous Menu, press MENU
41
Edit Satellite
Edit Satellite
Satellite Name
* Longitude
: xxxxxxxxx
* Transponder : xx
* TV Channels : xx
* Radio Channels :xx
To delete a satellite, press the E when the
highlighted bar is located at the transponder you
want to delete.
To add a satellite, press the SAT key.
And then, “Edit/Add SAT or TP” menu will be
displayed, and you can add a satellite in that menu.
E
Delete
F
Cancel
SAT
A dd TP
To return to the previous Menu, press MENU
Select Satellite
Select Satellite
1. ASTRA 1
2. HOTBIRD
To move to another satellite you want to watch, press the
SAT key on the remote control and choose the proper satellite
with the channel up/down keys ( G H ).
Press OK to confirm.
Common Interface
From here you will get access to
information and menus connected to the
CI module.
This information may vary a lot
depending on the service provider.
Please see the documentation delivered
together with your CI module.
3. EUTELSAT
Common Interface
Slot 1 : Module not installed
Slot 2 : Module not installed
To return to the previous Menu, press MENU
ALT Audio
If more than one audio channel is provided by the
broadcaster on a specific channel, you can
activate the audio mode display by pressing
the
key.
42
L
L Audio R
1
R
TV Guide
While watching or listening to any channel,
if you want to know more information regarding
the program shown, press the GUIDE key on the
remote control to display the “TV Guide” or the
“Radio Guide”.
You can move to another channel by pressing the
G H keys and step through the time zones by
pressing the F E keys.
The title(contents) of the program and playing time
zone for each channel are available only when the
information provided by the broadcaster.
If you want to view the current TV channel, press
“VIEW” key on the remote control.
TV Guide
Now
1. Henan 1
No Information
No Time
3. Hubei 1
No Information
No Time
No Information
No Time
2. Henan 2
No Information
4. Hubei 2
No Information
5. Fujian 1
6. Fujian 2
No Information
7. JX SAT TV
No Information
8. LNTV
TV/Radio
Radio
No Information
f e
Next
Current Time = 00:00
i
more info
No Time
No Time
No Time
No Time
No Time
Advanced Installation
Edit/Add SAT or TP
Edit/Add SAT or TP
Satellite
F
Longitude
You can edit a pre-programmed satellite name and
add a new one in this menu.
Also you can edit and add Transponder Frequency
parameter by using the F E keys.
To add a new satellite name, press OK after moving
to [ ???????? ] mode for satellite, then the graphic
keyboard will be activated. After entering new
satellite name and press OK on the“Save” on the
keyboard.
And then, you can set each parameters by giving
the data for Transponder Freq., LNB Polarization,
Symbol Rate.
To edit an additional transponder on a preprogrammed satellite, you should input all the
required data after moving to the satellite you want
to edit.
ASTRA
E
019.2E
Index
5
TP Signal Quality
0
LNB Polarization
Vertical
Symbol Rate
0
FEC
AUTO
Channel Name
????????
Video PID
0
Audio PID
0
PCR PID
Auto
Edit/Add SAT or TP
Satellite
F
Longitude
Index
TP Signal Quality
LNB Polarization
Symbol Rate
FEC
Channel Name
Video PID
Audio PID
PCR PID
Signal Level
????????
E
019.2E
???
0..9
1
0
Vertical
0
AUTO
?????????
0
0
Auto
63%
No signal
43
Edit LNB Local Frequency
Edit LNB Local Frequency
LNB Local Freq
You can edit up to 8 local frequencies by using
numeric keys.
And if you want to save newly edited frequency,
press OK.
0..9
F
10678
E
* LNB Local Freq. Editing = Numeric key
* Change =
* Save = OK key
To return to the previous Menu, press MENU
Software Upgrade
In this menu, you can upgrade the receiver with new
software being provided from the satellite.
After putting in the correct data provided by the
broadcaster and pressing OK key on the “Start
Upgrade” bar, “Checking new software” is displayed
on the TV screen, then search the software.
1. If there is no new software for upgrading,
following messages are displayed.
“No new software” on the TV screen
“None” on the LED displayed on the front panel.
Then, the present channel is displayed on the
screen.
Software Upgrade
Satellite
F
Longitude
TP / Signal Quality
LNB polarization
Symbol Rate
ASTRA 1
019.2 E
12604
Horizontal
FEC
Set to Default
22000
AUTO
Start Upgrade
2. If there is a new software for upgrading, the software upgrade is started and “OTA” is displayed on the LED.
After finishing upgrading, “done” is displayed on the LED and “Upgrade completed” on the screen.
Then, the present channel is displayed.
Note: 1. Please do not turn off the receiver while upgrading.)
2. In case of putting in wrong data for the upgrade, press OK key on the “Set Default” bar.
Reset (Factory Default)
Reset (Factory Default)
* If you want Factory Reset, press OK.
If you want to reset all the data edited, press OK twice.
*CAUTION : A ll the information of satellite and
transponder to be edited by the user
will be initialized by this process.
To return to the previous Menu, press MENU
44
E
6. Specifications
1. Tuner & Channel
Input Connector
1 x F type with Loopthrough
Frequency Range
950MHz to 2150MHz
Output Connector
Input Impedance
Signal Level
IF Frequency
IF Bandwidth
LNB Power & Polarization
22KHz Tone
1 x F type 75 Ohm IF signal out
75 Ohm
-25 to -65dBm
480MHz
36MHz
Vertical
+13.5V ~+14.5V
Horizontal +17.5V ~+18.5V
Frequency 22kHz ±2kHz
Amplitude 0.6Vp-p ±0.2Vp-p
Demodulation
QPSK
FEC Decoder
Convolutional Code Rate
Input Symbol Rate
2 ~ 32Msps
1/2, 2/3, 3/4, 5/6, and 7/8 with Constraint
Length K=7
2. MPEG Transport Stream A/V Decoding
Transport Stream
MPEG-2 ISO/IEC 13818
Profile & Level
MPEG-2 MP @ ML
Input T/S Data Rate
Aspect Ratio
Transport Stream Specification
80Mbit/S Max.
4:3, 16:9 with Pan Vector
Video Resolution
720 x 576(PAL), 720 x 480(NTSC)
Audio Mode
Stereo, Dual Channel, Joint Stereo, Mono
Audio Decoding
Sampling Rate
3. Memory
MPEG Audio Layer 1,2, Musicam
32, 44.1, and 48kHz
Flash Memory
up to 2 Mbytes
EEPROM
2 Kbytes
Program DRAM
8 Mbytes
45
4. A/V & Data In/Out
SCART
TV x 1, VCR x 1
S/PDIF Out
RCA X 1
RGB Video Out
Analog Audio Out
TV x 1 (SCART socket)
RCA x 2 (L-CH x 1, R-CH x 1)
2 x SCART socket(TV, VCR)
Resolution
16bit DAC
Output Level 2Vrms Max.
Data Interface
5. Power Supply
Volume & Mute Control
RS232C, BAUD Rate 115200 Max , 9Pin D-SUB
Input Voltage
AC207-253V, 45~55Hz
Power Consumption
30W Max. (Below 7W Max. For Standby Mode)
Type
Protection
Linear PWM
Separate internal fuse and chassis grounding
The Input shall have lighting
or Electric Shock Protection.
6. Physical Specification
Size (W x H x D)
Weight
7. Environment
Operating Temperature
Storage Temperature
46
250mm x 40mm x 200mm
about 2 Kg
+5°C ~+50°C
-40°C ~+65°C
3972/10/2001