1
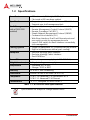
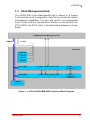
aTCA-8202 2U 2-slot AdvancedTCA® Shelf User’s Manual Manual Revision: 2.00 Revision Date: August 12, 2011 Part No: 50-1G010-1000 Advance Technologies; Automate the World. Revision History Revision Release Date 2.00 2011/08/12 Description of Change(s) Initial Release aTCA-8202 Preface Copyright 2011 ADLINK Technology Inc. This document contains proprietary information protected by copyright. All rights are reserved. No part of this manual may be reproduced by any mechanical, electronic, or other means in any form without prior written permission of the manufacturer. Disclaimer The information in this document is subject to change without prior notice in order to improve reliability, design, and function and does not represent a commitment on the part of the manufacturer.In no event will the manufacturer be liable for direct, indirect, special, incidental, or consequential damages arising out of the use or inability to use the product or documentation, even if advised of the possibility of such damages. Environmental Responsibility ADLINK is committed to fulfill its social responsibility to global environmental preservation through compliance with the European Union's Restriction of Hazardous Substances (RoHS) directive and Waste Electrical and Electronic Equipment (WEEE) directive. Environmental protection is a top priority for ADLINK. We have enforced measures to ensure that our products, manufacturing processes, components, and raw materials have as little impact on the environment as possible. When products are at their end of life, our customers are encouraged to dispose of them in accordance with the product disposal and/or recovery programs prescribed by their nation or company. Trademarks Product names mentioned herein are used for identification purposes only and may be trademarks and/or registered trademarks of their respective companies. Preface iii Using this Manual Audience and Scope The aTCA-8202 User’s Manual is intended for hardware technicians and systems operators with knowledge of installing, configuring and operating ATCA systems. Manual Organization This manual is organized as follows: Chapter 1, Introduction: Introduces the aTCA-8202, its features, and package contents. Chapter 2, Hardware Information: Provides information on the physical features, dimensions, and pre-installed hardware components of the aTCA-8202. Chapter 3, Getting Started: Provides information on procedures to begin using the aTCA-8202. Chapter 4, Shelf Maintenance: Provides information on maintaining the aTCA-8202. Important Safety Instructions: Presents safety instructions all users must follow for the proper setup, installation and usage of equipment and/or software. Getting Service: Contact information for ADLINK’s worldwide offices. iv Preface aTCA-8202 Conventions Take note of the following conventions used throughout this manual to make sure that users perform certain tasks and instructions properly. Additional information, aids, and tips that help users perform tasks. NOTE: CAUTION: WARNING: Preface Information to prevent minor physical injury, component damage, data loss, and/or program corruption when trying to complete a task. Information to prevent serious physical injury, component damage, data loss, and/or program corruption when trying to complete a specific task. v This page intentionally left blank. vi Preface aTCA-8202 Table of Contents Revision History...................................................................... ii Preface .................................................................................... iii List of Figures ........................................................................ ix List of Tables.......................................................................... xi 1 Introduction ........................................................................ 1 1.1 Features............................................................................... 1 1.2 Specifications....................................................................... 2 1.3 Shelf Management Hub ....................................................... 3 1.4 Ordering Information............................................................ 4 1.5 Package Contents ............................................................... 4 2 Hardware Information ........................................................ 5 2.1 External Layout.................................................................... 5 2.2 Mechanical Dimensions....................................................... 6 2.3 Backplane ............................................................................ 7 2.4 Cooling System.................................................................... 8 Fan Tray Module ............................................................. 8 Fan Control ..................................................................... 8 Fans Specifications ......................................................... 8 2.5 Power Supply....................................................................... 9 3 Getting Started ................................................................. 11 3.1 Installation Environment .................................................... 11 3.2 Inserting and Removing ATCA Blades .............................. 12 Inserting an ATCA blade into the shelf ......................... 12 Removing an ATCA blade from the shelf ..................... 13 3.3 Shelf Management Hub ..................................................... 13 Table of Contents vii 3.4 Powering Up the System ................................................... 13 3.5 Managing the Shelf ............................................................ 14 aCMM-2200 Shelf Management Hub ........................... 14 Serial Connection ......................................................... 14 LAN Connection ............................................................ 15 Temperature Management ........................................... 16 4 Shelf Maintenance ............................................................ 19 4.1 Fan Tray Module................................................................ 19 Removing the fan tray module ...................................... 19 Replacing the fan tray module ...................................... 20 Important Safety Instructions............................................... 21 Getting Service ...................................................................... 23 viii Table of Contents aTCA-8202 List of Figures Figure 1-1: Figure 2-1: Figure 2-2: Figure 2-3: aTCA-8202/aCMM-2200 Functional Block Diagram........ 3 aTCA-8202 Shelf Front Panel.......................................... 5 aTCA-8202 Shelf Rear Panel .......................................... 5 aTCA-8202 Mechanical Dimensions ............................... 6 List of Figures ix This page intentionally left blank. x List of Figures aTCA-8202 List of Tables Table 1-1: aTCA-8202 Shelf Specifications ...................................... 2 Table 3-1: aTCA-8202 Backplane Thermal Thresholds.................. 16 List of Tables xi This page intentionally left blank. xii List of Tables aTCA-8202 1 Introduction The aTCA-8202 is a 2U AdvancedTCA® shelf with two slots that support AdvancedTCA® blades and a dedicated slot for an aCMM-2200 Shelf Management Hub. Equipped with a dual-star topology fabric interface, the aTCA-8202 comes with a hot-swappable fan tray module (push cooling) and one 650W AC power supply. Providing robust control, monitoring, and management of the aTCA-8202 is the aCMM-2200 Shelf Management Hub, with full system management capabilities and built-in non-manageable Layer-2 GbE switch for Base Interface connectivity. With dual-IPMB and I2C system busses, the aCMM-2200 can control all installed AdvancedTCA blades and the fan tray module, based on temperature and other built-in sensor readings. 1.1 Features X 19” rackmount shelf – 2U height and 15.3” depth X Two ATCA slots with dual-star topology fabric interface X No support for rear transition modules (RTM) X Dual IPMB bus X One I2C-controlled hot-swappable fan tray module X Single slot for an aCMM-2200 Shelf Management Hub with Layer-2 GbE switch for Base Interface connectivity X Single 650W AC power supply Introduction 1 1.2 Specifications Form Factor • 19” rackmount, 2U height, 15.3” depth • Fits inside a 600 mm-deep cabinet Specification • Supports up to two standard AdvancedTCA® blades • Supports one shelf management hub Shelf Management (with aCMM-2200 installed) Supports multiple management interfaces including: • Remote Management Control Protocol (RMCP) • Remote Procedure Call (RPC) • Simple Network Management Protocol (SNMP) • Command Line Interface (CLI) • Web-Base Interface: Dual Fast Ethernet ports and one serial console for management access • Layer-2 GbE switch for Base Interface connectivity (non-manageable) Cooling System • Single hot-swappable I2C-controlled fan tray module • Right to left transverse airflow (push cooling) Backplane • Dual-star topology Base Interface • Dual-star topology Fabric Interface • Dual-IPMB bus Power Filter 650W built-in power supply (input: 100-240VAC) Weight (barebone) 11.5kg (including power supply) Temperature • Operating: 0ºC to 50ºC • Storage: -20ºC to 80ºC Humidity 5% to 95%, non-condensing Dimensions 432mm x 87mm x 485.6mm (W x H x D) Compliance PICMG 3.0 AdvancedTCA Specification R3.0 PICMG 3.1 AdvancedTCA Ethernet Certifications CE, FCC, designed for NEBS Level 3 Table 1-1: aTCA-8202 Shelf Specifications Specifications are subject to change without notice. NOTE: 2 Introduction aTCA-8202 1.3 Shelf Management Hub The aCMM-2200 Shelf Management Hub is based on a Pigeon Point Systems shelf management controller to provide full system management capabilities. It comes with built-in non-manageable Layer-2 GbE switch to provide Base Interface connectivity for the aTCA-8202’s two ATCA slots. A functional block diagram is shown below. aCMM-2200 Shelf Management Hub IPMB A/B I2C A/B Backplane LM75 92h FRU 52h FRU 52h LM75 90h Slot 1 @82h BCH2 BCH1 FCH1 FCH2 Update Channels Slot 2 @84h BCH2 BCH1 FCH1 FCH2 Update Channels IPM Fan Controller Figure 1-1: aTCA-8202/aCMM-2200 Functional Block Diagram Introduction 3 1.4 Ordering Information aTCA-8202/AC: 2U 2-slot Rackmount AdvancedTCA System with single aCMM-2200 Shelf Management Hub 1.5 Package Contents Before unpacking, check the shipping carton for any damage. If the shipping carton and/or contents are damaged, inform your dealer immediately. Retain the shipping carton and packing materials for inspection. Obtain authorization from the dealer before returning any product to ADLINK. The following contents are included in the shipping carton: X aTCA-8202 ATCA Shelf X aCMM-2200 Shelf Management Hub (ShMH) X Accessory package NOTE: 4 Z Rackmount brackets Z Retention screws The aTCA-8202 does NOT include slot filler panels. Filler panels for ATCA and ShMH slots are available and may be purchased separately. Introduction aTCA-8202 2 Hardware Information This chapter provides information on the external layout and preinstalled hardware components of the aTCA-8202. NOTE: The following illustrations present an aTCA-8202 shelf and are intended for reference only. The figures below may differ from your actual shelf configuration. 2.1 External Layout Ground Terminal Power Button Shelf Management Module Serial Port LAN Ports Status LED Fan Tray Module Figure 2-1: aTCA-8202 Shelf Front Panel AC Power Inlet Circuit Breaker Figure 2-2: aTCA-8202 Shelf Rear Panel Hardware Information 5 2.2 Mechanical Dimensions Dimensions in mm Figure 2-3: aTCA-8202 Mechanical Dimensions 6 Hardware Information aTCA-8202 2.3 Backplane The aTCA-8202 shelf comes with a cBP-5020 backplane featuring two AdvancedTCA slots that do not support rear I/O functionality and a dedicated slot for an aCMM-2200 Shelf Management Hub. Features X Dual-star topology Base Interface X Dual-star topology Fabric Interface X Dual-IPMB bus Specifications X PICMG 3.0 AdvancedTCA Base R3.0 X PICMG 3.1 AdvancedTCA Ethernet R1.0 Hardware Information 7 2.4 Cooling System Fan Tray Module The aTCA-8202 shelf is equipped with one fan tray module that has three fans to provide optimum cooling for AdvancedTCA blades. The hot-swappable fan tray module is located at the right of the shelf with air flow from right to left (push cooling). Refer to “Fan Tray Module” on page 19.for details on removing and replacing the fan tray module. NOTE: Fan Control The aCMM-2200 detects and adjusts fan speed based on two temperature sensors located on the backplane.. NOTE: Refer to “Temperature Management” on page 16.for detailed information on how fan speed is controlled by the shelf management hub. Fans Specifications The fan tray module houses three Delta FFB0812EHE-9U34 fans. Rated voltage 12 V DC Operating voltage 7.0 to 13.8 V DC Input current 0.75 A (0.9 A max) Input power 9.0 W (10.8 W max) Speed 5700 rpm (ref.) Maximum airflow (at zero static pressure) 2.270 m3/minute (2.040 m3/minute minimum) 80.16 CFM (72.04 CFM minimum) Maximum air pressure (at zero airflow) 20.63 mm H20 (16.71 mm H20 minimum) 0.812 inch H20 (0.658 inch H20 minimum) Acoustical noise (average) 52.5 dBa (56.5 dBA maximum) Insulation type 8 UL Class A Hardware Information aTCA-8202 2.5 Power Supply The aTCA-8202 comes with single built-in 650W TSJ7000-Z power supply. Specifications Input Voltage Current Frequency 100-240VAC 7.9-3.5A 47-63Hz Output Voltage Max Power Output Hardware Information [email protected] 650 W 9 This page intentionally left blank. 10 Hardware Information aTCA-8202 3 Getting Started This chapter provides information on procedures to begin using the aTCA-8202 shelf. WARNING: DO NOT install or apply power to equipment that is damaged or if there is missing/incomplete equipment. Doing so may cause damage to equipment or bodily harm. 3.1 Installation Environment Whenever unpacking and preparing to install any equipment described in this manual, please refer to the Important Safety Instructions chapter of this manual. The aTCA-8202 contains electrostatically sensitive equipment that can be easily damaged by static electricity. The equipment must be handled on a grounded anti-static mat. The operator must wear an anti-static wristband, grounded at the same point as the anti-static mat. Inspect the carton and packaging for damage. Shipping and handling could cause damage to the equipment inside. Make sure that the equipment and its associated components have no damage before installing. CAUTION: The equipment must be protected from static discharge and physical shock. Never remove any of the socketed parts except at a static-free workstation. Use the anti-static bag shipped with the product to handle the equipment and wear a grounded wrist strap when servicing. Getting Started 11 3.2 Inserting and Removing ATCA Blades This section describes the insertion and removal procedures for ATCA product and filler blades. ATCA blades are hot-swappable and it is not necessary to power down the shelf to insert or remove them. The same insertion/removal procedures apply to filler blades, with the exception that filler blades do not have levers. The aTCA-8202 is designed with two slots that support ATCA blades. ATCA connectors are rigid and require careful handling and proper installation. ATCA blades are equipped with locking handles and retention screws for easy installation and removal. Improper installation of ATCA blades may damage the backplane. WARNING: Inserting an ATCA blade into the shelf 1. If necessary, remove any filler blades from the aTCA-8202 shelf to expose the desired ATCA slot. 2. Align the blade with the card guides of the desired slot of the shelf. 3. Position the ATCA blade into the slot, then carefully slide its edges into the blade guide rail. Make sure that the blade is correctly aligned with the shelf to prevent damage to the blade and/or backplane. 4. Push the blade into the slot until the handles come in contact with the shelf and the metal tacks insert into the shelf holes. 5. Push the handles inward until they 'click' in place 6. Fasten the retention screws (turning in a clock-wise direction) at both ends of the blade to secure it in place. 12 Getting Started aTCA-8202 Removing an ATCA blade from the shelf 1. Loosen the retention screws on both sides of the blade. 2. Unlatch the ATCA blade handles and pull them outward until the blade disengages from the shelf. 3. Carefully pull the blade out from the shelf, then store in a safe place. 3.3 Shelf Management Hub The aCMM-2200 Shelf Management Hub is not serviceable by the user. If you encounter any problems with the aCMM-2200, please contact ADLINK. 3.4 Powering Up the System After installing all necessary components, you are now ready to power up the system. To connect the aTCA-8202 to an AC power source: 1. Insert the AC power plug into the socket at the rear of the shelf and push the circuit breaker to the right to set it to the ON position. 2. Press the power button located at the top left of the front panel. 3. When the shelf is powered up, the power button LED lights blue and the cooling fans begin rotating. The aCMM-2200 Shelf Management Hub powers up immediately and the Status LED lights up green. If the Status LED lights red, this indicates a problem exists with the shelf - check the System Event Log (SEL) using the the clia command: clia sel. Getting Started 13 3.5 Managing the Shelf aCMM-2200 Shelf Management Hub The aTCA-8202 is equipped with one aCMM-2200 Shelf Management Hub (ShMH) to provide shelf management functionality. When an aCMM-2200 ShMH is NOT installed in the shelf, all fans in the fan tray module will rotate at full speed (Level 15). NOTE: To access fan, temperature, ATCA blade FRU (field replaceable unit), and power information, the installed ShMH must be connected to a host computer using one of the following: X serially using an DB9 cable X over a LAN using a standard RJ-45 cable X via network switch or hub Serial Connection You may use the bundled DB9 cable to connect the shelf serially to a host computer. Refer to the illustration below. A ShMH module DB9 cable Host computer 14 Getting Started aTCA-8202 The aCMM-2200 ShMH COM port is set with the following default parameters: Type RS232 (COM) Baud Rate 115200bps Data Bits 8 Parity None Stop Bits 1 Flow Control None LAN Connection Using a Fast Ethernet connection, you may connect the ShMH directly to a notebook or PC using an RJ-45 cable or to a network switch or router for high-speed remote management. Refer to the following illustrations. A ShMH module RJ-45 cable Host computer By default, the LAN1 port has the following settings: Getting Started IP 172.16.13.209 Login name root Password None 15 Temperature Management The aTCA-8202 shelf has two temperature sensors on the left and right sides of the backplane. The aCMM-2200 ShMH automatically detects these sensors and the temperature sensors on installed ATCA blades. The ShMH uses these sensor readings to dynamically adjust the fan speed to maintain safe shelf and blade temperatures. The table below lists the temperature thresholds and Fan Level settings applied by the ShMH as dictated by detected backplane temperatures. Temperature thresholds of ATCA blades will vary. Please refer to the user manual provided by the blade manufacturer. Threshold Temperature Action Non-Critical 45ºC Fan Level 7 Critical 50ºC Fan Level 15 Non-Recoverable 65ºC Shutdown all blades Table 3-1: aTCA-8202 Backplane Thermal Thresholds Each time an alarm is received by the ShMH, an event record will be written to the System Event Log (SEL). System administrators may use the the clia command to check the SEL (clia sel) or to verify the fan speeds detected and adjusted by the ShMH (clia fans). Non-Critical Threshold When a temperature sensor monitored by the ShMH issues an alarm that a device (shelf or blade) has exceeded the non-critical threshold, the fan speed will increase by one level. The fan speed will continue to increase by one level every 30 seconds as long as the alarm continues to be issued. When the alarm turns off, the fan speed l will decrease by one level every 30 seconds. Critical Threshold When a temperature sensor monitored by the ShMH issues an alarm that a device (shelf or blade) has exceeded the critical 16 Getting Started aTCA-8202 threshold, the fan speed will immediately increase to Level 15 to provide maximum cooling. Non-recoverable Threshold When a temperature sensor monitored by the ShMH issues an alarm that a device (shelf or blade) has exceeded the non-recoverable threshold, the ShMH will shut down all blades to protect them from damage. The shelf and ShMH will remain powered on and the blades can be reactivated manually by removing and reinserting them into the shelf or by remote command. Getting Started 17 This page intentionally left blank. 18 Getting Started aTCA-8202 4 Shelf Maintenance This chapter provides information on how to remove and replace user serviceable components on the aTCA-8202. 4.1 Fan Tray Module This section provides information on how to remove and replace the fan tray module which is located on the right side of the shelf front panel. The fan tray is hot-swappable and may be replaced while the shelf is operating. To obtain replacement fan modules, contact ADLINK or your local distributor. NOTE: Removing the fan tray module 1. Loosen the two retention screws on the right side of the aTCA-8202 shelf. 2. Use your thumbs to pull the fan tray module outwards from the shelf and detach the connectors from the backplane. To avoid injury, wait at least five seconds or until all fans have stopped rotating before removing fan tray. WARNING: 3. Fully remove the fan tray module from the shelf. Shelf Maintenance 19 Replacing the fan tray module 1. Insert the fan tray module into the right side of the aTCA-8202 shelf. 2. Secure the fan tray module to the shelf by tightening the two of retention screws. 20 Shelf Maintenance aTCA-8202 Important Safety Instructions For user safety, please read and follow all instructions, WARNINGS, CAUTIONS, and NOTES marked in this manual and on the associated equipment before handling/operating the equipment. X Read these safety instructions carefully. X Keep this user’s manual for future reference. X Read the specifications section of this manual for detailed information on the operating environment of this equipment. X When installing/mounting or uninstalling/removing equipment: Z X Turn off power and unplug any power cords/cables. To avoid electrical shock and/or damage to equipment: Z Keep equipment away from water or liquid sources; Z Keep equipment away from high heat or high humidity; Z Keep equipment properly ventilated (do not block or cover ventilation openings); Z Make sure to use recommended voltage and power source settings; Z Always install and operate equipment near an easily accessible electrical socket-outlet; Z Secure the power cord (do not place any object on/over the power cord); Z Only install/attach and operate equipment on stable surfaces and/or recommended mountings; and, Z If the equipment will not be used for long periods of time, turn off and unplug the equipment from its power source. Important Safety Instructions 21 X Never attempt to fix the equipment. Equipment should only be serviced by qualified personnel. X A Lithium-type battery may be provided for uninterrupted, backup or emergency power. CAUTION: X 22 Risk of explosion if battery is replaced with one of an incorrect type. Dispose of used batteries according to their instructions. Equipment must be serviced by authorized technicians when: Z The power cord or plug is damaged; Z Liquid has penetrated the equipment; Z It has been exposed to high humidity/moisture; Z It is not functioning or does not function according to the user’s manual; Z It has been dropped and/or damaged; and/or, Z It has an obvious sign of breakage. Important Safety Instructions aTCA-8202 Getting Service Contact us should you require any service or assistance. ADLINK Technology, Inc. Address: 9F, No.166 Jian Yi Road, Zhonghe District New Taipei City 235, Taiwan ᄅؑקխࡉ৬ԫሁ 166 ᇆ 9 ᑔ Tel: +886-2-8226-5877 Fax: +886-2-8226-5717 Email: [email protected] Ampro ADLINK Technology, Inc. Address: 5215 Hellyer Avenue, #110, San Jose, CA 95138, USA Tel: +1-408-360-0200 Toll Free: +1-800-966-5200 (USA only) Fax: +1-408-360-0222 Email: [email protected] ADLINK Technology (China) Co., Ltd. Address: Ϟ⍋Ꮦ⌺ϰᮄऎᓴ∳催⾥ᡔುऎ㢇䏃 300 ো(201203) 300 Fang Chun Rd., Zhangjiang Hi-Tech Park, Pudong New Area, Shanghai, 201203 China Tel: +86-21-5132-8988 Fax: +86-21-5132-3588 Email: [email protected] ADLINK Technology Beijing Address: ࣫ҀᏖ⍋⎔ऎϞഄϰ䏃 1 োⲜ߯ࡼॺ E ᑻ 801 ᅸ(100085) Rm. 801, Power Creative E, No. 1, B/D Shang Di East Rd., Beijing, 100085 China Tel: +86-10-5885-8666 Fax: +86-10-5885-8625 Email: [email protected] ADLINK Technology Shenzhen Address: ⏅ഇᏖफቅऎ⾥ᡔುफऎ催ᮄफϗ䘧᭄ᄫᡔᴃು A1 ᷟ 2 ὐ C ऎ (518057) 2F, C Block, Bldg. A1, Cyber-Tech Zone, Gao Xin Ave. Sec. 7, High-Tech Industrial Park S., Shenzhen, 518054 China Tel: +86-755-2643-4858 Fax: +86-755-2664-6353 Email: [email protected] Getting Service 135 ADLINK Technology (Europe) GmbH Address: Nord Carree 3, 40477 Duesseldorf, Germany Tel: +49-211-495-5552 Fax: +49-211-495-5557 Email: [email protected] ADLINK Technology, Inc. (French Liaison Office) Address: 15 rue Emile Baudot, 91300 Massy CEDEX, France Tel: +33 (0) 1 60 12 35 66 Fax: +33 (0) 1 60 12 35 66 Email: [email protected] ADLINK Technology Japan Corporation Address: ͱ101-0045 ᵅҀ䛑गҷ⬄ऎ⼲⬄䤯 ⬎ފ3-7-4 ⼲⬄ 374 ɛɳ 4F KANDA374 Bldg. 4F, 3-7-4 Kanda Kajicho, Chiyoda-ku, Tokyo 101-0045, Japan Tel: +81-3-4455-3722 Fax: +81-3-5209-6013 Email: [email protected] ADLINK Technology, Inc. (Korean Liaison Office) Address: 昢殾柢 昢爎割 昢爎壟 1675-12 微汾瘶捒娯 8 猻 8F Mointer B/D,1675-12, Seocho-Dong, Seocho-Gu, Seoul 137-070, Korea Tel: +82-2-2057-0565 Fax: +82-2-2057-0563 Email: [email protected] ADLINK Technology Singapore Pte. Ltd. Address: 84 Genting Lane #07-02A, Cityneon Design Centre, Singapore 349584 Tel: +65-6844-2261 Fax: +65-6844-2263 Email: [email protected] ADLINK Technology Singapore Pte. Ltd. (Indian Liaison Office) Address: No. 1357, "Anupama", Sri Aurobindo Marg, 9th Cross, JP Nagar Phase I, Bangalore - 560078, India Tel: +91-80-65605817 Fax: +91-80-22443548 Email: [email protected] 136 Getting Service