1
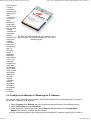
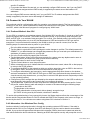
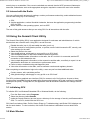
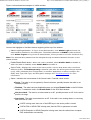
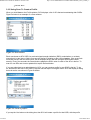
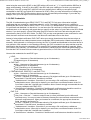
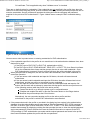
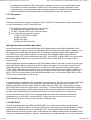
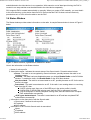
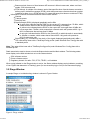
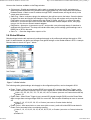
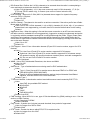
Summit User's Guide for Software Version 2.02
1 von 25
http://www.summitdatacom.com/Documents/Summit_Users_Guide_C...
User's Guide for 802.11g and 802.11a/g Radios
from Summit Data Communications, Inc.
Software Version 2.02 for Windows Embedded CE and Windows
Mobile
1.0 Introduction
1.1 Product Overview
1.2 Security Capabilities
2.0 Getting Started
2.1 Install or Upgrade Summit Software
2.2 Install the Radio
2.3 Configure the Manner of Obtaining an IP Address
2.4 Connect to Your WLAN
2.2.1 Preferred Method: Use SCU
2.4.2 Alternative: Use Windows Zero Config
2.5 Interact with the Radio
3.0 Using the Summit Client Utility
3.1 Initializing SCU
3.2 Main Window
3.3 Profile Window
3.3.1 Using Scan To Create a Profile
3.3.2 EAP Credentials
3.3.3 Encryption
3.3.4 ThirdPartyConfig
3.3.5 EAP-FAST
3.4 Status Window
3.5 Diags Window
3.6 Global Window
3.6.1 PMK Caching
4.0 Using the Summit System Tray Icon
5.0 Regulatory Domains and Channels
Appendix: FCC Information
1.0 Introduction
Thank you for choosing one of the following wireless LAN (WLAN) radio modules or cards from Summit
Data Communications, Inc.:
802.11g radios, which support 802.11b and 802.11g:
Compact flash - Module with antenna connectors (SDC-CF10G) or card with integrated
antennas (SDC-CF20G or SDC-CF22G)
PCMCIA - Module with antenna connectors (SDC-PC10G) or card with integrated antennas
(SDC-PC20G or SDC-PC22G)
Miniature compact flash - Module with antenna connectors (SDC-MCF10G)
Note: SDIO radios must use V2.01.xxSD. They cannot currently use V2.02.xx.
802.11a/g radios, which support 802.11a, 802.11b, and 802.11g
Compact flash - Module with antenna connectors [SDC-CF10AG or card with integrated
antennas (SDC-CF22AG)]
PCMCIA - Module with antenna connectors [SDC-PC10AG or card with integrated antennas
19.01.2010 09:15
Summit User's Guide for Software Version 2.02
2 von 25
http://www.summitdatacom.com/Documents/Summit_Users_Guide_C...
(SDC-PC22G)]
Miniature compact flash - Module with antenna connectors (SDC-MCF10AG)
Note: SDIO radios must use V2.01.xxSD. They cannot currently use V2.02.xx.
Your Summit WLAN radio, or WLAN client adapter, enables a computing device to communicate to a
computing network using all of the IEEE 802.11 protocols listed above for that radio.
The hardware components for all Summit radios are the same. A 20G or 22G version is a 10G version with
integrated antennas. (In fact, if you look at the back of a CF20G, you'll see a label for the CF10G.) A
PCMCIA version is a CF version in a specially designed CF-to-PCMCIA carrier. The miniature CF version
is essentially the CF version with a different layout and a different (Molex) connector.
This manual is a user's guide for a Summit radio that is installed on a computing device that is running one
of the following operating systems:
Windows Embedded CE 6.0, 5.0, or 4.2
Windows Mobile 6.1, Window Mobile 6, Windows Mobile 5.0, or Pocket PC 2003
The software that Summit provides for its radios on these operating systems includes:
A device driver for the operating system running on the computing device that uses the radio
An integrated IEEE 802.1X supplicant that supports the highest level of standards-based WLAN
security with a broad range of options
The Summit Client Utility (SCU), a configuration, monitoring, and management application designed
for Summit radios
A service that displays in the Windows System Tray an icon that provides a visual status for the
Summit radio and enables the user to launch SCU by tapping the icon
1.1 Product Overview
For an overview of Summit WLAN radios, click on the Products link on the Summit home page.
Your Summit radio is Wi-Fi CERTIFIED and certified for Version 4 of Cisco Compatible Extensions
(CCX):
Wi-Fi - The Wi-Fi Alliance certifies that Summit radios support the specified IEEE 802.11 protocols
with support for Wi-Fi Protected Access (WPA) and WPA2, both Personal and Enterprise. The
Extensible Authentication Protocol (EAP) type tested by the Wi-Fi Alliance was PEAP-MSCHAPv2.
For details, visit the Wi-Fi Alliance Web site at http://www.wi-fi.com, click on the Wi-Fi CERTIFIED
Products link, and search for Summit Data Communications.
CCX - Summit radios are certified to Version 4 of the CCX specification for application-specific
devices (ASDs). For an overview of CCX, go to
http://www.cisco.com/web/partners/pr46/pr147/partners_pgm_concept_home.html. For details on the
features in CCX V4 for ASDs, go to http://www.cisco.com/warp/public/765/ccx
/versions_and_features.shtml.
1.2 Security Capabilities
Summit radios typically are used in business-critical mobile devices that transmit sensitive information,
such as inventory data and patient information, over the air that separates the mobile devices from the
network. To protect transmitted data as well as the mobile devices and network infrastructure that transmit
and receive the data, an organization's IT department often imposes on mobile devices the same strict
security standards imposed on other client devices. Summit's integrated approach to security simplifies the
task of enforcing a consistent security policy on all devices.
A foundational element of the IEEE 802.11i WLAN security standard is IEEE 802.1X, and a critical
application on a mobile device is an 802.1X supplicant. Such a supplicant provides an interface between
the radio and the operating system and supports the authentication and encryption elements required for
802.11i, also known as WPA2, as well as predecessors such as WPA and WEP. Summit software includes
19.01.2010 09:15
Summit User's Guide for Software Version 2.02
3 von 25
http://www.summitdatacom.com/Documents/Summit_Users_Guide_C...
an integrated supplicant that supports a broad range of security capabilities, including:
802.1X authentication using pre-shared keys or an EAP type, required for WPA2 and WPA
Data encryption and decryption using WPA2 AES, WPA TKIP, Cisco TKIP, or WEP
The following EAP types are supported by the Summit software integrated supplicant and can be
configured in SCU:
PEAP - Provides secure user authentication by using a TLS tunnel to encrypt EAP traffic. Two
different inner methods are used with PEAP:
EAP-MSCHAPV2, resulting in PEAP-MSCHAP - This is appropriate for use against Windows
Active Directory and domains
EAP-GTC, resulting in PEAP-GTC - This can be used for authentication with static (login)
passwords against a variety of databases. It also can be used for authentication with one-time
passwords (OTPs) against OTP databases such as SecureID. Because Summit software
does not support session resume, the use of PEAP-GTC with OTPs is not recommended.
When a client device is power-cycled, or when the radio roams from one access point (AP) to
another, the user must re-enter the OTP.
EAP-TTLS - Is an alternative to PEAP that, like PEAP, provides secure user authentication by using
a TLS tunnel to encrypt EAP traffic.
EAP-TLS - Provides secure user authentication by using a TLS tunnel to encrypt EAP traffic.
Provides very strong security, but relies on client certificates for user authentication credentials.
LEAP - Is an authentication method for use with Cisco WLAN APs. LEAP does not require the use
of server or client certificates. LEAP supports Windows Active Directory and domains but requires
the use of strong passwords to avoid a vulnerability to offline dictionary attacks.
EAP-FAST - Is a successor to LEAP and does not require strong passwords to protect against
offline dictionary attacks. Like LEAP, EAP-FAST does not require the use of server or client
certificates and supports Windows Active Directory and domains. EAP-FAST requires the
provisioning of a protected access credential (PAC). SCU supports PACs that are provisioned
manually and stored on the client device; SCU also supports dynamic PAC provisioning.
PEAP, EAP-TTLS, and EAP-TLS require the use of Windows facilities for the configuration of digital
certificates.
With each of the EAP types supported by SCU, if authentication credentials are not stored in the active
configuration profile, then the user is prompted to enter those credentials the first time the radio tries to
associate to an AP that supports 802.1X (EAP).
2.0 Getting Started
Before you can use a Summit radio, you or your device manufacturer must install Summit software and the
radio in your computing device. If you are doing the software and hardware installation, then you will need
the following:
A mobile computing device:
With a compact flash (CF) Type I or Type II slot or a PCMCIA (PC Card) Type II slot
That runs an operating system supported by Summit software (see Section 1.0)
Summit software
A Summit radio module or radio card
For a radio module, antennas, each with a cable that is fitted with a Hirose U.FL connector that can
be attached to an antenna connector on the radio module:
10G: One or two antennas for 2.4 GHz (802.11b and 802.11g)
10AG: One or two antennas for 2.4 GHz (802.11b and 802.11g) and one or two antennas for 5
GHz (802.11a)
It is recommended that you install the software before you install the hardware. If you insert the card in your
device before you install the software, then the "Found New Hardware Wizard" screen will appear, and you
must select Cancel to cancel the Hardware Wizard.
19.01.2010 09:15
Summit User's Guide for Software Version 2.02
4 von 25
http://www.summitdatacom.com/Documents/Summit_Users_Guide_C...
2.1 Install or Upgrade Summit Software
Summit software for Windows Embedded CE or Windows Mobile is in a .cab file, which is the software
equivalent of a "file cabinet". A Summit .cab file contains all software components, including the device
driver and the Summit Client Utility (SCU). To install or upgrade Summit software, perform these tasks:
Download the appropriate .cab file for the operating system and processor of your device. You can
obtain your device's operating system and processor from the system information under Windows
Control Panel (Tap Start, then Settings, and then System or Control Panel)
Pocket PC or Mobile - Select a .cab file with a name that begins with "mobile".
CE .NET - Do a search on your device's processor to determine if it is an ARM v4i processor
or an ARM v4 processor. If it is an ARM v4i processor, select a .cab file with a name that
begins with "sdc_armv4i". If it is an ARM v4 processor, select a .cab file with a name that
begins with "sdc_armv4".
Copy the file to your device using a supported file transfer mechanism. Common methods of moving
the file include:
Place the file on a supported Compact Flash or SD memory card and use that card for
copying the file to the device.
Use a program such as FTP or Microsoft ActiveSync.
On the device, use the resident File Explorer program to locate the .cab file.
Run the .cab file by single-clicking the file or by right-clicking and selecting Run.
If asked to replace any existing files on the device, answer Yes to All.
Profiles are sets of radio and security settings that are created on the SCU Profile window. Every profile
has a unique name. Global settings include radio and security settings that apply to all profiles and settings
that apply to SCU itself. Profiles and global settings are stored in the registry.
When you install Summit software, no profile settings or global settings are loaded in the registry. Profile
settings and global settings are placed in the registry only when you use SCU, use the Summit software
developer's kit (SDK), or edit the registry directly. If nothing is specified for a profile setting or a global
setting, then Summit software will use a default value.
When you install or upgrade Summit software over an existing installation, you should perform a cold boot
of the device to ensure that the device uses the newly installed software. The act of upgrading Summit
software does not overwrite or remove profile settings and global settings in the registry, but a cold boot
may clear those settings unless the registry is in non-volatile memory. The first time the driver or SCU is
loaded after an upgrade, all existing profiles and global settings are validated, and invalid values are reset.
2.2 Install the Radio
Once you have installed the Summit software, you must install the Summit radio in a CF or PCMCIA slot.
Instructions on installing a Summit radio module in an internal slot (within a device) are available only to
device manufacturers.
To install a 20G or 22G Series radio card, you simply insert the card in an external card slot. To install a
10G Series or 10AG Series radio module in an external slot, you must complete two types of connections:
Module to device - When you slide the radio module into a CF or PCMCIA external slot, a connector
on the end of the module mates with a connector on the device.
Antenna(s) to module - To connect one or two antennas to the radio module, you use an antenna
cable that mates with the antenna on one end and with the radio modules U.FL connector on the
other end.
The standard approach is to insert the module in the external slot first and then connect the antenna(s). If
the antenna connectors on the radio module are not visible when the module is inserted, however, then you
will need to connect the antenna(s) before inserting the module in the external slot.
To connect the antennas, take each antenna and its cable, which is fitted with a Hirose U.FL connector, and
attach the antenna cable to the radio module by mating the U.FL connector on the antenna cable with a
U.FL connector on the radio module. Follow the instructions below for your module:
19.01.2010 09:15
Summit User's Guide for Software Version 2.02
5 von 25
10G module There are
two antenna
connectors.
If you have a
single
antenna, then
connect it to
the main
antenna
connector,
which is
located to the
right of the
auxiliary
connector,
and set the
Rx Diversity
and Tx
Diversity
global
settings to
Main Only
(see Section
3.6). If you
have two
antennas for
diversity,
then connect
the primary
antenna to
the main
antenna
connector
and the
secondary
antenna to
the auxiliary
antenna
connector,
which is
located to the
left of the
main
connector.
http://www.summitdatacom.com/Documents/Summit_Users_Guide_C...
The SDC-CF10G module has two connectors
for 2.4 GHz antennas.
10AG
module There are
four antenna
connectors,
two for the 5
GHz
(802.11a)
band and two
for the 2.4
GHz
(802.11b and
802.11g)
19.01.2010 09:15
Summit User's Guide for Software Version 2.02
6 von 25
http://www.summitdatacom.com/Documents/Summit_Users_Guide_C...
band, with the
2.4 GHz
connectors
located to the
right of the 5
GHz
connectors. If
you have a
single
antenna for
each band,
then connect
it to the main
antenna
connector for
each band,
which is
The SDC-CF10AG module has two connectors for 5
located to the GHz antennas (left) and two connectors for 2.4 GHz
right of the
antennas (right).
auxiliary
connector,
and set the
Rx Diversity
and Tx
Diversity
global
settings to
Main Only
(see Section
3.6). If you
have two
antennas for
each band
for diversity,
then in each
band connect
the primary
antenna to
the main
antenna
connector
and the
secondary
antenna to
the auxiliary
antenna
connector.
2.3 Configure the Manner of Obtaining an IP Address
Here are the steps required to use facilities on Windows Embedded CE or Windows Mobile to configure
the manner of obtaining an IP address:
Select Programs, then Settings, then the Connections tab at the bottom of the Settings screen
Select Connections and then Advanced
On the Advanced Connections screen, select Network Card and then select Summit WLAN
Adapter from the list of available network devices
On the screen that appears, choose that a server will assign an IP address (using DHCP) or enter a
19.01.2010 09:15
Summit User's Guide for Software Version 2.02
7 von 25
http://www.summitdatacom.com/Documents/Summit_Users_Guide_C...
specific IP address
If you select the Name Servers tab, you can statically configure DNS servers, but if you use DHCP
for IP address assignment then DNS usually is supplied by the same server that hands out IP
addresses
You can configure DNS servers statically, but if you use DHCP for IP address assignment then DNS
usually is supplied by the same server that assigns IP addresses.
2.4 Connect to Your WLAN
Two methods exist for configuring the radio for operation on a wireless network. The first and preferred
method is to use SCU, which is described in detail in the next section of this guide. The other method is to
use WZC, which is the Microsoft program for configuring any WLAN card.
2.4.1 Preferred Method: Use SCU
To use SCU to connect to your wireless network, first initialize SCU (see Section 3.1) and go to the Profile
window by tapping the Profile tab. The Default configuration profile, if not modified, does not specify an
SSID, an EAP type, or a method of data encryption. As a result, if the Default profile is the active profile,
then the radio will associate only to an AP that broadcasts its SSID and requires no EAP type and no
encryption. If no profile has been created for the WLAN to which you want to connect, then use the
following steps to create and select a profile for your WLAN:
Go to the Main window by tapping the Main tab.
Tap the Admin Login button to have privileges to make changes to profiles. The default password is
SUMMIT. If you administrator has changed that password, then you must ask your administrator for
assistance in creating a profile for your WLAN.
Go to the Profile window by tapping the Profile tab.
Tap the New button. When a pop-up screen prompts for a name, enter any alpha-numeric name to
identify this profile (as unique from other profiles that are defined).
Tap the OK button to return to the Profile tab.
Tap the Commit button to save the profile name.
When a message pops up to indicate that this command has been saved, select OK on that pop-up
to return to the Profile window.
To configure the SSID for the network to which you wish to associate, enter an SSID in the text box
to the right of SSID, and select the Commit button and OK at the pop-up.
To configure authentication and encryption, use the appropriate drop-down boxes on the window,
and enter credentials for IEEE 802.1X EAP types or WEP keys just below the drop-down boxes. (To
view the security drop-down boxes, you may have to minimize the alpha-numeric keyboard provided
by the operating system.)
Configure any other settings that are dictated by the network administrator for the SSID to which you
must associate, being sure to tap Commit after you configure all settings.
Tap the Main tab. In the Active Profile drop-down box will appear the newly created profile. Select
this profile, and the Summit radio will attempt to connect to the network using the following steps:
Associate to the SSID
Authenticate to the network
If EAP authentication is being used, derive dynamic encryption keys
If DHCP is being used by the network, obtain an IP address
To assist with troubleshooting of any connectivity issues, the Status window reflects the current state of the
device and the Diag window allows for DHCP renewal and ICMP Echo Requests, also known as Pings, to
be sent by the device. You can learn more about using these SCU windows in Section 3.
2.4.2 Alternative: Use Windows Zero Config
Another method of configuring the radio is through the operating systems WZC feature. If the radio is
inserted and the SCU is not configured, then WZC will attempt to use the card to attach to an available
WLAN. A pop-up box will appear that indicates which networks (SSIDs) have been located and asks the
user which network the device should use. Selecting an SSID that requires security will prompt the user for
19.01.2010 09:15
Summit User's Guide for Software Version 2.02
8 von 25
http://www.summitdatacom.com/Documents/Summit_Users_Guide_C...
security keys or credentials. If the correct credentials are entered, then the WZC process will attempt to
associate, authenticate, and run the appropriate encryption required to connect the user to the network.
2.5 Interact with the Radio
You can configure radio and security settings, monitor performance and activity, and troubleshoot issues
with the radio using any of the following:
SCU
Another application, such as Wavelink Avalanche, that uses the application programming interface
(API) for SCU
Native facilities in the operating system, such as WZC
The rest of this guide assumes that you are using SCU for all interactions with the radio.
3.0 Using the Summit Client Utility
The Summit Client Utility (SCU) is an application designed for end users and administrators of mobile
devices that use a Summit radio. Using SCU, an end user can:
Disable the radio (turn it off) and enable the radio (turn it on)
View the contents of configuration profiles, or profiles, each of which houses the RF, security, and
other settings for the radio
Select the profile to be used
View global settings, which apply to every profile or to SCU itself
View a snapshot status of the current wireless network connection
View more detailed status information on the radio, the AP to which it is connected, and the RF
connection or link between the two
View in-depth diagnostic information on the connection and the radio, most likely to report it to an
administrator when there is a connection or performance issue
Perform various troubleshooting and diagnostic tests
View other information on the radio, such as software versions and regulatory domain
After completing an administrator login to the utility, a user can perform these additional tasks:
Create, rename, edit, and delete profiles
Alter global settings, which apply to every profile or to SCU itself
The SCU provides a graphical user interface (GUI) for access to all of its functions. Access to these
functions also is available through an application programming interface (API) that is defined in a software
developer's kit (SDK). Through the API, an application such as Wavelink Avalanche can manage Summit
radios.
3.1 Initializing SCU
To initialize SCU on Windows Embedded CE or Windows Mobile, do the following:
From the Start menu, select Programs.
Select the directory called Summit.
Inside the Summit directory are two items: a directory for the storage of security certificates and the
SCU. To run SCU, double-click the SCU icon.
SCU has five windows: Main, Profile, Status, Diags (or Troubleshooting), and Global. SCU displays one
tab for each window. To view a window, click its tab. Each window is described in more detail in this
section.
3.2 Main Window
19.01.2010 09:15
Summit User's Guide for Software Version 2.02
9 von 25
http://www.summitdatacom.com/Documents/Summit_Users_Guide_C...
Figure 1 below shows two examples of a Main window:
Figure 1: Main window, with and without automatic profile selection active
Here are the highlights of the Main window, beginning at the top of the window:
Admin Login/Logout button - To log in as an administrator, click Admin Login and enter the
administrator password in the dialog box. The default password is SUMMIT (case sensitive).
Click Admin Logout to log out as an administrator, leaving access to end-user functions only.
Note: The administrator password can be changed through the Admin Password function on the
Global window.
Enable/Disable Radio button - When the radio is enabled, select Disable Radio to disable it;
when the radio is disabled, select Enable Radio to enable it.
Active Profile - Displays the name of the active profile. Use the drop-down menu to select a
different profile. If ThirdPartyConfig is selected (and after the device goes through a power
cycle), WZC (Windows Zero Configuration) or another application is used to configure the
SSID, Auth Type, EAP Type, and Encryption settings. See "ThirdPartyConfig" for more
information.
Status - Indicates the current status of the Summit radio. Potential values include:
Down - The radio is not recognized by Summit software, possibly because the radio is not
installed properly.
Disabled - The radio has been disabled because you clicked Disable Radio on the SCU Main
window. To enable the radio, click Enable Radio on the SCU Main window.
Not Associated - The radio is not associated to an AP, possibly because no AP for the active
profile is in range.
Associated - The radio is associated to an AP. If the radio is not sending data to or receiving
data from the AP, then:
If WEP is being used, then one of the WEP keys in the active profile is invalid.
If WPA-PSK or WPA2-PSK is being used, then the PSK or password is invalid.
If WPA-Enterprise or WPA2-Enterprise is being used, then the radio did not complete
EAP authentication successfully.
19.01.2010 09:15
Summit User's Guide for Software Version 2.02
10 von 25
http://www.summitdatacom.com/Documents/Summit_Users_Guide_C...
<EAP type> Authenticated - The radio is associated to an AP and has completed EAP
authentication successfully.
Radio Type - Indicates the device's radio type including:
BG - Summit 802.11g radio (supports 802.11b and 802.11g)
ABG - Summit 802.11 a/g radio (supports 802.11a, 802.11b, and 802.11g)
Reg. Domain - Indicates the regulatory domain(s) for which the radio is configured. The
domain(s) cannot be configured by an administrator or user. For more information on
regulatory domains, see Section 5.0.
Auto Profile - Enables the user to activate or deactivate an automatic profile selection facility.
Click List and use the dialog box to select a created profile. When the facility is active and the
Summit radio makes its first attempt to associate to an AP (after a device startup or resume),
SCU tries each profile, in order, until the radio associates to an AP. That profile becomes the
active profile and remains the active profile until one of the following occurs:
The device is suspended and resumed, power-cycled, or restarted, which causes the
automatic profile selection facility to restart the selection process.
The user turns off the automatic profile selection facility and manually selects a different profile
on the SCU Main window.
Note: The profile list should not include any profiles with an Ad Hoc Radio Mode setting.
Driver - Indicates the current version of the device driver.
SCU - Indicates the SCU version currently running on the device. Displays only if space
permits.
Import/Export - Displays only if the radio is programmed to allow import/export functions and if you
are logged in as an administrator.
Click Import/Export and use the dialog box to do one of the following:
Export global settings, all standard SCU profiles, and the special ThirdPartyConfig profile
from the SCU area of a device's registry to a file that can be transferred to another
device.
Import global settings, all standard SCU profiles, and the special ThirdPartyConfig profile
from a file (created using the Export facility) to the SCU area of a device's registry to
enable SCU to use the information.
Note: When importing information, select Add to existing to merge new information with current
registry information. Select Replace to overwrite the current registry information with the newlyimported information.
About SCU - Click About SCU to view SCU information including driver and the SCU version.
3.3 Profile Window
Profile settings are radio and security settings that are stored in the registry as part of a configuration profile. When
a profile is selected as the active profile on the Main window, the settings for that profile become active.
Notes: When the ThirdPartyConfig profile is selected, a power cycle must be performed. See "ThirdPartyConfig" for
more information.
If the Default profile is not modified, it does not specify an SSID, an EAP type, or a data encryption method. As a
result, if the Default is the active profile, then the radio associates only to an AP that broadcasts its SSID and
requires no EAP type and no encryption.
From the Profile window, an administrator can:
19.01.2010 09:15
Summit User's Guide for Software Version 2.02
11 von 25
http://www.summitdatacom.com/Documents/Summit_Users_Guide_C...
Define up to 20 profiles, in addition to the special ThirdPartyConfig profile.
Change profile settings.
Delete any profile except the special ThirdPartyConfig and the active profile.
Profile changes are not saved to the profile until you click Commit.
Figure 2 below is an example of a Profile window:
Figure 2: Profile window
The Profile window displays the following properties and options:
Edit Profile - Use the drop-down menu to select the profile to be viewed or edited.
Only an administrator can edit a profile.
Actions - Actions included New, Rename, Delete, and Scan. New, Rename, and
Delete are only available to an administrator.
New - Create a new profile with default settings. Assign a unique name (a
string of up to 32 characters). Edit profile settings using other Profile window
selections.
Rename - Change the profile name to one that is not assigned to another
profile.
Delete - Delete a non-active profile. You cannot delete an active profile.
Scan - Click to view a list of APs that are broadcasting SSIDs; select an SSID
and create a profile for it. See "Using Scan to Create a Profile" for more
information.
Radio - Select a radio attribute from the list on the left to view its value or setting in
the box on the right. Only an administrator can edit these values or settings. See
"Radio Settings" for more information.
Security - Values for the two primary security attributes, EAP type and encryption
type, are displayed in separate drop-down lists with the current values highlighted.
Only an administrator can edit these security settings. See "Security Settings" for
more information.
Encryption - When the administrator selects an encryption type that requires
the definition of WEP keys or a pre-shared key (PSK), the WEP keys/PSKs button
becomes active. Click WEP keys/PSKs to define WEP keys or a PSK.
EAP Type - When the administrator selects an EAP type, the Credentials button
becomes active. Click Credentials to define authentication credentials for the
selected EAP type.
Save Changes - To save changes for the selected profile, you must click Commit. If
19.01.2010 09:15
Summit User's Guide for Software Version 2.02
12 von 25
http://www.summitdatacom.com/Documents/Summit_Users_Guide_C...
you make changes without clicking Commit and attempt to move to a different SCU
window, a warning message displays and provides the option of saving your changes
before you leave the Profile window.
3.3.1 Radio Settings
SSID - Service set identifier for the WLAN to which the radio connects.
Value - A string of up to 32 characters
Default - None
Client Name - The name assigned to the Summit radio and the client device that uses it.
Value - A string of up to 16 characters
Default - None
Power Save - Indicates the radio's power save mode.
Value:
CAM - Constantly Awake Mode
Maximum - Maximum power savings
Fast - Fast power save mode
Default - Fast
Tx Power - Indicates transmit power. Transmit power can be overridden by a Cisco AP if the CCX
Support global setting is set to Full and the AP defines maximum transmit power for the client as a
lower value.
Value:
Maximum - Maximum defined for current regulatory domain
One of the following values in milliwatts (mW): 50, 30, 20, 10, 5, 1
Default - Maximum
Note: The device manufacturer should use the Summit Manufacturing Utility (SMU) to ensure that the
transmit power value reported by SCU is EIRP, or the total effective transmit power of the radio (including
gains that the antenna provides and losses from the antenna cable.
Bit Rate - Indicates the bit rate used by a radio when interacting with a WLAN AP.
Value - Auto (rate negotiated automatically with AP) or one of the following rates in megabits per
second (Mbps): 1, 2, 5.5, 6, 9, 11, 12, 18, 24, 36, 48, 54.
Default - Auto
Note: If you select a specific bit rate, then the radio connects to an AP only if that AP has the specified SSID
configured with the selected bit rate as the only required rate.
Radio Mode - Use of 802.11a, 802.11g, and 802.11b frequencies and data rates when interacting with AP,
or use of ad hoc mode to associate to a client radio instead of an AP.
When SCU operates with a Summit 802.11g radio, an administrator can select from among the following Radio
Mode values:
Value:
B rates only - 1, 2, 5.5, and 11 Mbps
G rates only - 6, 9, 12, 18, 24, 36, 48, and 54 Mbps
BG rates full - All B and G rates
BG rates optimized - 1, 2, 5.5, 6, 11, 24, 36, and 54 Mbps. This should only be used with Cisco APs
running IOS in autonomous mode (without controllers). For Cisco APs that are tied to controllers and
for non-Cisco APs, Summit recommends BG rates full.
Default - BG rates full
When SCU operates with a Summit 802.11a/g radio, an administrator can select from among the following Radio
Mode values:
Value:
B rates only - 1, 2, 5.5, and 11 Mbps
G rates only - 6, 9, 12, 18, 24, 36, 48, and 54 Mbps
BG rates full - All B and G rates
A rates only - 6, 9, 12, 18, 24, 36, 48, and 54 Mbps (same as G rates)
19.01.2010 09:15
Summit User's Guide for Software Version 2.02
13 von 25
http://www.summitdatacom.com/Documents/Summit_Users_Guide_C...
ABG rates full - All A rates and all B and G rates, with A rates (the .11a radio) preferred. See
"Preferred Band for 802.11a/g Radio" for more information.
BGA rates full - All B and G rates and all A rates, with B and G rates (the .11g radio) preferred. See
"Preferred Band for 802.11a/g Radio" for more information.
Ad Hoc - See "Ad Hoc" for more information. rates optimized - 1, 2, 5.5, 6, 11, 24, 36, and 54 Mbps.
This should only be used with Cisco APs running IOS in autonomous mode (without controllers). For
Cisco APs that are tied to controllers and for non-Cisco APs, Summit recommends BG rates full.
Default - ABG rates full
Auth Type - 802.11 authentication type, used when associating to AP.
Value - Open, shared-key, or LEAP (Network-EAP)
Default - Open
Note: See http://www.cisco.com/en/US/products/hw/wireless/ps4570
/products_configuration_example09186a00801bd035.shtml for a Cisco explanation of 802.11 authentication
using Open and Network-EAP. The Summit Client Utility refers to Network-EAP as LEAP.
3.3.2 Preferred Band for 802.11a/g Radio
When the Radio Mode value is ABG rates full or BGA rates full, one band (5 GHz for ABG or 2.4 GHz for BGA) is
preferred over the other. When trying to associate to an AP, the radio considers APs in the preferred band. If the
radio is able to associate to one of these APs, then the radio will not try to associate to an AP in the other band. The
only time that the radio attempts to associate to an AP in the non-preferred band is when the radio is not associated
and cannot associate in the preferred band. When roaming, the radio considers only APs in the current band (the
band in which the radio is currently associated). When an administrator tries to create or edit a profile, SCU
determines which radio is operating in the device and populates the available radio mode values according to the
radio type. Suppose a profile created for an 802.11a/g card is loaded on a device with an 802.11g card. If a radio
mode value of A rates only, ABG rates full, or BGA rates full was set in the profile, then SCU displays a value of
BG rates full. If the administrator does not save any changes to the profile, then SCU leaves the profile, including
the radio mode, unchanged. If the administrator saves any changes to the profile, then SCU saves the radio mode
value as BG rates full.
3.3.3 Ad Hoc
If the administrator selects Ad Hoc for radio mode, then the Summit radio uses ad hoc mode instead of
infrastructure mode. In infrastructure mode, the radio associates to an AP. In ad hoc mode, the radio associates to
another client radio that is in ad hoc mode and has the same SSID and, if configured, static WEP key.
3.3.4 Security Settings
EAP type - Extensible Authentication Protocol type used for 802.1X authentication to AP.
Value - None, LEAP, EAP-FAST, PEAP-MSCHAP, PEAP-GTC, EAP-TLS, EAP-TTLS
Default - None
Credentials - Authentication credentials for the selected EAP type. See "EAP Credentials" for more
information.
Encryption - Type of encryption (and decryption) used to protect transmitted data. See "Encryption - Cisco
TKIP" and "Encryption - WPA Migration Mode and WPA2 Mixed" for more information.
Value:
None - No encryption.
Manual WEP - WEP with up to four static keys (40-bit or 128-bit in ASCII or hex) defined under
WEP/PSK Keys.
Auto WEP - WEP with key generated during EAP authentication.
CKIP Manual - WEP with up to four static keys (40-bit or 128-bit in ASCII or hex) defined under
WEP/PSK Keys, plus Cisco TKIP and/or Cisco MIC, if configured on AP.
CKIP Auto - WEP with key generated during EAP authentication, plus Cisco TKIP and/or Cisco
MIC, if configured on AP.
WPA-PSK - TKIP with PSK (ASCII passphrase or hex PSK) defined under WEP/PSK Keys.
WPA-TKIP - TKIP with key generated during EAP authentication.
WPA2-PSK - AES with PSK (ASCII passphrase or hex PSK) defined under WEP/PSK Keys.
WPA2-AES - AES with key generated during EAP authentication.
CCKM-TKIP - TKIP with key generated during EAP authentication and with Cisco key
management protocol for fast reauthentication.
19.01.2010 09:15
Summit User's Guide for Software Version 2.02
14 von 25
http://www.summitdatacom.com/Documents/Summit_Users_Guide_C...
Default: None
3.3.5 Using Scan To Create a Profile
When you click Scan on the Profile window, SCU displays a list of APs that are broadcasting their SSIDs.
Figure 3a below is an example of a Scan window:
Figure 3a: Scan window
Each row shows an AP's SSID, its received signal strength indication (RSSI), and whether or not data
encryption is in use (true or false). You can sort the list by clicking on the column headers. If the scan finds
more than one AP with the same SSID, the list displays the AP with the strongest RSSI and the least
security. Every five seconds, the Scan window updates the RSSI value for each of the APs in the list. To
scan for new APs and view an updated list, tap the Refresh button.
If you are authorized as an administrator in SCU, you can create a profile for any SSID in the list. To do
so, double-click the row for the SSID or tap the row and tap the Configure button. SCU will display a dialog
box such as the one shown in Figure 3b below:
Figure 3b: Create a profile?
If you tap the Yes button on the dialog box, then SCU will create a profile for that SSID, with the profile
19.01.2010 09:15
Summit User's Guide for Software Version 2.02
15 von 25
http://www.summitdatacom.com/Documents/Summit_Users_Guide_C...
name being the same as the SSID (or the SSID with a suffix such as "_1" if a profile with the SSID as its
name exists already). If the AP is using WEP, then SCU will open a dialog box in which you can specify
WEP keys. If the AP is using EAP, then SCU will open a dialog box in which you can specify login
credentials for the EAP type (which SCU assumes is LEAP). After you enter information on a dialog box,
you will return to the SCU Profile window, where you can view and edit profile settings. If you make any
changes, then you must tap the Commit button to save them.
3.3.6 EAP Credentials
The 802.1X authentication types PEAP, EAP-TTLS, and EAP-TLS rely upon information in digital
certificates that are created by a certificate authority, or CA. To enable a client device to validate (or
authenticate) the server used for PEAP, EAP-TTLS, or EAP-TLS authentication, you must provision a root
CA certificate and distribute it to that client. You can store the CA certificate in a device's Microsoft
certificate store or in a directory with a path that you specify as the value for Certs Path on the SCU Global
window. If you don't specify a Certs Path value, then SCU uses for the Certs Path value the path to the
certs directory that is off the SCU folder. For EAP-TLS you also must generate a user certificate for each
client; that user certificate must be stored in the Microsoft certificate store on the client.
Instead of using digital certificates, EAP-FAST relies upon strong shared-secret keys that are unique to
users. These secrets are called protected access credentials (PACs) and can be created automatically or
manually. With automatic or in-band provisioning, the PAC is created and distributed to the client device in
one operation. With manual or out-of-band provisioning, the PAC is created in one step and then must be
distributed to the client device separately. SCU supports PACs created automatically or manually. When
you create a PAC manually, you must load it to the directory identified by the Certs Path global setting. Be
sure that the PAC file does not have read-only permissions set, or SCU will not be able to use the PAC.
Here are the credentials for each EAP type:
LEAP:
User - Username or Domain\Username (up to 64 characters)
Password (up to 32 characters)
EAP-FAST:
User - Username or Domain\Username (up to 64 characters)
Password (up to 32 characters)
PAC Filename (up to 32 characters)
PAC Password (up to 32 characters)
PEAP-MSCHAP, PEAP-GTC, and EAP-TTLS:
User - Username or Domain\Username (up to 64 characters)
Password (up to 32 characters)
CA Cert - Filename of root certificate authority (CA) digital certificate (up to 32 characters) -leave blank if "Use MS store" checkbox is checked
"Validate server" checkbox - Check this if you are using a CA certificate to validate an
authentication server. When this is checked, you must enter a certificate filename in the CA
Cert field or check the "Use MS store" checkbox. Note: Summit strongly recommends the use
of server validation with PEAP-GTC.
"Use MS store" checkbox - Check this if the Microsoft certificate store should be used for a
CA certificate. This is applicable only when "Validate server" is checked.
EAP-TLS:
User - Username or Domain\Username (up to 64 characters)
User Cert - Click the "..." button to select a user (or client) certificate from the Microsoft
certificate store. You may not enter a filename, because the user certificate must reside in the
Microsoft certificate store. When you browse for a certificate, the pop-up box shows two
fields, Issued By and Issued To.
CA Cert - Filename of root certificate authority (CA) digital certificate (up to 32 characters) -leave blank if "Use MS store" checkbox is checked
"Validate server" checkbox - Check this if you are using a CA certificate to validate an
authentication server. When this is checked, you must enter a certificate filename in the CA
Cert field or check the "Use MS store" checkbox.
"Use MS store" checkbox - Check this if the Microsoft certificate store should be used for a
19.01.2010 09:15
Summit User's Guide for Software Version 2.02
16 von 25
http://www.summitdatacom.com/Documents/Summit_Users_Guide_C...
CA certificate. This is applicable only when "Validate server" is checked.
There are no default values for credentials. If the credentials are not specified in the profile then, when the
radio tries to associate using that profile, Summit software will display a dialog box that prompts the user to
enter the credentials. Summit software will populate the dialog box with the username and password
supplied for the previous EAP authentication. Figure 4 below shows a sample PEAP credentials dialog
box:
Figure 4: PEAP credentials dialog box
Here are some other important notes on entering credentials for EAP authentication:
If the credentials specified in the profile do not match those in the authentication database then, when
that profile is used:
If the EAP type is EAP-FAST or EAP-TLS, authentication will fail.
If the EAP type is LEAP, PEAP-MSCHAP, PEAP-GTC, or EAP-TTLS, then Summit software
will try the credentials three times and then prompt the user to enter valid credentials. Once
EAP authentication is passed, Summit software will store the valid credentials in the profile.
When prompted with a dialog box, the user can enter valid credentials, enter invalid credentials, or
cancel the operation:
If the user enters valid credentials and taps the OK button, the radio will associate and
authenticate.
If the user enters invalid credentials and taps the OK button, the radio will associate but not
authenticate, and the user will be re-prompted to enter credentials.
If the user taps the Cancel button or the user clears the credentials fields and taps the OK
button, then the radio will not attempt to associate with that profile until the user performs one
of the following actions (while the profile is the active profile):
Causes the device to go through a power cycle or suspend/resume
Disables and enables the radio or taps the Reconnect button on the Diags window
Modifies the profile and taps the Commit button
Alternatively, the user can select another profile as the active profile and then
switch back to the profile for which EAP authentication was canceled.
If the password stored in the profile or provided in the dialog box has expired in the authentication
database, then the authentication server may send an "Expired Password" (RFC 2759) message to
the client. If the EAP type is PEAP-MSCHAP, PEAP-GTC, or EAP-TTLS, then Summit software
handles that message by displaying a dialog box that prompts the user to enter the expired password
and a new password. Summit software then uses the entered information to respond to the RFC
2759 message. If EAP authentication succeeds and the expired password was saved in the profile,
then Summit software updates the profile with the new password.
19.01.2010 09:15
Summit User's Guide for Software Version 2.02
17 von 25
http://www.summitdatacom.com/Documents/Summit_Users_Guide_C...
Any password provided for EAP authentication, whether in a profile or in an authentication dialog
box, should not contain parentheses. Neither SCU nor the dialog box flags a parenthesis as an
invalid character, but the integrated supplicant treats parentheses as delimiters and interprets the
characters between a left parenthesis and a right parenthesis as the "true" password.
3.3.7 Encryption
Cisco TKIP
If the active profile has an Encryption setting of CKIP or CKIP EAP, then the Summit radio will associate
or roam successfully to an AP is configured with:
The SSID and other RF settings of the active profile
The authentication method of the active profile
For WEP, the static WEP keys of the active profile
Any of the following encryption settings:
WEP only (no CKIP or CMIC)
WEP with CKIP
WEP with CMIC
WEP with CKIP and CMIC
WPA Migration Mode and WPA2 Mixed Mode
Summit radios support two special AP settings: WPA Migration Mode and WPA2 Mixed Mode. WPA
Migration Mode is a setting on Cisco APs that enables both WPA and non-WPA clients to associate to an
AP using the same SSID, provided that the AP is configured for Migration Mode (WPA optional with
TKIP+WEP128 or TKIP+WEP40 cipher). In other words, WPA Migration Mode means WPA key
management with TKIP for the pairwise cipher and TKIP, 128-bit WEP, or 40-bit WEP for the group cipher.
When WPA Migration Mode in use, you can select WPA TKIP or WEP EAP for your Summit radio
encryption type.
WPA2 Mixed Mode operation enables both WPA and WPA2 clients to associate to an AP using the same
SSID. WPA2 Mixed Mode is defined by the Wi-Fi Alliance, and support for the feature is a part of Wi-Fi
certification testing. When WPA2 Mixed Mode is configured, the AP advertises the encryption ciphers
(TKIP, CCMP, other) that are available for use, and the client selects the encryption cipher it wants to use.
In other words, WPA Mixed Mode means WPA key management with AES for the pairwise cipher and
AES or TKIP for the group cipher. When WPA2 Mixed Mode in use, you can select WPA2 AES or WPA
TKIP for your Summit radio encryption type.
3.3.8 ThirdPartyConfig
If the profile named ThirdPartyConfig is selected as the active profile, then SCU works in tandem with WZC
or another third-party application for configuration of all radio and security settings for the radio. The
third-party application must be used to define the SSID, Auth Type, EAP Type, and Encryption settings.
SCU can be used to define the Client Name, Power Save, Tx Power, Bit Rate, and Radio Mode settings.
Those SCU profile settings, all SCU global settings, and the third-party application settings are applied to
the radio when ThirdPartyConfig is selected as the active profile and a power cycle is performed.
On some devices that run Pocket PC or Windows Mobile, the radio will not associate if WPA with
pre-shared keys, or WPA-PSK, is used with WZC. If that is the case for your device, then to use
WPA-PSK you must use an SCU profile other than ThirdPartyConfig.
3.3.9 EAP-FAST
The 802.1X authentication types PEAP and EAP-FAST use a client-server security architecture that
encrypts EAP transactions within a TLS tunnel. PEAP relies on the provisioning and distribution of a digital
certificate for the authentication server. With EAP-FAST, tunnel establishment is based upon strong
shared-secret keys that are unique to users. These secrets are called protected access credentials (PACs)
and can be created automatically or manually. With automatic or in-band provisioning, the PAC is created
19.01.2010 09:15
Summit User's Guide for Software Version 2.02
18 von 25
http://www.summitdatacom.com/Documents/Summit_Users_Guide_C...
and distributed to the client device in one operation. With manual or out-of-band provisioning, the PAC is
created in one step and then must be distributed to the client device separately.
SCU supports PACs created automatically or manually. When you create a PAC manually, you must load it
to the certs directory on the device that runs SCU. Be sure that the PAC file does not have read-only
permissions set, or SCU will not be able to use the PAC.
3.4 Status Window
The Status window provides status information on the radio. A sample Status window is shown in Figure 5
below:
Figure 5: Status windows, infrastructure and ad hoc modes
Here is the information on the Status window:
Name of active profile
Association status - Indicates the current status of the Summit radio. Potential values include:
Down - The radio is not recognized by Summit software, possibly because the radio is not
installed properly.
Disabled - The radio has been disabled because you clicked Disable Radio on the SCU Main
window. To enable the radio, click Enable Radio on the SCU Main window.
Not Associated - The radio is not associated to an AP, possibly because no AP for the active
profile is in range.
Associated - The radio is associated to an AP. If the radio is not sending data to or receiving
data from the AP, then:
If WEP is being used, then one of the WEP keys in the active profile is invalid.
If WPA-PSK or WPA2-PSK is being used, then the PSK or password is invalid.
If WPA-Enterprise or WPA2-Enterprise is being used, then the radio did not complete
EAP authentication successfully.
<EAP type> Authenticated - The radio is associated to an AP and has completed EAP
authentication successfully.
Information on the client device with the Summit radio
Client name, if defined in active profile
IP address
MAC address
Information on AP to which Summit radio is associated
Name
IP address
MAC address
19.01.2010 09:15
Summit User's Guide for Software Version 2.02
19 von 25
http://www.summitdatacom.com/Documents/Summit_Users_Guide_C...
Beacon period: Amount of time between AP beacons in Kilomicroseconds, where one Ksec
equals 1,024 microseconds
DTIM interval: A multiple of the beacon period that specifies how often the beacon contains a
delivery traffic indication message (DTIM), which tells power-save client devices that a packet
is waiting for them (e.g. a DTIM interval of 3 means that every third beacon contains a DTIM)
Information on WLAN connection between Summit radio and AP
Channel
Transmit power
Data (bit) rate
Signal strength (RSSI), displayed graphically and in dBm
A green color indicates that the RSSI for the current AP is stronger than -70 dBm, which
means that the Summit radio should operate consistently at 54 Mbps
A yellow color indicates that the RSSI for the current AP is stronger than -90 dBm but
not stronger than -70 dBm, which means that a Summit radio will operate at 802.11g or
802.11a data rates that are less than 54 Mbps
A red color indicates that the RSSI for the current AP (to which the radio is associated)
is -90 dBm or weaker, which means that a Summit 802.11b/g radio will operate at
802.11b data rates only
Signal quality (%), a measure of the clarity of the signal, displayed graphically and in dBm -This value will be lower with a ThirdPartyConfig profile (under Windows Zero Config) than with
a standard profile
Note: This value will be lower with a ThirdPartyConfig profile (under Windows Zero Config) than with a
standard profile.
Radio association state is shown on both the Status window and the Main window. The following status
items display on the Main window but not on the Status window:
SCU software version
Driver software version
Regulatory domain for radio: FCC, ETSI, TELEC, or Worldwide
When a ping initiated on the Diags window is active, the Status window displays a ping indicator consisting
of two "lights" that alternative in "flashing" green (for a successful ping) or red (for an unsuccessful ping).
3.5 Diags Window
A sample Diags, or troubleshooting, window is shown in Figure 6 below:
Figure 6: Diags window
19.01.2010 09:15
Summit User's Guide for Software Version 2.02
20 von 25
http://www.summitdatacom.com/Documents/Summit_Users_Guide_C...
Here are the functions available on the Diags window:
(Re)connect - Disable and enable the radio, apply or reapply the current profile, and attempt to
associate and authenticate to the wireless LAN, logging all activity in the output area at the bottom.
Release/Renew - Obtain a new IP address through DHCP release/renew, and log all activity in the
output area at the bottom.
Start Ping - Start a continuous ping to the address in the edit box next to the button. Once the button
is tapped, its name and function will change to Stop Ping. Pings will continue until you tap the Stop
Ping button, move to an SCU window other than Diags or Status, exit SCU, or remove the radio.
Note that, if your device has both a Summit radio and another network adapter active, then pings
may go out over the non-Summit network adapter.
Diagnostics - Attempt to (re)connect to an AP, and provide a more thorough dump of data than is
obtained with (Re)connect. The dump will include radio state, profile settings, global settings, and a
BSSID list of APs in the area.
Save To... - Save the diagnostics output to a file.
3.6 Global Window
Global settings include radio and security settings that apply to all profiles and settings that apply to SCU
itself. An administrator can define and change most global settings on the Global window in SCU. A sample
Global window is shown in Figure 7 below:
Figure 7: Global window
The following radio global settings, which apply to all configuration profiles, can be changed in SCU:
Roam Trigger - When moving average RSSI from current AP is weaker than Roam Trigger, radio
does a roam scan where it probes for an AP with a signal that is at least Roam Delta dBm stronger
Value: -50, -55, -60, -65, -70, -75, -80, -85, -90, or Custom (see note on Custom below the list)
Default: -70
Roam Delta - When Roam Trigger is met, second AP's signal strength (RSSI) must be Roam Delta
dBm stronger than moving average RSSI for current AP before radio will attempt to roam to second
AP
Value: 5, 10, 15, 20, 25, 30, 35, or Custom (see note on Custom below the list)
Default: 10
Roam Period - After association or roam scan (with no roam), radio will collect RSSI scan data for
Roam Period seconds before considering roaming
Value: 5, 10, 15, 20, 25, 30, 35, 40, 45, 50, 55, 60, or Custom (see note on Custom below the
list)
Default: 10
19.01.2010 09:15
Summit User's Guide for Software Version 2.02
21 von 25
http://www.summitdatacom.com/Documents/Summit_Users_Guide_C...
BG Channel Set - Defines the 2.4 GHz channels to be scanned when the radio is contemplating a
roam and needs to determine what APs are available.
Value: Full (all channels); 1,6,11 (the most commonly used 2.4 GHz channels); 1,7,13 (for
ETSI and TELEC radios only); or Custom (see note on Custom below the list)
Default: Full
DFS Channels - Support for 5 GHz (802.11a) channels where support for dynamic frequency
selection (DFS) is required
Value: On, Off
Default: Off
Ad Hoc Channel - The channel to be used for an ad hoc connection if the active profile has a Radio
Mode value of "Ad Hoc"
Value: One of the 2.4 GHz channels (1-14) or UNII-1 channels (36, 40, 44, 48) -- If you select a
channel that is not supported by your radio, then SCU uses the default value for this setting.
Default: 1
Aggressive Scan - When this setting is On and the current connection to an AP becomes tenuous,
the radio scans for available APs more aggressively. Aggressive scanning complements and works
in conjunction with the standard scanning that is configured through the Roam Trigger, Roam Delta,
and Roam Period settings. Summit recommends that the Aggressive Scan global setting be On
unless there is significant co-channel interference because of overlapping coverage from APs that
are on the same channel.
Value: On or Off
Default: On
CCX Support - Use of Cisco information element (IE) and CCX version number; support for CCX
features
Value:
Full: Use Cisco IE and CCX version number; support all CCX features
Optimized: Use Cisco IE and CCX version number; support all CCX features except
AP-assisted roaming, AP-specified maximum transmit power, and radio management
Off: Do not use Cisco IE and CCX version number
Default: Optimized
WMM - Use of Wi-Fi Multimedia Extensions, also known as WMM
Value: On, Off
Default: Off
Auth Server - Type of authentication server being used for EAP authentication
Value:
Type 1: Cisco Secure ACS or another server that uses PEAPv1 for PEAP with
EAP-MSCHAPV2 (PEAP-MSCHAP)
Type 2: A different authentication server, such as Juniper Networks Steel Belted
RADIUS, that uses PEAPv0 for PEAP-MSCHAP
Default: Type 1
TTLS Inner Method - Authentication method used within secure tunnel created by EAP-TTLS:
Value:
Auto-EAP: Any available EAP method
MSCHAPV2
MSCHAP
PAP
CHAP
EAP-MSCHAPV2
Default: Auto-EAP
PMK Caching - When WPA2 is in use, type of Pairwise Master Key (PMK) caching to use -- See the
section on PMK Caching.
Value: Standard or OPMK
Default: Standard
Frag Thresh - If packet size (in bytes) exceeds threshold, then packet is fragmented
Value: An integer from 256 to 2346
Default: 2346
RTS Thresh - Packet size above which RTS/CTS is required on link
Value: An integer from 0 to 2347
Default: 2347
19.01.2010 09:15
Summit User's Guide for Software Version 2.02
22 von 25
http://www.summitdatacom.com/Documents/Summit_Users_Guide_C...
RX Diversity - How to handle antenna diversity when receiving data from AP
Value:
On-Start on Main: On startup use main antenna
On-Start on Aux: On startup, use auxiliary antenna
Main only: Use main antenna only
Aux only: Use auxiliary antenna only
Note: V2.02 does not support the AUX antenna as a single-antenna solution.
Default: On-Start on Main
TX Diversity - How to handle antenna diversity when transmitting data to AP
Value:
Main only: Use main antenna only
Aux only: Use auxiliary antenna only
Note:V2.02 does not support the AUX antenna as a single-antenna solution.
On: Use diversity
Default: On
LED - Use of LED; available only with MCF10G
Value: On, Off
Default: Off
If SCU displays a value of "Custom" for a global setting, then the operating system registry has been
edited to include a value that is not available for selection on the Global window. Selecting Custom has no
real effect. If SCU displays a value other than Custom and you select the value of Custom and click
Commit, then SCU reverts to the value that it displayed before you selected Custom.
The following SCU global settings, which apply to SCU and other Summit applications, can be changed in
SCU:
Tray Icon - Enabling of System Tray icon, which is described in detail on Section 4.
Value: On, Off
Default: On
Hide Passwords - If this is On, then SCU as well as EAP authentication dialog boxes mask
passwords and other sensitive information, such as WEP keys
Value: On, Off
Default: Off
Admin Password - Password that must be specified when Admin Login button pressed
Value: A string of up to 64 characters
Default: SUMMIT
Certs Path - Directory where certificate(s) for EAP authentication are housed
Value: A valid directory path of up to 64 characters
Default: Depends on device
Auth Timeout - Specifies the number of seconds that Summit software will wait for an EAP
authentication request to succeed or fail. If authentication credentials are specified in the active
profile and the authentication times out, then association will fail. If authentication credentials are not
specified in the active profile and the authentication times out, then the user will be re-prompted to
enter authentication credentials
Value: An integer from 3 to 60
Default: 8
Ping Payload - Amount of data in bytes to be transmitted on a ping
Value: 32, 64, 128, 256, 512, 1024
Default: 32
Ping Timeout ms - Amount of time in milliseconds that transpires without a response before ping
request is considered a failure
Value: An integer from 1 to 30000
Default: 5000
Ping Delay ms - Amount of time in milliseconds between successive ping requests
Value: An integer from 0 to 7200000
19.01.2010 09:15
Summit User's Guide for Software Version 2.02
23 von 25
http://www.summitdatacom.com/Documents/Summit_Users_Guide_C...
Default: 1000
When global settings are changed on the window and the Commit button is clicked, the changes take effect
immediately. The only exception is the WMM setting if you change it, you must do a power cycle or
suspend/resume on the device to cause the change to take effect. (SCU provides you with a warning about
the required power cycle.) To cause global settings changes to take effect without a power cycle, Summit
software may have to reset and re-establish the WLAN connection between the Summit radio and the AP.
If you make changes without tapping Commit and attempt to move to a different SCU window, SCU will
display a warning message and give you the option of saving your changes before you leave the Global
window.
A few global settings can be defined or set only through a separate utility such as the Summit
Manufacturing Utility, which Summit makes available only to device manufacturers and not to their
customers.
3.6.1 PMK Caching
PMK caching is an alternative to CCKM supported with WPA2. The goal of PMK caching is to speed up
roaming between APs by accomplishing 802.1X reauthentications without communicating with the
authentication server. When a client does an initial authentication to the WLAN infrastructure, both sides
derive the information needed for reauthentications.
If there are no controllers, then standard PMK caching is used, and reauthentication information is cached
only on the initial AP. When the client tries to reauthenticate to that AP, the client and the AP use the
cached information to do the four-way handshake to exchange keys. If there are controllers, then
opportunistic PMK caching is used, and reauthentication information is cached on the controllers. When the
client tries to reauthenticate, the client and the controller behind the AP use the cached information to do
the four-way handshake to exchange keys.
Use the PMK Caching global setting to configure the type of PMK caching supported by your
infrastructure. If the Summit radio is configured for one type of PMK caching and the infrastructure
supports the other type, then PMK caching will not work, and every roam will require a full 802.1X
authentication that requires interaction with an authentication server.
If the active profile has an Encryption setting of WPA2 CCKM, then the Summit radio ignores the PMK
Caching global setting and attempts to use CCKM.
4.0 Using the Summit System Tray Icon
On Windows CE or Windows Mobile, Summit software includes a service that displays an icon in the
Windows System Tray. That icon provides a visual status for the Summit radio in the device and enables
the user to launch SCU by tapping the icon.
The software for the service is installed with other Summit software in a .cab file. The service is active and
displays an icon in the System Tray only when all of the following are true:
A Summit radio is installed in the device or inserted in an external slot in the device
The device is active
Windows Zero Config is not active
The SCU Tray Icon global setting is On (the default setting)
Once the service is active, if you remove the radio, turn off the device, make WZC active, or set the Tray
Icon global setting to Off (and power cycle the device), then the service is stopped and the tray icon
removed.
When the service is active, it queries the driver every three seconds for the status of the connection for the
active profile, as selected in the SCU Main window. Based on the driver's response to the query, the
service displays one of the following icons:
19.01.2010 09:15
Summit User's Guide for Software Version 2.02
24 von 25
http://www.summitdatacom.com/Documents/Summit_Users_Guide_C...
The radio is not associated/authenticated to an AP
The signal strength (RSSI) for the current AP (to which the radio is associated) is -90 dBm or
weaker, which means that a Summit 802.11b/g radio will operate at 802.11b data rates only
The RSSI for the current AP is stronger than -90 dBm but not stronger than -70 dBm, which
means that a Summit radio will operate at 802.11g or 802.11a data rates that are less than 54 Mbps
The RSSI for the current AP is stronger than -70 dBm but not stronger than -50 dBm, which
means that a Summit radio should operate consistently at 54 Mbps
The RSSI for the current AP is stronger than -50 dBm
When you tap the icon, the SCU application is launched. On most CE devices, the System Tray icon is not
visible while SCU is running, but the service remains active. If SCU usually runs on the device, or if you
want to maximize performance, then you should disable the System Tray icon service by setting the Tray
Icon global setting to Off and power cycling the device.
5.0 Regulatory Domains and Channels
Summit radios are certified for operation in three regulatory domains:
1. FCC, which is governed by the Federal Communications Commission, the regulatory agency and
standards body for the Americas and parts of Asia
2. ETSI, which is governed by the European Telecommunications Standards Institute, the standards
body applicable to most of Europe, Africa, the Middle East and parts of Asia
3. TELEC, which is governed by the Telecom Engineering Center, the standards body for Japan
A Summit radio can be programmed for any one of these three domains. Alternatively, a Summit radio can
be programmed for a Worldwide domain, which enables the radio to be used in any domain.
A Summit radio's regulatory domain determines the radio's maximum transmit power and the frequency
channels available to the radio. An 802.11g radio, which supports both 802.11b and 802.11g, operates in
the 2.4 GHz frequency spectrum, where up to 14 channels, numbered 1 to 14, are defined. Adjacent
channels overlap. In fact, there must be five channels of separation to avoid overlap and co-channel
interference. As an example, channels 1, 6, and 11 are non-overlapping.
An 802.11a/g radio operates in both the 2.4 GHz spectrum for 802.11b and 802.11g and the 5 GHz
spectrum for 802.11a. The 5 GHz frequency spectrum is grouped into sets of channels, or bands:
UNII-1: 36, 40, 44, 48
UNII-2: 52, 56, 60, 64
Intermediate: 100, 104, 108, 112, 116, 120, 124, 128, 132, 136, 140
UNII-3: 149, 154, 159, 165
None of the channels in these bands overlap. Note that, for FCC countries, UNII-1 operation is allowed
only indoors. The table below shows the channels that are available in each regulatory domain:
Domain
FCC
ETSI
2.4 GHz channels
1-11
1-13
TELEC
1-14
WorldWide
KCC
1-11
1-13
5 GHz channels (AG radio only)
UNII-1, UNII-2, Intermediate, and UNII-3
UNII-1, UNII-2, and Intermediate
UNII-1 and UNII-2, plus additional channels in
the UNII-1 band: 34, 38, 42, 46
UNII-1
UNII-1, UNII-2, Intermediate, and UNII-3
A radio programmed for the WorldWide domain may not be limited to the channels listed in the table
above. The radio can use IEEE 802.11d support or a special Summit-defined mechanism to adapt itself to
the channels that are available on the APs in the vicinity.
802.11d is the ratified IEEE standard for the operation of a wireless LAN client radio in multiple regulatory
domains. Beginning with Version 2.00, Summit software supports a performance-optimized version of
19.01.2010 09:15
Summit User's Guide for Software Version 2.02
25 von 25
http://www.summitdatacom.com/Documents/Summit_Users_Guide_C...
IEEE 802.11d. When a Summit radio programmed for the WorldWide domain associates to an AP that is
configured for 802.11d, the radio will adapt its channels and maximum transmit power to those for the
country specified by the AP. To take advantage of 802.11d support in Summit software and ensure optimal
performance, make sure that every AP on your WLAN:
Supports 802.11d
Specifies the correct Country information element
Broadcasts its SSID or SSIDs
In addition, make sure that every Summit radio is programmed for a regulatory domain of Worldwide. A
radio that is programmed for a regulatory domain of FCC, ETSI, or TELEC will ignore the Country
information elements from APs.
A Summit radio uses 802.11d only when it tries to associate on an SSID for the first time or after a
disconnect. During the initial association process, if the AP provides a Country information element, then
the radio configures its channel set and maximum transmit power for that country. The radio assumes that
all APs with the same SSID have the same 802.11d country code; as a result, the radio effectively ignores
the country code when roaming from one AP to another.
Beginning with Version 2.01 of Summit software, a Summit radio programmed for the WorldWide domain
supports not only 802.11d but also a "world mode" capability. When the radio is within range of APs that
are not configured for 802.11d, the radio identifies the channels that the APs support and automatically
adapts its channel set to the channels supported by the APs. The world mode feature applies to all 14
channels at 2.4 GHz but only to the UNII-1 channels at 5 GHz.
Appendix: FCC Information
FCC information is provided to device manufacturers in the appendix to the users guide for the Summit
Manufacturing Utility, which is made available only to device manufacturers.
-----------------------------------------------------------------------[1] The device manufacturer should use the Summit Manufacturing Utility (SMU) to ensure that the Tx Power value
reported by SCU is EIRP, or the total effective transmit power of the radio, including gains that the antenna provides
and losses from the antenna cable.
[2] See http://www.cisco.com/en/US/products/hw/wireless/ps4570
/products_configuration_example09186a00801bd035.shtml for a Cisco explanation of 802.11 authentication using
Open and Network-EAP. The Summit Client Utility refers to Network-EAP as LEAP.
19.01.2010 09:15