1
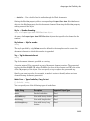
MATLAB® Report Generator™
User's Guide
R2015b
How to Contact MathWorks
Latest news:
www.mathworks.com
Sales and services:
www.mathworks.com/sales_and_services
User community:
www.mathworks.com/matlabcentral
Technical support:
www.mathworks.com/support/contact_us
Phone:
508-647-7000
The MathWorks, Inc.
3 Apple Hill Drive
Natick, MA 01760-2098
MATLAB® Report Generator™ User's Guide
© COPYRIGHT 1999–2015 by The MathWorks, Inc.
The software described in this document is furnished under a license agreement. The software may be used
or copied only under the terms of the license agreement. No part of this manual may be photocopied or
reproduced in any form without prior written consent from The MathWorks, Inc.
FEDERAL ACQUISITION: This provision applies to all acquisitions of the Program and Documentation
by, for, or through the federal government of the United States. By accepting delivery of the Program
or Documentation, the government hereby agrees that this software or documentation qualifies as
commercial computer software or commercial computer software documentation as such terms are used
or defined in FAR 12.212, DFARS Part 227.72, and DFARS 252.227-7014. Accordingly, the terms and
conditions of this Agreement and only those rights specified in this Agreement, shall pertain to and
govern the use, modification, reproduction, release, performance, display, and disclosure of the Program
and Documentation by the federal government (or other entity acquiring for or through the federal
government) and shall supersede any conflicting contractual terms or conditions. If this License fails
to meet the government's needs or is inconsistent in any respect with federal procurement law, the
government agrees to return the Program and Documentation, unused, to The MathWorks, Inc.
Trademarks
MATLAB and Simulink are registered trademarks of The MathWorks, Inc. See
www.mathworks.com/trademarks for a list of additional trademarks. Other product or brand
names may be trademarks or registered trademarks of their respective holders.
Patents
MathWorks products are protected by one or more U.S. patents. Please see
www.mathworks.com/patents for more information.
Revision History
January 1999
December 2000
June 2004
August 2004
October 2004
December 2004
April 2005
September 2005
March 2006
September 2006
March 2007
September 2007
First printing
Second printing
Third printing
Online only
Online only
Online only
Online only
Online only
Online only
Online only
Fourth printing
Fifth printing
March 2008
October 2008
October 2008
March 2009
September 2009
March 2010
September 2010
April 2011
September 2011
March 2012
September 2012
March 2013
September 2013
March 2014
October 2014
March 2015
September 2015
Online only
Online only
Online only
Online only
Online only
Online only
Online only
Online only
Online only
Online only
Online only
Online only
Online only
Online only
Online only
Online only
Online only
New (Release 11)
Revised (Release 12)
Revised for Version 2.02 (Release 14)
Revised for Version 2.1
Revised for Version 2.1.1 (Release 14SP1)
Revised for Version 2.2 (Release 14SP1+)
Revised for Version 2.2.1 (Release 14SP2+)
Revised for Version 2.3.1 (Release 14SP3)
Revised for Version 3.0 (Release 2006a)
Revised for Version 3.1 (Release 2006b)
Revised for Version 3.2 (Release 2007a)
Revised for Version 3.2.1 (Release 2007b)
This publication was previously for MATLAB®
and Simulink®. It is now for MATLAB® only.
Revised for Version 3.3 (Release 2008a)
Revised for Version 3.4 (Release 2008b)
Revised for Version 3.5 (Release 2008b+)
Revised for Version 3.6 (Release 2009a)
Revised for Version 3.7 (Release 2009b)
Revised for Version 3.8 (Release 2010a)
Revised for Version 3.9 (Release 2010b)
Revised for Version 3.10 (Release 2011a)
Revised for Version 3.11 (Release 2011b)
Revised for Version 3.12 (Release 2012a)
Revised for Version 3.13 (Release 2012b)
Revised for Version 3.14 (Release 2013a)
Revised for Version 3.15 (Release 2013b)
Revised for Version 3.16 (Release 2014a)
Revised for Version 4.0 (Release 2014b)
Revised for Version 4.1 (Release 2015a)
Revised for Version 4.2 (Release 2015b)
Contents
1
2
Getting Started
MATLAB Report Generator Product Description . . . . . . . . .
Key Features . . . . . . . . . . . . . . . . . . . . . . . . . . . . . . . . . . . . .
1-2
1-2
MATLAB Code and Results Presentation . . . . . . . . . . . . . . . .
1-3
Report Creation Workflow . . . . . . . . . . . . . . . . . . . . . . . . . . . .
Approaches for Creating Reports . . . . . . . . . . . . . . . . . . . . . .
Interactive Report Generation . . . . . . . . . . . . . . . . . . . . . . . .
1-4
1-4
1-4
How MATLAB Report Generator and MATLAB Software
Interact . . . . . . . . . . . . . . . . . . . . . . . . . . . . . . . . . . . . . . . . . .
1-6
Report Components . . . . . . . . . . . . . . . . . . . . . . . . . . . . . . . . . .
Types of Report Components . . . . . . . . . . . . . . . . . . . . . . . . .
1-7
1-7
Working with the Report Explorer . . . . . . . . . . . . . . . . . . . . .
About the Report Explorer . . . . . . . . . . . . . . . . . . . . . . . . . .
1-8
1-8
Supported Report Formats . . . . . . . . . . . . . . . . . . . . . . . . . . .
Limitations for Report Formats . . . . . . . . . . . . . . . . . . . . . .
1-11
1-11
Create Your First Report
Create a MATLAB Report . . . . . . . . . . . . . . . . . . . . . . . . . . . . .
2-2
Create a Report Setup File . . . . . . . . . . . . . . . . . . . . . . . . . . .
2-3
v
3
vi
Contents
Add Report Content Using Components . . . . . . . . . . . . . . . . .
Report Components . . . . . . . . . . . . . . . . . . . . . . . . . . . . . . . .
Specify Report Variables . . . . . . . . . . . . . . . . . . . . . . . . . . . .
Create a Title Page . . . . . . . . . . . . . . . . . . . . . . . . . . . . . . . .
Add a Chapter . . . . . . . . . . . . . . . . . . . . . . . . . . . . . . . . . . .
Add Introductory Text to the First Chapter . . . . . . . . . . . . .
Add an Image . . . . . . . . . . . . . . . . . . . . . . . . . . . . . . . . . . .
Create the Magic Squares and Their Images . . . . . . . . . . . .
Create a For Loop . . . . . . . . . . . . . . . . . . . . . . . . . . . . . . . .
Add a Chapter for Each Square . . . . . . . . . . . . . . . . . . . . .
Determine the Matrix Size . . . . . . . . . . . . . . . . . . . . . . . . .
Insert the Magic Square Size into the Report . . . . . . . . . . .
Create the Magic Square . . . . . . . . . . . . . . . . . . . . . . . . . . .
Add Display Logic . . . . . . . . . . . . . . . . . . . . . . . . . . . . . . . .
Display the Magic Square . . . . . . . . . . . . . . . . . . . . . . . . . .
2-5
2-5
2-7
2-9
2-12
2-14
2-16
2-21
2-22
2-24
2-26
2-28
2-29
2-32
2-34
Generate a Report . . . . . . . . . . . . . . . . . . . . . . . . . . . . . . . . . .
2-39
Set Up a Report
Report Setups . . . . . . . . . . . . . . . . . . . . . . . . . . . . . . . . . . . . . . .
Setup Hierarchy . . . . . . . . . . . . . . . . . . . . . . . . . . . . . . . . . .
Setup Files . . . . . . . . . . . . . . . . . . . . . . . . . . . . . . . . . . . . . .
Create a Report Setup . . . . . . . . . . . . . . . . . . . . . . . . . . . . .
3-2
3-2
3-2
3-3
Create a New Setup File . . . . . . . . . . . . . . . . . . . . . . . . . . . . . .
Create Setup File Using the Report Explorer . . . . . . . . . . . .
Create Setup File Programmatically . . . . . . . . . . . . . . . . . . .
Working with Setup Files . . . . . . . . . . . . . . . . . . . . . . . . . . .
3-4
3-4
3-4
3-4
Open a Report Setup . . . . . . . . . . . . . . . . . . . . . . . . . . . . . . . . .
Opening a Setup on the MATLAB Path . . . . . . . . . . . . . . . .
Opening a Setup Not on the MATLAB Path . . . . . . . . . . . . .
Opening a Setup Programmatically . . . . . . . . . . . . . . . . . . . .
3-6
3-6
3-7
3-7
Close a Report Setup . . . . . . . . . . . . . . . . . . . . . . . . . . . . . . . .
Close a Setup Using the Report Explorer . . . . . . . . . . . . . . .
Close a Setup Programmatically . . . . . . . . . . . . . . . . . . . . . .
3-8
3-8
3-8
Save a Report Setup . . . . . . . . . . . . . . . . . . . . . . . . . . . . . . . . .
Save a Setup Under Its Existing Name . . . . . . . . . . . . . . . . .
Save a Setup Under a New Name . . . . . . . . . . . . . . . . . . . . .
4
3-9
3-9
3-9
Load Report Setup into MATLAB Workspace . . . . . . . . . . .
3-10
Insert Components . . . . . . . . . . . . . . . . . . . . . . . . . . . . . . . . .
Point-and-Click Method . . . . . . . . . . . . . . . . . . . . . . . . . . . .
Drag-and-Drop Method . . . . . . . . . . . . . . . . . . . . . . . . . . . .
Fix Context Violations . . . . . . . . . . . . . . . . . . . . . . . . . . . . .
3-11
3-11
3-11
3-11
Set Component Properties . . . . . . . . . . . . . . . . . . . . . . . . . . .
Edit Component Property Values . . . . . . . . . . . . . . . . . . . .
Computed Property Values . . . . . . . . . . . . . . . . . . . . . . . . .
3-12
3-12
3-12
Move Components . . . . . . . . . . . . . . . . . . . . . . . . . . . . . . . . . .
Point-and-Click Method . . . . . . . . . . . . . . . . . . . . . . . . . . . .
Drag-and-Drop Method . . . . . . . . . . . . . . . . . . . . . . . . . . . .
3-13
3-13
3-14
Delete Components . . . . . . . . . . . . . . . . . . . . . . . . . . . . . . . . .
3-15
Deactivate Components . . . . . . . . . . . . . . . . . . . . . . . . . . . . .
3-16
Send Components to the MATLAB Workspace . . . . . . . . . .
3-17
Generate a Report
Generate a Report . . . . . . . . . . . . . . . . . . . . . . . . . . . . . . . . . . .
Run a Report . . . . . . . . . . . . . . . . . . . . . . . . . . . . . . . . . . . .
Report Output Options . . . . . . . . . . . . . . . . . . . . . . . . . . . . .
4-2
4-2
4-2
Select Report Generation Options . . . . . . . . . . . . . . . . . . . . .
Report Options Dialog Box . . . . . . . . . . . . . . . . . . . . . . . . . .
Report Output Format . . . . . . . . . . . . . . . . . . . . . . . . . . . . .
PDF Stylesheets . . . . . . . . . . . . . . . . . . . . . . . . . . . . . . . . . .
Web Stylesheets . . . . . . . . . . . . . . . . . . . . . . . . . . . . . . . . . .
RTF (DSSSL Print) and Word Stylesheets . . . . . . . . . . . . . .
Report Generation Processing . . . . . . . . . . . . . . . . . . . . . . .
Location of Report Output File . . . . . . . . . . . . . . . . . . . . . .
4-4
4-4
4-5
4-8
4-8
4-9
4-10
4-11
vii
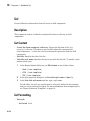
Report Description . . . . . . . . . . . . . . . . . . . . . . . . . . . . . . .
5
viii
Contents
4-12
Report Generation Preferences . . . . . . . . . . . . . . . . . . . . . . .
Report Generator Preferences Pane . . . . . . . . . . . . . . . . . . .
File Format and Extension . . . . . . . . . . . . . . . . . . . . . . . . .
Image Formats . . . . . . . . . . . . . . . . . . . . . . . . . . . . . . . . . .
Report Viewing . . . . . . . . . . . . . . . . . . . . . . . . . . . . . . . . . .
Reset to Defaults . . . . . . . . . . . . . . . . . . . . . . . . . . . . . . . . .
4-13
4-13
4-14
4-15
4-15
4-16
Change Report Locale . . . . . . . . . . . . . . . . . . . . . . . . . . . . . . .
4-17
Convert XML Documents to Different File Formats . . . . . .
Why Convert XML Documents? . . . . . . . . . . . . . . . . . . . . . .
Convert XML Documents Using the Report Explorer . . . . . .
Convert XML Documents Using the Command Line . . . . . .
Edit XML Source Files . . . . . . . . . . . . . . . . . . . . . . . . . . . .
4-18
4-18
4-18
4-20
4-20
Create a Report Log File . . . . . . . . . . . . . . . . . . . . . . . . . . . .
4-21
Generate MATLAB Code from Report Setup File . . . . . . . .
4-22
Troubleshooting Report Generation Issues . . . . . . . . . . . . .
Memory Usage . . . . . . . . . . . . . . . . . . . . . . . . . . . . . . . . . .
HTML Report Display on UNIX Systems . . . . . . . . . . . . . .
4-25
4-25
4-25
Add Content with Components
Components . . . . . . . . . . . . . . . . . . . . . . . . . . . . . . . . . . . . . . . .
Component Formatting . . . . . . . . . . . . . . . . . . . . . . . . . . . . .
5-2
5-3
Report Structure Components . . . . . . . . . . . . . . . . . . . . . . . . .
5-4
Table Formatting Components . . . . . . . . . . . . . . . . . . . . . . . .
5-5
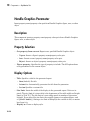
Property Table Components . . . . . . . . . . . . . . . . . . . . . . . . . .
About Property Table Components . . . . . . . . . . . . . . . . . . . .
Open the Example Report Template . . . . . . . . . . . . . . . . . . .
Examine the Property Table Output . . . . . . . . . . . . . . . . . . .
Select Object Types . . . . . . . . . . . . . . . . . . . . . . . . . . . . . . . .
5-6
5-6
5-8
5-8
5-9
6
Display Property Name/Property Value Pairs . . . . . . . . . . . .
Edit Table Titles . . . . . . . . . . . . . . . . . . . . . . . . . . . . . . . . .
Enter Text into Table Cells . . . . . . . . . . . . . . . . . . . . . . . . .
Add, Replace, and Delete Properties in Tables . . . . . . . . . .
Format Table Columns, Rows, and Cells . . . . . . . . . . . . . . .
Zoom and Scroll . . . . . . . . . . . . . . . . . . . . . . . . . . . . . . . . .
Select a Table . . . . . . . . . . . . . . . . . . . . . . . . . . . . . . . . . . .
5-9
5-12
5-12
5-13
5-14
5-16
5-16
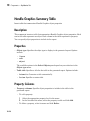
Summary Table Components . . . . . . . . . . . . . . . . . . . . . . . . .
About Summary Table Components . . . . . . . . . . . . . . . . . .
Open the Example Report Template . . . . . . . . . . . . . . . . . .
Select Object Types . . . . . . . . . . . . . . . . . . . . . . . . . . . . . . .
Add and Remove Properties . . . . . . . . . . . . . . . . . . . . . . . .
Set Relative Column Widths . . . . . . . . . . . . . . . . . . . . . . . .
Set Object Row Options . . . . . . . . . . . . . . . . . . . . . . . . . . . .
5-17
5-17
5-18
5-19
5-19
5-20
5-20
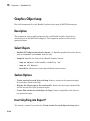
Logical and Looping Components . . . . . . . . . . . . . . . . . . . . .
5-21
Edit Figure Loop Components . . . . . . . . . . . . . . . . . . . . . . . .
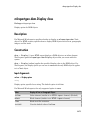
Figure Loop in a Report . . . . . . . . . . . . . . . . . . . . . . . . . . .
Figure Properties . . . . . . . . . . . . . . . . . . . . . . . . . . . . . . . .
Loop on the Current Figure . . . . . . . . . . . . . . . . . . . . . . . .
Loop on Visible Figures . . . . . . . . . . . . . . . . . . . . . . . . . . . .
Loop on Figures with Tags . . . . . . . . . . . . . . . . . . . . . . . . .
Modify Loop Section Options . . . . . . . . . . . . . . . . . . . . . . . .
5-22
5-22
5-23
5-24
5-24
5-24
5-24
Template-Based Report Formatting
Report Conversion Templates . . . . . . . . . . . . . . . . . . . . . . . . .
Templates for Report Conversion . . . . . . . . . . . . . . . . . . . . .
Custom Templates . . . . . . . . . . . . . . . . . . . . . . . . . . . . . . . .
Custom Component Styles . . . . . . . . . . . . . . . . . . . . . . . . . .
Benefits of Using Templates . . . . . . . . . . . . . . . . . . . . . . . . .
6-2
6-2
6-2
6-2
6-2
Generate a Report Using a Template . . . . . . . . . . . . . . . . . . .
6-4
Conversion Template Contents . . . . . . . . . . . . . . . . . . . . . . . .
Default Styles . . . . . . . . . . . . . . . . . . . . . . . . . . . . . . . . . . . .
Part Templates . . . . . . . . . . . . . . . . . . . . . . . . . . . . . . . . . . .
6-5
6-5
6-9
ix
Header and Footers in Word Conversion Templates . . . . . .
x
Contents
6-10
Copy a Conversion Template . . . . . . . . . . . . . . . . . . . . . . . . .
Copy a Conversion Template . . . . . . . . . . . . . . . . . . . . . . . .
6-12
6-12
Open a Conversion Template . . . . . . . . . . . . . . . . . . . . . . . . .
6-14
Set Conversion Template Properties . . . . . . . . . . . . . . . . . .
6-15
Move a Conversion Template . . . . . . . . . . . . . . . . . . . . . . . . .
6-16
Delete a Conversion Template . . . . . . . . . . . . . . . . . . . . . . . .
6-17
Customize Microsoft Word Report Styles . . . . . . . . . . . . . . .
Customize Default Microsoft Word Component Styles . . . . .
Create Styles in a Microsoft Word Template . . . . . . . . . . . .
6-18
6-18
6-18
Customize Microsoft Word Part Templates . . . . . . . . . . . . .
Custom Word Part Templates . . . . . . . . . . . . . . . . . . . . . . .
Display the Developer Ribbon in Word . . . . . . . . . . . . . . . .
Customize a Word Conversion Part Template . . . . . . . . . . .
Set Default Text Style for a Hole . . . . . . . . . . . . . . . . . . . .
Distinguish Inline and Block Holes . . . . . . . . . . . . . . . . . . .
Avoid Changing Block Holes to Inline Holes . . . . . . . . . . . .
Delete a Hole . . . . . . . . . . . . . . . . . . . . . . . . . . . . . . . . . . .
Add an Inline Hole . . . . . . . . . . . . . . . . . . . . . . . . . . . . . . .
Add a Block Hole . . . . . . . . . . . . . . . . . . . . . . . . . . . . . . . .
6-21
6-21
6-22
6-22
6-23
6-25
6-26
6-26
6-28
6-29
Customize a Microsoft Word Title Page Template . . . . . . . .
Create a Custom Template . . . . . . . . . . . . . . . . . . . . . . . . .
Change the Color of a Report Title . . . . . . . . . . . . . . . . . . .
Assign the Template to a Report . . . . . . . . . . . . . . . . . . . . .
Customize Title Page Content and Layout . . . . . . . . . . . . .
6-30
6-30
6-31
6-33
6-34
Create a Custom HTML Template . . . . . . . . . . . . . . . . . . . . .
Copy an HTML Template . . . . . . . . . . . . . . . . . . . . . . . . . .
Select an HTML Editor . . . . . . . . . . . . . . . . . . . . . . . . . . . .
Edit HTML Styles in a Template . . . . . . . . . . . . . . . . . . . .
6-36
6-36
6-37
6-37
7
8
Create Custom Components
About Custom Components . . . . . . . . . . . . . . . . . . . . . . . . . . .
7-2
Create Custom Components . . . . . . . . . . . . . . . . . . . . . . . . . . .
7-3
Define Components . . . . . . . . . . . . . . . . . . . . . . . . . . . . . . . . . .
Required Component Data . . . . . . . . . . . . . . . . . . . . . . . . . .
Specify the Location of Component Files . . . . . . . . . . . . . . . .
Set Component Display Options . . . . . . . . . . . . . . . . . . . . . .
Specify Component Properties . . . . . . . . . . . . . . . . . . . . . . . .
Modify Existing Components . . . . . . . . . . . . . . . . . . . . . . . .
Build Components . . . . . . . . . . . . . . . . . . . . . . . . . . . . . . . .
Rebuild Existing Components . . . . . . . . . . . . . . . . . . . . . . .
Remove a Component . . . . . . . . . . . . . . . . . . . . . . . . . . . . .
7-6
7-6
7-6
7-7
7-9
7-11
7-11
7-12
7-12
Specify Tasks for a Component to Perform . . . . . . . . . . . . .
About Component Customization . . . . . . . . . . . . . . . . . . . .
Required Customization: Specify Format and Content of Report
Output . . . . . . . . . . . . . . . . . . . . . . . . . . . . . . . . . . . . . . .
Change a Component's Outline String in the Report Explorer
Hierarchy . . . . . . . . . . . . . . . . . . . . . . . . . . . . . . . . . . . .
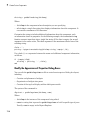
Modify the Appearance of Properties Dialog Boxes . . . . . . .
Specify Additional Component Properties . . . . . . . . . . . . . .
7-13
7-13
7-15
7-16
7-17
Customized Components . . . . . . . . . . . . . . . . . . . . . . . . . . . . .
Fetching Securities Data and Displaying It in a Table . . . . .
Displaying Securities Data in Two Tables . . . . . . . . . . . . . .
7-19
7-19
7-24
7-13
Create Custom Stylesheets
Stylesheets . . . . . . . . . . . . . . . . . . . . . . . . . . . . . . . . . . . . . . . . .
Built-In Versus Custom Stylesheets . . . . . . . . . . . . . . . . . . .
Customize Stylesheets Using Data Items . . . . . . . . . . . . . . .
8-2
8-2
8-3
Create a New Stylesheet . . . . . . . . . . . . . . . . . . . . . . . . . . . . . .
8-4
xi
9
Edit, Save, or Delete a Stylesheet . . . . . . . . . . . . . . . . . . . . . .
Edit a Stylesheet . . . . . . . . . . . . . . . . . . . . . . . . . . . . . . . . . .
Save a Stylesheet . . . . . . . . . . . . . . . . . . . . . . . . . . . . . . . . .
Delete a Stylesheet . . . . . . . . . . . . . . . . . . . . . . . . . . . . . . . .
8-5
8-5
8-7
8-8
Edit Stylesheet Data Items . . . . . . . . . . . . . . . . . . . . . . . . . . . .
Data Item Categories in Built-In Stylesheets . . . . . . . . . . . .
Edit Data Items in Simple or Advanced Edit Mode . . . . . . .
Data Items . . . . . . . . . . . . . . . . . . . . . . . . . . . . . . . . . . . . .
8-9
8-9
8-13
8-13
Stylesheet Cells for Headers and Footers . . . . . . . . . . . . . . .
About Stylesheet Cells and Cell Groups . . . . . . . . . . . . . . .
Headers and Footers . . . . . . . . . . . . . . . . . . . . . . . . . . . . . .
Add Content to Headers and Footers Using Templates . . . .
Insert Graphics Files . . . . . . . . . . . . . . . . . . . . . . . . . . . . . .
Modify Fonts and Other Properties . . . . . . . . . . . . . . . . . . .
8-23
8-23
8-24
8-26
8-27
8-27
Customized Stylesheets . . . . . . . . . . . . . . . . . . . . . . . . . . . . . .
Number Pages in a Report . . . . . . . . . . . . . . . . . . . . . . . . .
Add Graphics to Headers in PDF Reports . . . . . . . . . . . . . .
Change Font Size, Page Orientation, and Paper Type of a
Generated Report . . . . . . . . . . . . . . . . . . . . . . . . . . . . . .
Edit Font Size as a Derived Value in XML . . . . . . . . . . . . .
8-29
8-29
8-30
PDF Fonts for Non-English Platforms . . . . . . . . . . . . . . . . .
PDF Font Support for Languages . . . . . . . . . . . . . . . . . . . .
Identifying When to Specify a Font . . . . . . . . . . . . . . . . . . .
Stylesheets Override PDF Font Mapping . . . . . . . . . . . . . .
Non-English PDF Font Mapping Tasks . . . . . . . . . . . . . . . .
lang_font_map.xml File . . . . . . . . . . . . . . . . . . . . . . . . . . . .
Locate Non-English Fonts . . . . . . . . . . . . . . . . . . . . . . . . . .
Add or Modify Language Font Mappings . . . . . . . . . . . . . . .
Specify the Location of Font Files . . . . . . . . . . . . . . . . . . . .
8-40
8-40
8-40
8-41
8-41
8-41
8-43
8-44
8-45
Comparing XML Files
Compare XML Files . . . . . . . . . . . . . . . . . . . . . . . . . . . . . . . . . .
xii
Contents
8-35
8-37
9-2
10
11
12
13
How to Compare XML Files . . . . . . . . . . . . . . . . . . . . . . . . . . .
Select Files to Compare . . . . . . . . . . . . . . . . . . . . . . . . . . . .
Change Comparison Type . . . . . . . . . . . . . . . . . . . . . . . . . . .
XML Comparison Examples . . . . . . . . . . . . . . . . . . . . . . . . .
See Also . . . . . . . . . . . . . . . . . . . . . . . . . . . . . . . . . . . . . . . .
9-4
9-4
9-5
9-5
9-5
Explore the XML Comparison Report . . . . . . . . . . . . . . . . . . .
Navigate the XML Comparison Report . . . . . . . . . . . . . . . . .
Save Comparison Log Files in a Zip File . . . . . . . . . . . . . . . .
Export Results to the Workspace . . . . . . . . . . . . . . . . . . . . .
9-6
9-6
9-8
9-8
How the Matching Algorithm Works . . . . . . . . . . . . . . . . . . .
How the Chawathe Algorithm Works . . . . . . . . . . . . . . . . .
Why Use a Heuristic Algorithm? . . . . . . . . . . . . . . . . . . . . .
Examples of Matching Results . . . . . . . . . . . . . . . . . . . . . .
9-10
9-10
9-12
9-12
Components — Alphabetical List
Functions – Alphabetical List
Classes – Alphabetical List
Create a Report Program
Create a Report Program . . . . . . . . . . . . . . . . . . . . . . . . . . . .
13-3
xiii
xiv
Contents
Document Object Model . . . . . . . . . . . . . . . . . . . . . . . . . . . . .
DOM Object Help and Documentation . . . . . . . . . . . . . . . .
13-4
13-4
Construct a DOM Object . . . . . . . . . . . . . . . . . . . . . . . . . . . . .
13-6
Import the DOM API Package . . . . . . . . . . . . . . . . . . . . . . . .
13-7
Get and Set DOM Object Properties . . . . . . . . . . . . . . . . . . .
13-8
Create a Document Object to Hold Content . . . . . . . . . . . . .
13-9
Add Content to a Report . . . . . . . . . . . . . . . . . . . . . . . . . . . .
13-11
Clone a DOM Object . . . . . . . . . . . . . . . . . . . . . . . . . . . . . . .
13-13
Add Content as a Group . . . . . . . . . . . . . . . . . . . . . . . . . . . .
13-14
Stream a Report . . . . . . . . . . . . . . . . . . . . . . . . . . . . . . . . . . .
13-16
Report Packages . . . . . . . . . . . . . . . . . . . . . . . . . . . . . . . . . .
13-17
Close a Report . . . . . . . . . . . . . . . . . . . . . . . . . . . . . . . . . . . .
13-18
Display a Report . . . . . . . . . . . . . . . . . . . . . . . . . . . . . . . . . .
13-19
Report Formatting Approaches . . . . . . . . . . . . . . . . . . . . . .
13-20
Use Style Sheets . . . . . . . . . . . . . . . . . . . . . . . . . . . . . . . . . . .
13-21
Use Format Objects . . . . . . . . . . . . . . . . . . . . . . . . . . . . . . . .
13-23
Use Format Properties . . . . . . . . . . . . . . . . . . . . . . . . . . . . .
13-24
Format Inheritance . . . . . . . . . . . . . . . . . . . . . . . . . . . . . . . .
13-25
Create Object Containers . . . . . . . . . . . . . . . . . . . . . . . . . . .
13-26
Form-Based Reporting . . . . . . . . . . . . . . . . . . . . . . . . . . . . .
13-28
Fill the Blanks in a Report Form . . . . . . . . . . . . . . . . . . . .
Navigate Holes in the Form . . . . . . . . . . . . . . . . . . . . . . .
13-29
13-29
Use Subforms in a Report . . . . . . . . . . . . . . . . . . . . . . . . . . .
13-31
Create Document Part Template Libraries . . . . . . . . . . . .
13-33
Create a Document Part Template Library in a Microsoft Word
Template File . . . . . . . . . . . . . . . . . . . . . . . . . . . . . . . .
13-33
Create a Document Part Template Library in an HTML
Template File . . . . . . . . . . . . . . . . . . . . . . . . . . . . . . . .
13-35
Object-Oriented Report Creation . . . . . . . . . . . . . . . . . . . .
13-38
Simplify Filling in Forms . . . . . . . . . . . . . . . . . . . . . . . . . . .
13-39
Create and Format Text . . . . . . . . . . . . . . . . . . . . . . . . . . . .
Create Text . . . . . . . . . . . . . . . . . . . . . . . . . . . . . . . . . . . .
Create Special Characters . . . . . . . . . . . . . . . . . . . . . . . . .
Append HTML or XML Markup . . . . . . . . . . . . . . . . . . . .
Format Text . . . . . . . . . . . . . . . . . . . . . . . . . . . . . . . . . . .
13-41
13-41
13-41
13-42
13-42
Create and Format Paragraphs . . . . . . . . . . . . . . . . . . . . . .
Create a Paragraph . . . . . . . . . . . . . . . . . . . . . . . . . . . . . .
Create a Heading . . . . . . . . . . . . . . . . . . . . . . . . . . . . . . .
Format a Paragraph . . . . . . . . . . . . . . . . . . . . . . . . . . . . .
13-46
13-46
13-46
13-47
Create and Format Lists . . . . . . . . . . . . . . . . . . . . . . . . . . . .
Create an Unordered List . . . . . . . . . . . . . . . . . . . . . . . . .
Create an Ordered List . . . . . . . . . . . . . . . . . . . . . . . . . . .
Create a Multilevel List . . . . . . . . . . . . . . . . . . . . . . . . . .
Format Lists . . . . . . . . . . . . . . . . . . . . . . . . . . . . . . . . . . .
13-52
13-52
13-53
13-55
13-56
Create and Format Tables . . . . . . . . . . . . . . . . . . . . . . . . . .
Two Types of Tables . . . . . . . . . . . . . . . . . . . . . . . . . . . . .
Create a Table from a Two-Dimensional Array . . . . . . . . .
Create a Table Using the Table entry Function . . . . . . . . .
Create a Table from Scratch . . . . . . . . . . . . . . . . . . . . . . .
Format a Table . . . . . . . . . . . . . . . . . . . . . . . . . . . . . . . . .
Create a Formal Table . . . . . . . . . . . . . . . . . . . . . . . . . . .
Format a Formal Table . . . . . . . . . . . . . . . . . . . . . . . . . . .
Create and Format Table Rows . . . . . . . . . . . . . . . . . . . . .
Format Table Columns . . . . . . . . . . . . . . . . . . . . . . . . . . .
Create and Format Table Entries . . . . . . . . . . . . . . . . . . .
13-58
13-58
13-59
13-59
13-60
13-61
13-66
13-66
13-67
13-68
13-69
Create Links . . . . . . . . . . . . . . . . . . . . . . . . . . . . . . . . . . . . . .
Links . . . . . . . . . . . . . . . . . . . . . . . . . . . . . . . . . . . . . . . . .
13-72
13-72
xv
xvi
Contents
Create a Link Target . . . . . . . . . . . . . . . . . . . . . . . . . . . .
Create an External Link . . . . . . . . . . . . . . . . . . . . . . . . . .
Create an Internal Link . . . . . . . . . . . . . . . . . . . . . . . . . .
Add Text or Images to Links . . . . . . . . . . . . . . . . . . . . . . .
13-72
13-73
13-73
13-73
Create and Format Images . . . . . . . . . . . . . . . . . . . . . . . . . .
Create an Image . . . . . . . . . . . . . . . . . . . . . . . . . . . . . . . .
Resize an Image . . . . . . . . . . . . . . . . . . . . . . . . . . . . . . . .
Image Storage . . . . . . . . . . . . . . . . . . . . . . . . . . . . . . . . . .
Links from an Image . . . . . . . . . . . . . . . . . . . . . . . . . . . . .
13-75
13-75
13-76
13-76
13-76
Create a Table of Contents . . . . . . . . . . . . . . . . . . . . . . . . . .
Create a Microsoft Word Table of Contents . . . . . . . . . . . .
Create an HTML Table of Contents . . . . . . . . . . . . . . . . .
Set Outline Levels of Section Heads . . . . . . . . . . . . . . . . .
13-77
13-77
13-79
13-81
Create Image Maps . . . . . . . . . . . . . . . . . . . . . . . . . . . . . . . .
13-84
Automatically Number Document Content . . . . . . . . . . . .
Automatically Number Content Programmatically . . . . . .
Automatically Number Content Using Part Templates . . .
13-86
13-86
13-88
Appending HTML to DOM Reports . . . . . . . . . . . . . . . . . . .
Why Append HTML to a DOM Report? . . . . . . . . . . . . . . .
Workflow for Appending HTML . . . . . . . . . . . . . . . . . . . .
13-90
13-90
13-90
Append HTML Content to DOM Reports . . . . . . . . . . . . . .
Use an addHTML Method . . . . . . . . . . . . . . . . . . . . . . . . .
Append an HTML Object . . . . . . . . . . . . . . . . . . . . . . . . .
Address Errors . . . . . . . . . . . . . . . . . . . . . . . . . . . . . . . . .
13-92
13-92
13-93
13-93
Append HTML File Contents to DOM Reports . . . . . . . . . .
Use an addHTMLFile Method . . . . . . . . . . . . . . . . . . . . . .
Append an HTMLFile Object . . . . . . . . . . . . . . . . . . . . . . .
Address Errors . . . . . . . . . . . . . . . . . . . . . . . . . . . . . . . . .
13-94
13-94
13-94
13-95
Use an HTML Cleanup Program . . . . . . . . . . . . . . . . . . . . .
Use HTML Tidy to Fix HTML Code . . . . . . . . . . . . . . . . .
13-96
13-96
HTML Code Requirements for DOM Reports . . . . . . . . . .
XML-Parsable HTML Code . . . . . . . . . . . . . . . . . . . . . . .
Supported HTML Elements and Attributes . . . . . . . . . . .
Supported HTML CSS Style Attributes for All Elements .
13-100
13-100
13-100
13-102
Support for HTML Character Entities . . . . . . . . . . . . . . .
DOCTYPE Declaration . . . . . . . . . . . . . . . . . . . . . . . . . .
13-103
13-104
Display Report Generation Messages . . . . . . . . . . . . . . . .
Report Generation Messages . . . . . . . . . . . . . . . . . . . . . .
Display DOM Default Messages . . . . . . . . . . . . . . . . . . .
Create and Display a Progress Message . . . . . . . . . . . . .
13-106
13-106
13-106
13-108
Compile a Report Program . . . . . . . . . . . . . . . . . . . . . . . . .
13-110
Create a Microsoft Word Template . . . . . . . . . . . . . . . . . .
13-111
Add Holes in a Microsoft Word Template . . . . . . . . . . . . .
Display the Developer Ribbon in Word . . . . . . . . . . . . . .
Inline and Block Holes . . . . . . . . . . . . . . . . . . . . . . . . . .
Create an Inline Hole . . . . . . . . . . . . . . . . . . . . . . . . . . .
Create a Block-Level Hole . . . . . . . . . . . . . . . . . . . . . . . .
Set Default Text Style for a Hole . . . . . . . . . . . . . . . . . .
13-112
13-112
13-112
13-112
13-113
13-114
Modify Styles in a Microsoft Word Template . . . . . . . . . .
Edit Styles in a Word Template . . . . . . . . . . . . . . . . . . .
Add Styles to a Word Template . . . . . . . . . . . . . . . . . . . .
13-117
13-117
13-118
Create an HTML Template . . . . . . . . . . . . . . . . . . . . . . . . .
Edit a Zipped HTML Template . . . . . . . . . . . . . . . . . . . .
13-122
13-122
Add Holes in an HTML Template . . . . . . . . . . . . . . . . . . .
Inline and Block Holes . . . . . . . . . . . . . . . . . . . . . . . . . .
Create an Inline Hole . . . . . . . . . . . . . . . . . . . . . . . . . . .
Create a Block Hole . . . . . . . . . . . . . . . . . . . . . . . . . . . .
13-124
13-124
13-124
13-125
Modify Styles in an HTML Template . . . . . . . . . . . . . . . . .
13-127
Create Microsoft Word Page Layout Sections . . . . . . . . .
Define Page Layouts in a Template . . . . . . . . . . . . . . . . .
Navigate Template-Defined Sections . . . . . . . . . . . . . . . .
Create Sections Programmatically . . . . . . . . . . . . . . . . . .
13-128
13-128
13-128
13-129
Create Page Footers and Headers . . . . . . . . . . . . . . . . . . .
Create Page Headers and Footers in a Template . . . . . . .
Create Page Headers and Footers Programmatically . . . .
13-131
13-131
13-133
xvii
14
xviii
Contents
Programmatic PowerPoint Presentation Creation
Create a Presentation Program . . . . . . . . . . . . . . . . . . . . . . .
PPT API Programs . . . . . . . . . . . . . . . . . . . . . . . . . . . . . . .
Two Ways to Use the PPT API . . . . . . . . . . . . . . . . . . . . . .
PPT API Applications and PowerPoint Templates . . . . . . . .
Template Elements . . . . . . . . . . . . . . . . . . . . . . . . . . . . . . .
14-2
14-3
14-4
14-5
14-5
Create PPT Objects . . . . . . . . . . . . . . . . . . . . . . . . . . . . . . . . .
PPT Objects . . . . . . . . . . . . . . . . . . . . . . . . . . . . . . . . . . . .
Use a PPT Constructor . . . . . . . . . . . . . . . . . . . . . . . . . . . .
PPT Objects Created Without Constructors . . . . . . . . . . . . .
14-8
14-8
14-8
14-9
Import the PPT API Package . . . . . . . . . . . . . . . . . . . . . . . .
14-11
Get and Set PPT Object Properties . . . . . . . . . . . . . . . . . . .
14-12
Create a Presentation Object to Hold Content . . . . . . . . .
14-14
Generate a Presentation . . . . . . . . . . . . . . . . . . . . . . . . . . . .
14-15
Display Presentation Generation Messages . . . . . . . . . . . .
Presentation Generation Messages . . . . . . . . . . . . . . . . . .
Display PPT Default Messages . . . . . . . . . . . . . . . . . . . . .
Create and Display a Progress Message . . . . . . . . . . . . . .
14-16
14-16
14-16
14-18
Presentation Formatting Approaches . . . . . . . . . . . . . . . . .
Template Formatting . . . . . . . . . . . . . . . . . . . . . . . . . . . .
Format Objects . . . . . . . . . . . . . . . . . . . . . . . . . . . . . . . . .
Format Properties . . . . . . . . . . . . . . . . . . . . . . . . . . . . . . .
Interactive Formatting of Slide Content . . . . . . . . . . . . . .
14-20
14-21
14-21
14-22
14-22
Presentation Format Inheritance . . . . . . . . . . . . . . . . . . . .
14-24
Set Up a PowerPoint Template . . . . . . . . . . . . . . . . . . . . . .
Use Existing Presentations as Templates . . . . . . . . . . . . .
Customize a Copy of the Default Template . . . . . . . . . . . .
Global Presentation Formatting Using a Slide Master . . . .
Add a Slide Master . . . . . . . . . . . . . . . . . . . . . . . . . . . . . .
Format a Slide Layout . . . . . . . . . . . . . . . . . . . . . . . . . . .
Add a Slide Layout . . . . . . . . . . . . . . . . . . . . . . . . . . . . . .
14-26
14-26
14-26
14-27
14-28
14-30
14-31
Add a Placeholder . . . . . . . . . . . . . . . . . . . . . . . . . . . . . . .
Change the Style for a Table . . . . . . . . . . . . . . . . . . . . . . .
14-32
14-35
Access PowerPoint Template Elements . . . . . . . . . . . . . . .
PPT API Applications and PowerPoint Templates . . . . . . . .
Template Elements . . . . . . . . . . . . . . . . . . . . . . . . . . . . . . .
Get Slide Master Names . . . . . . . . . . . . . . . . . . . . . . . . . .
Get Slide Layout Names . . . . . . . . . . . . . . . . . . . . . . . . . .
Get Placeholder and Content Object Names . . . . . . . . . . .
Get Table Style Names . . . . . . . . . . . . . . . . . . . . . . . . . . .
14-37
14-5
14-5
14-39
14-40
14-41
14-42
Define a Style Using Format Objects . . . . . . . . . . . . . . . . .
14-45
Use Format Properties . . . . . . . . . . . . . . . . . . . . . . . . . . . . .
Dot Notation . . . . . . . . . . . . . . . . . . . . . . . . . . . . . . . . . . .
Get the Properties of an Object . . . . . . . . . . . . . . . . . . . . .
Set the Properties of an Object . . . . . . . . . . . . . . . . . . . . .
14-47
14-47
14-47
14-48
Update Presentation Content Programmatically . . . . . . .
Generate the Existing Presentation . . . . . . . . . . . . . . . . . .
Updates to the Presentation . . . . . . . . . . . . . . . . . . . . . . .
Set Up the Existing Presentation . . . . . . . . . . . . . . . . . . .
Import the PPT API Package . . . . . . . . . . . . . . . . . . . . . .
Create the Presentation Object . . . . . . . . . . . . . . . . . . .
Replace a Picture . . . . . . . . . . . . . . . . . . . . . . . . . . . . . . .
Replace Text with Links . . . . . . . . . . . . . . . . . . . . . . . . . .
Replace a Table . . . . . . . . . . . . . . . . . . . . . . . . . . . . . . . . .
Insert a New Slide . . . . . . . . . . . . . . . . . . . . . . . . . . . . . .
Generate and Open the Presentation . . . . . . . . . . . . . . . .
Code for myUpdatedPresentation . . . . . . . . . . . . . . . . .
14-50
14-50
14-52
14-54
14-55
14-55
14-55
14-56
14-56
14-57
14-57
14-58
Create a Presentation Programmatically . . . . . . . . . . . . . .
Set Up a Template . . . . . . . . . . . . . . . . . . . . . . . . . . . . . .
Import the PPT API Package . . . . . . . . . . . . . . . . . . . . . .
Create the Presentation Object . . . . . . . . . . . . . . . . . . .
Add a Presentation Title Slide . . . . . . . . . . . . . . . . . . . . .
Add a Slide with a Picture . . . . . . . . . . . . . . . . . . . . . . . .
Add a Slide with Text . . . . . . . . . . . . . . . . . . . . . . . . . . . .
Add a Slide with a Table . . . . . . . . . . . . . . . . . . . . . . . . . .
Generate and Open the Presentation . . . . . . . . . . . . . . . .
Code for myNewPPTPresentation . . . . . . . . . . . . . . . . . .
14-61
14-63
14-65
14-65
14-66
14-67
14-67
14-68
14-69
14-70
xix
xx
Contents
Add Slides . . . . . . . . . . . . . . . . . . . . . . . . . . . . . . . . . . . . . . . .
Specify the Order of a Slide . . . . . . . . . . . . . . . . . . . . . . .
Specify the Slide Master . . . . . . . . . . . . . . . . . . . . . . . . . .
14-73
14-73
14-75
Add and Replace Presentation Content . . . . . . . . . . . . . . .
Set Up the Template . . . . . . . . . . . . . . . . . . . . . . . . . . . . .
Replace Content . . . . . . . . . . . . . . . . . . . . . . . . . . . . . . . .
Add and Replace Text . . . . . . . . . . . . . . . . . . . . . . . . . . . .
Add or Replace a Table . . . . . . . . . . . . . . . . . . . . . . . . . . .
Add or Replace a Picture . . . . . . . . . . . . . . . . . . . . . . . . . .
14-76
14-76
14-77
14-77
14-80
14-81
Create and Format Text . . . . . . . . . . . . . . . . . . . . . . . . . . . .
Create Text . . . . . . . . . . . . . . . . . . . . . . . . . . . . . . . . . . . .
Create a Subscript or Superscript . . . . . . . . . . . . . . . . . . .
Format Text . . . . . . . . . . . . . . . . . . . . . . . . . . . . . . . . . . .
14-83
14-83
14-83
14-84
Create and Format Paragraphs . . . . . . . . . . . . . . . . . . . . . .
Create a Paragraph . . . . . . . . . . . . . . . . . . . . . . . . . . . . . .
Format Paragraph Content . . . . . . . . . . . . . . . . . . . . . . . .
14-86
14-86
14-86
Create and Format Tables . . . . . . . . . . . . . . . . . . . . . . . . . .
Create a Table . . . . . . . . . . . . . . . . . . . . . . . . . . . . . . . . . .
Format a Table . . . . . . . . . . . . . . . . . . . . . . . . . . . . . . . . .
14-89
14-89
14-89
Create and Format Pictures . . . . . . . . . . . . . . . . . . . . . . . . .
Create a Picture . . . . . . . . . . . . . . . . . . . . . . . . . . . . . . . .
Format a Picture . . . . . . . . . . . . . . . . . . . . . . . . . . . . . . . .
14-94
14-94
14-95
Create and Format Links . . . . . . . . . . . . . . . . . . . . . . . . . . .
Create an External Link . . . . . . . . . . . . . . . . . . . . . . . . . .
Format an External Link . . . . . . . . . . . . . . . . . . . . . . . . .
14-96
14-96
14-96
1
Getting Started
• “MATLAB Report Generator Product Description” on page 1-2
• “MATLAB Code and Results Presentation” on page 1-3
• “Report Creation Workflow” on page 1-4
• “How MATLAB Report Generator and MATLAB Software Interact” on page 1-6
• “Report Components” on page 1-7
• “Working with the Report Explorer” on page 1-8
• “Supported Report Formats” on page 1-11
1
Getting Started
MATLAB Report Generator Product Description
Design and generate reports from MATLAB applications
MATLAB Report Generator lets you create richly formatted Microsoft® Word, HTML, or
PDF reports that present results from your MATLAB programs and applications. You
can use the prebuilt, customizable Word and HTML templates to lay out and format
reports. You can also design and create reports based on your organization’s templates
and standards.
MATLAB Report Generator automatically captures results and figures across multiple
MATLAB functions and presents them within a single report.
Key Features
• Automated reporting from MATLAB
• Report formatting based on Word and HTML templates
• Report designer for creating custom Word, HTML, and PDF reports
• Selective report generation via logical control flow components, such as IF, THEN,
ELSE, and WHILE
• API for forms-based Word and HTML report generation
1-2
MATLAB Code and Results Presentation
MATLAB Code and Results Presentation
You can use the MATLAB Report Generator to create reports for sharing your MATLAB
code and presenting the results of the code.
In addition, MATLAB provides several methods for presenting MATLAB code and
results, including:
• MATLAB publish command
• MATLAB notebook command
MATLAB enables you to publish your MATLAB code quickly, so that you can describe
and share your code with others, even if they do not have MATLAB software. You can
publish in various formats, including HTML, XML, and LaTeX. If Microsoft Word or
Microsoft PowerPoint® applications are on your Microsoft Windows® system, you can
publish to their formats as well.
On Windows platform, you can use the notebook command to create a Microsoft Word
document that contains text, MATLAB commands, and the output from MATLAB
commands. The document is a record of an interactive MATLAB session annotated with
text or a document embedded with live MATLAB commands and output.
To compare the MATLAB tools for presenting MATLAB code and results and MATLAB
Report Generator, see “Options for Presenting Your Code”.
1-3
1
Getting Started
Report Creation Workflow
Approaches for Creating Reports
You can create and generate reports :
• Interactively, using the Report Explorer
• Programmatically, using the DOM (Document Object Model) API
You can use the Report Explorer graphical interface to create reports without having to
write code.
Using the programmatic approach, you can integrate report generation into analysis and
testing applications. For more information, see “Programmatic Report Creation”.
Interactive Report Generation
1
Open the Report Explorer.
2
Create a report setup file. For details about report setups, see “Report Setup”.
3
Add content by adding to the report setup file existing components or custom
components that you create. For details about using components, see “Working with
Components”.
4
Apply styles and standards to the report by choosing an existing stylesheet
or a custom stylesheet. For details on stylesheets and attributes, see “Layout
Stylesheets”.
5
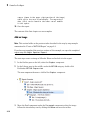
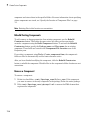
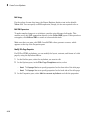
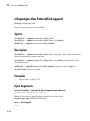
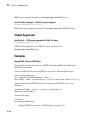
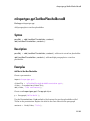
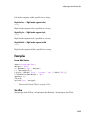
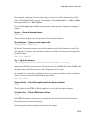
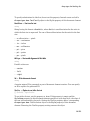
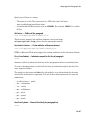
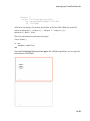
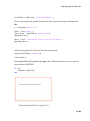
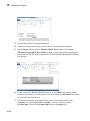
Generate the report. See “Generate Reports”.
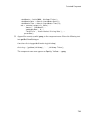
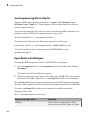
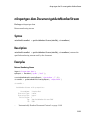
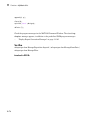
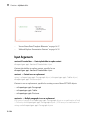
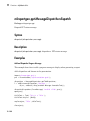
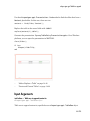
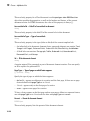
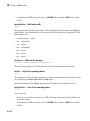
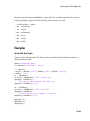
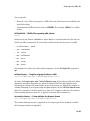
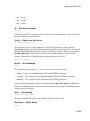
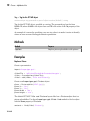
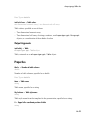
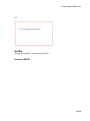
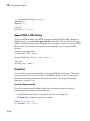
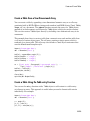
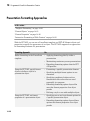
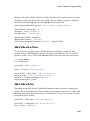
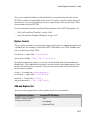
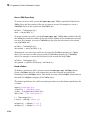
The following figure illustrates a typical MATLAB Report Generator workflow.
1-4
Report Creation Workflow
Report Generator
Generate
M-code
Open
Report
Explorer
(GUI)
Create
setup
file
Add
components
Apply
stylesheet
Generate
report
To practice using this report creation workflow, see “Working with Components”.
1-5
1
Getting Started
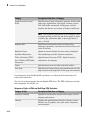
How MATLAB Report Generator and MATLAB Software Interact
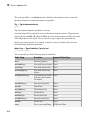
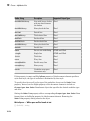
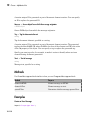
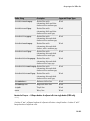
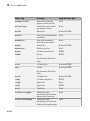
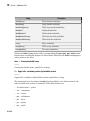
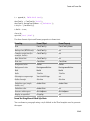
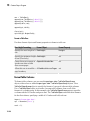
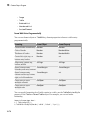
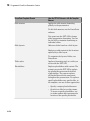
The MATLAB Report Generator and MATLAB software interact to create reports. You
can access the Report Explorer from the MATLAB command line.
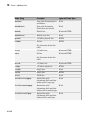
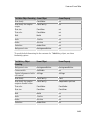
The following table summarizes these interactions.
User Interface
MATLAB Report Generator Interaction
Description
Report
Explorer
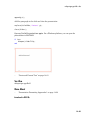
The Report Explorer provides
a graphical interface. For more
information, see “Working with the
Report Explorer” on page 1-8.
Use the Report Explorer to edit
existing report templates, components,
stylesheets, and attributes, or to
customize your own.
MATLAB
Enter commands at the MATLAB
command line command line to:
• Start the Report Explorer
• Create and modify report template
files
• Apply stylesheets
• Specify output formats for reports
• Generate reports
The following MATLAB commands work
with the MATLAB Report Generator
software:
• report — Start the Report Explorer.
• setedit — Edit a report template
with the Report Explorer.
• rptconvert — Convert a source
file created by the report generation
process to the desired output format.
• rptlist — List .rpt files in the
current path.
1-6
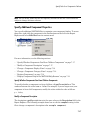
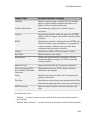
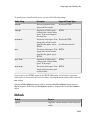
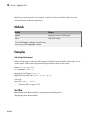
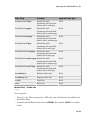
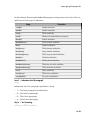
Report Components
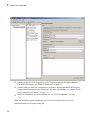
Report Components
Types of Report Components
Components are MATLAB objects that specify the content of a report. The MATLAB
Report Generator provides a set of components for specifying the types of content that
commonly occur in MATLAB-based reports. The Simulink® Report Generator provides
additional components to facilitate generation of reports from Simulink models. You can
also create custom components to handle content specific to your application.
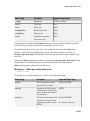
Using the Report Explorer, you can interactively combine components to create a report
setup (see “Report Setup”) that specifies the content of a particular report or type of
report. You can then run the setup from the Report Explorer or the MATLAB command
line to create instances of the report.
Use a combination of the following types of components in your report setup file, based on
the goals for the report.
Type of Component
Description
“Report Structure Components” on page
5-4
Include a title page, chapters, sections,
paragraphs, lists, tables, and other
standard document structure elements.
“Table Formatting Components” on page
5-5
Organize generated content into tables.
“Property Table Components” on page
5-6
Display tables with property name/
property value pairs for objects.
“Summary Table Components” on page
5-17
Display tables with specified properties for
objects.
“Logical and Looping Components” on page Run child components a specified number
5-21
of times. There are several looping
components, including logical loops and
Handle Graphics® loops.
Use the Report Explorer to add components to a report setup file and to specify
component properties.
1-7
1
Getting Started
Working with the Report Explorer
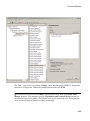
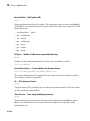
About the Report Explorer
Use the Report Explorer to:
• Create and modify report setup files.
• Apply stylesheets to format the generated report.
• Specify the report file format.
• Generate reports.
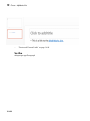
Open the Report Explorer using one of these approaches:
• From the MATLAB Toolstrip, in the Apps tab, in the Database Connectivity and
Reporting section, click Report Generator.
• In the MATLAB Command Window, enter report.
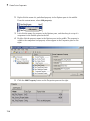
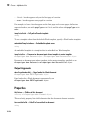
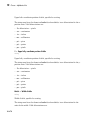
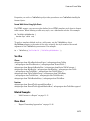
1-8
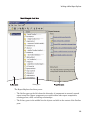
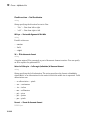
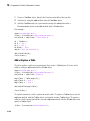
Working with the Report Explorer
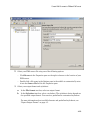
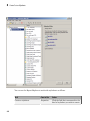
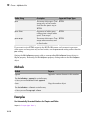
Library pane
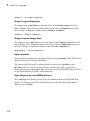
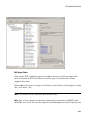
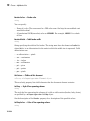
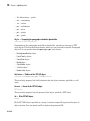
The Report Explorer has three panes:
• The Outline pane on the left shows the hierarchy of components in currently opened
report setup files. Report components can reside within other report components,
creating parent, child, and sibling relationships.
• The Library pane in the middle lists the objects available in the context of the Outline
pane.
1-9
1
Getting Started
Outline Pane Context
Library Pane Contents
No report setup file is open.
Reports
Report setup file is open.
Components
Stylesheet is open.
Stylesheet attributes
• The Properties pane contents depend on the Outline pane context. If no report setup
file is open, on the right displays tasks the Report Explorer can perform. If a report
setup file is open, the Properties pane displays the properties for the item that is
currently selected in the Options pane.
Outline Pane Context
Properties Pane Contents
No report setup file is open.
Tasks that the Report Explorer can
perform
Report setup file is open.
Properties for the item that is currently
selected
After you create a report setup file,
the Properties pane initially displays
properties for the report setup file as a
whole.
Tip If the Report Explorer window opens with only two panes, one of the panes is hidden.
You can move the vertical boundaries between the panes to reveal any hidden pane, or to
make visible panes wider or narrower.
1-10
Supported Report Formats
Supported Report Formats
When the report-generation process first creates a report, it generates a DocBook
XML source file. You can customize this XML as needed. For more information on
how to customize DocBook XML, see the OASIS™ DocBook TC Web page at http://
www.oasis-open.org/committees/docbook and the online version of DocBook: The
Definitive Guide by Norman Walsh and Leonard Muellner, with contributions from Bob
Stayton at http://www.docbook.org/tdg/en/html/docbook.html.
Next, the report-generation process converts the XML source to one of these userspecified report formats:
• Adobe® Acrobat® PDF
• Hypertext Markup Language (HTML)
• Microsoft Word (.doc)
• Rich Text Format (RTF)
Note: RTF reports use placeholders (field codes) for dynamically generated content,
such as page numbers or images.
On Windows platforms, to display that content, press Ctrl+A, and then press F9.
On Linux® and Mac platforms, use the field code update interface for the program
that you are using to view the RTF document.
Limitations for Report Formats
PDF reports only support bitmap (.bmp), jpeg (.jpg), and Scalable Vector Graphics
(.svg). The SVG format is only supported for Simulink models and Stateflow® charts.
For reports that use the Word Document format, you must have Microsoft Word
software installed on the machine that you use to generate the report.
1-11
2
Create Your First Report
• “Create a MATLAB Report” on page 2-2
• “Create a Report Setup File” on page 2-3
• “Add Report Content Using Components” on page 2-5
• “Generate a Report” on page 2-39
2
Create Your First Report
Create a MATLAB Report
This example shows how to create a report that explains and illustrates magic squares –
matrices whose columns, rows, and diagonals each add up to the same number (see the
magic function reference in the MATLAB documentation).
To create this report, you perform these main tasks:
• “Create a Report Setup File” on page 2-3
• “Add Report Content Using Components” on page 2-5
Note: You do not need to know the MATLAB software to use this example. However,
knowledge of MATLAB is helpful for understanding the MATLAB code that executes
during report generation.
This example includes separate sections for different kinds of report creation and
generation tasks. Each section builds on the previous sections. However, if you want to
work through a later section without having done the previous sections, you can view the
completed report setup file: Magic Squares Report.
2-2
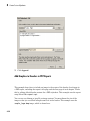
Create a Report Setup File
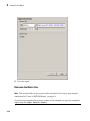
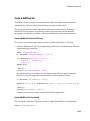
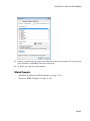
Create a Report Setup File
To set up the magic squares report, first create a setup file to store the setup. Then add
MATLAB objects, called components, to the setup to specify the report content.
To create the report setup file:
1
Start a MATLAB software session.
2
Open the Report Explorer. From the MATLAB Toolstrip, in the Apps tab, in the
Database Connectivity and Reporting section, click Report Generator.
3
Select File > New to create a report setup file. The new report setup has the default
name Unnamed.rpt.
4
In the Properties pane on the right:
a
To save the report in the current working folder, select Present working
directory from the Directory list.
b
Set File format to web (HTML) to create the report as an HTML file.
c
In the Report description text box, replace the existing text with the following
text.
Tip Copy and paste this text from the HTML documentation into the Report
Explorer.
This report creates a series of magic squares
and displays them as images.
A magic square is a matrix in which the
columns, rows, and diagonal all add up to the
same number.
Note: When you change a Properties pane field, its background color changes. This
indicates that there are unapplied changes to that field. As soon as you perform any
action with another component, MATLAB Report Generator applies the changes, and
the background color becomes white again.
5
Save your report. Select File > Save As and name your report setup file
magic_squares.rpt.
2-3
2
Create Your First Report
The new file name appears in the Outline pane.
To create the content for the report, see “Add Report Content Using Components” on
page 2-5.
2-4
Add Report Content Using Components
Add Report Content Using Components
In this section...
“Report Components” on page 2-5
“Specify Report Variables” on page 2-7
“Create a Title Page” on page 2-9
“Add a Chapter” on page 2-12
“Add Introductory Text to the First Chapter” on page 2-14
“Add an Image” on page 2-16
“Create the Magic Squares and Their Images” on page 2-21
“Create a For Loop” on page 2-22
“Add a Chapter for Each Square” on page 2-24
“Determine the Matrix Size” on page 2-26
“Insert the Magic Square Size into the Report” on page 2-28
“Create the Magic Square” on page 2-29
“Add Display Logic” on page 2-32
“Display the Magic Square” on page 2-34
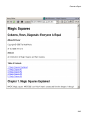
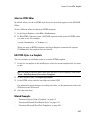
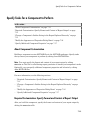
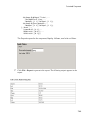
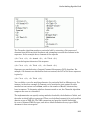
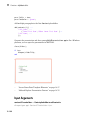
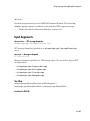
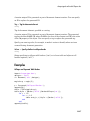
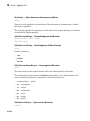
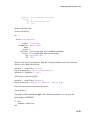
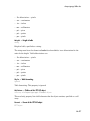
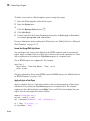
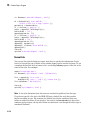
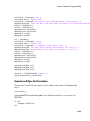
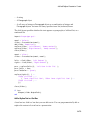
Report Components
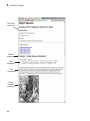
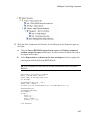
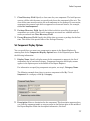
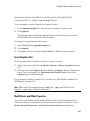
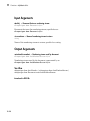
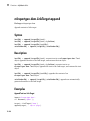
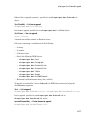
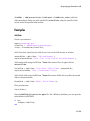
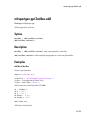
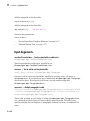
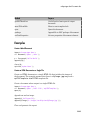
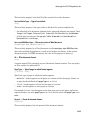
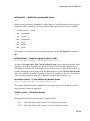
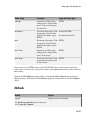
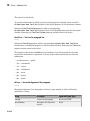
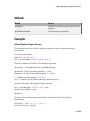
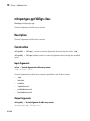
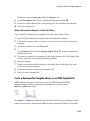
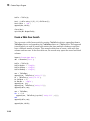
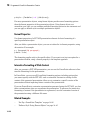
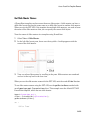
Report components specify the information to include in the report. The following figure
shows a sample page from the report that you create in this example, highlighting
components that you use to produce the report.
2-5
2
Create Your First Report
Title Page
component
Chapter
component
Text
component
Text
component
Figure
Snapshot
component
2-6
Add Report Content Using Components
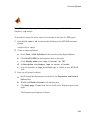
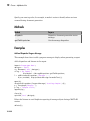
Specify Report Variables
The magic squares report uses variables defined in the MATLAB workspace to specify
the number and sizes of squares to display and whether to display the variables as tables
of numbers or images of color-coded squares:
• The magicSizeVector variable specifies an array of magic square sizes
• largestDisplayedArray variable specifies the size of the largest magic square to be
displayed as an array of numbers
You could require that a user create these variables in the MATLAB workspace before
running the report. However, a better solution is to let the report itself create the
variables, using the Evaluate MATLAB Expression component.
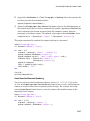
To use the Evaluate MATLAB Expression component to define the report variables.
1
In the Outline pane on the left, select the root component of the report setup.
2
In the Library pane in the middle, under the MATLAB category, select Evaluate
MATLAB Expression.
3
In the Properties pane on the right, click the icon next to Add component to
current report to insert the Evaluate MATLAB Expression component into the
report.
You cannot edit the component information in the Properties pane until you have
added the component to the report.
In the Outline pane, the Eval component appears under the magic_squares report.
2-7
2
Create Your First Report
The icon in the upper left corner of the Eval component indicates that this
component cannot have child components. By default, any components you add with
the Eval component selected are siblings to this component.
The options for the Evaluate MATLAB Expression component appear in the
Properties pane.
4
To exclude the MATLAB code details and its output in this report, clear the Insert
MATLAB expression in report and Display command window output in
report check boxes.
5
In the Expression to evaluate in the base workspace text box, replace the
existing text with the following MATLAB code.
Tip Copy and paste this text from the HTML documentation into the Report
Explorer.
2-8
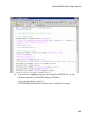
Add Report Content Using Components
%This MATLAB code sets up two variables
%that define how the report runs.
%magicSizeVector is a list of MxM
%Magic Square sizes to insert into
%the report. Note that magic
%squares cannot be 2x2.
magicSizeVector=[4 8 16 32];
%largestDisplayedArray sets the
%limit of array size that will be
%inserted into the report with the
%Insert Variable component.
largestDisplayedArray=15;
6
In the Evaluate this expression if there is an error text box, replace the existing
text with the following text.
disp(['Error during eval: ', evalException.message])
This causes an error to display if the MATLAB code fails.
Tip To execute these commands immediately, in the top right corner of the Report
Explorer, click the Eval Now button. This confirms that your commands are correct,
to reduce the chances of report generation problems.
7
Save the report. Select File > Save.
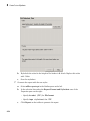
Create a Title Page
Note: This section builds on the previous tasks described in the step-by-step example
summarized in “Create a MATLAB Report” on page 2-2.
If you have not completed the previous sections of this example, see open the completed
report setup file: Magic Squares Report.
To create a title page for the report, use the Title Page component.
2-9
2
Create Your First Report
1
In the Outline pane on the left, select the Eval component.
2
In the Options pane in the middle, under the Formatting category, double-click
Title Page to add the component to the report.
Because the Eval component icon indicates that this component cannot have
children, the Title Page component is a sibling of the Eval component. Likewise,
the Title Page component also cannot have child components.
Note: To use a Title Page component, you need to have a Chapter component in your
report. You have not yet added a Chapter component, so the Properties pane displays
a message indicating that a chapters is required for the Title Page component to
appear correctly. Because later in this example you add Chapter components to this
report, you can ignore that message.
3
2-10
In the Properties pane on the right, use the Main tab to enter the following title
page information.
Add Report Content Using Components
a
In the Title text box, enter Magic Squares.
b
In the Subtitle text box, enter Columns, Rows, Diagonals: Everyone is
Equal.
c
Under Options, choose Custom author from the selection list.
d
In the field to the right of the Custom author field, enter Albrecht Durer.
Albrecht Dürer created an etching that contains a magic square. Your final
report includes an image of that etching.
4
e
Select the Include copyright holder and year check box.
f
In the next text box, enter The MathWorks.
g
In the second text box, enter 1988.
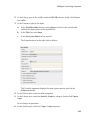
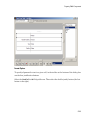
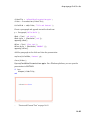
In the Properties pane, click the Abstract tab and then enter the following text:
An introduction to Magic Squares and their meaning.
2-11
2
Create Your First Report
The pane should look as follows:
5
Save the report.
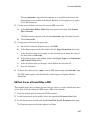
Add a Chapter
Note: This section builds on the previous tasks described in the step-by-step example
summarized in “Create a MATLAB Report” on page 2-2.
2-12
Add Report Content Using Components
If you have not completed the previous sections of this example, see open the completed
report setup file: Magic Squares Report.
Add a chapter to the report by using the Chapter/Subsection component.
1
In the Outline pane on the left, select the Title Page component.
2
In the Library pane in the middle, under the Formatting category, double-click
Chapter/Subsection.
The Outline pane looks as follows.
The Eval, Title Page, and Chapter components are all child components of the
report's top level, and are siblings of one another.
The Chapter component can have child components. The next section explains how
to add child components to this Chapter component.
3
For the custom chapter title, in the Properties pane on the right, enter Magic
Squares Explained.
The Outline pane changes to reflect the chapter title.
4
Save the report.
2-13
2
Create Your First Report
Add Introductory Text to the First Chapter
Note: This section builds on the previous tasks described in the step-by-step example
summarized in “Create a MATLAB Report” on page 2-2.
If you have not completed the previous sections of this example, see open the completed
report setup file: Magic Squares Report.
Include introductory text in the first chapter by adding the Paragraph and Text
components.
1
In the Outline pane on the left, select the Chapter component.
2
In the Library pane in the middle, under the Formatting category, double-click
Paragraph.
In the Outline pane, the new component appears as a child of the Chapter
component.
2-14
Add Report Content Using Components
3
By default, the Paragraph component inherits its text from its child components.
Add two Text components.
Note: The Text component must have the Paragraph component as its parent.
4
In the Library pane, under the Formatting category, double-click Text.
5
Double-click Text again to add a second component.
The Outline pane looks as follows.
6
In the Outline pane, select the first Text component.
7
In the Text to include in report text box, enter %<help('magic')>.
The % sign and angle brackets <> indicate to the MATLAB Report Generator
software that this is MATLAB code to evaluate. The command help('magic')
displays information about the MATLAB magic function.
8
In the Outline pane, select the second Text component.
9
In the Text to include in report text box, enter the following text.
Tip Copy and paste this text from the HTML documentation into the Report
Explorer.
The German artist Albrecht Durer (1471-1528)
created many woodcuts and prints with religious
and scientific symbolism. One of his most famous
works, Melancholia I, explores the depressed state
of mind that opposes inspiration and expression.
Renaissance astrologers believed that the Jupiter magic
2-15
2
Create Your First Report
square (shown in the upper right portion of the image)
could aid in the cure of melancholy. The engraving's
date (1514) can be found in the lower row of numbers
in the square.
10 Save the report.
The contents of the first chapter are now complete.
Add an Image
Note: This section builds on the previous tasks described in the step-by-step example
summarized in “Create a MATLAB Report” on page 2-2.
If you have not completed the previous sections of this example, see open the completed
report setup file: Magic Squares Report.
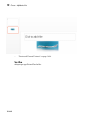
The next steps create an image of Albrecht Dürer and include it in the report.
1
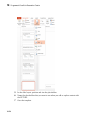
In the Outline pane on the left, select the Chapter component.
2
In the Library pane in the middle, under the MATLAB category, double-click
Evaluate MATLAB Expression.
The new component becomes a child of the Chapter component.
3
2-16
Move the Eval component under the Paragraph component so that the image
follows the introductory text by clicking the down arrow on the toolbar.
Add Report Content Using Components
4
With the Eval component still selected, do the following in the Properties pane on
the right:
a
Clear the Insert MATLAB expression in report and Display command
window output in report check boxes. You do not want to include the code or
its output in the report.
b
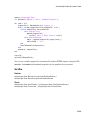
In the Expression to evaluate in the base workspace text box, replace the
existing text with the following MATLAB code.
Tip Copy and paste this text from the HTML documentation into the Report
Explorer.
%This loads a self-portrait of Albrecht
%Durer, a German artist. There is a
%magic square in the upper right corner
%of the image.
durerData=load('durer.mat','-mat');
figure('Units','Pixels',...
'Position',[200 200 size(durerData.X,2)*.5 size(durerData.X,1)*.5 ]);
image(durerData.X);
colormap(durerData.map);
axis('image');
set(gca,...
'Xtick',[],...
'Ytick',[],...
'Units','normal',...
'Position',[0 0 1 1]);
clear durerData
2-17
2
Create Your First Report
This MATLAB code displays the Dürer etching in a MATLAB figure window.
c
In the Evaluate expression if there is an error text box, replace the existing
text with the following text:
disp(['Error during eval: ', evalException.message])
This code executes if an error occurs while loading the Dürer etching.
The Properties pane on the right looks as follows.
2-18
Add Report Content Using Components
5
In the Outline pane on the left, select the Eval component.
6
In the Library pane in the middle, under the Handle Graphics category, doubleclick Figure Snapshot.
2-19
2
Create Your First Report
To inline an image component (such as Image or Figure Snapshot), include it within
a Paragraph component.
7
In the Properties pane:
a
In the Paper orientation list, select Portrait.
b
In the Invert hardcopy list, select Don't invert.
Selecting this option specifies not to change the image's on-screen colors for
printing.
2-20
Add Report Content Using Components
The next three steps set up the report to delete the image from the MATLAB
workspace after the image has been added to the report.
8
In the Outline pane, select the Figure Snapshot component.
9
In the Library pane, under the MATLAB category, double-click Evaluate MATLAB
Expression.
10 In the Properties pane:
a
Clear the Insert MATLAB expression in report and Display command
window output in report check boxes. You do not want to include the code or
its output in the report.
b
In the Expression to evaluate in the base workspace text box, replace the
existing text with the following text:
%This command deletes the Durer image
delete(gcf);
The delete(gcf) command deletes the current image in the MATLAB
workspace, in this case, the Dürer etching.
c
In the Evaluate expression if there is an error text box, replace the existing
text with the following text:
disp(['Error during eval: ', evalException.message])
This code executes if an error occurs while deleting the Dürer etching.
11 Save the report.
Create the Magic Squares and Their Images
In the next steps, you add a chapter to the report for each magic square specified by
the magicSizeVector report variable. You use a For Loop component to perform this
essentially repetitive task. To create the magic squares and their images, you perform
these tasks:
• “Create a For Loop” on page 2-22
• “Add a Chapter for Each Square” on page 2-24
• “Determine the Matrix Size” on page 2-26
• “Insert the Magic Square Size into the Report” on page 2-28
2-21
2
Create Your First Report
• “Create the Magic Square” on page 2-29
• “Add Display Logic” on page 2-32
• “Display the Magic Square” on page 2-34
Create a For Loop
Note: This section builds on the previous tasks described in the step-by-step example
summarized in “Create a MATLAB Report” on page 2-2.
If you have not completed the previous sections of this example, see open the completed
report setup file: Magic Squares Report.
1
In the Outline pane on the left, select the Chapter component.
2
In the Library pane in the middle, under the Logical and Flow Control
category, double-click For Loop.
The Outline pane looks as follows.
2-22
Add Report Content Using Components
This For Loop component appears inside the Chapter component. However, the
magic squares should be processed after the first chapter, so the for component
should be a sibling of the Chapter component, not a child.
3
In the Outline pane, select the for component.
4
Click the left arrow to make the for component a sibling, not a child, of the
Chapter component.
5
In the Properties pane on the right:
2-23
2
Create Your First Report
a
In the End text box, replace the existing text with the following text:
length(magicSizeVector)
This is the length of the vector that contains the various sizes for the magic
square matrices.
b
In the Variable name text box, replace the existing text with the following text:
MAGIC_SQUARE_INDEX
This variable acts as a loop index.
The Outline pane looks as follows.
6
Save the report.
Add a Chapter for Each Square
Note: This section builds on the previous tasks described in the step-by-step example
summarized in “Create a MATLAB Report” on page 2-2.
If you have not completed the previous sections of this example, see open the completed
report setup file: Magic Squares Report.
2-24
Add Report Content Using Components
Next create a chapter for each square by adding a Chapter component to the report as a
child of the For Loop component. This causes the Report Generator to create a chapter on
each iteration of the For Loop during report generation.
1
In the Outline pane on the left, select the for component.
2
In the Library pane in the middle, under the Formatting category, double-click
Chapter/Subsection.
It becomes a child of the for component.
3
In the Properties pane on the right, select Custom from the Title list and enter the
following for the chapter title:
Magic Square # %<MAGIC_SQUARE_INDEX>
The Properties pane looks as follows.
2-25
2
Create Your First Report
4
Save the report.
Determine the Matrix Size
Note: This section builds on the previous tasks described in the step-by-step example
summarized in “Create a MATLAB Report” on page 2-2.
If you have not completed the previous sections of this example, see open the completed
report setup file: Magic Squares Report.
2-26
Add Report Content Using Components
Extract the size of each magic square matrix from magicSizeVector using an Evaluate
MATLAB Expression component.
1
In the Outline pane on the left, select the bottom Chapter component.
2
In the Library pane in the middle, under the MATLAB category, double-click
Evaluate MATLAB Expression.
3
In the Properties pane on the right:
a
Clear the Insert MATLAB expression in report and Display command
window output in report check boxes.
b
In the Expression to evaluate in the base workspace text box, replace the
existing text with the following text:
magic_Square_Size=magicSizeVector(MAGIC_SQUARE_INDEX);
This command extracts the next size for the magic square from the vector
of sizes initialized in the first Eval component of the report. The variable
magic_Square_Size represents the size of the current magic square being
processed.
c
In the Evaluate expression if there is an error text box, replace the existing
text with the following:
disp(['Error during eval: ', evalException.message])
This code executes if an error occurs while attempting to extract a value from
magicSizeVector.
The Outline pane looks as follows.
2-27
2
Create Your First Report
4
Save the report.
Insert the Magic Square Size into the Report
Note: This section builds on the previous tasks described in the step-by-step example
summarized in “Create a MATLAB Report” on page 2-2.
If you have not completed the previous sections of this example, see open the completed
report setup file: Magic Squares Report.
Insert the size of the magic square into the report using the Paragraph and Insert
Variable components.
1
In the Outline pane on the left, select the bottom Eval component.
2
In the Library pane in the middle, under the Formatting category, double-click
Paragraph.
Do not change the properties. The variable that contains the size of the magic square
goes in this paragraph.
3
2-28
In the Outline pane, select the Paragraph component (below the for component).
Add Report Content Using Components
4
In the Library pane, under the MATLAB category, double-click Insert Variable.
5
In the Properties pane on the right:
a
In the Variable name text box, enter magic_Square_Size.
b
In the Display as list, select Inline text.
The Outline pane looks as follows.
6
Save the report.
Create the Magic Square
Note: This section builds on the previous tasks described in the step-by-step example
summarized in “Create a MATLAB Report” on page 2-2.
If you have not completed the previous sections of this example, see open the completed
report setup file: Magic Squares Report.
2-29
2
Create Your First Report
To create the magic square and display the associated matrix or image, use the Evaluate
MATLAB Expression component.
1
In the Outline pane on the left, select the bottom Paragraph component.
2
In the Library pane in the middle, under the MATLAB category, double-click
Evaluate MATLAB Expression.
Make this component a sibling of the Paragraph component, not a child, as
described in the next two steps.
3
In the Outline pane, select the Eval component.
4
Click the left arrow on the toolbar to make the Eval component a sibling of the
previous Paragraph component.
5
In the Properties pane on the right:
a
Clear the Insert MATLAB expression in report and Display command
window output in report check boxes.
b
In the Expression to evaluate in the base workspace text box, replace the
existing text with the following MATLAB code.
Tip Copy and paste this text from the HTML documentation into the Report
Explorer.
%This MATLAB script produces a magic
%square of size magic_Square_Size
%and creates an image of that square.
mySquare=magic(magic_Square_Size);
clf
imagesc(mySquare);
title(sprintf('Magic Square N=%i',magic_Square_Size))
set(gca,'Ydir','normal');
axis equal;
axis tight;
This code creates a magic square matrix mySquare of size
magic_Square_Size, and opens an image of that matrix in the MATLAB
figure window.
2-30
Add Report Content Using Components
c
In the Evaluate expression if there is an error text box, replace the existing
text with the following:
disp(['Error during eval: ', evalException.message])
This code executes if an error occurs while creating and displaying the magic
square.
The Properties pane looks as follows.
6
Save the report.
2-31
2
Create Your First Report
Add Display Logic
Note: This section builds on the previous tasks described in the step-by-step example
summarized in “Create a MATLAB Report” on page 2-2.
If you have not completed the previous sections of this example, see open the completed
report setup file: Magic Squares Report.
Use Logical If, Logical Then, and Logical Else components to determine whether to
display the magic square as an array of numbers or as an image.
2-32
1
In the Outline pane on the left, select the Eval component.
2
On the Library pane in the middle, under the Logical and Flow Control
category, double-click Logical If.
3
On the Properties pane on the right, in the Test Expression text box, replace the
existing text with the following text:
Add Report Content Using Components
magic_Square_Size<=largestDisplayedArray
This command tests whether the current matrix size (magic_Square_Size) is
less than or equal to the value assigned in the first Eval component of the report
(largestDisplayedArray=15).
To process the result of this Logical If component, create two child components
—Logical Then and Logical Else. If magic_Square_Size is less than or equal
to 15, the matrix variable appears in the report. If magic_Square_Size is greater
than 15, the matrix image appears in the report.
4
On the Outline pane, select the if component.
5
On the Library pane, under Logical and Flow Control, double-click Logical
Else.
6
On the Outline pane, select the if component again.
2-33
2
Create Your First Report
7
On the Library pane, under Logical and Flow Control, double-click Logical
Then.
The then component appears above the else component.
8
Save the report.
Display the Magic Square
Note: This section builds on the step-by-step example presented in “Create a MATLAB
Report” on page 2-2.
To see the completed report setup file, open Magic Squares Report.
1
2-34
In the Outline pane on the left, select the then component.
Add Report Content Using Components
2
In the Library pane in the middle, under the MATLAB category, double-click Insert
Variable.
3
In the Properties pane on the right:
a
In the Variable name text box, enter mySquare, which is the variable that
contains the magic square of the specified size.
b
In the Title list, select None.
c
In the Array size limit text box, enter 0.
The Properties pane on the right looks as follows.
This Variable component displays the magic square matrix, stored in the
mySquare variable.
4
In the Outline pane, select the else component.
5
In the Library pane, under the Handle Graphics category, double-click Figure
Loop.
Do not change its properties.
6
In the Outline pane, select the Figure Loop component.
2-35
2
Create Your First Report
7
In the Library pane, under the Handle Graphics category, double-click Figure
Snapshot.
8
In the Properties pane:
a
In the Paper orientation list, select Portrait.
b
In the Image size list, select Custom.
c
Under the Image size list, enter [5 4] for the custom image size.
d
In the Invert hardcopy list, select Invert.
This option changes dark axes colors to light axes colors, and vice versa.
The Properties pane on the right looks as follows.
2-36
Add Report Content Using Components
The Outline pane looks like the following.
2-37
2
Create Your First Report
9
2-38
Save the report.
Generate a Report
Generate a Report
Note: This section builds on the step-by-step example presented in “Create a MATLAB
Report” on page 2-2.
To see the completed report setup file, open Magic Squares Report.
Now the report contains all the components it needs.
On the toolbar, click the Report icon to generate the report. The following dialog box
appears.
1
A Message List window appears, displaying informational and error messages as the
report processes. While the report generates, specify the level of detail you would like
the Message List window to display. Options range from 0 (least detail) to 6 (most
detail). Click the list located under the title bar of the Message List window to choose
an option, as shown here.
Message level 3 (Important messages) is used for the remainder of this example.
2-39
2
Create Your First Report
2
An image of the etching appears briefly.
3
Images of two magic square images of sizes 16 and 32 appear briefly.
4
In the Outline pane on the left of your Report Explorer window, each component of
the report setup file is highlighted as it is executed.
At the beginning of this example you specified HTML as the output format of this report.
When processing finishes, the MATLAB Web browser opens and displays the report's
HTML file.
2-40
Generate a Report
2-41
3
Set Up a Report
• “Report Setups” on page 3-2
• “Create a New Setup File” on page 3-4
• “Open a Report Setup” on page 3-6
• “Close a Report Setup” on page 3-8
• “Save a Report Setup” on page 3-9
• “Load Report Setup into MATLAB Workspace” on page 3-10
• “Insert Components” on page 3-11
• “Set Component Properties” on page 3-12
• “Move Components” on page 3-13
• “Delete Components” on page 3-15
• “Deactivate Components” on page 3-16
• “Send Components to the MATLAB Workspace” on page 3-17
3
Set Up a Report
Report Setups
In this section...
“Setup Hierarchy” on page 3-2
“Setup Files” on page 3-2
“Create a Report Setup” on page 3-3
A report setup is a set of MATLAB objects, called components, that specifies the content
and form of a report.
The MATLAB Report Generator provides a setup editor, called the Report Explorer, that
you use to create and edit report setups.
Once you create a setup, you can generate a report from it, using the Report Explorer or
MATLAB commands.
Setup Hierarchy
A report setup has a hierarchical structure that generally mirrors the structure of the
type of report that it defines.
For example, a report typically has a title page and one or more chapters. Each chapter
contains one or more sections, each of which contains one or more paragraphs, figures,
tables, lists, etc. A report setup typically comprises components that correspond to these
structural elements of a report.
In a report setup, child-parent relationships among the components correspond to the
containment relationships among the structural elements of the report. In particular,
all setups contain a root component that serves as the ancestor for all other components
in the setup. The root component also specifies the setup name and report generation
options, such as the document type of the generated report (for example, HTML or PDF)
and the path for the generated report. The root component typically parents a title page
component and one or more chapter components that in turn parent one or more section
components that parent one or more paragraph, figure, table, and list components.
Setup Files
The report generator stores setups in files called setup files. The name of a setup
file consists of the name of the setup that it stores followed by the file extension
3-2
Report Setups
.rpt. For example, the name of the setup file for a setup named myreport would be
myreport.rpt.
Create a Report Setup
To create a report setup:
• Create a new setup file.
• Insert components to define the content and format of the report.
• Set component properties.
• Save the setup.
Once you create a template, you can execute it to generate an instance of the type of
report that it defines.
3-3
3
Set Up a Report
Create a New Setup File
In this section...
“Create Setup File Using the Report Explorer” on page 3-4
“Create Setup File Programmatically” on page 3-4
“Working with Setup Files” on page 3-4
Create a new setup file either interactively from the Report Explorer or
programmatically.
Create Setup File Using the Report Explorer
1
If the Report Explorer is not already open, from the MATLAB Toolstrip, in the
Apps tab, in the Database Connectivity and Reporting section, click Report
Generator.
2
In the Report Explorer, use one of these approaches:
• Select File > New.
• On the Report Explorer toolbar, click the new template button.
The Outline pane displays a new setup named Unnamed, as a child of the Report
Generator node.
Create Setup File Programmatically
To create a setup file programmatically (from the MATLAB command line), use the
setedit command. For example, assuming a setup named myreport does not already
exist in the current directory, use the following command:
setedit myreport.rpt
Working with Setup Files
For details about performing operations on report setup files, see:
• “Open a Report Setup” on page 3-6
• “Close a Report Setup” on page 3-8
3-4
Create a New Setup File
• “Save a Report Setup” on page 3-9
3-5
3
Set Up a Report
Open a Report Setup
In this section...
“Opening a Setup on the MATLAB Path” on page 3-6
“Opening a Setup Not on the MATLAB Path” on page 3-7
“Opening a Setup Programmatically” on page 3-7
To make changes to a saved report setup, you must open its setup file. Open a report
setup either interactively from the Report Explorer or programmatically.
Opening a Setup on the MATLAB Path
Tip Use the setedit command to obtain a list of all the report setups on the MATLAB
path.
To open a setup that resides on the MATLAB path:
1
If the Report Explorer is not already open, from the MATLAB Toolstrip, in the
Apps tab, in the Database Connectivity and Reporting section, click Report
Generator.
2
In the Report Explorer, in the Outline pane on the left, select the Report
Generator node.
The Library pane in the middle displays a list of all the setup files that exist on the
MATLAB path.
3
In the Library pane, select the setup file that you want to open.
The setup properties dialog box appears in the Properties pane on the right.
4
To open the setup, in the Report Explorer use one of these approaches:
• On the Properties pane, click the Open report button.
• On the Library pane, double-click the entry for the setup.
• On the Library pane, from the context menu for the setup, select Open report.
The setup appears in the Outline pane as a child of the Report Generator node.
3-6
Open a Report Setup
Opening a Setup Not on the MATLAB Path
Tip Use the setedit command to obtain a list of all the report setups on the MATLAB
path.
To open a setup that resides off the MATLAB path:
1
If the Report Explorer is not already open, from the MATLAB Toolstrip, in the
Apps tab, in the Database Connectivity and Reporting section, click Report
Generator..
2
In the Report Explorer, select File > Open or select the file open button on the
Report Explorer toolbar.
A file browser opens.
3
Use the file browser to find the report setup in your file system and enter the setup
name in the file browser File name field.
4
Select the file browser Open button.
The setup appears in the Outline pane as a child of the Report Generator node.
Opening a Setup Programmatically
To open a report programmatically, use the setedit command. For example, the
following command opens the simple-report.rpt example that comes with the
MATLAB Report Generator.
setedit simple-report
This command opens the Report Explorer, if it is not already open, and opens the
simple-rpt setup in the Report Explorer.
Tip If a setup exists on the MATLAB path, you do not need to specify its full path when
using the setedit command. Use the setedit command to obtain a list of all the report
setups on the MATLAB path.
The newly opened report appears in the Outline pane as a child of the Report
Generator node.
3-7
3
Set Up a Report
Close a Report Setup
In this section...
“Close a Setup Using the Report Explorer” on page 3-8
“Close a Setup Programmatically” on page 3-8
Closing a setup removes the setup from the Report Explorer and from memory.
Close a Setup Using the Report Explorer
1
In the Report Explorer, in the Outline pane, select the setup root node.
2
In Report Explorer, use one of these approaches:
• Click the Delete button.
• Select File > Close.
• From the context menu of the root node of the setup file, select Close.
Close a Setup Programmatically
You can close a report that you have previously opened. For example, the following code
opens a setup and then closes it.
setup('simple-report.rpt');
root = RptgenML.Root;
root.closeReport('simple-report');
3-8
Save a Report Setup
Save a Report Setup
In this section...
“Save a Setup Under Its Existing Name” on page 3-9
“Save a Setup Under a New Name” on page 3-9
Save a Setup Under Its Existing Name
1
In the Report Explorer, in the Outline pane, select the setup root node.
2
In Report Explorer, use one of these approaches:
• Click the Save button.
• Select File > Save.
• From the context menu of the root node of the setup file, select Save.
Save a Setup Under a New Name
1
In the Report Explorer, in the Outline pane, select the setup root node.
2
Select File > Save As.
A file browser opens.
3
Use the file browser to select a new path for the setup.
4
In the file browser, click Save.
3-9
3
Set Up a Report
Load Report Setup into MATLAB Workspace
To load a setup into the MATLAB workspace without loading it into the Report Explorer,
use the rptgen.loadRpt function.
You can then modify the setup programmatically. For example, the following code loads a
setup into memory, sets its output type to PDF, and generates a report.
setupRoot = rptgen.loadRpt('simple-report');
setupRoot.Format = 'pdf-fop';
setupRoot.execute;
3-10
Insert Components
Insert Components
In this section...
“Point-and-Click Method” on page 3-11
“Drag-and-Drop Method” on page 3-11
“Fix Context Violations” on page 3-11
Point-and-Click Method
1
In the Report Explorer, in the Outline pane, select the parent node of the component
to be inserted. For example, if you are inserting a paragraph into a section, select the
section that will contain the paragraph.
2
In the Library pane, select the type of component that you want to insert in the
report setup.
3
In the Properties pane, select the Add component to current report button.
Drag-and-Drop Method
1
In the Report Explorer, in the Library pane, select the type of component that you
want to insert in the setup.
2
Drag the component from the Library pane into the Outline pane and drop it onto
the parent of the component to be created.
Fix Context Violations
The Report Explorer allows you to insert components into invalid contexts.
For example, a Chapter/Subsection component is a valid parent for a Paragraph
component, but not vice-versa. Nevertheless, the Report Explorer allows you to insert
a Chapter/Subsection as a child of a Paragraph. If you insert a component in an invalid
context, the Report Explorer displays a warning.
Although you can create an invalid setup hierarchy, you cannot generate a report from
an invalid hierarchy. You must fix the context violations first. For example, move
components from invalid contexts to valid contexts (see “Move Components” on page
3-13).
3-11
3
Set Up a Report
Set Component Properties
In this section...
“Edit Component Property Values” on page 3-12
“Computed Property Values” on page 3-12
Edit Component Property Values
Most components have properties that you can set to select optional features. For
example, the Text component lets you specify the color of the text that it generates
among other properties.
To set component properties:
1
In the Report Explorer, in the Outline pane, select the component.
The Properties dialog box for the component appears in the Properties pane.
2
Use the Properties dialog box to set component properties.
Computed Property Values
During report generation, the Report Generator can compute the values of component
properties, using MATLAB expressions that you specify. This enables dynamic creation
of report content. For example, you can use MATLAB expressions to compute the content
of Paragraph components and the value of looping components that generate repeated
content.
You can use MATLAB expressions to compute the value of any string property of a
component. A string property is a property whose value is a string of text. To specify
a MATLAB expression as a string property value, in the Properties dialog box, in the
property edit box, enter %<expr>, where expr is a MATLAB expression that evaluates to
a string.
3-12
Move Components
Move Components
In this section...
“Point-and-Click Method” on page 3-13
“Drag-and-Drop Method” on page 3-14
Point-and-Click Method
1
In the Report Explorer, in the Outline pane, select the component that you want to
move.
2
Reposition the component in the setup hierarchy, using one of these approaches:
• On the Report Explorer toolbar, use the move buttons.
• From the Edit menu, use the move commands.
• From the context menu of the component, use the move commands.
Note: The move buttons and commands are enabled only if they are valid in the
context of the component to be moved. For example, if a component cannot move
further to the right in the hierarchy, the Move Right button is disabled.
The following table summarizes the available move buttons and commands.
Move Command or
Button
Effect
Move Up
Moves a component ahead of the sibling that formerly
preceded it in the hierarchy. If the component is the first
child of its parent, the component becomes a sibling of its
former parent.
Move Down
Moves a component after the sibling that formerly followed
it in the hierarchy. If a component is the last sibling of its
parent, it moves up one level in the hierarchy to become a
sibling of its former parent.
Move Left
Moves a component up one level in the hierarchy. The
component becomes a sibling of its former parent.
3-13
3
Set Up a Report
Move Command or
Button
Effect
Move Right
Moves a component down one level in the hierarchy. The
component becomes the child of the sibling that formerly
preceded it in the hierarchy.
Drag-and-Drop Method
3-14
1
In the Report Explorer, in the Outline pane, select the component that you want to
move.
2
Drag the component and drop it on the component that you want to be its parent.
Delete Components
Delete Components
1
In the Report Explorer, in the Outline pane, select the component that you want to
delete.
2
Delete the component, using one of these approaches:
• On the Report Explorer toolbar, click the Delete button.
• Select Edit > Delete.
• From the context menu of the component, select Delete.
3-15
3
Set Up a Report
Deactivate Components
You can deactivate any component in a report setup. Deactivating a component causes it
to be skipped during generation of a report.
Deactivating components can be useful for debugging setups. For example, you can
deactivate a component that you suspect is causing an error or you can activate only the
components you want to debug, thereby cutting the time required to verify a fix.
To deactivate (or reactivate) a component:
3-16
1
In the Report Explorer, in the Outline pane, select the component that you want to
deactivate (or reactivate).
2
Select the appropriate Activate/Deactivate Component option from either the
Edit menu or from the context menu of the component.
Send Components to the MATLAB Workspace
Send Components to the MATLAB Workspace
You can send the components of a setup from the Report Explorer to the MATLAB
workspace. This allows you to inspect and set their properties at the MATLAB command
line.
Sending components to the workspace can be useful for creating or debugging MATLAB
programs that create report setups and generate reports from them.
To send a component to the MATLAB workspace:
1
In the Report Explorer, in the Outline pane, select the component that you want to
send to the workspace.
2
From the context menu of the component, select Send to Workspace.
3-17
4
Generate a Report
• “Generate a Report” on page 4-2
• “Select Report Generation Options” on page 4-4
• “Report Generation Preferences” on page 4-13
• “Change Report Locale” on page 4-17
• “Convert XML Documents to Different File Formats” on page 4-18
• “Create a Report Log File” on page 4-21
• “Generate MATLAB Code from Report Setup File” on page 4-22
• “Troubleshooting Report Generation Issues” on page 4-25
4
Generate a Report
Generate a Report
In this section...
“Run a Report” on page 4-2
“Report Output Options” on page 4-2
Run a Report
You can generate a MATLAB Report Generator report using one of these methods:
• In the Report Explorer Outline pane, select a report and do one of the following
actions:
•
In the Report Explorer toolbar, click the Report button
.
• Press CTL+R.
• Select File > Report.
• From the MATLAB command line, use the report command. For example, to print
the system1_description report in PDF format, use:
report system1_description -fpdf
Report Output Options
Before you generate a report, you can set options to control aspects of report generation
processing such as:
• Output file format (PDF, HTML, or Microsoft Word)
• Stylesheet for the selected output file format, to control the layout of the report (for
example, whether to display a title page, font, and section numbering)
• Output file location
• Whether to view the generated report automatically
For details, see:
• “Report Output Format” on page 4-5
• “Location of Report Output File” on page 4-11
4-2
Generate a Report
• “Create a Report Log File” on page 4-21
• “Report Description” on page 4-12
• “Change Report Locale” on page 4-17
4-3
4
Generate a Report
Select Report Generation Options
In this section...
“Report Options Dialog Box” on page 4-4
“Report Output Format” on page 4-5
“PDF Stylesheets” on page 4-8
“Web Stylesheets” on page 4-8
“RTF (DSSSL Print) and Word Stylesheets” on page 4-9
“Report Generation Processing” on page 4-10
“Location of Report Output File” on page 4-11
“Report Description” on page 4-12
Report Options Dialog Box
To specify report generation options for a specific report, in the Report Explorer, use the
Report Options dialog box.
The Report Options dialog box in the Properties (right hand) pane of the Report Explorer.
4-4
Select Report Generation Options
To set defaults for report generation options that you can override with the Report
Options dialog box or with individual components, use the Report Generator Preferences
pane. For details, see “Report Generation Preferences” on page 4-13.
Report Output Format
In the Report Explorer, in the File format text box, choose the report output format.
Using a template when generating a report provides several benefits, compared to
generating a report without using a template.
• Report generation is faster.
• Report generation does not use Java® memory. Generating reports without using a
template can cause Java to run out of memory.
• You can customize report formatting using standard techniques for specifying Word
and HTML styles.
4-5
4
Generate a Report
File Format Using Report Templates
To use a template for report generation, select one of these options:
• PDF (from template)
• HTML (from template)
• Word (from template)
If you use a template, then from the list of templates, you can specify a template other
than the default template. Each output format that does not use a template has a default
stylesheet associated with it. Specify the stylesheet in the text box next to the File
format text box.
For more information about using templates for report generation, see “Generate a
Report Using a Template” on page 6-4.
File Format Using Report Explorer Stylesheets
If you do not use a template, then you can specify in the Stylesheet field, you can specify
a stylesheet.
Viewer
Format
Description
Stylesheets
Adobe Acrobat
Reader
Adobe Acrobat
(PDF)
Produce a PDF that PDF (see “PDF Stylesheets”
you can view using on page 4-8)
Adobe Acrobat
Reader software.
See “PDF: Image
Formats” on page
4-7.
Word processor
Word Document
(RTF) or Rich
Text Format
Produce output
that is compatible
with most wordprocessing
packages, including
Microsoft Word
software
See “RTF: Display
of Hidden Content”
on page 4-7.
4-6
Print (see “RTF (DSSSL
Print) and Word
Stylesheets” on page
4-9)
Select Report Generation Options
Viewer
Format
Description
Stylesheets
DocBook
DocBook (no
transform)
Produce a report in
DocBook format
N/A
Tip To create and use customized styles, see “Create a New Stylesheet” on page 8-4.
PDF: Image Formats
PDF reports only support bitmap (.bmp), .jpeg (.jpg), and Scalable Vector Graphics
(.svg).
The SVG format is only supported for Simulink models and Stateflow charts. For
example, MATLAB figures do not display in SVG when you select the SVG format for
PDF reports.
RTF: Display of Hidden Content
RTF reports use placeholders (field codes) for dynamically generated content, such as
page numbers or images.
On Windows platforms, to display that content, press Ctrl-A, and then press F9.
On Linux and Mac platforms, use the field code update interface for the program that
you are using to view the RTF document.
Change the Default Output Format
In the Report Generator Preferences pane, use the Format ID preference to specify the
default output format for reports.
Stylesheets
For each output format, you can choose from several stylesheets for each report output
format. For details, see:
• “PDF Stylesheets” on page 4-8
• “Web Stylesheets” on page 4-8
• “RTF (DSSSL Print) and Word Stylesheets” on page 4-9
4-7
4
Generate a Report
Note: Some Web and Print stylesheets include an automatically generated list of titles,
which includes table titles and figures with titles.
PDF Stylesheets
PDF Stylesheet
Description
Default print
stylesheet
Displays title page, table of contents, list of titles
Standard Print
Displays title page, table of contents, list of titles
Simple Print
Suppresses title page, table of contents, list of titles
Compact Simple Print
Minimizes page count, suppresses title, table of contents,
list of titles
Large Type Print
Uses 12-point font (slightly larger than Standard Print)
Very Large Type Print
Uses 24-point font and landscape paper orientation
Compact Print
Minimizes white space to reduce page count
Unnumbered Chapters &
Sections
Uses unnumbered chapters and sections
Numbered Chapters &
Sections
Numbers chapters and sections
Paginated Sections
Prints sections with page breaks
Custom Header
Lets you specify custom headers and footers
Custom Titlepage
Lets you specify custom title page content and
presentation
Verbose Print
Lets you specify advanced print options
Web Stylesheets
4-8
Web Stylesheet
Description
Default HTML stylesheet
HTML on a single page
Simulink book HTML
stylesheet
HTML on multiple pages; suppresses chapter headings
and table of contents
Select Report Generation Options
Web Stylesheet
Description
Truth Table HTML
stylesheet
HTML on multiple pages; suppresses chapter headings
and table of contents
Multi-page Web
HTML, with each chapter on a separate page
Single-page Web
HTML on a single page
Single-page Unnumbered
Chapters & Sections
HTML on a single page; chapters and sections are not
numbered
Single-page Numbered
Chapters & Sections
HTML on a single page; chapters and sections are
numbered
Single-page Simple
HTML on a single page; suppresses title page and table
of contents
Multi-page Simple
HTML on multiple pages; suppresses title page and
table of contents
Multi-page Unnumbered
Chapters & Sections
HTML on multiple pages; chapters and sections are not
numbered
Multi-page Numbered
Chapters & Sections
HTML on multiple pages; chapters and sections are
numbered
RTF (DSSSL Print) and Word Stylesheets
RTF or Word Stylesheet
Description
Standard Print
Displays title page, table of contents, list of titles
Simple Print
Suppresses title page, table of contents, list of titles
Compact Simple Print
Minimizes page count, suppresses title, table of contents,
list of titles
Large Type Print
Uses 12-point font (slightly larger than Standard Print)
Very Large Type Print
Uses 24-point font and landscape paper orientation
Compact Print
Minimizes white space to reduce page count
Unnumbered Chapters &
Sections
Uses unnumbered chapters and sections
Numbered Chapters &
Sections
Numbers chapters and sections
4-9
4
Generate a Report
Report Generation Processing
The Report Options dialog box includes several options for controlling report processing.
Option
Purpose
View report after
generation
View the report automatically. When report generation
finishes, the viewer associated with the report output
format displays the report.
Note: On Linux and Macintosh platforms, the report
output displays in Apache OpenOffice, which must be
installed in /Applications/OpenOffice.app.
To view the report manually, browse to the location
specified in the Report File Location section in the
Properties pane on the right, and open the file.
Auto save before
generation
Automatically save the report setup file before you
generate a report.
Compile model to report
on compiled information
Ensure that a report reflects compiled values.
By default, the Simulink Report Generator reports
uncompiled values of Simulink parameters. The
uncompiled values of some parameters, such as signal
data types, can differ from the compiled values used
during simulation.
This option causes the report generator to compile a
model before reporting on model parameters. After
generating the report, the report generator returns the
model to its uncompiled state.
Note: When you select this option, whenever report
generation requires simulating the model (for example,
the report includes a Model Simulation component),
the report generator uncompiles the model and then
recompiles the model, if necessary, to report on model
4-10
Select Report Generation Options
Option
Purpose
contents. If a report requires multiple compilations, the
processing can be quite time-consuming.
To minimize compilations, consider using separate
reports to report on the contents of a model and on the
results of simulating that model.
Evaluate this string after
generation
Specify MATLAB code for processing to occur after the
report is generated. For example, you could specify to
close a model.
Location of Report Output File
Choose a folder to store the report file. You must have write privileges for that folder.
Folder
In the Report Explorer, in the Report Options dialog box, use the Directory field to
specify the name of the folder in which to store the generated report file. Specify a folder
to which you have write privileges.
The following table summarizes the report file location options.
Folder
Option
The same folder as the report Same as setup file
setup file
The current working folder
Present working directory
Temporary folder
Temporary directory
Another folder
Custom.
Use the Browse button (...) to select from a list of
directories.
You can use %<VariableName> notation to specify a folder in the Custom text box.
For more information, see “%<VariableName> Notation” on page 10-99 on the Text
component reference page.
4-11
4
Generate a Report
Report File Name
In the Report Explorer, in the Report Options dialog box, use the Filename field to
specify a file name for the report file. Select one of the following options.
File Name
Option
The same file name as the report
setup file
Same as setup file (default)
A file name different from the report Custom.
setup file name
Enter the name of the report.
You can use %<VariableName> notation to specify a file name in the Custom text box.
For more information, see “%<VariableName> Notation” on page 10-99 on the Text
component reference page.
Increment to Prevent Overwriting
To maintain the previous version of the setup file when you save updates to the setup
file, select If report already exists, increment to prevent overwriting.
Image Output File Location
Images are placed in a folder with the same name as the report file. For example,
testreport.html images are placed in a folder named testreport_files.
Report Description
To record notes and comments about your report setup, use the Report Description
field. This text that you enter appears in the Properties pane when you select a report
setup file in the Outline pane.
4-12
Report Generation Preferences
Report Generation Preferences
In this section...
“Report Generator Preferences Pane” on page 4-13
“File Format and Extension” on page 4-14
“Image Formats” on page 4-15
“Report Viewing” on page 4-15
“Reset to Defaults” on page 4-16
Report Generator Preferences Pane
To set defaults for report generation options, use the Report Generator Preferences pane.
You can override these preferences with the Report Options dialog box or with individual
components.
To specify report generation options for a specific report, in the Report Explorer, use the
Report Options dialog box. For details, see “Select Report Generation Options” on page
4-4.
To open the Report Generator Preferences pane, use one of these approaches:
• In the Report Explorer, select File > Preferences.
• From the MATLAB Toolstrip, in the Home tab, in the Environment section, select
Preferences > Report Generator.
4-13
4
Generate a Report
File Format and Extension
To specify the default file format for reports, use the Format ID preference. The default
preference is web (HTML). You can select from a range of file formats, such as PDF,
Microsoft Word, or LaTex.
Note: For reports that use the Word Document format, you must have Microsoft Word
installed on the machine that you use to generate the report.
4-14
Report Generation Preferences
The Extension preference reflects the standard file extension for the file format
specified with the Format ID preference. You can change the extension.
Image Formats
To set the default image formats associated with the output format for a report, use the
following preferences.
Preference
Purpose
Simulink Images
Specify the format for Simulink images to include in the
report.
Stateflow Images
Specify the format for Stateflow charts to include in the
report.
HG Images
Specify the format for Handle Graphics images to
include in the report.
Note: The default preferences for image formats should work in most viewing
environments. However, some image formats do not display in some viewing
environments.
Several components, such as the Figure Snapshot component, include an option
for specifying the image format. The component setting overrides the image format
preference.
Report Viewing
To control how you view a generated report, you can set the following preferences.
Preference
Purpose
View command
Specify the MATLAB command you want to use to view
the report.
Each file format has an associated default view
command preference. You can modify the view command
(for example, to support the use of a system browser).
4-15
4
Generate a Report
Preference
Purpose
Visible in Report
Explorer
Deselect this check box to make the current output
format unavailable in the Report Explorer. For example,
if your specified report format is Word document and
you deselect this check box, then the Microsoft Word
document format is no longer available for reports
created using the Report Explorer.
Animate Report Explorer Select this check box if you want components in the
when generating reports Outline pane to be animated as the report generates.
This box is selected by default.
To speed up the report generation processing, consider
clearing this preference.
Reset to Defaults
To reset all of the preferences in the Output Format Options section of the Report
Generator Preferences pane, click Reset to Defaults.
The Reset to Defaults button does not change the Animate Report Explorer when
generating reports preference.
4-16
Change Report Locale
Change Report Locale
Versions 2.0 and later of the MATLAB Report Generator and Simulink Report Generator
software use the locale (system language settings) through the Oracle® Java interface;
therefore, they should use the language specified on your system.
Alternatively, you can change the language directly in Java from the MATLAB command
line. The following example sets the language to Italian:
java.util.Locale.setDefault(java.util.Locale.ITALY)
Alternatively, you can set the preferred language directly in your .rpt file:
1
Right-click the Report component and select Send to Workspace.
This displays the properties of the report, which are stored in the variable ans.
Access the report's Language property from the command line through this variable.
By default, Language is auto, which indicates that the system's default language is
in use.
2
Override the default value of Language by setting this property to your desired
language; for example, en for English or it for Italian.
4-17
4
Generate a Report
Convert XML Documents to Different File Formats
In this section...
“Why Convert XML Documents?” on page 4-18
“Convert XML Documents Using the Report Explorer” on page 4-18
“Convert XML Documents Using the Command Line” on page 4-20
“Edit XML Source Files” on page 4-20
Why Convert XML Documents?
You can generate a report in a different output file format without regenerating it by
using either the Report Explorer File Converter or the rptconvert command. These
utilities convert DocBook XML source files created by the report-generation process into
formatted documents such as HTML, RTF, or PDF.
Note: The report-generation process can only convert XML source files created by the
latest version of the software.
Convert XML Documents Using the Report Explorer
To open the Convert Properties pane:
1
In the Report Explorer, select Tools > Convert source file.
The Convert Source File Properties pane appears. All XML files in your current
folder appear in the Options pane in the middle.
4-18
Convert XML Documents to Different File Formats
2
Select your XML source file using one of the following options:
• Click Browse in the Properties pane on the right to browse to the location of your
XML source.
• Double-click a file name in the Options pane in the middle to automatically enter
it into the Source file field in the Properties pane.
3
Select your output format and stylesheet:
a
In the File format text box, select an output format.
b
In the Stylesheet text box, select a stylesheet. The stylesheet choice depends on
the specified output format. You can use a predefined or customized stylesheet.
For more information about available formats and predefined stylesheets, see
“Report Output Format” on page 4-5.
4-19
4
Generate a Report
For more information about customizing stylesheets, see “Create a New
Stylesheet” on page 8-4.
4
Use the View Report when done converting check box to indicate whether you
want to view the report after it has conversion.
5
To begin the conversion, click Convert file.
Convert XML Documents Using the Command Line
To convert files using the command line, use the rptconvertfunction.
Edit XML Source Files
Before you send a source file to the converter, edit it as text in the Report Explorer:
4-20
1
In the Outline pane on the left, open the File Converter.
2
Right-click MATLAB Report Generator and select Convert source file.
3
In the Options pane in the middle, select the source file to edit.
4
In the Properties pane on the right, click Edit as text.
5
Use the MATLAB Editor to edit and save the text.
Create a Report Log File
Create a Report Log File
A log file describes the report setup file report-generation settings and components. A log
file can be used for many purposes, including:
• As a debugger
• As a reference to a report setup file
• To share information about a report setup file through email
A log file includes the following information:
• Report setup file outline
• Components and their attributes
• Generation status messages currently displayed in the Generation Status tab
To generate a log file, click File > Log File. An HTML version of the log file with the
name <report_template_file_name_log>.html is saved in the same folder as the
report setup file.
4-21
4
Generate a Report
Generate MATLAB Code from Report Setup File
You can generate MATLAB code versions of report setup files in the form of a MATLAB
file (*.m). A MATLAB file of a report setup file is useful for various purposes, including
generating reports and modifying report setup files programmatically.
To generate a MATLAB file, load a report setup file into the Report Explorer and click
File > Generate MATLAB File. After the MATLAB file generates, it opens in the
MATLAB Editor. The filename for the generated file is the file name of the report setup
file , preceded by “build.”
Generate Reports from MATLAB Files
This example generates a MATLAB file from the figloop_tutorial.rpt report setup
file, which is part of the MATLAB Report Generator software. The example then uses the
report function to generate a report from the MATLAB file. For more information about
this function, see the report reference page.
1
Start the Report Explorer by entering report in the MATLAB Command Window.
2
In the Options pane in the middle, double-click figloop_tutorial.rpt to open its
report setup file.
3
In the Outline pane on the left, click Report - figloop_tutorial.rpt to select
it.
4
In the Report Explorer menu bar, click File > Generate MATLAB File.
The MATLAB Report Generator software generates MATLAB code for
the figloop_tutorial.rpt report setup file. It saves this code in the
buildfigloop_tutorial.m file in the folder you specify. Part of this file appears
in the following figure.
4-22
Generate MATLAB Code from Report Setup File
5
To generate the figloop_tutorial report from this MATLAB file, run the
following command in the MATLAB Command Window:
report(buildfigloop_tutorial);
The MATLAB Report Generator software runs and displays the report.
4-23
4
Generate a Report
4-24
Troubleshooting Report Generation Issues
Troubleshooting Report Generation Issues
In this section...
“Memory Usage” on page 4-25
“HTML Report Display on UNIX Systems” on page 4-25
Memory Usage
By default, the MATLAB software sets a limit of 100 MB on the amount of memory the
Oracle Java Virtual Machine (JVM™) software can allocate. The memory that the report
generation process uses to build a document must fit within this limit. If you are having
trouble processing large reports, it might be helpful to increase the amount of memory
that MATLAB Report Generator and Simulink Report Generator software can allocate.
See the following sections for more information.
Run the MATLAB Software Without a Desktop
One way to increase the amount of JVM memory available to the MATLAB Report
Generator and Simulink Report Generator software is to run the MATLAB software with
-nodesktop mode enabled.
Increase the MATLAB JVM Memory Allocation Limit
To increase the amount of JVM memory available by increasing the MATLAB JVM
memory allocation limit, from the MATLAB Toolstrip, in the Home tab, in the
Environment section, select Preferences. Use the General > Java Heap Memory
dialog box.
HTML Report Display on UNIX Systems
HTML reports may not automatically display on some UNIX® platforms. To work around
this issue, configure the MATLAB Report Generator software to launch an external
browser:
1
In the Report Explorer, click File > Preferences.
2
Enter the following text in the View command field:
web(rptgen.file2urn('%file name'), '-browser')
Where file name is the name of your report setup file.
4-25
5
Add Content with Components
• “Components” on page 5-2
• “Report Structure Components” on page 5-4
• “Table Formatting Components” on page 5-5
• “Property Table Components” on page 5-6
• “Summary Table Components” on page 5-17
• “Logical and Looping Components” on page 5-21
• “Edit Figure Loop Components” on page 5-22
5
Add Content with Components
Components
Components are MATLAB objects that specify the content of a report. Add components
to specify the types of content that commonly occur in reports. The MATLAB Report
Generator provides a set of components for specifying the types of content that commonly
occur in MATLAB-based reports. The Simulink Report Generator provides additional
components to facilitate generation of reports from Simulink models. You can also create
custom components to handle content specific to your application.
Using the Report Explorer, you can interactively combine components to create a report
setup that specifies the content of a particular report or type of report. For general
information about working with components, see:
• “Insert Components” on page 3-11
• “Set Component Properties” on page 3-12
Use a combination of the following types of components in your report setup file, based on
your goals for the report.
Type of Component
Description
“Report Structure Components” on page
5-4
Include a title page, chapters, sections,
paragraphs, lists, tables, and other
standard document structure elements.
“Table Formatting Components” on page
5-5
Organize generated content into tables.
“Property Table Components” on page
5-6
Display tables with property name/
property value pairs for objects.
“Summary Table Components” on page
5-17
Display tables with specified properties for
objects.
“Logical and Looping Components” on page Run child components a specified number
5-21
of times. There are several looping
components, including logical loops and
Handle Graphics loops.
5-2
Components
Component Formatting
When you generate a report, in the Report Options dialog box, in the File format field
you specify the type of report output you want. For example, you can generate a report in
PDF, HTML, or Microsoft Word format.
For each format, you can choose to apply styles from either of these style definition
sources:
• An HTML or Word report conversion template
• A Model Explorer stylesheet for HTML, Word, or PDF.
The output format and the associated template or stylesheet that you select for a report
determines most aspects of the formatting of the generated report. For example, a report
template or stylesheet typically uses different font sizes for chapter titles and section
titles. For details, see “Report Output Format” on page 4-5.
Several components include properties that you can set to specify formatting details for
that specific instance of a component. For example, for the MATLAB Property Table,
you can specify formatting such as whether to display table borders or the alignment of
text in table cells.
5-3
5
Add Content with Components
Report Structure Components
Use report structure components to organize the content of your report into chapters,
sections, paragraphs, lists, tables, and other standard document structure elements. The
following table summarizes the report structure components.
5-4
Component
Usage
Title Page
Generate a title page for a report.
Chapter/Subsection
Parent components that generate the content of a chapter or
chapter subsection.
Paragraph
Specify the content and text format of a paragraph of text. Can
serve as the parent of one or more text components, enabling use
of multiple text formats (for example, bold, regular, or italic) in
the same paragraph.
Text
Format strings of generated text.
List
Generate a list from a cell array of numbers or strings or parent
components (for example, Paragraph components) that specify the
items in a list. You can create multilevel lists by embedding list
components within list components.
Link
Generate a hyperlink from one location in a report to another or
to an external location on the user’s file system or the Worldwide
Web.
Image
Insert an image into a report.
Array-Based Table
Generate a table from a cell array of numbers or strings.
Table
Parent a table body component. See “Table Formatting
Components” on page 5-5.
Table Formatting Components
Table Formatting Components
Use table formatting components to organize generated content into tables. The following
table summarizes the table formatting components.
Component
Usage
Table
Parent a table body component. Can also parent column
specification components and a table header and a table
footer component. Specifies properties of the table as a whole
(for example, its title, number of columns, and border).
Table Body
Parent the rows that make up the table body. Specifies the
default vertical alignment of entries in a table body.
Table Column
Specification
Specify attributes of a table column, such as its width and
borders and the default horizontal alignment of column
entries.
Table Entry
Parent a component that determines a table entry’s content,
such as a paragraph, image, list, or another table component.
Specifies attributes of a table entry, such as the number of
rows and columns that it spans.
Table Footer
Parent the row components that generate the content of a
table footer.
Table Header
Parent the row components that generate the content of a
table header.
Table Row
Parent the table entry components that generate the content
of a table row.
Tip Inserting a Table component into a setup also inserts all the descendant components
required to generate a 2x2 table, creating a table template. Edit this template to create a
table that suits your needs.
5-5
5
Add Content with Components
Property Table Components
In this section...
“About Property Table Components” on page 5-6
“Open the Example Report Template” on page 5-8
“Examine the Property Table Output” on page 5-8
“Select Object Types” on page 5-9
“Display Property Name/Property Value Pairs” on page 5-9
“Edit Table Titles” on page 5-12
“Enter Text into Table Cells” on page 5-12
“Add, Replace, and Delete Properties in Tables” on page 5-13
“Format Table Columns, Rows, and Cells” on page 5-14
“Zoom and Scroll” on page 5-16
“Select a Table” on page 5-16
About Property Table Components
Property Table components display property name/property value pairs for objects in
tables. The following example shows a property table from the figloop-tutorial
report.
5-6
Property Table Components
Many types of property table components are available, including:
• MATLAB Property Table
• Simulink Property Table (requires Simulink Report Generator)
• Stateflow Property Table (requires Simulink Report Generator)
The component used in this example represents MATLAB Report Generator property
table components, all of which exhibit similar behavior.
5-7
5
Add Content with Components
Open the Example Report Template
This example uses the figloop-tutorial report template. To open the figure loop
tutorial report template, at the MATLAB command line enter:
setedit figloop-tutorial
Examine the Property Table Output
Property pages for all property table components are similar in form. In the Outline
pane, select the Figure Prop Table component. To modify table settings, in the
Handle Graphics Property Table dialog box, click the Edit... button.
5-8
Property Table Components
Select Object Types
Property table components offer multiple object types on which to report. For example,
the Handle Graphics Property Table lets you report on a figure, an axes object, or a
Handle Graphics object.
You can select a different object type on which to report in the Object type list in the
Properties pane for the component.
Display Property Name/Property Value Pairs
Split Property/Value Cells
1
In the Properties pane for the Handle Graphics Property Table component, clear the
Split property/value cells check box.
2
Click Edit. The table is now in nonsplit mode. Nonsplit mode supports more than
one property name/property value pair per cell and text.
3
For the property name and property value to appear in adjacent horizontal cells
in the table, select the Split property/value cells check box. The table is now in
5-9
5
Add Content with Components
split mode. Split mode supports only one property name/property value pair per cell.
If more than one property pair appears in a cell, only the first pair appears in the
report; all subsequent pairs are ignored.
Display Options
Property name/property value pairs can appear in cells in several ways. To specify how
a given property name/property value pair appears in a cell, select that field in the table
(for this tutorial, select the Name property). Choose Value from the display options
drop-down list at the bottom of the dialog box. In the selected table row, only the value
appears.
5-10
Property Table Components
Format Options
To specify alignment for text in a given cell, in the toolbar at the bottom of the dialog box
use the four justification buttons.
Select the HandleVisibility table row. Then select the double-justify button (the last
button to the right).
5-11
5
Add Content with Components
Edit Table Titles
Table titles can contain properties and text. By default, the title of a table is the same as
the value of the %<Name> property. You can modify this property to modify the table title.
Note: Table titles are always in nonsplit mode.
Enter Text into Table Cells
For the text to be visible, the table must be in nonsplit mode. Clear Split property/
value cells.
To enter text into the HandleVisibility table cell, double-click the cell. A gray box
appears with the label for the cell property.
5-12
Property Table Components
If you type text outside the angle brackets, the text appears as is in the report. Text
inside the table brackets must specify a valid property name. If you enter an invalid
property name, the property name appears in the report without a property value.
Add, Replace, and Delete Properties in Tables
Adding Table Properties
To add a Handle Graphics property to a table, use the following steps.
1
In the Figure Property Table window, select a table row above which you want add a
new property.
2
Click the Add Row Above Current Cell
button
A new row appears above the current row.
3
Add the property to the new table row.
a
Select the new table row.
5-13
5
Add Content with Components
b
In the Properties Type drop-down list at the upper-right of the dialog box, select
a property type.
c
In the Properties list, select the property you want to add.
d
Click the << Add button, or double-click the property name. The property
appears in the table row.
Alternatively, if you know the name of the property you want to add, enter the
property name directly into the cell as described in “Enter Text into Table Cells” on
page 5-12. For information about adding new table rows, see “Add and Delete
Columns and Rows” on page 5-14.
Replace Table Properties
To replace a property in a cell of a table in split mode, follow the instructions in “Adding
Table Properties” on page 5-13.
Note: You cannot use these steps to delete a property in a cell when the table is in
nonsplit mode.
Delete Table Properties
Delete a property by backspacing over it or using the Delete key.
Format Table Columns, Rows, and Cells
Add and Delete Columns and Rows
To add or delete a column or row, select a cell and then click one of the buttons described
in the following table.
Note: You cannot delete a row or column when it is the only row or column in the table.
Button
Action
Add column (added to the left of the selected column)
5-14
Property Table Components
Button
Action
Delete selected column
Add row (added above the selected row)
Delete selected row
Resize Columns
To resize the width of a column, click and drag its vertical borders as needed.
Merge and Split Cells
To merge or split table cells, select a row and then click one of the buttons described in
the following table.
Button
Action
Merge cells downward
Merge cells to the right
Split cells
Display or Hide Cell Borders
To toggle cell borders on and off:
1
Place your cursor in a cell and right-click to invoke its context menu.
2
Choose Cell borders > Top, Bottom, Right, or Left to toggle the specified border
on or off.
5-15
5
Add Content with Components
Zoom and Scroll
You can zoom in and out of the table with the zoom buttons, which are located to the left
of the horizontal scroll bar.
Button
Action
Zoom in
Zoom out
You can scroll vertically and horizontally using the table scroll bars.
Select a Table
To display property name/property value pairs, you can select a preset table or use a
custom table.
• A preset table is built-in and formatted. You can select a preset table in the preset
table selection list in the upper-left of the Figure Prop Table window. To apply a
preset table, select the table and click Apply.
• To create a custom table, select a preset table and modify it to fit your needs by
adding and/or deleting rows and properties. You may want to start with the Blank
4x4 preset table.
Note: You cannot save a custom table as a preset table. If you do so, you lose all
changes to the custom table.
5-16
Summary Table Components
Summary Table Components
In this section...
“About Summary Table Components” on page 5-17
“Open the Example Report Template” on page 5-18
“Select Object Types” on page 5-19
“Add and Remove Properties” on page 5-19
“Set Relative Column Widths” on page 5-20
“Set Object Row Options” on page 5-20
About Summary Table Components
Summary table components insert tables that include specified properties for objects into
generated reports. Summary tables contain one object per row, with each object property
appearing in a column, as shown in the following summary table in the figlooptutorial report.
5-17
5
Add Content with Components
Many types of summary table components are available, including:
• Handle Graphics Summary Table
• Simulink Summary Table (requires Simulink Report Generator)
• Stateflow Summary Table (requires Simulink Report Generator)
The component used in this example represents MATLAB Report Generator summary
table components, all of which exhibit similar behavior
Open the Example Report Template
This example uses the figloop-tutorial report template. To open the figure loop
tutorial report template, enter the following at the MATLAB command line:
5-18
Summary Table Components
setedit figloop-tutorial
Select Object Types
You can use the Object type selection list to choose Handle Graphics object types for the
summary table, including blocks, signals, systems, and models. The figloop-tutorial
reports on figure objects.
Add and Remove Properties
You can select object properties to appear in the summary table from the Property
Columns pane. To add a property to the summary table, select the property category from
the property category drop-down box to the right of the Property columns table. Each
property category has its own list of properties, which appear in the field under the box.
The following figure shows Main Properties as the selected category.
To add a property:
1
Select the category from the property category drop-down box.
2
Select a property in the properties list.
3
Click the Add property
button.
The property appears in the Property columns table.
5-19
5
Add Content with Components
To remove a property from the table:
1
2
Select the property in the Property columns table.
Click the Delete property
button.
The property name is removed from the Property columns table.
Note: After making changes in the Report Explorer, click Apply to make the changes
take effect.
You can define your own properties by entering their names into the Property columns
table using valid variable notation. For more information, see “%<VariableName>
Notation” on page 10-99 on the Text component reference documentation.
Set Relative Column Widths
To apply a relative column width to the summary table columns in the generated report,
double-click on the Width column of a row in the Property columns table . If you do not
specify a value for this field, column widths automatically set.
Set Object Row Options
You can use the Object Rows pane to set options for table rows, including anchor,
filtering, and sorting options. Select Insert anchor for each row to place an anchor
in each table row in the report. Use the Include figures list to specify what objects to
include in the summary table.
Summary table components in figloop-tutorial report on figure objects. For more
information on options for these figure objects, see the following sections:
• “Loop on the Current Figure” on page 5-24
• “Loop on Visible Figures” on page 5-24
• “Loop on Figures with Tags” on page 5-24
5-20
Logical and Looping Components
Logical and Looping Components
Logical and looping components execute conditionally, determining when a child
component executes or how many times a child component executes.
A looping component runs its child components a specified number of times. There are
several looping components, such as logical loops and Handle Graphics loops.
For an example that uses loop components, see “Edit Figure Loop Components” on page
5-22.
5-21
5
Add Content with Components
Edit Figure Loop Components
In this section...
“Figure Loop in a Report” on page 5-22
“Figure Properties” on page 5-23
“Loop on the Current Figure” on page 5-24
“Loop on Visible Figures” on page 5-24
“Loop on Figures with Tags” on page 5-24
“Modify Loop Section Options” on page 5-24
Figure Loop in a Report
This example uses the Figure Loop, which is representative of many types of loops. The
Figure Loop component runs its child components several times. In each iteration, the
Figure Loop applies its child components to Handle Graphics figures. The figlooptutorial report setup file creates a report that documents several Handle Graphics
figures.
1
At the MATLAB command prompt, enter:
setedit figloop-tutorial
2
To display the Handle Graphics figures, enter:
figloopfigures
The figures Membrane Data, An Application, and Peaks Data appear on the
screen because their visible property is 'on'. The Invisible Membrane Data
and An Invisible Application figures do not appear on screen because their
visible property is 'off'. These invisible figures exist, but they are hidden.
3
In the Report Explorer, in the Outline pane on the left, select the Figure Loop
component called Figure Loop Section 1.
The Properties pane for the Figure Loop component appears.
5-22
Edit Figure Loop Components
Figure Properties
Figure properties control which figures appear in the report. Table 1.1 of the figlooptutorial report includes a summary of the properties of the figures used in this
tutorial.
5-23
5
Add Content with Components
For this example, do not change these properties. For more information, see “Add,
Replace, and Delete Properties in Tables” on page 5-13.
Loop on the Current Figure
To include only the current figure in the report, select Current figure only from
the Include figures selection list. The current figure is the figure that is current when
the report generates. This figure may not be the same figure that you selected as the
current figure in the Report Explorer before report generation. For example, if the
report generation process creates figures in your report, the last figure created with
HandleVisibility set to 'on' is the current figure.
Loop on Visible Figures
To include snapshots of all visible figures in your report, in the Include figures
selection list, select Visible figures. This option inserts a snapshot and Property
Table for all figures that are currently open and visible.
1
Select the Data figures only (Exclude applications) option to exclude figures
from the loop whose HandleVisibility parameter is 'off'.
2
To generate the report, in the Report Explorer toolbar click the Report button.
In the generated report, scroll down to “Chapter 2 Figures in Report.” The Membrane
Data and Peaks Data figures appear in the generated report.
Loop on Figures with Tags
To include figures with specified tags in the report:
1
In the Include figures selection list, select the All figures with tags option.
2
In the list of tags, delete membrane.
3
Click Report to generate the report.
The An Application and An Invisible Application figures appear in the report.
They both have an app tag.
Modify Loop Section Options
In a loop, a section refers to a space in the generated report in which information,
including text, images, and tables, appears. You can alter the appearance of sections
5-24
Edit Figure Loop Components
in each loop appear in the report by using the options in the Figure Loop component's
Section Options pane.
• Create Section for Each Object in Loop — Create an individual section for each
object found in the loop, using the object title as the section title. This option is useful
when a loop does not contain a Chapter/Subsection component that organizes the loop
results.
• Display the Object Type in the Section Title — Precede section titles with object
titles. Enable this option by selecting Create section for each object in loop. For
example:
1
Enter membrane back in the list of tags.
2
Generate the figloop-tutorial report.
The figures produced by the loop are:
Membrane Data
Invisible Membrane Data
An Application
An Invisible Application
3
Enable the Create section for each object in loop option.
4
Enable the Display the Object Type in the Section Title option.
5
Generate the figloop-tutorial report.
The figures produced are now:
Figure
Figure
Figure
Figure
-
Membrane Data
Invisible Membrane Data
An Application
An Invisible Application
The figures produced are now:
Figure
Figure
Figure
Figure
-
Membrane Data
Invisible Membrane Data
An Application
An Invisible Application
• Create a Link Anchor for Each Object in Loop — Create a hyperlink to the
object in the generated report.
5-25
6
Template-Based Report Formatting
• “Report Conversion Templates” on page 6-2
• “Generate a Report Using a Template” on page 6-4
• “Conversion Template Contents” on page 6-5
• “Copy a Conversion Template” on page 6-12
• “Open a Conversion Template” on page 6-14
• “Set Conversion Template Properties” on page 6-15
• “Move a Conversion Template” on page 6-16
• “Delete a Conversion Template” on page 6-17
• “Customize Microsoft Word Report Styles” on page 6-18
• “Customize Microsoft Word Part Templates” on page 6-21
• “Customize a Microsoft Word Title Page Template” on page 6-30
• “Create a Custom HTML Template” on page 6-36
6
Template-Based Report Formatting
Report Conversion Templates
In this section...
“Templates for Report Conversion” on page 6-2
“Custom Templates” on page 6-2
“Custom Component Styles” on page 6-2
“Benefits of Using Templates” on page 6-2
Templates for Report Conversion
By selecting the Word (from template) output type, you can cause the Report
Generator to use a Microsoft Word template to convert the XML content for a report to a
Word or PDF document. Similarly, by selecting HTML (from template), you can cause
the Report Generator to use an HTML template to convert XML content to an HTML
document. The Report Generator uses the template to determine the layout and format of
the resulting document.
Custom Templates
The MATLAB Report Generator comes with default HTML and Word templates. You can
create customized versions of these templates to meet your report formatting and layout
requirements. You can use a custom template to generate a report. Specify the name of
the custom template in the Report Options dialog box, in the Template field.
Custom Component Styles
You can use styles defined in your custom template to format instances of Paragraph,
Text, and other report components. In the component properties dialog box, specify the
name of the style in the Style field.
Benefits of Using Templates
When you use a template to generate a report, report generation:
• Is faster.
6-2
Report Conversion Templates
• Does not use Java memory to convert report XML content to HTML, Word, or PDF.
Converting report XML content without using a template can cause Java to run out of
memory.
Also, templates allow you to use your knowledge of Word and HTML document
formatting to format reports.
Related Examples
•
“Generate a Report Using a Template” on page 6-4
•
“Copy a Conversion Template” on page 6-12
•
“Customize Microsoft Word Report Styles” on page 6-18
•
“Customize Microsoft Word Part Templates” on page 6-21
•
“Customize a Microsoft Word Title Page Template” on page 6-30
•
“Create a Custom HTML Template” on page 6-36
More About
•
“Report Conversion Templates” on page 6-2
•
“Conversion Template Contents” on page 6-5
6-3
6
Template-Based Report Formatting
Generate a Report Using a Template
1
In Report Explorer, in the Outline pane, select the report.
2
In the Report Options dialog box that appears in the Properties pane, set the File
format field to one of these options:
• HTML (from template)
• PDF (from template)
• Word (from template)
3
Optionally, from the list of templates available for the current file format, select a
template.
4
If you select HTML (from template) for the file format, choose a packaging option
for the output files.
• Unzipped — Generate the report files in a subfolder of the current folder. The
subfolder has the report name.
• Zipped — Package report files in a single compressed file that has the report
name, with a .zip extension.
• Both Zipped and Unzipped
5
In the toolbar, click the Report button (
).
More About
•
6-4
“Report Conversion Templates” on page 6-2
Conversion Template Contents
Conversion Template Contents
In this section...
“Default Styles” on page 6-5
“Part Templates” on page 6-9
“Header and Footers in Word Conversion Templates” on page 6-10
A report conversion template contains:
• A main template with default style definitions for report elements.
• Part templates for the report elements such as title pages, chapters, and titles for
sections and tables. Part templates contain fill-in-the-blanks holes for generated
content.
• Headers and footers.
Default Styles
The default conversion template includes styles that the Report Explorer uses to
format components during report generation. Most styles begin with rg (for example,
rgTitle). Styles for syntax highlighting MATLAB code begin with MWSG, for example,
MWSHKeywords. The default style names and formatting are the same for the Word and
HTML templates, to the extent applicable. For example, page break formatting applies
when you use a Word template, but not an HTML template.
You can modify the built-in styles, but do not delete them. In addition, you can define
your own styles and use them in components that allow you to specify a style, such as the
Paragraph component.
Style
Report Explorer Components the Style Formats
MWSHComment
MATLAB code comment
MWSHKeywords
MATLAB code keywords
MWSHStrings
MATLAB code strings
rgAbstract
Title Page component abstract
rgAbstractTitle
Title Page component abstract section
rgAuthor
Title Page component front page author
rgAuthorVerso
Title Page component back page author
6-5
6
6-6
Template-Based Report Formatting
Style
Report Explorer Components the Style Formats
rgBody
Text component
rgChapter
Chapter component
rgChapterTitle
Chapter component title
rgCopyright
Title Page component copyright
rgFigure
Paragraph that contains an image
generated by a snapshot or Image
component, to adjust the spacing of images
relative to adjacent paragraphs
rgFigureCaption
The caption for Image component and
snapshot components
rgFigureTitle
The Image component and snapshot
components title
rgFigureTitleNumber
The Image component and snapshot
components title number
rgFigureTitlePrefix
The Image component and snapshot
components title prefix
rgFigureTitleText
The Image component and snapshot
components title text
rgLegalNotice
Title Page component legal notice
section
rgListTitle
The List component title
rgListTitleNumber
The List component title number
rgListTitlePrefix
The List component title prefix
rgListTitleText
The List component title text
rgParagraph
Paragraph component text
rgParagraphTitle
Paragraph component title
Conversion Template Contents
Style
Report Explorer Components the Style Formats
rgProgramListing
Code generated by:
• Text component with Show text as
syntax highlighted MATLAB code
option is selected
• MATLAB Function Block component
• Truth Table component
rgPubDate
Title page report creation date
rgPubDatePrefix
Title page report creation date prefix
rgSect1Title
Section title for first-level section in a
chapter
rgSect1TitleNumber
Number for Section title for first-level
section in a chapter
rgSect1TitlePrefix
Prefix for Section title for first-level
section in a chapter
rgSect1TitleText
Text for Section title for first-level section
in a chapter
rgSect2Title
Section title for second-level section in a
chapter
rgSect2TitleNumber
Number for Section title for second-level
section in a chapter
rgSect2TitlePrefix
Prefix for Section title for second-level
section in a chapter
rgSect2TitleText
Text for Section title for second-level
section in a chapter
rgSect3Title
Section title for third-level section in a
chapter
rgSect3TitleNumber
Number for Section title for third-level
section in a chapter
rgSect3TitlePrefix
Prefix for Section title for third-level
section in a chapter
6-7
6
6-8
Template-Based Report Formatting
Style
Report Explorer Components the Style Formats
rgSect3TitleText
Text for Section title for third-level
section in a chapter
rgSect4Title
Section title for fourth-level section in a
chapter
rgSect4TitleNumber
Number for Section title for fourth-level
section in a chapter
rgSect4TitlePrefix
Prefix for Section title for fourth-level
section in a chapter
rgSect4TitleText
Text for Section title for fourth-level
section in a chapter
rgSect5Title
Section title for fifth-level section in a
chapter
rgSect5TitleNumber
Number for Section title for fifth-level
section in a chapter
rgSect5TitlePrefix
Prefix for Section title for fifth-level
section in a chapter
rgSect5TitleText
Text for Section title for fifth-level section
in a chapter
rgSubTitle
Title Page component subtitle
rgTable
Table content
rgTableTitle
Table title
rgTableTitleNumber
Table title number
rgTableTitlePrefix
Table title prefix
rgTableTitleText
Table title text
rgTitle
Title Page component front page title
abstract, and legal notice section
rgTitleVerso
Title Page component back page title
abstract, and legal notice section
rgTOCSection
Table of contents
Conversion Template Contents
Part Templates
The conversion templates include template parts to format specific elements of a report.
Part Template
Report Explorer Components the Part Template
Formats
rgRectoTitlePage
Title Page
Front title page contents, including the
report title, subtitle, author, and an image.
rgVersoTitlePage
Title Page
Back title page contents, including the
date published, copyright, legal notice, and
abstract.
rgTOCSectionTitle
The table of contents automatically
generated for Word and PDF.
rgChapter
Chapter/Section
Chapter (top-level section), including the
title (prefix, such as Chapter, number, and
title) and for the content.
rgSect1Title
Chapter/Section
rgSect2Title
Title for a section (sections below the
chapter level). The title can include a prefix
(such as Chapter), number, and title.
rgSect3Title
rgSect4Title
rgSect5Title
rgListTitle
List
Title of the list.
rgTableTitle
Table, Array-BasedTable, and table
components such as Handle Graphics
Property Table
6-9
6
Template-Based Report Formatting
Part Template
Report Explorer Components the Part Template
Formats
Table title, including prefix (such as Table,
number, and title) and for the content.
rgFigureTitle
Table and Array-BasedTable
Table title, including prefix (such as Table,
number, and title) and for the content.
Part Template Holes
Part templates include fill-in-the-blanks hole markup. The report converter fills holes
with content that the MATLAB Report Generator generates.
For example, the rgChapter part template in the default Word conversion template
includes an rgChapterTitle hole.
The report converter fills the rgChapterTitle hole with the contents of the Title
property of top-level Chapter/Section components in a report.
You can rearrange or delete holes to change the order in which generated content
appears in the report or to omit content. Do not add holes. If you add holes, the report
converter ignores them.
Header and Footers in Word Conversion Templates
Word conversion templates include headers and footers for the document as a whole.
You can also specify headers and footers for the rgRectoTitlePage,
rgVersoTitlePage, and rgChapter part templates.
6-10
Conversion Template Contents
Related Examples
•
“Generate a Report Using a Template” on page 6-4
•
“Copy a Conversion Template” on page 6-12
•
“Customize Microsoft Word Report Styles” on page 6-18
•
“Customize Microsoft Word Part Templates” on page 6-21
•
“Customize a Microsoft Word Title Page Template” on page 6-30
More About
•
“Report Conversion Templates” on page 6-2
6-11
6
Template-Based Report Formatting
Copy a Conversion Template
Copy a Conversion Template
1
In Report Explorer, select Tools > Edit Document Conversion Template. The
Template Browser appears in the Report Explorer.
2
In the Library pane (middle pane), select a template from the list of Word or HTML
templates. For example, select Default Word Template.
3
In the Template Browser, click Copy template. A file browser appears.
4
In the file browser, navigate to the location where you want to save the template file.
Select a folder that is on the MATLAB path (for example, in the MATLAB folder in
your home folder).
Specify the file name, using the default file extension for a Word template (.dotx).
5
Click Save.
Results
A template you create by copying a template appears in the list of Word or HTML
templates. The initial name of the copy in the list of templates is Copy of ORIGINAL,
where ORIGINAL is the name of the template that you copied. The name in the list is not
the file name you used when you saved the copy.
To change the template name that appears in the list of templates, in the Template
Properties dialog box, specify the name in the Display name field. For details, see “Set
Conversion Template Properties” on page 6-15.
Related Examples
6-12
•
“Set Conversion Template Properties” on page 6-15
•
“Open a Conversion Template” on page 6-14
•
“Move a Conversion Template” on page 6-16
•
“Delete a Conversion Template” on page 6-17
•
“Customize Microsoft Word Report Styles” on page 6-18
•
“Customize Microsoft Word Part Templates” on page 6-21
•
“Customize a Microsoft Word Title Page Template” on page 6-30
Copy a Conversion Template
More About
•
“Report Conversion Templates” on page 6-2
6-13
6
Template-Based Report Formatting
Open a Conversion Template
1
In Report Explorer, select Tools > Edit Document Conversion Template. The
Template Browser appears in the Report Explorer.
2
Select a template from the list of Word and HTML templates in the Library pane.
For example, select Default Word Template. The properties of the template
appear in the Report Explorer Properties pane.
3
In the Template Browser, click Open template.
If you open a default template, you cannot edit it. To edit a template, make a copy of the
default template and open the copy.
To open both the template and the template stylesheet, in the Template Browser click
Open stylesheet.
Related Examples
•
“Copy a Conversion Template” on page 6-12
•
“Set Conversion Template Properties” on page 6-15
More About
•
6-14
“Report Conversion Templates” on page 6-2
Set Conversion Template Properties
Set Conversion Template Properties
For custom conversion templates, you can specify properties to describe the template.
1
In Report Explorer, select Tools > Edit Document Conversion Template.
2
From the list of templates in the Library pane, click the template whose properties
you want to set.
3
In the fields at the top of the Properties pane, specify properties for the template.
• Template id — Description of the template, such as Word template for
model reports
• Display name — Template name to display in the list of Word templates (for
example, Model reports)
• Description — Description of the template
• Creator — Name of the person or organization that created the template
4
Apply the properties by selecting another template in the list of templates.
Related Examples
•
“Copy a Conversion Template” on page 6-12
•
“Open a Conversion Template” on page 6-14
More About
•
“Report Conversion Templates” on page 6-2
6-15
6
Template-Based Report Formatting
Move a Conversion Template
You can change the location of a template file.
1
In Report Explorer, select Tools > Edit Document Conversion Template. The
Template Browser appears in the Report Explorer.
2
In the Report Explorer, select the template to move.
3
In the Template Browser, select Move template.
4
In the file browser, navigate to the new location for the template file. Enter a file
name, using the appropriate extension for the type of template (.dotx or .htmtx).
5
Click Save. The Path property in the Template Browser shows the new location.
Related Examples
•
“Copy a Conversion Template” on page 6-12
•
“Open a Conversion Template” on page 6-14
•
“Delete a Conversion Template” on page 6-17
More About
•
6-16
“Report Conversion Templates” on page 6-2
Delete a Conversion Template
Delete a Conversion Template
1
In Report Explorer, select Tools > Edit Document Conversion Template. The
Template Browser appears in the Report Explorer.
2
In the Report Explorer, select the template to delete.
3
In the Template Browser, select Delete template and click Yes.
Related Examples
•
“Copy a Conversion Template” on page 6-12
•
“Open a Conversion Template” on page 6-14
•
“Move a Conversion Template” on page 6-16
More About
•
“Report Conversion Templates” on page 6-2
6-17
6
Template-Based Report Formatting
Customize Microsoft Word Report Styles
In this section...
“Customize Default Microsoft Word Component Styles” on page 6-18
“Create Styles in a Microsoft Word Template” on page 6-18
You can customize report styles in a custom Word conversion template or add styles to a
custom Word template.
For more information about Word styles, see the Microsoft Word documentation.
Customize Default Microsoft Word Component Styles
Note: If you do not have a custom Word conversion template, see “Copy a Conversion
Template” on page 6-12.
1
In the Report Explorer, select Tools > Edit Document Conversion Template.
2
In the list of templates in the middle pane, select the custom template that contains
the style you want to customize.
3
In the Properties pane, click Open stylesheet. The Word Manage Styles dialog
box appears.
4
Use the Manage Styles dialog box to modify or create styles.
Styles that begin with rg (for example, rgParagraph) are the default styles used
for report components. A default style applies to all instances of a component with
which it is associated. (In the Report Explorer, some components allow you to replace
the name of a default style with the name a style that you create. This allows you to
specify different styles for different instances of the same component.)
For details, see “Create Styles in a Microsoft Word Template” on page 6-18.
Create Styles in a Microsoft Word Template
Note: If you do not have a custom Word conversion template, see “Copy a Conversion
Template” on page 6-12.
6-18
Customize Microsoft Word Report Styles
1
In the Report Explorer, select Tools > Edit Document Conversion Template.
2
In the list of templates in the middle pane, select a custom template.
3
In the Properties pane, click Open stylesheet.
4
If applicable, select an existing style to use as a starting point for the new style.
5
Click the New Style button.
6
Specify a name for the new style and define the style characteristics. To save the new
style definition, click OK and close the dialog box.
7
In the Manage Styles dialog box, click OK.
8
In Word, save and close the template.
Related Examples
•
“Customize Microsoft Word Part Templates” on page 6-21
•
“Customize a Microsoft Word Title Page Template” on page 6-30
More About
•
“Report Conversion Templates” on page 6-2
6-19
6
Template-Based Report Formatting
•
6-20
“Conversion Template Contents” on page 6-5
Customize Microsoft Word Part Templates
Customize Microsoft Word Part Templates
In this section...
“Custom Word Part Templates” on page 6-21
“Display the Developer Ribbon in Word” on page 6-22
“Customize a Word Conversion Part Template” on page 6-22
“Set Default Text Style for a Hole” on page 6-23
“Distinguish Inline and Block Holes” on page 6-25
“Avoid Changing Block Holes to Inline Holes” on page 6-26
“Delete a Hole” on page 6-26
“Add an Inline Hole” on page 6-28
“Add a Block Hole” on page 6-29
Custom Word Part Templates
You can create custom Word part templates (such as a title page part template) to:
• Tailor report formatting to meet your specific formatting requirements.
• Delete a hole. For a description of holes, see “Part Template Holes” on page 6-10.
• Rearrange the order of holes.
• Add fixed content to a footer or header.
If you delete a hole in a part template, then the generated report does not include the
component data associated with that hole. For example, the rgRectoTitlePage part
template includes an rgAuthor hole. If you delete the rgAuthor hole, then reports
generated with the template do not include the author, even if the report has a Title
Page component that specifies a value for the Author property.
The only kind of holes that you can add to a part template are the holes that the
Report Explorer supports for that part template. For example, for the rgChapter part
template, you can only reinsert rgChapterTitlePrefix, rgChapterTitleNumber,
rgChapterTitle, and rgChapterContent holes. Do not add multiple instances of the
same kind of hole in a part template.
6-21
6
Template-Based Report Formatting
Display the Developer Ribbon in Word
To work with holes in a Word template, use the Word Developer ribbon. If the
Developer tab is not showing in your Word ribbon, add it to the ribbon.
1
In Word, select File > Options.
2
In the Word Options dialog box, select Customize Ribbon.
3
In the Customize the Ribbon list, select the Developer check box and click OK.
Tip If you do not see Developer check box in the list, set Customize the Ribbon to
Main Tabs.
Customize a Word Conversion Part Template
To customize a report element such as a title page, replace the appropriate default part
template with a customized copy of the part template. For another example illustrating
how to create a custom Word part template, see “Customize Title Page Content and
Layout” on page 6-34.
Note: If you do not have a custom Word conversion template, see “Copy a Conversion
Template” on page 6-12.
1
In the Report Explorer, select Tools > Edit Document Conversion Template.
2
In the list of templates in the middle pane, select a custom template.
3
In the Properties pane, click Open template.
4
At the beginning of the template, position the cursor in the first paragraph and click
the Quick Parts button.
5
6-22
In the Insert tab, select the Quick Parts
button.
6
In the Quick Parts Gallery, select the part template (for example, rgChapter).
7
Edit the copy of the part template. For example, remove a hole by right-clicking and
selecting Remove Content Control.
8
In the template, select the part template, including all of its holes.
9
In the Quick Parts Gallery, select Save Selection to Quick Part Gallery.
Customize Microsoft Word Part Templates
10 In the Create New Building Block dialog box, set Name to the part template name
(for example, rgChapter) and the Category to mlreportgen. Click OK.
11 In the template, delete the customized part template.
12 Save the main template.
Set Default Text Style for a Hole
Your template can specify the name of a style to use as a default to format text generated
for a hole.
Note: If you do not have a custom Word conversion template, see “Copy a Conversion
Template” on page 6-12.
1
2
3
4
In the Report Explorer, select Tools > Edit Document Conversion Template.
In the list of templates in the middle pane, select the custom template that has the
hole you want to set the default text style for.
In the Template Browser, click Open template.
In the Insert tab, select the Quick Parts
button.
5
In the Quick Parts Gallery, select the part template that contains the hole (for
example, rgChapter).
6
Right-click in the text area of the hole whose default text style you want to specify.
For example, in rgChapter, right-click in the rgChapterTitle hole.
7
Select Properties.
8
9
In the Content Control Properties dialog box, select the Use a style to format text
typed into the empty control check box.
From the Style list, select a style to use an existing style or select New Style to
create a new style to use as the default style and click OK.
6-23
6
Template-Based Report Formatting
10 Select the part template and click the Quick Parts button.
11 Click Save Selection to Quick Part Gallery.
12 In the Create New Building Block dialog box, set Name to the part template name
(for example, rgChapter) and the Category to mlreportgen. Click OK.
13 Save and close the template.
6-24
Customize Microsoft Word Part Templates
Distinguish Inline and Block Holes
The Report Explorer supports two types of holes: inline and block.
• Use an inline hole is for content that you can include in a Word paragraph.
• Use a block hole for content that you cannot embed in a paragraph.
You can configure the Word editor to provide visual cues that indicate whether a hole is
an inline or block hole.
Note: If you do not have a custom Word conversion template, see “Copy a Conversion
Template” on page 6-12.
1
Open the custom Word template.
2
On the Word ribbon, select the Home tab.
3
Click the Show/Hide
4
On the Word ribbon, select the Developer tab.
5
Click Design Mode to Word markup for holes.
6
Click a hole to determine whether it is an inline or block hole.
button to display Word paragraph markers.
• Inline hole — The bounding box does not include the paragraph marker.
• Block hole — The bounding box does includes the paragraph marker.
6-25
6
Template-Based Report Formatting
Avoid Changing Block Holes to Inline Holes
Do not change a block hole to an inline hole.
You can accidentally change a block hole to an inline hole by removing the paragraph
marker of an inline hole that is followed by a block hole. For example, if you delete the
paragraph marker for the rgChapterTitle inline hole, the rgChapterContent block
hole changes to an inline hole.
Delete a Hole
Note: If you do not have a custom Word conversion template, see “Copy a Conversion
Template” on page 6-12.
1
In the Report Explorer, select Tools > Edit Document Conversion Template.
2
In the list of Word templates in the middle pane, select the custom template that you
want to edit.
3
In the Template Browser, click Open template.
4
To display Word paragraph markers (if they are not already visible), on the Word
ribbon in the Home tab, click the Show/Hide
6-26
button.
5
In the Word ribbon, in the Insert tab, click the Quick Parts
6
Select the part template to customize. For example, select rgChapter to customize
the part template for a chapter.
button.
Customize Microsoft Word Part Templates
Tip To display Word markup for the part template, on the Word ribbon, in the
Developer tab, click Design Mode.
7
Write down the name of the part template you are customizing, because you need to
enter that name later in this procedure.
8
In the rgChapter part template, delete the rgChapterTitlePrefix hole. Select
the hole markup and click the Delete key.
9
In the template, select all of the contents of the part template.
10 Right-click and select Properties.
11 In the Content Control Properties dialog box, in the Title and Tag fields, enter the
name of the template part you are customizing rgChapter. Click OK.
12 In the template, select all of the contents of the part template. In the Insert tab,
click the Quick Parts button.
13 Click Save Selection to Quick Part Gallery.
14 In the Create New Building Block dialog box, set Name to the part template name
(for example, rgChapter) and the Category to mlreportgen. Click OK.
15 In the template, select all of the contents of the part template and click the Delete
button.
16 Save and close the template.
6-27
6
Template-Based Report Formatting
Add an Inline Hole
The only kind of holes that you can add to a part template are the holes that the
Report Explorer supports for that part template. For example, for the rgChapter part
template, the only inline holes that you can reinsert are rgChapterTitlePrefix,
rgChapterTitleNumber, and rgChapterTitle holes. Do not add multiple instances of
the same kind of hole in a part template.
Note: If you do not have a custom Word conversion template, see “Copy a Conversion
Template” on page 6-12.
1
In the Report Explorer, select Tools > Edit Document Conversion Template.
2
In the list of Word templates in the middle pane, select the custom template that you
want to edit.
3
In the Template Browser, click Open template.
4
To display Word paragraph markers, click the Show/Hide
5
Position the Word insertion mark at the point in a paragraph where you want to add
an inline hole.
button.
Tip If the hole is the only content in a paragraph or is at the end of a paragraph, add
several blank spaces and insert the hole before the spaces.
6
Click the Rich Text Control button
insertion point.
7
To see hole markup, on the Word ribbon, in the Developer tab click Design Mode.
8
Right-click in the hole and select Properties.
9
In the dialog box, in the Title and Tag fields, enter the name of the hole. Use a
Report Explorer hole name. For example, if you insert an rgChapterTitlePrefix
hole, set the Title and Tag fields to rgChapterTitlePrefix.
. Word inserts a rich text control at the
10 In the template, select all of the contents of the part template. In the Insert tab,
click the Quick Parts button.
11 Click Save Selection to Quick Part Gallery.
12 In the Create New Building Block dialog box, set Name to the part template name
(for example, rgChapter) and the Category to mlreportgen. Click OK.
6-28
Customize Microsoft Word Part Templates
13 In the template, select all of the contents of the part template and click the Delete
button.
14 Save and close the template.
Add a Block Hole
The only kind of holes that you can add to a part template are the holes that the Report
Explorer supports for that part template. For example, for the rgChapter part template,
the block hole that you can reinsert is rgChapterContent holes. Do not add multiple
instances of the same kind of hole in a part template.
Creating a block-level hole in a Word document is essentially the same as creating an
inline hole. The main difference is that rich text content control must contain an (empty)
paragraph instead of residing in a paragraph. Create an empty paragraph at the point
where you want to create a block-level hole. If you are at the end of a document, create a
second empty paragraph.
Related Examples
•
“Copy a Conversion Template” on page 6-12
•
“Customize Microsoft Word Report Styles” on page 6-18
•
“Customize a Microsoft Word Title Page Template” on page 6-30
More About
•
“Report Conversion Templates” on page 6-2
•
“Conversion Template Contents” on page 6-5
6-29
6
Template-Based Report Formatting
Customize a Microsoft Word Title Page Template
In this section...
“Create a Custom Template” on page 6-30
“Change the Color of a Report Title” on page 6-31
“Assign the Template to a Report” on page 6-33
“Customize Title Page Content and Layout” on page 6-34
The Report Explorer default Word document conversion template contains document
part templates for the front (recto) and back (verso) side of a report title page. The Report
Explorer file converter for the Word (from template) output type uses the title page
part templates to produce the title pages in the Word output.
This example shows how to create a custom template that changes the color of the title
and how to customize the layout of a title page. The example uses a custom template
with the Report Generator magic square report example.
Create a Custom Template
Note: To complete the rest of this example, you need a custom Word conversion template.
If you have a custom template that you want to use for this example, you can skip to
“Change the Color of a Report Title” on page 6-31.
6-30
1
In the Report Explorer, select Tools > Edit Document Conversion Template.
2
In the list of templates, select the Default Word Template.
3
In the Template Browser, click Copy template.
4
In the file browser, navigate to the folder on the MATLAB path that you want to use
for the custom template. For the file name, enter magic-square and click Save.
5
In the list of templates, select Copy of Default Word Template.
6
At the top of the Template Properties dialog box, use these settings:
Customize a Microsoft Word Title Page Template
7
Apply the properties by selecting another template in the list of templates.
Change the Color of a Report Title
You can customize the Magic Square Template (see “Create a Custom Template” on
page 6-30) to use blue text for the report title.
1
In the Report Explorer, select Tools > Edit Document Conversion Template.
2
In the Report Explorer list of Word templates, select Magic Square Template.
3
In the Template Browser, click Open style sheet. In Word, the template opens,
with the Manage Styles dialog box displayed.
4
In the Manage Styles dialog box, select the rgTitle style and click Modify.
6-31
6
Template-Based Report Formatting
5
6-32
In the Modify Style dialog box for rgTitle, click the down arrow for Automatic.
Select the blue color box and click OK.
Customize a Microsoft Word Title Page Template
6
In the Manage Styles dialog box, click OK.
7
Save and close the template.
Assign the Template to a Report
You can assign the customized template to the magic-square.rpt Report Explorer
report.
1
In the Report Explorer, select Report Generator node.
2
In the Report Explorer, in the list of reports, select magic_square.rpt.
6-33
6
Template-Based Report Formatting
3
In the Report Options pane, click Open report.
4
In the magic_squares report, add a Title Page component. In the Title Page
dialog box, set the Title field to Magic Squares.
5
Below the Title Page component, add a Chapter component.
6
In the Report Options dialog box, set File format to Word (from template) and
instead of Default Word Template, select Magic Squares Template.
7
Generate the report. Select the magic_squares report. In the Report Explorer
toolbar, click the Report
button.
In the generated report, the title, Magic Squares, appears in blue.
Customize Title Page Content and Layout
This example assumes you have created a custom Magic Square Template (see “Create a
Custom Template” on page 6-30). You can use a different custom Word template.
6-34
1
In the Report Explorer, select Tools > Edit Document Conversion Template.
2
In the Report Explorer list of Word templates, select Magic Square Template. In
the Report Options pane, click Open template.
3
With the cursor in the first (and only visible) paragraph in the template, in the
Insert tab, select the Quick Parts button.
Customize a Microsoft Word Title Page Template
4
In the Quick Parts gallery, select rgRectoTitlePage to insert of the front title page
part template in the main document conversion template.
Tip To display Word markup for the part template, on the Word ribbon, in the
Developer tab, click Design Mode.
5
Highlight the rgImage hole and drag it above the rgTitle hole.
6
Delete the rgAuthor hole.
7
Select the rgRectoTitlePage part template and click the Quick Parts button.
8
Click Save Selection to Quick Part Gallery.
9
In the Create New Building Block dialog box, set Name to rgRectoTitlePage and
the Category to mlreportgen. Click OK.
10 In the template, select the contents of the part template (including the section break)
and click the Delete button.
11 Save and close the template.
Suppose that you use the custom template to generate a report that has a Title Page
component that specifies an image and an author. The generated report displays the
image at the top of the title page and does not include an author.
Related Examples
•
“Copy a Conversion Template” on page 6-12
•
“Customize Microsoft Word Report Styles” on page 6-18
More About
•
“Report Conversion Templates” on page 6-2
•
“Conversion Template Contents” on page 6-5
6-35
6
Template-Based Report Formatting
Create a Custom HTML Template
In this section...
“Copy an HTML Template” on page 6-36
“Select an HTML Editor” on page 6-37
“Edit HTML Styles in a Template” on page 6-37
Copy an HTML Template
To customize the format styles used in the default HTML template, you need to copy that
template (or a template that was copied from the default template) and modify or add
style definitions in the copy.
1
In Report Explorer, select Tools > Edit Document Conversion Template.
2
In the Library pane (middle pane), select a template from the list of HTML
templates. For example, select the DefaultHTMLTemplate.
3
In the Properties pane, click Copy template.
4
In the file browser, navigate to the location where you want to save the template file.
Select a path that is on the MATLAB path (for example, in the MATLAB folder in your
home directory).
Specify the file name, using the default file extension for a HTML template
(.htmtx). Click Save.
5
In the list of templates in the middle pane, select the template copy you just created.
6
In the Properties pane, in the Template id and Display name fields, specify a
unique ID and display name for the template.
The display name is the name that appears in the Report Explorer list of templates.
The template ID is what you use to identify a template when using a command-line
interface.
7
6-36
To save the template properties you entered, move the cursor outside of the
Properties pane and click.
Create a Custom HTML Template
Select an HTML Editor
By default, when you edit an HTML style sheet, the style sheet appears in the MATLAB
Editor.
To use a different editor for editing an HTML template:
1
In the Report Explorer, select File > Preferences
2
In Edit HTML Command, enter a MATLAB expression that opens the HTML editor
you want to use. For example:
system('Dreamweaver %<FileName> &')
When you open an HTML stylesheet, the Report Explorer automatically replaces
FileName with the template that you selected.
Edit HTML Styles in a Template
You can customize or add format styles in a custom HTML template.
1
In the list of templates in the middle pane, select the custom template that you want
to edit.
Tip If the Report Explorer middle pane does not show a list of templates, then select
Tools > Edit Document Conversion Template.
2
In the Properties pane, click Open stylesheet.
3
In the HTML editor, edit the cascading style sheet (CSS).
For information about editing a cascading style sheet, see documentation such as the
W3Schools.com CSS tutorial.
4
Save the style sheet.
Related Examples
•
“Generate a Report Using a Template” on page 6-4
•
“Customize Microsoft Word Report Styles” on page 6-18
•
“Customize Microsoft Word Part Templates” on page 6-21
6-37
6
Template-Based Report Formatting
More About
•
6-38
“Report Conversion Templates” on page 6-2
7
Create Custom Components
• “About Custom Components” on page 7-2
• “Create Custom Components” on page 7-3
• “Define Components” on page 7-6
• “Specify Tasks for a Component to Perform” on page 7-13
• “Customized Components” on page 7-19
7
Create Custom Components
About Custom Components
In most cases, the components provided with the MATLAB Report Generator software
should be more than adequate for your needs. You can, however, create custom
components if you want to generate a report via functionality that is not available in
the standard MATLAB Report Generator components. For example, you can create a
component that inserts a corporate logo into your report, or a component that plots data.
7-2
Create Custom Components
Create Custom Components
To create a component:
1
Open the Report Explorer.
2
Select one of the component creation choices from the Tools menu:
• To create a custom component, select Create Component.
• To create a custom component from an existing component, select Create
Component from.
• To create a component from an existing version 1 component, select Create
Component from V1.
Tip You can also create a custom component by clicking the Create a new userdefined reporting component link in the Report Explorer Properties pane on the
right.
The Report Explorer displays as follows:
• The Outline pane on the left displays the structure of components you create.
• The Options pane in the middle lists properties you add to components.
• The Properties pane on the right specifies the behavior of component properties.
7-3
7
Create Custom Components
3
Specify properties of the component in the Properties pane of the Report Explorer.
For more information, see “Define Components” on page 7-6.
4
Specify tasks you want the component to perform by editing the MATLAB files that
comprise the framework of the component. For more information, see “Specify Tasks
for a Component to Perform” on page 7-13.
5
Build the component. For more information, see “Build Components” on page
7-11.
After you build the custom component, you can use it to specify options for your
generated report in the report setup file.
7-4
Create Custom Components
Note: You must restart the MATLAB software session before using a newly created or
rebuilt component.
7-5
7
Create Custom Components
Define Components
In this section...
“Required Component Data” on page 7-6
“Specify the Location of Component Files” on page 7-6
“Set Component Display Options” on page 7-7
“Specify Component Properties” on page 7-9
“Modify Existing Components” on page 7-11
“Build Components” on page 7-11
“Rebuild Existing Components” on page 7-12
“Remove a Component” on page 7-12
Required Component Data
You must specify the following information when you create a component:
1
The path where you want to put the folder that contains all files for the component.
For information on how to specify this folder, see “Specify the Location of Component
Files” on page 7-6.
2
Properties of the component. For more information, see “Specify Component
Properties” on page 7-9.
3
Display options for the component, including its display name, category, and
description. For more information, see “Set Component Display Options” on page
7-7.
Specify the Location of Component Files
You can create components that perform similar functions and group them in Package
Directories. Each package folder must have a Parent Directory that is in the MATLAB
path. When you build a new component, the MATLAB Report Generator software
creates files that make up the component. These files are stored in the folder structure
<parent>/@package_name/@class_name.
Specify these directories in the following fields in the Component File Location area of
the Properties pane:
7-6
Define Components
1
Class Directory Field. Specify a class name for your component. The build process
creates a folder with the name you specify and places the component's files in it. The
class folder name must be unique for each component in the package. By convention,
component class names begin with an uppercase or lowercase letter c; for example,
cUserDefinedComponent.
2
Package Directory Field. Specify the folder in which to store files for groups of
components you create. Files for each component are stored in a subfolder with the
name you entered into Class Directory Field.
3
Parent Directory Field. Specify this folder when you create a package for the first
time. This folder is the parent folder of the Package Directory.
Set Component Display Options
You can specify how you want your component to appear in the Report Explorer by
entering data in the Component Display Options area of the Properties pane. Enter
the following information:
1
Display Name. Specify a display name for the component to appear in the list of
components for its associated category. Component categories and display names
appear in the Options pane in the middle of the Report Explorer.
For information on specifying component categories, see step 3, Category Name.
The following example shows how to create a component called My First
Component in a category called My Category.
2
Description. Enter a description for the component. This description appears when
you click the component name or category name in the Options pane in the middle of
the Report Explorer. Make the description informative, but brief.
7-7
7
Create Custom Components
3
Category Name. Specify the category of components to which the new component
belongs. The component appears under this category in the Options pane in the
middle of the Report Explorer.
Predefined choices appear in the Category name list. Select a component category
from this list.
To create a custom component category, type the name for the category into the
Category name field. This category name appears in the list of available categories
in the Report Explorer.
4
child components.
Select the Component may contain children check box if you want the
component to have child components. Child components appear under the component
in the Report Explorer hierarchy. During report generation, the component runs all
child components and includes their output in the report.
7-8
Define Components
Specify Component Properties
Component properties determine how a component behaves and what information it
inserts into a report. To see the current value of a component's property, double-click it
in the Outline pane on the left in the Report Explorer. For example, the following figure
displays the property values for New_String_Property.
Add Properties to Components
You add properties to a component from the properties list. Each property has a default
value that you can modify as needed.
There are several ways to add properties to components:
1
Right-click the name of the component to which you want to add properties in the
Outline pane on the left. Select Add new property from its context menu.
7-9
7
Create Custom Components
7-10
2
Right-click the name of a predefined property in the Options pane in the middle.
From the context menu, select Add property.
3
Left-click the name of a property in the Options pane, and then drag it on top of a
component in the Outline pane on the left.
4
Double-click the property name in the Options pane in the middle. The property is
added to the component and property values appear in the Properties pane on the
right.
5
Click the Add Property button on the Properties pane on the right.
Define Components
Specify Component Properties
1
Property Name. Create a name for the new property. A property name must be a
valid MATLAB variable name, and must be unique within a component.
2
Data Type. Specify the property's data type. Options are:
• Double
• Enumeration
• Integer
• String
• String Vector
• %<Parsed String>
Use this data type to include the value of a variable in the MATLAB workspace in
a component. For more information about this data type, see “%<VariableName>
Notation” on page 10-99 on the Text reference page.
• True/False
3
Default Value. Set a default value for the property. The default value must be
compatible with the data type. If incompatibilities exist between the default value
and the data type, the component might not build.
4
Dialog Prompt. This text appears next to the widget on the component's dialog box.
It indicates what the property does and how it affects report generation.
Note: When the component builds, a colon is appended to your entry in the Dialog
prompt field. Your entry appears in the Properties pane with the colon appended.
Modify Existing Components
Report components are modifiable. You can derive a new component from an existing
component by double-clicking the name of the component and modifying its values and
properties.
Build Components
After you have entered all data required for defining the component, you build it by
clicking the Build Component button. The build process creates all files needed for the
7-11
7
Create Custom Components
component and stores them in the specified folder. For more information about specifying
where components are stored, see “Specify the Location of Component Files” on page
7-6.
Note: Existing files in this location are overwritten.
Rebuild Existing Components
To add, remove, or change properties of an existing component, use the Rebuild
Constructor button. This button becomes active only after you have previously
created a component using the Build Component button. To activate the Rebuild
Constructor button, specify the Package name and Class name for an existing
component. These fields are located in the Component File Location area of the
Properties pane.
If you select a component using Tools > Create component from, the component's
fields are filled in automatically and the button becomes active.
After you have finished modifying the component, click the Rebuild Constructor
button to rebuild the component. Writable files in the component's folder location are not
overwritten.
Remove a Component
To remove a component:
7-12
1
Delete its class folder, <root>/@package_name/@class_name. If the component
you want to remove is the only component in the package, delete the entire package.
2
Edit <root>/@package_name/rptcomps2.xml to remove the XML element that
registers the component.
Specify Tasks for a Component to Perform
Specify Tasks for a Component to Perform
In this section...
“About Component Customization” on page 7-13
“Required Customization: Specify Format and Content of Report Output” on page
7-13
“Change a Component's Outline String in the Report Explorer Hierarchy” on page
7-15
“Modify the Appearance of Properties Dialog Boxes” on page 7-16
“Specify Additional Component Properties” on page 7-17
About Component Customization
Building a component creates MATLAB files in the MATLAB workspace. Specify tasks
that you want your component to perform by editing these MATLAB files.
Note: You must specify the format and content of your report output by editing
execute.m. This file is called during report generation to invoke your component's tasks.
Optionally, you can specify additional component properties and behavior by editing
other MATLAB files.
For more information, see the following sections:
• “Required Customization: Specify Format and Content of Report Output” on page
7-13
• “Change a Component's Outline String in the Report Explorer Hierarchy” on page
7-15
• “Modify the Appearance of Properties Dialog Boxes” on page 7-16
• “Specify Additional Component Properties” on page 7-17
Required Customization: Specify Format and Content of Report Output
After you build the component, specify the format and content of your report output by
editing the execute.m file.
7-13
7
Create Custom Components
The execute command has the following syntax:
out = execute(thisComp, parentDoc)
Where:
• thisComp is a handle to the component that you are running.
• parentDoc is a handle to the document that you are generating.
• out is a Document Object Model (DOM) node or string to add to the report.
For information on manipulating DOM nodes, see xmlwrite in the MATLAB
documentation.
One or more default lines of code within the execute.m file show each property for the
component. Here is an example of a component property line within an execute.m file:
pstring = thisComp.NewStringProperty;
% New string property;
The following sections describe how to edit execute.m to create additional report
elements.
Create Tables
To create a table, replace the Source property value with the name of a cell array or
structure:
out = execute(rptgen.cfr_table(...
'Source', tableSrc,...
'numHeaderRows',1,...
'TableTitle','Example Title'),...
parentDoc);
For more information, enter help(rptgen.cfr_table) at the MATLAB command line.
Create Lists
To create a list, replace the Source property value with the name of a cell vector:
out = execute(rptgen.cfr_list(...
'Source', listSrc,...
'ListStyle','orderedlist',...
'ListTitle','Example List'),...
parentDoc);
7-14
Specify Tasks for a Component to Perform
For more information, enter help(rptgen.cfr_list) at the MATLAB command line.
Create Text
To create text, replace the ParaText property value with a text string:
out = execute(rptgen.cfr_paragraph(...
'ParaText', paraSrc,...
parentDoc);
For more information, enter help(rptgen.cfr_paragraph) at the command line.
Create Figures
To create figures, specify a figure in the FigureHandle property value.
figSrc = gcf;
out = execute(rptgen_hg.chg_fig_snap(...
'FigureHandle', figSrc,...
'Title', '',...
'isResizeFigure', 'manual',...
'PrintSize', [6 4],...
'PrintUnits', 'inches'),...
parentDoc);
For more information, enter help(rptgen_hg.chg_fig_snap) at the MATLAB
command line.
Run Child Components
The following code runs child components. The first line calls execute.m for child
components. The second line appends the results of running the child components to the
report:
childOut = thisComp.runChildren(parentDoc);
out = parentDoc.createDocumentFragment(out, childOut);
Change a Component's Outline String in the Report Explorer Hierarchy
To change the string used to describe the component in the Report Explorer hierarchy,
edit the getOutlineString MATLAB file. By default, getoutlinestring returns the
display name of the component. The getOutlineString command has the following
syntax:
7-15
7
Create Custom Components
olstring = getOutlineString(thisComp)
Where:
• thisComp is the component whose description you are specifying.
• olstring is a single-line string that displays information about the component. It
can contain a maximum of 32 characters.
Customize the string to include additional information about the component, such
as information about its properties. In the following example, the truncatestring
function converts input data into a single-line string. If the data is empty, the second
argument is the return value, The third argument is the maximum allowed size of the
resulting string.
cInfo = '';
pstring = rptgen.truncateString(thisComp.string,'<empty>',16);
Use a dash (-) as a separator between the name and additional component information,
as follows:
if ~isempty(cInfo)
olstring = [olstring, '-', cInfo];
end
Modify the Appearance of Properties Dialog Boxes
You can edit the getdialogschema.m file to control most aspects of dialog box layout,
including:
• Creation and placement of widgets
• Organization of widgets into panes
• Creation of the top-level display within which panes reside
The syntax of the command is:
dlgstruct = getdialogschema(thisComp, name)
Where:
• thisComp is the instance of the component being edited.
• name is a string that is passed to getdialogschema to build a specific type of pane.
Usually, name is empty in the Report Explorer.
7-16
Specify Tasks for a Component to Perform
Note: Do not modify fields that are not explicitly included in this file. These fields are
subject to change in future releases.
Specify Additional Component Properties
You can edit additional MATLAB files to customize your component further. To access
these files, right-click the component in the Outline pane on the left in the Report
Explorer and select Edit files from its context menu.
For more information, see the following sections:
• “Specify Whether Components Can Have Children Components” on page 7-17
• “Modify a Component Description” on page 7-17
• “Change a Component Display Name” on page 7-18
• “Change a Component Category Name” on page 7-18
• “Register Components” on page 7-18
• “Display Component Help in the MATLAB Help Browser” on page 7-18
Specify Whether Components Can Have Children Components
To specify whether a component can have children, edit getParentable.m. This
command returns the value true or false. For example, if you no longer want your
component to have child components, modify the value within the code as follows:
p = false;
Modify a Component Description
The description n getDescription.m is the same value as the Description field in the
Report Explorer. The following example shows how to edit the compDesc string in this
file to change a component's description to An example component:
7-17
7
Create Custom Components
compDesc = 'An example component';
Change a Component Display Name
The display name in getName.m is the same value as the Display name field in the
Report Explorer. The following example shows how to edit the compName string in this
file to change a component's display name to Example Component:
compName = 'Example Component';
Change a Component Category Name
The category name in getType.m is the same value as the Category name field in the
Report Explorer. The following example shows how to edit the compCategory string in
this file to change a component's category name to Custom Components:
compCategory = 'Custom Components';
Register Components
You can register components in the Report Explorer using rptcomps2.xml. This file also
helps build the list of available components.
The content of this file must be consistent with the values in the getName.m and
getType.m files. If you have changed values in either of these files, you must also
change their values in rptcomps2.xml. You must restart the MATLAB software session
for the Report Explorer to display new information.
Display Component Help in the MATLAB Help Browser
The viewHelp.m file displays a help file for the component within the MATLAB Help
browser. To display the help file, highlight the name of the component in the Report
Explorer and click Help.
7-18
Customized Components
Customized Components
In this section...
“Fetching Securities Data and Displaying It in a Table” on page 7-19
“Displaying Securities Data in Two Tables” on page 7-24
Note: These examples require the Datafeed Toolbox™ software.
Fetching Securities Data and Displaying It in a Table
This example shows how to create a component that fetches securities data and displays
it in a report as a table.
1
Create a component named Equity Values in the class folder named
CStockTicker.
2
Give the component one string property named Ticker, and specify its attributes.
a
In the Options pane of the Report Explorer, double-click
New_String_Property.
b
For Property name, specify a valid MATLAB variable name.
c
Specify the property's data type. In this case, Ticker is a string value, which is
the default data type.
d
Specify the property's default value.
Because this example fetches ticker values for the security Google, set the
Default value to 'GOOG'. (The single quotation marks are required to specify a
string value for this field.)
Your specified settings appear in the Code Preview pane.
7-19
7
Create Custom Components
3
To build the new component, click the Build button in the Report Explorer. The
Equity Values component now appears in the Options pane in the middle of the
Report Explorer.
4
Edit the component's execute.m file to retrieve stock market data and display it in
a table in the generated report.
a
In the @CStockTicker folder, open execute.m.
b
Enter the following text into execute.m.
function out=execute(thisComp,parentDoc,varargin)
7-20
Customized Components
stockQuote = fetch(GOOG, thisComp.Ticker);
stockQuote.Date = datestr(stockQuote.Date,1);
stockQuote.Time = datestr(stockQuote.Time,13);
out = execute(rptgen.cfr_table(...
'Source', stockQuote,...
'numHeaderRows', 0,...
'TableTitle', 'Stock Market Pricing Data'),...
parentDoc);
5
Append the security symbol, goog, to the component name. Enter the following text
into getOutlineString.m.
function olstring=getOutlineString(thisComp)
olstring = [getName(thisComp),' - ',thisComp.Ticker];
The component name now appears as Equity Values — goog.
7-21
7
Create Custom Components
6
Modify the getdialogschema.m file to change the appearance of the Properties
pane. Enter the following text into this file to display the last quoted price for the
security in the Properties pane.
function dlgStruct = getdialogschema(thisComp, name)
try
currQuote = fetch(yahoo, thisComp.Ticker);
quoteStr = sprintf('Last value: %g', currQuote.Last);
catch
quoteStr = sprintf('Warning: ...
"%s" is not a valid symbol.', thisComp.Ticker);
end
dlgStruct = thisComp.dlgMain(name,...
thisComp.dlgContainer({
7-22
Customized Components
thisComp.dlgWidget('Ticker',...
'DialogRefresh',true,...
'RowSpan',[1 1],'ColSpan',[1 1]);
thisComp.dlgText(quoteStr,...
'RowSpan',[2 2],'ColSpan',[1 1]);
},'Stock',...
'LayoutGrid',[3 2],...
'RowStretch',[0 0 1],...
'ColStretch',[0 1]));
The Properties pane for the component, Equity Values, now looks as follows.
7
Click File > Report to generate the report. The following output appears in the
report.
7-23
7
Create Custom Components
Displaying Securities Data in Two Tables
This example, which shows how to use multiple properties within a component, expands
upon “Fetching Securities Data and Displaying It in a Table” on page 7-19.
1
Create a report setup file and save it as stockreport.rpt. Add two Equity
Values components to the setup file.
2
Edit the entry in the New marker property field to change the ticker property of
the second component to '^GSPC' (S&P 500 index).
3
Run the report.
The report displays two tables of data, one for Google® and another for the S&P 500
index.
7-24
Customized Components
7-25
8
Create Custom Stylesheets
• “Stylesheets” on page 8-2
• “Create a New Stylesheet” on page 8-4
• “Edit, Save, or Delete a Stylesheet” on page 8-5
• “Edit Stylesheet Data Items” on page 8-9
• “Stylesheet Cells for Headers and Footers” on page 8-23
• “Customized Stylesheets” on page 8-29
• “PDF Fonts for Non-English Platforms” on page 8-40
8
Create Custom Stylesheets
Stylesheets
In this section...
“Built-In Versus Custom Stylesheets” on page 8-2
“Customize Stylesheets Using Data Items” on page 8-3
Built-In Versus Custom Stylesheets
Stylesheets specify formatting and display settings for reports. The report-generation
process uses stylesheets to convert reports from DocBook XML format to a format that
you specify. If you want to generate the given report in a different format than initially
specified, you can convert the XML document using a different or modified stylesheet.
The following table lists report output formats and their default stylesheets.
Report Format
Default Stylesheet
HTML
Uses stylesheets for either single- or multiple-page documents
PDF
Formatting Object (FO) stylesheet
RTF, Word
Document Style Semantics and Specification Language (DSSSL)
stylesheet
The following table shows a list of properties for the built-in stylesheets.
Properties of Stylesheets
Name
Description
Description
A description of the stylesheet.
Display name
The stylesheet name that appears in the Options pane.
Transform type The process used to generate reports that use a specified stylesheet.
Supported types are:
• HTML
• FO (Formatting Object) for PDF reports
• DSSSL (Document Style Semantics and Specification Language) for
RTF and Word reports
8-2
Stylesheets
Name
Description
Note: This field is not editable.
In most cases, the stylesheets provided with the MATLAB Report Generator software
should be more than adequate for your needs. However, you may want to modify
the built-in stylesheets to meet special requirements. For example, suppose one of
the built-in stylesheets meets your requirements, but you want to change the page
orientation. You can create a custom stylesheet by editing the built-in stylesheet to your
specifications.
Customize Stylesheets Using Data Items
Each built-in stylesheet includes editable styles, also called data items, organized in
categories. These data items specify styles that the file converter uses for a given report.
You can edit these data items to customize stylesheets for your reports.
Data items can be of different types, some of which require different editing methods.
For more information about editing data items, see “Edit Stylesheet Data Items” on page
8-9.
Tip See the Help area at the bottom of the Properties pane on the right for a description
of a specific data item that you are editing.
8-3
8
Create Custom Stylesheets
Create a New Stylesheet
To create a stylesheet:
1
Open the Report Explorer.
2
From the menu bar, click Tools > Edit Stylesheet.
3
In the Properties pane on the right, choose the built-in stylesheet for the format with
which you want to work. Options are:
• New HTML. Creates a stylesheet for HTML reports.
• New multi-page HTML. Creates a stylesheet for HTML reports with more than
one page.
• New FO (PDF). Creates a stylesheet for PDF reports.
• New DSSSL (RTF). Creates a stylesheet for RTF reports.
The new stylesheet appears in the Outline pane on the left.
4
5
8-4
In the Properties pane on the right, modify the properties for the stylesheet as
needed. Add data items to the new stylesheet:
a
Drag the data item you want to add from the Options pane in the middle to the
stylesheet in the Outline pane on the left.
b
In the Properties pane on the right, edit the data items for the selected style. For
more information, see “Edit Stylesheet Data Items” on page 8-9
Save the stylesheet. For information about how to save a stylesheet, see “Save a
Stylesheet” on page 8-7.
Edit, Save, or Delete a Stylesheet
Edit, Save, or Delete a Stylesheet
In this section...
“Edit a Stylesheet” on page 8-5
“Save a Stylesheet” on page 8-7
“Delete a Stylesheet” on page 8-8
Edit a Stylesheet
To edit a stylesheet:
1
In Report Explorer, select a report setup file in the Outline pane on the left.
2
From the menu bar, click Tools > Edit Stylesheet.
The Report Explorer displays as follows.
• The Outline pane on the left displays the structure of stylesheets you create.
• The Options pane in the middle lists stylesheets available for customizing.
Tip Double-click a category to collapse it. Double-click it again to expand it.
• The Properties pane on the right shows properties of stylesheets, such as name and
description.
8-5
8
Create Custom Stylesheets
You can use the Report Explorer to work with stylesheets as follows.
8-6
Task
Pane to Use
Action
Create a stylesheet
Properties
Click the link that corresponds to the
kind of stylesheet you want to create
Edit, Save, or Delete a Stylesheet
Task
Pane to Use
Action
Open an existing stylesheet
Properties
Click the name of the stylesheet,
which appear in the Open
Stylesheets area
Select a stylesheet to use for
converting an XML source file
Options
Select a stylesheet by clicking on it
View a list of customized styles in Outline
a stylesheet
Expand any open stylesheet
View a list of styles in a
stylesheet
Outline or
Options
Double-click the stylesheet
View a list of stylesheets
available for editing in a given
category
Options
Double-click the folder that
corresponds to the kind of output you
want (that is, HTML, PDF, RTF, or
Word)
View open stylesheets
Outline
Expand the Stylesheet Editor item in
Report Explorer
Change the name or description
of the current stylesheet
Properties
Edit the text in the Display Name or
Description field.
Convert an XML source file using Properties
the current stylesheet
Click Send to Source File
Converter in the Properties pane.
Edit customized style data
Click the style data item, which
appears in the Stylesheet
Customizations area
Properties
Open a style data item for editing Options
or viewing
Double-click the data item that you
want to edit.
View a list of customized style
data
Expand the stylesheet
Outline
Save a Stylesheet
You must save a stylesheet before you can use it to convert a source file or associate it
with a report. To use the Report Explorer to save a stylesheet:
1
Select the stylesheet that you want to save in the Outline pane on the left.
8-7
8
Create Custom Stylesheets
2
Select File > Save As from the menu bar and specify a new name for the stylesheet
(to avoid overwriting built-in stylesheets). You must save the file in a folder in your
MATLAB path for the stylesheet to appear in the Report Explorer. The file name
must be unique in the MATLAB path.
By convention, MATLAB Report Generator stylesheets have .rgs as their file name
extension.
Delete a Stylesheet
To use the Report Explorer to delete a stylesheet that you created:
1
Select the stylesheet that you want to delete in the Outline pane on the left.
2
Click the stylesheet to delete from the Options pane in the middle.
3
Click Delete stylesheet in the stylesheet's Properties pane on the right.
You must restart the MATLAB software session for deleted stylesheets to disappear from
the Options pane.
Note: You cannot delete built-in stylesheets.
8-8
Edit Stylesheet Data Items
Edit Stylesheet Data Items
In this section...
“Data Item Categories in Built-In Stylesheets” on page 8-9
“Edit Data Items in Simple or Advanced Edit Mode” on page 8-13
“Data Items” on page 8-13
Data Item Categories in Built-In Stylesheets
You can edit data items in built-in stylesheets to customize them. Data items appear in
categories, according to their function. The following tables list the categories and data
items for each type of stylesheet provided with the MATLAB Report Generator software.
Categories of Styles in PDF (FO) Stylesheets
Category
Description of Data Items in Category
Automatic labeling
Options for enumeration of parts of the report, such as
chapters and sections
Callouts
Options and specifications related to callouts, such as
defaults, use of graphics, size, path, fonts, characters,
and extensions
Cross References
Option to control whether page numbers appear in
report
Font Families
Specification of defaults for body text, copyright, quotes,
symbols, dingbats, monospace, sans serif, and titles
Graphics
Specification of default width and options related to
scaling attributes
Lists
Specification of spacing related to lists and list items
Meta/*Info
Options related to year ranges
Miscellaneous
Options and specifications for placement of titles,
comments, variable lists, block quotations, ulinks,
hyphenations of URLs, verbatim environment display,
use of SVG, table footnote numbers, superscript, and
subscript
8-9
8
Create Custom Stylesheets
Category
Description of Data Items in Category
Pagination and General
Styles
Specifications of page orientation, margins, double-sided,
paper type, hyphenation, line height, columns, master
font, draft mode, watermark, blank pages, rules for
headers and footers, and content of headers and footers
Note: You can specify parameters in this category, such
as margin widths and header and footer height, in units
of inches (in), millimeters (mm), or picas (pi), where 1
pica = 1/6 inch.
Property Sets
Specification and options related to figure titles,
monospace properties, verbatim text, section titles, and
levels of sections
Reference Pages
Option to control whether the class name is displayed
Stylesheet Extensions
Line numbering and table columns extensions
Table of Contents (TOC)/
List of Tables (LOT)/Index
Generation
Specifications for layout of TOC, depth of sections,
indentation, and margins
Tables
Specifications for size of tables and their borders
Title Page
Specifications for positioning and transformation of title
page elements and properties of title page text elements
For information about DocBook XSL stylesheets, see http://docbook.sourceforge.net/
release/xsl/current/doc/ .
You can set up font mappings for non-English PDF fonts. The PDF stylesheets override
those mappings. For details, see
Categories of Styles in HTML and Multi-Page HTML Stylesheets
8-10
Category of Style
Description of Data Items in Category
Automatic labeling
Options for enumeration of parts of the report, such as
chapters and sections
Callouts
Options and specifications related to callouts, such as
defaults, use of graphics, size, path, fonts, characters,
and extensions
Edit Stylesheet Data Items
Category of Style
Description of Data Items in Category
Chunking
Options related to using an explicit TOC for chunking,
depth of section chunks, navigational graphics, and
display of titles in headers and footers
Stylesheet Extensions
Line numbering, graphic size, and table columns
extensions
Graphics
Specification of default width and depth, use of HTML
embed for SVG, viewports, and options related to scaling
attributes
HTML
Specifications related to dynamically served HTML, base
and head elements, type of stylesheet, css, propagation
of styles, longdesc, validation, cleanup, draft mode,
watermark, and generation of abstract
Linking
Specification of Mailto URL and target for ulinks
Meta/*Info
Options related to year ranges
Miscellaneous
Options and specifications for comments, verbatim
environment pixels, em space, use of SVG, and table
footnote numbers
Reference Pages
Option control whether the class name is displayed
Table of Contents (TOC)/
List of Tables (LOT)/Index
Generation
Specifications for layout of TOC, depth of sections,
indentation, and margins
Tables
Specifications for size of tables, table cell spacing and
padding, and borders
Title Page
Specifications for positioning and transformation of title
page elements and properties of title page text elements
XSLT Processing
Options related to header and footer navigation and
rules
For information about:
• DocBook — see http://www.oasis-open.org/docbook/documentation/reference/html/
docbook.html
• DocBook XSL stylesheets — see http://docbook.sourceforge.net/release/xsl/current/doc/
8-11
8
Create Custom Stylesheets
• DocBook print parameters, see http://docbook.sourceforge.net/release/dsssl/current/
doc/print/
Categories of Styles in RTF (DSSSL) Stylesheets
8-12
Category of Style
Description of Data Items in Category
Admonitions
Options and path for admonition graphics
Backends
Options for Tex, MIF, and RTF back-end usage
Bibliographies
Options related to checking citations; suppressing,
enumerating, and using titles of entries
Fonts
Specifications for font family and size to use for some
elements
Footnotes
Options for ulinks as footnotes and page location
Graphics
Specifications for file extensions, file names, and loading
library database
Indents
Specifications for hanging indents, first paragraphs, and
start of blocks
Labeling
Enumeration of sections and other elements
Miscellaneous
Options for floating formal objects, punctuation for
run-in heads and honorifics, bold for first use of term,
minimum leading between lines, and automatic
hyphenation
OLinks
Using an extension for finding outline information
Object Rules
Specifications for placement and width of rules
Paper/Page Characteristics
Specifications for paper type, page numbers, width of
pages, margins, and columns; heading-levels, sides; and
writing mode (such as left-to-right)
Quadding
Specifications for justifying paragraphs
RefEntries and Functions
Options related to generation and display of reference
entries and synopses for functions
Running heads
Options for generating and displaying running heads of
chapters
Table of Contents (TOC)/List
of Tables (LOT)
Options to produce or display TOC for sets, books, parts,
references, articles. Options to display TOC on title page
Edit Stylesheet Data Items
Category of Style
Description of Data Items in Category
Tables
Specification of width in simple list
VariableLists
Options and specifications for term length and
formatting
Verbatim Environments
Specifications for width, enumeration, size, indentation,
line frequency, and callouts
Vertical Spacing
Specifications for space between lines and paragraphs
Edit Data Items in Simple or Advanced Edit Mode
• To edit a data item in simple edit mode, edit a simple string that corresponds to the
data in the stylesheet. This string appears in the field to the right of the Value label.
For some values, use a selection list to change the value instead of typing in text.
• To edit a data item in advanced edit mode, edit the XML code directly.
Note: This section gives instructions for simple edit mode, except where explicitly
specified otherwise.
The user interface is in simple edit mode when the data item appears in a pane labeled
Value. It is in advanced edit mode when the data item appears in a pane labeled Value
(XML). To switch from simple to advanced edit mode, click Edit as XML.
Edit values for most data items in PDF and HTML stylesheets in either simple edit mode
or advanced edit mode. Edit values for RTF stylesheets in simple edit mode only. Data
items in RTF stylesheets do not support advanced edit mode.
Note: To modify content for headers and footers you edit stylesheet cells, which do not
appear in either simple or advanced mode. For more information, see “Stylesheet Cells
for Headers and Footers” on page 8-23.
Data Items
Select a stylesheet from the Options pane in the middle of the Report Explorer. The
Outline pane on the left shows the name of the current style data item inside its
8-13
8
Create Custom Stylesheets
stylesheet. The Options pane in the middle shows a list of available stylesheet data
items. The Properties pane on the right displays Stylesheet Editor: Data. It also
includes the following information:
• The value of the data item is in a pane labeled Value in simple edit mode or Value
(XML) in advanced edit mode.
• To the right of the value is the Edit as XML toggle button.
• The Preview pane includes a partial view of the stylesheet that specifies the data
item. The data in this pane is not editable.
• The Help pane contains information about the data item. This information is not
editable.
8-14
Edit Stylesheet Data Items
Edit Boolean and Enumerated Values
In the previous figure, theShow Comments data item is of type Boolean. Its current
value is true(1). Change this value using the menu list for the value field. In this case,
the only other possible value is false(2).
8-15
8
Create Custom Stylesheets
Edit Strings
For the values of some data items, the Report Explorer displays text in the editable
Value field. You can specify an XML expression, though you are not required to do so.
Edit XML Expressions
To make complex changes to a stylesheet, consider using Advanced edit mode. This
enables you to edit XML expressions directly in the Value (XML) pane. If this pane does
not appear, click Edit as XML to switch to advanced edit mode.
Make sure that you enter valid XML. Invalid XML values generate an error, which
appears at the top of the Properties pane.
Modify Title Page Properties
For PDF or HTML stylesheets, you can modify the layout, contents, and format of a title
page by using the Stylesheet Editor.
1
In the Outline pane, select the stylesheet you want to edit.
2
In the Options pane, in the Title Page Templates section, select:
• Book Titlepage Recto to specify properties for the front side of the title page
• Book Titlepage Verso to specify properties for the back side of the title page
3
8-16
In the Properties pane, select Add to current stylesheet and edit the properties.
Edit Stylesheet Data Items
To adjust the grid used to position the title page elements (such as the title and author)
on the page, in the Properties pane specify:
• Columns — The number of columns in the page grid
• Width — The width of each column
• Rows — The number of rows in the page grid
• Width — The width of each row
To view the grid layout on the generated title page, select Show grid.
By default, all of the title page elements appear on the title page. To exclude display of a
title page element:
8-17
8
Create Custom Stylesheets
1
In the Properties pane, in the Include on title page list, select an element to
exclude.
2
Click the right arrow button. The element appears in the Exclude from Title Page
list.
To specify properties for an individual title page element:
1
In Properties pane, in the Include on title page list, select the title page element.
2
Adjust the applicable properties:
• Layout options — Specify which title page grid row and column in which you
which you want the element to appear. To span multiple rows or columns, specify
numbers for the Span row and Span column properties.
• Format options — For text elements, specify the font size, whether to use bold or
italics, text color, and text alignment.
• Transform options — You can use these options to specify XSLT code to customize
the contents and format of title page elements. Use the XPath property to
specify the path to the XSLT object that you want to modify. Use the Transform
property to specify the custom content and layout.
Modify TOC Properties
To change values for generation of the report's table of contents (TOC), select the
appropriate values from a matrix of check boxes.
The following figure shows the values for the Generate Toc data item on the PDF
stylesheet. Select the check boxes to control the values that appear in the report's title
page and table of contents.
8-18
Edit Stylesheet Data Items
Modify Title Placement Properties
The Title Placement data items, which are in the Miscellaneous category, control the
position of titles for figures and tables.
Selecting one of these data items for editing causes the Properties pane on the right
to display possible values in a menu list. Specify whether you want the title to appear
before or after a given figure or table.
8-19
8
Create Custom Stylesheets
Modify Attributes
An attribute is a data item that specifies information for an XML element. An attribute
must be a child of an attribute set. For more information, see “Edit Attribute Sets” on
page 8-20.
Note: The information in the Help area of the Properties pane of an attribute describes
the set to which the attribute belongs.
Edit Attribute Sets
An attribute set consists of a group of attributes. Selecting an attribute set in the Outline
pane on the left causes the Properties pane to list the attributes that belong to that set.
To edit a specific attribute, expand the attribute set in the Outline pane and select the
attribute you want to edit.
To edit the attribute set, type text in the Inherit attribute sets area of the Properties
pane.
An example of an attribute set is Formal Object Properties, a data item in the
Property Sets category of the default print stylesheet for PDF documents.
Here is an example of the Report Explorer showing the Formal Object Properties
attribute set in the Properties pane.
8-20
Edit Stylesheet Data Items
Edit Varpair Values
Data items in RTF stylesheets appear as varpair data items, which are name/value
pairs of information. RTF stylesheets are the only type of stylesheet that includes
varpair data items.
Edit varpair data items as strings or as Boolean values. Boolean values appear as true
(#t) and false (#f).
Note: You cannot edit RTF stylesheet data items as XML.
Note: Data of type varpair is sometimes represented in stylesheets as DSSSL rather
than XML. As a result, the code that appears in the Preview pane of the Properties pane
8-21
8
Create Custom Stylesheets
on the right looks different from code associated with other kinds of MATLAB Report
Generator stylesheets.
Delete Data Items
To delete a customized data item:
8-22
1
Right-click the data item in the Outline pane on the left.
2
Select Delete.
Stylesheet Cells for Headers and Footers
Stylesheet Cells for Headers and Footers
In this section...
“About Stylesheet Cells and Cell Groups” on page 8-23
“Headers and Footers” on page 8-24
“Add Content to Headers and Footers Using Templates” on page 8-26
“Insert Graphics Files” on page 8-27
“Modify Fonts and Other Properties” on page 8-27
About Stylesheet Cells and Cell Groups
Use stylesheet cells to specify content of headers and footers in PDF reports.
The MATLAB Report Generator software defines a page as six cells. These cells
correspond to the left, right, and center of the page's header and the left, right, and
center of the page's footer.
A cell group consists of one or more stylesheet cells. Two cell groups are available for
PDF reports: Header Content and Footer Content.
The Properties pane for each cell in a cell group lists the group's current stylesheet cell
definitions. These definitions appear in a two-column list of Conditional cell values.
The first column displays the name of a condition. The second column displays content
that appears in the report if the specified condition is met.
For example, the stylesheet cell Page sequence - Blank specifies the content for a
blank page; by default, the content is empty. Similarly, Cell - Right Side specifies
the content for the right side of the header on every page.
8-23
8
Create Custom Stylesheets
You can use many combinations of conditions and values to customize content of headers
and footers. The MATLAB Report Generator software provides several predefined
conditions that are frequently used. These predefined cells appear in the Properties
panes for the Header Content and for Footer Content cell groups.
Headers and Footers
Add Content That Satisfies Specified Conditions
You can use the Properties pane of a stylesheet cell to specify content that satisfies
specified conditions. The Properties pane for a stylesheet cell includes the following.
8-24
Stylesheet Cells for Headers and Footers
Label
Definition
Description
Condition
Condition that must
be met for content to
appear in the report
This is a selection list of frequently used and predefined
conditions. Select a condition and click Edit to view or
change a condition's XML code
Value (XML)
Content to appear
in the report if the
condition is met
Modify or create XML code for header or footer content
Append
Template
Name of the template Templates containing XML code that you can use to
that you use to add
add content. For more information, see “Add Content to
content
Headers and Footers Using Templates” on page 8-26.
When the File Converter processes a page, it evaluates settings that are relevant to each
of the six cells on the page and adds content accordingly. If there are no conditions in
effect for a given cell, the File Converter uses the default values for the cell group.
8-25
8
Create Custom Stylesheets
Possible conditions and their values as coded in XML are shown in the following table.
Possible Values for the
Condition
Sample XML Code
$position
right
center
left
$position='right'
$position='center'
$position='left'
$sequence
odd
even
first
blank
$sequence=odd
$sequence=even
$sequence=first
$sequence=blank
$double-sided
0
1
$double-sided=0
$double-sided=1
$pageclass
$titlepage
$lot
$body
$pageclass=$titlepage
$pageclass=$lot
$pageclass=$body
Name of Condition
Use standard logical operators (such as = , != , and, or) and nested expressions
(characters between parentheses are an expression within an expression) to specify
complex conditions. You can use complex conditions to set the position of headers and
footers on pages. You can also use them to specify other settings, such as where in the
report the content appears.
Add Content to Headers and Footers Using Templates
Templates are available for adding the following items to headers and footers:
• Text
• Author names
• Page numbers
• Titles for chapters and sections
• Chapter numbering
• Draft information
• Comments
• Graphics
Templates used by the File Converter are Extensible Style Language Transformations
(XSLT), which is a language for transforming XML documents into other XML
8-26
Stylesheet Cells for Headers and Footers
documents. For details about XSLT, see the Web site for the World Wide Web
Consortium (W3C®) at http://www.w3.org/TR/xslt.
To use a template to specify content for a header or footer:
1
In the Append template list, select the type of content you want to add.
2
Click Append.
The Properties pane on the right displays default content for the type you select.
Edit the XML code to change the default content.
For example, to specify text as the content:
1
Select Text from the Append template list.
2
Click Append.
3
The default value for xsl:text is Confidential. Edit the value as needed.
Insert Graphics Files
To add a graphics file to headers or footers in a report, you must:
1
Specify the name of the file in the Header Content or Footer Content stylesheet
cell.
2
Edit the values of the Region Before Extent and Region After Extent data
items. These are located in the Pagination and General Styles folder of the
Options pane for PDF formatting.
For an example of adding a graphic file to a header, see “Add Graphics to Headers in
PDF Reports” on page 8-30.
Note: PDF reports only support bitmap (.bmp), jpeg (.jpg), and Scalable Vector
Graphics (.svg) images in headers and footers.
Modify Fonts and Other Properties
You cannot use stylesheet cells to modify the font family or other such properties of
headers and footers. To specify the style of the content in headers and footers, use the
Header Content Properties and Footer Content Properties attribute sets.
8-27
8
Create Custom Stylesheets
Each of these attribute sets is a pagination style data item for PDF stylesheets. You can
edit a particular attribute in the set by selecting it in the Outline pane on the left.
For an example of modifying font size and other properties of a PDF report, see “Change
Font Size, Page Orientation, and Paper Type of a Generated Report” on page 8-35.
8-28
Customized Stylesheets
Customized Stylesheets
In this section...
“Number Pages in a Report” on page 8-29
“Add Graphics to Headers in PDF Reports” on page 8-30
“Change Font Size, Page Orientation, and Paper Type of a Generated Report” on page
8-35
“Edit Font Size as a Derived Value in XML” on page 8-37
Number Pages in a Report
This example shows how to edit a stylesheet cell to number the upper-right side of all
pages in the generated report.
1
2
Define a basic stylesheet cell in the Header Content cell group with a condition of
right.
a
Open a PDF stylesheet in the Report Explorer.
b
Double-click Header Content (under Pagination and General Styles) in the
Options pane in the middle.
c
Click Position - Right in the Properties pane on the right.
Set the header content to the current page number by selecting Page number from
the Append template selection list.
8-29
8
Create Custom Stylesheets
3
Click Append.
Add Graphics to Headers in PDF Reports
This example shows how to include an image in the center of the header of each page in
a PDF report, excluding the report's title page and the first page of each chapter. You do
this by editing default header content for a PDF stylesheet. This example uses the report
setup file mfile-report.rpt.
You can use any bitmap or jpeg file as image content. You must know the size of the
image so that you can allow enough room for it in the header. This example uses the
sample_logo.bmp image, which is shown here.
8-30
Customized Stylesheets
Note: PDF reports only support bitmap (.bmp), jpeg (.jpg), and Scalable Vector
Graphics (.svg) images.
To include this image file in the center of each header in the body of a PDF report:
1
Open mfile-report.rpt by entering the following at the MATLAB command
prompt:
setedit mfile-report
2
3
Create a custom stylesheet.
a
Select Tools > Edit Stylesheet in the menu bar of the Report Explorer.
b
Click New FO (PDF) in the Properties pane on the right.
c
As the Display name, enter Logo stylesheet for PDF.
d
As Description, enter Company logo in center of header.
e
Save the stylesheet as logo_stylesheet.rgs in a folder on your MATLAB
path.
Open the cell group for editing.
a
Scroll through the Options pane on the left to the Pagination and General
Styles folder.
b
Double-click Header Content in the Options pane.
c
Click Body page – Center from the list of cells in the Properties pane on the
right.
The Properties pane appears as shown.
8-31
8
Create Custom Stylesheets
d
Delete the text in the Value (XML) field.
e
Select Graphic from the Append template selection list and click Append.
The Properties pane on the right shows the XML code that tells the File
Converter to include the graphic.
8-32
Customized Stylesheets
4
By default, the name of the graphic is logo.bmp. Change all instances of this name
to sample_logo.bmp in the Value (XML) field.
5
Save the stylesheet.
6
Make sure that the amount of room available in the header is large enough to
accommodate the image file.
a
In the Options pane in the middle, double-click Region Before Extent, which
is in the Pagination and General Styles folder.
8-33
8
Create Custom Stylesheets
7
b
By default the value for the height of the header is 0.4 inch. Replace this value
with 1.0in.
c
Save the stylesheet.
Generate the report with the new styles.
a
Select mfile-report.rpt in the Outline pane on the left.
b
In the selection lists under the Report Format and Stylesheet area of the
Properties pane on the right:
• Specify Acrobat (PDF) for File format
• Specify Logo stylesheet for PDF.
c
8-34
Click Report on the toolbar to generate the report.
Customized Stylesheets
Change Font Size, Page Orientation, and Paper Type of a Generated
Report
This example shows how to:
• Generate an XML source file without converting it to a supported report format
• Make section headers in a report larger
• Change the report page orientation to landscape
• Change the report paper type to A4
Create a custom stylesheet by editing an existing stylesheet to change the appearance
of the wsvar-report report, which is provided with the MATLAB Report Generator
software.
1
Generate a source file for the report.
a
Open the report by entering the following command in the MATLAB Command
Window:
setedit wsvar-report
b
In the Report Format and Stylesheet area of the Properties pane, change the
format to DocBook (no transform).
c
Check the If report already exists, increment to prevent overwriting
check box.
d
Select File > Report to generate the report.
The report-generation process creates an XML source file in the MATLAB
Editor.
2
Convert the report to PDF format.
a
Select Tools > Convert Source File from the Report Explorer menu bar to
open the File Converter.
b
From the Source file selection list, enter wsvar-report0.xml.
c
From the File format selection list, select Acrobat (PDF).
d
From the Stylesheet selection list, select Unnumbered Chapters and
Sections.
e
Click Convert File.
8-35
8
Create Custom Stylesheets
The MATLAB Report Generator software converts the XML source file for
wsvar-report to PDF format, and then opens the PDF document.
3
Make the report headers more prominent.
a
In the File Converter, click Edit.
The Report Explorer displays the Unnumbered Chapters and Sections
stylesheet.
b
In the Properties pane on the right, enter Custom Large Section Headers
as the stylesheet name.
c
Enter the description No chapter and section numbering, larger
section titles.
d
In the Outline pane on the left, select the Custom Large Section Headers
stylesheet.
e
In the Options pane in the middle, select Section Title Level 1 Properties.
f
In the Properties pane on the right, click Add to current stylesheet.
The Section Title Level 1 Properties data item appears in the Outline pane
on the left as a child of the Custom Large Section Headers stylesheet.
g
In the Properties pane on the right, select the Font Size attribute.
The Properties pane on the right displays an XML expression specifying font
size as a multiple of the Body Font Size attribute.
h
Click Edit as string.
The MATLAB Report Generator software converts the XML expression to a
simple string, which appears in a pane labeled Value.
i
Enter the value 18pt.
The size of the font is now fixed at 18 points, rather than being a multiple of the
body font size attribute.
8-36
j
Select File > Save to save the stylesheet.
k
Save the stylesheet as customheader.rgs, in a folder in your MATLAB path.
Customized Stylesheets
The customheader.rgs stylesheet appears as an available stylesheet in the
Options pane in the middle of the Report Explorer. It also appears as an option
in the File Converter.
4
Use the new stylesheet to convert the current XML source file.
a
In the Stylesheet Editor: Main Properties pane on the right, click Send to
File Converter
The File Converter appears, with the customheader.rgs stylesheet selected.
b
5
6
Click Convert file.
Change page orientation and paper type.
a
On the File Converter Properties pane, click Edit.
b
In the Options pane on the left, double-click the Page Orientation data item.
c
In the Properties pane on the right, use the selection list to change the value of
the data item to Landscape.
d
In the Options pane in the middle, double-click Paper Type in the Pagination
and General Styles folder.
e
In the Properties pane on the right, select A4 from the selection list.
f
Save the stylesheet.
Generate the report wsvar-report.xml in PDF format using customheader.rgs..
The PDF report appears with horizontally oriented pages of slightly different
dimensions.
Edit Font Size as a Derived Value in XML
This example shows how to change the font size in a report to a value derived from other
values. You do this by editing the PDF report's XML source directly.
1
Open the default print stylesheet for PDF documents.
2
In the Options pane in the middle, select and expand the Property Sets folder.
3
In the Options pane, double-click the Section Title Level1 Properties data item.
The Properties pane on the right appears as follows.
8-37
8
Create Custom Stylesheets
4
In the Attributes area of the Properties pane on the right, click Font Size - <xml>.
The Report Explorer looks as follows.
8-38
Customized Stylesheets
The font size value is a product of $body.font.master and 2.0736. To change the
font size to a larger size, change the multiplication factor to 3.0736.
Tip You specify the value for the $body.font.master data item in the Body Font
Master property. This property is in the Pagination and General Styles category in
the Options pane in the middle. The default value of this data item is 10. Changing this
value causes the derived values to change accordingly.
8-39
8
Create Custom Stylesheets
PDF Fonts for Non-English Platforms
In this section...
“PDF Font Support for Languages” on page 8-40
“Identifying When to Specify a Font” on page 8-40
“Stylesheets Override PDF Font Mapping” on page 8-41
“Non-English PDF Font Mapping Tasks” on page 8-41
“lang_font_map.xml File” on page 8-41
“Locate Non-English Fonts” on page 8-43
“Add or Modify Language Font Mappings” on page 8-44
“Specify the Location of Font Files” on page 8-45
PDF Font Support for Languages
The MATLAB Report Generator supports a wide range of English language fonts for PDF
reports.
The MATLAB Report Generator also provides basic PDF font support for some nonEnglish languages, including:
• Japanese
• Korean
• Russian (Cyrillic)
You can use the language font map to:
• Add or modify specifications for PDF font usage for supported non-English languages.
• Create PDF font support for a non-supported language.
• Change the default English fonts, if you do not specify a stylesheet.
The language font map specifications indicate what font to use on a specific platform (for
example, Windows) for basic report elements such as body text.
Identifying When to Specify a Font
If a required non-English font is missing for a report, the generated text includes pound
sign characters (#). For example:
8-40
PDF Fonts for Non-English Platforms
Stylesheets Override PDF Font Mapping
PDF stylesheets for the MATLAB Report Generator specify fonts for body text, copyright,
quotes, symbols, dingbats, monospace, sans serif, and titles.
The PDF stylesheet settings override the PDF font mapping entries.
If you do not specify a PDF stylesheet, then you can use PDF language font mapping
entries to change the default fonts for English reports.
Non-English PDF Font Mapping Tasks
To add or modify non-English PDF font mapping specifications:
• “Locate Non-English Fonts” on page 8-43
• “Add or Modify Language Font Mappings” on page 8-44
• “Specify the Location of Font Files” on page 8-45
lang_font_map.xml File
Use an XML editor with the lang_font_map.xml file to enter all the PDF font
mappings for your reports.
Installing the MATLAB Report Generator software loads the lang_font_map.xml file
in the following location:
<matlabroot>/toolbox/shared/rptgen/resources/fontmap
The lang_font_map.xml file includes two sections:
8-41
8
Create Custom Stylesheets
• name_map — Contains name_mapping elements that specify the name of the font, the
language, and the font usage in the report (for example, body text).
• file_map— Contains entries for the location of the font files for the fonts specified in
the name_map.
For example, the following lang_font_map.xml file includes name_map and file_map
entries that provide basic PDF font support for Japanese (ja), Korean (ko), and Russian
(ru).
lang_font_map.xml example
<?xml version="1.0" encoding="UTF-8" ?>
<lang_font_map>
<name_map>
<name_mapping lang="ja" platform="win"
<name_mapping lang="ja" platform="win"
<name_mapping lang="ja" platform="win"
<name_mapping lang="ja" platform="win"
<name_mapping
<name_mapping
<name_mapping
<name_mapping
8-42
lang="ko"
lang="ko"
lang="ko"
lang="ko"
platform="win"
platform="win"
platform="win"
platform="win"
usage="body">MS Gothic</name_mapping>
usage="monospace">MS Gothic</name_mapping>
usage="sans">MS Gothic</name_mapping>
usage="title">MS Gothic</name_mapping>
usage="body">Gulim</name_mapping>
usage="monospace">Gulim</name_mapping>
usage="sans">Gulim</name_mapping>
usage="title">Gulim</name_mapping>
PDF Fonts for Non-English Platforms
<name_mapping
<name_mapping
<name_mapping
<name_mapping
lang="ru"
lang="ru"
lang="ru"
lang="ru"
platform="win"
platform="win"
platform="win"
platform="win"
<name_mapping
<name_mapping
<name_mapping
<name_mapping
lang="en"
lang="en"
lang="en"
lang="en"
platform="glnx"
platform="glnx"
platform="glnx"
platform="glnx"
<name_mapping
<name_mapping
<name_mapping
<name_mapping
</name_map>
lang="ru"
lang="ru"
lang="ru"
lang="ru"
platform="mac"
platform="mac"
platform="mac"
platform="mac"
usage="body">Arial Unicode MS</name_mapping>
usage="monospace">Arial Unicode MS</name_mapping>
usage="sans">Arial Unicode MS</name_mapping>
usage="title">Arial Unicode MS</name_mapping>
usage="body">FreeSerif, Regular</name_mapping>
usage="monospace">FreeMono, Regular</name_mapping>
usage="sans">FreeSans, Regular</name_mapping>
usage="title">FreeSerif, Bold</name_mapping>
usage="body">Arial Unicode MS</name_mapping>
usage="monospace">Arial Unicode MS</name_mapping>
usage="sans">Arial Unicode MS</name_mapping>
usage="title">Arial Unicode MS</name_mapping>
<file_map>
<file_mapping lang="ja" platform="win" name="MS Gothic">msgothic.ttc</file_mapping>
<file_mapping lang="ja" platform="win" name="MS PGothic">msgothic.ttc</file_mapping>
<file_mapping lang="ko" platform="win" name="Gulim">gulim.ttc</file_mapping>
<file_mapping
<file_mapping
<file_mapping
<file_mapping
lang="en"
lang="en"
lang="en"
lang="en"
platform="glnx"
platform="glnx"
platform="glnx"
platform="glnx"
name="FreeSerif, Regular">FreeSerif.ttf</file_mapping>
name="FreeMono, Regular">FreeMono.ttf</file_mapping>
name="FreeSans, Regular">FreeSans.ttf</file_mapping>
name="FreeSerif, Bold">FreeSerifBold.ttf</file_mapping>
<file_mapping lang="ru" platform="mac" name="Arial Unicode MS">Arial Unicode.ttf</file_mapping>
</file_map>
</lang_font_map>
Locate Non-English Fonts
The system from which you generate a report using the language font map must have
access to the appropriate non-English fonts.
Use one of these font formats for non-English font support:
• Type 1 (PostScript®)
• TrueType
• OpenType®
Fonts in other formats, such as bitmap fonts for the X Window System (X11), produce
poor MATLAB Report Generator report output.
Some TrueType fonts are grouped into packages called TrueType Collections. To specify a
collection in the language font map file, specify the individual font within the TrueType
Collection.
In addition to the font name, the weight (e.g., bold) and slant (e.g., italic, oblique) may
distinguish one font from another in the same family.
8-43
8
Create Custom Stylesheets
The approach you use to identify font names depends on your computer platform.
Font names on Windows
To identify a TrueType font name on Windows systems:
1
Navigate to the font folder (usually C:\Windows\Fonts).
2
If the font is a simple TrueType (not a collection), in the window, right-click the font
and choose Properties to see the name of the file containing that font.
3
If the font is a TrueType Collection, right-click to open the collection, optionally in
a new window. Each constituent font appears, with its name. Use the name of the
constituent font, not the name of the whole collection.
a
Right-click any of constituent font and select Properties. The properties box
displays the name of the file containing that font.
Font names on Mac OS X
Mac OS X provides an application called Font Book (in the /Applications folder) that
provides information about available fonts on the system. The application shows all the
fonts on your system. Hover over a specific font to see a datatip with the font name and
the path to the font.
Font names on Linux
Linux distributions use a variety of conventions for the location of fonts, or how those
font folders can be found. By default, MATLAB Report Generator searches these folders,
in this order:
1
/.fonts/
2
/usr/local/share/fonts/
3
/usr/X11R6/lib/fonts/
4
/usr/share/fonts/
You can specify alternative folders in the fonts.conf file (in the /etc/fonts/ folder).
Add or Modify Language Font Mappings
In the name_map section of the lang_font_map.xml file, add a separate name_mapping
entry for each combination of language, font, and usage that you want in PDF reports.
8-44
PDF Fonts for Non-English Platforms
Each name_mapping element has three attributes:
• lang specifies the two letter ISO 639-1 code corresponding to the language of the
report.
• platform specifies the operating system platform:
• win — Windows
• mac — Mac OS X
• glnx— Linux
• usage specifies the kind of report element or font:
• body
• title
• monospaced
• sans (sanserif)
The text of the name_mapping element is a font name, as specified in an XSL-FO
stylesheet.
Here is an example name_mapping entry:
<name_mapping_lang="ja" platform="win" usage="body">MS Gothic</name_mapping>
Specify the Location of Font Files
In the file_map section, add a file_mapping entry that identifies the location of the
font file for each font that you include in the name_map section.
Each of the platforms (Windows, Mac, and Linux) has a different default search path for
fonts. If the lang_font_map.xml file does not contain a full file path for a font, the
MATLAB Report Generator uses a platform-specific approach to search for the font.
Windows Font File Locations
On Windows platforms, the MATLAB Report Generator searches for fonts in <windir>/
Fonts, where winder is an operating system environment variable. The typical location
is C:\Windows or C:\Winnt.
Mac Font File Locations
On Mac OS X platforms, fonts are generally in one of these folders:
8-45
8
Create Custom Stylesheets
• ~/Library/Fonts
• /Library/Fonts
• Network/Library/Fonts
• System/Library/Fonts
• System/Folder/Fonts
Linux Font File Locations
On Linux platforms, the convention for locating fonts can differ, depending on the Linux
distribution. The MATLAB Report Generator follows the Debian® convention of finding
the list of font folders in the /etc/fonts/fonts.conf file.
If the MATLAB Report Generator does not find the fonts.conf file in /etc/fonts/
folder, it searches the following folders, in the following order:
1
/.fonts
2
/usr/local/share/fonts
3
/usr/X11R6/lib/fonts
4
/usr/share/fonts
Because of the variety of conventions used in different Linux distributions, consider
using full file paths in file_mapping elements.
8-46
9
Comparing XML Files
• “Compare XML Files” on page 9-2
• “How to Compare XML Files” on page 9-4
• “Explore the XML Comparison Report” on page 9-6
• “How the Matching Algorithm Works” on page 9-10
9
Comparing XML Files
Compare XML Files
You can use MATLAB Report Generator software to compare a pair of XML text files.
The XML comparison tool processes the results into a report that you can use to explore
the file differences.
You can access the XML comparison tool from:
• The MATLAB Current Folder browser context menu
• The MATLAB command line.
The XML comparison tool compares the files using the “Chawathe” algorithm, as
described in this paper:
Change Detection in Hierarchically Structured Information, Sudarshan Chawathe,
Anand Rajaraman, and Jennifer Widom; SIGMOD Conference, Montreal, Canada, June
1996, pp. 493-504.
This conference paper is based upon work published in 1995: see http://
dbpubs.stanford.edu:8090/pub/1995-45.
XML comparison reports display in the Comparison Tool. For more information about the
Comparison Tool, see “Comparing Files and Folders” in the MATLAB documentation.
The XML comparison report shows a hierarchical view of the portions of the two XML
files that differ. The report does not show sections of the files that are identical.
If the files are identical you see a message reporting there are no differences.
Note: It might not be possible for the analysis to detect matches between previously
corresponding sections of files that have diverged too much.
Change detection in the Chawathe analysis is based on a scoring algorithm. Items
match if their Chawathe score is above a threshold. The MATLAB Report Generator
implementation of Chawathe's algorithm uses a comparison pattern that defines the
thresholds. For more information, see “How the Matching Algorithm Works” on page
9-10.
For information about creating and using XML comparison reports, see:
9-2
Compare XML Files
1
“How to Compare XML Files” on page 9-4
2
“Explore the XML Comparison Report” on page 9-6
9-3
9
Comparing XML Files
How to Compare XML Files
In this section...
“Select Files to Compare” on page 9-4
“Change Comparison Type” on page 9-5
“XML Comparison Examples” on page 9-5
“See Also” on page 9-5
Select Files to Compare
• “From the Current Folder Browser” on page 9-4
• “From the Comparison Tool” on page 9-5
• “From the Command Line” on page 9-5
From the Current Folder Browser
To compare two files from the Current Folder browser:
• For two files in the same folder, select the files, right-click and select Compare
Selected Files/Folders.
• To compare files in different folders:
1
Select a file, right-click and select Compare Against
2
Select the second file to compare in the Select Files or Folders for Comparison
dialog box.
3
Leave the default Comparison type, XML text comparison.
4
Click Compare.
If the selected files are XML files, the XML comparison tool performs a Chawathe
analysis on the files and displays a report in the Comparison Tool.
The file you right-click to launch the XML comparison tool displays on the right side of
the report.
For more information about comparisons of other file types with the Comparison
Tool, such as text, MAT or binary, see “Comparing Files and Folders” in the MATLAB
documentation.
9-4
How to Compare XML Files
From the Comparison Tool
To compare files using the Comparison Tool, from the MATLAB Toolstrip, in the File
section, select the Compare button. In the dialog box select files to compare.
If the files you select to compare are XML files and you select an XML comparison, the
XML comparison tool performs a Chawathe analysis of the XML files, and generates an
report.
From the Command Line
To compare XML files from the command line, enter
visdiff(filename1, filename2)
where filename1 and filename1 are XML files. This XML comparison functionality is
an extension to the MATLAB visdiff function.
Change Comparison Type
If you specify two XML files to compare using either the Current Folder Browser or
the visdiff function, then the Comparison Tool automatically performs the default
comparison type, XML text comparison.
To change comparison type, either create a new comparison from the Comparison Tool,
or use the Compare Against option from the Current Folder browser. You can change
comparison type in the Select Files or Folders for Comparison dialog box. If you want
the MATLAB text differences report for XML files, change the comparison type to Text
comparison in the dialog before clicking Compare.
XML Comparison Examples
For an example with instructions, see mlxml_testplan.
See Also
For an overview, see “Compare XML Files” on page 9-2.
For explanations on how to use and understand the report and the XML comparison
functionality, see “Explore the XML Comparison Report” on page 9-6
9-5
9
Comparing XML Files
Explore the XML Comparison Report
In this section...
“Navigate the XML Comparison Report” on page 9-6
“Save Comparison Log Files in a Zip File” on page 9-8
“Export Results to the Workspace” on page 9-8
Navigate the XML Comparison Report
The XML comparison report shows changes only. The report is a hierarchical view of
the differences between two XML text files, and is not a hierarchical view of the original
XML data.
To step through differences, use the Comparison tab on the toolstrip. To move to the
next or previous group of differences, on the Comparison tab, in the Navigate section,
click the arrow buttons to go to the previous or next difference.
You can also click to select items in the hierarchical trees.
• Selected items appear highlighted in a box.
• If the selected item is part of a matched pair it is highlighted in a box in both left and
right trees.
Report item highlighting indicates the nature of each difference as follows:
Type of report
item
Highlighting
Notes
Modified
Pink
Modified items are matched pairs that differ between the
two files. When you select a modified item it is highlighted
in a box in both trees.
Changed parameters for the selected pair are displayed in
a separate Parameters panel for review. If strings are too
long to display in the Parameters table, right-click and
select Compare as Text to open a new comparison of the
parameters.
Unmatched
Green
When you select an unmatched item it is highlighted in a
box in one tree only.
9-6
Explore the XML Comparison Report
Type of report
item
Highlighting
Notes
Container
None
Rows with no highlighting indicate a container item that
contains other modified or unmatched items.
Use the toolbar buttons or the Comparison menu for the following functions:
• Refresh — Run Chawathe analysis again to refresh the comparison report.
• Swap Sides — Swap sides and rerun comparison. Runs the Chawathe analysis
again.
• Save As > Save as HTML — Opens the Save dialog box, where you can choose to
save a printable version of the XML comparison report. The report is a noninteractive
HTML document of the differences detected by the Chawathe algorithm for printing
or archiving a record of the comparison.
• Save As > Save to Workspace — Export XML comparison results to workspace.
• In the Navigate section, click the arrow buttons (or press Up or Down keys) to go to
the previous difference or go to the next difference.
• Compare Selected Parameter — Open a new report for the currently selected
pair of parameters. Use this when the report cannot display all the details in the
Parameters pane, e.g., long strings or a script.
Use the View tab controls on the toolstrip for the following functions:
• Expand All — Expands every item in the tree.
Tip Right-click to expand or collapse the hierarchy within the selected tree node.
• Collapse All — Collapses all items in the tree to the most compact view possible.
See also “XML Comparison Examples” on page 9-5.
To understand the results within an XML comparison report, try reading the
documentation section on “How the Matching Algorithm Works” on page 9-10.
Note: It may not be possible for the analysis to detect matches between previously
corresponding sections of files that have diverged too much.
9-7
9
Comparing XML Files
Save Comparison Log Files in a Zip File
Temporary XML comparison files accumulate in tempdir/MatlabComparisons/
XMLComparisons/TempDirs/. These temporary files are deleted when you close the
related comparison report.
You can zip the temporary files (such as log files) created during XML comparisons, for
sharing or archiving. While the comparison report is open, enter:
xmlcomp.zipTempFiles('c:\work\myexportfolder')
The destination folder must exist. The output reports the zip file name:
Created the zipfile "c:\work\myexportfolder\20080915T065514w.zip"
To view the log file for the last comparison in the MATLAB Editor, enter:
xmlcomp.showLogFile
Export Results to the Workspace
To export the XML comparison results to the MATLAB base workspace,
1
On the Comparison tab, in the Comparison section, select Save As > Save to
Workspace.
The Input Variable Name dialog box appears.
2
Specify a name for the export object in the dialog and click OK. This action exports
the results of the XML comparison to an xmlcomp.Edits object in the workspace.
The xmlcomp.Edits object contains information about the XML comparison including
file names, filters applied, and hierarchical nodes that differ between the two XML files.
To create an xmlcomp.Edits object at the command line without opening the
Comparison Tool, enter:
Edits = xmlcomp.compare(a.xml,b.xml)
9-8
Property of xmlcomp.Edits
Description
Filters
Array of filter structure arrays. Each
structure has two fields, Name and Value.
Explore the XML Comparison Report
Property of xmlcomp.Edits
Description
LeftFileName
File name of left file exported to XML.
LeftRoot
xmlcomp.Node object that references the
root of the left tree.
RightFileName
File name of right file exported to XML.
RightRoot
xmlcomp.Node object that references the
root of the right tree.
TimeSaved
Time when results exported to the
workspace.
Version
MathWorks® release-specific version
number of xmlcomp.Edits object.
Property of xmlcomp.Node
Description
Children
Array of xmlcomp.Node references to child
nodes, if any.
Edited
Boolean — If Edited = true then the
node is either inserted (green) or part of a
modified matched pair (pink).
Name
Name of node.
Parameters
Array of parameter structure arrays. Each
structure has two fields, Name and Value.
Parent
xmlcomp.Node reference to parent node, if
any.
Partner
If matched, Partner is an xmlcomp.Node
reference to the matched partner node in
the other tree. Otherwise empty [].
9-9
9
Comparing XML Files
How the Matching Algorithm Works
In this section...
“How the Chawathe Algorithm Works” on page 9-10
“Why Use a Heuristic Algorithm?” on page 9-12
“Examples of Matching Results” on page 9-12
How the Chawathe Algorithm Works
The XML comparison tool compares the XML files using the “Chawathe” algorithm, as
described in the paper:
Change Detection in Hierarchically Structured Information, Sudarshan Chawathe,
Anand Rajaraman, and Jennifer Widom; SIGMOD Conference, Montreal, Canada, June
1996, pp. 493-504.
The core of the XML file comparison engine is Chawathe’s matching algorithm. This
matching algorithm is a heuristic method based on a scoring system.
XML text documents are hierarchical data structures. Users can insert, delete, or reorder
elements, modify their contents, or move elements across different parts of the hierarchy.
The Chawathe algorithm can detect these different types of changes within the hierarchy
of the document. As with conventional text differencing utilities, the Chawathe algorithm
detects local text that is added, deleted, or changed, and additionally can prepare an
edit script that can be used to create a report of the hierarchical location of detected
differences.
The Chawathe algorithm attempts to match elements that are of the same category.
The Chawathe paper refers to these categories as labels. In the following XML example
documents (with labels A, B, and C):
• The three C elements on the left are compared with the three C elements on the right
• The single B element on the left is compared with the two B elements on the right
9-10
How the Matching Algorithm Works
The Chawathe algorithm matches a particular label by extracting a flat sequence of
elements from the hierarchical document and attempting to match the elements in the
sequences. In the example above, elements of the sequence
(<C> First </C>, <C> Second </C>, <C> Third </C>)
are matched against elements of the sequence
(<C> First </C>, <C> Third </C>, <C> Fourth </C>)
Sequences are matched using a Longest Common Subsequence (LCS) algorithm. For
example, if C elements are matched on their text content, the LCS of the above sequences
is given by:
(<C> First </C>, <C> Third </C>)
You can define a score for matching elements of a particular label in different ways. For
instance, in the above example, C elements can be matched on text content, B can be
matched on text content and on Name, and A on the number of B and C elements they
have in common. To determine whether elements match or not, the Chawathe algorithm
compares the score to a threshold.
The implementation can specify scoring methods, thresholds, the definition of labels, and
the order in which labels are processed. These can be defined separately for each problem
domain or type of XML file. The XML comparison tool provides suitable definitions
for a set of common XML file types, and uses a default definition for any type of XML
document it does not recognize.
9-11
9
Comparing XML Files
Why Use a Heuristic Algorithm?
Chawathe’s algorithm is a heuristic. That is, it cannot guarantee to return the optimal
matching between two sequences. It is the use of a threshold mechanism in combination
with an LCS algorithm that makes the algorithm a heuristic. A heuristic algorithm is
preferable to an optimal matching because the heuristic is much faster.
An algorithm can only guarantee a mathematically optimal matching by exhaustively
computing the score between all pairs of elements in the two sequences and choosing
those pairs that maximize an overall matching score between the two sequences.
This exhaustive approach is computationally very expensive because its running time
increases exponentially with the length of the sequences to be matched.
Also a user's expectations can depend on context information that is not available to the
matching algorithm (e.g., prior knowledge of the precise sequence of changes applied).
This means even a mathematically optimal algorithm might match elements contrary to
a user's expectations.
In contrast with the mathematically optimal approach, Chawathe’s algorithm guarantees
linear running time for sequences that are the same or very similar. The worst-case
scenario is quadratic running time for sequences that are entirely different.
The XML comparison tool performs best when the files to be compared are mostly
similar. It becomes slower for files that contain more differences.
Examples of Matching Results
• “Elements Matched in Previous Comparisons Fail to Match” on page 9-12
• “Elements Matched Across Different Parts of the Hierarchy” on page 9-13
• “Two Sequences of Elements Are Cross-Matched” on page 9-14
Elements Matched in Previous Comparisons Fail to Match
Elements could fail to match even if they were matched in comparisons of previous
versions of the documents. A seemingly small change in one of the properties used for
matching can cause this to happen if it tips the score under the threshold.
Consider the following example where
• B elements are scored on the value of x
9-12
How the Matching Algorithm Works
• A elements are scored on the ratio of matching B elements
• For both A and B the score is compared with a threshold of 0.5.
The left A and the middle A have two out of three B elements in common, resulting in a
matching score of 2/3=0.66. The XML comparison tool marks the A elements as matched
and the report shows that their contents have been modified.
When a user makes a further change to the middle document (resulting in the right
document), and this new document is compared again to the left document, the matching
score for A drops to 1/3=0.33. The algorithm considers the A elements unmatched this
time. In this case, the difference between the two documents is marked as a deletion of A
from the left document and an insertion of a new A into the right document.
This problem is likely to occur when there is little information available inside a single
element to score a match. A seemingly small change in one of the properties used for
matching could tip the score under the threshold, and therefore result in a large change
in the outcome of the comparison.
Elements Matched Across Different Parts of the Hierarchy
Sometimes matches of similar items occur across different parts of the hierarchy. In the
following example, C elements are matched on name:
9-13
9
Comparing XML Files
In this case, the user might expect to see the very first C element on the left marked as
deleted, with the second and third C elements matched to the corresponding C element
on the right. However, this might not happen, if the first C on the left is matched to the
second C on the right, even though these two C elements exist in very different parts of
the document hierarchy. This mismatch would result in the third C element on the left
being marked as deleted.
This case is likely to occur when there are several potential matching candidates for a
particular element. In other words, when elements of a particular label tend to be very
similar. Whether such a spurious cross-matching occurs or not depends on all of the
other C elements within the two documents. The LCS algorithm used for matching the
two sequences favors local matches over distant ones. In other words, sub-sequences
of elements that are close together in the first sequence tend to be matched to subsequences of elements that are close together in the second sequence. However, this
locality is not always guaranteed, and the outcome depends on how other elements in the
sequence are matched.
Two Sequences of Elements Are Cross-Matched
It is difficult to distinguish many similar potential matches. In the following example, B
elements are scored on name, p1, and p2, and the score is compared to a threshold of 0.5.
9-14
How the Matching Algorithm Works
The right document contains one B element more than the left document, and therefore
one of the B elements on the right must remain unmatched and the tool will mark one as
inserted. However, since most B elements on the left potentially match most B elements
on the right, it is impossible to predict exactly how the sequences will be matched. For
instance, the comparison could generate the following result:
“B
“B
“B
“B
name=”1”
name=”2”
name=”3”
name=”4”
…”
…”
…”
…”
>
>
>
>
“B
“B
“B
“B
name=”2” …”
name=”new” …”
name=”3” …”
name=”4” …”
In this case, “B name= “1” on the right remains unmatched. As in the previous example,
this depends on how all of the other B elements in the two documents are matched. This
situation is likely to occur when elements have several potential matching candidates.
9-15
10
Components — Alphabetical List
10
Components — Alphabetical List
Array-Based Table
Convert rectangular array into table and insert it into report
Description
This component converts a rectangular cell array into a table and inserts the table into
the report.
Table Content
• Workspace variable name: Specifies the workspace variable name with which to
construct the table.
• Collapse large cells to a single description: Consolidates large cells into one
description.
Formatting Options
• Table title: Specifies the title of your table.
• Cell alignment:
• left
• center
• right
• double justified
• Column widths: Inputs a vector with m elements, where m equals the number
of columns in the table. Column sizing is relative and normalized to page width.
For example, say that you have a 2-by-3 cell array and input the following into the
Column widths field:
[1 2 3]
The report output format for the cell array is such that the second column is twice the
width of the first column, and the third column is three times the width of the first
column. If the vector is greater than the number of columns in the table, the vector
10-2
Array-Based Table
is truncated so that the number of elements equals the number of columns. If m is
less than the number of columns in the table, the vector is padded with 1s so that the
number of elements equals the number of columns.
If you use this field, it is recommended that you specify a width for each column. Any
width not specified defaults to 1. MATLAB displays a warning when defaulting any
unspecified column width to 1.
• Table grid lines: Displays grid lines, which create borders between fields, in the
table.
• Table spans page width (HTML only): Sets the table width to the width of the
page on which it appears.
Header/Footer Options
Designating a row as a header or footer row causes the contents of the row to appear in
boldface.
• Number of header rows: Specifies the number of header rows.
• Footer list:
• No footer: Specifies no footers for the report.
• Last N rows are footer: Enables you to select a footer that is different from
your header.
Example
Consider the following cell array in the MATLAB workspace:
{'foo','bar';[3],[5]}
Its cell table in the report appears as follows.
foo
bar
3
5
Note that the table has no headers or footers and no title.
10-3
10
Components — Alphabetical List
Insert Anything into Report?
Yes. Table.
Class
rptgen.cfr_table
See Also
Table, Table Body, Table Column Specification, Table Entry, Table Footer,
Table Header, Table Row, Chapter/Subsection, Empty Component, Image, Link,
List, Paragraph, Text, Title Page
10-4
Axes Loop
Axes Loop
Run child components for all axes objects in MATLAB workspace
Description
The Axes Loop component runs its child components for all axes objects in the MATLAB
workspace. For information about working with looping components, see “Logical and
Looping Components” on page 5-21.
Object Selection
• Loop type:
• All axes: Loops on all axes objects.
• Current axes: Loops on the currently selected axes object.
• Exclude objects which subclass axes: Excludes objects, such as legends and color
bars, from the loop.
• Loop Menu:
• Loop on axes with handle visibility "on": Loops only on visible axes
objects.
• Loop on all axes: Loops on all axes objects.
• Search terms: Specifies search terms for the loop. For example, to search for Tag
and My Data, enter "Tag" ,"My Data".
Section Options
• Create section for each object in loop: Inserts a section in the generated report
for each object found in the loop.
• Display the object type in the section title: Automatically inserts the object type
into the section title in the generated report.
• Create link anchor for each object in loop: Creates a hyperlink to the object in
the generated report.
10-5
10
Components — Alphabetical List
Insert Anything into Report?
Yes, inserts a section if you select the Create section for each object in loop option.
Class
rptgen_hg.chg_ax_loop
See Also
Axes Snapshot, Figure Loop, Figure Snapshot, Graphics Object Loop,
Handle Graphics Linking Anchor, Handle Graphics Name, Handle Graphics
Parameter, Handle Graphics Property Table, Handle Graphics Summary
Table
10-6
Axes Snapshot
Axes Snapshot
Insert image of selected MATLAB axes objects into the generated report
Description
Inserts an image of selected MATLAB axes objects into the generated report.
Format
• Image file format: Specifies the image file format. Select Automatic HG Format
to automatically choose the format best suited for the specified report output format.
Otherwise, choose an image format that your output viewer can read. Automatic HG
Format is the default option. Options include:
• Automatic HG Format (uses the Handle Graphics file format selected in the
Preferences dialog box)
• Bitmap (16m-color)
• Bitmap (256-color)
• Black and white encapsulated PostScript
• Black and white encapsulated PostScript (TIFF)
• Black and white encapsulated PostScript2
• Black and white encapsulated PostScript2 (TIFF)
• Black and white PostScript
• Black and white PostScript2
• Color encapsulated PostScript
• Color encapsulated PostScript (TIFF)
• Color encapsulated PostScript2
• Color encapsulated PostScript2 (TIFF)
• Color PostScript
• Color PostScript2
• JPEG high quality image
10-7
10
Components — Alphabetical List
• JPEG medium quality image
• JPEG low quality image
• PNG 24-bit image
• TIFF - compressed
• TIFF - uncompressed
• Windows metafile
• Capture figure from screen: Captures the figure for the generated report directly
from the screen. Options include:
• Client area only: Captures part of the figure.
• Entire figure window: Captures the entire figure window.
Print Options
• Paper orientation:
• Landscape
• Portrait
• Rotated
• Use figure orientation: Uses the orientation for the figure, which you set
with the orient command.
• Full page image (PDF only): In PDF reports, scales images to fit the full
page, minimizes page margins, and maximizes the size of the image by using
either a portrait or landscape orientation.
For more information about paper orientation, see the orient command in the
MATLAB documentation.
• Image size:
• Use figure PaperPositionMode setting: Sets the image size in the report
to the PaperPositionMode property of the figure. For more information about
paper position mode, see orient in the MATLAB documentation.
• Automatic (same size as onscreen): Sets the image in the report to the
same size as it appears on the screen.
10-8
Axes Snapshot
• Custom: Specifies a custom image size. Specify the image size in the Size field and
Units list.
• Size: Specifies the size of the figure snapshot in the format [w h] (width, height).
This field is active only if you choose Custom in the Image size selection list.
• Units: Specifies the units for the size of the figure snapshot. This field is active only if
you choose Set image size in the Custom selection list.
• Invert hardcopy: Sets the InvertHardcopy property of Handle Graphics figures.
This property inverts colors for printing; that is, it changes dark colors to light colors
and vice versa. Options include:
• Automatic: Automatically changes dark axes colors to light axes colors. If the
axes color is a light color, it is not inverted.
• Invert: Changes dark axes colors to light axes colors and vice versa.
• Don't invert: Does not change the colors in the image displayed on the screen
for printing.
• Use figure's InvertHardcopy setting: Uses the InvertHardcopy
property set in the Handle Graphics image.
• Make figure background transparent: Makes the image background
transparent.
Display Options
• Scaling: Controls size of the image, as displayed in a browser. Making an image
larger using this option does not affect the storage size of the image, but the quality
of the displayed image may decrease as you increase or decrease the size of the
displayed image.
Generally, to achieve the best and most predictable display results, use the default
setting of Use image size.
• Use image size: Causes the image to appear the same size in the report as on
screen (default).
• Fixed size: Specifies the number and type of units.
• Zoom: Specifies the percentage, maximum size, and units of measure.
• Size: Specifies the size of the snapshot in the format w h (width, height). This field is
active only if you choose Fixed size in the Scaling list.
10-9
10
Components — Alphabetical List
• Max size: Specifies the maximum size of the snapshot in the format w h (width,
height). This field is active only if you choose Zoom from the Scaling list.
• Units: Specifies the units for the size of the snapshot. This field is active only if you
choose Zoom or Fixed size in the Image size selection list.
• Alignment: Only reports in PDF or RTF format support this property. Options are:
• Auto
• Right
• Left
• Center
• Title: Specifies text to appear above the snapshot.
• Caption: Specifies text to appear under the snapshot.
Insert Anything into Report?
Yes. Image.
Class
rptgen_hg.chg_ax_snap
See Also
Axes Loop, Figure Loop, Figure Snapshot, Graphics Object Loop, Handle
Graphics Linking Anchor, Handle Graphics Name, Handle Graphics
Parameter, Handle Graphics Property Table, Handle Graphics Summary
Table
10-10
Chapter/Subsection
Chapter/Subsection
Group portions of report into sections with titles
Description
This component groups portions of the report into sections. Each section has a title and
content.
The following rules apply to this component:
• Child components appear inside the section created by this component.
• Selecting the Get title from first child component check box prevents this
component from accepting paragraph-level children. In this case, this component's
first child must be a Text component.
• This component can have Chapter/Subsection components as its children.
• Sections can be nested. There are seven levels of nesting possible. The seventh nested
section in the report is untitled, although the child components of this section include
information into the report.
Chapter Numbering
By default, chapters are numbered and sections are not numbered. Specify chapter and
section numbering using a stylesheet. For more information about chapter and section
numbering options in Web and print stylesheets, see “Report Output Format” on page
4-5.
Section Title
• Title: Specifies a title to display in the generated report:
• Automatic: Automatically generates a title.
• Custom: Specifies a custom title.
• Style Name: Specifies the style to use with the chapter or section title. To specify a
style, perform these steps.
10-11
10
Components — Alphabetical List
1
In the Report Options dialog box, set File format to one of these values:
• Word (from template)
• HTML (from template)
• PDF (from template)
2
In the Chapter/Section properties dialog box, set Title to Custom.
3
Set Style Name to Custom.
4
In the Style Name text box, type a style name.
To take effect, the style you specify must be defined in the template that you
use to generate the report. For example, if you use a Word template that defines
a Heading 2 style, you can enter Heading 2 as the style name. For more
information about template styles, see “Report Conversion Templates” on page
6-2.
• Numbering: Specifies a numbering style for the report:
• Automatic: Numbers by context.
• Custom: Allows you to create your own numbering style.
• Section Type: Shows you in which level a selected section resides.
Insert Anything into Report?
Yes. Chapter or section.
Class
rptgen.cfr_section
See Also
Empty Component, Image, Link, List, Paragraph, Table, Text, Title Page
10-12
Comment
Comment
Insert comment into XML source file created by report generation process
Description
This component inserts a comment into the XML source file created by the reportgeneration process. This comment is not visible in the generated report.
This component can have children. Child components insert their output into the XML
source file, but this does not appear in the generated report.
To make comment text appear in the report:
1
Edit the XML source file (which has the same name as your report file, but has a xml
extension).
2
Find the comment area in the XML source file by locating the comment tags <-- and
-->.
3
Remove the comment tags.
4
Convert the XML source file using the rptconvert command.
Properties
• Comment text: Specifies comments to include in the report.
• Show comment in Generation Status window: Displays comments in the
Generation Status tab while the report generates.
• Status message priority level: Specifies the priority level of the status messages
that appear during report generation. Priority options range from 1 Error
messages only to 6 All messages. The default is 3 Important messages. This
option is only available if you select the Show comment in Generation Status
window option.
Insert Anything into Report?
No. This component inserts comments, which can appear in the report, into the report's
XML source file.
10-13
10
Components — Alphabetical List
Class
rptgen.crg_comment
See Also
“Convert XML Documents to Different File Formats” on page 4-18, Import File, Nest
Setup File, Stop Report Generation, Time/Date Stamp
10-14
Empty Component
Empty Component
Group components to move, activate, or deactivate them, or create blank space in list
Description
This component does not insert anything into the generated report. It can have any
component as a child. You can use it to group components together so that you can easily
move, activate, or deactivate them, or create a blank space in a list.
If the MATLAB Report Generator software does not recognize a given component when
loading a report setup file, it replaces the unrecognized component with this component.
Insert Anything into Report?
No.
Class
rptgen.crg_empty
See Also
Chapter/Subsection, Image, Link, List, Paragraph, Table, Text, Title Page
10-15
10
Components — Alphabetical List
Evaluate MATLAB Expression
Evaluate specified MATLAB expression
Description
This component evaluates a specified MATLAB expression. You can include code and/or
command-line output in the report.
Properties
• Insert MATLAB expression in report: Causes the MATLAB expression that this
component evaluates to appear in the report.
• Display command window output in report: Includes the command window
output that results from the evaluation of the specified MATLAB expression.
• Expression to evaluate in the base workspace: Specifies the expression to
evaluate in the MATLAB workspace. .
If you are using Simulink Report Generator, then you can use functions such as
Rptgen.getReportedBlock to filter the modeling elements on which to report
and to perform special reporting on specific elements. For more information, in the
Simulink Report Generator documentation, see “Loop Context Functions”.
• Evaluate this expression if there is an error: Evaluates another MATLAB
expression if the specified expression produces an error. You must enter in this field
the expression to evaluate in case of an error.
If you do not change the default error handling code, then when you generate the
report, and there is an error in the MATLAB code that you added:
• If you clear Evaluate this expression if there is an error check box, then the
complete report is generated, without displaying an error message at the MATLAB
command line.
• If you select Evaluate this expression if there is an error check box, then
the complete report is generated and an error message appears at the MATLAB
command line.
10-16
Evaluate MATLAB Expression
To stop report generation when an error occurs in the MATLAB code that you added,
change the second and third lines of the following default error handling code, as
described below:
warningMessageLevel = 2;
displayWarningMessage = true;
failGenerationWithException = false;
failGenerationWithoutException = false;
To stop report generation and display an exception, change the default code to:
displayWarningMessage = false;
failGenerationWithException = true;
To stop report generation without displaying an exception, change the default code to:
displayWarningMessage = false;
failGenerationWithoutException = true;
If you want to completely replace the default error handling code, use the
evalException.message variable in your code to return information for the
exception.
Insert Anything into Report?
Inserts text only if you select one of the following options:
• Insert MATLAB expression string in report
• Display command window output in report
Class
rptgen.cml_eval
See Also
Insert Variable, MATLAB Property Table, MATLAB/Toolbox Version Number,
Variable Table
10-17
10
Components — Alphabetical List
Figure Loop
Apply child components to specified graphics figures
Description
This component applies each child component to specified figures in the report. For more
information about working with this component, see “Logical and Looping Components”
on page 5-21.
Figure Selection
• Include figures
• Current figure only: Includes only the current figure in the report.
• Visible figures: Loops on all visible figures. The Data figures only option
is checked by default and excludes figures with HandleVisibility = 'off'
from the loop.
• All figures with tags: Loops on figures with specified tags, select When
you select a given tag, all figures with that tag appear in the loop, regardless of
whether each figure is visible or whether its HandleVisibility attribute is 'on'
or 'off'.
The tag field (located under All figures with tags) shows selected tags. To
add tags to this field, type in the tag names, separating them with new lines.
• Loop Figure List: Shows all figures that are included in the loop. If the report setup
file generates new figures or changes existing figures, figures in the Loop Figure
List are not the figures that are reported on.
Section Options
• Create section for each object in loop: Inserts a section in the generated report
for each object found in the loop.
• Display the object type in the section title: Inserts the object type automatically
into the section title in the generated report.
10-18
Figure Loop
• Create link anchor for each object in loop: Creates a hyperlink to the object in
the generated report.
Insert Anything into Report?
Yes, inserts a section if you select the Create section for each object in loop option.
Class
rptgen_hg.chg_fig_loop
See Also
Axes Loop, Axes Snapshot, Figure Snapshot, Graphics Object Loop,
Handle Graphics Linking Anchor, Handle Graphics Name, Handle Graphics
Parameter, Handle Graphics Property Table, Handle Graphics Summary
Table
10-19
10
Components — Alphabetical List
Figure Snapshot
Insert snapshot of Handle Graphics figure into report
Description
This component inserts a snapshot of a Handle Graphics figure into the report.
Format
• Image file format: Specifies the image file format. Select Automatic HG Format
to automatically choose the format best suited for the specified report output format.
Otherwise, choose an image format that your output viewer can read. Automatic HG
Format is the default option. Other options include:
• Automatic HG Format (uses the Handle Graphics file format selected in the
Preferences dialog box)
• Bitmap (16m-color)
• Bitmap (256-color)
• Black and white encapsulated PostScript
• Black and white encapsulated PostScript (TIFF)
• Black and white encapsulated PostScript2
• Black and white encapsulated PostScript2 (TIFF)
• Black and white PostScript
• Black and white PostScript2
• Color encapsulated PostScript
• Color encapsulated PostScript (TIFF)
• Color encapsulated PostScript2
• Color encapsulated PostScript2 (TIFF)
• Color PostScript
• Color PostScript2
• JPEG high quality image
10-20
Figure Snapshot
• JPEG medium quality image
• JPEG low quality image
• PNG 24-bit image
• TIFF - compressed
• TIFF - uncompressed
• Windows metafile
• Capture picture from screen:
• Client area only: Captures a portion of the figure window.
• Entire figure window: Captures the entire figure window.
Print Options
• Paper orientation:
• Landscape
• Portrait
• Rotated
• Use figure orientation: Uses the orientation for the figure, which you set
with the orient command.
• Full page image (PDF only): In PDF reports, scales images to fit the full
page, minimizes page margins, and maximizes the size of the image by using
either a portrait or landscape orientation.
For more information about paper orientation, see the orient command in the
MATLAB documentation.
• Image size:
• Use figure PaperPositionMode setting: Uses the figure's
PaperPositionMode property as the image size in the report. For more
information about paper position mode, see the orient command in the MATLAB
documentation.
• Automatic (same size as on screen): Sets the image in the report to the
same size as it appears on the screen.
10-21
10
Components — Alphabetical List
• Custom: Specifies a custom image size. Set the image size in the Size field and
Units list.
• Size: Specifies the size of the figure snapshot in the form w h (width times height).
This field is active only if you choose Custom from the Image size selection list.
• Units: Specifies units for the size of the figure snapshot. This field is active only if you
choose Custom in the Image size selection list.
• Invert hardcopy: Sets print colors using the figure's InvertHardcopy property,
which inverts colors for printing. Options include:
• Automatic: Automatically changes dark axes colors to light axes colors. If the
axes color is a light color, it is not inverted.
• Invert: Changes dark axes colors to light axes colors and vice versa.
• Don't invert: Does not change the colors in the image.
• Use figure's InvertHardcopy setting: Uses the value of the
InvertHardcopy property set in the Handle Graphics image.
• Make figure background transparent: Makes the image background
transparent.
Display Options
• Scaling:
• Fixed size: Specifies the number and type of units.
• Zoom: Specifies the percentage, maximum size, and units of measure.
• Use image size: Causes the size of the image in the report to appear the same
size as on screen.
• Size: Specifies the size of the snapshot in the format w h (width, height). This field is
active only if you choose Fixed size in the Scaling list.
• Max size: Specifies the maximum size of the snapshot in the format w h (width,
height). This field is active only if you choose Zoom from the Scaling list.
• Units: Specifies units for the size of the snapshot. This field is active only if you
choose Zoom or Fixed size in the Image size selection list.
• Alignment Only reports in PDF or RTF format support this property. Options include:
• Auto
10-22
Figure Snapshot
• Right
• Left
• Center
• Title: Specifies a title for the figure:
• Custom: Specifies a custom title.
• Name: Specifies the figure name as the title.
• Caption: Specifies text to appear under the snapshot.
Insert Anything into Report?
Yes. Image.
Class
rptgen_hg.chg_fig_snap
See Also
Axes Loop, Axes Snapshot, Figure Loop, Graphics Object Loop, Handle
Graphics Linking Anchor, Handle Graphics Name, Handle Graphics
Parameter, Handle Graphics Property Table, Handle Graphics Summary
Table
10-23
10
Components — Alphabetical List
For Loop
Iteratively execute child components
Description
This component functions like the MATLAB for loop, except that instead of executing a
statement, it executes its child components. It must have at least one child component to
execute.
Loop Type
The loop type can have incremented indices or a vector of indices. For more information
on for loops and indices, see for in the MATLAB documentation.
• Incremented indices: Executes a for loop of the form:
for varname=x:y:z
• Start: Corresponds to x in the previous expression.
• Increment: Corresponds to y in the previous expression.
• End: Corresponds to z in the previous expression.
• Vector of Indices: Executes a for loop of the form:
for varname=[a b c ...]
Specify appropriate values in the Vector field in the form a b c ...
Workspace Variable
• Show index value in base workspace: Displays the loop index in the MATLAB
workspace while other components execute.
• Variable name: Allows you to specify the variable name. The default is
RPTGEN_LOOP.
• Remove variable from workspace when done: Removes the loop index from
the MATLAB workspace. This option is only available if you select the Show index
value in base workspace option.
10-24
For Loop
Insert Anything into Report?
No.
Class
rptgen_lo.clo_for
See Also
Logical Else, Logical Elseif, Logical If, Logical Then, While Loop
10-25
10
Components — Alphabetical List
Graphics Object Loop
Run child components for each Handle Graphics object open in MATLAB workspace
Description
This component runs its child components for each Handle Graphics object that is
currently open in the MATLAB workspace. The component inserts a table into the
generated report.
Select Objects
• Exclude GUI objects (uicontrol, uimenu, ...): Excludes graphical interface objects,
such as uicontrol and uimenu, from the loop.
• Loop list: Specifies the loop level for Handle Graphics objects:
• Loop on objects with handle visibility "on"
• Loop on all objects
• Search for: Allows you to enter space-delimited search terms.
Section Options
• Create section for each object in loop: Inserts a section in the generated report
for each object found in the loop.
• Display the object type in the section title: Inserts the object type automatically
into the section title in the generated report.
• Create link anchor for each object in loop: Creates a hyperlink to the object in
the generated report.
Insert Anything into Report?
Yes, inserts a section if you select the Create section for each object in loop option.
10-26
Graphics Object Loop
Class
rptgen_hg.chg_obj_loop
See Also
Axes Loop, Axes Snapshot, Figure Loop, Figure Snapshot, Handle Graphics
Linking Anchor, Handle Graphics Name, Handle Graphics Parameter, Handle
Graphics Property Table, Handle Graphics Summary Table
10-27
10
Components — Alphabetical List
Handle Graphics Linking Anchor
Designate location to which links point
Description
This component designates a location to which links point. It should have a looping
component as its parent.
Properties
• Insert text: Specifies text to appear after the linking anchor.
• Link from current: Sets the current model, system, block, or signal as the linking
anchor:
• Automatic: Automatically selects the appropriate figure, axes, or object as a
linking anchor. If the Figure Loop component is this component's parent, the
linking anchor points to the current figure. Similarly, if the Graphics Object
Loop is this component's parent, the linking anchor points to the current object.
• Figure: Sets the linking anchor to the current figure.
• Axes: Sets the linking anchor to the current axes.
• Object: Sets the linking anchor to the current object.
Insert Anything into Report?
Yes. Anchor.
Class
rptgen_hg.chg_obj_anchor
10-28
Handle Graphics Linking Anchor
See Also
Axes Loop, Axes Snapshot, Figure Loop, Figure Snapshot, Graphics Object
Loop, Handle Graphics Name, Handle Graphics Parameter, Handle Graphics
Property Table, Handle Graphics Summary Table
10-29
10
Components — Alphabetical List
Handle Graphics Name
Insert name of Handle Graphics object into the report
Description
This component inserts the name of a Handle Graphics object as text into the report. You
can use this component to create a section title based on the current figure by making it
the first child component of a Chapter/Subsection component, and then selecting the
Chapter/Subsection component's Get title from first child component option.
Properties
• Display name as:
• Type Name
• Type –Name
• Type: Name
• Show name of current:
• Figure: Shows the name of the current figure. The first nonempty figure
parameter determines the name.
• Axes: Shows the name of the current axes. The first nonempty axes parameter
determines the name.
• Other Object: Sets the name of the current object to the figure's
CurrentObject parameter and its first nonempty parameter.
Insert Anything into Report?
Yes. Text.
Class
rptgen_hg.chg_obj_name
10-30
Handle Graphics Name
See Also
Axes Loop, Axes Snapshot, Figure Loop, Figure Snapshot, Graphics Object
Loop, Handle Graphics Linking Anchor, Handle Graphics Parameter, Handle
Graphics Property Table, Handle Graphics Summary Table
10-31
10
Components — Alphabetical List
Handle Graphics Parameter
Insert property name/property value pair from Handle Graphics figure, axes, or other
object
Description
This component inserts a property name/property value pair from a Handle Graphics
figure, axes, or other object.
Property Selection
• Get property from current: Reports on a specified Handle Graphics object:
• Figure: Inserts a figure's property name/property value pair.
• Axes: Inserts an axes' property name/property value pair.
• Object: Inserts an object's property name/property value pair.
• Figure property: Specifies the type of property to include. The All option shows
every parameter for the current object.
Display Options
• Title: Specifies a title for the generated report:
• None (default): No title.
• Automatic: Automatically generates the title from the parameter.
• Custom Specifies a custom title.
• Size limit: Limits the width of the display in the generated report. Units are in
pixels. The size limit of a given table is the hypotenuse of the table width and height
[sqrt(w^2+h^2)]. The size limit of a text string equals its number of characters
squared. If you exceed the size limit, the variable appears in condensed form, such
as [64x64 double]. Setting a size limit of 0 displays the variable in full, no matter
how large it is.
• Display as: Choose a display style:
10-32
Handle Graphics Parameter
• Auto table/paragraph: Displays as a table or paragraph.
• Inline text: Displays in line with the surrounding text.
• Paragraph: Displays as a paragraph.
• Table: Displays as a table.
• Ignore if value is empty: Excludes empty parameters from the generated report.
Insert Anything into Report?
Yes. Text.
Class
rptgen_hg.chg_property
See Also
Axes Loop, Axes Snapshot, Figure Loop, Figure Snapshot, Graphics Object
Loop, Handle Graphics Linking Anchor, Handle Graphics Name, Handle
Graphics Property Table, Handle Graphics Summary Table
10-33
10
Components — Alphabetical List
Handle Graphics Property Table
Insert table that reports on property name/property value pairs
Description
This component inserts a table that reports on property name/property value pairs.
For more information on using this component, see “Property Table Components” on page
5-6.
Select Graphics Object
• Object type: Specifies an object type for the generated report:
• Figure
• Axes
• Object
• Filter by class: Specifies a class or classes for the table.
Table
You can select a preset table, which is already formatted and set up, from the list in the
upper-left corner of the attributes page.
To create a custom table, edit a preset table, such as Blank 4x4. Add and delete rows
and add properties. To open the Edit Table dialog box, click Edit.
For details about creating custom property tables, see “Property Table Components” on
page 5-6.
• Preset table: Specifies the type of table to display the object property table.
• Defaults
• Callbacks
10-34
Handle Graphics Property Table
• Graphics
• Printing
• Blank 4x4
To apply a preset table, select the table and click Apply.
• Split property/value cells: Splits property name/property value pairs into separate
cells. For the property name and property value to appear in adjacent horizontal cells
in the table, select the Split property/value cells check box. In this case, the table is
in split mode and there can be only one property name/property value pair in a cell. If
there is more than one name/property pair in a cell, only the first pair appears in the
report. All subsequent pairs are ignored.
For the property name and property value to appear together in one cell, clear the
Split property/value cells check box. In this case, the table is in nonsplit mode,
which supports more than one property name/property value pair per cell. It also
supports text.
Before switching from nonsplit mode to split mode, make sure that you have only one
property name/property value pair per table cell. If you have more than one property
name/property value pair or any text, only the first property name/property value pair
appears in the report; subsequent pairs and text are omitted.
• Display outer border: Displays the outer border of the table in the generated
report.
Table Cells
Select table properties to modify. The selection in this pane affects the availability of
fields in the Title Properties pane.
If you select Figure Properties, only the Contents and Show options appear. If you
select any other object in the Table Cells pane, the Lower border and Right border
options appear.
Title Properties
• Contents: Enables you to modify the contents of the table cell selected in the Table
Cells pane. Options include:
10-35
10
Components — Alphabetical List
• Left
• Center
• Right
• Double justified
• Show as: Enables you to choose the format for the contents of the table cell. Options
include:
• Value
• Property Value
• PROPERTY Value
• Property: Value
• PROPERTY: Value
• Property - Value
• PROPERTY - Value
• Alignment: Aligns text in the table cells. Options are:
• Left
• Center
• Right
• Double-justified
• Lower border: Displays the lower border of the table in the generated report.
• Right border: Displays the right border of the table in the generated report.
Insert Anything into Report?
Yes. Table.
Class
rptgen_hg.chg_prop_table
10-36
Handle Graphics Property Table
See Also
Axes Loop, Axes Snapshot, Figure Loop, Figure Snapshot, Graphics Object
Loop, Handle Graphics Linking Anchor, Handle Graphics Name, Handle
Graphics Parameter, Handle Graphics Summary Table
10-37
10
Components — Alphabetical List
Handle Graphics Summary Table
Insert table that summarizes Handle Graphics object properties
Description
This component inserts a table that summarizes Handle Graphics object properties. Each
row in the table represents an object. Each column in the table represents a property.
You can specify object properties to include in the report.
Properties
• Object type: Specifies the object type to display in the generated report. Options
include:
• figure
• axes
• object
The available options in the Select Objects pane depend on your selection in the
Object type menu.
• Table title: Specifies a title for the table in the generated report. Options include:
• Automatic: Generates a title automatically.
• Custom: Specifies a custom title.
Property Columns
• Property columns: Specifies object properties to include in the table in the
generated report.
• To add a property:
1
Select the appropriate property level in the menu.
2
In the list under the menu, select the property to add and click Add.
• To delete a property, select its name and click Delete.
10-38
Handle Graphics Summary Table
Some entries in the list of available properties (such as Depth) are “virtual”
properties which you cannot access using the get_param command. The properties
used for property/value filtering in the block and system loop components must be
retrievable by the get_param. Therefore, you cannot configure your summary table to
report on all blocks of Depth == 2.
• Remove empty columns: Removes empty columns from the table in the generated
report.
• Transpose table: Changes the summary table rows into columns in the generated
report, putting the property names in the first column and the values in the other
columns.
Object Rows
Insert anchor for each row: Inserts an anchor for each row in the summary table.
Figure Selection
The options displayed in the Figure Selection pane depend on the object type selected
in the Object type list:
• If Object type is figure, the following options appear:
• Include figures
• Current figure only: Includes only the current figure in the report.
• Visible figures: Executes child components for figures that are currently
open and visible. The Data figures only option is checked by default. This
option excludes figures with HandleVisibility = 'off' from the loop.
• All figures with tags: Includes all figures with a specified tag regardless
of whether they are visible or their HandleVisibility parameter is 'on' or
'off'. The tag selection list, located under this option, shows available tags.
You can add tag names to this list.
• Data figure only (Exclude applications): Shows only data figures.
• Loop Figure List: Shows figures within the current set of figures to display.
• If Object type is axes, the following options appear:
10-39
10
Components — Alphabetical List
• Loop type:
• All axes: Loops on all axes objects.
• Current axes: Loops on the selected axes object.
• Exclude objects which subclass axes: Excludes objects such as legends and
color bars.
• Loop Menu:
• Loop on axes with handle visibility "on": Loops on visible axes
objects.
• Loop on all axes: Loops on all axes objects.
• Search terms: Specifies search terms for the loop. For example, to search for Tag
and My Data, enter "Tag", "My Data".
• If Object type is object, the following options appear:
• Exclude GUI objects (uicontrol, uimenu, ...): Excludes graphical interface
objects, such as uicontrol and uimenu, from the loop.
• Loop menu: Specifies the loop level:
• Loop on objects with handle visibility "on"
• Loop on all objects
• Search for: Specifies space-delimited search terms.
Insert Anything into Report?
Yes. Table.
Class
rptgen_hg.chg_summ_table
10-40
Handle Graphics Summary Table
See Also
Axes Loop, Axes Snapshot, Figure Loop, Figure Snapshot, Graphics Object
Loop, Handle Graphics Linking Anchor, Handle Graphics Name, Handle
Graphics Parameter, Handle Graphics Property Table
10-41
10
Components — Alphabetical List
Image
Insert image from external file into report
Description
This component inserts an image from an external file into the report. It can have the
Chapter/Subsection or Paragraph component as its parent. If the Paragraph
component is its parent, you must select the Insert as inline image check box.
Class
• File name: Specifies the image file name. You can enter this name manually, or use
the Browse button (...) to find the image file.
The image must be in a format that your viewer can read. An error like the following
appears if you specify the name of an image file that does not exist:
No file name.
Could not create graphic.
This field supports %<VariableName> notation. For more information about this
notation, see “%<VariableName> Notation” on page 10-99 on the Text component
reference page.
• Copy to local report files directory: Saves a copy of the image to a local report
files folder.
Display Options
• Scaling: Controls size of the image, as displayed in a browser. Making an image
larger using this option does not affect the storage size of the image, but the quality
of the displayed image may decrease as you increase or decrease the size of the
displayed image.
Generally, to achieve the best and most predictable display results, use the default
setting of Use image size.
10-42
Image
• Use image size: Causes the image to appear the same size in the report as on
screen (default).
• Fixed size: Specifies the number and type of units.
• Zoom: Specifies the percentage, maximum size, and units of measure.
• Size: Specifies the size of the snapshot in the format w h (width, height). This field is
active only if you choose Fixed size from the Scaling list.
• Max size: Specifies the maximum size of the snapshot in the format w h (width,
height). This field is active only if you choose Zoom from the Scaling list;
• Units: Specifies units for the size of the snapshot. This field is active only if you
choose Zoom or Fixed size in the Image size selection list.
• Alignment: Only reports in PDF or RTF formats support this format property.
Options are:
• Auto
• Right
• Left
• Center
• Title: Specifies text to appear above the snapshot.
• Caption: Specifies text to appear under the snapshot.
• Full page image (PDF only): In PDF reports, scales images to fit the full page,
minimizes page margins, and maximizes the size of the image by using either a
portrait or landscape orientation.
Preview
The image that you specify in the Image file name field appears in this pane. You
cannot preview Adobe PostScript images, or images with formats that the imread
function does not support, such as gif.
Clicking an image causes it to display in full size.
Insert Anything into Report?
Yes. Image.
10-43
10
Components — Alphabetical List
Class
rptgen.cfr_image
See Also
Chapter/Subsection, Empty Component, List, Paragraph, Table, Text, Title
Page
10-44
Import File
Import File
Import ASCII text file into report
Description
This component imports an ASCII text file into the report.
Properties
• File name: Specifies the name of the file to import into the text field. You can enter a
name, or use the Browse button (...) to find the file.
• Import file as: Specifies formatting for the imported file. Options include:
• Plain text (ignore line breaks): Imports the file as plain text without any
line breaks (no paragraphs). If you select this option, the Import File component
acts like the Text component, so it should have the Paragraph component as its
parent.
The examples in this section use the following text as the input file:
This is the first row of text from the imported file.
The second row follows a line break in the first row.
There is a blank line above the third row.
Plain text (ignore line breaks) produces the following formatting for the
example file:
This is the first row of text from the imported file.
The second row follows a line break in the first row.
There is a blank line above the third row.
• Paragraphs defined by line breaks: Imports the file as text, in paragraphs
with line breaks (hard returns or carriage returns). This option produces the
following formatting for the example file:
This is the first row of text from the imported file.
The second row follows a line break in the first row.
10-45
10
Components — Alphabetical List
There is a blank line above the third row.
• Paragraphs defined by empty rows: Imports the file as text, in paragraphs
with empty rows (rows that include no text). This option produces the following
formatting for the example file:
This is the first row of text from the imported file.
The second row follows a line break in the first row.
There is a blank line above the third row.
• Text (retain line breaks) (default): Imports the file as plain text with line
breaks. This option produces the following formatting for the example file:
This is the first row of text from the imported file.
The second row follows a line break in the first row.
There is a blank line above the third row.
• Fixed-width text (retain line breaks): Imports the file as fixed-width
text (all letters have the same width or size), including line breaks. This option is
useful for importing MATLAB files. This option produces the following formatting
for the example file:
This is the first row of text from the imported file.
The second row follows a line break in the first row.
There is a blank line above the third row.
• DocBook XML: Inserts an XML source file, and makes no changes to its format.
• Formatted Text (RTF/HTML): Inserts an RTF or HTML source file, and makes no
changes to its format.
• Syntax highlighted MATLAB code: Inserts a MATLAB file.
The File Contents field displays the first few lines of the file to be imported.
Insert Anything into Report?
Yes.
• Inserts text if you select one of the following options:
• Plain text (ignore line breaks)
10-46
Import File
• Text (retain line breaks)
• Fixed-width text (retain line breaks)
• Inserts paragraphs if you select one of the following options:
• Paragraphs defined by line breaks
• Paragraphs defined by empty rows
• Inserts the contents of an XML file if you select the DocBook XML option.
• Inserts the contents of the RTF or HTML file if you select the Formatted text (RTF/
HTML) option.
• Inserts a link to a file if you import the file into an HTML report.
Class
rptgen.crg_import_file
See Also
Comment, Nest Setup File, Stop Report Generation, Time/Date Stamp
10-47
10
Components — Alphabetical List
Insert Variable
Insert variable values into report
Description
This component inserts the value (and, optionally, the name) of each the following
variables into the report:
• A variable from the MATLAB workspace
• A variable from a MAT-file
• A global variable
• A variable that you specify directly
Source
• Variable name: Specifies the name of the variable:
• %<VariableName>: Inserts the value of a variable from the MATLAB workspace
into the report.
• Variable location:
• Base Workspace: Gets a variable from the MATLAB workspace.
• MAT File: Gets a variable from a binary file with a .mat extension.
• Global variable: Gets a global variable.
• Direct: Gets a variable that you specify directly.
Display Options
• Title: Specify a title for the report:
• Automatic: Generates a title automatically.
• Custom: Specifies a custom title.
• None: Specifies no title.
10-48
Insert Variable
• Array size limit: Limits the width of the display in the generated report. Units
are in pixels. The size limit for a given table is the hypotenuse of the table width
and height [sqrt(w^2+h^2)]. The size limit of a given text string is the number of
characters squared. If you exceed the size limit, the variable appears in condensed
form, such as [64x64 double]. Setting a size limit of 0 displays the variable in full,
regardless of its size.
• Object depth limit: Specifies the maximum number of nesting levels to report on for
a variable value
• Object count limit: Specifies the maximum number of nested objects to report on for
a variable value
• Display as: Choose a display style from the menu:
• Table: Displays as a table.
• Paragraph: Displays as a paragraph.
• Inline text: Displays inline with the surrounding text.
• Table or paragraph depending on data type: Displays as a table or
paragraph.
• Show variable type in headings: Show data type of this variable in the title of its
report.
• Show variable table grids: Show grid lines for the table used to report the value of
this variable.
• Make variable table page wide: Make the variable table as wide as the page on
which the table appears.
• Omit if value is empty: Exclude empty parameters from the generated report.
• Omit if property default value: Exclude object property from the report if that
property uses the default value.
Insert Anything into Report?
Yes. Text.
Class
rptgen.cml_variable
10-49
10
Components — Alphabetical List
See Also
Evaluate MATLAB Expression, MATLAB Property Table, MATLAB/Toolbox
Version Number, Variable Table
10-50
Link
Link
Insert linking anchors or pointers into report
Description
This component inserts linking anchors or pointers into the report.
For a PDF report, if you open the report from MATLAB (for example, if you open the
report right after generating it), the link does not work. However, if you open a PDF
report outside of MATLAB (for example, from Adobe Acrobat), the link works properly.
Properties
• Link type: Select the type of link to insert into the report. Options include:
• Linking anchor: Specifies a link to an anchor.
• Internal document link: Specifies a location in the report (as specified by an
anchor).
• URL (external) link: Specifies a link to a Web site or to a MATLAB command
to execute from generated report.
• Link identifier: Indicates the location to which the link points. It can contain only
ASCII characters, and it is not visible in the generated report.
For a Web link, the link identifier options are context sensitive; their formats
differ depending on the link type you select. For example, to link to an external file
foo.txt, specify the link identifier as follows:
• On UNIX systems:
file:///home/janedoe/foo.txt
• On Microsoft Windows systems:
H:\foo.txt
For a link to a MATLAB command, enter matlab: followed by a space and the
MATLAB command that you want the link to execute.
• Link text: Specifies text to use in the link.
10-51
10
Components — Alphabetical List
• Emphasize link text: Italicizes the link text.
Examples
Link to an External Web Site
1
Open Report Explorer with the setedit command.
2
In the Properties pane on the right, click Create and edit a new report file.
3
In the Library pane in the middle, under the Formatting category, select the Text
component and click the Add component icon.
4
In the Properties pane, enter Open the (add a blank space at the end of the
string).
5
In the Library pane, under the Formatting category, select the Link component and
click the Add component icon.
6
In the Properties pane:
• Set Link type to URL (external) link.
• In Link Identifier, enter http://www.mathworks.com.
• In Link text, enter MathWorks Web site. (with a period).
7
10-52
Generate the report.
Link
8
Click the link to open the MathWorks Web site.
Link to Another Place in a Report
1
At the MATLAB command line, enter setedit magic-square.rpt.
2
In the Outline pane on the left, select the Title Page component.
3
In the Library pane in the middle, under the Formatting category, select the Link
component and click the Add component icon.
4
In the Properties pane:
• Set Link type to Linking anchor.
• In Link identifier, enter explanation.
In the Contents pane, the Link component appears as Anchor - explanation.
5
In the Outline pane, under the second Chapter component, select the Eval
component.
6
In the Library pane, under the Formatting category, select the Paragraph component
and click the Add component icon.
7
In the Library pane, under the Formatting category, select the Link component and
click the Add component icon.
8
In the Properties pane:
• Set Link type to Internal document link.
• In Link identifier, enter explanation.
10-53
10
Components — Alphabetical List
• In Link text, enter For a detailed explanation, click here. (with the
period).
9
10-54
Generate the report.
Link
10 Click the link to move to near the top of the report, to “Chapter 1. Magic Squares
Explained.”.
10-55
10
Components — Alphabetical List
Link to a Model
This example shows how to add a link to a Simulink model. To view the model, you must
have the Simulink software installed.
1
Open Report Explorer with the setedit command.
2
In the middle pane, click simulink-default_rptgensl_version.rpt.
3
In the Library pane in the middle, under the Formatting category, select the
Paragraph component and click the Add component icon.
4
In the Library pane in the middle, under the Formatting category, select the Link
component and click the Add component icon.
5
In the Properties pane:
• Set Link type to URL (external) link.
• In Link Identifier, enter
matlab:open_system('%<RptgenSL.getReportedModel()>').
• In Link text, enter Open model.
6
10-56
Generate the report.
Link
7
Click the “Open model” link to open the model.
Insert Anything into Report?
Yes. Text or anchor.
Class
rptgen.cfr_link
See Also
Chapter/Subsection, Empty Component, List, Paragraph, Table, Text, Title
Page
10-57
10
Components — Alphabetical List
List
Create bulleted or numbered list from cell array or child components
Description
This component creates a bulleted or numbered list from a cell array or child
components.
List Content
• Create list from workspace cell array: Creates the list from of the 1-byn or n-by-1 cell array. This option is not available when this component has
child components — in this case, the list automatically generates from the child
components.
• List title: Specifies the title of the list.
• List title style name: Specifies the style to use with the list title. To specify a style,
perform these steps.
1
In the Report Options dialog box, set File format to one of these values:
• Word (from template)
• HTML (from template)
• PDF (from template)
2
In the List properties dialog box, set List title style name to Specify.
3
In the List title style name text box, type a style name.
To take effect, the style you specify must be a list style defined in the template
that you use to generate the report. For more information about template styles,
see “Report Conversion Templates” on page 6-2.
List Formatting
• List style:
• Bulleted list
10-58
List
• Numbered list.
• Numbering style: Specifies a numbering style for numbered lists. This setting is
supported only in the RTF/DOC report format. Options include:
• 1,2,3,4,...
• a,b,c,d,...
• A,B,C,D,...
• i,ii,iii,iv,...
• I,II,III,IV,...
• List style name: Specifies the style to use with the list. To specify a style, perform
these steps.
1
In the Report Options dialog box, set File format to one of these values:
• Word (from template)
• HTML (from template)
• PDF (from template)
2
Set List style name to Specify.
3
In the List style name text box, type a style name.
To take effect, the style you specify must be defined in the template that you use
to generate the report.
• Show parent number in nested list (1.1.a): Displays all level numbers in a nested
list. You can create a nested list by putting one cell array inside another or by nesting
one List component inside another. Following is an example of how a list appears
when you select this option:
1. Example
2. Example
2.1. Example
2.2. Example
2.2.a. Example
2.2.b. Example
3. Example
This option is not available if you select Show only current list value (a).
• Show only current list value (a): Displays only the current list value. Following is
an example of how a list appears when you select this option:
10-59
10
Components — Alphabetical List
1. Example
2. Example
1. Example
2. Example
1. Example
2. Example
3. Example
This option is not available if you select Show parent number in nested list
(1.1.a).
Example 1: Creating a Nested List
Consider the following report setup file, which includes a nested list created by putting a
List component inside another List component:
[-] Report - Unnamed.rpt
[-] Bulleted list from child components
[ ] Text - sky
[ ] Table - varname
[ ] Image - test
[ ] Text - grass
[-] Bulleted list from child components
[ ] Text - clouds
[ ] Text - sun
[-] Paragraph - information
This report setup file generates a report that includes the following bulleted lists:
• sky
• varname, the table from the variable
• test, a snapshot of the image
• grass
• clouds
• sun
• information
Example 2: Creating a List Using Child Components
To generate a report that includes the following bulleted list:
10-60
List
• red
• green
• blue
Use the following report setup file:
[-] Report - Unnamed.rpt
[-] Bulleted list from child components
[ ] Text - red
[ ] Text - green
[ ] Text - blue
Creating a List Using a Cell Array
To generate the same bulleted list as in the previous example, configure a report setup
file to call a cell array, colors:
[-] Report - Unnamed.rpt
[-] Bulleted list from cell array called colors
Wherecolors is:
colors={'red','green','blue'}
Insert Anything into Report?
Yes. List.
Class
rptgen.cfr_list
See Also
Chapter/Subsection, Empty Component, Link, Paragraph, Table, Text, Title
Page
10-61
10
Components — Alphabetical List
Logical Else
Specify an else condition for a Logical If component
Description
This component acts as an else when it is the child of the Logical If component. You
can specify this component in one of the following ways:
• if
then
else
• if
then
elseif
elseif
.
.
.
else
Properties
If component has no children, insert text: Inserts specified text into your report
when the Logical Else component has no child components. In this case, this
component acts like the Text component.
Insert Anything into Report?
Yes, when if or elseif statement is false.
Class
rptgen_lo.clo_else
10-62
Logical Else
See Also
For Loop, Logical Elseif, Logical If, Logical Then, While Loop
10-63
10
Components — Alphabetical List
Logical Elseif
Specify an elseif condition for a Logical If component
Description
This component acts as an elseif when it is the child of the Logical If component.
You must specify this component as follows:
if
then
elseif
elseif
.
.
.
else
Properties
• Test expression: Specifies a MATLAB expression to evaluate.
• If component has no children, insert text: Inserts the specified text into the
report when the Logical Elseif component has no child components. In this case,
this component acts like the Text component.
Insert Anything into Report?
Yes, when parent if statement is false.
Class
rptgen_lo.clo_else_if
See Also
For Loop, Logical Else, Logical If, Logical Then, While Loop
10-64
Logical If
Logical If
Specify logical if condition
Description
This component acts as a logical if; it can have the Logical Then, Logical Elseif,
or Logical Else components as children components. This component executes its
child components when the specified workspace expression is true. It displays a specified
string when it has no child components. You can specify this component as follows:
• if
then
• if
then
else
• if
then
elseif
elseif
.
.
.
else
Properties
• Test expression: Specifies a MATLAB expression to evaluate.
• If component has no children, insert text: Inserts specified text into the report
when the Logical If component has no children.
Insert Anything into Report?
Depends on specified attribute values.
10-65
10
Components — Alphabetical List
Class
rptgen_lo.clo_if
See Also
For Loop, Logical Else, Logical Elseif, Logical Then, While Loop
10-66
Logical Then
Logical Then
Specify a then condition for a Logical If component
Description
This component acts as a then when it is the child of the Logical If component. You
can specify this component as follows:
• if
then
• if
then
else
• if
then
elseif
elseif
.
.
.
else
Attributes
If component has no children, insert text: Inserts specified text into the report when
the Logical Then component has no children. In this case, this component acts like the
Text component.
Insert Anything into Report?
Yes, when parent if statement is true.
Class
rptgen_lo.clo_then
10-67
10
Components — Alphabetical List
See Also
For Loop, Logical Else, Logical Elseif, Logical If, While Loop
10-68
MATLAB Property Table
MATLAB Property Table
Insert table that includes MATLAB object property name/property value pairs
Description
This component inserts a table that includes MATLAB object property name/property
value pairs.
Table
Select a preset table, which is already formatted and set up, in the preset table list in the
upper-left corner of the attributes page.
• Preset table: Choose a type of table:
• Default
• Blank 4x4
To apply the preset table, select the table and click Apply.
• Split property/value cells: Splits property name/property value pairs into separate
cells. Select the Split property/value cells check box for the property name and
property value to appear in adjacent cells. In this case, the table is in split mode; only
one property name/property value pair per cell is allowed. If more than one name/
property pair exists in a cell, only the first pair appears in the report; subsequent
pairs are ignored.
Clear the Split property/value cells check box for a given property name and
property value to appear together in one cell. In this case, the table is in nonsplit
mode, which supports more than one property name/property value pair. It also
supports text.
Before switching from nonsplit mode to split mode, make sure that you have only one
property name/property value pair per table cell.
• Display outer border: Displays the outer border of the table in the generated
report.
10-69
10
Components — Alphabetical List
• Table Cells: Modifies table properties. The selection in this pane affects the available
fields in the Cell Properties pane.
Cell Properties
Available options in the Cell Properties pane depend what you select for Table Cells.
If you select Workspace Properties, only the Contents and Show options appear. If
you select any other option, the Lower border and Right border options appear.
• Contents: Modifies the contents of the table cell selected in the Table Cells pane.
• Show as: Specifies the format for the contents of the table cell. Options include:
• Value
• Property Value
• PROPERTY Value
• Property: Value
• PROPERTY: Value
• Property - Value
• PROPERTY - Value
• Alignment: Specifies how to align the contents of the selected table cell in the Table
Cells field. Options include:
• Left
• Center
• Right
• Double justified
• Lower border: Displays the lower border of the table in the generated report.
• Right border: Displays the right border of the table in the generated report.
Creating Custom Tables
To create a custom table, edit a preset table, such as Blank 4x4. You can add and delete
rows and add properties. To open the Edit Table dialog box, click Edit.
For details about using this dialog box to create custom property tables, see “Property
Table Components” on page 5-6.
10-70
MATLAB Property Table
Insert Anything into Report?
Yes. Table.
Class
rptgen.cml_prop_table
See Also
Evaluate MATLAB Expression, Insert Variable, MATLAB/Toolbox Version
Number, Variable Table
10-71
10
Components — Alphabetical List
MATLAB/Toolbox Version Number
Insert table that shows version and release numbers and release date of MathWorks
products
Description
Using the Table Filter, specify whether this component reports version information for
all installed MathWorks products or just those products required for a model.
For the specified set of products, this component inserts a table showing any of these
columns that you specify:
• Version number
• Release number
• Release date
• Is required for model
You can list all your MathWorks products by typing ver at the MATLAB command line.
Table Title
Table title: Specifies the table title. The default is version number.
Table Filter
Show only toolboxes required for model: When you select this option, the report
shows version information for only those products required for a model or chart. By
default, the report shows version information for all installed MathWorks products.
Note: This option uses the Simulink Manifest Tools analysis to determine what products
appear in the version information table. See “Analysis Limitations” for Manifest Tools
analysis limitations.
10-72
MATLAB/Toolbox Version Number
Table Columns
• Version number: Includes the product version number (for example, 3.4) for all
installed MathWorks products or for only those products required for a model or
chart.
or
• Release number: Includes the MathWorks release number (for example, R2009b) for
all installed MathWorks products or for only those products required for a model or
chart.
• Release date: Includes the release date of for all installed MathWorks products or for
only those products required for a model.
• Is required for model: Indicates “Yes” for each MathWorks product required for a
model or chart.
Insert Anything into Report?
Yes. Table.
Class
rptgen.cml_ver
See Also
Evaluate MATLAB Expression, Insert Variable, MATLAB Property Table,
Variable Table
10-73
10
Components — Alphabetical List
Nest Setup File
Allow one report setup file (rpt file) to run inside another
Description
This component runs another report setup file at the point where the Nest Setup File
component is located in the current report setup file.
The components of the inserted report setup file are stored in the current report setup
file at the same level as the Nest Setup File component. Thus, inserted components
have the same parent component as the Nest Setup File component.
Properties
• Report filename: Specifies the name of the report setup file to import and run. You
can enter a path to the file or use the browse button (...) to find the file. You can
enter an absolute path or a relative path, relative to the report into which you nest
the report.
• Nest all reports with specified file name: Nests all reports with the same name
as specified in the Report filename option.
• Inline nested report in this report: Inserts the nested report in the original report
setup file where this component is located.
• Recursion limit: Allows you to nest a report setup file inside itself by setting a
recursion limit in this field. The recursion limit sets a limit on the number of times
the report setup file can run itself.
• Insert link to external report: Creates two separate reports, one using the original
report setup file and one using the nested report setup file. The report that includes
the nested report includes an absolute path link to the nested report.
• Link to external report is relative: If you select Insert link to external report,
then you can use the Link to external report is relative option to ensure the link
to the nested report is a relative link. This feature facilitates including the report on a
Web site.
• Increment file name to avoid overwriting: Appends a number to the file name of
report that includes the nested report, to preserve earlier versions of current report
file.
10-74
Nest Setup File
The Nest Setup File dialog box displays the report description of the nested report, if the
nested report has a report description.
Example
In the following example, the report setup file R2 is nested in R1:
[-] Report - R1.rpt
[-] Report - R2.rpt
[ ] Chapter
[ ] 1
[-] B
[ ] 2
[ ] Nest Setfile - R2.rpt
[-] Chapter
[ ] C
[ ] 4
[ ] D
[ ] 5
The generated report is identical to the one generated by the following report setup file:
[-] Report - R1.rpt
[ ] Chapter
[-] B
[ ] 1
[ ] 2
[-] Section 1
[ ] 4
[ ] 5
[ ] C
[ ] D
Components that determine their behavior from their parents, such as Chapter/
Subsection, are affected by components in the parent report setup file.
Insert Anything into Report?
Yes, if the nested report setup file produces a report.
Class
rptgen.crg_nest_set
See Also
Comment, Import File, Stop Report Generation, Time/Date Stamp
10-75
10
Components — Alphabetical List
Paragraph
Insert paragraph text into report
Description
This component inserts a paragraph into the report. The paragraph text is taken from a
child text component, or from text that you enter in the Paragraph Text field.
Title Options
• No paragraph title (default): Specifies no title for the paragraph.
• Get title from first child: Gets the title of the paragraph from its first child
component, which should be a Text component.
• Custom title: Specifies a custom title for the paragraph.
Style Name
Specifies the style to use with the paragraph title. To specify a style, perform these steps.
1
In the Report Options dialog box, set File format to one of these values:
• Word (from template)
• HTML (from template)
• PDF (from template)
2
In the Paragraph properties dialog box, set Title Options to one of these values:
• Get title from first child
• Custom title
3
Set Style Name to Specify.
4
In the Style Name text box, type a style name.
To take effect, the style you specify must be a paragraph style (or a linked
paragraph/character style for Word reports) defined in the template that you use
10-76
Paragraph
to generate the report. For more information about template styles, see “Report
Conversion Templates” on page 6-2.
Paragraph Text
Enter paragraph text into this field. If the Paragraph component has child components,
the paragraph content is taken from the paragraph text and the child components;
otherwise, the Paragraph component inserts text from this field. If the Paragraph
component does not have any child components and you do not enter any text into this
field, nothing appears in the report.
Use the %<VariableName> notation in this field if you want to insert the value of
a variable from the MATLAB workspace. For more details about this notation, see
“%<VariableName> Notation” on page 10-99 on the Text component reference page.
Style Name
Specifies the style to use with the paragraph text. To specify a style, perform these steps.
1
In the Report Options dialog box, set File format to one of these values:
• Word (from template)
• HTML (from template)
• PDF (from template)
2
Set Style Name to Specify.
3
In the Style Name text box, type a style name.
To take effect, the style you specify must be a paragraph style (or a linked
paragraph/character style for Word reports) defined in the template that you use to
generate the report. For example, if you use a Word template that defines a Normal
style, you can enter Normal as the style name. For more information about template
styles, see “Report Conversion Templates” on page 6-2.
10-77
10
Components — Alphabetical List
Style
Note: If you use the Style Name field to specify a style for the paragraph text, the style
formats below override the corresponding formats specified in the style. For example,
selecting Bold makes the text bold, even if the specified style specifies regular weight
text.
• Bold: Makes the text bold.
• Italic: Makes the text italic.
• Underline: Underlines the text.
• Strikethrough: Strikes through the text.
• Retain spaces and carriage returns: Formats text in the report in the same way
as it is entered.
• Show text as syntax-highlighted MATLAB code: Displays the text as syntaxhighlighted MATLAB code.
• Color: Specifies the color of the text.
• Select a color from a list of colors.
• Enter %<expr>.
• Enter an RGB (truecolor) value as #RRGGBB. For example, #0000ff is a shade of
blue.
Insert Anything into Report?
Yes, depending on child components.
Class
rptgen.cfr_paragraph
10-78
Paragraph
See Also
Chapter/Subsection, Empty Component, Image, Link, List, Table, Text, Title
Page
10-79
10
Components — Alphabetical List
Stop Report Generation
Halt report generation
Description
This component acts like Stop during report generation. You can use this component
inside an if/then statement by using Logical and Flow Control components to halt the
report-generation process when the specified condition is true. When report generation
halts, an XML source file is created, but not converted.
Confirmation Properties
• Confirm before stopping generation: Generates a confirmation dialog box before
stopping report generation.
• Confirmation question: Specifies a confirmation question for the prompt. The
default is “Stop generating the report?”
• Halt button name: Specifies a name for the button that stops report generation. The
default is “Halt Generation”.
• Continue button name: Specifies a name for the button that continues report
generation. The default is “Continue Generation”.
Example
This example creates a simple report that takes a snapshot of the current figure. If there
is no current figure, the report generation automatically halts:
[-] Report - figure-report.rpt
[-] if (isempty(get(0,'CurrentFigure')))
[ ] Stop Generation
[-] Figure Loop - current
[-] Chapter - <Title from SubComponent1>
[ ] Figure Name
[ ] Graphics Figure Snapshot
[ ] Figure Prop Table - Figure Properties
10-80
Stop Report Generation
Insert Anything into Report?
No.
Class
rptgen.crg_halt_gen
See Also
Comment, Import File, Nest Setup File, Time/Date Stamp
10-81
10
Components — Alphabetical List
Table
Insert parent of table
Description
This component is a parent of a component hierarchy that you specify to insert a table
into a report. Adding this component creates a hierarchy that defines a 2x2 table that
you modify to define your specific table.
Properties
• Title: Specifies a title for the table. Enter text or %<expr>. If you specify a table title,
text in the form Table #: precedes the table title.
• Title style name: Specifies the style to use with the table title. To specify a style,
perform these steps.
1
In the Report Options dialog box, set File format to one of these values:
• Word (from template)
• HTML (from template)
• PDF (from template)
2
In the Table properties dialog box, set Title style name to Specify.
3
In the Title style name text box, type a style name.
To take effect, the style you specify must be defined in a table style in the
template that you use to generate the report. For more information about
template styles, see “Report Conversion Templates” on page 6-2.
• Number of columns: Specifies the number of columns in the table. Enter a number
or %<expr>. A table must have at least one column.
• Table style name: Specifies the style to use with the table. To specify a style,
perform these steps.
1
10-82
In the Report Options dialog box, set File format to one of these values:
Table
• Word (from template)
• HTML (from template)
• PDF (from template)
2
Set Table style name to Specify.
3
In the Table style name text box, type a style name.
To take effect, the style you specify must be a table style in the template that
you use to generate the report. For more information about template styles, see
“Report Conversion Templates” on page 6-2.
• Table width options: Determines the width of the table.
• Auto: Automatically sets the table width based on the table contents.
• Specify: Enter the table width as either a percentage of the page width (for
example, 75%), or provide an absolute width for the table. You can specify a table
width in inches (in), picas (pi), or points (pt).
• Table spans page width: Spreads the table across the width of the page. If you clear
this property, the table uses the Table width options setting.
• Border: Specifies whether to draw border lines around the outside edges of the table.
For example, to draw a border line only at the top of the table, select Top.
• Between columns: Draw a vertical line on the right side of each column (except for
the last column) in the table.
To override this setting for a specific column or table entry, use the Column
separator property of the Table Column Specification or Table Entry components,
respectively.
• Between rows: Draw a horizontal line at the bottom of each row (except for the last
row) in the table.
To override this setting for a specific table column, row, or entry, use the Row
separator property of the appropriate component: Table Column Specification, Table
Row, or Table Entry.
• Horizontal entry alignment: Aligns the position of Table Entry component content
relative to the left and right sides of a table column.
• Left: Aligns content with the left side of the column
• Center: Aligns content in the middle of the column
10-83
10
Components — Alphabetical List
• Right: Aligns content with the right side of the column
• Double justified: Justifies the left and right sides of the entry content, to
avoid ragged left and right alignment
To override this setting:
• For a specific table column, use the Table Column Specification Entry horizontal
alignment property.
• For a specific table entry, use the Table Entry Horizontal alignment property.
• Indent: Specifies the amount by which to indent the table from the left edge of an
HTML page or from the left margin of a Word page. The specified indent must be
positive and may include an optional unit specifier. For example, you can specify
0.67in. If you do not specify a unit, pixels is the assumed unit. Here are the unit
abbreviations.
• in
• cm
• mm
• pt
Note: To use this option, in the Report Options dialog box, set the File format field to
HTML (from template), Word (from template), or PDf(from template).
• Rotate table 90 degrees: For PDF and HTML output file formats, rotates the table
90 degrees counterclockwise to the direction of the text flow on the page.
Insert Anything into Report?
Yes. Table.
Class
rptgen.cfr_ext_table
10-84
Table
See Also
Table Body, Table Column Specification, Table Entry, Table Footer,
Table Header, Table Row, Array-Based Table, Chapter/Subsection, Empty
Component, Image, Link, List, Paragraph, Text, Title Page
10-85
10
Components — Alphabetical List
Table Body
Insert parent of table body
Description
This component is a parent of the rows that define the body of a table.
This component must be a child of a Table component. Add Table Row components as
children to define the content of the table body.
Properties
• Style Name: Specifies the style to use with the table body. To specify a style, perform
these steps.
1
In the Report Options dialog box, set File format to one of these values:
• Word (from template)
• HTML (from template)
• PDF (from template)
2
Set Style Name to Specify.
3
In the Style Name text box, type a style name.
To take effect, the style you specify must be a table style defined in the template
that you use to generate the report. For more information about template styles,
see “Report Conversion Templates” on page 6-2.
• Entry vertical alignment: Positions table entry content relative to the top and
bottom of the row in which the table entry appears.
To override this setting for a table header or footer, or for a table row within one
of those table elements, use the Entry vertical alignment property for the Table
Header, Table Footer, or Table Row component.
To override this setting for a specific table entry, use the Table Entry Vertical
alignment property.
10-86
Table Body
Insert Anything into Report?
Yes. Table.
Class
rptgen.cfr_ext_table_body
See Also
Table, Table Column Specification, Table Entry, Table Footer, Table
Header, Table Row, Array-Based Table, Chapter/Subsection, Empty
Component, Image, Link, List, Paragraph, Text, Title Page
10-87
10
Components — Alphabetical List
Table Column Specification
Specify table column properties
Description
Specifies the format of a table column. Add a Table Column Specification component for
only those columns that you do not want the default settings for the table.
Properties
• Column number: Specifies a column number for the column to which this column
specification applies. Enter a number or %<expr>. Avoid using the same column
number for two column specifications in the same table.
• Column name: Specifies the name of this column. The name appears in the Outline
pane of the Report Explorer. Enter text or a %<expr>.
A Table Entry component can use this name to specify that it starts or ends on this
column.
• Column width: Specifies the width of the column.
To specify an absolute column width, specify a number or %<expr>. Use one of these
units of measure: inches (in), picas (pi), or points (pt).
You can use relative widths for columns. If you use relative widths for one column
in a table, you must use relative widths for the other columns in the table. Specify
1* for one column, as a baseline. For other columns, specify the width as a factor of
the baseline column. The width of each column reflects its relative size. For example,
suppose a two column table is 6 inches wide. The width of the first column is set to
1*, and the width of the second column is set to 2*. The width of the first column is 2
inches, and the width of the second column is 4 inches.
• Entry horizontal alignment: Justifies the position of table entries in the column,
relative to the left and right sides of the column.
Use the Horizontal entry alignment setting of the Table component, or explicitly
set this property:
10-88
Table Column Specification
• Left: Aligns content with the left side of the column.
• Center: Aligns content in the middle of the column.
• Right: Aligns content with the right side of the column.
• Double justified: Justifies the left and right sides the entry content, to avoid
ragged left and ragged right alignment.
To override this setting for a specific table entry, use the Table Entry Horizontal
alignment property for that table entry.
• Column separator: Use the Between columns setting of the Table component, or
explicitly set the Column separator property.
• True: Draws a vertical line at the right edge of the column (except for the last
column).
• False: Draws no vertical line at the right edge of the column.
• Row separator: Use the Between rows setting of the Table component, or explicitly
set the Row separator property.
• True: Draws a horizontal line at the bottom of each row in the column (except for
the bottom row).
• False: Does not draw a horizontal line at the bottom of each row in the column.
Insert Anything into Report?
Yes. Table.
Class
rptgen.cfr_ext_table_colspec
See Also
Table, Table Body, Table Entry, Table Footer, Table Header, Table Row,
Array-Based Table, Chapter/Subsection, Empty Component, Image, Link, List,
Paragraph, Text, Title Page
10-89
10
Components — Alphabetical List
Table Entry
Insert table entry
Description
Specifies the format of a table entry.
This component must be a child of a descendant of a Table Row component. Add
Paragraph, Image, List, and other components to define the content of the table entry.
Note: Spanning columns and rows is not supported when the File format for generating
the report is set to Word Document(RTF)
Properties
• Horizontal alignment: Use the Entry horizontal alignment setting of the Table
Column Specification component for the column in which the table entry appears, or
explicitly set the Horizontal alignment property.
• Left: Aligns content with the left side of the column.
• Center: Aligns content in the middle of the column.
• Right: Aligns content with the right side of the column.
• Double justified: Justifies the left and right sides the entry content, to avoid
ragged left and right alignment.
• Vertical alignment: Positions the table entry content relative to the top and bottom
of the row in which the table entry appears.
Use this property to override the Entry vertical alignment setting of the Table Row
component in which this table entry appears.
• Column separator: Use this property to override the Column separator setting
of the Table Column Specification component for the column in which the table entry
appears.
• True: Draws a vertical line at the right edge of the column for this table entry.
• False: Draws no vertical line at the right edge of the column for this table entry.
10-90
Table Entry
• Row separator: Use this property to override the Row separator setting of the
Table Row component for the row in which the table entry appears.
• True: Draws a horizontal line at the bottom of the row, below the table entry.
• False: Does not draw a horizontal line at the bottom of the row, below the table
entry.
• Background color: Specifies the background color of the table entry. You can:
• Use Auto to apply the Background Color setting of the Table Row component in
which the table entry appears.
• Select a color from a list of colors.
• Enter %<expr>.
• Enter an RGB (truecolor) value as #RRGGBB. For example, #0000ff is a shade of
blue.
• Span start column name: Specifies the name of the column (as defined by the Table
Column Specification component) to use as the first (left side) of a set of spanned
columns for displaying the table entry content.
• Span end column name: Specifies the name of the column (as defined by the Table
Column Specification component) to use as the last (right side) of a set of spanned
columns for displaying the table entry.
• Rows spanned: Specifies the number of rows to span for the table entry. The
spanning starts with the table row in which you define the table entry and extends
below that row for the number of rows that you specify.
• Text orientation: Rotates table entry text in 90 degree increments, relative to the
page text flow.
To use the text orientation of the table row in which this table entry appears, select
Auto.
To override the Text orientation setting for the Table Row component in which this
table entry appears, select a rotation value.
• Rotated text width: Specifies the width of table entry text that you rotate (with the
Text orientation property).
Specify the text width in inches (in), picas (pi), or points (pt).
To avoid truncating the rotated text, set the Rotated text width to a value that
allows the display of the longest string in the table row.
10-91
10
Components — Alphabetical List
Insert Anything into Report?
Yes. Table.
Class
rptgen.cfr_ext_table_entry
See Also
Table, Table Body, Table Column Specification, Table Footer, Table
Header, Table Row, Array-Based Table, Chapter/Subsection, Empty
Component, Image, Link, List, Paragraph, Text, Title Page
10-92
Table Footer
Table Footer
Insert parent of table footer
Description
This component is a parent of the Table Row components that define a table footer.
Properties
• Style Name: Specifies the style to use with the table footer. To specify a style,
perform these steps.
1
In the Report Options dialog box, set File format to one of these values:
• Word (from template)
• HTML (from template)
• PDF (from template)
2
Set Style Name to Specify.
3
In the Style Name text box, type a style name.
To take effect, the style you specify must be a table style defined in the template
that you use to generate the report. For more information about template styles,
see “Report Conversion Templates” on page 6-2.
• Entry vertical alignment: Positions the table entry content relative to the top and
bottom of the table footer rows in which the table entries appear.
To override this setting for a specific row in the table footer, use the Entry vertical
alignment property of the Table Row component for that row.
Insert Anything into Report?
Yes. Table.
10-93
10
Components — Alphabetical List
Class
rptgen.cfr_ext_table_foot
See Also
Table, Table Body, Table Column Specification, Table Entry, Table Header,
Table Row, Array-Based Table, Chapter/Subsection, Empty Component, Image,
Link, List, Paragraph, Text, Title Page
10-94
Table Header
Table Header
Insert parent of table header
Description
This component is a parent of the Table Row components that define a table header.
Properties
• Style Name: Specifies the style to use with the table header. To specify a style,
perform these steps.
1
In the Report Options dialog box, set File format to one of these values:
• Word (from template)
• HTML (from template)
• PDF (from template)
2
Set Style Name to Specify.
3
In the Style Name text box, type a style name.
To take effect, the style you specify must be a table style defined in the template
that you use to generate the report. For more information about template styles,
see “Report Conversion Templates” on page 6-2.
• Entry vertical alignment: Positions the table entry content relative to the top and
bottom of the table header rows in which the table entries appear.
To override this setting for a specific row in the table header, use the Entry vertical
alignment property of the Table Row component for that row.
Insert Anything into Report?
Yes. Table.
10-95
10
Components — Alphabetical List
Class
rptgen.cfr_ext_table_head
See Also
Table, Table Body, Table Column Specification, Table Entry, Table Footer,
Table Row, Array-Based Table, Chapter/Subsection, Empty Component, Image,
Link, List, Paragraph, Text, Title Page
10-96
Table Row
Table Row
Insert parent of table row entries
Description
This component is a parent of Table Entry components that define a table row.
Properties
• Entry vertical alignment: Positions the table entry content relative to the top and
bottom of the table row in which the table entries appear.
Use this property to override the Entry vertical alignment setting of the Table
Header, Table Footer, or Table Body component in which the table row appears.
• Row separator: Use this property to override the Row separator setting of the
Table component.
• True: Draws a horizontal line at the bottom of the row (except for the last row).
• False: Does not draw a horizontal line at the bottom of the row.
• Background color: Specifies the background color of the table row. You can:
• Use Auto for the background color that the report stylesheet specifies, which for
stylesheets provided with MATLAB Report Generator is white by default.
• Select a color from a list of colors.
• Enter %<expr>.
• Enter an RGB (truecolor) value as #RRGGBB. For example, #0000ff is a shade of
blue.
• Row height: Specifies the height of the table row.
To let the table contents automatically set the row height, use Auto.
To specify an absolute height for this table row, select Specify and enter the height
in inches (in), picas (pi), or points (pt).
• Text orientation: Rotates text in the table entries in this table row, relative to the
page text flow.
10-97
10
Components — Alphabetical List
To override the text rotation for a specific table entry, use the Table Entry Text
orientation property for that table entry.
• Rotated text width: Specifies the width of table entry text that you rotate with the
Text orientation property.
Specify the text width in inches (in), picas (pi), or points (pt).
To avoid truncating the rotated text, set the Rotated text width to a value that
allows the display of the longest string in the table row.
To override the rotated text width for a specific table entry in the table row, use the
Table Entry Rotated text width property.
Insert Anything into Report?
Yes. Table.
Class
rptgen.cfr_ext_table_row
See Also
Table, Table Body, Table Column Specification, Table Entry, Table Footer,
Table Header, Array-Based Table, Chapter/Subsection, Empty Component,
Image, Link, List, Paragraph, Text, Title Page
10-98
Text
Text
Format and insert text into report
Description
This component formats and inserts text into the report. It must have the Paragraph
component as its parent.
Properties
• Text to include in report: Specifies text to include in the report.
• Style Name: Specifies the style to use with the text. To specify a style, perform these
steps.
1
In the Report Options dialog box, set File format to one of these values:
• Word (from template)
• HTML (from template)
• PDF (from template)
2
Set Style Name to Specify.
3
In the Style Name text box, type a style name.
To take effect, the style you specify must be a paragraph (or a linked paragraph/
character style for Word reports) defined in the template that you use to generate
the report. For more information about template styles, see “Report Conversion
Templates” on page 6-2.
%<VariableName> Notation
You can enter %<VariableName> in this field (and in any field where the text appears
blue) to include the value of a variable from the base MATLAB workspace. You cannot
enter more than one variable in %<>. If you enter an invalid variable name, the report
includes the text %<VariableName> instead of the value of the variable.
10-99
10
Components — Alphabetical List
Example
1
Enter the following text:
I have a %<ObjName> and it has %<NumLeaves> leaves.
The word '%<ObjName>' has %<size(ObjName)> letters.
2
Set ObjName = "plant" and NumLeaves = 3.
3
Generate the report. It looks as follows:
I have a plant and it has 3 leaves.
The word 'plant' has 5 letters.
Style
Note: If you use the Style Name field to specify a style for this text component, the style
formats below override the corresponding formats specified in the style. For example,
selecting Bold makes the text bold, even if the specified style specifies regular weight
text.
• Bold: Makes the text bold.
• Italic: Makes the text italic.
• Underline: Underlines the text.
• Strikethrough: Strikes through the text.
• Subscript: Formats text as a subscript, in a smaller font than the other text, set
slightly below the other text.
• Superscript: Formats text as a superscript, in a smaller font than the other text, set
slightly above the other text.
• Retain spaces and carriage returns: Formats the text in the report as you entered
it.
• Show text as syntax-highlighted MATLAB code: Shows the text as syntaxhighlighted MATLAB code.
• Color: Specifies the color of the text.
• Select a color from a list of colors.
• Enter %<expr>.
10-100
Text
• Enter an RGB (truecolor) value as #RRGGBB. For example, #0000ff is a shade of
blue.
Insert Anything into Report?
Yes. Text.
Class
rptgen.cfr_text
See Also
Chapter/Subsection, Empty Component, Image, Link, List, Paragraph, Table,
Title Page
10-101
10
Components — Alphabetical List
Time/Date Stamp
Insert time and date of report generation into report
Description
This component inserts the time and date of the report generation into your report as
text. It must have the Paragraph or Chapter/Subsection component as its parent.
Prefix
Include text before stamp : Includes text before the time/date stamp. Specify the text
in the corresponding field.
Time Stamp Properties
• Include current time in stamp: Inserts the current time into the time/date stamp.
• Time display: Specifies the appearance of the time display. Options include:
• 12-hour
• 24-hour
• Time Separator: Specifies a separation marker between hours, minutes, and
seconds. Options include:
• Blank space ( ): Formats time as Hour Minute Second
• Colon (:): Formats time as Hour:Minute:Second
• Period (.): Formats time as Hour.Minute.Second
• None () : Formats time as HourMinuteSecond
• Include seconds in time stamp: Displays seconds in the time/date stamp.
Date Stamp Properties
• Include current date in stamp: Inserts the current date in the time/date stamp.
10-102
Time/Date Stamp
• Date order: Specifies the order in which the day, month, and year appear. Options
include:
• Day Month Year
• Month Day Year
• Year Month Day
• Date separator: Specifies a separation marker between day, month, and year.
Options include:
• Blank space ( ): Displays date as Day Month Year
• Colon (:): Displays date as Day:Month:Year
• Slash (/): Displays date as Day/Month/Year
• Period (.): Displays date as Day.Month.Year
• None (): Displays date as DayMonthYear
• Month display: Specifies how the month displays. Options include:
• Long (December)
• Short (Dec)
• Numeric (12)
• Year display: Specifies how the month displays. Options include:
• Long (2007)
• Short (07)
Preview
This pane displays the time/date stamp to appear in the report.
Insert Anything into Report?
Yes. Text.
10-103
10
Components — Alphabetical List
Class
rptgen.crg_tds
See Also
Comment, Import File, Nest Setup File, Stop Report Generation
10-104
Title Page
Title Page
Insert title page at beginning of report
Description
This component inserts a title page at the beginning of the report. You can use it in a
report setup file as a child of a Chapter/Subsection component or by itself.
To use the Title Page component, you need to have a Chapter component in your report.
For PDF and HTML reports, you can use the Stylesheet Editor to position title page
elements (for example, title, copyright, and images) anywhere on the front or reverse side
of the title page in any order. You can specify the size, color, weight, and slant of text
elements. For details, see “Modify Title Page Properties” on page 8-16.
Properties
The text fields on this property pane support the %<VariableName> notation. For
more details, see “%<VariableName> Notation” on page 10-99 on the Text component
reference page.
Main Tab
Title
• Title: Specifies the title of the report. The title is in a large font.
• Subtitle: Specifies the subtitle of the report. The subtitle is in a smaller font under
the title.
Options
• Author:
• Custom(default): Specifies the author of the report.
10-105
10
Components — Alphabetical List
• No author: Does not specify an author name.
• Automatic author: Automatically includes your user name as the author name.
The author name appears under the subtitle, in a smaller font than the subtitle.
• Include report creation date: Includes the date that the report is created. Choose
the date format in the corresponding list.
• Include copyright holder and year: Includes copyright holder and year
information.
• Display legal notice on title page: Includes the legal notice, report creation date,
and copyright information on the title page of PDF and Microsoft Word reports.
Image Tab
File
• File name: Specifies the file name of an image to appear under the subtitle, on the
title page.
• Copy to local report files directory: Copies the image file into the folder in which
the report file is located.
Display Options
• Scaling: Controls size of the image, as displayed in a browser. Making an image
larger using this option does not affect the storage size of the image, but the quality
of the displayed image may decrease as you increase or decrease the size of the
displayed image.
Generally, to achieve the best and most predictable display results, use the default
setting of Use image size.
• Use image size: Causes the image to appear the same size in the report as on
screen (default).
• Fixed size: Specifies the number and type of units.
• Zoom: Specifies the percentage, maximum size, and units of measure.
• Size: Specifies the size of the snapshot in the form w h (width, height). This field is
active only if you choose Fixed size in the Scaling list
10-106
Title Page
• Alignment: Only reports in PDF or RTF format support this property. Options
include:
• Auto
• Right
• Left
• Center
Abstract Tab
• Abstract Text: Specifies an optional abstract for the report.
• Style Name: Specifies the style to use with the abstract text. To specify a style,
perform these steps.
1
In the Report Options dialog box, set File format to one of these values:
• Word (from template)
• HTML (from template)
• PDF (from template)
2
Set Style Name to Specify.
3
In the Style Name text box, type a style name.
To take effect, the style you specify must be a paragraph (or a linked paragraph/
character style for Word reports) defined in the template that you use to generate
the report. For example, if you use a Word template that defines a Normal style,
you can enter Normal as the style name. For more information about template
styles, see “Report Conversion Templates” on page 6-2.
Style
Note: If you use the Style Name field to specify a style for this text, the style formats
below override the corresponding formats specified in the style. For example, selecting
Bold makes the text bold, even if the specified style specifies regular weight text.
• Bold: Makes the text bold.
10-107
10
Components — Alphabetical List
• Italic: Makes the text italic.
• Underline: Underlines the text.
• Strikethrough: Strikes through the text.
• Retain spaces and carriage returns: Formats the text in the generated report as
you entered it.
• Show text as syntax-highlighted MATLAB code: Shows the text as syntaxhighlighted MATLAB code.
• Color: Specifies the color of the text.
Legal Notice Tab
• Legal Notice Text: Specifies an optional legal notice for the report.
• Style Name: Specifies the style to use with the legal notice text. To specify a style,
perform these steps.
1
In the Report Options dialog box, set File format to one of these values:
• Word (from template)
• HTML (from template)
• PDF (from template)
2
Set Style Name to Specify.
3
In the Style Name text box, type a style name.
To take effect, the style you specify must be a paragraph (or a linked paragraph/
character style for Word reports) defined in the template that you use to generate
the report. For example, if you use a Word template that defines a Normal style,
you can enter Normal as the style name. For more information about template
styles, see “Report Conversion Templates” on page 6-2.
Style
Note: If you use the Style Name field to specify a style for this text, the style formats
below override the corresponding formats specified in the style. For example, selecting
Bold makes the text bold, even if the specified style specifies regular weight text.
10-108
Title Page
• Bold: Makes the text bold.
• Italic: Makes the text italic.
• Underline: Underlines the text.
• Strikethrough: Strikes through the text.
• Retain spaces and carriage returns: Formats the text in the generated report as
you entered it.
• Show text as syntax-highlighted MATLAB code: Shows the text as syntaxhighlighted MATLAB code.
• Color: Specifies the color of the text.
Insert Anything into Report?
Yes. Title page.
Class
rptgen.cfr_titlepage
See Also
Chapter/Subsection, Empty Component, Image, Link, List, Paragraph, Table,
Text
10-109
10
Components — Alphabetical List
Variable Table
Insert table that displays all the variables in the MATLAB workspace
Description
This component inserts a table that displays all the variables in the MATLAB workspace.
Tip Find all the variables in the MATLAB workspace by typing whos at the command
line.
Source Workspace
Read variables from:
• Base workspace: Reads variables from the MATLAB workspace.
• MAT-file: Reads variables from a binary file with a .mat extension. Use
the %<VariableName> notation. For more details about this notation, see
“%<VariableName> Notation” on page 10-99 on the Text component reference page.
Table Title
• Table title:
• Automatic (Variables from MATLAB workspace): Sets the table title to the
name of a MATLAB variable.
• Custom: Specifies a custom title.
• Table Columns:
• Variable dimensions (MxN): Includes the size of the variable.
• Variable memory bytes: Includes the number of bytes of memory consumed by
the variable.
• Variable class: Includes the variable class.
• Variable value: Includes the value of the variable.
10-110
Variable Table
Note: Large variable arrays collapse to [MxN CLASS]. For example, if you have a
300-by-200 double array, it appears in the report as [300x200 DOUBLE].
Example
The following is an example of a variable table that includes size, memory bytes, and
value information in the table columns.
Name
Size
Bytes
Value
aCell
1x2
238
{ [ 1 2 3 4 ] Speed (kph) }
aNumber
1x1
8
1
aString
1x11
22
Speed (kph)
aStructure
1x1
302
[struct w/ fields. Inputs, Outputs]
aVector
1x4
32
[1234]
Insert Anything into Report?
Yes. Table.
Class
rptgen.cml_whos
See Also
Evaluate MATLAB Expression, Insert Variable, MATLAB Property Table,
MATLAB/Toolbox Version Number
10-111
10
Components — Alphabetical List
While Loop
Iteratively execute child components while a specified condition is true
Description
This component iteratively executes its child components while a specified condition is
true. The While Loop component must have at least one child component; the purpose
of this component is to run its children several times. If it does not have any children,
this component does not add anything to the report.
Tip Limit the number of repetitions to prevent infinite loops.
Logic Properties
• Continue looping if this expression is true: Specifies a string to evaluate. This
string must be a valid MATLAB expression that evaluates to 1 or 0 (true or false).
For example, if a = 1, b = 2, and c = 3, the following command:
d=(a>b/c)
returns:
d = 1
Because 1 is greater than b/c (2/3), this expression is true and evaluates to 1.
• Limit number of loops to: Allows you to prevent infinite loops. Use the left and
right arrows to increase or decrease the number of loops.
• Initialize with this expression: Initializes the loop with a valid MATLAB
expression.
Insert Anything into Report?
Yes, if it has a child component.
10-112
While Loop
Class
rptgen_lo.clo_while
See Also
For Loop, Logical Else, Logical Elseif, Logical If, Logical Then
10-113
10
Components — Alphabetical List
Report Explorer
Design and generate reports on MATLAB applications
Description
Use the Report Explorer to:
• Create and modify report setup files.
• Apply templates or stylesheets to format the generated report.
• Specify the report file format.
• Generate reports.
Open the Report Explorer App
MATLAB command prompt: Enter report.
Examples
•
“Create a Report Setup File” on page 2-3
•
“Add Report Content Using Components” on page 2-5
•
“Generate a Report” on page 2-39
More About
10-114
•
“Report Setup”
•
“Working with Components”
•
“Format Reports”
•
“Generate Reports”
•
“Manage Report Conversion Templates”
•
“Customize Report Conversion Templates”
Report Explorer
See Also
Functions
report | rptconvert | rptlist | setedit
Introduced before R2006a
10-115
11
Functions – Alphabetical List
11
Functions – Alphabetical List
compwiz
Create custom MATLAB Report Generator components
Syntax
compwiz
compwiz ('–browse')
compwiz ('–v1browse')
compwiz (rptgen.cfr_list)
Description
The Create Component dialog box creates a framework for custom report components.
For more information, see “Create Custom Components” on page 7-3.
• compwiz with no arguments displays the Component Editor in the Report Explorer.
• compwiz ('–browse') displays a list of components from which to derive a new
component.
• compwiz ('–v1browse') displays a list of legacy (v1.x) components from which to
derive a new component.
• compwiz (rptgen.cfr_list) initializes the Component Editor with the settings of
the referenced components.
More About
•
“Create Custom Components” on page 7-3
See Also
setedit | report | rptconvert | rptlist
11-2
append
append
Class: mlreportgen.dom.Container
Package: mlreportgen.dom
Append DOM object to container
Syntax
domObjOut = append(containerObj,domObj)
Description
domObjOut = append(containerObj,domObj) appends the DOM object to the
specified container object.
Input Arguments
containerObj — Container object to append DOM object to
mlreportgen.dom.Container object
Container object to append DOM object to, specified as an
mlreportgen.dom.Container object.
domObj — DOM document element object to append
DOM object
DOM document element object to append, specified as a DOM object.
• mlreportgen.dom.CustomElement
• mlreportgen.dom.Container
• mlreportgen.dom.DocumentPart
• mlreportgen.dom.FormalTable
• mlreportgen.dom.Group
• mlreportgen.dom.ExternalLink
11-3
11
Functions – Alphabetical List
• mlreportgen.dom.HTML
• mlreportgen.dom.HTMLFile
• mlreportgen.dom.Image
• mlreportgen.dom.InternalLink
• mlreportgen.dom.LinkTarget
• mlreportgen.dom.OrderedList
• mlreportgen.dom.Paragraph
• mlreportgen.dom.RawText
• mlreportgen.dom.Table
• mlreportgen.dom.Text
• mlreportgen.dom.TemplateHole
• mlreportgen.dom.UnorderedList
Output Arguments
domObjOut — Appended document element
document element object
Appended document element, returned by one of these DOM objects:
• mlreportgen.dom.CustomElement
• mlreportgen.dom.Container
• mlreportgen.dom.DocumentPart
• mlreportgen.dom.FormalTable
• mlreportgen.dom.Group
• mlreportgen.dom.ExternalLink
• mlreportgen.dom.HTML
• mlreportgen.dom.HTMLFile
• mlreportgen.dom.Image
• mlreportgen.dom.InternalLink
• mlreportgen.dom.LinkTarget
• mlreportgen.dom.OrderedList
11-4
append
• mlreportgen.dom.Paragraph
• mlreportgen.dom.RawText
• mlreportgen.dom.Table
• mlreportgen.dom.Text
• mlreportgen.dom.TemplateHole
• mlreportgen.dom.UnorderedList
Examples
Append Content to Container
Create a container object.
import mlreportgen.dom.*;
rpt = Document('MyReport','docx');
c = Container();
Append content to the container and append the container to the report.
append(c,Paragraph('Hello'));
append(c,Table(magic(5)));
append(rpt,c);
Close and generate the report.
close(rpt);
rptview(rpt.OutputPath);
•
“Create Object Containers” on page 13-26
•
“Add Content as a Group” on page 13-14
See Also
mlreportgen.dom.Container | mlreportgen.dom.Group
Introduced in R2015a
11-5
11
Functions – Alphabetical List
clone
Class: mlreportgen.dom.Container
Package: mlreportgen.dom
Copy container object
Syntax
clonedContainer = clone(sourceContainer)
Description
clonedContainer = clone(sourceContainer) copies (clones) the specified
container.
Input Arguments
sourceContainer — Container object to copy
mlreportgen.dom.Container object
Container object to copy, specified as an mlreportgen.dom.Container object.
Output Arguments
clonedContainer — Copied container object
mlreportgen.dom.Container object
Copied container object, returned as an mlreportgen.dom.Container object.
Examples
Copy Container Object
Create a container object. Microsoft Word output ignores the HTML container element
tag (in this example, the div tag).
11-6
clone
import mlreportgen.dom.*;
rpt = Document('MyReport','docx');
c = Container();
Color all of the text in this container red.
c.Style = {Color('red')};
Append content to the container and append the container to the report.
append(c,Paragraph('Hello'));
append(c,Table(magic(5)));
append(rpt,c);
Clone the container.
clonedC = clone(c);
Append the cloned container to the report.
append(rpt,clonedC);
Close and generate the report.
close(rpt);
rptview(rpt.OutputPath);
•
“Create Object Containers” on page 13-26
•
“Add Content as a Group” on page 13-14
See Also
mlreportgen.dom.Container | mlreportgen.dom.Group
Introduced in R2015a
11-7
11
Functions – Alphabetical List
mlreportgen.dom.CustomElement.append
Package: mlreportgen.dom
Append HTML content to custom element
Syntax
domObjOut = append(customElementObj,domObj)
Description
domObjOut = append(customElementObj,domObj) appends an element to a custom
element.
Examples
Append Text to a Custom Element
This example shows how to add a custom element that provides a check box in an HTML
report.
Create and a custom element and append text to it.
import mlreportgen.dom.*;
d = Document('test');
input1 = CustomElement('input');
input1.CustomAttributes = {
CustomAttribute('type', 'checkbox'), ...
CustomAttribute('name', 'vehicle'), ...
CustomAttribute('value', 'Bike'), ...
};
append(input1, Text('I have a bike'));
Append the custom element to an ordered list and display the report.
ol = OrderedList({input1});
11-8
mlreportgen.dom.CustomElement.append
append(d,ol);
close(d);
rptview('test','html');
•
“Add Content to a Report” on page 13-11
Input Arguments
customElementObj — Custom element to append content to
mlreportgen.dom.CustomElement object
Custom element to append content to, specified as an
mlreportgen.dom.CustomElement object.
domObj — DOM object to append to custom element
DOM object
DOM object to append to the custom element.
Output Arguments
domObjOut — DOM object appended to custom element
DOM object
DOM object appended to a custom element, represented by a DOM object.
See Also
mlreportgen.dom.CustomAttribute | mlreportgen.dom.CustomElement
Introduced in R2014b
11-9
11
Functions – Alphabetical List
addHTML
Class: mlreportgen.dom.Document
Package: mlreportgen.dom
Append HTML string to document
Syntax
htmlObjOut = addHTML(documentObj,htmlText)
Description
htmlObjOut = addHTML(documentObj,htmlText) converts a string of HTML text to
a group of DOM objects and appends the group to the Document object documentObj.
Input Arguments
documentObj — Document to append content to
mlreportgen.dom.Document object
Document object to append content to, specified as an mlreportgen.dom.Document
object.
htmlText — HTML text
string
HTML text, specified as a string.
Example: '<p><b>Hello</b> <i style="color:green">World</i></p>'
Output Arguments
htmlObjOut — HTML object with appended content
mlreportgen.dom.HTML object
11-10
addHTML
HTML object with appended content, returned as an mlreportgen.dom.HTML object.
Examples
Append HTML Text to Document
Create an HTML object from HTML text to use for a Microsoft Word report.
import mlreportgen.dom.*;
rpt = Document('HTMLToWordReport','docx');
htmlObj = addHTML(rpt,...
'<p><b>Hello</b> <i style="color:green">World</i></p>');
Generate the Word report.
close(rpt);
rptview(rpt.OutputPath);
•
“Append HTML Content to DOM Reports” on page 13-92
See Also
mlreportgen.dom.HTML | mlreportgen.dom.HTMLFile
More About
•
“Appending HTML to DOM Reports” on page 13-90
Introduced in R2015a
11-11
11
Functions – Alphabetical List
addHTMLFile
Class: mlreportgen.dom.Document
Package: mlreportgen.dom
Append HTML file contents to document
Syntax
documentObjOut = addHTMLFile(documentObj,htmlFilePath)
Description
documentObjOut = addHTMLFile(documentObj,htmlFilePath) appends HTML
file contents to a document.
Input Arguments
documentObj — Document to append content to
mlreportgen.dom.Document object
Document object to append content to, specified as an mlreportgen.dom.Document
object.
htmlFilePath — HTML file path
string
HTML file path, specified as a string.
Output Arguments
documentObjOut — Document object with HTML file content appended
mlreportgen.dom.Document object
Document object with HTML file content appended, returned as an
mlreportgen.dom.Document object.
11-12
addHTMLFile
Examples
Append HTML File Contents to a Document
In a text editor, create a file and enter this text:
<!DOCTYPE html>
<html>
<head>
<title>My First HTML</title>
</head>
<body>
<p>This is the <b>first</b> paragraph.</p>
<p>This is the <b>second</b> paragraph</p>
</body>
</html>
Save the file in the MATLAB current folder as html_example.html.
Create a Word report.
import mlreportgen.dom.*;
rpt = Document('HTMLReport','docx');
Append the HTML file content to the document.
addHTMLFile(rpt,'html_example.html');
Generate the Word report.
close(rpt);
rptview(rpt.OutputPath);
•
“Append HTML File Contents to DOM Reports” on page 13-94
See Also
mlreportgen.dom.Document.addHTMLFile | mlreportgen.dom.HTML |
mlreportgen.dom.HTMLFile
11-13
11
Functions – Alphabetical List
More About
•
“Appending HTML to DOM Reports” on page 13-90
Introduced in R2015a
11-14
mlreportgen.dom.Document.append
mlreportgen.dom.Document.append
Package: mlreportgen.dom
Append DOM or MATLAB object to document
Syntax
domObjOut
domObjOut
domObjOut
domObjOut
=
=
=
=
append(docObj,textContent)
append(docObj,listContent)
append(docObj,tableContent)
append( ___ ,styleName)
domObjOut = append(docObj,domObj)
Description
domObjOut = append(docObj,textContent) appends text or numbers to a
document and returns a text element object.
domObjOut = append(docObj,listContent) appends a one-dimensional cell array
as an unordered list and returns an unordered list object.
domObjOut = append(docObj,tableContent) appends a two-dimensional cell array
as a table and returns a table object.
domObjOut = append( ___ ,styleName) appends the specified content, using the
specified style.
domObjOut = append(docObj,domObj) appends a DOM object to the document and
returns a document element object.
Examples
Append an Ordered List Object
Create an OrderedList object and append it to a report.
11-15
11
Functions – Alphabetical List
import mlreportgen.dom.*;
d = Document('mydoc','html');
ol = OrderedList({'first step' 'second step' 'last step'});
append(d,ol);
close(d);
rptview('mydoc','html');
Specify a Style for Appended Text
Use the Word Title style for the text.
import mlreportgen.dom.*;
d = Document('mydoc','docx');
append(d,'This Is a Title','Title');
close(d);
rptview('mydoc','docx');
Append a Cell Array as a Table
import mlreportgen.dom.*;
d = Document('mydoc');
table = append(d,{'row 1 - col 1' 'row 1 - col 2';...
'row 2 - col 1' 'row 2 - col 2'});
table.Style = {Border('double'),ColSep('solid'),RowSep('solid')};
close(d);
rptview('mydoc','html');
•
“Add Content to a Report” on page 13-11
Input Arguments
docObj — Document to append content to
mlreportgen.dom.Document object
Document to append content to, specified as an mlreportgen.dom.Document object.
textContent — Text to append to document
string
Text to append to document.
11-16
mlreportgen.dom.Document.append
Example: myTextObj = append(myDocument,'This is an introduction')
listContent — Items to append to the document as unordered list
horizontal one-dimensional matrix | cell array
Specify items to be displayed in an unordered list. Each matrix or cell-array element
becomes a list item.
For a matrix, use each element can be a numeric or Boolean value.
For a cell array, each element can be:
• A string
• A number
• A Boolean value
• One of these DOM objects:
• mlreportgen.dom.Text
• mlreportgen.dom.Paragraph
• mlreportgen.dom.ExternalLink
• mlreportgen.dom.HTML
• mlreportgen.dom.InternalLink
• mlreportgen.dom.Table
• mlreportgen.dom.Image
• mlreportgen.dom.CustomElement
• A horizontal one-dimensional array (for a sublist)
tableContent — Items to append to document as table
matrix | cell array
Specify content for a table using either:
• A vertical one-dimensional matrix or cell array
• A two-dimensional matrix or cell array
For a matrix, each element can be a numeric or Boolean value.
For a cell array, each element can be:
11-17
11
Functions – Alphabetical List
• A string
• A number
• A Boolean value
• One of the following DOM objects:
• mlreportgen.dom.Text
• mlreportgen.dom.Paragraph
• mlreportgen.dom.OrderedList
• mlreportgen.dom.UnorderedList
• mlreportgen.dom.Table
• mlreportgen.dom.Image
• mlreportgen.dom.CustomElement
• A horizontal one-dimensional array (for a sublist)
Example: {'row 1 - col 1' 'row 1 - col 2';'row 2 - col 1' 'row 2 - col
2'}
styleName — Name of style to apply to appended content
string
The style to use with the appended content. The style defines the appearance of the
document element in the output document.
Use a style that is defined in the stylesheet of the template of the document you append
content to.
domObj — DOM document element object to append
DOM object
You can append the following DOM objects:
• mlreportgen.dom.CustomElement
• mlreportgen.dom.DocumentPart
• mlreportgen.dom.DOCXSection
• mlreportgen.dom.FormalTable
• mlreportgen.dom.Group
• mlreportgen.dom.ExternalLink
11-18
mlreportgen.dom.Document.append
• mlreportgen.dom.HTML
• mlreportgen.dom.Image
• mlreportgen.dom.InternalLink
• mlreportgen.dom.LinkTarget
• mlreportgen.dom.OrderedList
• mlreportgen.dom.Paragraph
• mlreportgen.dom.RawText
• mlreportgen.dom.Table
• mlreportgen.dom.Text
• mlreportgen.dom.UnorderedList
Output Arguments
domObjOut — Appended document element
document element object
Document element created and appended. One of the following DOM objects:
• mlreportgen.dom.CustomElement
• mlreportgen.dom.DocPart
• mlreportgen.dom.DOCXSection
• mlreportgen.dom.FormalTable
• mlreportgen.dom.Group
• mlreportgen.dom.ExternalLink
• mlreportgen.dom.HTML
• mlreportgen.dom.Image
• mlreportgen.dom.InternalLink
• mlreportgen.dom.LinkTarget
• mlreportgen.dom.OrderedList
• mlreportgen.dom.Paragraph
• mlreportgen.dom.RawText
• mlreportgen.dom.Table
11-19
11
Functions – Alphabetical List
• mlreportgen.dom.Text
• mlreportgen.dom.UnorderedList
See Also
mlreportgen.dom.Document
Introduced in R2014b
11-20
mlreportgen.dom.Document.close
mlreportgen.dom.Document.close
Package: mlreportgen.dom
Close document
Syntax
close(docObj)
Description
close(docObj) closes a document. Once a document is closed, you can no longer append
content to it. Closing the document outputs any remaining content, such as remaining
template text.
Examples
Close a Document
Close the myReport document.
import mlreportgen.dom.*;
myReport = Document('mydoc','html');
append(myReport,Paragraph('This is an introduction'));
close(myReport);
rptview('mydoc','html');
•
“Add Content to a Report” on page 13-11
Input Arguments
docObj — Document to close
mlreportgen.dom.Document object
11-21
11
Functions – Alphabetical List
Document to close, specified as an mlreportgen.dom.Document object.
See Also
mlreportgen.dom.Document | mlreportgen.dom.Document.open
Introduced in R2014b
11-22
mlreportgen.dom.Document.createAutoNumberStream
mlreportgen.dom.Document.createAutoNumberStream
Package: mlreportgen.dom
Create numbering stream
Syntax
streamOut = createAutoNumberStream(docObj,streamName)
streamOut = createAutoNumberStream(docObj,streamName,streamType)
streamOut = createAutoNumberStream(docObj,streamName,streamType,
initialValue)
Description
streamOut = createAutoNumberStream(docObj,streamName) creates a
numbering stream using Arabic numbers and an initial value of 0.
streamOut = createAutoNumberStream(docObj,streamName,streamType)
creates a numbering stream using the specified type of characters (Arabic numbers,
alphabetic, or Roman numerals) and an initial value corresponding to 0 (for example, a or
i).
streamOut = createAutoNumberStream(docObj,streamName,streamType,
initialValue) creates a numbering stream using the specified type of characters
(Arabic numbers, alphabetic, or Roman numerals) and specified initial value.
Examples
Create a Numbering Stream for Chapter Heading
import mlreportgen.dom.*;
myReport = Document('mydoc','html');
chapStream = createAutoNumberStream(myReport,'chapter','I');
for i=1:5
11-23
11
Functions – Alphabetical List
p = Paragraph('Chapter ');
p.Style = {CounterInc('chapter')};
p.WhiteSpace = 'pre';
append(p,AutoNumber('chapter'));
append(myReport, p);
end
close(myReport);
rptview(myReport.OutputPath,myReport.Type);
•
“Automatically Number Document Content” on page 13-86
Input Arguments
docObj — Document to apply numbering stream to
mlreportgen.dom.Document object
Document to apply numbering stream to, specified as an mlreportgen.dom.Document
object.
streamName — Name of numbering stream
string
Consider using a name that indicates the kinds of document element (for example, a
chapter heading) that you expect to apply the stream to.
streamType — Type of numbering stream characters
string
Use one of these letters to specify the type of characters to use for the numbering values.
• 'n' — Arabic numerals (you can also use 'N').
• 'a'— Lowercase alphabetic letters (a,b,c,...)
• ‘A’ — Uppercase alphabetic letters (A,B,C,...)
• ‘i’ — Lowercase Roman numerals (i,ii,iii,...)
• ‘I’ — Uppercase Roman numerals (I,II,III,...)
initialValue — Starting value for a numbering stream
number
11-24
mlreportgen.dom.Document.createAutoNumberStream
Use a number, regardless of the type of stream. The initial value used by the stream
depends on the type of stream. For example, if you set initialValue to 0:
• Arabic numeral stream — 0
• Alphabetic stream — a or A
• Roman numerals stream — i or I
Data Types: double
Output Arguments
streamOut — Numbering stream
mlreportgen.dom.AutoNumberStream object
A numbering stream, represented by an mlreportgen.dom.AutoNumberStream object.
More About
Tips
When you append an mlreportgen.dom.AutoNumber object, specify a numbering
stream.
See Also
mlreportgen.dom.Document | mlreportgen.dom.Document.createAutoNumberStream |
mlreportgen.dom.Document.getAutoNumberStream
Introduced in R2014b
11-25
11
Functions – Alphabetical List
mlreportgen.dom.Document.createTemplate
Package: mlreportgen.dom
Create DOM template
Syntax
createTemplate(path)
createTemplate(path,type)
Description
createTemplate(path) creates a DOM template in the specified location. The file
extension indicates whether to create a Microsoft Word template (.dotx) or an HTML
template (.htmx).
createTemplate(path,type) creates a template of the specified type at the specified
path. If the path does not have an extension, this method appends an extension of the
appropriate type ( 'htmx' for an HTML template, 'htmx' for a Word template, or
'html' for a single-file HTML template.
Examples
Create a Word Template
Create a Microsoft Word template in the current folder.
import mlreportgen.dom.*
Document.createTemplate('MyWordTemplate.dotx','docx');
11-26
•
“Create a Microsoft Word Template” on page 13-111
•
“Create an HTML Template” on page 13-122
mlreportgen.dom.Document.createTemplate
Input Arguments
path — Path for new template
string
If you use the path argument without the type argument, for a Word template, include
the .dotx extension and for an HTML template, include the .htmx extension.
If you use both the path and type arguments, and path does not have an extension, the
createTemplate method appends the appropriate extension (.dotx or .htmx).
type — Type of output
'html' (default) | 'docx' | 'html-file'
Type of output, specified as 'html', 'docx' or 'html-file'.
• 'html'— HTML output HTML output as a zipped or unzipped folder containing the
HTML document text, image, style sheet, and JavaScript files
• 'docx'— Word output
• 'html-file'— HTML output consisting of a single file that contains the text, style
sheets, JavaScript®, and images for the report
If you specify a template using the path argument, the template must be consistent with
the type argument. You must specify a Word template (.dotx) for Word output, an
HTML template package (.htmtx) for HTML output, and a single-file HTML template
(.html) for html-file output.
More About
Tips
Invoke createTemplate on the mlreportgne.dom.Document class itself, but not
on an instance of that class. In other words, use Document.createTemplate, not
myDocument.createTemplate (where myDocument is a derived class of Document).
See Also
mlreportgen.dom.Document | mlreportgen.dom.Template | unzipTemplate |
zipTemplate
11-27
11
Functions – Alphabetical List
Introduced in R2014b
11-28
mlreportgen.dom.Document.fill
mlreportgen.dom.Document.fill
Package: mlreportgen.dom
Fill document holes with generated content
Syntax
fill()
Description
fill() fills the holes in a document with generated content. Use this method with a
class derived from the mlreportgen.dom.Document class.
Examples
Add a fill Method to Invoke Hole-Specific fill Methods
This example shows how to define a report that fills a CustomerName hole in a Word
template.
Create a Word or HTML template that has a CustomerName hole. This example assumes
that there is a Word template called CustomerLetter.dotx.
In a file, create a report class derived from mlreportgen.dom.Document. From the
MATLAB toolstrip, select New > Class and define the class. For example:
classdef MyReport < mlreportgen.dom.Document
%MYREPORT defines a customize letter to customers
%
% rpt = MyReport('mydoc','docx','CustomerLetter');
% rpt.CustomerName = 'Smith';
% fill(rpt);
properties
CustomerName;
11-29
11
Functions – Alphabetical List
end
methods
function rpt = MyReport(filename,type,template)
rpt = [email protected](filename,type,template);
end
function fillCustomerName(rpt)
append(rpt,rpt.CustomerName);
end
end
end
Use the report.
rpt = MyReport('mydoc','docx','CustomerLetter');
rpt.CustomerName = 'Mr. Smith';
fill(rpt);
•
“Add Content to a Report” on page 13-11
More About
Tips
In the derived class, define fill methods to insert content for each hole in the template.
Use this signature:
fillHOLE_ID(docObj);
HOLE_ID is the ID of a hole defined by the template that the document uses, and docObj
is an instance of the derived class. When invoked on a derived Document object, the fill
method moves from the first hole in the document to the last, invoking the corresponding
fillHOLE_ID method at each hole. This approach eliminates the need for additional
code to loop through the holes in a template.
See Also
mlreportgen.dom.Document | mlreportgen.dom.Document.moveToNextHole
Introduced in R2014b
11-30
mlreportgen.dom.Document.getAutoNumberStream
mlreportgen.dom.Document.getAutoNumberStream
Package: mlreportgen.dom
Return numbering stream
Syntax
autoNumStreamOut = getAutoNumberStream(docObj,streamName)
Description
autoNumStreamOut = getAutoNumberStream(docObj,streamName) returns the
specified numbering stream used by the document.
Examples
Return a Numbering Stream
import mlreportgen.dom.*;
myReport = Document('mydoc','html');
createAutoNumberStream(myReport,'chapterNum','I',1);
streamOut = getAutoNumberStream(myReport,'chapterNum')
streamOut =
AutoNumberStream with properties:
StreamName:
CharacterType:
CharacterCase:
InitialValue:
Tag:
Id:
•
'chapterNum'
'roman'
'upper'
1
'dom.AutoNumberStream:500'
'500'
“Automatically Number Document Content” on page 13-86
11-31
11
Functions – Alphabetical List
Input Arguments
docObj — Document that uses numbering stream
mlreportgen.dom.Document object
Document that uses the numbering stream, specified as an
mlreportgen.dom.Document object.
streamName — Name of numbering stream to return
string
Name of the numbering stream to return, specified as a string.
Output Arguments
autoNumStreamOut — Numbering stream used by document
mlreportgen.dom.AutoNumberStream object
Numbering stream used by the document, represented by an
mlreportgen.dom.AutoNumberStream object.
See Also
mlreportgen.dom.AutoNumber | mlreportgen.dom.AutoNumberStream |
mlreportgen.dom.Document.createAutoNumberStream
Introduced in R2014b
11-32
mlreportgen.dom.Document.getCoreProperties
mlreportgen.dom.Document.getCoreProperties
Package: mlreportgen.dom
Get document or template core properties
Syntax
corePropertiesOut = getCoreProperties(path)
Description
corePropertiesOut = getCoreProperties(path) specifies the core OPC
properties for the document or template having the specified path.
Examples
Return Core Properties of a Document
import mlreportgen.dom.*;
myReport = Document('mydoc','docx');
append(myReport,'Hello world');
close(myReport);
coreProps = Document.getCoreProperties('mydoc.docx')
coreProps =
CoreProperties with properties:
Category:
ContentStatus:
Creator:
Description:
Identifier:
Keywords:
Language:
[]
[]
'MathWorks'
[]
[]
[]
[]
11-33
11
Functions – Alphabetical List
LastModifiedBy:
Revision:
Subject:
Title:
Version:
Tag:
Id:
''
'2'
[]
''
[]
'dom.CoreProperties:203'
'203'
Input Arguments
path — Path to document or template
string
Path to the document or template, specified as a string.
Output Arguments
corePropertiesOut — Core properties of document or template
mlreportgen.dom.CoreProperties object
Core properties of the document or template, represented by an
mlreportgen.dom.CoreProperties object.
More About
•
“Report Packages” on page 13-17
See Also
mlreportgen.dom.Document.getOPCMainPart |
mlreportgen.dom.Document.setCoreProperties | mlreportgen.dom.OPCPart
Introduced in R2014b
11-34
mlreportgen.dom.Document.getImageDirectory
mlreportgen.dom.Document.getImageDirectory
Package: mlreportgen.dom
Get image folder of document
Syntax
imageDirectory = getImageDirectory(path,type)
Description
imageDirectory = getImageDirectory(path,type) gets the image folder of a
document or template package located at the specified path and of the specified type
(Microsoft Word or HTML). This is a static method. Invoke it on the Document class.
Examples
Get the Image Folder
Suppose that the main image folder of an HTML document named MyDoc.htmx resides
in images under the root of the package. To get the path, enter:
mlreportgen.dom.Document.getImageDirectory('MyDoc','html');
ans =
/images
Input Arguments
path — Path of document or template package
string
Path of the document or template package
11-35
11
Functions – Alphabetical List
type — Type of document or package
'docx' | 'html'
Type document or template. For a Word document or template, specify 'docx'. For an
HTML document or template, specify 'html'.
Output Arguments
imageDirectory — Image folder of document
string
The path of the image folder for the package.
More About
•
“Report Packages” on page 13-17
See Also
mlreportgen.dom.Document.getImagePrefix |
mlreportgen.dom.Document.getOPCMainPart |
mlreportgen.dom.Document.setCoreProperties | mlreportgen.dom.OPCPart
Introduced in R2014b
11-36
mlreportgen.dom.Document.getImagePrefix
mlreportgen.dom.Document.getImagePrefix
Package: mlreportgen.dom
Get generated image name prefix
Syntax
imagePrefix = getImagePrefix(path,type)
Description
imagePrefix = getImagePrefix(path,type) gets the image name prefix of a
document or template package located at the specified path and of the specified type
(Microsoft Word or HTML). The DOM interface uses the prefix when generating internal
names of images appended to the document. This is a static method. Invoke it on the
Document class.
Examples
Get the Image Name Prefix
Suppose that the image name prefix of an HTML document named MyDoc.htmx is
image. To get the image name prefix, enter:
mlreportgen.dom.Document.getImagePrefix('MyDoc','html');
ans =
image
Input Arguments
path — Path of document or template package
string
11-37
11
Functions – Alphabetical List
Path of the document or template package
type — Type of document or package
'docx' | 'html'
Type document or template. For a Word document or template, specify 'docx'. For an
HTML document or template, specify 'html'.
Output Arguments
imagePrefix — Image name prefix
string
The generated image name prefix.
More About
•
“Report Packages” on page 13-17
See Also
mlreportgen.dom.Document.getImageDirectory |
mlreportgen.dom.Document.getOPCMainPart |
mlreportgen.dom.Document.setCoreProperties | mlreportgen.dom.OPCPart
Introduced in R2014b
11-38
mlreportgen.dom.Document.getMainPartPath
mlreportgen.dom.Document.getMainPartPath
Package: mlreportgen.dom
Return path of main part of document output package
Syntax
pathOut = getMainPartPath(docObj)
Description
pathOut = getMainPartPath(docObj) returns the full path of the main part of the
output package of the specified document. The main part is the file that contains the
XML or HTML markup for a document.
Examples
Get Path to Main Part of Output Package
This code returns the path to the main part of an HTML document named MyReport.
The main part is named index.html and it is in the root of the MyReport package. This
example assumes that there is a reports folder on the S: drive.
d = mlreportgen.dom.Document('S:\reports\MyReport','html');
d.PackageType='unzipped';
getMainPartPath(d)
's:\reports\MyReport\index.hml'
Input Arguments
docObj — Document that contains main part
mlreportgen.dom.Document object
Document that contains the main part, specified as an mlreportgen.dom.Document
object.
11-39
11
Functions – Alphabetical List
Output Arguments
pathOut — Path of main part of document output package
string
Path of the main part of document output package.
More About
•
“Report Packages” on page 13-17
See Also
mlreportgen.dom.Document.getOPCMainPart |
mlreportgen.dom.Document.setCoreProperties | mlreportgen.dom.OPCPart
Introduced in R2014b
11-40
mlreportgen.dom.Document.getOPCMainPart
mlreportgen.dom.Document.getOPCMainPart
Package: mlreportgen.dom
Return main part of document, document part, or template
Syntax
partOut = getOPCMainPart(path)
partOut = getOPCMainPart(path,docType)
Description
partOut = getOPCMainPart(path) returns the path of the main part (file) of a
package for a document, document part, or template, based on the specified path. The
returned path is relative to the root directory of the package, which is symbolized by a
forward slash (/). The main part is the file that contains the document or template XML
or HTML markup.
partOut = getOPCMainPart(path,docType) returns the relative path of the main
part of the output package of the specified type (Microsoft Word or HTML) of document,
document part, or template.
Examples
Get Path to Main Part of a Document Package
The example returns the path to the main part of an HTML document named
myDoc.htmx. The main part is named root.html, which is in the top-level folder of the
package.
import mlreportgen.dom.*;
myDocument = Document('myDoc','html');
append(myDocument,'Hello world');
close(myDocument);
11-41
11
Functions – Alphabetical List
mlreportgen.dom.Document.getOPCMainPart('MyDoc.htmx','html')
ans =
/root.html
Input Arguments
path — Path of document
string
If you use the path argument without the docType argument, include the .docx or
.htmx extension.
If you use both the path and docType arguments, getOPCMainPart appends an
extension of the appropriate type (.docx or .htmx).
docType — Type of document, document part, or template
'docx' | 'html'
Type of document, document part, or template, specified as a string.
Output Arguments
partOut — Path of main part of a package
string
The path to the main part of the document, document part, or template. The returned
path is relative to the root directory of the package, which is symbolized by a forward
slash (/).
More About
Tips
The getOPCMainPart method is a static method. Invoke it on the Document class,
rather than on an instance of the Document class or on a class derived from the
Document class.
11-42
mlreportgen.dom.Document.getOPCMainPart
•
“Report Packages” on page 13-17
See Also
mlreportgen.dom.Document.getMainPartPath |
mlreportgen.dom.Document.setCoreProperties | mlreportgen.dom.OPCPart
Introduced in R2014b
11-43
11
Functions – Alphabetical List
mlreportgen.dom.Document.moveToNextHole
Package: mlreportgen.dom
Move document append point to next template hole
Syntax
holeID = moveToNextHole(docObj)
Description
holeID = moveToNextHole(docObj) copies to the output document any text
between the current hole and the next hole in the document template. DOM creates an
mlreportgen.dom.RawText object for the text. This method makes the next hole the
current hole and returns the ID of that hole.
Examples
Move to Next Hole
import mlreportgen.dom.*;
myReport = Document('myDoc','docx');
moveToNextHole(myReport);
•
“Add Content to a Report” on page 13-11
Input Arguments
docObj — Document
mlreportgen.dom.Document object
Document in which to move the append point to the next hole.
11-44
mlreportgen.dom.Document.moveToNextHole
Output Arguments
holeID — Template hole ID
hole ID
The ID of the template hole that the method moves to (the new current hole).
Data Types: char
More About
Tips
The first time you invoke the moveToNextHole method, the DOM copies to the output
document all of the text up to the first hole in the template. Use Document.append
methods to add content to the output document to fill the first hole. The next time you
invoke moveToNextHole, the DOM copies to the output document all the text between
the first and second hole in the template. Then use Document.append methods to fill in
the second hole. In this way, you can successively fill all of the holes in a document.
See Also
mlreportgen.dom.Document | mlreportgen.dom.Document.fill
Introduced in R2014b
11-45
11
Functions – Alphabetical List
mlreportgen.dom.Document.open
Package: mlreportgen.dom
Open document
Syntax
open(docObj)
Description
open(docObj) opens a document for appending content.
Examples
Open a Document
import mlreportgen.dom.*;
myReport = Document('myDoc','html');
open(myReport);
•
“Add Content to a Report” on page 13-11
Input Arguments
docObj — Document to open
mlreportgen.dom.Document object
Document to open, specified as an mlreportgen.dom.Document object.
11-46
mlreportgen.dom.Document.open
More About
Tips
• After you open a document, you can no longer change its generated document type or
the template.
• The append method for a document opens a document if the document is not already
opened. Therefore, you rarely need to use the open method.
See Also
mlreportgen.dom.Document | mlreportgen.dom.Document.close
Introduced in R2014b
11-47
11
Functions – Alphabetical List
mlreportgen.dom.Document.package
Package: mlreportgen.dom
Add OPC part files to document package
Syntax
partOut = package(docObj,opcPart)
Description
partOut = package(docObj,opcPart) adds a file specified by an OPC part object to
the OPC package of a document.
Examples
Add Files to a Document Package
This example shows how to use the package method to add special browser processing
code. In this example, the processData.js file operates on the data.json file. This
example assumes that there are data.json and processData.js files in the current
folder.
import mlreportgen.dom.*;
myReport = Document('myDoc','html');
package(myReport,OPCPart('/data/data.json','data.json'));
package(myReport,OPCPart('/js/processData.js','processData.js'))
close(myReport);
Input Arguments
docObj — Document OPC package to add files to
mlreportgen.dom.Document object
11-48
mlreportgen.dom.Document.package
Document OPC package to add files to, specified as an mlreportgen.dom.Document
object.
opcPart — OPC part that specifies file to add to OPC package
mlreportgen.dom.OPCPart object
Define an OPCPart object to specify the files to add.
Output Arguments
partOut — Added OPC part file
mlreportgen.dom.OPCPart object
Added OPC part file, represented by an mlreportgen.dom.OPCPart object.
More About
•
“Report Packages” on page 13-17
See Also
mlreportgen.dom.Document.getCoreProperties |
mlreportgen.dom.Document.getOPCMainPart | mlreportgen.dom.OPCPart |
unzipTemplate | zipTemplate
Introduced in R2014b
11-49
11
Functions – Alphabetical List
mlreportgen.dom.Document.setCoreProperties
Package: mlreportgen.dom
Set OPC core properties of output document or template
Syntax
corePropertiesOut = setCoreProperties(path,corePropertiesObj)
Description
corePropertiesOut = setCoreProperties(path,corePropertiesObj) sets the
core OPC property values of the document or template having the specified path.
Examples
Set OPC Core Properties for a Document Package
This example shows how to use setCoreProperties to apply core property settings to a
report.
import mlreportgen.dom.*;
myReport = Document('mydoc','docx');
append(myReport,'Hello world');
close(myReport);
coreProps = Document.getCoreProperties('mydoc.docx');
coreProps.Title = 'MATLAB Example';
Document.setCoreProperties('mydoc.docx',coreProps)
In Windows Explorer, if you navigate to the mydoc.docx file, you can see that the Title
field says MATLAB Example.
Input Arguments
path — Path of document, document part, or template
string
11-50
mlreportgen.dom.Document.setCoreProperties
Path of document, document part, or template, specified as a string.
corePropertiesObj — OPC core properties to use
mlreportgen.dom.CoreProperties object
OPC core properties to use, specified as an mlreportgen.dom.CoreProperties object.
Output Arguments
corePropertiesOut — OPC core properties
mlreportgen.dom.CoreProperties object
OPC core properties, represented by an mlreportgen.dom.CoreProperties object.
More About
•
“Report Packages” on page 13-17
See Also
mlreportgen.dom.CoreProperties | mlreportgen.dom.Document.getCoreProperties |
mlreportgen.dom.Document.getOPCMainPart
Introduced in R2014b
11-51
11
Functions – Alphabetical List
mlreportgen.dom.ExternalLink.append
Package: mlreportgen.dom
Append custom element to external link
Syntax
textObjOut = append(externalLinkObj,text)
textObjOut = append(externalLinkObj,text,styleName)
domObjOut = append(externalLinkObj,domObj)
Description
textObjOut = append(externalLinkObj,text) appends a Text object constructed
from the specified text string to the link.
textObjOut = append(externalLinkObj,text,styleName) appends text using
the specified style.
domObjOut = append(externalLinkObj,domObj) appends a Text, Image, or
CustomElement object to the link.
Examples
•
“Create Links” on page 13-72
Input Arguments
externalLinkObj — External link object to append custom element to
mlreportgen.dom.ExtermalLink object
External link object to append custom element to, specified as an
mlreportgen.dom.ExtermalLink object.
text — Text to append
string
11-52
mlreportgen.dom.ExternalLink.append
Text to append, specified as a string.
styleName — Name of style to apply to appended text string
string
The style to use with the appended text. The style defines the appearance of the
document element in the output document.
Use a style that is defined in the stylesheet of the template of the document you append
content to.
domObj — DOM object to append
mlreportgen.dom.Text object | mlreportgen.dom.Image object |
mlreportgen.dom.CustomElement object
DOM object to append, specified as an mlreportgen.dom.Text,
mlreportgen.dom.Image, or mlreportgen.dom.CustomElement object.
Output Arguments
textObjOut — Text appended to external link
mlreportgen.dom.Text object
Text appended to an external link, represented by an mlreportgen.dom.Text object.
domObjOut — DOM object appended to external link
mlreportgen.dom.Text object | mlreportgen.dom.Image object |
mlreportgen.dom.CustomElement object
External link with appended content, returned as a DOM object of the same class as the
input argument DOM object.
See Also
mlreportgen.dom.ExternalLink | mlreportgen.dom.InternalTarget |
mlreportgen.dom.LinkTarget
Introduced in R2014b
11-53
11
Functions – Alphabetical List
mlreportgen.dom.FormalTable.appendFooterRow
Package: mlreportgen.dom
Append row to table footer
Syntax
rowObjOut = appendFooterRow(tableObj,rowObj)
Description
rowObjOut = appendFooterRow(tableObj,rowObj) appends a row of table entries
to the footer of a table.
Examples
Append a Table Footer
Create, format, and append a formal table.
import mlreportgen.dom.*;
myReport = Document('myDoc','html');
table = FormalTable({'row1 - col1' 'row1 - col2 ';...
'row2 - col1' 'row2 - col2'});
table.Style = {Border('double'),ColSep('solid'),RowSep('solid')};
append(myReport,table);
Create a row (and its entries) for the footer. Use bold text for the text in the row.
rowForFooter = TableRow();
rowForFooter.Style = {Bold(true)};
col1Title = TableEntry('Column 1 footer');
col2Title = TableEntry('Column 2 footer');
append(rowForFooter,col1Title);
append(rowForFooter,col2Title);
Append the footer row and display the report.
11-54
mlreportgen.dom.FormalTable.appendFooterRow
footerRow = appendFooterRow(table,rowForFooter);
close(myReport);
rptview('myDoc','html');
•
“Create and Format Tables” on page 13-58
Input Arguments
tableObj — Table
mlreportgen.dom.FormalTable object
Table that contains the footer to append a row to.
rowObj — Row to append to table footer
mlreportgen.dom.TableRow object
Row to append to the table footer, specified as an mlreportgen.dom.TableRow object.
Output Arguments
rowObjOut — Row appended to table footer
mlreportgen.dom.TableRow object
Row appended to the table footer, represented by an mlreportgen.dom.TableRow
object.
See Also
mlreportgen.dom.FormalTable | mlreportgen.dom.Table
Introduced in R2014b
11-55
11
Functions – Alphabetical List
mlreportgen.dom.FormalTable.appendHeaderRow
Package: mlreportgen.dom
Append row to table header
Syntax
rowObjOut = appendHeaderRow(tableObj,rowObj)
Description
rowObjOut = appendHeaderRow(tableObj,rowObj) appends a row of table entries
to the header of this table.
Examples
Append a Table Header
Create a formal table.
import mlreportgen.dom.*;
myReport = Document('myDoc','html');
table = FormalTable({'row1 - col1' 'row1 - col2 ';...
'row2 - col1' 'row2 - col2'});
table.Style = {Border('double'),ColSep('solid'),RowSep('solid')};
append(myReport,table);
Create a row for the header.
rowForHeader = TableRow();
col1Title = TableEntry('Column 1 header');
col2Title = TableEntry('Column 2 header');
append(rowForHeader,col1Title);
append(rowForHeader,col2Title);
Append the header row and display the report.
11-56
mlreportgen.dom.FormalTable.appendHeaderRow
headerRow = appendHeaderRow(table,rowForHeader);
close(myReport);
rptview('myDoc','html');
•
“Create and Format Tables” on page 13-58
Input Arguments
tableObj — Table
mlreportgen.dom.FormalTable object
Table that contains the header to append a row to.
rowObj — Row to append to table header
mlreportgen.dom.TableRow object
Row to append to the table header, specified as an mlreportgen.dom.TableRow object.
Output Arguments
rowObjOut — Row appended to table header
mlreportgen.dom.TableRow object
Row appended to table header, represented by an mlreportgen.dom.TableRow object.
See Also
mlreportgen.dom.FormalTable | mlreportgen.dom.Table
Introduced in R2014b
11-57
11
Functions – Alphabetical List
mlreportgen.dom.Group.append
Package: mlreportgen.dom
Add DOM object to group
Syntax
domObjOut = append(groupObj,domObj)
Description
domObjOut = append(groupObj,domObj) appends a DOM object to a group. Use
groups to append a set of document elements together.
Examples
Append a Paragraph to a Group
import mlreportgen.dom.*;
myReport = Document('myDoc','html');
x = 0:pi/100:2*pi;
y = sin(x);
plot1 = plot(x,y);
saveas(plot1,'plot1.png')
plotimage = Image('plot1.png');
para = Paragraph('Value of the sine function from 0 to 2pi');
groupForPlot = Group();
append(groupForPlot,para);
append(groupForPlot,plotimage);
append(myReport,groupForPlot);
close(myReport);
rptview('myDoc','html');
•
11-58
“Add Content to a Report” on page 13-11
mlreportgen.dom.Group.append
Input Arguments
groupObj — Group object to append DOM object to
mlreportgen.dom.Group object
Group object to append the DOM object to, specified as an mlreportgen.dom.Group
object.
domObj — DOM document element object to append
DOM object
You can append the following DOM objects:
• mlreportgen.dom.CustomElement
• mlreportgen.dom.DocumentPart
• mlreportgen.dom.FormalTable
• mlreportgen.dom.Group
• mlreportgen.dom.ExternalLink
• mlreportgen.dom.HTML
• mlreportgen.dom.HTMLFile
• mlreportgen.dom.Image
• mlreportgen.dom.InternalLink
• mlreportgen.dom.LinkTarget
• mlreportgen.dom.OrderedList
• mlreportgen.dom.Paragraph
• mlreportgen.dom.RawText
• mlreportgen.dom.Table
• mlreportgen.dom.TemplateHole
• mlreportgen.dom.Text
• mlreportgen.dom.UnorderedList
Output Arguments
domObjOut — Appended document object
DOM object
11-59
11
Functions – Alphabetical List
You can append the following DOM objects:
• mlreportgen.dom.CustomElement
• mlreportgen.dom.DocumentPart
• mlreportgen.dom.FormalTable
• mlreportgen.dom.Group
• mlreportgen.dom.ExternalLink
• mlreportgen.dom.HTML
• mlreportgen.dom.HTMLFile
• mlreportgen.dom.Image
• mlreportgen.dom.InternalLink
• mlreportgen.dom.LinkTarget
• mlreportgen.dom.OrderedList
• mlreportgen.dom.Paragraph
• mlreportgen.dom.RawText
• mlreportgen.dom.Table
• mlreportgen.dom.TemplateHole
• mlreportgen.dom.Text
• mlreportgen.dom.UnorderedList
See Also
mlreportgen.dom.Document | mlreportgen.dom.DocumentPart |
mlreportgen.dom.DOCXSection | mlreportgen.dom.Group
Introduced in R2014b
11-60
append
append
Class: mlreportgen.dom.HTML
Package: mlreportgen.dom
Append HTML string to HTML object
Syntax
htmlObjOut = append(htmlObj,htmlText)
htmlObjOut = append(htmlObj,htmlObjToAppend)
Description
htmlObjOut = append(htmlObj,htmlText) converts HTML string into an HTML
object and appends the object to htmlObj.
htmlObjOut = append(htmlObj,htmlObjToAppend) appends the
htmlObjToAppend object to htmlObj.
Input Arguments
htmlObj — HTML object to append content to
mlreportgen.dom.HTML object
HTML object to append content to, specified as an mlreportgen.dom.HTML object.
htmlText — HTML text
string
HTML text, specified as a string
Example: '<p><b>Hello</b> <i style="color:green">World</i></p>'
htmlObjToAppend — HTML object to append
mlreportgen.dom.HTML object
HTML object to append, specified as an mlreportgen.dom.HTML object.
11-61
11
Functions – Alphabetical List
Output Arguments
htmlObjOut — HTML content appended to HTML object
mlreportgen.dom.HTML object
HTML content appended to an HTML object, returned as an mlreportgen.dom.HTML
object.
Examples
Append HTML text to an HTML Object
Create an HTML object from HTML text, to use for a Microsoft Word report.
import mlreportgen.dom.*;
rpt = Document('HTML2WordReport','docx');
htmlObj = HTML('<p><b>Hello</b> <i style="color:green">World</i></p>');
Append content to the HTML object. Append the HTML object to the document.
append(htmlObj,'<p>This is <u>me</u> speaking</p>');
append(rpt,htmlObj);
Generate the report.
close(rpt);
rptview(rpt.OutputPath);
•
“Append HTML Content to DOM Reports” on page 13-92
See Also
mlreportgen.dom.Document.addHTML | mlreportgen.dom.HTML |
mlreportgen.dom.HTMLFile
More About
•
“Appending HTML to DOM Reports” on page 13-90
Introduced in R2015a
11-62
clone
clone
Class: mlreportgen.dom.HTML
Package: mlreportgen.dom
Copy HTML object
Syntax
clonedHTMLObj = clone(sourceHTMLObj)
Description
clonedHTMLObj = clone(sourceHTMLObj) copies (clones) the specified HTML object,
including its children.
Input Arguments
sourceHTMLObj — HTML object to copy
mlreportgen.dom.HTML object
HTML object to copy, specified as an mlreportgen.dom.HTML object.
Output Arguments
clonedHTMLObj — HTML object with appended content
an mlreportgen.dom.HTML object
HTML object with appended content, returned as an mlreportgen.dom.HTML object.
Examples
Copy an HTML Object
Create an HTML object from HTML text, to use for a Microsoft Word report.
11-63
11
Functions – Alphabetical List
import mlreportgen.dom.*;
rpt = Document('ClonedHTMLReport','docx');
htmlObj1 = HTML('<p><b>Hello</b> <i style="color:green">World</i></p>');
Append the HTML object to the report.
append(rpt,htmlObj1);
Copy the HTML object and append the copy to the report.
htmlObj2 = clone(htmlObj1);
append(rpt,htmlObj2);
Generate the report.
close(rpt);
rptview(rpt.OutputPath);
•
“Append HTML File Contents to DOM Reports” on page 13-94
See Also
mlreportgen.dom.HTML | mlreportgen.dom.HTMLFile
More About
•
“Appending HTML to DOM Reports” on page 13-90
Introduced in R2015a
11-64
append
append
Class: mlreportgen.dom.HTMLFile
Package: mlreportgen.dom
Append HTML to HTMLFile object
Syntax
htmlObjOut = append(htmlFileObj,htmlText)
htmlObjOut = append(htmlFileObj,htmlObjToAppend)
Description
htmlObjOut = append(htmlFileObj,htmlText) converts HTML string into an
HTML object and appends the object to htmlFileObj.
htmlObjOut = append(htmlFileObj,htmlObjToAppend) appends the
htmlObjToAppend object to htmlFileObj.
Input Arguments
htmlFileObj — HTMLFile object to append content to
mlreportgen.dom.HTMLFile object
HTMLFile object to append content to, specified as an mlreportgen.dom.HTMLFile
object.
htmlText — HTML string
string
HTML text, specified as a string.
Example: '<p><b>Hello</b> <i style="color:green">World</i></p>'
htmlObjToAppend — HTML object to append
mlreportgen.dom.HTML object
11-65
11
Functions – Alphabetical List
HTML object to append, specified as an mlreportgen.dom.HTML object.
htmlFileObjToAppend — HTMLFile object to append
mlreportgen.dom.HTMLFile object
HTMLFile object to append, specified as an mlreportgen.dom.HTMLFile object.
Output Arguments
htmlObjOut — HTML content appended to HTMLFile object
mlreportgen.dom.HTML object
HTML content appended to an HTMLFile object, returned as an
mlreportgen.dom.HTML object.
Examples
Append HTML Text to an HTML Object
This example assumes that there is an HTML file called myHTMLfile.html in the
MATLAB current folder.
Create an HTMLFile object from HTML text to use for a Microsoft Word report.
import mlreportgen.dom.*;
rpt = Document('HTMLToWordReport','docx');
htmlFileObj = HTML('<p><b>Hello</b> <i style="color:green">World</i></p>');
Append content to the HTMLFile object and append the HTMLFile object to the
document.
append(htmlFileObj,'<p>This is <u>me</u> speaking</p>');
append(rpt,htmlFileObj);
Generate the report.
close(rpt);
rptview(rpt.OutputPath);
•
11-66
“Append HTML File Contents to DOM Reports” on page 13-94
append
See Also
mlreportgen.dom.HTML | mlreportgen.dom.HTMLFile
More About
•
“Appending HTML to DOM Reports” on page 13-90
Introduced in R2015a
11-67
11
Functions – Alphabetical List
mlreportgen.dom.LinkTarget.append
Package: mlreportgen.dom
Append content to link target
Syntax
textObj = append(targetObj,text)
textObj = append(targetObj,text,styleName)
textObj = append(targetObj,textObj)
autoNumberObj = append(targetObj,autoNumberObj)
Description
textObj = append(targetObj,text) converts text to an mlreportgen.dom.Text
object, appends the text to the link target, and returns the text object.
textObj = append(targetObj,text,styleName) converts text to an
mlreportgen.dom.Text object, appends the text to the link target, and returns the text
object.
textObj = append(targetObj,textObj) appends the content of an
mlreportgen.dom.Text object.
autoNumberObj = append(targetObj,autoNumberObj) appends an automatically
generated number to the link target.
Examples
Append Text to a Link Target
import mlreportgen.dom.*
d = Document('mydoc');
target = LinkTarget('home')
append(target,' - top of page')
11-68
mlreportgen.dom.LinkTarget.append
append(d,target);
append(d,InternalLink('home','Go to Top');
close(d);
rptview('mydoc', 'html');
Append an Automatically Generated Number to a Link Target
import mlreportgen.dom.*
d = Document('mydoc','docx');
number = AutoNumber('paragraph');
target = LinkTarget('para');
append(target,'number');
InternalLink('para','Link to paragraph');
q = Paragraph('This paragraph is not linked to.');
append(d,q);
PageBreakBefore(true);
p = Paragraph('This is the paragraph that is linked to.');
append(p,
p.Style = {CounterInc('paragraph'),PageBreakBefore(true)};
append(d,p);
close(d);
rptview('mydoc','docx');
•
“Add Content to a Report” on page 13-11
Input Arguments
targetObj — Link target to append content to
mlreportgen.dom.LinkTarget object
Link target to append content to, specified as an mlreportgen.dom.LinkTarget
object.
text — Text to append
string
Text to append, specified as a string.
11-69
11
Functions – Alphabetical List
styleName — Name of style
string
Name of style, specified as a string.
textObj — Text object containing the text to append
mlreportgen.dom.Text object
Text object containing the text to append, specified as an mlreportgen.dom.Text
object.
autoNumberObj — Automatically generated number
mlreportgen.dom.AutoNumber object
Automatically generated number, specified as an mlreportgen.dom.AutoNumber
object.
Output Arguments
textObj — Text object
mlreportgen.dom.Text object
Text object, represented by an mlreportgen.dom.Text object.
autoNumberObj — Automatically generated number for link target
mlreportgen.dom.AutoNumber object
Automatically generated number for link target, specified as a string.
See Also
mlreportgen.dom.AutoNumber | mlreportgen.dom.Text
Introduced in R2014b
11-70
mlreportgen.dom.MessageDispatcher.dispatch
mlreportgen.dom.MessageDispatcher.dispatch
Package: mlreportgen.dom
Dispatch DOM status message
Syntax
dispatch(dispatcher,message)
Description
dispatch(dispatcher,message) dispatches a DOM status message.
Examples
Add and Dispatch a Progress Message
This example shows how to add a progress message to display when generating a report.
Add a dispatcher and listener to the report.
import mlreportgen.dom.*;
doctype = 'html';
d = Document('test',doctype);
d.Tag = 'My report';
dispatcher = MessageDispatcher.getTheDispatcher;
l = addlistener(dispatcher,'Message', ...
@(src,evtdata) disp(evtdata.Message.formatAsText));
open(d);
dispatch(dispatcher,ProgressMessage('starting chapter',d));
p = Paragraph('Chapter ');
p.Tag = 'chapter title';
append(d,p);
11-71
11
Functions – Alphabetical List
close(d);
rptview('test',doctype);
delete (l);
Check the progress messages in the MATLAB Command Window. The starting
chapter message appears, in addition to the predefined DOM progress messages.
•
“Display Report Generation Messages” on page 13-106
Input Arguments
dispatcher — DOM message dispatcher
mlreportgen.dom.MessageDispatcher object
DOM message dispatcher, specified as an mlreportgen.dom.MessageDispatcher
object.
message — Message to dispatch
message object
Use one of the following types of DOM message objects:
• mlreportgen.dom.ProgressMessage
• mlreportgen.dom.WarningMessage
• mlreportgen.dom.ErrorMessage
• mlreportgen.dom.DebugMessage
See Also
mlreportgen.dom.MessageDispatcher.getTheDispatcher |
mlreportgen.dom.MessageEventData | mlreportgen.dom.MessageFilter
Introduced in R2014b
11-72
mlreportgen.dom.MessageDispatcher.getTheDispatcher
mlreportgen.dom.MessageDispatcher.getTheDispatcher
Package: mlreportgen.dom
Return DOM message dispatcher
Syntax
getTheDispatcher
Description
getTheDispatcher returns the DOM message dispatcher. There is only one DOM
message dispatcher per MATLAB session.
Examples
Add a Dispatcher and Dispatch a Progress Message
This example shows how to return the DOM message dispatcher and use it to dispatch a
progress message.
Add a dispatcher and listener to the report.
import mlreportgen.dom.*;
doctype = 'html';
d = Document('test',doctype);
d.Tag = 'My report';
dispatcher = MessageDispatcher.getTheDispatcher;
l = addlistener(dispatcher,'Message', ...
@(src, evtdata) disp(evtdata.Message.formatAsText));
open(d);
dispatch(dispatcher, ProgressMessage('starting chapter',d));
p = Paragraph('Chapter 1');
p.Tag = 'chapter title';
11-73
11
Functions – Alphabetical List
append(d, p);
close(d);
rptview('test',doctype);
delete (l);
Check the progress messages in the MATLAB Command Window. The starting
chapter message appears, in addition to the predefined DOM progress messages.
•
“Display Report Generation Messages” on page 13-106
See Also
mlreportgen.dom.MessageDispatcher.dispatch | mlreportgen.dom.MessageEventData |
mlreportgen.dom.MessageFilter
Introduced in R2014b
11-74
mlreportgen.dom.OrderedList.append
mlreportgen.dom.OrderedList.append
Package: mlreportgen.dom
Append content to ordered list
Syntax
listItemObjOut = append(orderedList,listItemObj)
listItemsOut = append(orderedList,listItems)
listObjOut = append(orderedList,list)
customElementOut = append(orderedList,customElementObj)
Description
listItemObjOut = append(orderedList,listItemObj) appends a list item to an
ordered list.
listItemsOut = append(orderedList,listItems) appends matrix or a cell array
of list items.
listObjOut = append(orderedList,list) appends an ordered or unordered list.
customElementOut = append(orderedList,customElementObj) appends a
custom element.
Examples
Append Three List Items
Add three items to a list.
import mlreportgen.dom.*;
myReport = Document('myDoc','html');
ol = OrderedList({'Item 1' 'Item 2'});
append(myReport,ol);
append(ol,{'Item 3' 'Item 4' 'Item 5'});
11-75
11
Functions – Alphabetical List
close(myReport);
rptview('myDoc','html');
Append an Unordered List
import mlreportgen.dom.*;
myReport = Document('myDoc','html');
ol = OrderedList({'Item 1' 'Item 2'});
append(myReport,ol);
ulist = UnorderedList({'subitem1' 'subitem2'});
append(ol,ul);
close(myReport);
rptview('myDoc','html');
Append an Ordered Sublist
import mlreportgen.dom.*;
myReport = Document('myDoc','html');
ol = OrderedList({'a1',OrderedList({'a1','a2','b2'}),'b1'});
append(myReport,ol);
close(myReport);
rptview('myDoc','html');
Append an Unordered Sublist
import mlreportgen.dom.*;
myReport = Document('myDoc','html');
ol = OrderedList({'a1',{'a2','b2'},'b1'});
append(myReport,ol);
close(myReport);
rptview('myDoc','html');
•
“Create and Format Lists” on page 13-52
Input Arguments
orderedList — Ordered list to append content to
mlreportgen.dom.OrderedList object
11-76
mlreportgen.dom.OrderedList.append
Ordered list to append content to, specified as an mlreportgen.dom.OrderedList
object.
listItemObj — List item to append
mlreportgen.dom.ListItem object
List item to append, specified as an mlreportgen.dom.ListItem object.
listItems — Items to append
matrix | cell array
A matrix can include numeric or Boolean values.
Cell array containing a combination of the following:
• A string
• A number
• A Boolean value
• One of the following DOM objects:
• mlreportgen.dom.Text
• mlreportgen.dom.Paragraph
• mlreportgen.dom.ExternalLink
• mlreportgen.dom.InternalLink
• mlreportgen.dom.Table
• mlreportgen.dom.Image
• mlreportgen.dom.CustomElement
• Horizontal one-dimensional array (for a sublist)
To append an ordered list, use an OrderedList DOM object instead of using the
listContent argument.
list — List to append
mlreportgen.dom.OrderedList object | mlreportgen.dom.UnorderedList object
List to append, specified as an mlreportgen.dom.OrderedList or
mlreportgen.dom.UnorderedList object.
customElementObj — Custom element to append
mlreportgen.dom.CustomElement object
11-77
11
Functions – Alphabetical List
The custom element must be a valid HTML or Word child of a list, depending on whether
the output type of the document to which this element is appended is HTML or Word.
Output Arguments
listItemObjOut — List item appended to ordered list
mlreportgen.dom.ListItem object
List items appended to an ordered list, represented by an mlreportgen.dom.ListItem
object, matrix, or cell array. If you use the .
listItemsOut — List items appended to ordered list
matrix | cell array
List items appended to an ordered list, represented by a matrix or cell array, depending
on the format used for the listItems input argument.
listObjOut — List item appended to ordered list
mlreportgen.dom.ListItem object
List items appended to an ordered list, represented by an mlreportgen.dom.ListItem
object, matrix, or cell array. If you use the .
customElementOut — Custom element appended to ordered list
mlreportgen.dom.CustomElement object
Custom element appended to ordered list, represented by an
mlreportgen.dom.CustomElement object.
See Also
mlreportgen.dom.ListItem | mlreportgen.dom.OrderedList |
mlreportgen.dom.UnorderedList
Introduced in R2014b
11-78
mlreportgen.dom.Paragraph.append
mlreportgen.dom.Paragraph.append
Package: mlreportgen.dom
Append content to paragraph
Syntax
textObjOut = append(paraObj,text)
textObjOut = append(paraObj,text,styleName)
domObjOut = append(paraObj,domObj)
Description
textObjOut = append(paraObj,text) creates a text object containing the specified
text string and appends it to a paragraph.
textObjOut = append(paraObj,text,styleName) creates and appends a text
object using the specified style.
domObjOut = append(paraObj,domObj) appends a document element object, such as
an image, to a paragraph.
Examples
Append a Text String
import mlreportgen.dom.*;
d = Document('mydoc','html');
para = Paragraph('Results: ');
append(d,para);
append(para,'Study 1');
close(d);
11-79
11
Functions – Alphabetical List
rptview('mydoc','html');
Specify a Style for Appended Text
import mlreportgen.dom.*;
doc = Document('mydoc','docx');
para = Paragraph('Results: ','Title');
para.WhiteSpace = 'pre';
append(doc,para);
append(para,'Study 2');
close(doc);
rptview('mydoc','docx');
Append an External Link
import mlreportgen.dom.*;
docLink = Document('mydocLink','html');
mathWorksLink = ExternalLink...
('http://www.mathworks.com/','MathWorks site');
para = Paragraph('Go to the ');
append(para, mathWorksLink);
append(docLink,para);
close(docLink);
rptview('mydocLink','html');
•
“Add Content to a Report” on page 13-11
Input Arguments
paraObj — Paragraph to append content to
mlreportgen.dom.Paragraph object
Paragraph to append content to, specified as an mlreportgen.dom.Paragraph object.
text — Text string to append to paragraph
string
Text string to append to the paragraph, specified as a string.
11-80
mlreportgen.dom.Paragraph.append
styleName — Name of a style to apply to text
string
Name of the style to define the appearance of the text. Use a style that is in the
stylesheet of the document that contains the paragraph.
domObj — Document element to append to paragraph
DOM object
You can append the following types of document element object to a paragraph:
• mlreportgen.dom.ExternalLink
• mlreportgen.dom.Image
• mlreportgen.dom.InternalLink
• mlreportgen.dom.LinkTarget
• mlreportgen.dom.Text
• mlreportgen.dom.CustomElement
If you specify a custom element, it must be a valid HTML or Word child of the
paragraph, based on the document output type.
Output Arguments
textObjOut — Text appended to paragraph
mlreportgen.dom.Text object
Text appended to a paragraph, represented by an mlreportgen.dom.Text object.
domObjOut — Document element appended to paragraph
DOM object.
Document element appended to paragraph, specified as a DOM object.
See Also
mlreportgen.dom.Paragraph | mlreportgen.dom.Paragraph.clone |
mlreportgen.dom.Text
Introduced in R2014b
11-81
11
Functions – Alphabetical List
mlreportgen.dom.Paragraph.clone
Package: mlreportgen.dom
Copy paragraph object
Syntax
clonedPara = clone(sourcePara)
Description
clonedPara = clone(sourcePara) copies (clones) the specified paragraph. The
resulting cloned paragraph includes the children of the source paragraph, but not the
parent.
Examples
Copy a Paragraph Object
import mlreportgen.dom.*;
myReport = Document('myDoc','html');
para1 = Paragraph('This is a paragraph');
para1.Bold = true;
append(d,para1);
para1Copy = clone(para1);
para1Copy
para1Copy =
Paragraph with properties:
OutlineLevel:
Bold:
Italic:
Color:
BackgroundColor:
11-82
[]
1
[]
[]
[]
mlreportgen.dom.Paragraph.clone
Underline:
WhiteSpace:
FontFamilyName:
FontSize:
Strike:
HAlign:
OuterLeftMargin:
FirstLineIndent:
StyleName:
Style:
CustomAttributes:
Children:
Parent:
Tag:
Id:
•
[]
[]
[]
[]
[]
[]
[]
[]
[]
{[1x1 mlreportgen.dom.Bold]}
[]
[1x1 mlreportgen.dom.Text]
[]
'dom.Paragraph:15'
'15'
“Add Content to a Report” on page 13-11
Input Arguments
sourcePara — Paragraph object to copy
mlreportgen.dom.Paragraph object
Paragraph object to copy, specified as an mlreportgen.dom.Paragraph object.
Output Arguments
clonedPara — Copied paragraph object
mlreportgen.dom.Paragraph object
Copied paragraph object, represented by an mlreportgen.dom.Paragraph object.
More About
Tips
• Use the clone method to append the same paragraph content more than once in a
document.
11-83
11
Functions – Alphabetical List
• When you clone a paragraph, DOM copies all of the children objects of the source
paragraph, but not the parent of the paragraph.
• The cloned paragraph includes formats that you set in the source paragraph. The
cloned paragraph formats use the same format objects as the source paragraph. If
you change the format setting in the shared format object, the source and cloned
paragraphs reflect that change.
If you change a format setting in the cloned paragraph, then DOM creates a new
format object for the cloned paragraph, using the new format setting. For that format,
the source and cloned paragraph no longer share the same format object.
This example shows the relationship between the formats for the source and cloned
paragraphs.
1
Create a paragraph that uses a style that sets the Bold and Italic formats to
true.
import mlreportgen.dom.*;
myReport = Document('myDoc','html');
p = Paragraph('This is a paragraph');
append(myReport,p);
MyStyle = {Bold,Italic};
p.Style = MyStyle;
p.Bold
ans =
1
p.Italic
ans =
1
2
Clone the paragraph. The Bold and Italic formats are the same as those of the
source paragraph.
pClone = clone(p);
pClone.Bold
ans =
1
11-84
mlreportgen.dom.Paragraph.clone
p.Italic
ans =
1
3
For the cloned paragraph, change turn off bold text. The change to the Bold
format in the cloned paragraph does not affect the text for the source paragraph.
The source paragraph text is still bold.
pClone.Bold = false;
p.Bold
ans =
1
4
In the style object (MyStyle) for the source paragraph, turn off italics. Now the
cloned paragraph does not use italics, because it shares the MyStyle setting for
the Italics format.
MyStyle(2).Value = false
pClone.Italic
ans =
0
See Also
mlreportgen.dom.Document | mlreportgen.dom.Paragraph |
mlreportgen.dom.Paragraph.append
Introduced in R2014b
11-85
11
Functions – Alphabetical List
mlreportgen.dom.ProgressMessage.formatAsHTML
Package: mlreportgen.dom
Wrap message in HTML tags
Syntax
htmlMessageOut = formatAsHTML(message)
Description
htmlMessageOut = formatAsHTML(message) returns the message text formatted
with HTML tags.
Examples
Format a Message as HTML
This example uses formatAsHTML with the Web command to display the progress
messages.
import mlreportgen.dom.*;
doctype = 'html';
d = Document('test',doctype);
d.Tag = 'My report';
dispatcher = MessageDispatcher.getTheDispatcher;
l = addlistener(dispatcher,'Message', ...
@(src, evtdata) disp(evtdata.Message.formatAsHTML));
open(d);
dispatch(dispatcher, ProgressMessage('starting chapter',d));
p = Paragraph('Chapter ');
p.Tag = 'chapter title';
p.Style = { CounterInc('chapter'),...
CounterReset('table'),WhiteSpace('pre') };
append(p,AutoNumber('chapter'));
11-86
mlreportgen.dom.ProgressMessage.formatAsHTML
append(d,p);
close(d);
rptview('test',doctype);
delete (l);
•
“Display Report Generation Messages” on page 13-106
Input Arguments
message — Progress message
mlreportgen.dom.ProgressMessage object
Progress message, specified as an mlreportgen.dom.ProgressMessage object.
Output Arguments
htmlMessageOut — Progress message with HTML tagging
mlreportgen.dom.ProgressMessage object
Progress message with HTML tagging, specified as an
mlreportgen.dom.ProgressMessage object.
See Also
mlreportgen.dom.MessageFilter | mlreportgen.dom.ProgressMessage |
mlreportgen.dom.ProgressMessage.formatAsText
Introduced in R2014b
11-87
11
Functions – Alphabetical List
mlreportgen.dom.ProgressMessage.formatAsText
Package: mlreportgen.dom
Format message as text
Syntax
textMessageOut = formatAsText(message)
Description
textMessageOut = formatAsText(message) returns the message text formatted as
text.
Examples
Format a Message with White Spaces
This example uses formatAsText with the Web command to display the progress
messages.
import mlreportgen.dom.*;
doctype = 'html';
d = Document('test',doctype);
d.Tag = 'My report';
dispatcher = MessageDispatcher.getTheDispatcher;
l = addlistener(dispatcher,'Message', ...
@(src, evtdata) disp(evtdata.Message.formatAsText));
open(d);
dispatch(dispatcher,ProgressMessage('starting chapter',d));
p = Paragraph('Chapter ');
p.Tag = 'chapter title';
p.Style = { CounterInc('chapter'),...
CounterReset('table'),WhiteSpace('pre') };
append(p, AutoNumber('chapter'));
11-88
mlreportgen.dom.ProgressMessage.formatAsText
append(d,p);
close(d);
rptview('test',doctype);
delete(l);
•
“Display Report Generation Messages” on page 13-106
Input Arguments
message — The DOM progress message
mlreportgen.dom.ProgressMessage object
The DOM message, specified as an mlreportgen.dom.ProgressMessage object.
Output Arguments
textMessageOut — DOM progress message formatted as text
mlreportgen.dom.ProgressMessage object
DOM progress message formatted as text, represented by an
mlreportgen.dom.ProgressMessage object.
See Also
mlreportgen.dom.MessageFilter | mlreportgen.dom.ProgressMessage |
mlreportgen.dom.ProgressMessage.formatAsHTML
Introduced in R2014b
11-89
11
Functions – Alphabetical List
mlreportgen.dom.ProgressMessage.passesFilter
Package: mlreportgen.dom
Determine if message passes filter
Syntax
tf = passesFilter(message,filter)
Description
tf = passesFilter(message,filter) determines whether the message passes the
filter.
Examples
Determine Whether a Message Passes a Filter
This example shows how to add a progress message to display when generating a report.
Add a dispatcher and listener to the report. Configure the dispatcher to include debug
messages.
import mlreportgen.dom.*;
d = Document('test','html');
dispatcher = MessageDispatcher.getTheDispatcher;
dispatcher.Filter.DebugMessagesPass = true;
l = addlistener(dispatcher,'Message', ...
@(src, evtdata) disp(evtdata.Message.formatAsText));
Create a progress message.
open(d);
dispatch(dispatcher, ProgressMessage('starting chapter',d));
p = Paragraph('Chapter ');
11-90
mlreportgen.dom.ProgressMessage.passesFilter
p.Tag = 'chapter title';
p.Style = { CounterInc('chapter'),...
CounterReset('table'),WhiteSpace('pre') };
append(p,AutoNumber('chapter'));
append(d,p);
Generate the report and delete the listener.
close(d);
rptview('test','html');
delete(l);
Check the progress messages in the MATLAB Command Window. In addition to the
predefined DOM progress messages, the starting chapter message added in this
example appears. The output also includes debug messages.
•
“Display Report Generation Messages” on page 13-106
Input Arguments
message — DOM progress message
mlreportgen.dom.ProgressMessage object
DOM progress message, specified as an mlreportgen.dom.ProgressMessage object.
filter — Filter to use with message
mlreportgen.dom.MessageFilter object
Filter to use with the progress message, specified as an
mlreportgen.dom.MessageFilter object.
Output Arguments
tf — Indication of whether the message passes the filter
a Boolean
• 1 — Messages passes the specified filter (the dispatcher handles the message)
• 0 — Messages fails the specified filter (the dispatcher ignores the message)
11-91
11
Functions – Alphabetical List
See Also
mlreportgen.dom.MessageFilter | mlreportgen.dom.ProgressMessage
Introduced in R2014b
11-92
mlreportgen.dom.Table.entry
mlreportgen.dom.Table.entry
Package: mlreportgen.dom
Access table entry
Syntax
tableEntryOut = entry(tableObj,row,column)
Description
tableEntryOut = entry(tableObj,row,column) returns the table entry for the
specified column of the specified row.
Examples
Color a table entry
Color the table entry in row 3, column 4.
import mlreportgen.dom.*;
myReport = Document('myDoc','html');
t = Table(magic(5));
t.entry(3,4);
t.entry(3,4).Children(1).Color = 'red';
append(myReport,t);
close(myReport);
rptview('myDoc','html');
•
“Create and Format Tables” on page 13-58
Input Arguments
tableObj — Table containing the entry
mlreportgen.dom.Table object | mlreportgen.dom.FormalTable object
11-93
11
Functions – Alphabetical List
row — Table row containing the entry
number
Index number of the row (top row is row 1).
Data Types: double
column — Column containing the entry
number
Index number of the column (in a left-to-right text flow table, the left-most column is 1).
Data Types: double
Output Arguments
tableEntryOut — Table entry object
mlreportgen.dom.TableEntry object
See Also
mlreportgen.dom.Table.row | mlreportgen.dom.TableEntry
Introduced in R2014b
11-94
mlreportgen.dom.Table.row
mlreportgen.dom.Table.row
Package: mlreportgen.dom
Access table row
Syntax
tableRowOut = row(tableObj,row)
Description
tableRowOut = row(tableObj,row) returns the table row at the specified row
number.
Examples
Color a Table Row
Color the second row of a table.
import mlreportgen.dom.*;
myReport = Document('myDoc','html');
t = Table(magic(5));
te = row(t,2);
te.Style = {Color('red')};
append(myReport,t);
close(myReport);
rptview('myDoc','html');
•
“Create and Format Tables” on page 13-58
Input Arguments
tableObj — Table containing entry
mlreportgen.dom.Table object | mlreportgen.dom.FormalTable object
11-95
11
Functions – Alphabetical List
Table containing the entry, specified as an mlreportgen.dom.Table or
mlreportgen.dom.FormalTable object.
row — Table row
number
Index number of the row (top row is row 1).
Data Types: double
Output Arguments
tableRowOut — Table row object
mlreportgen.dom.TableRow object
Table row object, represented by an mlreportgen.dom.TableRow object.
See Also
mlreportgen.dom.TableEntry | mlreportgen.dom.TableRow
Introduced in R2014b
11-96
mlreportgen.dom.TableRow.append
mlreportgen.dom.TableRow.append
Package: mlreportgen.dom
Append content to table row
Syntax
entryOut = append(rowObj,entryObj)
Description
entryOut = append(rowObj,entryObj) appends an entry to a table row.
Examples
Append a Table Entry to a Row
Create a two-column table.
import mlreportgen.dom.*;
myReport = Document('myDoc','html');
table = Table(2);
table.Style = {Border('solid'),RowSep('solid'),ColSep('solid')};
table.TableEntriesStyle = {Width('2in'),HAlign('center')};
Create three table rows with entries. Append each entry to a row using
append(row,te).
for i=1:3
row = TableRow();
te = TableEntry();
append(te,Text([num2str(i) ' - 1']));
append(row,te);
te = TableEntry();
append(te,Text([num2str(i) ' - 2']));
append(row,te);
append(table,row);
11-97
11
Functions – Alphabetical List
end
Append the table and display the report.
append(myReport,table);
close(myReport);
rptview('myDoc','html');
•
“Create and Format Tables” on page 13-58
Input Arguments
rowObj — Row to append the table entry to
mlreportgen.dom.TableRow object
Row to append the table entry to, specified as an mlreportgen.dom.TableRow object.
entryObj — Table entry to append
mlreportgen.dom.TableEntry object
Table entry to append, specified as an mlreportgen.dom.TableEntry object.
Output Arguments
entryOut — Appended table entry
mlreportgen.dom.TableEntry object
Appended table entry, represented by an mlreportgen.dom.TableEntry object.
See Also
mlreportgen.dom.TableEntry | mlreportgen.dom.TableRow
Introduced in R2014b
11-98
mlreportgen.ppt.ContentPlaceholder.add
mlreportgen.ppt.ContentPlaceholder.add
Package: mlreportgen.ppt
Add paragraph or paragraphs to content placeholder
Syntax
paraObj = add(contentPlaceholder,content)
add(contentPlaceholder,contents)
Description
paraObj = add(contentPlaceholder,content) adds a paragraph to a content
placeholder.
add(contentPlaceholder,contents) adds multiple paragraphs to a content
placeholder.
Examples
Add Paragraphs to a Content Placeholder
Create a presentation.
import mlreportgen.ppt.*
slidesFile = 'myContentPlaceholder.pptx';
slides = Presentation(slidesFile);
add(slides,'Title and Content');
Use the Presentation.find method to find the Content placeholders.
contents = find(slides,'Content');
Create an mlreportgen.ppt.Paragraph object. Add the paragraph to the first
Content placeholder.
para = add(contents(1),'First item in the list' );
11-99
11
Functions – Alphabetical List
para.Italic = true;
para.FontColor = 'green';
Add multiple paragraphs to the first Content placeholder.
add(contents(1),{ ...
'List item', ...
{'Inner list item','Other inner list item' }...
'List item', ...
});
Generate the presentation and then open myBoldPresentation.pptx. On a Windows
platform, you can open the presentation in MATLAB:
close(slides);
if ispc
winopen(slidesFile);
end
•
“Access PowerPoint Template Elements” on page 14-37
•
“Add and Replace Presentation Content” on page 14-76
Input Arguments
contentPlaceholder — Content placeholder to add content to
mlreportgen.ppt.ContentPlaceholder object
11-100
mlreportgen.ppt.ContentPlaceholder.add
Content placeholder to add content to, specified as an
mlreportgen.ppt.ContentPlaceholder object.
content — Content to add
string | mlreportgen.ppt.Paragraph object
Content to add, specified as a string or an mlreportgen.ppt.Paragraph object. The
slide layout specifies whether the text displays as a paragraph, bulleted list item, or
numbered list item.
contents — Multiple paragraphs to add
Cell array of strings or mlreportgen.ppt.Paragraph objects or a combination of both
| Cell array of mlreportgen.ppt.Paragraph objects | Cell array of a combination of
strings and mlreportgen.ppt.Paragraph objects
Content to add, specified as a cell array of strings, mlreportgen.ppt.Paragraph
objects, or a combination of both. Inner cell arrays specify inner list items. The slide
layout specifies whether the text displays as paragraphs, bulleted list items, or numbered
list items.
Output Arguments
paraObj — Paragraph added to content placeholder
mlreportgen.ppt.Paragraph object
Paragraph added to content placeholder, returned as an mlreportgen.ppt.Paragraph
object.
See Also
mlreportgen.ppt.ContentPlaceholder | mlreportgen.ppt.ContentPlaceholder.replace |
mlreportgen.ppt.Paragraph
Introduced in R2015b
11-101
11
Functions – Alphabetical List
mlreportgen.ppt.ContentPlaceholder.replace
Package: mlreportgen.ppt
Replace content in content placeholder
Syntax
contentObj = replace(contentPlaceholder,content)
replace(contentPlaceholder,contents)
Description
contentObj = replace(contentPlaceholder,content) replaces the content of a
content placeholder. You can replace all the paragraphs in a ContentPlaceholder by a
paragraph. You can replace the whole ContentPlaceholder with a Table or Picture
object.
replace(contentPlaceholder,contents) replaces the content of a content
placeholder. You can replace all the paragraphs in a ContentPlaceholder by multiple
paragraphs.
Examples
Replace the Content Placeholders with Paragraphs
Create a presentation.
import mlreportgen.ppt.*
name1 = 'before';
slides = Presentation(name1);
add(slides,'Comparison');
The default PPT API PowerPoint template Comparison slide layout has a Left
Content and a Right Content placeholder. Replace the content in those content
placeholders. Then generate the presentation.
11-102
mlreportgen.ppt.ContentPlaceholder.replace
replace(slides,'Left Content','dummy content');
replace(slides,'Right Content','dummy content');
close(slides);
Create a second presentation, using the first presentation as the template.
name2 = 'after';
slides = Presentation(name2,name1);
Use the find method with the Presentation object to find content objects named
Left Content and Right Content.
left = find(slides,'Left Content');
right = find(slides,'Right Content');
Replace the left and right content.
para = replace(left(1),'Left item in the list');
para.Italic = true;
para.FontColor = 'green';
replace(right(1), { ...
'Right List item', ...
{'Inner right list item','Other inner right list item'}...
'Right List item', ...
});
Generate the presentation and then open myBoldPresentation.pptx. On a Windows
platform, you can open the presentation in MATLAB:
close(slides);
if ispc
winopen(slides.OutputPath);
end
11-103
11
Functions – Alphabetical List
•
“Access PowerPoint Template Elements” on page 14-37
•
“Add and Replace Presentation Content” on page 14-76
Input Arguments
contentPlaceholder — Content placeholder to replace content
mlreportgen.ppt.ContentPlaceholder object
Content placeholder to replace content, specified as an
mlreportgen.ppt.ContentPlaceholder object.
content — Content to use as replacement
string | mlreportgen.ppt.Paragraph object | mlreportgen.ppt.Table object |
mlreportgen.ppt.Picture object
Content to use as replacement, specified as a string or one of these PPT API objects:
• mlreportgen.ppt.Paragraph
• mlreportgen.ppt.Table
• mlreportgen.ppt.Picture
contents — Multiple paragraphs to use as replacement
Cell array of strings or mlreportgen.ppt.Paragraph objects or a combination of both
| Cell array of mlreportgen.ppt.Paragraph objects | Cell array of a combination of
strings and mlreportgen.ppt.Paragraph objects
11-104
mlreportgen.ppt.ContentPlaceholder.replace
Multiple paragraphs to use as replacement, specified as a cell array of strings,
mlreportgen.ppt.Paragraph objects, or a combination of both. Inner cell arrays
specify inner list items. The slide layout specifies whether the text displays as
paragraphs, bulleted list items, or numbered list items.
Output Arguments
contentObj — Content object
mlreportgen.ppt.Paragraph object | mlreportgen.ppt.Table object |
mlreportgen.ppt.Picture object
Content object, returned as an mlreportgen.ppt.Paragraph,
mlreportgen.ppt.Table, or mlreportgen.ppt.Picture object. The output object
corresponds to the string or content object that you specify with the content input
argument.
See Also
mlreportgen.ppt.ContentPlaceholder | mlreportgen.ppt.ContentPlaceholder.add |
mlreportgen.ppt.Paragraph | mlreportgen.ppt.Picture | mlreportgen.ppt.Table
Introduced in R2015b
11-105
11
Functions – Alphabetical List
mlreportgen.ppt.MessageDispatcher.dispatch
Package: mlreportgen.ppt
Dispatch PPT status message
Syntax
dispatch(dispatcher,message)
Description
dispatch(dispatcher,message) dispatches a PPT status message.
Examples
Add and Dispatch a Progress Message
This example shows how to add a progress message to display when generating a report.
Add a dispatcher and listener to the presentation.
import mlreportgen.ppt.*;
pre = Presentation('myPresentation.pptx');
dispatcher = MessageDispatcher.getTheDispatcher;
l = addlistener(dispatcher,'Message', ...
@(src, evtdata) disp(evtdata.Message.formatAsText));
dispatch(dispatcher,ErrorMessage('invalid slide',pre));
open(pre);
titleText = Text('This is a Title');
titleText.Style = {Bold};
replace(pre,'Title',titleText);
close(pre);
11-106
mlreportgen.ppt.MessageDispatcher.dispatch
delete(l);
Check the progress messages in the MATLAB Command Window. The starting
chapter message appears, in addition to the predefined PPT progress messages.
•
“Display Presentation Generation Messages” on page 14-16
Input Arguments
dispatcher — PPT message dispatcher
mlreportgen.ppt.MessageDispatcher object
PPT message dispatcher, specified as an mlreportgen.ppt.MessageDispatcher
object.
message — Message to dispatch
PPT message object
Message to dispatch, specified as a PPT message object. Use one of these types of PPT
message objects:
• mlreportgen.ppt.ProgressMessage
• mlreportgen.ppt.WarningMessage
• mlreportgen.ppt.ErrorMessage
• mlreportgen.ppt.DebugMessage
See Also
mlreportgen.ppt.MessageDispatcher.getTheDispatcher |
mlreportgen.ppt.MessageEventData | mlreportgen.ppt.MessageFilter
Introduced in R2015b
11-107
11
Functions – Alphabetical List
mlreportgen.ppt.MessageDispatcher.getTheDispatcher
Package: mlreportgen.ppt
Return PPT message dispatcher
Syntax
getTheDispatcher
Description
getTheDispatcher returns the PPT message dispatcher. There is only one PPT
message dispatcher per MATLAB session.
Examples
Add a Dispatcher and Dispatch a Progress Message
This example shows how to return the PPT message dispatcher and use it to dispatch a
progress message.
Add a dispatcher and listener to the report.
import mlreportgen.ppt.*;
pre = Presentation('myPresentation.pptx');
dispatcher = MessageDispatcher.getTheDispatcher;
l = addlistener(dispatcher,'Message', ...
@(src, evtdata) disp(evtdata.Message.formatAsText));
dispatch(dispatcher,ProgressMessage...
('Empty presentation will be created',pre));
open(pre);
close(pre);
delete(l);
11-108
mlreportgen.ppt.MessageDispatcher.getTheDispatcher
Check the progress messages in the MATLAB Command Window. The starting
chapter message appears, in addition to the predefined PPT progress messages.
•
“Display Presentation Generation Messages” on page 14-16
See Also
mlreportgen.ppt.MessageDispatcher.dispatch | mlreportgen.ppt.MessageEventData |
mlreportgen.ppt.MessageFilter
Introduced in R2015b
11-109
11
Functions – Alphabetical List
mlreportgen.ppt.Paragraph.append
Package: mlreportgen.ppt
Append content to paragraph
Syntax
contentObj = append(paragraph,content)
Description
contentObj = append(paragraph,content) appends content to a paragraph.
Examples
Append Formated Text and External Link to Paragraph
Create a presentation.
import mlreportgen.ppt.*
slidesFile = 'myParagraphPresentation.pptx'
slides = Presentation(slidesFile);
add(slides,'Title Slide');
add(slides,'Title and Content');
Create a Paragraph object to use for the title of slides. Make the text bold and red.
p1 = Paragraph('Title for ');
Add more text to the title.
text = append(p1,'My Presentation');
text.Bold = true;
text.FontColor = 'red';
Replace the title with the p1 paragraph.
replace(slides,'Title',p1);
11-110
mlreportgen.ppt.Paragraph.append
Create a paragraph for the content of the second slide.
p2 = Paragraph('Click the link for the ');
contentObj = append(p2,ExternalLink('http://www.mathworks.com','MathWorks site.'));
Replace the content with the p2 paragraph.
replace(slides,'Content',p2);
Close the presentation.
close(slides);
Open myParagraphPresentation.pptx file. On a Windows platform, you can open the
presentation in MATLAB:
if ispc
winopen(slidesFile);
end
•
“Add and Replace Text” on page 14-77
11-111
11
Functions – Alphabetical List
•
“Create and Format Paragraphs” on page 14-86
Input Arguments
paragraph — Paragraph to append content to
mlreportgen.ppt.Paragraph object
Paragraph to append content to, specified as an mlreportgen.ppt.Paragraph object.
content — Content to append to paragraph
string | mlreportgen.ppt.Text object | mlreportgen.ppt.ExternalLink object
Content to add to a paragraph, specified as a string, an mlreportgen.ppt.Text object,
or an mlreportgen.ppt.ExternalLink object.
Output Arguments
contentObj — Content object
mlreportgen.ppt.Text object | mlreportgen.ppt.ExternalLink object
Content object, returned as an mlreportgen.ppt.Text or
mlreportgen.ppt.ExternalLink object. The output object corresponds to the input
string or Text object.
See Also
mlreportgen.ppt.ExternalLink | mlreportgen.ppt.Paragraph | mlreportgen.ppt.Text
Introduced in R2015b
11-112
mlreportgen.ppt.Picture.replace
mlreportgen.ppt.Picture.replace
Package: mlreportgen.ppt
Replace picture
Syntax
pictureObj = replace(picture,replacementPicture)
Description
pictureObj = replace(picture,replacementPicture) replaces a picture with
another picture.
Examples
Replace a Picture
Create a presentation.
import mlreportgen.ppt.*
slides = Presentation('myPictureReplacePresentation');
slide1 = add(slides,'Blank');
Create an mlreportgen.ppt.Picture object.
plane = Picture(which('b747.jpg'));
plane.X = '1in';
plane.Y = '1in';
plane.Width = '5in';
plane.Height = '2in';
Add the picture to the slide.
add(slide1,plane);
11-113
11
Functions – Alphabetical List
Create a second picture.
peppers = Picture(which('peppers.png'));
peppers.X = '1in';
peppers.Y = '1in';
peppers.Width = '3in';
peppers.Height = '3in';
Replace the plane picture with the peppers picture.
replace(plane,peppers);
Close the presentation.
close(slides);
•
“Access PowerPoint Template Elements” on page 14-37
•
“Add or Replace a Picture” on page 14-81
Input Arguments
picture — Picture to replace
mlreportgen.ppt.Picture object
Picture to replace, specified as an mlreportgen.ppt.Picture object.
replacementPicture — Picture to use as replacement
mlreportgen.ppt.Picture object
Picture to use as a replacement, specified as an mlreportgen.ppt.Picture object.
Output Arguments
pictureObj — Picture
mlreportgen.ppt.Picture object
Picture, returned as an mlreportgen.ppt.Picture object.
See Also
mlreportgen.ppt.Picture
11-114
mlreportgen.ppt.Picture.replace
Introduced in R2015b
11-115
11
Functions – Alphabetical List
mlreportgen.ppt.PicturePlaceholder.replace
Package: mlreportgen.ppt
Replace picture in picture placeholder
Syntax
pictureObj = replace(picturePlaceholder,picture)
Description
pictureObj = replace(picturePlaceholder,picture) replaces the picture
in a picture placeholder. PowerPoint modifies the picture dimensions to fill in the
picturePlaceholder dimensions. If the picture dimensions are bigger, PowerPoint
stretches the image proportionally. If the picture dimensions are smaller, the picture is
centered.
Examples
Replace Picture in Picture Placeholder
Create a presentation.
import mlreportgen.ppt.*
slidesFile = 'myPlaceholderPresentation.pptx';
slides = Presentation(slidesFile);
slide1 = add(slides,'Title and Picture');
Create an mlreportgen.ppt.Picture object.
plane = Picture(which('b747.jpg'));
Find an object whose Name property is Picture.
pictures = find(slide1,'Picture');
Replace the picture in the picture placeholder.
11-116
mlreportgen.ppt.PicturePlaceholder.replace
replace(pictures(1),plane);
Generate the presentation and then open myPlaceholderPresentation.pptx. On a
Windows platform, you can open the presentation in MATLAB:
close(slides);
if ispc
winopen(slidesFile);
end
•
“Access PowerPoint Template Elements” on page 14-37
•
“Add or Replace a Picture” on page 14-81
Input Arguments
picturePlaceholder — Picture placeholder whose picture to replace
mlreportgen.ppt.PicturePlaceholder object
Picture placeholder whose picture to replace, specified as an
mlreportgen.ppt.PicturePlaceholder object.
picture — Picture to use as replacement
mlreportgen.ppt.Picture object
Picture to use as replacement, specified as an mlreportgen.ppt.Picture object.
Output Arguments
pictureObj — Picture
mlreportgen.ppt.Picture object
Picture, represented by an mlreportgen.ppt.Picture object.
See Also
mlreportgen.ppt.Picture | mlreportgen.ppt.PicturePlaceholder
Introduced in R2015b
11-117
11
Functions – Alphabetical List
mlreportgen.ppt.Presentation.add
Package: mlreportgen.ppt
Add slide to presentation
Syntax
slideObj
slideObj
slideObj
slideObj
slideObj
slideObj
=
=
=
=
=
=
add(presentation,slideLayout)
add(presentation,slideLayout,slideMaster)
add(presentation,slideLayout,otherSlide)
add(presentation,slideLayout,slideMaster,otherSlide)
add(presentation,slideLayout,index)
add(presentation,slideLayout,slideMaster,index)
Description
slideObj = add(presentation,slideLayout) adds a slide to the presentation,
using the specified slide layout under the first slide master in the presentation.
slideObj = add(presentation,slideLayout,slideMaster) uses the slide layout
under the specified slide master. Use the slideMaster argument when the presentation
contains multiple slide masters. If you do not provide the slideMaster argument, a new
slide is created from the first layout that matches with slideLayout name.
slideObj = add(presentation,slideLayout,otherSlide) adds the slide
immediately before the slide specified in the otherSlide argument, using the specified
slide layout under the first slide master in the presentation.
slideObj = add(presentation,slideLayout,slideMaster,otherSlide) adds
the slide immediately before the otherSlide slide, using the specified slide layout
under the specified slide master.
slideObj = add(presentation,slideLayout,index) adds the slide at the index
position specified by index, using the specified slide layout under the specified slide
master.
11-118
mlreportgen.ppt.Presentation.add
slideObj = add(presentation,slideLayout,slideMaster,index) adds the
slide immediately before the slide specified by otherSlide, using the specified slide
layout under the specified slide master.
Examples
Add Slides
Create a presentation.
import mlreportgen.ppt.*
slidesFile = 'myAddSlidesPresentation.pptx';
slides = Presentation(slidesFile);
Add a first slide, specifying the slide layout, but not the slide master or location.
contentSlide = add(slides,'Title and Content');
replace(contentSlide,'Title','This is the Title of the Slide Content');
Add another slide using the Office Theme slide master. Have it appear before
contentSlide.
titleSlide = add(slides,'Title Slide','Office Theme',contentSlide);
replace(titleSlide,'Title','Presentation Title');
Add a blank slide using the Office Theme slide master. Make the new slide the second
slide in the presentation.
blankSlide = add(slides,'Blank','Office Theme',2);
Close presentation.
close(slides);
Open myAddSlidesPresentation.pptx file. On a Windows platform, you can open the
presentation in MATLAB:
if ispc
winopen(slidesFile);
end
11-119
11
Functions – Alphabetical List
•
“Add and Replace Presentation Content” on page 14-76
Input Arguments
presentation — Presentation to add slide to
mlreportgen.ppt.Presentation object
Presentation to add content to, specified as an mlreportgen.ppt.Presentation
object.
slideLayout — Layout of slide to add
string
Layout of slide to add, specified as a string. The layout must be in the presentation
template.
11-120
mlreportgen.ppt.Presentation.add
To see the available layouts, you can:
• Use the mlreportgen.ppt.Presentation.getLayoutNames method.
• In the PowerPoint template, select Home > Layout.
slideMaster — Slide master for the slide layout
string
Slide master for the specified slide layout. The slide master must be in the presentation
template.
To see the available layouts, use one of these approaches:
• Use the mlreportgen.ppt.Presentation.getSlideMasterNames method.
• In the PowerPoint template, select View > Slide Master. The slide masters are the
numbered slides. To get the name of a slide master, hover over it. Specify the name
without including the words Slide Master.
otherSlide — Slide to insert new slide before
mlreportgen.ppt.Slide object
Slide to insert new slide before, specified as an mlreportgen.ppt.Slide object.
index — Index representing position of slide in presentation
double
Index representing position of slide in presentation, specified as a double.
Output Arguments
slideObj — Slide
mlreportgen.ppt.Slide object
Slide, returned as an mlreportgen.ppt.Slide object.
See Also
mlreportgen.ppt.Presentation | mlreportgen.ppt.Presentation.getLayoutNames |
mlreportgen.ppt.Presentation.replace | mlreportgen.ppt.Slide
Introduced in R2015b
11-121
11
Functions – Alphabetical List
mlreportgen.ppt.Presentation.close
Package: mlreportgen.ppt
Close presentation
Syntax
close(presentation)
Description
close(presentation) closes a presentation and generates a PowerPoint presentation.
Examples
Create and Generate a Presentation
Create a presentation.
import mlreportgen.ppt.*
slidesFile = 'myParagraphPresentation.pptx';
slides = Presentation(slidesFile);
add(slides,'Title Slide');
Create a Paragraph object to use for the title of slides. Make the text bold and red.
p = Paragraph('My Title');
p.Bold = true;
p.FontColor = 'red';
Replace the title for the first slide with the paragraph.
contents = find(slides,'Title');
replace(contents(1),p);
Close the presentation.
11-122
mlreportgen.ppt.Presentation.close
close(slides);
Open myParagraphPresentation.pptx file. On a Windows platform, you can open the
presentation in MATLAB:
if ispc
winopen(slidesFile);
end
•
“Generate a Presentation” on page 14-15
Input Arguments
presentation — Presentation to close and generate
mlreportgen.ppt.Presentation object
Presentation to close, specified as an mlreportgen.ppt.Presentation object.
See Also
mlreportgen.ppt.Presentation | mlreportgen.pptPresentation.open
Introduced in R2015b
11-123
11
Functions – Alphabetical List
mlreportgen.ppt.Presentation.find
Package: mlreportgen.ppt
Search in presentation
Syntax
searchResults = find(presentation,objectName)
Description
searchResults = find(presentation,objectName) searches in the presentation
for the content objects whose Name property value matches the value you specify using
objectName.
Examples
Search in Presentation
Create a presentation.
import mlreportgen.ppt.*
slidesFile = 'myPresFindPresentation.pptx';
slides = Presentation(slidesFile);
add(slides,'Title Slide');
add(slides,'Title and Content');
Use the Presentation.find method to find presentation objects whose Name property
is Title.
contents = find(slides,'Title')
contents =
1x2 TextBoxPlaceholder array with properties:
Bold
11-124
mlreportgen.ppt.Presentation.find
FontColor
Italic
Strike
Subscript
Superscript
Underline
Name
X
Y
Width
Height
Style
Children
Parent
Tag
Id
Create a paragraph.
p = Paragraph('My Presentation Title');
Replace the content in slide 1 with Paragraph object p.
replace(contents(1),p);
Generate the presentation. Open myPresFindPresentation.pptx. On a Windows
platform, you can open the presentation in MATLAB:
close(slides);
if ispc
winopen(slidesFile);
end
•
“Add and Replace Presentation Content” on page 14-76
Input Arguments
presentation — Presentation to search
mlreportgen.ppt.Presentation object | string
Presentation to search, specified as an mlreportgen.ppt.Presentation object or as a
string that contains the name of a presentation.
11-125
11
Functions – Alphabetical List
objectName — Name property value to search
string
Name property value to search, specified as string. The search looks in the whole
presentation, searching for objects with the specified Name property value. Search strings
are case-sensitive. The search treats the string as a full string.
Output Arguments
searchResults — Search results
object array
Search results, returned as an object array.
See Also
mlreportgen.ppt.Presentation | mlreportgen.ppt.Slide.find
Introduced in R2015b
11-126
mlreportgen.ppt.Presentation.getLayoutNames
mlreportgen.ppt.Presentation.getLayoutNames
Package: mlreportgen.ppt
Get names of layouts for presentation slide master
Syntax
layoutNames = getLayoutNames(presentation,slideMaster)
Description
layoutNames = getLayoutNames(presentation,slideMaster) gets the names of
layouts for a presentation slide master.
Examples
Get Names of Slide Layouts
Create a presentation.
import mlreportgen.ppt.*
slidesFile = 'layouts.pptx';
slides = Presentation(slidesFile);
Get the names of the slide masters in the presentation.
masters = getMasterNames(slides);
Get the names of layouts in the first slide master.
layouts = getLayoutNames(slides,masters{1});
layouts
Columns 1 through 5
'Title Slide' 'Title and Vertica…'
'Vertical Title an…'
'Title and Table'
11-127
'Title
11
Functions – Alphabetical List
Columns 6 through 11
'Title and Content'
'Section Header'
'Two Content'
'Comparison'
'Title Only'
Columns 12 through 13
'Content with Capt…'
'Picture with Capt…'
Generate the presentation. Open layouts.pptx. On a Windows platform, you can open
the presentation in MATLAB:
close('slides')
if ispc
winopen(slidesFile);
end
•
“Access PowerPoint Template Elements” on page 14-37
•
“Set Up a PowerPoint Template” on page 14-26
Input Arguments
presentation — Presentation to get layout names for
mlreportgen.ppt.Presentation object
Presentation to get layout names for, specified as an mlreportgen.ppt.Presentation
object.
slideMaster — Slide master to get layout names for
string
Slide master to get layout names for, specified as a string.
Output Arguments
layoutNames — Slide layout names
cell array of strings
Slide layout names in the PowerPoint template, returned as a cell array of strings.
11-128
'
mlreportgen.ppt.Presentation.getLayoutNames
See Also
mlreportgen.ppt.Presentation | mlreportgen.pptPresentation.getMasterName |
mlreportgen.pptPresentation.getTableStyleNames
Introduced in R2015b
11-129
11
Functions – Alphabetical List
mlreportgen.ppt.Presentation.getMasterNames
Package: mlreportgen.ppt
Get names of slide masters for presentation
Syntax
masters = getMasterNames(presentation)
Description
masters = getMasterNames(presentation) gets the names of slide masters for a
presentation.
Examples
Get Slide Master Names of Default Template
Create a presentation.
import mlreportgen.ppt.*
slides = Presentation('myGetMastersPresentation');
Get the names of master slides in the presentation. The default PPT API template has
just one slide master.
masters = getMastersNames(slides);
masters(1)
ans =
'Office Theme'
11-130
•
“Access PowerPoint Template Elements” on page 14-37
•
“Set Up a PowerPoint Template” on page 14-26
mlreportgen.ppt.Presentation.getMasterNames
Input Arguments
presentation — Presentation to get slide master names for
mlreportgen.ppt.Presentation object
Presentation to get slide master names for, specified as an
mlreportgen.ppt.Presentation object.
Output Arguments
masters — Slide masters in presentation
cell array of strings
Slide masters in presentation, returned as a cell array of strings.
See Also
mlreportgen.ppt.Presentation | mlreportgen.pptPresentation.getLayoutName |
mlreportgen.pptPresentation.getTableStyleNames
Introduced in R2015b
11-131
11
Functions – Alphabetical List
mlreportgen.ppt.Presentation.getTableStyleNames
Package: mlreportgen.ppt
Get table style names for presentation
Syntax
tableStyles = getTableStyleNames(presentation)
Description
tableStyles = getTableStyleNames(presentation) gets the table style names
for a presentation.
Examples
Get Table Style Names
Create a presentation.
import mlreportgen.ppt.*
slides = Presentation('myPlaceholderPresentation');
Get the names of table styles in the presentation. The output actually includes many
more table style names.
getTableStyleNames(slides)
ans =
'Medium Style 2 - Accent 1'
'Light Style 1'
'Light Style 1 - Accent 1'
'Light Style 1 - Accent 2'
Create a table with the specified table format.
11-132
'{5C22544A-7EE6-4342-B048-85BDC9FD1C3A}'
'{9D7B26C5-4107-4FEC-AEDC-1716B250A1EF}'
'{3B4B98B0-60AC-42C2-AFA5-B58CD77FA1E5}'
'{0E3FDE45-AF77-4B5C-9715-49D594BDF05E}'
mlreportgen.ppt.Presentation.getTableStyleNames
table1 = Table({'a','b';'c','d'},'Medium Style 2 - Accent 1');
•
“Access PowerPoint Template Elements” on page 14-37
•
“Set Up a PowerPoint Template” on page 14-26
Input Arguments
presentation — Presentation to get table style names for
mlreportgen.ppt.Presentation object
Presentation to get tables style names for, specified as an
mlreportgen.ppt.Presentation object.
Output Arguments
tableStyles — Table styles in presentation
n-by-2 cell array of strings
Table styles in the presentation, returned as an array of strings. Each table style name
has an associated text string name and numeric string identifier. For example:
'Medium Style 2 - Accent 1'
'{5C22544A-7EE6-4342-B048-85BDC9FD1C3A}'
To use a table style name with the PPT API, you can use either the name string or the
numeric identifier string.
See Also
mlreportgen.ppt.Presentation | mlreportgen.pptPresentation.getLayoutNames |
mlreportgen.pptPresentation.getMasterNames
Introduced in R2015b
11-133
11
Functions – Alphabetical List
mlreportgen.ppt.Presentation.open
Package: mlreportgen.ppt
Open presentation
Syntax
open(presentation)
Description
open(presentation) opens a presentation and parses the template. To create an
custom template based on the PPT API default template, you can create an empty
presentation and open and close the empty template without adding any slides.
Examples
Open a Presentation
Create a presentation.
import mlreportgen.ppt.*
slides = Presentation('myTemplate');
Open the presentation.
open(slides);
Close the presentation.
close(slides);
11-134
•
“Create a Presentation Program” on page 14-2
•
“Generate a Presentation” on page 14-15
mlreportgen.ppt.Presentation.open
Input Arguments
presentation — Presentation to open
mlreportgen.ppt.Presentation object
Presentation to open, specified as an mlreportgen.ppt.Presentation object.
See Also
mlreportgen.dom.Presentation | mlreportgen.pptPresentation.close
Introduced in R2015b
11-135
11
Functions – Alphabetical List
mlreportgen.ppt.Presentation.replace
Package: mlreportgen.ppt
Replace paragraphs, tables, or pictures in presentation
Syntax
replace(presentation,placeholderName,content)
Description
replace(presentation,placeholderName,content) replaces existing content of
a placeholder with one or more paragraphs, a table, or a picture that you specify. If the
type of content you specify in the content input argument is not valid for replacing the
placeholder, the replace method has no effect.
Examples
Replace Presentation Content
Create a presentation.
import mlreportgen.ppt.*
slides = Presentation('myFirstPresentation');
Add slides.
add(slides,'Title Slide');
add(slides,'Title and Content');
Replace all the titles in the presentation.
replace(slides,'Title','My Slide Title');
Generate the presentation.
close(slides);
•
11-136
“Add and Replace Presentation Content” on page 14-76
mlreportgen.ppt.Presentation.replace
Input Arguments
presentation — Presentation to replace content in
mlreportgen.ppt.Presentation object
Presentation to replace content in, specified as an mlreportgen.ppt.Presentation
object.
placeholderName — Name of placeholders to replace
string
Name of placeholders to replace, specified as a string. The placeholder name must be
defined in the template.
content — Content to use as replacement
string | mlreportgen.ppt.Paragaph object | cell array of strings or
Paragraph objects, or a combination of both | mlreportgen.ppt.Table object |
mlreportgen.ppt.Picture object
Content to use as replacement, specified as one of these:
• string
• mlreportgen.ppt.Paragaph object
• cell array of strings or Paragraph objects, or a combination of both
• mlreportgen.ppt.Table object
• mlreportgen.ppt.Picture object
See Also
mlreportgen.ppt.Presentation | mlreportgen.ppt.Presentation.add |
mlreportgen.ppt.Presentation.getLayoutNames | mlreportgen.ppt.Slide
Introduced in R2015b
11-137
11
Functions – Alphabetical List
mlreportgen.ppt.ProgressMessage.formatAsHTML
Package: mlreportgen.ppt
Wrap message in HTML tags
Syntax
htmlMessageOut = formatAsHTML(message)
Description
htmlMessageOut = formatAsHTML(message) returns the message text formatted
with HTML tags.
Examples
Format a Message as HTML
This example uses formatAsHTML to display the progress messages.
import mlreportgen.ppt.*;
pre = Presentation('myPresentation.pptx');
dispatcher = MessageDispatcher.getTheDispatcher;
l = addlistener(dispatcher,'Message', ...
@(src, evtdata) disp(evtdata.Message.formatAsHTML));
dispatch(dispatcher,ErrorMessage('invalid slide',pre));
open(pre);
titleText = Text('This is a Title');
titleText.Style = {Bold};
replace(pre,'Title',titleText);
close(pre);
11-138
mlreportgen.ppt.ProgressMessage.formatAsHTML
delete(l);
•
“Display Presentation Generation Messages” on page 14-16
Input Arguments
message — Progress message
mlreportgen.ppt.ProgressMessage object
Progress message, specified as an mlreportgen.ppt.ProgressMessage object.
Output Arguments
htmlMessageOut — Progress message with HTML tagging
mlreportgen.ppt.ProgressMessage object
Progress message with HTML tagging, returned as an
mlreportgen.ppt.ProgressMessage object.
See Also
mlreportgen.ppt.MessageEventData | mlreportgen.ppt.MessageFilter |
mlreportgen.ppt.ProgressMessage | mlreportgen.ppt.ProgressMessage.formatAsText
Introduced in R2015b
11-139
11
Functions – Alphabetical List
mlreportgen.ppt.ProgressMessage.formatAsText
Package: mlreportgen.ppt
Format message as text
Syntax
textMessageOut = formatAsText(message)
Description
textMessageOut = formatAsText(message) returns the message text formatted as
text.
Examples
Format a Message Text
This example uses formatAsText to display the progress messages.
import mlreportgen.ppt.*;
pre = Presentation('myPresentation.pptx');
dispatcher = MessageDispatcher.getTheDispatcher;
dispatcher.Filter.DebugMessagesPass = true;
l = addlistener(dispatcher,'Message', ...
@(src,evtdata) disp(evtdata.Message.formatAsText));
dispatch(dispatcher,ErrorMessage('invalid slide',pre));
open(pre);
titleText = Text('This is a Title');
titleText.Style = {Bold};
replace(pre,'Title',titleText);
close(pre);
11-140
mlreportgen.ppt.ProgressMessage.formatAsText
delete(l);
•
“Display Presentation Generation Messages” on page 14-16
Input Arguments
message — The PPT progress message
mlreportgen.ppt.ProgressMessage object
The PPT progress message, specified as an mlreportgen.ppt.ProgressMessage
object.
Output Arguments
textMessageOut — PPT progress message formatted as text
mlreportgen.ppt.ProgressMessage object
PPT progress message formatted as text, returned as an
mlreportgen.ppt.ProgressMessage object.
See Also
mlreportgen.ppt.MessageEventData | mlreportgen.ppt.MessageFilter |
mlreportgen.ppt.ProgressMessage | mlreportgen.ppt.ProgressMessage.formatAsHTML
Introduced in R2015b
11-141
11
Functions – Alphabetical List
mlreportgen.ppt.ProgressMessage.passesFilter
Package: mlreportgen.ppt
Determine if message passes filter
Syntax
tf = passesFilter(message,filter)
Description
tf = passesFilter(message,filter) determines whether the message passes the
filter.
Examples
Determine Whether a Message Passes a Filter
This example shows how to add a progress message to display when generating a
presentation.
Add a dispatcher and listener to the report. Configure the dispatcher to include debug
messages.
import mlreportgen.ppt.*;
pre = Presentation('myPresentation.pptx');
dispatcher = MessageDispatcher.getTheDispatcher;
dispatcher.Filter.DebugMessagesPass = true;
l = addlistener(dispatcher,'Message', ...
@(src, evtdata) disp(evtdata.Message.formatAsText));
Create a progress message.
dispatch(dispatcher,ErrorMessage('invalid slide',pre));
open(pre);
titleText = Text('This is a Title');
11-142
mlreportgen.ppt.ProgressMessage.passesFilter
titleText.Style = {Bold};
replace(pre,'Title',titleText);
Generate the presentation and delete the listener.
close(pre);
delete(l);
Check the progress messages in the MATLAB Command Window. In addition to the
predefined PPT progress messages, the starting chapter message added in this
example appears. The output also includes debug messages.
•
“Display Presentation Generation Messages” on page 14-16
Input Arguments
message — PPT progress message
mlreportgen.ppt.ProgressMessage object
PPT progress message, specified as an mlreportgen.ppt.ProgressMessage object.
filter — Filter to use with message
mlreportgen.ppt.MessageFilter object
Filter to use with the progress message, specified as an
mlreportgen.ppt.MessageFilter object.
Output Arguments
tf — Indication of whether the message passes the filter
Boolean
• 1 — Messages passes the specified filter (the dispatcher handles the message)
• 0 — Messages fails the specified filter (the dispatcher ignores the message)
See Also
mlreportgen.ppt.MessageEventData | mlreportgen.ppt.MessageFilter |
mlreportgen.ppt.ProgressMessage
11-143
11
Functions – Alphabetical List
Introduced in R2015b
11-144
mlreportgen.ppt.Slide.add
mlreportgen.ppt.Slide.add
Package: mlreportgen.ppt
Add text box, table, or picture to slide
Syntax
slideObj = add(slide,object)
Description
slideObj = add(slide,object) adds a text box, table, or picture to a slide.
Examples
Add a Picture to a Slide
Create a presentation.
import mlreportgen.ppt.*
slidesFile = 'mySlideAddPresentation.pptx';
slides = Presentation(slidesFile);
slide1 = add(slides,'Blank');
Create an mlreportgen.ppt.Picture object.
plane = Picture(which('b747.jpg'));
plane.X = '4in';
plane.Y = '4in';
plane.Width = '5in';
plane.Height = '2in';
Add the plane picture to slide1.
add(slide1,plane);
11-145
11
Functions – Alphabetical List
Generate the presentation. Open mySlideAddPresentation.pptx.
close(slides);
Open the presentation mySlideAdd.pptx file. On a Windows platform, you can open the
presentation in MATLAB:
if ispc
winopen(slidesFile);
end
•
“Add and Replace Presentation Content” on page 14-76
Input Arguments
slide — Slide to add content to
mlreportgen.ppt.Slide object
Slide to add content to, specified as an mlreportgen.ppt.Slide object.
object — Object to add to slide
PPT object
Object to add to a slide, specified as one of these PPT objects:
• mlreportgen.dom.TextBox
• mlreportgen.dom.Table
• mlreportgen.dom.Picture
11-146
mlreportgen.ppt.Slide.add
Output Arguments
slideObj — Slide
mlreportgen.ppt.Slide object
Slide, returned as an mlreportgen.ppt.Slide object.
See Also
mlreportgen.ppt.Slide
Introduced in R2015b
11-147
11
Functions – Alphabetical List
mlreportgen.ppt.Slide.find
Package: mlreportgen.ppt
Search in slide
Syntax
searchResults = find(slide,objectName)
Description
searchResults = find(slide,objectName) searches for a slide content object
whose Name property has the value that you specify using objectName.
Examples
Search in Slide
Create a presentation.
import mlreportgen.ppt.*
slidesFile = 'mySlideFindPresentation.pptx';
slides = Presentation(slidesFile);
slide1 = add(slides,'Title and Content');
Search in slide1 for content object whose Name property is Content.
contents = find(slide1,'Content');
Make the content in the Content object in slide1 bold.
contents(1).Bold = true;
add(contents(1),'This is in bold');
Generate the presentation. Open mySlideFindPresentation.pptx. On a Windows
platform, you can open the presentation in MATLAB:
close(slides);
11-148
mlreportgen.ppt.Slide.find
if ispc
winopen(slidesFile);
end
•
“Add and Replace Presentation Content” on page 14-76
Input Arguments
slide — Slide to search
mlreportgen.ppt.Slide object | string
Slide to search, specified as an mlreportgen.ppt.Slide object or as a string that
contains the name of a slide in the presentation.
objectName — Slide content object whose Name property to search in
string
Object Name property to search for, specified as a string. The search looks for content
objects in the specified slide that have a Name property that matches the search string.
The search looks in the specified slide. Search strings are case sensitive. The search
treats the string as a full string.
Output Arguments
searchResults — Search results
array
Search results, represented by an array of PPT placeholder objects. The array can
contain these placeholder objects:
• mlreportgen.ppt.ContentPlaceholder
• mlreportgen.ppt.TextBoxPlaceholder
• mlreportgen.ppt.TablePlaceholder
• mlreportgen.ppt.PicturePlaceholder
See Also
mlreportgen.ppt.Presentation.find | mlreportgen.ppt.Slide
11-149
11
Functions – Alphabetical List
Introduced in R2015b
11-150
mlreportgen.ppt.Slide.replace
mlreportgen.ppt.Slide.replace
Package: mlreportgen.ppt
Replace paragraphs, tables, or pictures in slide
Syntax
replace(slide,objectName,content)
Description
replace(slide,objectName,content) replaces existing content of a placeholder
with one or more paragraphs, a table, or a picture that you specify. If the type of content
you specify in the content input argument is not valid for replacing the placeholder, the
replace method has no effect.
Examples
Replace Slide Content
Create a presentation.
import mlreportgen.ppt.*
slidesFile = 'mySlideReplacePresentation.pptx';
slides = Presentation(slidesFile);
slide1 = add(slides,'Title Slide');
slide2 = add(slides,'Title and Content');
Replace the titles in slide1 and slide2.
replace(slide1,'Title','Slide Title of Slide 1');
replace(slide2,'Title','Slide Title of Slide 2');
Generate the presentation. Open mySlideReplacePresentation.pptx. On a Windows
platform, you can open the presentation in MATLAB:
11-151
11
Functions – Alphabetical List
close(slides);
if ispc
winopen(slidesFile);
end
•
“Add and Replace Presentation Content” on page 14-76
Input Arguments
slide — Slide in which to replace content
mlreportgen.ppt.Slide object
Slide in which to replace content, specified as an mlreportgen.ppt.Slide object.
objectName — Name of placeholder to replace
string
Name of placeholder to replace, specified as a string. The placeholder name must be
defined in the template.
content — Content to use as replacement
string | mlreportgen.ppt.Paragaph object | cell array of strings or
Paragraph objects, or a combination of both | mlreportgen.ppt.Table object |
mlreportgen.ppt.Picture object
Content to use as replacement, specified as one of these:
• string
• mlreportgen.ppt.Paragaph object
• cell array of strings or Paragraph objects, or a combination of both
• mlreportgen.ppt.Table object
• mlreportgen.ppt.Picture object
See Also
mlreportgen.ppt.Slide
Introduced in R2015b
11-152
mlreportgen.ppt.Table.append
mlreportgen.ppt.Table.append
Package: mlreportgen.ppt
Append row to table
Syntax
tableObj = append(table,row)
Description
tableObj = append(table,row) appends a row to a table.
Examples
Create a Table with Table Rows
Create a presentation.
import mlreportgen.ppt.*
slides = Presentation('myTableEntryPresentation.pptx');
add(slides,'Title and Content');
Create a table with three columns.
table1 = Table();
Create the first table row.
tr1 = TableRow();
tr1.Style = {Bold(true)};
Create three table entries for the first row.
te1tr1 = TableEntry();
p = Paragraph('first entry');
p.FontColor = 'red';
11-153
11
Functions – Alphabetical List
append(te1tr1,p);
te2tr1 = TableEntry();
append(te2tr1,'second entry');
te3tr1 = TableEntry();
te3tr1.Style = {FontColor('green')};
append(te3tr1,'third entry');
Append the table entries to the first row.
append(tr1,te1tr1);
append(tr1,te2tr1);
append(tr1,te3tr1);
Create the second table row.
tr2 = TableRow();
Create three table entries for the second row.
te1tr2 = TableEntry();
te1tr2.Style = {FontColor('red')};
p = Paragraph('first entry');
append(te1tr2,p);
te2tr2 = TableEntry();
append(te2tr2,'second entry');
te3tr2 = TableEntry();
te3tr2.Style = {FontColor('green')};
append(te3tr2,'third entry');
Append the table entries to the second row.
append(tr2,te1tr2);
append(tr2,te2tr2);
append(tr2,te3tr2);
Append the table rows to the table.
append(table1,tr1);
append(table1,tr2);
Use the mlreportgen.ppt.Presentation.find method to find the slides that have a
Content placeholder. In this case, there are two.
11-154
mlreportgen.ppt.Table.append
contents = find(slides,'Content');
Replace the table in the second slide with table1.
replace(contents(1),table1);
Generate the presentation. Open the myTableEntryPresentation.pptx. On a
Windows platform, you can open the presentation in MATLAB:
close(slides);
if ispc
winopen(slidesFile);
end
•
“Create and Format Tables” on page 14-89
Input Arguments
table — Table to append content to
mlreportgen.ppt.Table object
Table to append content to, specified as an mlreportgen.ppt.Table object.
row — Row to append to table
mlreportgen.ppt.TableRow object
Row to append to table, specified as an mlreportgen.ppt.TableRow object.
11-155
11
Functions – Alphabetical List
Output Arguments
tableObj — Table
mlreportgen.dom.Table object
Table, returned as an mlreportgen.dom.Table object.
See Also
mlreportgen.ppt.Table | mlreportgen.ppt.TableEntry | mlreportgen.ppt.TableRow
Introduced in R2015b
11-156
mlreportgen.ppt.Table.entry
mlreportgen.ppt.Table.entry
Package: mlreportgen.ppt
Access table entry
Syntax
tableEntryOut = entry(tableObj,row,column)
Description
tableEntryOut = entry(tableObj,row,column) returns the table entry for the
specified column of the specified row.
Examples
Color a Table Entry
Color the table entry in row 3, column 4.
import mlreportgen.ppt.*;
slidesFile = 'myTableEntryMethod.pptx';
slides = Presentation(slidesFile);
slide1 = add(slides,'Title and Content');
t = Table(magic(5));
entry4row3 = t.entry(3,4);
entry4row3.BackgroundColor = 'red';
replace(slide1,'Content',t);
close(slides);
if ispc
winopen(slides.OutputPath);
end
11-157
11
Functions – Alphabetical List
•
“Create and Format Tables” on page 14-89
Input Arguments
tableObj — Table containing entry
mlreportgen.ppt.Table object
Table containing the entry, specified as an mlreportgen.ppt.Table object.
row — Table row containing entry
double
Table row containing the entry, specified as a double. The double is an index number
indicating the position of the row. The number of the top row is 1.
Data Types: double
column — Column containing entry
double
11-158
mlreportgen.ppt.Table.entry
Table column containing the entry, specified as a double. The double is an index
number indicating the position of the column. The number of the left column is 1.
Data Types: double
Output Arguments
tableEntryOut — Table entry object
mlreportgen.ppt.TableEntry object
Table entry object, returned as an mlreportgen.ppt.TableEntry object
See Also
mlreportgen.ppt.Table.row | mlreportgen.ppt.TableEntry
Introduced in R2014b
11-159
11
Functions – Alphabetical List
mlreportgen.ppt.Table.replace
Package: mlreportgen.ppt
Replace table with another table
Syntax
tableObj = replace(table,replacementTable)
Description
tableObj = replace(table,replacementTable) replaces a table with another
table.
Examples
Replace Table with Another Table
Create a presentation.
import mlreportgen.ppt.*
slidesFile = 'myTableReplacePresentation.pptx';
slides = Presentation(slidesFile);
slide1 = add(slides,'Blank');
Create an mlreportgen.ppt.Table object.
t1 = Table(magic(7));
t1.X = '2in';
t1.Y = '2in';
t1.Width = '6in';
t1.Height = '4in';
Search in slide1 for Table.
add(slide1,t1);
11-160
mlreportgen.ppt.Table.replace
Create another mlreportgen.ppt.Table object.
t2 = Table(magic(9));
t2.X = '2in';
t2.Y = '2in';
t2.Width = '7in';
t2.Height = '5in';
Replace t1 with t2.
replace(t1,t2);
Generate the presentation. Open myTableReplacePresentation.pptx. On a Windows
platform, you can open the presentation in MATLAB:
close(slides);
if ispc
winopen(slidesFile);
end
•
“Add or Replace a Table” on page 14-80
•
“Create and Format Tables” on page 14-89
Input Arguments
table — Table to replace with another table
mlreportgen.ppt.Table object
Table to replace table, specified as an mlreportgen.ppt.TablePlaceholder object.
replacementTable — Table to use as replacement
mlreportgen.ppt.Table object
Table to use as replacement, specified as an mlreportgen.ppt.Table object.
Output Arguments
tableObj — Table
mlreportgen.dom.Table object
11-161
11
Functions – Alphabetical List
Table, returned as an mlreportgen.dom.Table object.
See Also
mlreportgen.ppt.Table | mlreportgen.ppt.TablePlaceholder
Introduced in R2015b
11-162
mlreportgen.ppt.Table.row
mlreportgen.ppt.Table.row
Package: mlreportgen.ppt
Access table row
Syntax
tableRowOut = entry(tableObj,row)
Description
tableRowOut = entry(tableObj,row) returns the specified table row.
Examples
Color a Table Row
Color the third row in the table.
import mlreportgen.ppt.*;
slidesFile = 'myTableRowMethod.pptx';
slides = Presentation(slidesFile);
slide1 = add(slides,'Title and Content');
t = Table(magic(5));
row3 = t.row(3);
row3.BackgroundColor = 'red';
replace(slide1,'Content',t);
close(slides);
if ispc
winopen(slides.OutputPath);
end
•
“Create and Format Tables” on page 14-89
11-163
11
Functions – Alphabetical List
Input Arguments
tableObj — Table containing row
mlreportgen.ppt.Table object
Table containing the row, specified as an mlreportgen.ppt.Table object.
row — Table row
double
Table row, specified as a double. The double is an index number indicating the position
of the row. The number of the top row is 1.
Data Types: double
Output Arguments
tableRowOut — Table row object
mlreportgen.ppt.TableRow object
Table row object, returned as an mlreportgen.ppt.TableRow object
See Also
mlreportgen.ppt.Table.entry | mlreportgen.ppt.TableRow
Introduced in R2014b
11-164
mlreportgen.ppt.TableEntry.append
mlreportgen.ppt.TableEntry.append
Package: mlreportgen.ppt
Append string or paragraph to table entry
Syntax
tableEntryObj = append(tableEntry,content)
Description
tableEntryObj = append(tableEntry,content) appends a string or Paragraph
object to a table entry.
Examples
Create a Table with Table Rows and Entries
Create a presentation.
import mlreportgen.ppt.*
slidesFile = 'myTableEntryPresentation.pptx';
slides = Presentation(slidesFile);
add(slides,'Title and Content');
Create a table with three columns.
table1 = Table(3);
Create the first table row.
tr1 = TableRow();
tr1.Style = {Bold(true)};
Create three table entries for the first row.
te1tr1 = TableEntry();
11-165
11
Functions – Alphabetical List
p = Paragraph('first entry');
p.FontColor = 'red';
append(te1tr1,p);
te2tr1 = TableEntry();
append(te2tr1,'second entry');
te3tr1 = TableEntry();
te3tr1.Style = {FontColor('green')};
append(te3tr1,'third entry');
Append the table entries to the first row.
append(tr1,te1tr1);
append(tr1,te2tr1);
append(tr1,te3tr1);
Create the second table row.
tr2 = TableRow();
Create three table entries for the second row.
te1tr2 = TableEntry();
te1tr2.Style = {FontColor('red')};
p = Paragraph('first entry');
append(te1tr2,p);
te2tr2 = TableEntry();
append(te2tr2,'second entry');
te3tr2 = TableEntry();
te3tr2.Style = {FontColor('green')};
append(te3tr2,'third entry');
Append the table entries to the second row.
append(tr2,te1tr2);
append(tr2,te2tr2);
append(tr2,te3tr2);
Append the table rows to the table.
append(table1,tr1);
append(table1,tr2);
11-166
mlreportgen.ppt.TableEntry.append
Use the mlreportgen.ppt.Presentation.find method to find the slides that have a
Content placeholder. In this case, there are two.
contents = find(slides,'Content');
Replace the table in the second slide with table1.
replace(contents(1),table1);
Generate the presentation. Open myTableEntryPresentation.pptx. On a Windows
platform, you can open the presentation in MATLAB:
close(slides);
if ispc
winopen(slidesFile);
end
•
“Add or Replace a Table” on page 14-80
•
“Create and Format Tables” on page 14-89
Input Arguments
tableEntry — Table entry to append content to
mlreportgen.ppt.TableEntry object
Table entry to append content to, specified as an mlreportgen.ppt.TableEntry
object.
11-167
11
Functions – Alphabetical List
content — Content to append to table entry
string | mlreportgen.ppt.Paragraph object
Content to append to a table entry, specified as a string or one or more
mlreportgen.ppt.Paragraph objects.
Output Arguments
tableEntryObj — Table entry
mlreportgen.dom.TableEntry object
Table entry, returned as an mlreportgen.dom.TableEntry object.
See Also
mlreportgen.ppt.Table | mlreportgen.ppt.TableEntry | mlreportgen.ppt.TableRow
Introduced in R2015b
11-168
mlreportgen.ppt.TablePlaceholder.replace
mlreportgen.ppt.TablePlaceholder.replace
Package: mlreportgen.ppt
Replace table in table placeholder
Syntax
tableObj = replace(tablePlaceholder,table)
Description
tableObj = replace(tablePlaceholder,table) replaces the table in a table
placeholder.
Examples
Replace Table in Table Placeholder
Create a presentation.
import mlreportgen.ppt.*
slidesFile = 'myTableReplacePresentation.pptx';
slides = Presentation(slidesFile);
slide1 = add(slides,'Title and Table');
Create an mlreportgen.ppt.Table object.
t1 = Table(magic(7));
Search in slide1 for Table.
contents = find(slide1,'Table');
Replace the first table placeholder whose Name property is Table with a table.
replace(contents(1),t1);
11-169
11
Functions – Alphabetical List
Generate the presentation. Open myTableReplacePresentation.pptx. On a Windows
platform, you can open the presentation in MATLAB:
close(slides);
if ispc
winopen(slidesFile);
end
•
“Access PowerPoint Template Elements” on page 14-37
•
“Add or Replace a Table” on page 14-80
Input Arguments
tablePlaceholder — Table placeholder to replace table
mlreportgen.ppt.TablePlaceholder object
Table placeholder to replace table, specified as an
mlreportgen.ppt.TablePlaceholder object.
table — Table to use as replacement
mlreportgen.ppt.Table object
Table to use as a replacement, specified as an mlreportgen.ppt.Table object.
Output Arguments
tableObj — Table
mlreportgen.ppt.Table object
Table, returned as an mlreportgen.ppt.Table object.
See Also
mlreportgen.ppt.Table | mlreportgen.ppt.TablePlaceholder
Introduced in R2015b
11-170
mlreportgen.ppt.TableRow.append
mlreportgen.ppt.TableRow.append
Package: mlreportgen.ppt
Append table entry to table row
Syntax
tableEntryObj = append(tableRow,entry)
Description
tableEntryObj = append(tableRow,entry) appends a table entry to a table row.
Examples
Create a Table with Table Rows and Entries
Create a presentation.
import mlreportgen.ppt.*
slidesFile = 'myTableEntryPresentation.pptx';
slides = Presentation(slidesFile);
add(slides,'Title and Content');
Create a table with three columns.
table1 = Table(3);
Create the first table row.
tr1 = TableRow();
tr1.Style = {Bold(true)};
Create three table entries for the first row.
te1tr1 = TableEntry();
11-171
11
Functions – Alphabetical List
p = Paragraph('first entry');
p.FontColor = 'red';
append(te1tr1,p);
te2tr1 = TableEntry();
append(te2tr1,'second entry');
te3tr1 = TableEntry();
te3tr1.Style = {FontColor('green')};
append(te3tr1,'third entry');
Append the table entries to the first row.
append(tr1,te1tr1);
append(tr1,te2tr1);
append(tr1,te3tr1);
Create the second table row.
tr2 = TableRow();
Create three table entries for the second row.
te1tr2 = TableEntry();
te1tr2.Style = {FontColor('red')};
p = Paragraph('first entry');
append(te1tr2,p);
te2tr2 = TableEntry();
append(te2tr2,'second entry');
te3tr2 = TableEntry();
te3tr2.Style = {FontColor('green')};
append(te3tr2,'third entry');
Append the table entries to the second row.
append(tr2,te1tr2);
append(tr2,te2tr2);
append(tr2,te3tr2);
Append the table rows to the table.
append(table1,tr1);
append(table1,tr2);
11-172
mlreportgen.ppt.TableRow.append
Use the mlreportgen.ppt.Presentation.find method to find the slides that have a
Content placeholder. In this case, there are two.
contents = find(slides,'Content');
Replace the table in the second slide with table1.
replace(contents(1),table1);
Generate the presentation. Open myTableEntryPresentation.pptx. On a Windows
platform, you can open the presentation in MATLAB:
close(slides);
if ispc
winopen(slidesFile);
end
•
“Add or Replace a Table” on page 14-80
•
“Create and Format Tables” on page 14-89
Input Arguments
tableRow — Table row to append content to
mlreportgen.ppt.TableRow object
Table row to append content to, specified as an mlreportgen.ppt.TableRow object.
11-173
11
Functions – Alphabetical List
entry — Table entry to append to table row
mlreportgen.ppt.TableEntry object
Table entry to append to a table row, specified as an mlreportgen.ppt.TableEntry
object.
Output Arguments
tableEntryObj — Table entry
mlreportgen.dom.TableEntry object
Table entry, returned as an mlreportgen.dom.TableEntry object.
See Also
mlreportgen.ppt.Table | mlreportgen.ppt.TableEntry | mlreportgen.ppt.TableRow
Introduced in R2015b
11-174
mlreportgen.ppt.TextBox.add
mlreportgen.ppt.TextBox.add
Package: mlreportgen.ppt
Add paragraph to text box
Syntax
paraObj = add(textBox,content)
add(textBox,contents)
Description
paraObj = add(textBox,content) adds a paragraph to a text box.
add(textBox,contents) adds multiple paragraphs to a text box placeholder.
Examples
Add Text to Text Box
Create a presentation.
import mlreportgen.ppt.*
slidesFile = 'myTextBoxAddPresentation.pptx';
slides = Presentation(slidesFile);
slide1 = add(slides,'Blank');
Add a text box to the blank slide (slide1).
tb = TextBox();
tb.X = '1in';
tb.Y = '1in';
tb.Width = '4 in';
tb.Height = '2in';
add(slide1,tb);
Add text to the text box.
11-175
11
Functions – Alphabetical List
para = add(tb,'This is the content');
para.Bold = true;
Generate the presentation.
close(slides);
•
“Add and Replace Text” on page 14-77
•
“Create and Format Text” on page 14-83
Input Arguments
textBox — Text box to add text to
mlreportgen.ppt.TextBox object
Text box to add text to, specified as an mlreportgen.ppt.TextBox object.
content — Text to add to text box
string | array | cell array | mlreportgen.ppt.Paragraph
Content to add to a text box, specified as a string, array, cell array, or Paragraph object.
If you specify an array, include only mlreportgen.ppt.Paragraph objects in the array.
If you specify a cell array, you can include strings and mlreportgen.ppt.Paragraph
objects.
contents — Multiple paragraphs to add
Cell array of strings or mlreportgen.ppt.Paragraph objects or a combination of both
| Cell array of mlreportgen.ppt.Paragraph objects | Cell array of a combination of
strings and mlreportgen.ppt.Paragraph objects
Content to add, specified as a cell array of strings, mlreportgen.ppt.Paragraph
objects, or a combination of both. Inner cell arrays specify inner list items. The slide
layout specifies whether the text displays as paragraphs, bulleted list items, or numbered
list items.
Output Arguments
paraObj — Paragraph
mlreportgen.dom.Paragraph object
11-176
mlreportgen.ppt.TextBox.add
Paragraph, returned as an mlreportgen.dom.Paragraph object.
See Also
mlreportgen.ppt.Paragraph | mlreportgen.ppt.TextBox |
mlreportgen.ppt.TextBox.replace
Introduced in R2015b
11-177
11
Functions – Alphabetical List
mlreportgen.ppt.TextBox.replace
Package: mlreportgen.ppt
Replace text box paragraphs
Syntax
paraObj = replace(textBox,content)
replace(textBox,contents)
Description
paraObj = replace(textBox,content) replaces paragraph in a text box.
replace(textBox,contents) replaces multiple paragraphs in a text box placeholder.
Examples
Replace Text in a Text Box
Create a presentation.
import mlreportgen.ppt.*
slidesFile = 'myTextBoxReplacePresentation.pptx';
slides = Presentation(slidesFile);
slide1 = add(slides,'Blank');
Create an mlreportgen.ppt.Paragraph object.
p = Paragraph('Hello World');
Add a text box to the blank slide (slide1).
tb = TextBox();
tb.X = '1in';
tb.Y = '1in';
11-178
mlreportgen.ppt.TextBox.replace
tb.Width = '4 in';
tb.Height = '2in';
add(slide1,tb);
Add replace the text box with the paragraph.
add(tb,p);
Replace the content of the text box.
replace(tb,'This is the real content');
Generate the presentation.
close(slides);
•
“Add and Replace Text” on page 14-77
•
“Create and Format Text” on page 14-83
Input Arguments
textBox — Text box to replace text in
mlreportgen.ppt.TextBox object
Text box replace text in, specified as an mlreportgen.ppt.TextBox object.
content — Text to use as replacement
string | array | cell array
Text to use as replacement, specified as a string, array, cell array, or Paragraph object.
If you specify an array, include only mlreportgen.ppt.Paragraph objects in the array.
If you specify a cell array, you can include strings and mlreportgen.ppt.Paragraph
objects.
contents — Multiple paragraphs to use as replacement
Cell array of strings or mlreportgen.ppt.Paragraph objects or a combination of both
| Cell array of mlreportgen.ppt.Paragraph objects | Cell array of a combination of
strings and mlreportgen.ppt.Paragraph objects
Content to use as a replacement, specified as a cell array of strings,
mlreportgen.ppt.Paragraph objects, or a combination of both. Inner cell arrays
11-179
11
Functions – Alphabetical List
specify inner list items. The slide layout specifies whether the text displays as
paragraphs, bulleted list items, or numbered list items.
Output Arguments
paraObj — Paragraph
mlreportgen.dom.Paragraph object
Paragraph, returned as an mlreportgen.dom.Paragraph object.
See Also
mlreportgen.ppt.Paragraph | mlreportgen.ppt.TextBox | mlreportgen.ppt.TextBox.add
Introduced in R2015b
11-180
mlreportgen.ppt.TextBoxPlaceholder.add
mlreportgen.ppt.TextBoxPlaceholder.add
Package: mlreportgen.ppt
Add paragraphs to text box placeholder
Syntax
paraObj = add(textBoxPlaceholder,content)
add(textBoxPlaceholder,contents)
Description
paraObj = add(textBoxPlaceholder,content) adds text in a text box placeholder.
add(textBoxPlaceholder,contents) adds multiple paragraphs to a text box
placeholder.
Examples
Add Text to Text Box Placeholder
Create a presentation.
import mlreportgen.ppt.*
slidesFile = 'myTextBoxPlaceholderAddPresentation.pptx';
slides = Presentation(slidesFile);
add(slides,'Title and Content');
Create an mlreportgen.ppt.Paragraph object.
p = Paragraph('Hello World');
Use the Presentation.find method to find content the text box placeholder called
Title in the presentation. Replace the title for the first slide with the paragraph.
contents = find(slides,'Title');
11-181
11
Functions – Alphabetical List
Add the paragraph to the first slide.
replace(contents(1),p);
Add the paragraph to the first slide.
add(contents(1),' -- How are You?');
Generate the presentation.
close(slides);
•
“Access PowerPoint Template Elements” on page 14-37
•
“Add and Replace Text” on page 14-77
Input Arguments
textBoxPlaceholder — Text box placeholder to add text to
mlreportgen.ppt.TextBoxPlaceholder object
Text box placeholder to add text to, specified as an
mlreportgen.ppt.TextBoxPlaceholder object.
content — Text to add to text box placeholder
string | array | cell array | mlreportgen.ppt.Paragraph
Content to add to a text box placeholder, specified as a string, array, cell array, or
Paragraph object. If you specify an array, include only mlreportgen.ppt.Paragraph
objects in the array. If you specify a cell array, you can include strings and
mlreportgen.ppt.Paragraph objects.
contents — Multiple paragraphs to add
Cell array of strings or mlreportgen.ppt.Paragraph objects or a combination of both
| Cell array of mlreportgen.ppt.Paragraph objects | Cell array of a combination of
strings and mlreportgen.ppt.Paragraph objects
Text to add, specified as a cell array of strings, mlreportgen.ppt.Paragraph objects,
or a combination of both. Inner cell arrays specify inner list items. The slide layout
specifies whether the text displays as paragraphs, bulleted list items, or numbered list
items.
11-182
mlreportgen.ppt.TextBoxPlaceholder.add
Output Arguments
paraObj — Paragraph
mlreportgen.dom.Paragraph object
Paragraph, returned as an mlreportgen.dom.Paragraaph object.
See Also
mlreportgen.ppt.Paragraph | mlreportgen.ppt.TextBoxPlaceholder |
mlreportgen.ppt.TextBoxPlaceholder.replace
Introduced in R2015b
11-183
11
Functions – Alphabetical List
mlreportgen.ppt.TextBoxPlaceholder.replace
Package: mlreportgen.ppt
Replace text box placeholder paragraphs
Syntax
paraObj = replace(textBoxPlaceholder,content)
replace(textBoxPlaceholder,contents)
Description
paraObj = replace(textBoxPlaceholder,content) replaces the text in a text box
placeholder.
replace(textBoxPlaceholder,contents) replaces multiple paragraphs in a text
box placeholder.
Examples
Replace Text in a Text Box Placeholder
Create a presentation.
import mlreportgen.ppt.*
slides = Presentation('myTextBoxReplacePresentation');
add(slides,'Title and Content');
Create an mlreportgen.ppt.Paragraph object.
p = Paragraph('Hello World');
Use the Presentation.find method to find text box placeholders called Title in the
presentation. Replace the title for the first slide with the paragraph.
contents = find(slides,'Title');
Add the paragraph to the first slide.
11-184
mlreportgen.ppt.TextBoxPlaceholder.replace
replace(contents(1),p);
Close the presentation.
close(slides);
•
“Access PowerPoint Template Elements” on page 14-37
•
“Add and Replace Text” on page 14-77
Input Arguments
textBoxPlaceholder — Text box placeholder
mlreportgen.ppt.TextBoxPlaceholder object
Text box placeholder to replace text in, specified as an
mlreportgen.ppt.TextBoxPlaceholder object.
content — Text to use as replacement
string | array | cell array
Text to use as replacement, specified as a string, array, cell array, or Paragraph object.
If you specify an array, include only mlreportgen.ppt.Paragraph objects in the array.
If you specify a cell array, you can include strings and mlreportgen.ppt.Paragraph
objects.
contents — Multiple paragraphs to use as replacement
Cell array of strings or mlreportgen.ppt.Paragraph objects or a combination of both
| Cell array of mlreportgen.ppt.Paragraph objects | Cell array of a combination of
strings and mlreportgen.ppt.Paragraph objects
Content to use as a replacement, specified as a cell array of strings,
mlreportgen.ppt.Paragraph objects, or a combination of both. Inner cell arrays
specify inner list items. The slide layout specifies whether the text displays as
paragraphs, bulleted list items, or numbered list items.
Output Arguments
paraObj — Paragraph
mlreportgen.ppt.Paragraph object
11-185
11
Functions – Alphabetical List
Paragraph, represented by an mlreportgen.ppt.Paragraph object.
See Also
mlreportgen.ppt.Paragraph | mlreportgen.ppt.TextBoxPlaceholder |
mlreportgen.ppt.TextBoxPlaceholder.add
Introduced in R2015b
11-186
report
report
Generate reports from report setup file
Syntax
report
report (filename,...)
report ( ___ ,-oOPATH)
report ( ___ ,-fFORMAT)
report ( ___ ,-genOption1,...)
[report1, report2, ...] = report (rptfile1, rptfile2, ...)
Description
• report with no arguments opens the Report Explorer. For more information on the
Report Explorer, see “Working with the Report Explorer” on page 1-8
• report (filename,...) generates a report from the specified report setup files.
You can specify one or more report setup files. When specifying the name of the report
setup file, omit the .rpt file name extension.
• report ( ___ ,-oOPATH) sets the name of the generated report. You can specify a
path or a single file name for the OPATH path argument.
• report ( ___ ,-fFORMAT) sets the output format and file name extension of the
generated report. Supported formats include:
• Adobe Acrobat PDF (.pdf)
• HTML (.html)
• Microsoft Word (.doc)
• Rich Text format (.rtf)
For example, report('simple-report','-fPDF') generates a PDF file.
• report ( ___ ,-genOption1,...) specifies one or more of the following report
generation options:
• -noview — Prevents launching the file viewer
11-187
11
Functions – Alphabetical List
• -graphical — Shows hierarchy in Report Explorer
• -debug — Enables debug mode
• -quiet — Sets error echo level to 0
• -sSTYLESHEETNAME — Sets stylesheet name (not required when choosing format)
• [report1, report2, ...] = report (rptfile1, rptfile2, ...) returns
the names of the generated reports. If the MATLAB Report Generator software
cannot generate a given report, its returned name is empty.
Note: For reports that use the Word Document format, you must have Microsoft Word
software installed on the machine that you use to generate the report.
Examples
Example 1: Setting the format of the generated report
• Generate the report testrpt in PDF format:
report testrpt -fpdf
• Generate the report testrpt in RTF format:
report testrpt -frtf
• Generate the report testrpt in Microsoft Word format:
report testrpt -fdoc
Note: Only Microsoft Windows platforms support this option.
• Generate a multipage HTML report from the figloop-tutorial report setup file:
report figloop-tutorial -fhtml -shtml-!MultiPage
Example 2: Specifying the file and path of the generated report
Generate a report named simple-report in the folder /tmp/index.html:
report ('simple-report','-o/tmp/index.html')
11-188
report
More About
•
“Generate Reports”
See Also
setedit | rptconvert | rptlist | compwiz
11-189
11
Functions – Alphabetical List
rptconvert
Convert DocBook XML files into supported document formats
Syntax
rptconvert()
rptname = rptconvert (source)
rptname = rptconvert (source, format)
rptname = rptconvert (source, format, stylesheet)
...=rptconvert(...,'-view')
...=rptconvert(...,'-quiet')
...=rptconvert(...,'-verbose')
sheetlist = rptconvert('-stylesheetlist')
sheetlist = rptconvert('-stylesheetlist',format)
FORMATLIST = rptconvert('-formatlist')
Description
This function converts a DocBook XML source file created by the report-generation
process to a supported document format. For information about supported output
formats, see “Supported Report Formats” on page 1-11.
rptconvert() with no input arguments launches the converter. When input arguments
are passed to this function, rptconvert converts the XML document to the specified
format and displays status messages to the MATLAB Command Window.
rptname = rptconvert (source) converts the specified DocBook XML file created
by the report-generation process. You can specify this file name with or without its file
extension.
rptname = rptconvert (source, format) converts using the specified unique
identifier code for each output format type. If you omit this argument, the XML file is
converted to HTML format by default.
rptname = rptconvert (source, format, stylesheet) converts using the
specified stylesheet. If you omit this argument, the default stylesheet for the selected
format is used.
11-190
rptconvert
You can also pass the following flags to the input arguments:
• ...=rptconvert(...,'-view') displays the converted document.
• ...=rptconvert(...,'-quiet') suppresses status messages.
• ...=rptconvert(...,'-verbose') shows detailed status messages.
• sheetlist = rptconvert('-stylesheetlist') returns a two-column cell array.
The first column of this array includes valid stylesheet identifiers. The second column
includes descriptions of each stylesheet.
• sheetlist = rptconvert('-stylesheetlist',format) returns an array like
that returned by sheetlist = rptconvert('-stylesheetlist'). The first
column of this array includes stylesheet identifiers for the specified format.
• FORMATLIST = rptconvert('-formatlist') returns a two-column cell array.
The first column of this array includes valid format values, the second column
includes descriptions of each format.
Examples
Retrieve a list of available HTML stylesheets:
rptconvert('-stylesheetlist','html')
More About
•
“Convert XML Documents to Different File Formats” on page 4-18
See Also
setedit | report | rptlist | compwiz
11-191
11
Functions – Alphabetical List
rptlist
Retrieve list of all report setup files in MATLAB path
Syntax
rptlist
rptlist ('system_name')
list = rptlist
Description
rptlist with no arguments opens the Report Explorer, which lists available report
setup files in the MATLAB path.
rptlist ('system_name') opens the Report Explorer with the Simulink system's
ReportName property selected.
list = rptlist returns a list of report setup files in the MATLAB path.
See Also
setedit
11-192
rptview
rptview
Display DOM report
Syntax
rptview(reportPath)
rptview(reportPath,'pdf')
rptview(reportName,format)
Description
rptview(reportPath) displays the report reportPath in an appropriate viewer,
based on the file extension. You can use the Document.OutputPath property to specify
reportPath.
rptview(reportPath,'pdf') converts a Word report to PDF and displays the report
in a PDF viewer.
rptview(reportName,format) displays the report reportPath in an appropriate
viewer, based on the format specified in format.
Examples
Display Report in HTML Viewer
Display an HTML report. Include the file extension when you specify the report name in
the rptview function.
import mlreportgen.dom.*;
d = Document('mydoc','html');
p = Paragraph('Hello World');
append(d,p);
close(d);
11-193
11
Functions – Alphabetical List
rptview('mydoc.htmx');
Convert a Word Report and Display It in a PDF Viewer
Use the rptview function to convert a Word report to PDF and display it in a PDF
viewer.
import mlreportgen.dom.*;
d = Document('mydoc','docx');
p = Paragraph('Hello World');
append(d,p);
close(d);
rptview('mydoc.docx','pdf');
Display Report Using the OutputPath Property
Display a report using the value of the OutputPath property of the
mlreportgen.dom.Document object of the report.
import mlreportgen.dom.*;
d = Document('mydoc','docx');
p = Paragraph('Hello World');
append(d,p);
close(d);
rptview(d.OutputPath);
Display Word Report Based on Name
Create two reports with the same name, but with different formats and content. Specify
the format to display the appropriate report.
import mlreportgen.dom.*;
d = Document('mydoc','html');
p = Paragraph('Hello World');
append(d,p);
close(d);
dWord = Document('mydoc','docx');
p = Paragraph('Hello again, World');
append(dWord,p);
11-194
rptview
close(dWord);
rptview('mydoc','docx');
Input Arguments
reportPath — Report file path including file extension
string
Path to a specific report file, including the file extension, specified as a string.
The report file name extension determines the viewer in which the report displays.
File Extension
Viewer
.htmx
MATLAB Web browser
.zip
MATLAB Web browser
.docx
The report displays in Microsoft Word
unless you add the 'pdf' argument after
reportPath.
reportName — Report name
string
The full path of a report, without the file extension, specified as a string. You can specify
a string with the full path. Alternatively, you can use the value of the OutputPath
property of the mlreportgen.dom.Document object that you create for the report.
format — Report output format
string
Use one of these values:
• 'html'
• 'docx'
• 'pdf'
See Also
mlreportgen.dom.Document
11-195
11
Functions – Alphabetical List
Introduced in R2014b
11-196
setedit
setedit
Start Report Explorer
Syntax
setedit (filename)
Description
setedit (filename) opens the Report Explorer and loads the report setup file named
filename. If a file with the specified name does not exist, Report Explorer opens an
empty report setup file with that name.
More About
•
“Working with the Report Explorer” on page 1-8
See Also
rptlist | report | rptconvert
11-197
11
Functions – Alphabetical List
unzipTemplate
Unzip zipped DOM template
Syntax
unzipTemplate(zippedTemplatePath)
unzipTemplate(zippedTemplatePath,unzippedTemplatePath)
Description
unzipTemplate(zippedTemplatePath) unzips the DOM template zip file specified by
zippedTemplatePath into a subfolder of the folder that contains the zipped template.
unzipTemplate(zippedTemplatePath,unzippedTemplatePath) unzips the DOM
template into the folder specified by unzippedTemplatePath.
Examples
Unzip DOM Template into Subfolder of Zipped Template Folder
Unzip a zipped DOM template called myTemplate.
unzipTemplate('myTemplate');
Unzip DOM Template into Specified Folder
This example assumes that there is a zipped DOM template called myTemplate in the
current folder and a folder called H:\report_templates.
unzipTemplate('myTemplate.htmtx','H:\report_templates\myTemplate');
Input Arguments
zippedTemplatePath — Path of the zipped DOM template
string
11-198
unzipTemplate
If you do not include a file extension in the path, the function assumes the extension is
.htmtx.
If you do not use the unzippedTemplatePath argument, the unzipTemplate function
unzips the template into a subfolder of the folder that contains the zipped template.
The name of the unzipped template folder is the same as the root name of the zipped
template. The root name is the zipped template name without its file extension.
unzippedTemplatePath — The location to store the unzipped DOM template
string
The template is unzipped into the folder that you specify in unzippedTemplate path.
More About
•
“Report Packages” on page 13-17
See Also
mlreportgen.dom.Document.createTemplate | zipTemplate
Introduced in R2014b
11-199
11
Functions – Alphabetical List
zipTemplate
Package DOM HTML template in zip file
Syntax
zipTemplate(unzippedTemplateFolder)
zipTemplate(zippedTemplate,unzippedTemplateFolder)
zipTemplate(zippedTemplate,unzippedTemplateFolder,mainDocument)
zipTemplate(zippedTemplate,unzippedTemplateFolder,mainDocument,
partTemplates)
Description
zipTemplate(unzippedTemplateFolder) zips (compresses and puts in a zip file) the
unzipped DOM template in unzippedTemplateFolder. The resulting zipped template
file name is the name specified in unzippedTemplateFolder, plus the file extension
htmtx. The zipTemplate function zips all of the files in the unzipped template folder,
including files in subfolders. The zipped template folder structure duplicates the folder
structure of the unzipped template.
Use this syntax if you created the unzipped template by unzipping a template created in
any of these ways:
• Used mlreportgen.dom.Document.createTemplate
• Copied the template from a default DOM template
• Created the template without using the DOM API or DOM templates and the zipped
file complies with the conditions listed in “Tips”.
zipTemplate(zippedTemplate,unzippedTemplateFolder) zips the unzipped DOM
template into the file specified by zippedTemplate.
zipTemplate(zippedTemplate,unzippedTemplateFolder,mainDocument)
zips the unzipped DOM template into the file specified by zippedTemplate. Use
the mainDocument argument to specify the name of main document in the unzipped
template if the main document name in the unzipped template is not report.html or
11-200
zipTemplate
root.html and your document part template library file, if it exists, is in a file called
docpart_templates.html.
zipTemplate(zippedTemplate,unzippedTemplateFolder,mainDocument,
partTemplates) zips the unzipped DOM template into the file specified by
zippedTemplate. Use this syntax when the unzipped template includes a document
part template library file whose file name is not docpart_templates.html. You must
specify mainDocument as the third argument, even if the main document file is called
report.html or root.html.
Examples
Zip to a File Whose Base Name is the Unzipped Template Folder
Zip the template myTemplate into a zip file called myTemplate.htmtx.
zipTemplate('myTemplate');
Zip to a Specified Zip File Name
Zip the template myTemplate into a zip file called myReportTemplate.htmtx.
zipTemplate('myReportTemplate.htmtx','myTemplate');
Zip When Main Document and Part Template File Use Custom Names
Zip a template whose main part is mainpart.html and whose part template library file
is documentpart_templates.html.
zipTemplate('myTemplate.htmx','myTemplate',...
'mainpart.html','documentpart_templates.html');
Input Arguments
unzippedTemplateFolder — Path to folder containing unzipped template
string
Path to folder containing unzipped template, specified as a string.
zippedTemplate — Path for zipped DOM template file
string
11-201
11
Functions – Alphabetical List
Full path for the zipped DOM template, including the file extension .htmtx, specified as
a string.
mainDocument — Name of main document file
string
Main document file name, including the file extension, specified as a string.
partTemplates — Document part library file name
string
Document part library file name, including the file extension, specified as a string.
More About
Tips
• If you created the unzipped template by unzipping a template created by using
mlreportgen.dom.Document.createTemplate or copying the template from a
default DOM template, you can use either of these syntaxes with no further action:
zipTemplate(unzippedTemplateFolder)
zipTemplate(zippedTemplate,unzippedTemplateFolder)
You can also use either of those two syntaxes if the unzipped template was created
without using the DOM interface and the template complies with the following
requirements.
• The main document file is named either report.html or root.html.
• The unzipped template either does not include a document part template
library file, or it includes a document part template library file named
docpart_templates.html.
• The unzipped template stores images in a folder named images.
If the unzipped template main document file is not named either report.html or
root.html, use the mainDocument input argument.
If the unzipped template includes a document part template library file with a name
other than docpart_templates.html, use the partTemplates input argument.
11-202
zipTemplate
If the unzipped template stores images in a folder other than one named images in
the root folder of the template, include a text file called _imgprefix in the folder
that contains images for the unzipped template. In the _imgprefix file, you can
include a prefix for the DOM interface to use to generate names images appended to
documents. For example, if the _imgprefix file contains the prefix graphic, the
generated image names are graphic1.png, graphic2.png, and so on. If you leave
the _imgprefix file empty, then the generated images use the prefix image.
•
“Report Packages” on page 13-17
See Also
mlreportgen.dom.Document.createTemplate | unzipTemplate
Introduced in R2014b
11-203
12
Classes – Alphabetical List
12
Classes – Alphabetical List
mlreportgen.dom.AllowBreakAcrossPages class
Package: mlreportgen.dom
Allow row to straddle page break
Description
Specifies whether to allow row to straddle page break. This format applies only to Word
documents.
Construction
breakAcrossPagesObj = AllowBreakAcrossPages() allows a row to flow onto the
next page when it cannot fit entirely on the current page.
breakAcrossPagesObj = AllowBreakAcrossPages(tf) forces a row to start on the
next page when it cannot fit on the current page and tf = false.
Input Arguments
tf — Allow row to flow onto next page
true (default) | logical value
A setting of false (or 0) forces a row to start on the next page when it cannot fit on the
current page. A setting of true (or 1) allows a row to flow onto the next page when it
cannot fit entirely on the current page.
Data Types: logical
Output Arguments
breakAcrossPagesObj — Control table row page break
mlreportgen.dom.AllowBreakAcrossPages object
Specification of table row page break handling, represented by an
mlreportgen.dom.AllowBreakAcrossPages object.
12-2
mlreportgen.dom.AllowBreakAcrossPages class
Properties
Id — ID for document element
string
A session-unique ID is generated as part of document element creation. You can specify
an ID to replace the generated ID.
Tag — Tag for document element
string
Tag for document element, specified as a string.
A session-unique ID is generated as part of document element creation. The generated
tag has the form CLASS:ID, where CLASS is the class of the element and ID is the value
of the Id property of the object. You can specify a tag to replace the generated tag.
Specify your own tag value, for example, to make it easier to identify where an issue
occurred during document generation.
Value — Allow row to flow onto next page
true (default) | logical value
The possible values are:
• 0— forces a row to start on the next page when it cannot fit on the current page
• 1— allows a row to flow onto the next page when it cannot fit entirely on the current
page
Data Types: logical
See Also
mlreportgen.dom.RepeatAsHeaderRow | mlreportgen.dom.TableRow
More About
•
“Report Formatting Approaches” on page 13-20
12-3
12
Classes – Alphabetical List
mlreportgen.dom.AutoNumber class
Package: mlreportgen.dom
Automatically generated number
Description
Automatically generated number for a DOM document element object.
Construction
autoObj = AutoNumber() creates an automatically generated number without a
specified number stream.
autoObj = AutoNumber(stream) creates a number based on the specified numbering
steam.
autoObj = AutoNumber(stream,styleName) creates a number using the specified
style.
Input Arguments
stream — Numbering stream for generating the number
string
Specify a numbering stream, using the value of the
mlreportgen.dom.AutoNumberStream object StreamName property.
If the specified stream does not exist, the DOM interface creates an Arabic
number stream having the specified name with an initial value of 0. To use a
stream with other properties, such as Roman numerals, create a stream using
mlreportgen.dom.Document.createAutoNumberStream.
styleName — Name of number style defined in the template
string
12-4
mlreportgen.dom.AutoNumber class
Name of number style defined in the template, specified as a string. The style specified
by styleName must be defined in the template used to create the document to which the
number is appended.
Output Arguments
autoObj — Automatically created number object
mlreportgen.dom.AutoNumber object
Automatically created number object, specified as an mlreportgen.dom.AutoNumber
object.
Properties
BackgroundColor — Background color
string
Specify one of these as a string:
• The name of a color. The name must be a CSS color name. See http://
www.crockford.com/wrrrld/color.html.
• A hexadecimal RGB (truecolor) value as #RRGGBB. For example, #0000ff is a shade
of blue.
Bold — Option to use bold for number
[] (default) | logical value
To make text bold, set this property to true or 1. If this property is empty and the
StyleName property for this document element specifies a style sheet style, the weight of
the number is determined by that style. Setting the Bold property adds a corresponding
mlreportGen.dom.Bold format object to the Style property of this document element.
Removing the Bold property setting removes the object.
Data Types: logical
Color — Text color
string
Specify one of these as a string:
12-5
12
Classes – Alphabetical List
• The name of a color. The name must be a CSS color name. See http://
www.crockford.com/wrrrld/color.html.
• A hexadecimal RGB (truecolor) value as #RRGGBB. For example, #0000ff is a shade
of blue.
CustomAttributes — Custom attributes of document element
array of mlreportgen.dom.CustomAttribute objects
HTML or Microsoft Word must support the custom attributes of this document element.
FontFamilyName — Name of font family for text
string
The name of a font family.
To specify substitutions for this font, do not set this property. Instead create and add a
mlreportgen.dom.FontFamily object to the Style property of this document element.
Setting the FontFamilyName property adds a corresponding
mlreportGen.dom.FontFamily format object to the Style property for this document
element. Removing the FontFamilyName property setting removes the object.
FontSize — Font size
string
If you need to specify substitutions for this font, do not set this property. Instead
create and add a mlreportgen.dom.FontFamily object to the Style property of this
document element.
Setting the FontSize property adds a corresponding mlreportGen.dom.FontSize
format object to the Style property for this document element. Removing the FontSize
property setting removes the object.
String having the format valueUnits, where Units is an abbreviation for the units in
which the font size is expressed. Use one of these abbreviations for the units for the font
size.
• no abbreviation — pixels
• cm — centimeters
• in — inches
• mm — millimeters
• pi — picas
12-6
mlreportgen.dom.AutoNumber class
• pt — points
• px — pixel
Id — ID for document element
string
A session-unique ID is generated as part of document element creation. You can specify
an ID to replace the generated ID.
Italic — Option to use italics for a number
[] (default) | logical value
To use italics for a number, set this property to true. If this property is empty and
the StyleName property for this document element specifies a style sheet style, the
slant of the number is determined by that style. Setting the Italic property adds a
corresponding mlreportGen.dom.Italic format object to the Style property of this
document element. Removing the Italic property setting removes the object.
Data Types: logical
Strike — Text strikethrough
string
The default for this property is []. You can set it to one of these values:
• none — Do not use strikethrough for Word and HTML documents
• single — Use a single line for strikethrough for Word and HTML documents
• double — Use a double line for strikethrough for Word documents
Setting the Strike property adds a corresponding mlreportGen.dom.Strike format
object to the Style property for this document element. Removing the Strike property
setting removes the object.
Style — Formats that define the element style
array of mlreportgen.dom.DOCXSection objects
The formats specified by this property override corresponding formats defined by the
stylesheet style specified by the StyleName property of this element. Formats that do
not apply to this element are ignored.
StyleName — Style for the number
string
12-7
12
Classes – Alphabetical List
The style specified by styleName must be defined in the template used to create the
document element to which this number is appended.
Tag — Tag for document element
string
Tag for document element, specified as a string.
A session-unique ID is generated as part of document element creation. The generated
tag has the form CLASS:ID, where CLASS is the class of the element and ID is the value
of the Id property of the object. You can specify a tag to replace the generated tag.
Specify your own tag value, for example, to make it easier to identify where an issue
occurred during document generation.
Underline — Type of underline, if any, for text
[] (default) | string
You can specify one of the following types of underlines.
12-8
Border String
Description
Supported Output Types
dash
Dashed underline
Word
dashedHeavy
Line with heavy dashes
Word
dashLong
Line with long dashes
Word
dashLongHeavy
Line with heavy long
dashes
Word
dashDotDotHeavy
Line with heavy dashes
with two dots between
the dashes
Word
dashDotHeavy
Heavy dash-dot line
Word
dotted
Dotted line
Word
dottedHeavy
Thick dotted line
Word
dotDash
Dot-dash line
Word
dotDotDash
Dot-dot-dash line
Word
dashDotHeavy
Heavy dot-dash line
Word
double
Double line
Word
none
Do not use underlining
HTML and Word
mlreportgen.dom.AutoNumber class
Border String
Description
Supported Output Types
single
Single line
HTML and Word
thick
Thick line
Word
wave
Wavy line
Word
waveyDouble
Double wavy line
Word
waveyHeavy
Heavy wavy
Word
words
Underline non-space
characters only
Word
If this property is empty and StyleName property of this document element specifies a
style sheet style, the type of underline is determined by that style.
To specify the color as well as the type of the underline, do not set the Underline
property. Instead, set the Style property of this document element to include an
mlreportgen.dom.Underline format object that specifies the desired underline type
and color.
Setting the Underline property adds a corresponding mlreportgen.dom.Underline
format object to the Style property for this document element. Removing the
Underline property setting removes the object.
WhiteSpace — White space and line breaks in text
[] (default) | string
To specify how to handle white space, use one of the following strings.
Border String
Description
Supported Output Types
normal
Does not preserve white
space and line breaks
Word and HTML
nowrap
Sequences of white space
collapse into a single white
space. Text never wraps to
the next line.
HTML
preserve
Preserves white space. Text Word and HTML
wraps only on line breaks.
See below for details.
Acts like the <pre> tag in
HTML.
12-9
12
Classes – Alphabetical List
Border String
Description
Supported Output Types
pre
Preserves white space. Text HTML
wraps only on line breaks.
Acts like the <pre> tag in
HTML.
pre-line
Sequences of white space
collapse into a single white
space. Text wraps.
pre-wrap
Preserves white space. Text HTML
wraps when necessary and
on line breaks
HTML
If you want to view HTML output in the MATLAB browser and you want to preserve
white space and wrap text only on line breaks, use the preserve setting rather than the
pre setting.
Setting the WhiteSpace property adds a corresponding WhiteSpace format object to
Style property. Removing the WhiteSpace property setting removes the WhiteSpace
object.
Methods
Method
Purpose
append
Append a custom element to this number.
Use AutoNumber.append in a similar way
to how you use ExternalLink.append.
clone
Copy the number object.
Use AutoNumber.clone in a similar way
to how you use Paragraph.clone.
Examples
Use Automatically Generated Numbers for Chapters and Tables
import mlreportgen.dom.*;
12-10
mlreportgen.dom.AutoNumber class
doctype = 'html';
d = Document('test',doctype);
p = Paragraph('Chapter ');
p.Style = {CounterInc('chapter'),CounterReset('table'),WhiteSpace('preserve')};
append(p,AutoNumber('chapter'));
append(d,p);
p = Paragraph('Table ');
append(p,AutoNumber('chapter'));
append(p,'.');
append(p,AutoNumber('table'));
p.Style = {CounterInc('table'),WhiteSpace('preserve')};
append(d,p);
p = Paragraph('Chapter ');
p.Style = {CounterInc('chapter'),CounterReset('table'),WhiteSpace('preserve')};
append(p, AutoNumber('chapter'));
append(d,p);
p = Paragraph('Table ');
append(p, AutoNumber('chapter'));
append(p,'.');
append(p,AutoNumber('table'));
p.Style = {CounterInc('table'),WhiteSpace('preserve')};
append(d,p);
close(d);
rptview('test',doctype);
•
“Automatically Number Document Content” on page 13-86
See Also
mlreportgen.dom.CounterInc | mlreportgen.dom.CounterReset
| mlreportgen.dom.Document.createAutoNumberStream |
mlreportgen.dom.Document.getAutoNumberStream
12-11
12
Classes – Alphabetical List
mlreportgen.dom.AutoNumberStream class
Package: mlreportgen.dom
Numbering stream
Description
A numbering stream generates a sequence of numbers for numbering chapters, tables,
figures, and other document objects. To create a numbering stream object, use the
mlreportgen.dom.Document.createAutoNumberStream method.
Properties
CharacterCase — Character case of generated numbers
string
Values can be:
• lower — lowercase (for example, a,b,c)
• lower — uppercase (for example, A,B,C)
CharacterType — Character type of generated numbers
string
Values can be:
• alphabetic — for example, a,b,c
• arabic — for example, 1,2,3
• roman — for example, i,ii,iii
Id — ID for document element
string
A session-unique ID is generated as part of document element creation. You can specify
an ID to replace the generated ID.
InitialValue — Initial value of generated number
string
12-12
mlreportgen.dom.AutoNumberStream class
The value of this property should be one less than the number that you want to be
generated first. For example, if you want the number of the first item to be numbered by
this stream to be 2, set the value of this property to 1.
StreamName — Name of numbering stream
string
Name of numbering stream, specified as a string.
Tag — Tag for document element
string
Tag for document element, specified as a string.
A session-unique ID is generated as part of document element creation. The generated
tag has the form CLASS:ID, where CLASS is the class of the element and ID is the value
of the Id property of the object. You can specify a tag to replace the generated tag.
Specify your own tag value, for example, to make it easier to identify where an issue
occurred during document generation.
See Also
mlreportgen.dom.CounterInc | mlreportgen.dom.CounterReset
| mlreportgen.dom.Document.createAutoNumberStream |
mlreportgen.dom.Document.getAutoNumberStream
Related Examples
•
“Automatically Number Document Content” on page 13-86
12-13
12
Classes – Alphabetical List
mlreportgen.dom.BackgroundColor class
Package: mlreportgen.dom
Background color of document element
Description
Specifies the background color of a document element
Construction
backgroundColorObj = BackgroundColor() creates a white background.
backgroundColorObj = BackgroundColor(colorName) creates a background color
object based on the specified CSS color name.
backgroundColorObj = BackgroundColor(rgbValue) creates a background color
object using the hexidecimal RGB color value.
Input Arguments
colorName — Name of a color to use
string
The name of a color, specified as a string. The name must be a CSS color name. See
http://www.crockford.com/wrrrld/color.html.
rgbValue — Hexidecimal RGB (red, green, blue) color value
string
A string using the following RGB format: #RRGGBB. Use # as the first character and twodigit hexidecimal numbers for each for the red, green, and blue values. For example,
'#0000ff' specifies blue.
Output Arguments
backgroundColorObj — Background color
mlreportgen.dom.BackgroundColor object
12-14
mlreportgen.dom.BackgroundColor class
Background color for a report object, returned as an
mlreportgen.dom.BackgroundColor object
Properties
HexValue — Hexadecimal color value (read-only)
string
Hexadecimal number representing an RGB color value. For example, '#8b008b'
specifies dark magenta. You can use either uppercase or lowercase letters as part of a
hexadecimal value.
Id — ID for document element
string
A session-unique ID is generated as part of document element creation. You can specify
an ID to replace the generated ID.
Tag — Tag for document element
string
Tag for document element, specified as a string.
A session-unique ID is generated as part of document element creation. The generated
tag has the form CLASS:ID, where CLASS is the class of the element and ID is the value
of the Id property of the object. You can specify a tag to replace the generated tag.
Specify your own tag value, for example, to make it easier to identify where an issue
occurred during document generation.
Value — CSS color name or hexadecimal RGB value for this color
string
Either a CSS color name or a hexidecimal RGB value, specified as a string.
12-15
12
Classes – Alphabetical List
Examples
Create and Apply a Background Color
Create a deep sky blue background color object and apply it to a paragraph. Instead
of specifying the CSS color name DeepSkyBlue, you could use the hexadecimal value
#00bfff.
import mlreportgen.dom.*;
doctype = 'html';
d = Document('test', doctype);
blue = 'DeepSkyBlue';
% blue = '#00BFFF';
colorfulStyle = {Bold, Color(blue), BackgroundColor('Yellow')};
p = Paragraph('deep sky blue paragraph with yellow background');
p.Style = colorfulStyle;
append(d, p);
close(d);
rptview('test', doctype);
See Also
mlreportgen.dom.Color
More About
•
12-16
“Report Formatting Approaches” on page 13-20
mlreportgen.dom.Bold class
mlreportgen.dom.Bold class
Package: mlreportgen.dom
Bold for text object
Description
Specifies whether to use bold for a text object
Construction
boldObj = Bold() creates a bold object that specifies to use bold for a text object.
boldObj = Bold(value) creates a bold object that specifies to use bold for a text object
if value is true. Otherwise, creates a bold object that specifies to use regular weight
text.
Input Arguments
value — Option to use bold or regular weight for text object
[] (default) | logical value
A setting of false (or 0) uses regular weight text. A setting of true (or 1) renders text in
bold.
Data Types: logical
Output Arguments
boldObj — Bold text
mlreportgen.dom.Bold object
Bold text, represented by an mlreportgen.dom.Bold object
12-17
12
Classes – Alphabetical List
Properties
Id — ID for document element
string
A session-unique ID is generated as part of document element creation. You can specify
an ID to replace the generated ID.
Tag — Tag for document element
string
Tag for document element, specified as a string.
A session-unique ID is generated as part of document element creation. The generated
tag has the form CLASS:ID, where CLASS is the class of the element and ID is the value
of the Id property of the object. You can specify a tag to replace the generated tag.
Specify your own tag value, for example, to make it easier to identify where an issue
occurred during document generation.
Value — Option to use bold or regular weight for a text object
[] (default) | logical value
The possible values are:
• 0— uses regular weight text
• 1— renders text in bold
Data Types: logical
Examples
Create Paragraph With Bold and Regular-Weight Text
import mlreportgen.dom.*;
doctype = 'html';
d = Document('test',doctype);
p = Paragraph('bold text ');
p.Style = {Bold};
append(d,p);
12-18
mlreportgen.dom.Bold class
t = Text('regular weight text');
t.Style = {Bold(false)};
append(p,t);
close(d);
rptview('test',doctype);
See Also
mlreportgen.dom.Italic
More About
•
“Report Formatting Approaches” on page 13-20
12-19
12
Classes – Alphabetical List
mlreportgen.dom.Border class
Package: mlreportgen.dom
Border properties of object
Description
Specifies the border properties of an object.
Construction
borderObj = Border() creates an unspecified border.
borderObj = Border(style) creates a border having the specified style.
borderObj = Border(style,color) creates a border having the specified style and
color.
borderObj = Border(style,color,width) creates a border having the specified
style, color, and width.
Input Arguments
style — Default style of border segments
string
Use one of these values.
String
12-20
Applies To
DOCX
HTML
'dashed'
X
X
'dashdotstroked'
X
mlreportgen.dom.Border class
String
Applies To
DOCX
HTML
'dashsmallgap'
X
'dotted'
X
X
'dotdash'
X
'dotdotdash'
X
'double'
X
X
'doublewave'
X
'inset'
X
X
'none'
X
X
'outset'
X
X
'single'
X
'solid'
X
'thick'
X
'thickthinlargegap'
X
'thickthinmediumgap'
X
'thickthinsmallgap'
X
'thinthicklargegap'
X
'thinthickmediumgap'
X
'thinthicksmallgap'
X
'thinthickthinlargegap'
X
'thinthickthinmediumgap'
X
'thinthickthinsmallgap'
X
'threedemboss'
X
'threedengrave'
X
'triple'
X
'wave'
X
color — Color of border
string
12-21
12
Classes – Alphabetical List
You can specify:
• The name of a color. The name must be a CSS color name. See http://
www.crockford.com/wrrrld/color.html.
• A hexadecimal RGB (truecolor) value as #RRGGBB. For example, #0000ff is a shade
of blue.
width — Width of border
string
String specifying the width of the border. String must have the format valueUnits
where Units is an abbreviation for the units in which the width size is expressed. Valid
abbreviations are:
• no abbreviation — pixels
• cm — centimeters
• in — inches
• mm — millimeters
• pi — picas
• pt — points
• px — pixel
Output Arguments
borderObj — Table border
mlreportgen.dom.Border object
Table border, represented by an mlreportgen.dom.Border object.
Properties
Color — Default color of border segments
string
You can specify:
• The name of a color. The name must be a CSS color name. See http://
www.crockford.com/wrrrld/color.html.
12-22
mlreportgen.dom.Border class
• A hexadecimal RGB (truecolor) value as #RRGGBB. For example, #0000ff is a shade
of blue.
Id — ID for document element
string
A session-unique ID is generated as part of document element creation. You can specify
an ID to replace the generated ID.
Style — Default style of border segments
string
For details, see the description of the style input argument for the
mlreportgen.dom.Border constructor.
Tag — Tag for document element
string
Tag for document element, specified as a string.
A session-unique ID is generated as part of document element creation. The generated
tag has the form CLASS:ID, where CLASS is the class of the element and ID is the value
of the Id property of the object. You can specify a tag to replace the generated tag.
Specify your own tag value, for example, to make it easier to identify where an issue
occurred during document generation.
Width — Width of border
string
String specifying the width of the border. String must have the format valueUnits
where Units is an abbreviation for the units in which the width size is expressed. Valid
abbreviations are:
• no abbreviation — pixels
• cm — centimeters
• in — inches
• mm — millimeters
• pi — picas
• pt — points
12-23
12
Classes – Alphabetical List
• px — pixel
BottomColor — Bottom border segment color
string
Bottom border segment color, specified as a string.
BottomStyle — Bottom border segment style
string
Bottom border segment style, specified as a string.
BottomWidth — Bottom border segment width
string
Bottom border segment width, specified as a string.
TopColor — Top border segment color
string
Top border segment color, specified as a string.
TopStyle — Top border segment style
string
Top border segment style, specified as a string.
TopWidth — Top border segment width
string
Top border segment width, specified as a string.
LeftColor — Left border segment color
string
Left border segment color, specified as a string.
LeftStyle — Left border segment style
string
Left border segment style, specified as a string.
LeftWidth — Left border segment width
string
12-24
mlreportgen.dom.Border class
Left border segment width, specified as a string.
RightColor — Right border segment color
string
Right border segment color, specified as a string.
RightStyle — Right border segment style
string
Right border segment style, specified as a string.
RightWidth — Right border segment width
string
Right border segment width, specified as a string.
Examples
Format Table Borders
import mlreportgen.dom.*;
doctype = 'html';
d = Document('test', doctype);
t = Table(magic(5));
t.Style = {Border('inset', 'crimson', '6pt'), Width('50%')};
t.TableEntriesInnerMargin = '6pt';
append(d, t);
close(d);
rptview('test', doctype);
•
“Create and Format Tables” on page 13-58
See Also
mlreportgen.dom.ColSep | mlreportgen.dom.RowSep | mlreportgen.dom.Table
12-25
12
Classes – Alphabetical List
mlreportgen.dom.BorderCollapse class
Package: mlreportgen.dom
Collapse HTML table borders
Description
Specifies whether to collapse table borders. This applies only to HTML tables.
Construction
borderCollapseObj = BorderCollapse() creates an unspecified format. Nothing is
inserted in the generated table markup.
borderCollapseObj = BorderCollapse(value) creates a border collapse object
having the specified value.
Input Arguments
value — Specify whether to collapse border
string
String specifying to collapse table borders ('on') or to leave table and adjacent cell
borders separate ('off').
Output Arguments
borderCollapseObj — Specify whether to collapse table borders
mlreportgen.dom.BorderCollapse object
Specify whether to collapse table borders, represented by an
mlreportgen.dom.BorderCollapse object.
Properties
Id — ID for document element
string
12-26
mlreportgen.dom.BorderCollapse class
A session-unique ID is generated as part of document element creation. You can specify
an ID to replace the generated ID.
Tag — Tag for document element
string
Tag for document element, specified as a string.
A session-unique ID is generated as part of document element creation. The generated
tag has the form CLASS:ID, where CLASS is the class of the element and ID is the value
of the Id property of the object. You can specify a tag to replace the generated tag.
Specify your own tag value, for example, to make it easier to identify where an issue
occurred during document generation.
Value — Specify whether to collapse border
string
String specifying to collapse table borders ('on') or to leave table and adjacent cell
borders separate ('off').
Examples
Collapse and Separate Table Borders
import mlreportgen.dom.*;
doctype = 'html';
d = Document('test',doctype);
magicArray = magic(5);
p = Paragraph('Collapsed Borders');
append(d,p);
table = Table(magicArray);
table.Style = {Border('solid'),BorderCollapse('on')};
for r = 1:5
for c = 1:5
table.entry(r,c).Style = {Border('solid')};
end
end
append(d,table);
12-27
12
Classes – Alphabetical List
p = Paragraph('Separate Borders');
append(d,p);
table = Table(magicArray);
table.Style = {Border('solid'),BorderCollapse('off')};
for r = 1:5
for c = 1:5
table.entry(r,c).Style = {Border('solid')};
end
end
append(d,table);
close(d);
rptview(d.OutputPath,doctype);
•
“Create and Format Tables” on page 13-58
See Also
mlreportgen.dom.Border | mlreportgen.dom.TableColSpec |
mlreportgen.dom.TableEntry | mlreportgen.dom.TableRow
12-28
mlreportgen.dom.CharEntity class
mlreportgen.dom.CharEntity class
Package: mlreportgen.dom
Create character entity reference
Description
Create a reference to a character entity reference.
Construction
charEntityObj = CharEntity() creates a reference to a non-breaking space ( )
entity. Appending this reference to a document causes a nonbreaking space to be
inserted.
charEntityObj = CharEntity(name) creates a reference to the character entity
specified by name.
charEntityObj = CharEntity(name,n) creates n references to the character entity
specified by name, that is, a string of n special characters.
Input Arguments
name — Specify character entity name
string
String must be a name that is listed at http://en.wikipedia.org/wiki/
List_of_XML_and_HTML_character_entity_references.
n — Number of character entities to use
integer
Number of character entities to use, specified as an integer.
Data Types: uint16
12-29
12
Classes – Alphabetical List
Output Arguments
charEntityObj — Reference to a character entity
mlreportgen.dom.CharEntity object
Reference to a character entity, represented by an mlreportgen.dom.CharEntity
object.
Properties
BackgroundColor — Background color
string
Specify one of these as a string:
• The name of a color. The name must be a CSS color name. See http://
www.crockford.com/wrrrld/color.html.
• A hexadecimal RGB (truecolor) value as #RRGGBB. For example, #0000ff is a shade
of blue.
Bold — Option to use bold for number
logical value
To make text bold, set this property to true or 1. If this property is empty and the
StyleName property for this document element specifies a style sheet style, the weight of
the number is determined by that style. Setting the Bold property adds a corresponding
mlreportGen.dom.Bold format object to the Style property of this document element.
Removing the Bold property setting removes the object.
Data Types: logical
Color — Text color
string
Specify one of these as a string:
• The name of a color. The name must be a CSS color name. See http://
www.crockford.com/wrrrld/color.html.
• A hexadecimal RGB (truecolor) value as #RRGGBB. For example, #0000ff is a shade
of blue.
12-30
mlreportgen.dom.CharEntity class
Content — Text string contained by this document element
string
Text string contained by this document element.
CustomAttributes — Custom attributes of document element
array of mlreportgen.dom.CustomAttribute objects
HTML or Microsoft Word must support the custom attributes of this document element.
FontFamilyName — Name of font family for text
string
The name of a font family.
To specify substitutions for this font, do not set this property. Instead create and add a
mlreportgen.dom.FontFamily object to the Style property of this document element.
Setting the FontFamilyName property adds a corresponding
mlreportGen.dom.FontFamily format object to the Style property for this document
element. Removing the FontFamilyName property setting removes the object.
FontSize — Font size
string
If you need to specify substitutions for this font, do not set this property. Instead
create and add a mlreportgen.dom.FontFamily object to the Style property of this
document element.
Setting the FontSize property adds a corresponding mlreportGen.dom.FontSize
format object to the Style property for this document element. Removing the FontSize
property setting removes the object.
String having the format valueUnits, where Units is an abbreviation for the units in
which the font size is expressed. Use one of these abbreviations for the units for the font
size.
• no abbreviation — pixels
• cm — centimeters
• in — inches
• mm — millimeters
12-31
12
Classes – Alphabetical List
• pi — picas
• pt — points
• px — pixel
Id — ID for document element
string
A session-unique ID is generated as part of document element creation. You can specify
an ID to replace the generated ID.
Italic — Option to use italics for number
logical value
To use italics for a number, set this property to true. If this property is empty and
the StyleName property for this document element specifies a style sheet style, the
slant of the number is determined by that style. Setting the Italic property adds a
corresponding mlreportGen.dom.Italic format object to the Style property of this
document element. Removing the Italic property setting removes the object.
Data Types: logical
Name — Name of character entity
string
The name is a character entity listed in http://en.wikipedia.org/wiki/
List_of_XML_and_HTML_character_entity_references.
Data Types: logical
Repeat — Number of times to repeat character entity
numeric value
Number of times to repeat character entity, specified as a numeric value.
Data Types: double
Strike — Text strikethrough
string
The default for this property is []. You can set it to one of these values:
• none — Do not use strikethrough for Word and HTML documents
• single — Use a single line for strikethrough for Word and HTML documents
12-32
mlreportgen.dom.CharEntity class
• double — Use a double line for strikethrough for Word documents
Setting the Strike property adds a corresponding mlreportGen.dom.Strike format
object to the Style property for this document element. Removing the Strike property
setting removes the object.
Style — Number formatting
array of mlreportgen.dom.DOCXSection objects
An array of mlreportgen.dom.DOCXSection objects that specifies the format for the
number.
StyleName — Style for number
string
The style specified by styleName must be defined in the template used to create the
document element to which this number is appended.
Tag — Tag for document element
string
Tag for document element, specified as a string.
A session-unique ID is generated as part of document element creation. The generated
tag has the form CLASS:ID, where CLASS is the class of the element and ID is the value
of the Id property of the object. You can specify a tag to replace the generated tag.
Specify your own tag value, for example, to make it easier to identify where an issue
occurred during document generation.
Underline — Type of underline, if any, for text
[] (default) | string
You can specify one of the following types of underlines.
Border String
Description
Supported Output Types
dash
Dashed underline
Word
dashedHeavy
Line with heavy dashes
Word
dashLong
Line with long dashes
Word
dashLongHeavy
Line with heavy long
dashes
Word
12-33
12
Classes – Alphabetical List
Border String
Description
Supported Output Types
dashDotDotHeavy
Line with heavy dashes
with two dots between
the dashes
Word
dashDotHeavy
Heavy dash-dot line
Word
dotted
Dotted line
Word
dottedHeavy
Thick dotted line
Word
dotDash
Dot-dash line
Word
dotDotDash
Dot-dot-dash line
Word
dashDotHeavy
Heavy dot-dash line
Word
double
Double line
Word
none
Do not use underlining
HTML and Word
single
Single line
HTML and Word
thick
Thick line
Word
wave
Wavy line
Word
waveyDouble
Double wavy line
Word
waveyHeavy
Heavy wavy
Word
words
Underline non-space
characters only
Word
If this property is empty and StyleName property of this document element specifies a
style sheet style, the type of underline is determined by that style.
To specify the color as well as the type of the underline, do not set the Underline
property. Instead, set the Style property of this document element to include an
mlreportgen.dom.Underline format object that specifies the desired underline type
and color.
Setting the Underline property adds a corresponding mlreportgen.dom.Underline
format object to the Style property for this document element. Removing the
Underline property setting removes the object.
WhiteSpace — White space and line breaks in text
[] (default) | string
12-34
mlreportgen.dom.CharEntity class
To specify how to handle white space, use one of the following strings.
Border String
Description
Supported Output Types
normal
Does not preserve white
space and line breaks
Word and HTML
nowrap
Sequences of white space
collapse into a single white
space. Text never wraps to
the next line.
HTML
preserve
Preserves white space. Text Word and HTML
wraps only on line breaks.
See below for details.
Acts like the <pre> tag in
HTML.
pre
Preserves white space. Text HTML
wraps only on line breaks.
Acts like the <pre> tag in
HTML.
pre-line
Sequences of white space
collapse into a single white
space. Text wraps.
pre-wrap
Preserves white space. Text HTML
wraps when necessary and
on line breaks
HTML
If you want to view HTML output in the MATLAB browser and you want to preserve
white space and wrap text only on line breaks, use the preserve setting rather than the
pre setting.
Setting the WhiteSpace property adds a corresponding WhiteSpace format object to
Style property. Removing the WhiteSpace property setting removes the WhiteSpace
object.
Methods
Method
Purpose
append
Append a custom element to this character
entity.
12-35
12
Classes – Alphabetical List
Method
Purpose
Use CharEntity.append in a similar way
to how you use ExternalLink.append.
clone
Clone this character entity.
Use CharEntity.clone in a similar way
to how you use Paragraph.clone.
Examples
Append a British Pound Sign
import mlreportgen.dom.*;
doctype = 'html';
d = Document('test',doctype);
p = Paragraph(CharEntity('pound'));
append(d,p);
append(p,'3');
close(d);
rptview('test',doctype);
Append Two Nonbreaking Spaces
import mlreportgen.dom.*;
doctype = 'html';
d = Document('test',doctype);
p = Paragraph('Some text');
append(d,p);
ce = CharEntity('nbsp',5);
append(p,ce);
append(p,'more text after five blank spaces');
close(d);
rptview('test',doctype);
See Also
mlreportgen.dom.Paragraph | mlreportgen.dom.Text
12-36
mlreportgen.dom.CharEntity class
More About
•
“Report Formatting Approaches” on page 13-20
12-37
12
Classes – Alphabetical List
mlreportgen.dom.Color class
Package: mlreportgen.dom
Color of document element
Description
Specifies the color of a document element.
Construction
colorObj = Color() creates a black color object.
colorObj = Color(colorName) creates a color object based on the specified CSS color
name.
colorObj = Color(rgbValue) creates a color object using the hexidecimal RGB color
value.
Input Arguments
colorName — Name of color
string
Name of a color. The name must be a CSS color name. See http://www.crockford.com/
wrrrld/color.html.
rgbValue — Hexidecimal RGB (red, green, blue) color value
string
A string using the following RGB format: #RRGGBB. Use # as the first character and twodigit hexidecimal numbers for each for the red, green, and blue values. For example,
'#0000ff' specifies blue.
Output Arguments
colorObj — Color for document element
mlreportgen.dom.Color object
12-38
mlreportgen.dom.Color class
Color for document element, represented by an mlreportgen.dom.Color object.
Properties
HexValue — hexidecimal color value (read-only)
string
Hexadecimal number representing an RGB color value. For example, '#8b008b'
specifies dark magenta. You can use either uppercase or lowercase letters as part of a
hexadecimal value.
Id — ID for document element
string
A session-unique ID is generated as part of document element creation. You can specify
an ID to replace the generated ID.
Tag — Tag for document element
string
Tag for document element, specified as a string.
A session-unique ID is generated as part of document element creation. The generated
tag has the form CLASS:ID, where CLASS is the class of the element and ID is the value
of the Id property of the object. You can specify a tag to replace the generated tag.
Specify your own tag value, for example, to make it easier to identify where an issue
occurred during document generation.
Value — CSS color name or hexidecimal RGB value for this color
string
Either a CSS color name or a hexidecimal RGB value.
Examples
Create and Apply a Color Object
Create a blue color object and apply it to a paragraph. Instead of specifying the CSS color
name 'blue', you could use the hexadecimal value '#0000ff'.
12-39
12
Classes – Alphabetical List
import mlreportgen.dom.*;
doctype = 'html';
d = Document('test',doctype);
colorfulStyle = {Bold,Color('blue')};
p = Paragraph('deep sky blue paragraph');
p.Style = colorfulStyle;
append(d,p);
close(d);
rptview('test',doctype);
See Also
mlreportgen.dom.BackgroundColor
More About
•
12-40
“Report Formatting Approaches” on page 13-20
mlreportgen.dom.ColSep class
mlreportgen.dom.ColSep class
Package: mlreportgen.dom
Draw lines between table columns
Description
Draw lines between table columns.
Construction
colSepObj = ColSep() creates unspecified column separators.
colSepObj = ColSep(style) creates a column separator of the specified style.
colSepObj = ColSep(style,color) creates a column separator having the specified
style and color.
colSepObj = ColSep(style,color,width) creates a column separator having the
specified style, color, and width.
Input Arguments
style — Style of column separator in table
string
String specifying the style of the table column separator.
String
Applies To
DOCX
HTML
'dashed'
X
X
'dashdotstroked'
X
12-41
12
Classes – Alphabetical List
String
DOCX
HTML
'dashsmallgap'
X
'dotted'
X
X
'dotdash'
X
'dotdotdash'
X
'double'
X
X
'doublewave'
X
'inset'
X
X
'none'
X
X
'outset'
X
X
'single'
X
'solid'
X
'thick'
X
'thickthinlargegap'
X
'thickthinmediumgap'
X
'thickthinsmallgap'
X
'thinthicklargegap'
X
'thinthickmediumgap'
X
'thinthicksmallgap'
X
'thinthickthinlargegap'
X
'thinthickthinmediumgap'
X
'thinthickthinsmallgap'
X
'threedemboss'
X
'threedengrave'
X
'triple'
X
'wave'
X
color — Color of column separator in table
string
12-42
Applies To
mlreportgen.dom.ColSep class
You can specify:
• The name of a color. The name must be a CSS color name. See http://
www.crockford.com/wrrrld/color.html.
• A hexadecimal RGB (truecolor) value as #RRGGBB. For example, #0000ff is a shade
of blue.
width — Width of column separator in the table
string
String specifying the color of the table column separator. String must have the format
valueUnits where Units is an abbreviation for the units in which the width size is
expressed. Valid abbreviations are:
• no abbreviation — pixels
• cm — centimeters
• in — inches
• mm — millimeters
• pi — picas
• pt — points
• px — pixel
Output Arguments
colSepObj — Column separator definition
mlreportgen.dom.ColSpec object
Column separator definition, represented by an mlreportgen.dom.ColSpec object.
Properties
Color — Separator color
string
You can specify:
• The name of a color. The name must be a CSS color name. See http://
www.crockford.com/wrrrld/color.html.
12-43
12
Classes – Alphabetical List
• A hexadecimal RGB (truecolor) value as #RRGGBB. For example, #0000ff is a shade
of blue.
Id — ID for document element
string
A session-unique ID is generated as part of document element creation. You can specify
an ID to replace the generated ID.
Style — Format for separator
array of format objects
Array of format objects (such as Bold objects) that specify the format for the separator.
This property overrides corresponding formats defined by the stylesheet style specified by
the StyleName property.
Tag — Tag for document element
string
Tag for document element, specified as a string.
A session-unique ID is generated as part of document element creation. The generated
tag has the form CLASS:ID, where CLASS is the class of the element and ID is the value
of the Id property of the object. You can specify a tag to replace the generated tag.
Specify your own tag value, for example, to make it easier to identify where an issue
occurred during document generation.
Width — Separator width
string
String representing a percentage (for example, '100%') or a number of units of
measurement, having the format valueUnits, where Units is an abbreviation for the
units in which the width is expressed.
The string has the format valueUnits, where Units is an abbreviation for the units in
which the width is expressed. Use one of these abbreviations for the units of a width.
• no abbreviation — pixels
• cm — centimeters
• in — inches
12-44
mlreportgen.dom.ColSep class
• mm — millimeters
• pi — picas
• pt — points
• px — pixel
Data Types: char
Examples
Specify Table Column Formatting
Set the width and color of the first column of a table.
import mlreportgen.dom.*
doc = Document('myTableColReport','docx');
grps(1) = TableColSpecGroup;
grps(1).Span = 1;
grps(1).Style = {Color('red'),Width('1in')};
table = Table(magic(5));
table.ColSpecGroups = grps;
append(doc,table);
close(doc);
rptview('myTableColReport','docx');
•
“Create and Format Tables” on page 13-58
See Also
mlreportgen.dom.RowSep
12-45
12
Classes – Alphabetical List
mlreportgen.dom.Container class
Package: mlreportgen.dom
Container of document objects
Description
Creates a container element. Use the mlreportgen.dom.Container.append method
to append document elements to the container. Use an mlreportgen.dom.Container
object in an HTML or Microsoft Word report to apply formats to all of the children of the
container.
In HTML output, a Container object generates an HTML element of the type specified
by its HTMLTag property and containing HTML elements corresponding to its DOM
contents. For example, a Container object with the HTMLTag property div and that
contains the text Hello World generates this markup:
<div><p><span>Hello World</span></p></div>
The generated HTML container element has the class and style properties specified
by the Container object StyleName and Style properties, respectively. The rules of
HTML CSS format inheritance assure that the generated children of the Container
object inherit the formats specified by the Container object Style and StyleName
properties. For example, if the Container object specifies red as its text color and none
of its text children specify a color, the text children are colored red.
For Microsoft Word report output, a Container object simulates container format
inheritance, applying the formats specified by the Container object Style attribute
to each child, unless overridden by the child, and then appending the child to the
Word output. The Word output ignores the HTMLTag and StyleName properties of the
Container object.
Tip You can use mlreportgen.dom.Container or mlreportgen.dom.Group objects to
produce collections of document elements.
• Use a container object to apply format inheritance to a set of objects and to create
HTML container elements not otherwise supported by the DOM, such as div, section,
and article.
12-46
mlreportgen.dom.Container class
• Use a group object to append the same content in multiple places in a document
without cloning the group.
Construction
containerObj = Container() creates a container with an HTML tag name div.
containerObj = Container(HTMLtag) creates a container with the specified HTML
tag name (for example, div, section, or article).
Input Arguments
HTMLtag — HTML container tag name
string
HTML container tag name, specified as a string. The name must be an HTML element,
such as 'div', 'section', or 'article'.
Note: Word output ignores the HTML container tag.
Output Arguments
containerObj — Container of document objects
mlreportgen.dom.Container object
Container of document objects, returned as an mlreportgen.dom.Container object.
Properties
Id — ID for document element
string
A session-unique ID is generated as part of document element creation. You can specify
an ID to replace the generated ID.
12-47
12
Classes – Alphabetical List
Children — Children of container
cell array of mlreportgen.dom.Element objects
This read-only property lists child elements that the container contains.
HTMLTag — HTML tag name of container
string
HTML container tag name, specified as a string. The name must be an HTML element,
such as 'div', 'section', or 'article'.
Note: Word output ignores the HTML container tag.
Parent — Parent of document element
DOM object
This read-only property lists the parent of this document element.
Style — Format specification
array of format objects
Format specification, specified as an array of format objects. The formats specified by
this property override corresponding formats defined by the stylesheet style specified by
the StyleName property of this element. Formats that do not apply to this element are
ignored.
StyleName — Style name
string
Style name, specified as a string. The style name is the name of a style specified in the
stylesheet of the document or document part to which this element is appended. The
specified style defines the appearance of this element in the output document where not
overridden by the formats specified by the Style property of this element.
Note: Word output ignores the style name.
Tag — Tag for document element
string
12-48
mlreportgen.dom.Container class
Tag for document element, specified as a string.
A session-unique ID is generated as part of document element creation. The generated
tag has the form CLASS:ID, where CLASS is the class of the element and ID is the value
of the Id property of the object. You can specify a tag to replace the generated tag.
Specify your own tag value, for example, to make it easier to identify where an issue
occurred during document generation.
Methods
Examples
Create Container for Word Report Formatting
Create a container object. Word output ignores the HTML container element tag (in this
example, the div tag).
import mlreportgen.dom.*;
rpt = Document('MyReport','docx');
c = Container();
Color all of the container text red.
c.Style = {Color('red')};
Append content to the container and append the container to the report.
append(c,Paragraph('Hello'));
append(c,Table(magic(5)));
append(rpt,c);
Close and generate the report.
close(rpt);
rptview(rpt.OutputPath);
•
“Create Object Containers” on page 13-26
•
“Add Content as a Group” on page 13-14
12-49
12
Classes – Alphabetical List
See Also
mlreportgen.dom.Group
Introduced in R2015a
12-50
mlreportgen.dom.CoreProperties class
mlreportgen.dom.CoreProperties class
Package: mlreportgen.dom
OPC core properties of document or template
Description
OPC core properties of a document or template.
Construction
corePropsObj = CoreProperties() creates an empty core properties object. Core
properties are metadata stored in a document OPC package that describe various
properties of the document. Windows Explorer displays some of the core properties when
you select a document.
Output Arguments
corePropsObj — OPC core properties
mlreportgen.dom.CoreProperties object
OPC core properties, represented by an mlreportgen.dom.CoreProperties object.
Properties
Category — Category of document
string
Category of a document, specified as a string.
ContentStatus — Content status of document
string
Content status of a document, specified as a string.
12-51
12
Classes – Alphabetical List
Creator — Creator of document
string
Creator of a document, specified as a string.
Description — Description of document
string
Description of a document, specified as a string.
Id — ID for document element
string
A session-unique ID is generated as part of document element creation. You can specify
an ID to replace the generated ID.
Identifier — Identifier for document
string
Identifier for a document, specified as a string.
Keywords — Keywords associated with document
array of strings
Keywords associated with a document, specified as a string.
Language — Language of document
string
Language of a document, specified as a string.
LastModifiedBy — Agent that last modified this document
string
Agent that last modified this document, specified as a string.
Revision — Revision of document
string
Revision of a document, specified as a string.
Subject — Subject of document
string
12-52
mlreportgen.dom.CoreProperties class
Subject of a document, specified as a string.
Tag — Tag for document element
string
Tag for document element, specified as a string.
A session-unique ID is generated as part of document element creation. The generated
tag has the form CLASS:ID, where CLASS is the class of the element and ID is the value
of the Id property of the object. You can specify a tag to replace the generated tag.
Specify your own tag value, for example, to make it easier to identify where an issue
occurred during document generation.
Title — Title of document
string
Title of a document, specified as a string.
Version — Version of document
string
Version of a document, specified as a string.
See Also
mlreportgen.dom.Document.getCoreProperties |
mlreportgen.dom.Document.setCoreProperties
More About
•
“Report Packages” on page 13-17
12-53
12
Classes – Alphabetical List
mlreportgen.dom.CounterInc class
Package: mlreportgen.dom
Number stream counter incrementer
Description
Creates a numbering stream counter incrementer.
Construction
counterIncObj = CounterInc() creates an empty counter incrementer.
counterIncObj = CounterInc(streamName) creates a counter incrementer for
the specified numbering stream. Assigning this format to the style of a DOM object
causes the associated stream counter to be incremented when the object is appended to a
document.
Input Arguments
streamName — Numbering stream name
string
Numbering stream name, specified as a string.
Output Arguments
counterIncObj — Numbering stream counter incrementer
mlreportgen.dom.CounterInc object
Numbering stream counter incrementer, represented by an
mlreportgen.dom.CounterInc object.
Properties
Id — ID for document element
string
12-54
mlreportgen.dom.CounterInc class
A session-unique ID is generated as part of document element creation. You can specify
an ID to replace the generated ID.
StreamName — Numbering stream name
string
Numbering stream name, specified as a string.
Tag — Tag for document element
string
Tag for document element, specified as a string.
A session-unique ID is generated as part of document element creation. The generated
tag has the form CLASS:ID, where CLASS is the class of the element and ID is the value
of the Id property of the object. You can specify a tag to replace the generated tag.
Specify your own tag value, for example, to make it easier to identify where an issue
occurred during document generation.
Examples
Increment Chapter Numbering
import mlreportgen.dom.*;
doctype = 'html';
d = Document('test',doctype);
p = Paragraph('Chapter ');
p.Style = {CounterInc('chapter'),WhiteSpace('preserve')};
append(p,AutoNumber('chapter'));
append(d,p);
p = Paragraph('Chapter ');
p.Style = {CounterInc('chapter'), WhiteSpace('preserve')};
append(p,AutoNumber('chapter'));
append(d,p);
close(d);
rptview('test',doctype);
•
“Automatically Number Document Content” on page 13-86
12-55
12
Classes – Alphabetical List
See Also
mlreportgen.dom.AutoNumber | mlreportgen.dom.AutoNumberStream |
mlreportgen.dom.CounterReset
12-56
mlreportgen.dom.CounterReset class
mlreportgen.dom.CounterReset class
Package: mlreportgen.dom
Reset numbering stream counter
Description
Reset a numbering stream counter.
Construction
counterResetObj = CounterReset() creates an empty counter reset object.
counterResetObj = CounterReset(streamName) creates a counter resetter for the
specified numbering stream. Assigning this format to the style of a DOM object causes
the associated stream counter to be reset to its initial value when the object is appended
to a document.
Input Arguments
streamName — Numbering stream name
string
Numbering stream name, specified as a string.
Output Arguments
reset — Numbering stream counter reset
mlreportgen.dom.CounterReset object
Numbering stream counter reset, represented by an mlreportgen.dom.CounterReset
object.
Properties
Id — ID for document element
string
12-57
12
Classes – Alphabetical List
A session-unique ID is generated as part of document element creation. You can specify
an ID to replace the generated ID.
StreamName — Numbering stream name
string
Numbering stream name, specified as a string.
Tag — Tag for document element
string
Tag for document element, specified as a string.
A session-unique ID is generated as part of document element creation. The generated
tag has the form CLASS:ID, where CLASS is the class of the element and ID is the value
of the Id property of the object. You can specify a tag to replace the generated tag.
Specify your own tag value, for example, to make it easier to identify where an issue
occurred during document generation.
Examples
Reset Numbering for Chapters and Tables
import mlreportgen.dom.*;
doctype = 'html';
d = Document('test',doctype);
p = Paragraph('Chapter ');
p.Style = {CounterInc('chapter'),CounterReset('table'),...
WhiteSpace('preserve') };
append(p,AutoNumber('chapter'));
append(d,p);
p = Paragraph('Table ');
append(p,AutoNumber('chapter'));
append(p,'.');
append(p,AutoNumber('table'));
p.Style = {CounterInc('table'),WhiteSpace('preserve') };
append(d,p);
p = Paragraph('Chapter ');
12-58
mlreportgen.dom.CounterReset class
p.Style = {CounterInc('chapter'),CounterReset('table'),...
WhiteSpace('preserve')};
append(p,AutoNumber('chapter'));
append(d,p);
p = Paragraph('Table ');
append(p,AutoNumber('chapter'));
append(p,'.');
append(p, AutoNumber('table'));
p.Style = {CounterInc('table'),WhiteSpace('preserve')};
append(d,p);
close(d);
rptview('test',doctype);
•
“Automatically Number Document Content” on page 13-86
See Also
mlreportgen.dom.AutoNumber | mlreportgen.dom.AutoNumberStream |
mlreportgen.dom.CounterInc
12-59
12
Classes – Alphabetical List
mlreportgen.dom.CustomAttribute class
Package: mlreportgen.dom
Custom element attribute
Description
Custom element attribute.
Construction
customAttributeObj = CustomAttribute() creates an empty custom attribute.
customAttributeObj = CustomAttribute(name) creates an attribute having the
specified name.
customAttributeObj = CustomAttribute(name,value) creates an attribute
having the specified name and value.
Input Arguments
name — Attribute name
string
Attribute name, specified as a string.
value — Attribute value
string
Attribute value, specified as a string.
Output Arguments
customAttributeObj — Custom attribute
mlreportgen.dom.CustomAttribute object
Custom attribute, represented by an mlreportgen.dom.CustomAttribute object.
12-60
mlreportgen.dom.CustomAttribute class
Properties
Id — ID for document element
string
A session-unique ID is generated as part of document element creation. You can specify
an ID to replace the generated ID.
Name — Attribute name
string
Attribute name, specified as a string.
Tag — Tag for document element
string
Tag for document element, specified as a string.
A session-unique ID is generated as part of document element creation. The generated
tag has the form CLASS:ID, where CLASS is the class of the element and ID is the value
of the Id property of the object. You can specify a tag to replace the generated tag.
Specify your own tag value, for example, to make it easier to identify where an issue
occurred during document generation.
Value — Value of this attribute
string
Value of this attribute, specified as a string.
Examples
Create Custom Attributes for a List
This example shows how to define custom attributes and append them to an unordered
list.
import mlreportgen.dom.*;
d = Document('test');
ul = UnorderedList();
12-61
12
Classes – Alphabetical List
li = ListItem('Owl');
li.CustomAttributes = {CustomAttribute('data-animal-type','bird')};
append(ul,li);
li = ListItem('Salmon');
li.CustomAttributes = {CustomAttribute('data-animal-type','fish')};
append(ul,li);
li = ListItem('Tarantula');
li.CustomAttributes = {CustomAttribute('data-animal-type','spider')};
append(ul,li);
append(d,ul);
close(d);
rptview('test','html');
See Also
mlreportgen.dom.CustomElement | mlreportgen.dom.CustomText
12-62
mlreportgen.dom.CustomElement class
mlreportgen.dom.CustomElement class
Package: mlreportgen.dom
Custom element of document
Description
Use a custom element to extend the DOM API. You can create a custom HTML or
Microsoft Word element that provides functionality not yet included in the DOM API.
Construction
customElementObj = CustomElement() creates an empty element.
customElementObj = CustomElement(name) creates a custom element having the
specified name.
Input Arguments
name — Custom element name
string
Name of an element supported by the type of document to which this custom element is
appended. For example, specify 'div' for a custom HTML div element or 'w:p' for a
custom Word paragraph element.
Output Arguments
customElementObj — Custom element
mlreportgen.dom.CustomElement object
Custom element, represented by an mlreportgen.dom.CustomElement object.
Properties
CustomAttributes — Custom attributes of document element
array of mlreportgen.dom.CustomAttribute objects
12-63
12
Classes – Alphabetical List
HTML or Microsoft Word must support the custom attributes of this document element.
Id — ID for document element
string
A session-unique ID is generated as part of document element creation. You can specify
an ID to replace the generated ID.
Name — Element name
string
Element name, specified as a string.
Style — Format specification
array of format objects
This property is ignored.
StyleName — Name of custom element style
string
This property is ignored.
Tag — Tag for document element
string
Tag for document element, specified as a string.
A session-unique ID is generated as part of document element creation. The generated
tag has the form CLASS:ID, where CLASS is the class of the element and ID is the value
of the Id property of the object. You can specify a tag to replace the generated tag.
Specify your own tag value, for example, to make it easier to identify where an issue
occurred during document generation.
Methods
12-64
Method
Purpose
append
Append a custom element to the document
element
mlreportgen.dom.CustomElement class
Method
Purpose
clone
Copy custom element.
Use CustomElement.clone similar to
how you use Paragraph.clone.
Examples
Create a Check Box Custom Element
This example shows how to add a custom element that provides a check box in an HTML
report.
Create and a custom element and append text to it.
import mlreportgen.dom.*;
d = Document('test');
input1 = CustomElement('input');
input1.CustomAttributes = {
CustomAttribute('type', 'checkbox'), ...
CustomAttribute('name', 'vehicle'), ...
CustomAttribute('value', 'Bike'), ...
};
append(input1, Text('I have a bike'));
Append the custom element to an ordered list and display the report.
ol = OrderedList({input1});
append(d,ol);
close(d);
rptview('test','html');
See Also
mlreportgen.dom.CustomAttribute | mlreportgen.dom.CustomText
12-65
12
Classes – Alphabetical List
mlreportgen.dom.CustomText class
Package: mlreportgen.dom
Plain text appended to custom element
Description
Plain text string to append to a custom element.
Construction
customTextObj = CustomText() creates an empty CustomText object.
customTextObj = CustomText(text) creates a CustomText object containing the
specified text string.
Input Arguments
text — Text string to append to custom element
string
Text specified as a string.
Output Arguments
customTextObj — Text string to append to custom element
mlreportgen.dom.CustomText object
Text to append to a custom element, represented by an mlreportgen.dom.CustomText
object.
Properties
Id — ID for document element
string
12-66
mlreportgen.dom.CustomText class
A session-unique ID is generated as part of document element creation. You can specify
an ID to replace the generated ID.
Parent — Parent of document element
DOM object
This read-only property lists the parent of this document element.
Tag — Tag for document element
string
Tag for document element, specified as a string.
A session-unique ID is generated as part of document element creation. The generated
tag has the form CLASS:ID, where CLASS is the class of the element and ID is the value
of the Id property of the object. You can specify a tag to replace the generated tag.
Specify your own tag value, for example, to make it easier to identify where an issue
occurred during document generation.
Value — Text to add
string
Text to add to a custom element, specified as a string.
Examples
Create Custom Text for a Script
import mlreportgen.dom.*;
d = Document('test');
script = CustomElement('script');
append(script,CustomText('document.write("Hello World!")'));
append(d,script);
close(d);
rptview('test','html');
See Also
mlreportgen.dom.CustomAttribute | mlreportgen.dom.CustomElement
12-67
12
Classes – Alphabetical List
mlreportgen.dom.DebugMessage class
Package: mlreportgen.dom
Debugging message
Description
Creates debugging message text originating from the specified source object.
Construction
debugMsgObj = DebugMessage(text,sourceObject) creates a debugging message
with the specified text, originating from the specified source object.
Input Arguments
text — Message text
string
The text to display for the message.
sourceObject — DOM object from which message originates
a DOM object
The DOM object from which the message originates.
Output Arguments
debugMsgObj — Debugging message
mlreportgen.dom.DebugMessage object
Debug message, represented by an mlreportgen.dom.DebugMessage object.
Properties
Id — ID for document element
string
12-68
mlreportgen.dom.DebugMessage class
A session-unique ID is generated as part of document element creation. You can specify
an ID to replace the generated ID.
Source — Source object message originates from
a DOM object
Source DOM object from which the message originates.
Tag — Tag for document element
string
Tag for document element, specified as a string.
A session-unique ID is generated as part of document element creation. The generated
tag has the form CLASS:ID, where CLASS is the class of the element and ID is the value
of the Id property of the object. You can specify a tag to replace the generated tag.
Specify your own tag value, for example, to make it easier to identify where an issue
occurred during document generation.
Text — Text of the message
string
Message text, specified as a string.
Methods
Use DebugMessage methods similar to how you use ProgressMessage methods.
Method
Purpose
formatAsHTML
Format message as HTML.
formatAsText
Format message as text.
passesFilter
Determine whether message passes filter.
Examples
Create a Debug Message
Create the report document.
12-69
12
Classes – Alphabetical List
import mlreportgen.dom.*;
d = Document('test','html');
Create the listener and add to the message dispatcher.
dispatcher = MessageDispatcher.getTheDispatcher;
dispatcher.Filter.ErrorMessagesPass = true;
dispatcher.Filter.ProgressMessagesPass = false;
l = addlistener(dispatcher,'Message', ...
@(src, evtdata) disp(evtdata.Message.formatAsText));
Create the message and dispatch it before opening.
msg = ErrorMessage('Invalid slide',pre);
dispatch(dispatcher, msg);
open(pre);
Add report content.
p = Paragraph('Chapter ');
p.Tag = 'chapter title';
p.Style = { CounterInc('chapter'),...
CounterReset('table'),WhiteSpace('pre') };
append(p, AutoNumber('chapter'));
append(d,p);
Run report.
close(d);
rptview('test','html');
Delete the listener to avoid duplicate reporting of message objects during a MATLAB
session.
delete(l);
•
“Display Report Generation Messages” on page 13-106
See Also
mlreportgen.dom.MessageDispatcher.dispatch
12-70
mlreportgen.dom.Display class
mlreportgen.dom.Display class
Package: mlreportgen.dom
Display option for DOM objects
Description
For Microsoft Word reports, specifies whether to display an mlreportgen.dom.Text
object. For HTML reports, specifies how to display DOM objects such as text, paragraphs,
images, and list items.
Construction
disp = Display() in an HTML report displays a DOM object as an inline element.
Word reports ignore mlreportgen.dom.Display objects that you create with this
syntax.
disp = Display(value) applies the specified display value to the DOM object. For
Word reports, the display option you can use is none and the only DOM object it applies
to is a Text object.
Input Arguments
value — Display option
string
Display option, specified as a string. The default option is inline.
For Microsoft Word reports, the only supported option is none.
Value
Display of Text or Paragraph Object
inline
Inline element (similar to an HTML <span> element). (Default)
block
Block element (similar to an HTML <span> element).
flex
Block-level flex container.
initial
Uses the default value of inline.
12-71
12
Classes – Alphabetical List
Value
Display of Text or Paragraph Object
inline-block
Inline-level block container. Displays the inside of the block as a
block-level box, and formats the object itself as an inline-level box.
inline-flex
Inline-level flex container.
inline-table
Inline-level table.
list-item
Similar to an HTML <li> bulleted list element.
none
Not displayed (has no effect on layout).
This is the only display option that applies to Word reports. In
Word, if you enable File > Options > Display > Hidden text, the
text displays in the report.
run-in
As block or inline, depending on the context. For example, if the
object is inside a block, the object displays as a block.
table
Similar to an HTML <table> element.
table-caption
Similar to an HTML <caption> element.
table-cell
Similar to an HTML <td> element.
table-column
Similar to an HTML <col> element.
table-columngroup
Similar to an HTML <colgroup> element.
table-footergroup
Similar to an HTML <tfoot> element.
table-headergroup
Similar to an HTML <thead> element.
table-row
Similar to an HTML <tr> element.
table-row-group Similar to an HTML <tbody> element.
Note: The Display class does not support the CSS display value of inherit.
For details about the CSS display property, see http://www.w3schools.com/cssref/
pr_class_display.asp.
12-72
mlreportgen.dom.Display class
Properties
Id — ID for Display object
string
A session-unique ID is generated as part of Display object creation. You can specify an
ID to replace the generated ID.
Tag — Tag for Display object
string
Tag for Display object, specified as a string.
A session-unique ID is generated as part of HTML object creation. The generated tag has
the form CLASS:ID, where CLASS is the class of the element and ID is the value of the
Id property of the object. You can specify a tag to replace the generated tag.
Specify your own tag value, for example, to make it easier to identify where an issue
occurred during presentation generation.
Value — Display option
string
Display option, specified as a string. For a list of options, see the description of the value
constructor input argument.
Examples
Hide Text in a Paragraph
In Word, make sure the File > Options > Display > Hidden text option is cleared. This
is the default setting.
import mlreportgen.dom.*;
rpt = Document('MyDispRep','docx');
t1 = Text('Hello');
t1.Style = {Display('none')};
p1 = Paragraph();
append(p1,t1);
12-73
12
Classes – Alphabetical List
t2 = Text('World');
append(p1,t2);
append(rpt,p1);
close(rpt);
rptview('MyDispRep','docx');
See Also
mlreportgen.dom.Text
More About
•
“Report Formatting Approaches” on page 13-20
External Websites
•
http://www.w3schools.com/cssref/pr_class_display.asp
•
www.w3schools.com/tags
•
www.w3schools.com/cssref
Introduced in R2015b
12-74
mlreportgen.dom.Document class
mlreportgen.dom.Document class
Package: mlreportgen.dom
Report definition document
Description
Create mlreportgen.dom.Document object that defines:
• The type of output (HTML or Microsoft Word)
• Where and how to store the output
• The template to use
To generate a PDF report, create a Word report and use the rptview function with the
'pdf' argument to convert the Word report to PDF.
Construction
documentObj = Document() creates an HTML document named Untitled.htmx in
the current directory, using the default HTML template.
documentObj = Document(outputPath) creates an HTML document at the specified
location.
documentObj = Document(outputPath,type) creates a document of the specified
type (for example, Word), using the default template for that type.
documentObj = Document(outputPath,type,templatePath) creates a document,
using the specified document type and Word or HTML template corresponding to the
type setting.
Input Arguments
outputPath — Path for the output file generated by the document
string
12-75
12
Classes – Alphabetical List
Full path of output file or folder for this document. If you do not specify a file extension,
the extension is based on the document type (for example, .docx for Microsoft Word).
When the document is open, you cannot set this property.
What you specify for the path depends on the value of the PackageType property.
• zipped— name of zip file
• unzipped— folder for the output files
• both— name of zip file
Data Types: char
type — Type of output
'html' (default) | 'docx' | 'html-file'
Type of output, specified as 'html', 'docx' or 'html-file'.
• 'html'— HTML output as a zipped or unzipped folder containing the HTML
document text, image, style sheet, and JavaScript® files
• 'docx'— Word output
• 'html-file'— HTML output consisting of a single file that contains the text, style
sheets, JavaScript, and images for the report
If you specify a template using the templatePath input argument, the template must be
consistent with the type argument. You must specify a Word template (.dotx) for Word
output, an HTML template package (.htmtx) for HTML output, and a single-file HTML
template (.html) for html-file output.
To generate a PDF report, create a Word report and use the rptview function with the
'pdf' argument to convert the Word report to PDF.
templatePath — The path of the document template
[] | string
If you do not want to use the default HTML or Word template, specify a template.
Full path of output file or folder for the template. If you do not specify a file extension,
the extension is based on the document type (for example, .docx for Word). Before
setting this property, close the document.
Data Types: char
12-76
mlreportgen.dom.Document class
Output Arguments
documentObj — Report definition document
mlreportgen.dom.Document object
Report definition document, represented by an mlreportgen.dom.Document object.
Properties
Children — Children of this document
cell array of mlreportgen.dom.Element objects
This read-only property lists child elements that the document element contains.
CurrentHoleId — Hole ID of current hole in document
string
This read-only property is the hole ID of the current hole in this document.
CurrentHoleType — Type of current hole
string
This read-only property is the type (inline or block) of the current template hole.
• An inline hole is for document elements that a paragraph element can contain: Text,
Image, LinkTarget, ExternalLink, InternalLink, CharEntity, AutoNumber.
• A block hole can contain a Paragraph, Table, OrderedList, UnorderedList,
DocumentPart, and Group.
CurrrentDOCXSection — The current section of Word document
mlreportgen.dom.DOCXSection object
This read-only property for a Word document is a mlreportgen.dom.DOCXSection
object that specifies the properties, as well as the headers and footers, of the current
document section. In HTML documents, the value of this property is always [].
ForceOverwrite — Option to overwrite existing output file
[] (default) | logical value
Set this property to true to overwrite an existing output file of the same name for a
report from this document. If this property is false, or if the existing output file is read12-77
12
Classes – Alphabetical List
only, then generating an output file using the same path as an existing output file causes
an error.
Data Types: logical
HTMLHeadExt — Custom content for HTML header
string
Custom content for HTML header, specified as a string.
Id — ID for document element
string
A session-unique ID is generated as part of document element creation. You can specify
an ID to replace the generated ID.
OutputPath — Path of output file or folder for this document
string
You cannot set this property once the document has been opened.
Path of this document's output file. If you do not specify the file extension, the DOM
interface adds an extension based on the output type of the document.
For unzipped output packaging, the path specifies the folder for the output files. The
default is the current folder.
PackageType — Packaging for files generated from this document
string
String specifying how to package the output files generated from this document. Use one
of these values:
• zipped (default)
• unzipped
• both
For zipped packaging, the document output is a zip file located at the location specified
by the OutputPath property. The zip file has the extension that matches the document
type: docx (for Word output) or htmx (for HTML output). For example, if the document
type is docx and OutputPath is s:\docs\MyDoc, the output is packaged in a zip file
named s:\docs\MyDoc.docx.
12-78
mlreportgen.dom.Document class
For unzipped packaging, the document output is stored in a folder having the root file
name of the OutputPath property. For example, if the OutputPath is s:\docs\MyDoc,
the output folder is s:\docs\MyDoc.
If you set PackageType to both, generating the report produces zipped and unzipped
output.
Parent — Parent of document element
DOM object
This read-only property lists the parent of this document element.
StreamOutput — Option to stream output to disk
false (default) | logical value
By default, document elements are stored in memory until the document is closed. Set
this property to true to write document elements to disk as the elements are appended
to the document.
Data Types: logical
Tag — Tag for this document
session-unique tag when the document is generated (default) | custom tag
String that identifies this document. The tag has the form CLASS:ID, where CLASS is the
document class and ID is the value of the Id property of the object.
An example of a reason for specifying your own tag value is to make it easier to identify
where an issue occurred during document generation.
Data Types: char
TemplatePath — Path of the template used for this document element
string
The full path to the HTML or Word template to use for this document element.
TitleBarText — Title for HTML browser title bar
string
For HTML documents, this property specifies the text for the title bar of the browser.
Word documents ignore this property.
Set this property before opening the document for output.
12-79
12
Classes – Alphabetical List
Type — Type of output
'html' (default) | 'docx' | 'html-file'
Type of output, specified as 'html', 'docx' or 'html-file'.
• 'html'— HTML output HTML output as a zipped or unzipped folder containing the
HTML document text, image, style sheet, and JavaScript files
• 'docx'— Word output
• 'html-file'— HTML output consisting of a single file that contains the text, style
sheets, JavaScript, and images for the report
If you specify a template using the TemplatePath property, the template must be
consistent with the type argument. You must specify a Word template (.dotx) for docx
output, an HTML template package (.htmtx) for HTML output, and a single-file HTML
template (.html) for html-file output.
To generate a PDF report, create a Word report and use the rptview function with the
'pdf' argument to convert the Word report to PDF.
Methods
12-80
Method
Purpose
addHTML
Append HTML string to document
addHTMLFile
Append HTML file contents to document
append
Append document element to the
document.
close
Close this document.
createAutoNumberStream
Create automatically generated numbering
stream.
createTemplate
Create document template.
fill
Fill document hole.
getAutoNumberStream
Get the automated numbering stream.
getCoreProperties
Get core properties of document.
getMainPartPath
Get relative path of main part of output
document.
mlreportgen.dom.Document class
Method
Purpose
getOPCMainPart
Get full path of main part of output
document.
moveToNextHole
Move to next template hole.
open
Open this document.
package
Append file to OPC package of document.
setCoreProperties
Set core properties of document element.
Examples
Create a Word Document
import mlreportgen.dom.*;
d = Document('mydoc','docx');
p = Paragraph('Hello World');
append(d,p);
close(d);
rptview('mydoc.htmx');
Create an HTML Document as a Single File
Create an HTML document as a single HTML file that includes the images of
the document. The example assumes that there is a MyImage.jpg image and a
myHTMLTemplate.html HTML template file.
Create a document whose output is a single HTML file.
import mlreportgen.dom.*;
d = Document('mydoc','html-file','myHTMLTemplate');
open(d);
Append text and an image.
append(d,'Hello world');
append(d,Image('C:/images/LocalSystem/MyImage.jpg'));
Close and generate the report.
12-81
12
Classes – Alphabetical List
close(d);
rptview(d.OutputPath);
See Also
mlreportgen.dom.DocumentPart
12-82
mlreportgen.dom.DocumentPart class
mlreportgen.dom.DocumentPart class
Package: mlreportgen.dom
Document part
Description
This class defines a form that can be filled out and appended to a document or another
document part of the same output type.
Construction
documentPartObj = DocumentPart() creates an HTML document part using the
default HTML template.
documentPart = DocumentPart(type) creates a document part of the specified type
(for example, Microsoft Word).
documentPartObj = DocumentPart(type,templatePath) creates a document part
based on the specified master template. The template must be either an HTML or Word
template, depending on the part type.
documentPartObj = DocumentPart(type,templatePath,
embeddedTemplateName) creates a document part of the specified type based on the
embedded template stored in the specified master template.
documentPartObj = DocumentPart(templateSrc,embeddeTemplateName)
creates a document part with the output type of the template used by the specified
master template source. The template source is a document or document part that
contains the embedded template.
Input Arguments
type — Type of output
'html' (default) | 'docx' | 'html-file'
12-83
12
Classes – Alphabetical List
Type of output, specified as 'html', 'docx' or 'html-file'.
• 'html'— HTML output
• 'docx'— Word output
• 'html-file'— HTML output, using a single file that contains the CSS, JavaScript,
and images for the report
If you specify a template using the templatePath input argument, the value for type
must be consistent with that type of template.
To generate a PDF report, create a Word report and use the rptview function with the
'pdf' argument to convert the Word report to PDF.
templatePath — Path of document template
[] | string
You cannot set this property once the document has been opened.
If you do not want to use the default HTML or Word template, specify a template.
Full path of output file or folder for the template. If you do not specify a file extension,
the extension is based on the document type (for example, .docx for Word).
embeddedTemplateName — Embedded template name
string
An embedded template is a template that is embedded in a Word template.
templateSrc — Document or document part whose template is master template
mlreportgen.dom.Document object | mlreportgen.dom.DocumentPart object
Document or document part whose template is the master template, specified as an
mlreportgen.dom.Document or mlreportgen.dom.DocumentPart object.
Output Arguments
documentPartObj — Document part
mlreportgen.dom.DocumentPart object
Document part, represented by an mlreportgen.dom.DocumentPart object.
12-84
mlreportgen.dom.DocumentPart class
Properties
Children — Children of this document
cell array of mlreportgen.dom.Element objects
This read-only property lists child elements that the document element contains.
CurrentHoleId — Hole ID of current hole in document
string
This read-only property is the hole ID of the current hole in this document.
CurrentHoleType — Type of current hole
string
This read-only property is the type (inline or block) of the current template hole.
• An inline hole is for document elements that a paragraph element can contain: Text,
Image, LinkTarget, ExternalLink, InternalLink, CharEntity, AutoNumber.
• A block hole can contain a Paragraph, Table, OrderedList, UnorderedList,
DocumentPart, and Group.
CurrrentDOCXSection — The current section of Word document
mlreportgen.dom.DOCXSection object
This read-only property for a Word document is a mlreportgen.dom.DOCXSection
object that specifies the properties, as well as the headers and footers, of the current
document section. In HTML documents, the value of this property is always [].
Id — ID for document element
string
A session-unique ID is generated as part of document element creation. You can specify
an ID to replace the generated ID.
Parent — Parent of document element
DOM object
This read-only property lists the parent of this document element.
Tag — Tag for document element
string
Tag for document element, specified as a string.
12-85
12
Classes – Alphabetical List
A session-unique ID is generated as part of document element creation. The generated
tag has the form CLASS:ID, where CLASS is the class of the element and ID is the value
of the Id property of the object. You can specify a tag to replace the generated tag.
Specify your own tag value, for example, to make it easier to identify where an issue
occurred during document generation.
TemplatePath — Path of the template used for this document element
string
The full path to the HTML or Word template to use for this document element.
Type — Type of output
string
The format for the output. Use one of these values:
• html
• docx
If you specify a template using the TemplatePath property, the value for Type must be
consistent with that type of template.
To generate a PDF report, create a Word report and use the rptview function with the
'pdf' argument to convert the Word report to PDF.
Methods
Use DocumentPart methods like you use the corresponding Document methods.
Method
Purpose
addHTML
Append HTML string to document
Use DocumentPart.addHTML in a similar
way to how you use Document.addHTML.
addHTMLFile
Use DocumentPart.addHTMLFile
in a similar way to how you use
Document.addHTMLFile.
12-86
Append HTML file contents to document
mlreportgen.dom.DocumentPart class
Method
Purpose
append
Append document element to the document
part.
close
Close this document part.
createTemplate
Create document part template.
fill
Fill document hole.
getCoreProperties
Get core properties of document part.
getOPCMainPart
Get full path of main part of output
document.
moveToNextHole
Move to next template hole.
open
Open this document part.
setCoreProperties
Set core properties of document part.
See Also
mlreportgen.dom.Document | mlreportgen.dom.DOCXSection |
mlreportgen.dom.DOCXSubDoc
Related Examples
•
“Use Subforms in a Report” on page 13-31
More About
•
“Form-Based Reporting” on page 13-28
12-87
12
Classes – Alphabetical List
mlreportgen.dom.DOCXPageFooter class
Package: mlreportgen.dom
Page footer definition for Microsoft Word document
Description
Add a footer to the first page of a section or to odd pages, even pages, or both.
Construction
docxPageFooterObj = DOCXPageFooter() creates an empty page footer based on the
default Word template.
docxPageFooterObj = DOCXPageFooter(pageType,templatePath) creates an
empty page footer for the specified type of page based on the specified template.
docxPageFooterObj =
DOCXPageFooter(pageType,templatePath,embeddedTemplateName) creates
an empty page footer for the specified type of page, based on the specified template
embedded in the specified master template.
docxPageFooterObj =
DOCXPageFooter(pageType,templateSrc,embeddedTemplateName) creates
an empty page footer for the specified type of page, based on the specified embedded
template in the specified master template of the specified document or document part
(templateSrc).
Input Arguments
pageType — Type of pages on which footer appears
[] (default) | string
You can specify one of these settings:
• default— footer appears on odd pages in a section and the first page, if there are no
page footers defined with pageType set to first
12-88
mlreportgen.dom.DOCXPageFooter class
• first— footer appears only on the first page of a section
• even— footer appears on even pages in a section
For example, to have a footer appear on the first page and on even pages, define two
separate footers, one with pageType set to first and the other with pageType set to
even.
templatePath — Full path of footer template
string
To use a template other than the default Word template, specify a Word footer template.
embeddedTemplateName — Embedded template name
string
An embedded template is a template that is embedded in a Word template.
templateSrc — Document or document part whose template is master template
mlreportgen.dom.Document object | mlreportgen.dom.DocumentPart object
Document or document part whose template is the master template, specified as an
mlreportgen.dom.Document or mlreportgen.dom.DocumentPart object.
Output Arguments
docxPageFooterObj — Page footer for Word document
mlreportgen.dom.DOCXPageFooter object
Page footer for a Word document, represented by an
mlreportgen.dom.DOCXPageFooter object.
Properties
Children — Children of this document
cell array of mlreportgen.dom.Element objects
This read-only property lists child elements that the document element contains.
CurrrentDOCXSection — The current section of Word document
mlreportgen.dom.DOCXSection object
12-89
12
Classes – Alphabetical List
This read-only property for a Word document is a mlreportgen.dom.DOCXSection
object that specifies the properties, as well as the headers and footers, of the current
document section. In HTML documents, the value of this property is always [].
CurrentHoleId — Hole ID of current hole in document
string
This read-only property is the hole ID of the current hole in this document.
CurrentHoleType — Type of current hole
string
This read-only property is the type (inline or block) of the current template hole.
• An inline hole is for document elements that a paragraph element can contain: Text,
Image, LinkTarget, ExternalLink, InternalLink, CharEntity, AutoNumber.
• A block hole can contain a Paragraph, Table, OrderedList, UnorderedList,
DocumentPart, and Group.
Id — ID for document element
string
A session-unique ID is generated as part of document element creation. You can specify
an ID to replace the generated ID.
PageType — Type of pages on which footer appears
[] (default) | string
Specify the type of page on which the footer appears.
• default— appears on odd pages in a section and the first page, if there are no page
footers defined with pageType set to first
• first— appears only on the first page of a section
• even— appears even paged in a section
To have a footer appear on the first page and on even pages, define two separate footers,
one with pageType set to first and the other with pageType set to even.
Parent — Parent of document element
DOM object
This read-only property lists the parent of this document element.
12-90
mlreportgen.dom.DOCXPageFooter class
Tag — Tag for document element
string
Tag for document element, specified as a string.
A session-unique ID is generated as part of document element creation. The generated
tag has the form CLASS:ID, where CLASS is the class of the element and ID is the value
of the Id property of the object. You can specify a tag to replace the generated tag.
Specify your own tag value, for example, to make it easier to identify where an issue
occurred during document generation.
TemplatePath — Path to template used for footer
string
Full path to a Microsoft Word template to use for this footer.
Methods
Use DocumentPageFooter methods like you use the corresponding Document methods.
Method
Purpose
append
Append one of these DOM objects to the
footer:
• CustomElement
• DOCXSection
• FormalTable
• Group
• ExternalLink
• Image
• InternalLink
• OrderedList
• Paragraph
• RawText
• Table
12-91
12
Classes – Alphabetical List
Method
Purpose
• Text
• UnorderedList
close
Close footer.
fill
Fill template hole.
moveToNextHole
Move to next template hole.
open
Open footer.
See Also
mlreportgen.dom.DOCXPageHeader | mlreportgen.dom.DOCXSection
Related Examples
•
12-92
“Create Page Footers and Headers” on page 13-131
mlreportgen.dom.DOCXPageHeader class
mlreportgen.dom.DOCXPageHeader class
Package: mlreportgen.dom
Page header definition for Microsoft Word document
Description
Add a header to the first page of a section or to odd pages, even pages, or both.
Construction
docxPageHeaderObj = DOCXPageHeader() creates an empty page header based on
the default Word template.
headerObj = DOCXPageHeader(pageType,templatePath) creates an empty page
header for the specified type of page, based on the specified master template.
docxPageHeaderObj =
DOCXPageHeader(pageType,templatePath,embeddedTemplateName) creates
an empty page header for the specified type of page, based on the specified embedded
template in the specified master template.
docxPageHeaderObj =
DOCXPageHeader(pageType,templateSrc,embeddedTemplateName) creates
an empty page header for the specified type of page, based on the specified embedded
template in the template used by the specified document or document part
(templateSrc).
Input Arguments
pageType — Type of pages on which header appears
[] (default) | string
Specify the type of page on which the header appears.
• default— header appears on odd pages in a section and the first page, if there are
no page headers defined with pageType set to first
12-93
12
Classes – Alphabetical List
• first— header appears only on the first page of a section
• even— header appears even paged in a section
For example, to have a header appear on the first page and on even pages, define two
separate headers, one with pageType set to first and the other with pageType set to
even.
templatePath — Full path of header template
string
To use a template other than the default Word template, specify a Word header template.
embeddedTemplateName — Embedded template name
string
An embedded template is a template that is embedded in a Word template.
templateSrc — Document or document part whose template is master template
mlreportgen.dom.Document object | mlreportgen.dom.DocumentPart object
Document or document part whose template is the master template, specified as an
mlreportgen.dom.Document or mlreportgen.dom.DocumentPart object.
Output Arguments
docxPageHeaderObj — Page header for Word document
mlreportgen.dom.DOCXPageHeader object
Page header for a Word document, represented by an
mlreportgen.dom.DOCXPageHeader object.
Properties
Children — Children of this document
cell array of mlreportgen.dom.Element objects
This read-only property lists child elements that the document element contains.
CurrentHoleId — Hole ID of current hole in document
string
12-94
mlreportgen.dom.DOCXPageHeader class
This read-only property is the hole ID of the current hole in this document.
CurrentHoleType — Type of current hole
string
This read-only property is the type (inline or block) of the current template hole.
• An inline hole is for document elements that a paragraph element can contain: Text,
Image, LinkTarget, ExternalLink, InternalLink, CharEntity, AutoNumber.
• A block hole can contain a Paragraph, Table, OrderedList, UnorderedList,
DocumentPart, and Group.
CurrrentDOCXSection — The current section of Word document
mlreportgen.dom.DOCXSection object
This read-only property for a Word document is a mlreportgen.dom.DOCXSection
object that specifies the properties, as well as the headers and footers, of the current
document section. In HTML documents, the value of this property is always [].
Id — ID for document element
string
A session-unique ID is generated as part of document element creation. You can specify
an ID to replace the generated ID.
PageType — Type of pages on which header appears
[] (default) | string
Specify the type of page on which the header appears.
• default— header appears on odd pages in a section and the first page, if there are
no page headers defined with pageType set to first
• first— header appears only on the first page of a section
• even— header appears on even pages in a section
For example, to have a header appear on the first page and on even pages, define two
separate headers, one with pageType set to first and the other with pageType set to
even.
Parent — Parent of document element
DOM object
This read-only property lists the parent of this document element.
12-95
12
Classes – Alphabetical List
Tag — Tag for document element
string
Tag for document element, specified as a string.
A session-unique ID is generated as part of document element creation. The generated
tag has the form CLASS:ID, where CLASS is the class of the element and ID is the value
of the Id property of the object. You can specify a tag to replace the generated tag.
Specify your own tag value, for example, to make it easier to identify where an issue
occurred during document generation.
TemplatePath — The path to template used for header
string
Full path to a Microsoft Word template to use for this header.
Methods
Use DocumentPageHeader methods like you use the corresponding Document methods.
Method
Purpose
append
Append one of these DOM objects to the
header:
• CustomElement
• DOCXSection
• FormalTable
• Group
• ExternalLink
• Image
• InternalLink
• OrderedList
• Paragraph
• RawText
• Table
12-96
mlreportgen.dom.DOCXPageHeader class
Method
Purpose
• Text
• UnorderedList
close
Close header.
fill
Fill template hole.
moveToNextHole
Move to next template hole.
open
Open header.
See Also
mlreportgen.dom.DOCXPageFooter | mlreportgen.dom.DOCXSection
Related Examples
•
“Create Page Footers and Headers” on page 13-131
12-97
12
Classes – Alphabetical List
mlreportgen.dom.DOCXPageMargins class
Package: mlreportgen.dom
Page margins for Microsoft Word page layout
Description
Specifies the size of the page margins of a section of a Microsoft Word document.
Construction
docxPageMarginsObj = DOCXPageMargins() specifies default page margins, which
are one inch for the top, bottom, left, and right margins, and one-half inch for the gutter,
header, and footer margins.
Output Arguments
docxPageMarginsObj — Page margins
DOCXPageMargins object
Page margins, represented by an DOCXPageMargins object.
Properties
Bottom — Bottom margin size
string
String specifying the width of the bottom margin. The string must have the format
valueUnits where Units is an abbreviation for the units in which the width size is
expressed. Valid abbreviations are:
• no abbreviation — pixels
• cm — centimeters
• in — inches
• mm — millimeters
12-98
mlreportgen.dom.DOCXPageMargins class
• pi — picas
• pt — points
• px — pixels
Footer — Footer size
string
Specify the size using the same format used for the Bottom property.
Gutter — Gutter size
string
Specify the size using the same format used for the Bottom property.
Header — Header size
string
Specify the size using the same format used for the Bottom property.
Id — ID for document element
string
A session-unique ID is generated as part of document element creation. You can specify
an ID to replace the generated ID.
Left — Left margin size
string
Specify the size using the same format used for the Bottom property.
Right — Right margin size
string
Specify the size using the same format used for the Bottom property.
Tag — Tag for document element
string
Tag for document element, specified as a string.
A session-unique ID is generated as part of document element creation. The generated
tag has the form CLASS:ID, where CLASS is the class of the element and ID is the value
of the Id property of the object. You can specify a tag to replace the generated tag.
12-99
12
Classes – Alphabetical List
Specify your own tag value, for example, to make it easier to identify where an issue
occurred during document generation.
Top — Top margin size
string
Specify the size using the same format used for the Bottom property.
Examples
Reset Default Margins
Reset the margins specified by the default DOM template.
import mlreportgen.dom.*;
d = Document('myreport','docx');
open(d);
s = d.CurrentDOCXSection;
s.PageMargins.Left = '.5in';
s.PageMargins.Right = '.5in';
append(d,'Left and right margins are .5 inch');
close(d);
rptview('myreport','docx');
See Also
mlreportgen.dom.DOCXSection
More About
•
12-100
“Report Formatting Approaches” on page 13-20
mlreportgen.dom.DOCXPageSize class
mlreportgen.dom.DOCXPageSize class
Package: mlreportgen.dom
Size and orientation of pages in Microsoft Word document
Description
Specifies the height, width, and orientation of pages in a section of a Microsoft Word
document.
Construction
docxPageSizeObj = DOCXPageSize() creates a page size object having default values
of 8.5-by-11 inches and portrait orientation.
docxPageSizeObj = DOCXPageSize(height,width) creates a portrait page having
a specified height and width.
docxPageSizeObj = DOCXPageSize(height,width,orientation) creates a page
having a specified height, width, and orientation.
Input Arguments
height — Height of page
'11in' (default) | string
String specifying the height of the page. The string must have the format valueUnits
where Units is an abbreviation for the units in which the width size is expressed. Valid
abbreviations are:
• no abbreviation — pixels
• cm — centimeters
• in — inches
• mm — millimeters
12-101
12
Classes – Alphabetical List
• pi — picas
• pt — points
• px — pixels
width — Width of page
'8.5in' (default) | string
The string must have the format valueUnits, where Units is an abbreviation for the
units in which the width size is expressed. Valid abbreviations are:
• no abbreviation — pixels
• cm — centimeters
• in — inches
• mm — millimeters
• pi — picas
• pt — points
• px — pixels
orientation — Orientation of page
string
Use one of these values:
• 'portrait' (default)
• 'landscape'
Specify height and width values that reflect the orientation setting. For example, if the
orientation is landscape and the document is to be printed on 8.5x11-inch paper, set
height to '8.5in' and width to '11in'.
Output Arguments
docxPageSizeObj — Page size and orientation of Word document
mlreportgen.dom.DOCXPageSize object
Page size and orientation of a Word document, represented by an
mlreportgen.dom.DOCXPageSize object.
12-102
mlreportgen.dom.DOCXPageSize class
Properties
Height — Height of pages in Word page layout section
string
String specifying the page height. The string must have the format valueUnits where
Units is an abbreviation for the units in which the width size is expressed. Valid
abbreviations are:
• no abbreviation — pixels
• cm — centimeters
• in — inches
• mm — millimeters
• pi — picas
• pt — points
• px — pixels
Id — ID for document element
string
A session-unique ID is generated as part of document element creation. You can specify
an ID to replace the generated ID.
Orientation — Orientation (portrait or landscape) for pages in section
string
Use one of these values:
• 'portrait' (default)
• 'landscape'
Specify height and width values that reflect the orientation setting. For example, if the
orientation is landscape and the document is to be printed on 8.5x11-inch paper, set
height to '8.5in' and width to '11in'.
Tag — Tag for document element
string
Tag for document element, specified as a string.
12-103
12
Classes – Alphabetical List
A session-unique ID is generated as part of document element creation. The generated
tag has the form CLASS:ID, where CLASS is the class of the element and ID is the value
of the Id property of the object. You can specify a tag to replace the generated tag.
Specify your own tag value, for example, to make it easier to identify where an issue
occurred during document generation.
Width — Width of page
'8.5in' (default) | string
The string must have the format valueUnits, where Units is an abbreviation for the
units in which the width size is expressed. Valid abbreviations are:
• no abbreviation — pixels
• cm — centimeters
• in — inches
• mm — millimeters
• pi — picas
• pt — points
• px — pixels
Examples
Set Page Orientation and Size
Change the page orientation and size specified by the default DOM template.
import mlreportgen.dom.*;
d = Document('myreport','docx');
open(d);
s = d.CurrentDOCXSection;
s.PageSize.Orientation ='landscape';
s.PageSize.Height = '8.5in';
s.PageSize.Width = '11in';
append(d,'This document has landscape pages');
close(d);
12-104
mlreportgen.dom.DOCXPageSize class
rptview('myreport','docx');
•
“Report Formatting Approaches” on page 13-20
See Also
mlreportgen.dom.DOCXPageMargins | mlreportgen.dom.DOCXSection
12-105
12
Classes – Alphabetical List
mlreportgen.dom.DOCXRawFormat class
Package: mlreportgen.dom
XML markup for array of Microsoft Word formats
Description
XML markup for an array of Microsoft Word formats.
Construction
docxRawFormatObj = DOCXRawFormat() creates an empty array of raw formats.
Output Arguments
docxRawFormatObj — XML markup for Word formats
mlreportgen.dom.DOCXRawFormat object
XML markup for Word formats, represented by an mlreportgen.dom.DOCXRawFormat
object.
Properties
Id — ID for document element
string
A session-unique ID is generated as part of document element creation. You can specify
an ID to replace the generated ID.
Markup — Word XML markup strings
cell array of strings
Specify a cell array of strings. Each string contains Word XML markup for a Word
format.
12-106
mlreportgen.dom.DOCXRawFormat class
For information about XML markup for Word formats, see http://officeopenxml.com/
anatomyofOOXML.php.
Tag — Tag for document element
string
Tag for document element, specified as a string.
A session-unique ID is generated as part of document element creation. The generated
tag has the form CLASS:ID, where CLASS is the class of the element and ID is the value
of the Id property of the object. You can specify a tag to replace the generated tag.
Specify your own tag value, for example, to make it easier to identify where an issue
occurred during document generation.
Examples
Turn on Line Numbering Based on Default DOM Template
In this example, the RawFormats property of a DOCXSection is initialized with the
markup for properties specified by the default template. This code appends the line
numbering property to the existing properties.
import mlreportgen.dom.*;
d = Document('myreport','docx');
open(d);
s = d.CurrentDOCXSection;
s.RawFormats = [s.RawFormats ...
{'<w:lnNumType w:countBy="1" w:start="1" w:restart="newSection"/>'}];
append(d,'This document has line numbers');
close(d);
rptview('myreport','docx');
See Also
mlreportgen.dom.DOCXSection
More About
•
“Report Formatting Approaches” on page 13-20
12-107
12
Classes – Alphabetical List
mlreportgen.dom.DOCXSection class
Package: mlreportgen.dom
Page format and layout for Microsoft Word document section
Description
Use an mlreportgen.dom.DOCXSection object to define the page format, headers, and
footers of a Word document section.
If this is the first DOCXSection in a document, then it controls the page layout of all the
document elements from the beginning of a document to this DOCXSection.
If this is the second or later DOCXSection in a document, then it controls the page layout
of all the document elements from the preceding DOCXSection to itself.
Before you set properties (such as margin widths) of a DOCXSection object, open the
Document object that contains the DOCXSection object.
Construction
docxSectionObj = DOCXSection() creates an empty document section.
Output Arguments
docxSectionObj — Numbering stream counter reset
mlreportgen.dom.DOCXSection object
Page format and layout for Word document section, represented by an
mlreportgen.dom.DOCXSection object.
Properties
Id — ID for document element
string
12-108
mlreportgen.dom.DOCXSection class
A session-unique ID is generated as part of document element creation. You can specify
an ID to replace the generated ID.
PageFooters — Page footers for this section
array of mlreportgen.dom.DOCXPageFooter objects
You can define up to three page footers for a section — one each for:
• The first page of the section
• Even pages
• Odd pages
PageHeaders — Page headers for this section
array of mlreportgen.dom.DOCXPageHeader objects
You can define up to three page headers for a section — one each for:
• The first page of the section
• Even pages
• Odd pages
PageMargins — Margin sizes and page orientation in this section
mlreportgen.dom.DOCXPageMargins object
Margin sizes and page orientation in this section, specified as an
mlreportgen.dom.DOCXPageMargins object.
PageSize — Size of pages in this section
mlreportgen.dom.DOCXPageSize object
Size of pages in this section, specified as an mlreportgen.dom.DOCXPageSize object.
Parent — Parent of document element
DOM object
This read-only property lists the parent of this document element.
RawFormats — XML markup for unsupported section formats
cell array
Cell array of strings, with each string containing Word XML markup for a Word format.
For information about XML markup for Word formats, see http://officeopenxml.com/
anatomyofOOXML.php.
12-109
12
Classes – Alphabetical List
Style — Formats defining section style
array of format objects
The formats you specify using this property override corresponding formats defined by
the stylesheet style specified by the StyleName property. The DOM interface ignores
formats that do not apply to this element.
Tag — Tag for document element
string
Tag for document element, specified as a string.
A session-unique ID is generated as part of document element creation. The generated
tag has the form CLASS:ID, where CLASS is the class of the element and ID is the value
of the Id property of the object. You can specify a tag to replace the generated tag.
Specify your own tag value, for example, to make it easier to identify where an issue
occurred during document generation.
Examples
Change Page Margins of a Document Section
Create a Word report. The value of d.CurrentDOCXSection is [].
import mlreportgen.dom.*;
d = Document('mydoc','docx');
Open the document, which generates a DOCXSection object from the default template
and assigns the handle of the object to d.CurrentDOCXSection.
open(d);
Assign a handle for the document DOCXSection object to the DOCXSection object s.
s = d.CurrentDOCXSection;
Change the left margin of s.
s.PageMargins.Left = '0.5in';
Add some content and display the report.
12-110
mlreportgen.dom.DOCXSection class
p = Paragraph('Hello World');
append(d,p);
close(d);
rptview('mydoc.docx');
See Also
mlreportgen.dom.DocumentPart | mlreportgen.dom.DOCXPageFooter |
mlreportgen.dom.DOCXPageHeader | mlreportgen.dom.DOCXPageMargins
| mlreportgen.dom.DOCXPageSize | mlreportgen.dom.DOCXRawFormat |
mlreportgen.dom.DOCXSubDoc
More About
•
“Report Formatting Approaches” on page 13-20
12-111
12
Classes – Alphabetical List
mlreportgen.dom.DOCXSubDoc class
Package: mlreportgen.dom
Reference to external Microsoft Word document
Description
Reference to external Microsoft Word document.
Construction
docxSubDocObj = DOCXSubDoc() creates an empty document reference.
docxSubDocObj = DOCXSubDoc(path) creates a reference to a Word document at
the specified path. Appending this reference to a Word document (the master document)
inserts a link to the subdocument at the point at which the reference is appended.
Opening a master document in Word causes the link to the subdocument to be
displayed, instead of its content. To replace the link with the content, select Expand
Subdocuments from the Outlining tab of the View tab on the Word tool strip.
The rptview command expands subdocuments automatically when it opens a Word
document.
Input Arguments
path — Path of document targeted by this reference
string
Path of document targeted by this reference, specified as a string.
Output Arguments
docxSubDocObj — Reference to external Word document
mlreportgen.dom.DOCXSubDoc object
12-112
mlreportgen.dom.DOCXSubDoc class
Path of Word document targeted by this reference, represented by an
mlreportgen.dom.DOCXSubDoc object.
Properties
Id — ID for document element
string
A session-unique ID is generated as part of document element creation. You can specify
an ID to replace the generated ID.
Tag — Tag for document element
string
Tag for document element, specified as a string.
A session-unique ID is generated as part of document element creation. The generated
tag has the form CLASS:ID, where CLASS is the class of the element and ID is the value
of the Id property of the object. You can specify a tag to replace the generated tag.
Specify your own tag value, for example, to make it easier to identify where an issue
occurred during document generation.
Target — Path of document targeted by this reference
string
Path of document targeted by this reference, specified as a string. Use ASCII characters.
Use the following format for specifying a full path involving a mapped drive.
'file:///C:/UserPath/FileName.docx'
Methods
Method
Purpose
clone
Clone this Word document reference.
Use DOCXSubDoc.clone in a similar way
to how you use Paragraph.clone.
12-113
12
Classes – Alphabetical List
Examples
Append a Word Document to a Report
import mlreportgen.dom.*
info = Document('CompanyInfo','docx');
append(info,'XYZ, Inc., makes widgets.');
close(info);
infoPath = info.OutputPath;
rpt = Document('Report','docx');
open(rpt);
append(rpt,Paragraph('About XYZ, Inc.'));
append(rpt,DOCXSubDoc(infoPath));
close(rpt);
rptview(rpt.OutputPath);
See Also
mlreportgen.dom.DocumentPart | mlreportgen.dom.DOCXSection
12-114
mlreportgen.dom.ErrorMessage class
mlreportgen.dom.ErrorMessage class
Package: mlreportgen.dom
Error message
Description
Specifies error message text originating from a specified source object.
Construction
errorMsgObj = ErrorMessage(text,sourceObject) creates an error message with
the specified text originating from the specified source object.
Input Arguments
text — Message text
string
The text to display for the message.
sourceObject — The DOM object from which the message originates
a DOM object
The DOM object from which the message originates.
Output Arguments
errorMsgObj — Error message
mlreportgen.dom.ErrorMessage object
Error message, represented by an mlreportgen.dom.ErrorMessage object.
Properties
Id — ID for document element
string
12-115
12
Classes – Alphabetical List
A session-unique ID is generated as part of document element creation. You can specify
an ID to replace the generated ID.
Source — Source object from which the message originates
a DOM object
Source DOM object from which the message originates.
Tag — Tag for document element
string
Tag for document element, specified as a string.
A session-unique ID is generated as part of document element creation. The generated
tag has the form CLASS:ID, where CLASS is the class of the element and ID is the value
of the Id property of the object. You can specify a tag to replace the generated tag.
Specify your own tag value, for example, to make it easier to identify where an issue
occurred during document generation.
Text — Text of message
string
Message text, specified as a string.
Methods
Use ErrorMessage methods similar to how you use ProgressMessage methods.
Method
Purpose
formatAsHTML
Format message as HTML.
formatAsText
Format message as text.
passesFilter
Determine whether message passes filter.
Examples
Create an Error Message
import mlreportgen.dom.*;
12-116
mlreportgen.dom.ErrorMessage class
d = Document('test','html');
dispatcher = MessageDispatcher.getTheDispatcher;
l = addlistener(dispatcher,'Message', ...
@(src, evtdata) disp(evtdata.Message.formatAsText));
open(d);
dispatch(dispatcher,ErrorMessage('invalid chapter',d));
p = Paragraph('Chapter ');
p.Tag = 'chapter title';
p.Style = {CounterInc('chapter'),...
CounterReset('table'),WhiteSpace('pre')};
append(p,AutoNumber('chapter'));
append(d,p);
close(d);
rptview('test','html');
Delete the listener to avoid duplicate reporting of message objects during a MATLAB
session.
delete(l);
•
“Display Report Generation Messages” on page 13-106
See Also
mlreportgen.dom.MessageDispatcher.dispatch
12-117
12
Classes – Alphabetical List
mlreportgen.dom.ExternalLink class
Package: mlreportgen.dom
Hyperlink to a location outside of document
Description
Defines a hyperlink to a location outside of the document.
Construction
externalLinkObj = ExternalLink(target,linkText) creates a hyperlink to the
specified target and having the specified link text. This constructor creates a text object
(mlreportgen.dom.Text) to hold the link text.
externalLinkObj = ExternalLink(target,linkText,linkTextStyleName)
creates a hyperlink with the specified link text and style name.
externalLinkObj = ExternalLink(target,textObj) creates a hyperlink to the
specified target using the specified Text object.
Input Arguments
target — Target of link
string | mlreportgen.dom.LinkTarget object
The link target of the external link, specified as either a string (for a URL) or as an
mlreportgen.dom.LinkTarget object.
linkText — Link text
string
The text to use for the link text.
linkTextStyleName — Name of style for link text
string
Name of style to use for the link text.
12-118
mlreportgen.dom.ExternalLink class
textObj — Text object containing link text
mlreportgen.dom.Text object
Text object containing link text, specified by an mlreportgen.dom.Text object.
Output Arguments
externalLinkObj — External link
mlreportgen.dom.ExternalLink object
External link, represented by an mlreportgen.dom.ExternalLink object.
Properties
CustomAttributes — Custom attributes of document element
array of mlreportgen.dom.CustomAttribute objects
HTML or Microsoft Word must support the custom attributes of this document element.
Id — ID for document element
string
A session-unique ID is generated as part of document element creation. You can specify
an ID to replace the generated ID.
Style — Format specification
array of format objects
Format objects that specify the format of a document element.
StyleName — Name of link style defined in the template
string
Name of link style defined in the template, specified as a string. The style specified by
styleName must be defined in the template used to create the document to which the
link is appended.
Tag — Tag for document element
string
Tag for document element, specified as a string.
12-119
12
Classes – Alphabetical List
A session-unique ID is generated as part of document element creation. The generated
tag has the form CLASS:ID, where CLASS is the class of the element and ID is the value
of the Id property of the object. You can specify a tag to replace the generated tag.
Specify your own tag value, for example, to make it easier to identify where an issue
occurred during document generation.
Target — Target URL of link
string
This read-only property displays the URL of the link target of this hyperlink.
Methods
Method
Purpose
append
Append text or a Text, Image, or
CustomElement object.
clone
Copy the external link
Use ExternalLink.clone in a similar
way to how you use Paragraph.clone.
Examples
Add an External Link
import mlreportgen.dom.*
d = Document('mydoc');
append(d,ExternalLink('http://www.mathworks.com/','MathWorks'));
close(d);
rptview('mydoc','html');
•
“Create Links” on page 13-72
See Also
mlreportgen.dom.InternalLink | mlreportgen.dom.LinkTarget
12-120
mlreportgen.dom.FirstLineIndent class
mlreportgen.dom.FirstLineIndent class
Package: mlreportgen.dom
Indent first line of paragraph
Description
Indent first line of a paragraph.
Construction
firstLineIndentObj = FirstLineIndent() creates an empty first line indentation
format object.
firstLineIndentObj = FirstLineIndent(width) indents first line of paragraph
by the specified amount.
firstLineIndentObj = FirstLineIndent(style,width) indents either the first
line of the paragraph relative to the page margin or indents the subsequent lines relative
to the page margin (hanging indentation).
Input Arguments
width — Width of indentation of first line of paragraph
string
String specifying the width of indentation of first line of paragraph. String must have the
format valueUnits where Units is an abbreviation for the units in which the size is
expressed. Valid abbreviations are:
• no abbreviation — pixels
• cm — centimeters
• in — inches
• mm — millimeters
• pi — picas
12-121
12
Classes – Alphabetical List
• pt — points
• px — pixels
style — Type of indentation
string
String specifying the style of indentation of the first line of the paragraph.
• normal (default) — indent relative to the page margin
• hanging — indent relative to the subsequent lines
Output Arguments
firstLineIndentObj — Indentation for first line of paragraph
mlreportgen.dom.FirstLineIndent object
Indentation for first line of paragraph, represented by an
mlreportgen.dom.FirstLineIndent object.
Properties
Id — ID for document element
string
A session-unique ID is generated as part of document element creation. You can specify
an ID to replace the generated ID.
Style — Type of indentation
string
String specifying the style of indentation of the first line of the paragraph.
• normal (default) — indent relative to the page margin
• hanging — indent relative to the subsequent lines
Tag — Tag for document element
string
Tag for document element, specified as a string.
12-122
mlreportgen.dom.FirstLineIndent class
A session-unique ID is generated as part of document element creation. The generated
tag has the form CLASS:ID, where CLASS is the class of the element and ID is the value
of the Id property of the object. You can specify a tag to replace the generated tag.
Specify your own tag value, for example, to make it easier to identify where an issue
occurred during document generation.
Width — Amount of indentation
string
String specifying the width of indentation of first line of paragraph. String must have the
format valueUnits where Units is an abbreviation for the units in which the size is
expressed. Valid abbreviations are:
• no abbreviation — pixels
• cm — centimeters
• in — inches
• mm — millimeters
• pi — picas
• pt — points
• px — pixels
See Also
mlreportgen.dom.Paragraph
More About
•
“Report Formatting Approaches” on page 13-20
12-123
12
Classes – Alphabetical List
mlreportgen.dom.FlowDirection class
Package: mlreportgen.dom
Direction of text or table column flow
Description
Specifies the direction for text to flow across a page or the order of columns.
Construction
flowDirectionObj = FlowDirection() causes text to flow from left to right and for
the first column to be on the left side of a table.
flowDirectionObj = FlowDirection(flow) causes text to flow or column to appear
in the specified direction (left-to-right or right-to-left).
Input Arguments
flow — Control text flow or table column ordering
string
String specifying the direction for text to flow or for table columns to appear.
• 'ltr' — text flow or table column order is from left to right
• 'rtl' — text flow or table column order is from right to left
Output Arguments
flowDirectionObj — Text flow direction or column order
mlreportgen.dom.FlowDirection object
Text flow or table column order, represented by an mlreportgen.dom.FlowDirection
object.
12-124
mlreportgen.dom.FlowDirection class
Properties
Id — ID for document element
string
A session-unique ID is generated as part of document element creation. You can specify
an ID to replace the generated ID.
Tag — Tag for document element
string
Tag for document element, specified as a string.
A session-unique ID is generated as part of document element creation. The generated
tag has the form CLASS:ID, where CLASS is the class of the element and ID is the value
of the Id property of the object. You can specify a tag to replace the generated tag.
Specify your own tag value, for example, to make it easier to identify where an issue
occurred during document generation.
Value — Text flow direction
string
String specifying the direction for text to flow or the order of table columns.
• 'ltr' — text flow or table column order is from left to right
• 'rtl' — text flow or table column order is from right to left
Examples
Flow Text from Right to Left
In this example, changing the text flow direction changes “stressed” into “desserts”.
import mlreportgen.dom.*;
doctype = 'docx';
d = Document('test',doctype);
p = Paragraph('desserts');
p.Style = {FlowDirection('rtl')};
append(d,p);
12-125
12
Classes – Alphabetical List
q = clone(p);
q.Style = {FlowDirection('ltr')};
append(d,q);
close(d);
rptview(d.OutputPath,doctype);
12-126
mlreportgen.dom.FontFamily class
mlreportgen.dom.FontFamily class
Package: mlreportgen.dom
Font family
Description
Properties of font family to be used to format document text.
Construction
fontFamilyObj = FontFamily() creates a Times New Roman font family.
fontFamilyObj = FontFamily(fontStr) creates the specified font family.
Input Arguments
fontStr — Font family
string
Font family, specified as a string.
Output Arguments
fontFamilyObj — Font family
mlreportgen.dom.FontFamily object
Font family, represented by an mlreportgen.dom.FontFamily object.
Properties
BackupFamilyNames — Backup font families
cell array
For HTML documents only. Cell array of strings specifying font families that a browser
can use if the font family specified in FamilyName is not available on a system.
12-127
12
Classes – Alphabetical List
ComplexScriptFamilyName — Font family for complex scripts
string
For Word documents only. String specifying a font family to substitute in a locale that
requires a complex script (such as Arabic) to render text.
EastAsiaFamilyName — Font family for East Asian locales
string
For Word documents only. String specifying a font family to substitute in an East Asian
locale, such as China, Japan, or Korea.
FamilyName — Font family to use if possible
string
String specifying a font family to be used for document text.
Id — ID for document element
string
A session-unique ID is generated as part of document element creation. You can specify
an ID to replace the generated ID.
Tag — Tag for document element
string
Tag for document element, specified as a string.
A session-unique ID is generated as part of document element creation. The generated
tag has the form CLASS:ID, where CLASS is the class of the element and ID is the value
of the Id property of the object. You can specify a tag to replace the generated tag.
Specify your own tag value, for example, to make it easier to identify where an issue
occurred during document generation.
See Also
mlreportgen.dom.CharEntity | mlreportgen.dom.FontSize | mlreportgen.dom.Paragraph
| mlreportgen.dom.Text
More About
•
12-128
“Report Formatting Approaches” on page 13-20
mlreportgen.dom.FontSize class
mlreportgen.dom.FontSize class
Package: mlreportgen.dom
Font size
Description
Specifies the size of a font.
Construction
fontSizeObj = FontSize() creates a 12-point font.
fontSizeObj = FontSize(sizeStr) creates the specified font size.
Input Arguments
sizeStr — Font size
'12pt' (default) | string
String having the format valueUnits, where Units is an abbreviation for the units in
which the size is expressed. The following abbreviations are valid:
• no abbreviation — pixels
• cm — centimeters
• in — inches
• mm — millimeters
• pi — picas
• pt — points
• px — pixels
Output Arguments
fontSizeObj — Font size
mlreportgen.dom.FontSize object
12-129
12
Classes – Alphabetical List
Font size, represented by an mlreportgen.dom.FontSize object.
Properties
Id — ID for document element
string
A session-unique ID is generated as part of document element creation. You can specify
an ID to replace the generated ID.
Tag — Tag for document element
string
Tag for document element, specified as a string.
A session-unique ID is generated as part of document element creation. The generated
tag has the form CLASS:ID, where CLASS is the class of the element and ID is the value
of the Id property of the object. You can specify a tag to replace the generated tag.
Specify your own tag value, for example, to make it easier to identify where an issue
occurred during document generation.
Value — Font size
'12pt' (default) | string
String having the format valueUnits, where Units is an abbreviation for the units in
which the size is expressed. The following abbreviations are valid:
• no abbreviation — pixels
• cm — centimeters
• in — inches
• mm — millimeters
• pi — picas
• pt — points
• px — pixels
See Also
mlreportgen.dom.FontFamily | mlreportgen.dom.Paragraph | mlreportgen.dom.Text
12-130
mlreportgen.dom.FontSize class
More About
•
“Report Formatting Approaches” on page 13-20
12-131
12
Classes – Alphabetical List
mlreportgen.dom.FormalTable class
Package: mlreportgen.dom
Formal table
Description
Defines a formal table, which is a table that has a body and optionally a
table header or table footer, or both. The table header, body, and footer are
mlreportgen.dom.TableHeader, mlreportgen.dom.TableBody, and
mlreportgen.dom.TableFooter objects, respectively.
Construction
formalTableObj = FormalTable() creates an empty formal table. Use this
constructor as the starting point to create a formal table from scratch.
formalTableObj = FormalTable(ncols) creates an empty formal table having the
specified number of columns.
formalTableObj = FormalTable(body) creates a formal table whose body content
you specify as a two-dimensional array. The constructor converts basic MATLAB
types to corresponding DOM objects. For example, the constructor converts strings to
mlreportgen.dom.Text objects.
formalTableObj = FormalTable(body,styleName) creates a formal table having
the specified body content and style.
formalTableObj = FormalTable(header,body) creates a formal table with a
header and a body using the specified contents, and an empty footer.
formalTableObj = FormalTable(header,body,styleName) creates a formal table
using the specified content and style. The table has an empty footer.
formalTableObj = FormalTable(header,body,footer) creates a formal table
with the specified content for the body, header, and footer.
12-132
mlreportgen.dom.FormalTable class
Input Arguments
ncols — Number of columns in table
numeric value
Number of columns in a table, specified as a numeric value.
Data Types: double
body — Table body content
two-dimensional numeric array | two-dimensional cell array
The cell array may contain:
• Character array (strings)
• One- or two-dimensional cell array
• double
• mlreportgen.dom.Text object
• mlreportgen.dom.Paragraph object
• mlreportgen.dom.Image object
• mlreportgen.dom.Table object
• mlreportgen.dom.FormalTable object
• mlreportgen.dom.OrderedList object
• mlreportgen.dom.UnorderedList object
• mlreportgen.dom.ExternalLink object
• mlreportgen.dom.InternalLink object
• mlreportgen.dom.CharEntity object
styleName — Style for table
string
The style specified by styleName must be defined in the template used to create the
document that contains this table.
header — Header content
two-dimensional numeric array | two-dimensional cell array of strings
The cell array may contain:
12-133
12
Classes – Alphabetical List
• Character array (strings)
• One- or two-dimensional cell array
• double
• mlreportgen.dom.Text object
• mlreportgen.dom.Paragraph object
• mlreportgen.dom.Image object
• mlreportgen.dom.Table object
• mlreportgen.dom.FormalTable object
• mlreportgen.dom.OrderedList object
• mlreportgen.dom.UnorderedList object
• mlreportgen.dom.ExternalLink object
• mlreportgen.dom.InternalLink object
• mlreportgen.dom.CharEntity object
footer — Footer content
two-dimensional numeric array | two-dimensional cell array of strings
The cell array may contain:
• Character array (strings)
• One- or two-dimensional cell array
• double
• mlreportgen.dom.Text object
• mlreportgen.dom.Paragraph object
• mlreportgen.dom.Image object
• mlreportgen.dom.Table object
• mlreportgen.dom.FormalTable object
• mlreportgen.dom.OrderedList object
• mlreportgen.dom.UnorderedList object
• mlreportgen.dom.ExternalLink object
• mlreportgen.dom.InternalLink object
• mlreportgen.dom.CharEntity object
12-134
mlreportgen.dom.FormalTable class
Output Arguments
formalTableObj — Formal table
mlreportgen.dom.FormalTable object
Formal table, represented by an mlreportgen.dom.FormalTable object.
Properties
BackgroundColor — Background color
string
Specify one of these as a string:
• The name of a color. The name must be a CSS color name. See http://
www.crockford.com/wrrrld/color.html.
• A hexadecimal RGB (truecolor) value as #RRGGBB. For example, #0000ff is a shade
of blue.
Body — Table body
mlreportgen.dom.TableBody object
The table constructor creates a table body object and assigns it to this property when the
formal table is constructed. You cannot subsequently set this property. However, you can
append content to the table body and set its properties via this property.
Border — Type of border to draw
string
Specify one of the following as a string.
Border String
Description
Supported Output Types
dashed
Dashed line
Word and HTML
dashdotstroked
Line with alternating
diagonal dashes and dot
Word
dashsmallgap
Dashed line with a small
gap between dashes
Word
dotted
Dotted line
Word and HTML
12-135
12
Classes – Alphabetical List
Border String
Description
Supported Output Types
dotdash
Line with alternating dots
and dashes
Word
dotdotdash
Line with alternating
double dots and a dash
Word
double
Double line
Word and HTML
doublewave
Double wavy line
Word
groove
3-D effect grooved line
HTML
hidden
No line
HTML
See discussion below this
table.
inset
3-D effect line
Word and HTML
none
No line
Word and HTML
See discussion below this
table.
12-136
outset
3-D effect line
Word and HTML
ridge
3-D effect ridged line
HTML
single
Single line
Word
solid
Single line
HTML
thick
Thick line
Word
thickthinlargegap
Dashed line with
alternating thick and thin
dashes with a large gap
Word
thickthinmediumgap
Dashed line with
alternating thick and thin
dashes with a medium gap
Word
thickthinsmallgap
Dashed line with
alternating thick and thin
dashes with a small gap
Word
mlreportgen.dom.FormalTable class
Border String
Description
Supported Output Types
thinthicklargegap
Dashed line with
alternating thin and thick
dashes with a medium gap
Word
thinthickmediumgap
Dashed line with
alternating thin and thick
dashes, with a medium gap
Word
thinthicksmallgap
Dashed line with
alternating thin and thick
dashes with a small gap
Word
thinthickthinlargegap
Dashed line with
alternating thin and thick
dashes with a large gap
Word
thinthickthinmediumgap Dashed line with
alternating thin and thick
dashes with a medium gap
Word
thinthickthinsmallgap
Dashed line with
alternating thin and thick
dashes with a small gap
Word
threedemboss
Embossed effect line
Word
threedengrave
Engraved effect line
Word
triple
Triple line
Word
wave
Wavy line
Word
BorderCollapse — Collapse borders of adjacent cells into single border (HTML only)
string
A value of 'on' collapses borders of adjacent cells into a single border. A value of 'off'
keeps borders of adjacent cells.
BorderColor — Border color
string
You can specify:
• Name of a color. The name must be a CSS color name. See http://www.crockford.com/
wrrrld/color.html.
12-137
12
Classes – Alphabetical List
• A hexadecimal RGB (truecolor) value as #RRGGBB. For example, #0000ff is a shade
of blue.
BorderWidth — Table border width
string
String specifying the width of the border. The string must have the format valueUnits
where Units is an abbreviation for the units in which the width size is expressed. Valid
abbreviations are:
• no abbreviation — pixels
• cm — centimeters
• in — inches
• mm — millimeters
• pi — picas
• pt — points
• px — pixels
Children — Children of this document
cell array of mlreportgen.dom.Element objects
This read-only property lists child elements that the document element contains.
ColSep — Style of line separating columns
string
The style the line separating the columns of a table or table section (header, body, footer),
as specified by a mlreportgen.dom.ColSep object.
See the description of the Border property for a description of the possible values.
ColSepColor — Color of line separating columns
string
You can specify:
• Name of a color. The name must be a CSS color name. See http://www.crockford.com/
wrrrld/color.html.
• A hexadecimal RGB (truecolor) value as #RRGGBB. For example, #0000ff is a shade
of blue.
12-138
mlreportgen.dom.FormalTable class
ColSepWidth — Width of line separating table columns
string
String having the format valueUnits, where Units is an abbreviation for the units in
which the width is expressed. Use one of these abbreviations for the units of a width.
• no abbreviation — pixels
• cm — centimeters
• in — inches
• mm — millimeters
• pi — picas
• pt — points
• px — pixels
For example, for a three pica wide column separator, set the ColSepWidth property to
3pi.
ColSpecGroups — Properties of group of columns in table
array of mlreportgen.dom.TableColSpecGroups objects
An array of mlreportgen.dom.TableColSpecGroups objects that specifies the width,
alignment, and other properties of a group of columns. The first object applies to the
first group of columns, the second object to the second group, etc. Specify the number of
columns belonging to each group using the Span property of the TableColSpecGroups
object. For example, if the first object has a span of 2, it applies to the first two columns.
If the second group has a span of 3, it applies to the next three columns, etc.
CustomAttributes — Custom attributes for document element
array of mlreportgen.doc.CustomAttribute objects
The custom attributes must be supported by the output type of the document to which
this document element is appended.
FlowDirection — Column flow direction
string
String specifying the direction for table columns to flow.
• 'ltr' — flow from left to right (column 1 is to the left in the table)
• 'rtl' — flow from right to left (column 1 is to the right in the table)
12-139
12
Classes – Alphabetical List
Footer — Footer for this table
mlreportgen.dom.TableFooter object
The table constructor creates a table footer object and assigns it to this property when
the formal table is constructed. You cannot subsequently set this property. However, you
can append content to the table body and set its properties via this property.
HAlign — Horizontal alignment of this table
string
Possible values are:
• center
• left
• right
Header — Table header
mlreportgen.dom.TableHeader object
The table constructor creates a table header object and assigns it to this property when
the formal table is constructed. You cannot subsequently set this property. However, you
can append content to the table body and set its properties via this property.
Id — ID for document element
string
A session-unique ID is generated as part of document element creation. You can specify
an ID to replace the generated ID.
OuterLeftMargin — Left margin (indentation) of document element
string
String specifying the left indentation. The string must have the format valueUnits
where Units is an abbreviation for the units in which the width size is expressed. Valid
abbreviations are:
• no abbreviation — pixels
• cm — centimeters
• in — inches
• mm — millimeters
12-140
mlreportgen.dom.FormalTable class
• pi — picas
• pt — points
• px — pixels
Parent — Parent of document element
DOM object
This read-only property lists the parent of this document element.
RowSep — Style of lines separating rows
string
The style of a line separating the rows of a table or table section (header, body, or footer).
See the description of the Border property for a description of the possible values.
RowSepColor — Color of row separator
string
You can specify:
• Name of a color. The name must be a CSS color name. See http://www.crockford.com/
wrrrld/color.html.
• A hexadecimal RGB (truecolor) value as #RRGGBB. For example, #0000ff is a shade
of blue.
RowSepWidth — Width of row separator
string
String specifying the width of the row separator. The string must have the format
valueUnits where Units is an abbreviation for the units in which the width size is
expressed. Valid abbreviations are:
• no abbreviation — pixels
• cm — centimeters
• in — inches
• mm — millimeters
• pi — picas
• pt — points
• px — pixels
12-141
12
Classes – Alphabetical List
Style — Format for table
array of format objects
Array of format objects (such as Bold objects) that specify the format for this table.
This property overrides corresponding formats defined by the stylesheet style specified by
the StyleName property.
StyleName — Style in document or document part stylesheet
string
Name of a style specified in the stylesheet of the document or document part to which
this table is appended
The style that specifies the appearance of this table in the output document, for formats
not specified by Style property.
You can set the StyleName property of any formal table section. Setting StyleName
overrides the style specified by the formal table itself. However, if you do this for a Word
document, you must explicitly specify the width of each column in a section to ensure
that all sections have the same width. Word, unlike HTML, has no built-in support for
formal tables. To handle this, the DOM interface represents a formal table as three
tables, one for each section, embedded in a 3x1 table.
TableEntriesStyle — Style to use for table entries
cell array
Cell array of format objects that specify the format for table entries.
TableEntriesInnerMargin — Inner margin for table entries
string
The inner margin is the margin between table cell content and the cell borders.
The string must have the format valueUnits where Units is an abbreviation for the
units in which the width size is expressed. Valid abbreviations are:
• no abbreviation — pixels
• cm — centimeters
• in — inches
• mm — millimeters
• pi — picas
12-142
mlreportgen.dom.FormalTable class
• pt — points
• px — pixels
Tag — Tag for document element
string
Tag for document element, specified as a string.
A session-unique ID is generated as part of document element creation. The generated
tag has the form CLASS:ID, where CLASS is the class of the element and ID is the value
of the Id property of the object. You can specify a tag to replace the generated tag.
Specify your own tag value, for example, to make it easier to identify where an issue
occurred during document generation.
Width — Table width
string
String representing a percentage (for example, '100%') of the page width (minus
margins for Word reports) or a number of units of measurement, having the format
valueUnits, where Units is an abbreviation for the units in which the width is
expressed.
• no abbreviation — pixels
• cm — centimeters
• in — inches
• mm — millimeters
• pi — picas
• pt — points
• px — pixels
Methods
Method
Purpose
append
Append a row of table entries to table.
Use FormalTable.append similar to how
you use TableRow.append.
12-143
12
Classes – Alphabetical List
Method
Purpose
clone
Copy the table.
Use FormalTable.clone the same way
you use Paragraph.clone.
See Also
mlreportgen.dom.ResizeToFitContents | mlreportgen.dom.Table
| mlreportgen.dom.TableBody | mlreportgen.dom.TableColSpec
| mlreportgen.dom.TableEntry | mlreportgen.dom.TableFooter |
mlreportgen.dom.TableHeader | mlreportgen.dom.TableRow
Related Examples
•
12-144
“Create and Format Tables” on page 13-58
mlreportgen.dom.Group class
mlreportgen.dom.Group class
Package: mlreportgen.dom
Group of document objects
Description
Group of document objects that you can append multiple times in a document without
you having to clone the group. When you append a group to a document, the DOM
interface clones the group.
Tip You can use mlreportgen.dom.Group and mlreportgen.dom.Container objects
to produce collections of document elements.
• Use a group object to append the same content in multiple places in a document
without having to clone the group. Group objects do not have a Style property for
using the same applicable styles to all document elements in the group.
• Use a container object to create a div, section, or article container element
and to use the same applicable styles to all document elements in the container. To
append the same container object contents in multiple places in a document, use the
mlreportgen.dom.Container.clone method.
Construction
groupObj = Group() creates an empty group.
Output Arguments
groupObj — Group of document objects
mlreportgen.dom.Group object
Group of document objects, represented by an mlreportgen.dom.Group object.
12-145
12
Classes – Alphabetical List
Properties
Id — ID for document element
string
A session-unique ID is generated as part of document element creation. You can specify
an ID to replace the generated ID.
Children — Children of this document
cell array of mlreportgen.dom.Element objects
This read-only property lists child elements that the document element contains.
Parent — Parent of document element
DOM object
This read-only property lists the parent of this document element.
Tag — Tag for document element
string
Tag for document element, specified as a string.
A session-unique ID is generated as part of document element creation. The generated
tag has the form CLASS:ID, where CLASS is the class of the element and ID is the value
of the Id property of the object. You can specify a tag to replace the generated tag.
Specify your own tag value, for example, to make it easier to identify where an issue
occurred during document generation.
Methods
Method
Purpose
append
Append a DOM object to the group
See Also
mlreportgen.dom.Container
12-146
mlreportgen.dom.Group class
Related Examples
•
“Add Content as a Group” on page 13-14
•
“Create Object Containers” on page 13-26
12-147
12
Classes – Alphabetical List
mlreportgen.dom.HAlign class
Package: mlreportgen.dom
Specify horizontal alignment of document object
Description
Specifies horizontal alignment of a document object.
Construction
alignObj = HAlign() creates an alignment object having the value 'left'.
alignObj = HAlign(value) creates an alignment object having the specified value.
Input Arguments
value — Horizontal alignment
string
String that specifies the horizontal alignment of a document object.
• 'center'
• 'left'
• 'right'
Output Arguments
horizontalAlignObj — Horizontal alignment
mlreportgen.dom.HAlign object
Horizontal alignment, represented by an mlreportgen.dom.HAlign object.
Properties
Id — ID for document element
string
12-148
mlreportgen.dom.HAlign class
A session-unique ID is generated as part of document element creation. You can specify
an ID to replace the generated ID.
Tag — Tag for document element
string
Tag for document element, specified as a string.
A session-unique ID is generated as part of document element creation. The generated
tag has the form CLASS:ID, where CLASS is the class of the element and ID is the value
of the Id property of the object. You can specify a tag to replace the generated tag.
Specify your own tag value, for example, to make it easier to identify where an issue
occurred during document generation.
Value — Horizontal alignment
string
• 'center'
• 'left'
• 'right'
See Also
mlreportgen.dom.VAlign
More About
•
“Report Formatting Approaches” on page 13-20
12-149
12
Classes – Alphabetical List
mlreportgen.dom.Heading class
Package: mlreportgen.dom
Heading paragraph
Description
Create a heading paragraph.
Construction
headingObj = Heading(level) creates an empty heading at the specified level.
headingObj = Heading(level,text) creates the specified level heading containing
the specified text.
headingObj = Heading(level,text,styleName) creates the specified level heading
containing the specified text and using the specified style.
headingObj = Heading(level,domObj) creates the specified level heading
containing the specified DOM object.
Input Arguments
text — Text string
string
Text to use for the heading.
level — Heading level
numeric value
Heading level, specified as a numeric value.
Data Types: double
styleName — Style for text
string
12-150
mlreportgen.dom.Heading class
The style specified by styleName must specify a paragraph style defined in the template
used to create the document to which this heading is appended.
domObj — DOM object to include in heading
DOM object
• ExternalLink
• Image
• InternalLink
• LinkTarget
• Text
Output Arguments
headingObj — Heading paragraph
mlreportgen.dom.Heading object
Heading paragraph, represented by an mlreportgen.dom.Heading object.
Properties
BackgroundColor — Background color
string
Specify one of these as a string:
• The name of a color. The name must be a CSS color name. See http://
www.crockford.com/wrrrld/color.html.
• A hexadecimal RGB (truecolor) value as #RRGGBB. For example, #0000ff is a shade
of blue.
Bold — Option to use bold for text
[] (default) | logical value
To make text bold, set this property to true or 1. If this property is empty and the
StyleName property for this document element specifies a style sheet style, the weight
of the text is determined by that style. Setting the Bold property adds a corresponding
mlreportgen.dom.Bold format object to the Style property of this document element.
Removing the Bold property setting removes the object.
12-151
12
Classes – Alphabetical List
Data Types: logical
Color — Text color
string
Specify one of these as a string:
• The name of a color. The name must be a CSS color name. See http://
www.crockford.com/wrrrld/color.html.
• A hexadecimal RGB (truecolor) value as #RRGGBB. For example, #0000ff is a shade
of blue.
CustomAttributes — Custom attributes of document element
array of mlreportgen.dom.CustomAttribute objects
HTML or Microsoft Word must support the custom attributes of this document element.
FirstLineIndent — Indentation amount for first line of paragraph
string
Amount by which to indent the first line of this paragraph relative to succeeding lines.
To create a hanging indent, in which all the lines are indented except for the first line,
use a negative number.
The string has the format valueUnits, where Units is an abbreviation for the units
in which the indentation is expressed. Use one of these abbreviations for the units for
indentation.
• no abbreviation — pixels
• cm — centimeters
• in — inches
• mm — millimeters
• pi — picas
• pt — points
• px — pixels
FontFamilyName — Name of font family for text
string
The name of a font family.
12-152
mlreportgen.dom.Heading class
To specify substitutions for this font, do not set this property. Instead create and add a
mlreportgen.dom.FontFamily object to the Style property of this document element.
FontSize — Font size for text
string
String having the format valueUnits, where Units is an abbreviation for the units in
which the font size is expressed. Use one of these abbreviations for the units for the font
size.
• no abbreviation — pixels
• cm — centimeters
• in — inches
• mm — millimeters
• pi — picas
• pt — points
• px — pixels
HAlign — Horizontal alignment of this table
string
Possible values are:
• center
• left
• right
Id — ID for document element
string
A session-unique ID is generated as part of document element creation. You can specify
an ID to replace the generated ID.
Italic — Option to use italics for text
[] (default) | logical value
To use italics for text, set this property to true. If this property is empty and the
StyleName property for this document element specifies a style sheet style, the slant of
the text is determined by that style. Setting the Italic property adds a corresponding
mlreportgen.dom.Italic format object to the Style property of this document
element. Removing the Italic property setting removes the object.
12-153
12
Classes – Alphabetical List
Data Types: logical
OuterLeftMargin — Left margin (indentation) of document element
string
String specifying the left indentation. The string must have the format valueUnits
where Units is an abbreviation for the units in which the width size is expressed. Valid
abbreviations are:
• no abbreviation — pixels
• cm — centimeters
• in — inches
• mm — millimeters
• pi — picas
• pt — points
• px — pixels
OutlineLevel — Outline level of this paragraph
[] (default) | numeric value
Setting the OutlineLevel property causes this paragraph to be included in
automatically generated outlines, such as a table of contents. The value specifies the
level of the paragraph in the table of contents. For example, to make a paragraph appear
as a Heading 1 (Word) or h1 (HTML), set OutlineLevel to 1.
Data Types: int32
Strike — Text strikethrough
string
The default for this property is []. You can set it to one of these values:
• none — Do not use strikethrough for Word and HTML documents
• single — Use a single line for strikethrough for Word and HTML documents
• double — Use a double line for strikethrough for Word documents
Setting the Strike property adds a corresponding mlreportGen.dom.Strike format
object to the Style property for this document element. Removing the Strike property
setting removes the object.
12-154
mlreportgen.dom.Heading class
Style — Text formatting
array of mlreportgen.dom.DOCXSection objects
An array of mlreportgen.dom.DOCXSection objects that specifies the format for the
text.
StyleName — Name of style to apply to text
string
The style specified by styleName must be defined in the template used to create the
document element to which this text is appended.
Data Types: char
Tag — Tag for document element
string
Tag for document element, specified as a string.
A session-unique ID is generated as part of document element creation. The generated
tag has the form CLASS:ID, where CLASS is the class of the element and ID is the value
of the Id property of the object. You can specify a tag to replace the generated tag.
Specify your own tag value, for example, to make it easier to identify where an issue
occurred during document generation.
Underline — Type of underline, if any, for text
[] (default) | string
You can specify one of the following types of underlines.
Border String
Description
Supported Output Types
dash
Dashed underline
Word
dashedHeavy
Line with heavy dashes
Word
dashLong
Line with long dashes
Word
dashLongHeavy
Line with heavy long
dashes
Word
dashDotDotHeavy
Line with heavy dashes
with two dots between
the dashes
Word
dashDotHeavy
Heavy dash-dot line
Word
12-155
12
Classes – Alphabetical List
Border String
Description
Supported Output Types
dotted
Dotted line
Word
dottedHeavy
Thick dotted line
Word
dotDash
Dot-dash line
Word
dotDotDash
Dot-dot-dash line
Word
dashDotHeavy
Heavy dot-dash line
Word
double
Double line
Word
none
Do not use underlining
HTML and Word
single
Single line
HTML and Word
thick
Thick line
Word
wave
Wavy line
Word
waveyDouble
Double wavy line
Word
waveyHeavy
Heavy wavy
Word
words
Underline non-space
characters only
Word
If this property is empty and StyleName property of this document element specifies a
style sheet style, the type of underline is determined by that style.
To specify the color as well as the type of the underline, do not set the Underline
property. Instead, set the Style property of this document element to include an
mlreportgen.dom.Underline format object that specifies the desired underline type
and color.
Setting the Underline property adds a corresponding mlreportgen.dom.Underline
format object to the Style property for this document element. Removing the
Underline property setting removes the object.
WhiteSpace — White space and line breaks in text
[] (default) | string
To specify how to handle white space, use one of the following strings.
12-156
Border String
Description
Supported Output Types
normal
Does not preserve white
space and line breaks
Word and HTML
mlreportgen.dom.Heading class
Border String
Description
Supported Output Types
nowrap
Sequences of white space
collapse into a single white
space. Text never wraps to
the next line.
HTML
preserve
Preserves white space. Text Word and HTML
wraps only on line breaks.
See below for details.
Acts like the <pre> tag in
HTML.
pre
Preserves white space. Text HTML
wraps only on line breaks.
Acts like the <pre> tag in
HTML.
pre-line
Sequences of white space
collapse into a single white
space. Text wraps.
pre-wrap
Preserves white space. Text HTML
wraps when necessary and
on line breaks
HTML
If you want to view HTML output in the MATLAB browser and you want to preserve
white space and wrap text only on line breaks, use the preserve setting rather than the
pre setting.
Setting the WhiteSpace property adds a corresponding WhiteSpace format object to
Style property. Removing the WhiteSpace property setting removes the WhiteSpace
object.
Methods
Method
Purpose
append
Append content to heading.
Use Heading.append similar to how you
use Paragraph.append.
12-157
12
Classes – Alphabetical List
Method
Purpose
clone
Copy heading.
Use Heading.clone the similar to how
you use Paragraph.clone.
See Also
mlreportgen.dom.Paragraph
12-158
mlreportgen.dom.Height class
mlreportgen.dom.Height class
Package: mlreportgen.dom
Height of object
Description
Specifies the height of an image.
Construction
heightObj = Height() creates a format object that specifies a height of 1 inch.
heightObj = Height(value) creates a height object having the specified height.
Input Arguments
value — Height of object
'1in' (default) | string
String having the format valueUnits, where Units is an abbreviation for the units in
which the height is expressed. The following abbreviations are valid:
• no abbreviation — pixels
• cm — centimeters
• in — inches
• mm — millimeters
• pi — picas
• pt — points
• px — pixels
Output Arguments
heightObj — Height of object
mlreportgen.dom.Height object
12-159
12
Classes – Alphabetical List
Height of object, represented by an mlreportgen.dom.Height object.
Properties
Id — ID for document element
string
A session-unique ID is generated as part of document element creation. You can specify
an ID to replace the generated ID.
Tag — Tag for document element
string
Tag for document element, specified as a string.
A session-unique ID is generated as part of document element creation. The generated
tag has the form CLASS:ID, where CLASS is the class of the element and ID is the value
of the Id property of the object. You can specify a tag to replace the generated tag.
Specify your own tag value, for example, to make it easier to identify where an issue
occurred during document generation.
Value — Object height
1in (default) | string
String having the format valueUnits, where Units is an abbreviation for the units in
which the height is expressed. The following abbreviations are valid:
• no abbreviation — pixels
• cm — centimeters
• in — inches
• mm — millimeters
• pi — picas
• pt — points
• px — pixels
See Also
mlreportgen.dom.RowHeight | mlreportgen.dom.Width
12-160
mlreportgen.dom.Height class
More About
•
“Report Formatting Approaches” on page 13-20
12-161
12
Classes – Alphabetical List
mlreportgen.dom.HorizontalRule class
Package: mlreportgen.dom
Horizontal line between report content
Description
Horizontal line to visually separate report content in a report. You can append a
HorizontalRule object to these DOM API objects:
• mlreportgen.dom.Document
• mlreportgen.dom.DocumentPart
• mlreportgen.dom.TableEntry
• mlreportgen.dom.Group
• mlreportgen.dom.Container
Construction
horizontalRuleObj = HorizontalRule() creates an unspecified horizontal line.
Output Arguments
horizontalRuleObj — Horizontal line
mlreportgen.dom.HorizontalRule object
Horizontal line, returned as an mlreportgen.dom.HorizontalRule object.
Properties
Border — Line style for horizontal rule
string
Line style for horizontal rule, specified as a string. Use one of these values.
12-162
mlreportgen.dom.HorizontalRule class
String
Applies To
DOCX
HTML
'dashed'
X
X
'dashdotstroked'
X
'dashsmallgap'
X
'dotted'
X
X
'dotdash'
X
'dotdotdash'
X
'double'
X
X
'doublewave'
X
'inset'
X
X
'none'
X
X
'outset'
X
X
'single'
X
'solid'
X
'thick'
X
'thickthinlargegap'
X
'thickthinmediumgap'
X
'thickthinsmallgap'
X
'thinthicklargegap'
X
'thinthickmediumgap'
X
'thinthicksmallgap'
X
'thinthickthinlargegap'
X
'thinthickthinmediumgap'
X
'thinthickthinsmallgap'
X
'threedemboss'
X
'threedengrave'
X
'triple'
X
12-163
12
Classes – Alphabetical List
String
'wave'
Applies To
DOCX
HTML
X
BorderColor — Color of line
string
Color of the line, specified as a string. You can specify:
• The name of a color. The name must be a CSS color name. See http://
www.crockford.com/wrrrld/color.html.
• A hexadecimal RGB (truecolor) value as #RRGGBB. For example, #0000ff is a shade
of blue.
BorderWidth — Width of line (in HTML report)
string
Width of line (in an HTML report), specified as a string. The string must have the format
valueUnits where Units is an abbreviation for the width. Valid abbreviations are:
• no abbreviation — pixels
• cm — centimeters
• in — inches
• mm — millimeters
• pi — picas
• pt — points
• px — pixel
BackgroundColor — Background color of line
string
Background color of the line, specified as a string. You can specify:
• The name of a color. The name must be a CSS color name. See http://
www.crockford.com/wrrrld/color.html.
• A hexadecimal RGB (truecolor) value as #RRGGBB. For example, #0000ff is a shade
of blue.
12-164
mlreportgen.dom.HorizontalRule class
HAlign — Horizontal alignment of line
string
Horizontal alignment of the line, specified as a string.
String
Description
Applies To
DOCX
HTML
'center'
Align center
X
X
'distribute'
Distribute all characters equally
X
'justify'
Justified
X
'KashidaHigh'
Widest Kashida length
X
'Kashida Low'
Low Kashida length
X
'KashidaMedium'
Medium Kashida length
X
'left'
Align left
X
X
'right'
Align right
X
X
'ThaiDistribute'
Thai language distribution
X
Note: Kashida is a type of justification used for some cursive scripts, primarily Arabic,
and Persian.
OuterLeftMargin — Outer left margin (indentation) of line
string
Outer left margin (indentation) of line, specified as a string. The string must have the
format valueUnits where Units is an abbreviation for the margin. Valid abbreviations
are:
• no abbreviation — pixels
• cm — centimeters
• in — inches
• mm — millimeters
• pi — picas
• pt — points
12-165
12
Classes – Alphabetical List
• px — pixels
OuterRightMargin — Outer right margin (indentation) of line
string
Outer right margin (indentation) of line, specified as a string. The string must have the
format valueUnits where Units is an abbreviation for the margin. Valid abbreviations
are:
• no abbreviation — pixels
• cm — centimeters
• in — inches
• mm — millimeters
• pi — picas
• pt — points
• px — pixels
Id — ID for document element
string
A session-unique ID is generated as part of document element creation. You can specify
an ID to replace the generated ID.
Style — Format specification for line
array of format objects
Format specification for the line, specified as an array of format objects.
StyleName — Stylesheet style for line
string
Stylesheet style for line, specified as a string. The name of a style must be specified in
the stylesheet of the document or document part to which this element is appended. The
specified style defines the appearance of this element in the output document where not
overridden by the formats specified by the Style property of this element.
Tag — Tag for line
string
Tag for line, specified as a string.
12-166
mlreportgen.dom.HorizontalRule class
A session-unique ID is generated as part of document element creation. The generated
tag has the form CLASS:ID, where CLASS is the class of the element and ID is the value
of the Id property of the object. You can specify a tag to replace the generated tag.
To make it easier to identify where an issue occurred during document generation, you
can Specify your own tag value.
Methods
Method
Purpose
clone
Copy horizontal line.
Use HorizontalRule.clone in a similar
way to how you use Paragraph.clone.
Examples
Add a Horizontal Rule
import mlreportgen.dom.*;
doctype = 'html';
d = Document('horizontalRule',doctype);
p1 = Paragraph('Top content');
append(d,p1);
hr = HorizontalRule();
hr.Border = 'dotted';
hr.BorderColor = 'blue';
append(d,hr);
p2 = Paragraph('Bottom content');
append(d,p2);
close(d);
rptview('horizontalRule',doctype);
Introduced in R2015b
12-167
12
Classes – Alphabetical List
mlreportgen.dom.HTML class
Package: mlreportgen.dom
Convert HTML text to container of DOM objects
Description
Converts a string of HTML text to an HTML object containing DOM objects having the
same content and format.
Construction
htmlObj = HTML() creates an empty HTML object.
htmlObj = HTML(htmlText)Converts a string of HTML text to an HTML object
containing DOM objects having the same content and format.
An HTML object supports these HTML elements and attributes.
HTML Element
Attributes
a
class, style, href, name
b
class, style
br
n/a
del
class, style
font
class, style, color, face, size
h1, h2, h3, h4, class, style, align
h5, h6
12-168
i
class, style
ins
class, style
img
class, style, src, height, width, alt
li
class, style
ol
class, style
mlreportgen.dom.HTML class
HTML Element
Attributes
p
class, style, align
pre
class, style
s
class, style
span
class, style
strike
class, style
sub
class, style
sup
class, style
table
class, style, align, bgcolor, border, cellspacing,
cellpadding, frame, rules, width
tbody
class, style, align, valign
tfoot
class, style, align, valign
thead
class, style, align, valign
td
class, style, bgcolor, height, width, colspan,
rowspan, valign, nowrap
tr
class, style, bgcolor, valign
u
class, style
ul
class, style
For information about these elements, see the W3Schools tags documentation at
www.w3schools.com/tags.
An HTML object supports these CSS formats:
• background-color
• border
• border-bottom
• border-bottom-color
• border-bottom-style
• boder-bottom-width
• border-color
• border-left
12-169
12
Classes – Alphabetical List
• border-left-color
• border-left-style
• boder-left-width
• border-right
• border-right-color
• border-rigtht-style
• border-right-width
• border-style
• border-top
• border-top-color
• border-top-style
• border-top-width
• color
• font-family
• font-size
• font-style
• font-weight
• height
• line-height
• margin
• margin-bottom
• margin-left
• margin-right
• margin-top
• padding
• padding-bottom
• padding-left
• padding-right
• padding-top
• text-align
12-170
mlreportgen.dom.HTML class
• text-decoration
• text-indent
• vertical-align
• white-space
• width
For information about these formats, see the W3Schools CSS documentation at
www.w3schools.com/cssref.
Input Arguments
htmlText — HTML text
string
HTML text, specified as a string
Example: html = HTML('<p><b>Hello</b> <i style="color:green">World</
i></p>');
Properties
Id — ID for HTML object
string
A session-unique ID is generated as part of HTML object creation. You can specify an ID to
replace the generated ID.
HTMLTag — Tag name of HTML container element
'div' (default) | string
Tag name of HTML container element, specified as a string, such as 'div', 'section',
or 'article' corresponding to this HTML object. This property applies only to HTML
output.
Children — Children of this HTML object
cell array of mlreportgen.dom.Element objects
This read-only property lists child elements that the HTML object contains.
12-171
12
Classes – Alphabetical List
Parent — Parent of this HTML object
a DOM object
This read-only property lists the parent of this HTML object.
Style — Formatting to apply to this HTML object
cell array of format objects
Formatting to apply to this HTML object, specified as a cell array of DOM format objects.
The children of this HTML object inherit any of these formats that they do not override.
StyleName — Style name of this HTML object
string
Style name of this HTML object, specified as a string. Use a name of a style specified in
the stylesheet of the document to which this HTML object is appended. The specified style
defines the appearance of the HTML object in the output document where not overridden
by the formats specified by this StyleName property of the HTML object.
Tag — Tag for HTML object
string
Tag for HTML object, specified as a string.
A session-unique ID is generated as part of HTML object creation. The generated tag has
the form CLASS:ID, where CLASS is the class of the element and ID is the value of the
Id property of the object. You can specify a tag to replace the generated tag.
Specify your own tag value, for example, to make it easier to identify where an issue
occurred during document generation.
Methods
Examples
Convert HTML Text to a Word Report
Create an HTML object from HTML text to use for a Word report.
import mlreportgen.dom.*;
12-172
mlreportgen.dom.HTML class
rpt = Document('MyRep1','docx');
html = HTML('<p><b>Hello</b> <i style="color:green">World</i></p>');
Append content to the HTML object and append the HTML object to the document.
append(html,'<p>This is <u>me</u> speaking</p>');
append(rpt,html);
Generate the Word report.
close(rpt);
rptview(rpt.OutputPath);
•
“Append HTML Content to DOM Reports” on page 13-92
See Also
mlreportgen.dom.Document.addHTML | mlreportgen.dom.HTMLFile
More About
•
“Appending HTML to DOM Reports” on page 13-90
•
“HTML Code Requirements for DOM Reports” on page 13-100
External Websites
•
www.w3schools.com/tags
•
www.w3schools.com/cssref
Introduced in R2015a
12-173
12
Classes – Alphabetical List
mlreportgen.dom.HTMLFile class
Package: mlreportgen.dom
Convert contents of HTML file to container of DOM objects
Description
Converts the contents of an HTML file to an HTMLFile object containing DOM objects
having the same content and format.
Construction
htmlFileObj = HTMLFile(htmlFile) converts the HTML file to an HTMLFile object
containing DOM objects having the same content and format.
An HTMLFile object supports these HTML elements and attributes.
HTML Element
Attributes
a
class, style, href, name
b
class, style
br
n/a
del
class, style
font
class, style, color, face, size
h1, h2, h3, h4, class, style, align
h5, h6
12-174
i
class, style
ins
class, style
img
class, style, src, height, width, alt
li
class, style
ol
class, style
p
class, style, align
mlreportgen.dom.HTMLFile class
HTML Element
Attributes
pre
class, style
s
class, style
span
class, style
strike
class, style
sub
class, style
sup
class, style
table
class, style, align, bgcolor, border, cellspacing,
cellpadding, frame, rules, width
tbody
class, style, align, valign
tfoot
class, style, align, valign
thead
class, style, align, valign
td
class, style, bgcolor, height, width, colspan,
rowspan, valign, nowrap
tr
class, style, bgcolor, valign
u
class, style
ul
class, style
For information about these elements, see the W3Schools tags documentation at
www.w3schools.com/tags.
An HTMLFile object supports these CSS formats:
• background-color
• border
• border-bottom
• border-bottom-color
• border-bottom-style
• boder-bottom-width
• border-color
• border-left
• border-left-color
12-175
12
Classes – Alphabetical List
• border-left-style
• boder-left-width
• border-right
• border-right-color
• border-rigtht-style
• border-right-width
• border-style
• border-top
• border-top-color
• border-top-style
• border-top-width
• color
• font-family
• font-size
• font-style
• font-weight
• height
• line-height
• margin
• margin-bottom
• margin-left
• margin-right
• margin-top
• padding
• padding-bottom
• padding-left
• padding-right
• padding-top
• text-align
• text-decoration
12-176
mlreportgen.dom.HTMLFile class
• text-indent
• vertical-align
• white-space
• width
For information about these formats, see the W3Schools CSS documentation at
www.w3schools.com/cssref.
Input Arguments
htmlFile — HTML file path
string
HTML file path, specified as a string.
Properties
Id — ID for HTMLFile object
string
A session-unique ID is generated as part of HTMLFile object creation. You can specify an
ID to replace the generated ID.
HTMLTag — HTML tag name of HTML container element
'div' (default) | string
Tag name of HTML container element, specified as a string, such as 'div', 'section',
or 'article' corresponding to this HTMLFile object. This property applies only to
HTML output.
Children — Children of this HTMLFile object
cell array of mlreportgen.dom.Element objects
This read-only property lists child elements that the HTMLFile object contains.
Parent — Parent of this HTMLFile object
a DOM object
This read-only property lists the parent of this HTMLFile object.
12-177
12
Classes – Alphabetical List
Style — Formatting to apply to HTMLFile object
cell array of format objects
Formatting to apply to the HTMLFile object, specified as a cell array of DOM format
objects. The children of this HTMLFile object inherit any of these formats that they do
not override.
StyleName — Style name of HTMLFile object
string
Style name of this HTMLFile object, specified as a string. Use a name of a style specified
in the stylesheet of the document to which this HTMLFile object is appended. The
specified style defines the appearance of the HTMLFile object in the output document
where not overridden by the formats specified by this StyleName property of the
HTMLFile object.
Tag — Tag for HTMLFile object
string
Tag for HTMLFile object, specified as a string.
A session-unique ID is generated as part of HTMLFile object creation. The generated tag
has the form CLASS:ID, where CLASS is the class of the element and ID is the value of
the Id property of the object. You can specify a tag to replace the generated tag.
Specify your own tag value, for example, to make it easier to identify where an issue
occurred during document generation.
Methods
Examples
Convert Simulink HTML File to Word Report
This example assumes that there are HTML files called myHTMLfile1.html and
myHTMLfile2.htmlin the MATLAB current folder.
Create a Microsoft Word report.
import mlreportgen.dom.*;
12-178
mlreportgen.dom.HTMLFile class
rpt = Document('MyHTMLReport','docx');
Create the first HTMLFile object and append HTML markup and an HTML object to the
HTMLFile object.
path = 'myHTMLfile1.html';
htmlFile1 = HTMLFile(path);
append(htmlFile1,'<p>This is <u>HTML markup text</u></p>');
htmlObj = HTML('<p>This is an <b>HTML object</b></p>');
append(htmlFile1,htmlObj);
Create a second HTMLFile object.
htmlFile2 = HTMLFile('myHTMLFile2.html');
Append the second HTMLFile object to the first HTMLFile object, and append the first
HTMLFile object to the document.
append(htmlFile1,htmlFile2)
append(rpt,htmlFile1);
Generate the report.
close(rpt);
rptview(rpt.OutputPath);
•
“Append HTML File Contents to DOM Reports” on page 13-94
See Also
mlreportgen.dom.Document.addHTMLFile | mlreportgen.dom.HTML
More About
•
“Appending HTML to DOM Reports” on page 13-90
•
“HTML Code Requirements for DOM Reports” on page 13-100
External Websites
•
www.w3schools.com/tags
•
www.w3schools.com/cssref
Introduced in R2015a
12-179
12
Classes – Alphabetical List
mlreportgen.dom.Image class
Package: mlreportgen.dom
Create image to be included in report
Description
Create an image to be included in a report.
Construction
imageObj = Image(imagePath) creates an image object containing the image file
specified by imagePath.
The contents of the specified image file are copied into the output document either when
the image object is appended to the document (in document streaming mode) or when
the document is closed. Do not delete the original file before it has been copied into the
document.
Input Arguments
imagePath — Path of image file
string
Path of an image file, specified as a string.
For a Microsoft Word report, you can use these image formats:
• .bmp
• .emf
• .eps
• .gif
• .jpeg
• .jpg
• .png
12-180
mlreportgen.dom.Image class
• .tif
• .tiff
For HTML reports, you can use the same image formats as for a Word report, plus you
can use .svg format.
Output Arguments
imageObj — Image
mlreportgen.dom.Image object
Image, represented by an mlreportgen.dom.Image object.
Properties
CustomAttributes — Custom attributes of document element
array of mlreportgen.dom.CustomAttribute objects
HTML or Microsoft Word must support the custom attributes of this document element.
Height — Height of image
string
String having the format valueUnits, where Units is an abbreviation for the units in
which the height is expressed. The following abbreviations are valid:
• no abbreviation — pixels
• cm — centimeters
• in — inches
• mm — millimeters
• pi — picas
• pt — points
• px — pixels
Alternatively, you can specify the image height using the Image.Style property. For
example:
Image.Style = {Height('4in')};
12-181
12
Classes – Alphabetical List
Id — ID for document element
string
A session-unique ID is generated as part of document element creation. You can specify
an ID to replace the generated ID.
Map — Map of hyperlink areas in image (HTML only)
mlreportgen.dom.ImageMap object
Map of hyperlink areas in image, specified as an mlreportgen.dom.ImageMap object
Path — Path of image file
string
Path of image file, specified as a string.
Style — Format specification
array of format objects
Format objects that specify the format of a document element.
StyleName — Name of image style sheet
string
Name of image style sheet, specified as a string. The style name is the name of a style
specified in the stylesheet of the document or document part to which this element
is appended. The specified style defines the appearance of this element in the output
document where not overridden by the formats specified by the Style property of this
element.
Note: Word output ignores the style name.
Tag — Tag for document element
string
Tag for document element, specified as a string.
A session-unique ID is generated as part of document element creation. The generated
tag has the form CLASS:ID, where CLASS is the class of the element and ID is the value
of the Id property of the object. You can specify a tag to replace the generated tag.
12-182
mlreportgen.dom.Image class
Specify your own tag value, for example, to make it easier to identify where an issue
occurred during document generation.
VAlign — Vertical alignment of image
string
Possible values are:
• top
• bottom
• middle
Width — Image width
string
String having the format valueUnits, where Units is an abbreviation for the units in
which the height is expressed. The following abbreviations are valid:
• no abbreviation — pixels
• cm — centimeters
• in — inches
• mm — millimeters
• pi — picas
• pt — points
• px — pixels
Methods
Method
Purpose
append
Append a custom element to this image.
Use Image.append in a similar way to
how you use ExternalLink.append.
clone
Clone this image
Use Image.clone in a similar way to how
you use Paragraph.clone.
12-183
12
Classes – Alphabetical List
See Also
mlreportgen.dom.ImageArea | mlreportgen.dom.ImageMap |
mlreportgen.dom.ScaleToFit
Related Examples
•
12-184
“Create and Format Images” on page 13-75
mlreportgen.dom.ImageArea class
mlreportgen.dom.ImageArea class
Package: mlreportgen.dom
Define image area as hyperlink
Description
Define an area in an image to be an HTML hyperlink. When a user clicks an image area,
the HTML browser displays the target page, based on the URL or link target you specify.
You can provide alternative text for screen reader users.
Construction
imageAreaObj = ImageArea() creates an empty image area.
imageAreaObj = ImageArea(target,altText,x1,y1,x2,y2) creates a rectangular
image area.
imageAreaObj = ImageArea(target,altText,x,y,radius) creates a circular
image area.
imageAreaObj = ImageArea(target,altText,polygonCoordinates) creates a
polygonal image area.
Input Arguments
target — Image area hyperlink target
string
String that specifies either of these values:
• URL of the page to be loaded when this image area is clicked
• Name of a link target
altText — Text to display if image is not visible
string
12-185
12
Classes – Alphabetical List
Text to display if the image is not visible, specified as a string.
x1 — x coordinate of top-left corner of rectangular image area, in pixels
unsigned integer
Specify relative to the top-left corner of the image.
Data Types: uint16
y1 — y coordinate of top-left corner of rectangular image area
unsigned integer
Specify relative to the top-left corner of the image, in pixels.
Data Types: uint16
x2 — x coordinate of bottom-right corner of rectangular image area
unsigned integer
Specify relative to the top-left corner of the image, in pixels.
Data Types: uint16
y2 — y coordinate of bottom-right corner of rectangular image area
unsigned integer
Specify relative to the top-left corner of the image, in pixels.
Data Types: uint16
x — x coordinate of center of circular image area
unsigned integer
Specify relative to the top-left corner of the image, in pixels.
Data Types: uint16
y — y coordinate of center of circular image area
unsigned integer
Specify relative to the top-left corner of the image, in pixels.
Data Types: uint16
radius — Radius of circular image area
unsigned integer
12-186
mlreportgen.dom.ImageArea class
The radius, in pixels.
Data Types: uint16
polygonCoordinates — Coordinates of polygonal image area
array
Specify an array of x and y coordinate pairs, with coordinates for each corner of the
polygon, in the form [x1, y1, x2, y2, ... xN, yN]. Specify the coordinates to
reflect the corners of the polygon, in sequence.
Specify each coordinate relative to the top-left corner of the image, in pixels.
Output Arguments
imageAreaObj — Image area hyperlink
mlreportgen.dom.ImageArea object
Image area hyperlink, represented by an mlreportgen.dom.ImageArea object.
Properties
Target — Image area target
string
String that specifies either of these values:
• URL of the page to be loaded when this image area is clicked
• Name of a link target
AlternateText — Text to display if image is not visible
string
Text to display if the image is not visible, specified as a string.
Shape — Shape of image area
string
(Read-only) Possible values are:
• 'rect' — rectangular image area
12-187
12
Classes – Alphabetical List
• 'circle' — circular image area
• 'poly' — polygonal image area
Coords — Coordinates for image area
array
(Read-only) The coordinates represent different kinds of points, depending on the shape
of the image area. Coordinates are relative to the top-left corner of the image.
• For a rectangle, the coordinates represent the top-left corner and the bottom-right
corner.
• For a circle, the array represents the coordinates at the center of the circle and the
radius.
• For a polygon, the coordinates represent the corners.
Id — ID for document element
string
A session-unique ID is generated as part of document element creation. You can specify
an ID to replace the generated ID.
Tag — Tag for document element
string
Tag for document element, specified as a string.
A session-unique ID is generated as part of document element creation. The generated
tag has the form CLASS:ID, where CLASS is the class of the element and ID is the value
of the Id property of the object. You can specify a tag to replace the generated tag.
Specify your own tag value, for example, to make it easier to identify where an issue
occurred during document generation.
Examples
Add Image Area to Image of a MATLAB Plot
import mlreportgen.dom.*
d = Document('imageArea','html');
12-188
mlreportgen.dom.ImageArea class
x = 0:pi/100:2*pi;
y = sin(x);
plot(x,y);
annotation('textbox', [0.2,0.4,0.1,0.1],...
'String', 'Help on plot function');
saveas(gcf,'plot_img.png');
plot1 = Image('plot_img.png');
append(d,plot1);
area1 = ImageArea(...
['http://www.mathworks.com/help/matlab/ref/' ...
'plot.html?searchHighlight=plot'], ...
'plot function help', 240,450,463,492);
map = ImageMap();
plot1.Map = map;
append(map,area1);
close(d);
rptview(d.OutputPath);
•
“Create and Format Images” on page 13-75
See Also
mlreportgen.dom.Image | mlreportgen.dom.ImageMap | mlreportgen.dom.LinkTarget
12-189
12
Classes – Alphabetical List
mlreportgen.dom.ImageMap class
Package: mlreportgen.dom
Map of hyperlink areas in image
Description
Map of image areas, which are areas within an image where a user can click to open
content in an HTML browser.
Construction
map = ImageMap() creates an empty image map. Use the ImageMap.append method
to add image areas to the map.
Output Arguments
map — Map of hyperlink areas in image
mlreportgen.dom.ImageMap object
Map of hyperlink areas in image, specified as an mlreportgen.dom.ImageMap object.
Properties
Id — ID for document element
string
A session-unique ID is generated as part of document element creation. You can specify
an ID to replace the generated ID.
Tag — Tag for document element
string
Tag for document element, specified as a string.
12-190
mlreportgen.dom.ImageMap class
A session-unique ID is generated as part of document element creation. The generated
tag has the form CLASS:ID, where CLASS is the class of the element and ID is the value
of the Id property of the object. You can specify a tag to replace the generated tag.
Specify your own tag value, for example, to make it easier to identify where an issue
occurred during document generation.
Methods
Method
Purpose
append
Append an image area to this image map.
clone
Clone this image map.
Use ImageMap.clone in a similar way you
how you use Paragraph.clone.
Examples
Append an Image Area to an Image Map
import mlreportgen.dom.*
d = Document('imageArea','html');
x = 0:pi/100:2*pi;
y = sin(x);
plot(x,y);
annotation('textbox', [0.2,0.4,0.1,0.1],...
'String', 'Help on plot function');
saveas(gcf,'plot_img.png');
plot1 = Image('plot_img.png');
append(d,plot1);
area1 = ImageArea(...
['http://www.mathworks.com/help/matlab/ref/' ...
'plot.html?searchHighlight=plot'], ...
'plot function help', 240,450,463,492);
map = ImageMap();
12-191
12
Classes – Alphabetical List
plot1.Map = map;
append(map,area1);
close(d);
rptview(d.OutputPath);
•
“Create and Format Images” on page 13-75
See Also
mlreportgen.dom.Image | mlreportgen.dom.ImageArea
12-192
mlreportgen.dom.InnerMargin class
mlreportgen.dom.InnerMargin class
Package: mlreportgen.dom
Margin between content and bounding box
Description
Specifies the margin between the content and the bounding box of a document object. A
bounding box of an object includes the border of the object (if it has a border), the inner
margin, and the object content.
Construction
marginObj = InnerMargin() creates an unspecified margin between the content of an
object and its bounding box.
marginObj = InnerMargin(all) creates the specified margin on all sides between
the content of an object and its bounding box.
marginObj = InnerMargin(left,right) creates the specified margins between the
left and right sides of the content of an object and its bounding box.
marginObj = InnerMargin(left,right,top,bottom) creates the specified
margins between sides of the content of an object and its bounding box.
Input Arguments
all — Margin size on all sides
string
String specifying the margin on all sides between the content of an object and its
bounding box. String must have the format valueUnits where Units is an abbreviation
for the units in which the width size is expressed. Valid abbreviations are:
• No abbreviation — pixels
12-193
12
Classes – Alphabetical List
• cm — centimeters
• in — inches
• mm — millimeters
• pi — picas
• pt — points
• px — pixel
left — Left margin size
string
String specifying the left margin between the content of an object and its bounding box.
See the all input argument description for valid strings.
right — Right margin size
string
String specifying the right margin between the content of an object and its bounding box.
See the all input argument description for valid strings.
top — Top margin size
string
String specifying the top margin between the content of an object and its bounding box.
See the all input argument description for valid strings.
bottom — Bottom margin size
string
String specifying the bottom margin between the content of an object and its bounding
box. See the all input argument description for valid strings.
Output Arguments
marginObj — Margin between content and bounding box
mlreportgen.dom.InnerMargin object
Margin between content and bounding box, specified with an
mlreportgen.dom.InnerMargin object.
12-194
mlreportgen.dom.InnerMargin class
Properties
Bottom — Size of bottom margin
string
String specifying the bottom margin. String must have the format valueUnits where
Units is an abbreviation for the units in which the width size is expressed. Valid
abbreviations are:
• No abbreviation — pixels
• cm — centimeters
• in — inches
• mm — millimeters
• pi — picas
• pt — points
• px — pixel
Left — Size of left margin
string
String specifying the left margin between the content of an object and its bounding box.
See the Bottom property description for valid strings.
Id — ID for document element
string
A session-unique ID is generated as part of document element creation. You can specify
an ID to replace the generated ID.
Right — Size of right margin
string
String specifying the right margin between the content of an object and its bounding box.
See the Bottom property description for valid strings.
Tag — Tag for document element
string
Tag for document element, specified as a string.
12-195
12
Classes – Alphabetical List
A session-unique ID is generated as part of document element creation. The generated
tag has the form CLASS:ID, where CLASS is the class of the element and ID is the value
of the Id property of the object. You can specify a tag to replace the generated tag.
Specify your own tag value, for example, to make it easier to identify where an issue
occurred during document generation.
Top — Size of top margin
string
String specifying the top margin between the content of an object and its bounding box.
See the Bottom property description for valid strings.
Examples
Add Inner Margins to a Paragraph
import mlreportgen.dom.*;
doctype = 'html';
d = Document('test',doctype);
p = Paragraph('Hello World');
p.Style = {Border('solid','red'), ...
HAlign('center'),InnerMargin('12pt')};
append(d,p);
p = Paragraph('More Greetings');
p.Style = {Border('solid','blue'), ...
HAlign('center'),InnerMargin('30pt')};
append(d,p);
close(d);
rptview('test',doctype);
See Also
mlreportgen.dom.OuterMargin
More About
•
12-196
“Report Formatting Approaches” on page 13-20
mlreportgen.dom.InternalLink class
mlreportgen.dom.InternalLink class
Package: mlreportgen.dom
Hyperlink to a location in same document
Description
Hyperlink to a location in the same document that contains the hyperlink. Use this kind
of link to provide internal navigation within a document.
Construction
internalLinkObj = InternalLink(targetName,linkText) creates a hyperlink to
the specified link target object and uses the specified link text.
internalLinkObj = InternalLink(targetName,linkText,
linkTextStyleName) creates a hyperlink to the specified link target and uses the
specified style name for the link text.
internalLinkObj = InternalLink(targetName,textObj) creates a hyperlink to
the specified target using the specified Text object.
Input Arguments
targetName — Link target name
string
Link target name, specified as string. The string is the value in the Name property
of an mlreportgen.dom.LinkTarget object or a URL.
linkText — Link text
string
The text to use for the link text.
linkTextStyleName — Name of style for link text
string
12-197
12
Classes – Alphabetical List
Name of style to use for the link text.
textObj — Text object containing link text
mlreportgen.dom.Text object
Text object containing link text, specified by an mlreportgen.dom.Text object.
Output Arguments
internalLinkObj — Internal link
mlreportgen.dom.InternalLink object
Internal link, represented by an mlreportgen.dom.InternalLink object.
Properties
Children — Children of this document
cell array of mlreportgen.dom.Element objects
This read-only property lists child elements that the document element contains.
CustomAttributes — Custom attributes of document element
array of mlreportgen.dom.CustomAttribute objects
HTML or Microsoft Word must support the custom attributes of this document element.
Id — ID for document element
string
A session-unique ID is generated as part of document element creation. You can specify
an ID to replace the generated ID.
Parent — Parent of document element
DOM object
This read-only property lists the parent of this document element.
StyleName — Name of link style defined in the template
string
12-198
mlreportgen.dom.InternalLink class
Name of link style defined in the template, specified as a string. The style specified by
styleName must be defined in the template used to create the document to which the
link is appended.
Style — Format specification
array of format objects
Format objects that specify the format of a document element.
Tag — Tag for document element
string
Tag for document element, specified as a string.
A session-unique ID is generated as part of document element creation. The generated
tag has the form CLASS:ID, where CLASS is the class of the element and ID is the value
of the Id property of the object. You can specify a tag to replace the generated tag.
Specify your own tag value, for example, to make it easier to identify where an issue
occurred during document generation.
Target — Internal target link
string
This read-only property displays the link target of this hyperlink.
Methods
Method
Purpose
append
Append text or a Text, Image, or
CustomElement object.
Use InternalLink.append
in a similar way to how you use
ExternalLink.append.
clone
Copy the internal link.
Use InternalLink.clone in a similar
way to how you use Paragraph.clone.
12-199
12
Classes – Alphabetical List
Examples
Add Internal Link
import mlreportgen.dom.*
d = Document('mydoc');
append(d, InternalLink('bio','About the Author'));
h = Heading(1,LinkTarget('bio'));
append(h,'Author''s Biography');
append(d,h);
close(d);
rptview('mydoc','html');
•
“Create Links” on page 13-72
See Also
mlreportgen.dom.ExternalLink | mlreportgen.dom.LinkTarget
12-200
mlreportgen.dom.Italic class
mlreportgen.dom.Italic class
Package: mlreportgen.dom
Italic for text object
Description
Specifies whether text should be rendered italic.
Construction
italicObj = Italic() creates a format object that specifies that text should be
rendered italic.
italicObj = Italic(value) creates a format object that specifies that text should be
rendered italic if value is true; otherwise, upright.
Input Arguments
value — Option to use italic or not for a text object
logical value
A setting of false (or 0) uses upright text. A setting of true (or 1) renders text in italic
Data Types: logical
Output Arguments
italicObj — Italic format object
mlreportgen.dom.Italic object
Italic format, represented by an mlreportgen.dom.Italic object.
Properties
Id — ID for document element
string
12-201
12
Classes – Alphabetical List
A session-unique ID is generated as part of document element creation. You can specify
an ID to replace the generated ID.
Tag — Tag for document element
string
Tag for document element, specified as a string.
A session-unique ID is generated as part of document element creation. The generated
tag has the form CLASS:ID, where CLASS is the class of the element and ID is the value
of the Id property of the object. You can specify a tag to replace the generated tag.
Specify your own tag value, for example, to make it easier to identify where an issue
occurred during document generation.
Value — Use italic or roman for text object
[] (default) | logical value
The possible values are:
• 0— uses roman (straight) text
• 1— renders text in italic
Data Types: logical
Examples
Create paragraph that whose text is italic by default
import mlreportgen.dom.*
d = Document('mydoc');
p = Paragraph('italic text');
p.Style = {Italic};
append(d,p);
close(d);
rptview('mydoc', 'html');
Add Upright Text
import mlreportgen.dom.*
d = Document('mydoc');
p = Paragraph('italic text
12-202
');
mlreportgen.dom.Italic class
p.Style = {Italic};
append(d,p);
t = Text('upright text');
t.Style = {Italic(false)};
append(p,t);
close(d);
rptview('mydoc', 'html');
More About
•
“Report Formatting Approaches” on page 13-20
12-203
12
Classes – Alphabetical List
mlreportgen.dom.KeepLinesTogether class
Package: mlreportgen.dom
Start paragraph on new page if necessary
Description
Start paragraph on new page if necessary
Construction
keepLinesTogetherObj = KeepLinesTogether() starts a paragraph on a new page
if it cannot fit entirely on current page.
keepLinesTogetherObj = KeepLinesTogether(onoff) starts paragraph on a new
page only if it cannot fit entirely on current page and onoff is true.
Input Arguments
onoff — Keep paragraph on one page
logical
Use one of these values:
• true (default)
• false
• 0
A setting of true (or 1) starts a paragraph on a new page when it cannot fit entirely on
the current page. A setting of false (or 0) allows a paragraph to span two pages when it
cannot fit entirely on the current page.
Data Types: logical
Output Arguments
keepLinesTogetherObj — Start paragraph on new page if necessary
mlreportgen.dom.KeepLinesTogether object
12-204
mlreportgen.dom.KeepLinesTogether class
Start paragraph on new page if necessary, represented by an
mlreportgen.dom.KeepLinesTogether object.
Properties
Id — ID for document element
string
A session-unique ID is generated as part of document element creation. You can specify
an ID to replace the generated ID.
Tag — Tag for document element
string
Tag for document element, specified as a string.
A session-unique ID is generated as part of document element creation. The generated
tag has the form CLASS:ID, where CLASS is the class of the element and ID is the value
of the Id property of the object. You can specify a tag to replace the generated tag.
Specify your own tag value, for example, to make it easier to identify where an issue
occurred during document generation.
Value — Keep paragraph lines together
logical
Possible values are:
• true or 1 — Starts paragraph on a new page when it cannot fit entirely on the
current page.
• false or 0 — Allows the paragraph to span two pages when it cannot fit entirely on
the current page.
Data Types: logical
See Also
mlreportgen.dom.KeepWithNext | mlreportgen.dom.PageBreakBefore
More About
•
“Report Formatting Approaches” on page 13-20
12-205
12
Classes – Alphabetical List
mlreportgen.dom.KeepWithNext class
Package: mlreportgen.dom
Keep paragraph on same page as next
Description
Keep paragraph on same page as paragraph that follows it. This format applies only to
Microsoft Word documents.
Construction
obj = KeepWithNext() keeps a paragraph on the same page as the paragraph that
follows it.
obj = KeepWithNext(onoff) keeps a paragraph on the same page as the paragraph
that follows it if onoff is true.
Input Arguments
onoff — Keep paragraph on same page as next
logical
Use one of these values:
• true (default)
• false
• 1
• 0
A setting of true (or 1) keeps a paragraph on the same page as the paragraph that
follows it. A setting of false (or 0) allows a paragraph to be on a different page from the
paragraph that follows it.
Data Types: logical
12-206
mlreportgen.dom.KeepWithNext class
Output Arguments
keepWithNextObj — Keep paragraph on same page as next
mlreportgen.dom.keepWithNext object
Keep paragraph on same page as next, represented by an
mlreportgen.dom.keepWithNext object.
Properties
Id — ID for document element
string
A session-unique ID is generated as part of document element creation. You can specify
an ID to replace the generated ID.
Tag — Tag for document element
string
Tag for document element, specified as a string.
A session-unique ID is generated as part of document element creation. The generated
tag has the form CLASS:ID, where CLASS is the class of the element and ID is the value
of the Id property of the object. You can specify a tag to replace the generated tag.
Specify your own tag value, for example, to make it easier to identify where an issue
occurred during document generation.
Value — Keep paragraph on same page as next paragraph
logical
Use one of these values:
• true or 1 — Keeps a paragraph on the same page as the paragraph that follows it.
• false or 0 — Allows a paragraph to be on a different page from the paragraph that
follows it.
Data Types: logical
See Also
mlreportgen.dom.KeepLinesTogether | mlreportgen.dom.PageBreakBefore
12-207
12
Classes – Alphabetical List
More About
•
12-208
“Report Formatting Approaches” on page 13-20
mlreportgen.dom.LineSpacing class
mlreportgen.dom.LineSpacing class
Package: mlreportgen.dom
Spacing between lines of paragraph
Description
Specifies the spacing between lines of a paragraph.
Construction
lineSpacingObj = LineSpacing() specifies line spacing equal to the height of one
line at the paragraph font size.
lineSpacingObj = LineSpacing(multiple) specifies a line spacing as a multiple of
the paragraph text line height (for example, 1.5).
lineSpacingObj = LineSpacing(spacingHeight) specifies line spacing as a
dimension, for example, '10pt'.
lineSpacingObj = LineSpacing(spacingHeight,spacingType) specifies line
spacing value and type.
Input Arguments
mulitple — Multiple of paragraph line height
1 (default) | scalar
Scalar that specifies the line spacing relative to the paragraph text line height.
spacingHeight — Height of line spacing
string
String having the format valueUnits, where Units is an abbreviation for the units in
which the height is expressed. The following abbreviations are valid:
• no abbreviation — pixels
• cm — centimeters
12-209
12
Classes – Alphabetical List
• in — inches
• mm — millimeters
• pi — picas
• pt — points
spacingType — Line spacing type
string
Type of line spacing, specified as one of these strings:
• 'multiple' — Value is the spacing in terms of number of lines.
• 'exact' — Value is the exact size of the line spacing.
• 'atleast' — Value is the minimum size of the line spacing (applies only to
Microsoft Word)
Output Arguments
lineSpacingObj — Spacing between lines of paragraph
mlreportgen.com.LineSpacing object
Spacing between lines of paragraph, represented by an
mlreportgen.com.LineSpacing object.
Properties
Id — ID for document element
string
A session-unique ID is generated as part of document element creation. You can specify
an ID to replace the generated ID.
Tag — Tag for document element
string
Tag for document element, specified as a string.
A session-unique ID is generated as part of document element creation. The generated
tag has the form CLASS:ID, where CLASS is the class of the element and ID is the value
of the Id property of the object. You can specify a tag to replace the generated tag.
12-210
mlreportgen.dom.LineSpacing class
Specify your own tag value, for example, to make it easier to identify where an issue
occurred during document generation.
Type — Option to specify type of line spacing height
string | 'exact' |
Type of line spacing, specified as one of these strings:
• 'multiple' — Value is the spacing in terms of number of lines.
• 'exact' — Value is the exact size of the line spacing.
• 'atleast' — Value is the minimum size of the line spacing (applies only to Word)
Value — Height of line spacing
'1in' (default) | string
String having the format valueUnits, where Units is an abbreviation for the units in
which the height is expressed. The following abbreviations are valid:
• no abbreviation — pixels
• cm — centimeters
• in — inches
• mm — millimeters
• pi — picas
• pt — points
Examples
Create Line Spacing 1.5 Times the Height of the Paragraph Text Lines
p = Paragraph();
p.Style = {LineSpacing(1.5)};
12-211
12
Classes – Alphabetical List
mlreportgen.dom.LinkTarget class
Package: mlreportgen.dom
Target for internal or external links or image area links
Description
A target to use for internal and external links and for image area links. You can specify
a LinkTarget object when you construct an mlreportgen.dom.InternalLink or
mlreportgen.dom.ImageArea object.
Construction
targetObj = LinkTarget(name) creates a link target with the specified name.
Input Arguments
name — Name of link target
string
Name of a link target, specified as a string.
To set up a link target for an external link:
• In a Word report, specify a Word bookmark.
• In an HTML report, specify an HTML named anchor (for example, <a
name='appendix'/>).
Microsoft Word replaces spaces in a link target names with underscore characters. Avoid
spaces in link target names in Word reports.
Output Arguments
targetObj — Link target object
mlreportgen.dom.LinkTarget object
12-212
mlreportgen.dom.LinkTarget class
Link target, represented by an mlreportgen.dom.LinkTarget object.
Properties
CustomAttributes — Custom attributes of document element
array of mlreportgen.dom.CustomAttribute objects
HTML or Microsoft Word must support the custom attributes of this document element.
Id — ID for document element
string
A session-unique ID is generated as part of document element creation. You can specify
an ID to replace the generated ID.
Name — Name of link target
string
Microsoft Word replaces spaces in a link target names with underscore characters. Avoid
spaces in link target names in Word reports.
Style — Format specification
array of format objects
Format objects that specify the format of a document element.
Stylename — Link target style name
string
The style specified by styleName must be defined in the template used to create the
document element to which this link target is appended.
Tag — Tag for document element
string
Tag for document element, specified as a string.
A session-unique ID is generated as part of document element creation. The generated
tag has the form CLASS:ID, where CLASS is the class of the element and ID is the value
of the Id property of the object. You can specify a tag to replace the generated tag.
12-213
12
Classes – Alphabetical List
Specify your own tag value, for example, to make it easier to identify where an issue
occurred during document generation.
Methods
Method
Purpose
append
Append content to link target.
clone
Copy link target.
Use LinkTarget.clone in a similar way
to how you use Paragraph.clone.
Examples
Link to Top of a Document
Define a link target at the top of the report and add an internal link to that target. In an
actual report, links to this target would appear further down in the report.
import mlreportgen.dom.*
d = Document('mydoc');
append(d,LinkTarget('home'));
append(d,InternalLink('home','Go to Top'));
close(d);
rptview('mydoc', 'html');
•
“Create Links” on page 13-72
See Also
mlreportgen.dom.ExternalLink | mlreportgen.dom.ImageArea |
mlreportgen.dom.InternalLink
12-214
mlreportgen.dom.ListItem class
mlreportgen.dom.ListItem class
Package: mlreportgen.dom
Create item for ordered or unordered list
Description
Specifies an item in an ordered (numbered) or unordered (bulleted) list.
Construction
listItemObj = ListItem() creates an empty list item.
listItemObj = ListItem(text) creates a list item using the specified text. The
constructor creates a Text object and appends the text object to the list item.
listItemObj = ListItem(text,styleName) creates a list item using the specified
text and applies the specified style.
listItemObj = ListItem(domObj) creates a list item and appends the specified
document element object to the list item.
listItemObj = ListItem(domObj,styleName) creates a list item using the
specified document element object and style name.
Input Arguments
text — Text for list item
string
The constructor creates an mlreportgen.dom.Text object for the specified text.
domObj — Document element object
a DOM object
You can specify a Paragraph object or elements that you can append to a paragraph,
including the following kinds of DOM objects:
• mlreportgen.dom.Text
12-215
12
Classes – Alphabetical List
• mlreportgen.dom.Paragraph
• mlreportgen.dom.Image
• mlreportgen.dom.Table
• mlreportgen.dom.FormalTable
• mlreportgen.dom.ExternalLink
• mlreportgen.dom.InternalLink
• mlreportgen.dom.CustomElement
styleName — Name of style for list item
string
Name of style to use for the list item, specified as a string.
Output Arguments
listItemObj — List item
mlreportgen.dom.ListItem object
List item, represented by an mlreportgen.dom.ListItem object.
Properties
Children — Children of this document
cell array of mlreportgen.dom.Element objects
This read-only property lists child elements that the document element contains.
CustomAttributes — Custom attributes of document element
array of mlreportgen.dom.CustomAttribute objects
HTML or Microsoft Word must support the custom attributes of this document element.
Id — ID for document element
string
A session-unique ID is generated as part of document element creation. You can specify
an ID to replace the generated ID.
Style — Format specification
array of format objects
12-216
mlreportgen.dom.ListItem class
Format objects that specify the format of a document element.
Parent — Parent of document element
DOM object
This read-only property lists the parent of this document element.
StyleName — This property is ignored
string
This property is ignored.
Tag — Tag for document element
string
Tag for document element, specified as a string.
A session-unique ID is generated as part of document element creation. The generated
tag has the form CLASS:ID, where CLASS is the class of the element and ID is the value
of the Id property of the object. You can specify a tag to replace the generated tag.
Specify your own tag value, for example, to make it easier to identify where an issue
occurred during document generation.
Methods
Method
Purpose
append
Append a string or any of these kinds of
DOM objects to a list item:
Use ListItem.append in a similar way
as you use Paragraph.append, except you • Text
can append different content to a list item • Paragraph
than to a paragraph.
• Table
• Image
• ExternalLink
• InternalLink
• CustomElement
12-217
12
Classes – Alphabetical List
Method
Purpose
clone
Clone a list item.
Use ListItem.clone the same way you
use Paragraph.clone.
Examples
Create List Items for an Ordered List
import mlreportgen.dom.*;
doctype = 'html';
d = Document('test',doctype);
p = Paragraph('Perform the following steps.');
append(d,p);
step1 = ListItem('Do this step first.');
textForItem = Text('Next, do this.');
step2 = ListItem(textForItem);
procedure = OrderedList();
append(procedure,step1);
append(procedure,step2);
append(d,procedure);
close(d);
rptview('test',doctype);
•
“Create and Format Lists” on page 13-52
See Also
mlreportgen.dom.OrderedList | mlreportgen.dom.UnorderedList
12-218
mlreportgen.dom.MessageDispatcher class
mlreportgen.dom.MessageDispatcher class
Package: mlreportgen.dom
DOM message dispatcher
Description
Dispatcher for document generation status messages.
Note: When you create a message dispatcher, the DOM API keeps the dispatcher
until the end of the current MATLAB session. Delete message event listeners to avoid
duplicate reporting of message objects during a MATLAB session.
Properties
Filter — Message filter
string
(Read-only) The value of this property is a filter that determines the types of messages
the dispatcher dispatches. You can control which types of messages are dispatched by
setting the properties of the filter.
Id — ID for document element
string
A session-unique ID is generated as part of document element creation. You can specify
an ID to replace the generated ID.
Tag — Tag for document element
string
Tag for document element, specified as a string.
A session-unique ID is generated as part of document element creation. The generated
tag has the form CLASS:ID, where CLASS is the class of the element and ID is the value
of the Id property of the object. You can specify a tag to replace the generated tag.
12-219
12
Classes – Alphabetical List
Specify your own tag value, for example, to make it easier to identify where an issue
occurred during document generation.
Methods
Method
Purpose
dispatch
Dispatch a document generation status
message.
getTheDispatcher
Get the message dispatcher.
Examples
Add and Dispatch a Progress Message
This example shows how to add a progress message to display when generating a report.
Add a dispatcher and listener to the report.
import mlreportgen.dom.*;
doctype = 'html';
d = Document('test',doctype);
d.Tag = 'My report';
dispatcher = MessageDispatcher.getTheDispatcher;
l = addlistener(dispatcher,'Message', ...
@(src,evtdata) disp(evtdata.Message.formatAsText));
open(d);
dispatch(dispatcher,ProgressMessage('starting chapter',d));
p = Paragraph('Chapter ');
p.Tag = 'chapter title';
append(d,p);
close(d);
rptview('test',doctype);
Delete the listener to avoid duplicate reporting of message objects during a MATLAB
session.
delete(l);
12-220
mlreportgen.dom.MessageDispatcher class
Check the progress messages in the MATLAB Command Window. The starting
chapter message appears, in addition to the predefined DOM progress messages.
•
“Display Report Generation Messages” on page 13-106
See Also
mlreportgen.dom.MessageDispatcher.dispatch |
mlreportgen.dom.MessageDispatcher.getTheDispatcher |
mlreportgen.dom.MessageEventData | mlreportgen.dom.MessageFilter
12-221
12
Classes – Alphabetical List
mlreportgen.dom.MessageEventData class
Package: mlreportgen.dom
Holds message triggering message event
Description
Contains the message that triggered a message event.
Construction
messageEventDataObj = MessageEventData(msg) creates a message
event data object that contains a DOM message (for example, a message of type
mlreportgen.dom.ProgressMessage).
The DOM message dispatcher attaches an object of this type to a message event when
it dispatches a message. This enables message event listeners to retrieve the dispatched
message. You need to create instances of this type only if you want to create your own
message dispatcher.
Input Arguments
msg — Message object
message object
A message object, such as an mlreportgen.dom.ProgressMessage object, that
triggers a message event.
Output Arguments
messageEventDataObj — Holds message triggering message event
mlreportgen.dom.MessageEventData object
Container for message triggering message event data, represented by an
mlreportgen.dom.MessageEventData object.
12-222
mlreportgen.dom.MessageEventData class
Properties
Id — ID for document element
string
A session-unique ID is generated as part of document element creation. You can specify
an ID to replace the generated ID.
Message — Message object (read-only)
message object
The value of this read-only property is a DOM message object, such as an
mlreportgen.dom.ProgressMessage object, that triggers a message event.
Tag — Tag for document element
string
Tag for document element, specified as a string.
A session-unique ID is generated as part of document element creation. The generated
tag has the form CLASS:ID, where CLASS is the class of the element and ID is the value
of the Id property of the object. You can specify a tag to replace the generated tag.
Specify your own tag value, for example, to make it easier to identify where an issue
occurred during document generation.
Examples
Capture Message Event Data
When you add a dispatcher, the DOM API creates the evtdata object, which is an
mlreportgen.dom.MessageEventData object.
import mlreportgen.dom.*;
doctype = 'html';
d = Document('test', doctype);
d.Tag = 'My report';
dispatcher = MessageDispatcher.getTheDispatcher;
l = addlistener(dispatcher, 'Message', ...
@(src, evtdata) disp(evtdata.Message.formatAsText));
12-223
12
Classes – Alphabetical List
open(d);
dispatch(dispatcher, ProgressMessage('starting chapter', d));
p = Paragraph('Chapter ');
p.Tag = 'chapter title';
p.Style = { CounterInc('chapter'), CounterReset('table'), WhiteSpace('pre') };
append(p, AutoNumber('chapter'));
append(d, p);
close(d);
rptview('test', doctype);
Delete the listener to avoid duplicate reporting of message objects during a MATLAB
session.
delete(l);
•
“Display Report Generation Messages” on page 13-106
See Also
mlreportgen.dom.MessageDispatcher
12-224
mlreportgen.dom.MessageFilter class
mlreportgen.dom.MessageFilter class
Package: mlreportgen.dom
Filter to control message dispatcher
Description
Filter for messages dispatched by the message dispatcher.
Properties
DebugMessagePass — Pass or block debug messages
logical value
• true— Pass debug messages.
• false— Block debug messages.
Data Types: logical
ErrorMessagePass — Pass or block error messages
logical value
• true— Pass error messages.
• false— Block error messages.
Data Types: logical
GlobalFilter — Pass or block all messages
logical value
• true— Pass all messages.
• false— Block all messages.
Data Types: logical
ProgressMessagePass — Pass or block progress messages
logical value
12-225
12
Classes – Alphabetical List
• true— Pass progress messages.
• false— Block progress messages.
Data Types: logical
GlobalFilter — Pass or block all messages
logical value
• true— Pass all messages.
• false— Block all messages.
Data Types: logical
SourceFilter — Pass messages only for this DOM object
DOM object
Pass messages only from the specified DOM object if the messages meet the other filter
conditions specified by this MessageFilter object.
See Also
mlreportgen.dom.MessageDispatcher.dispatch
Related Examples
•
12-226
“Display Report Generation Messages” on page 13-106
mlreportgen.dom.OPCPart class
mlreportgen.dom.OPCPart class
Package: mlreportgen.dom
Document part to include in OPC package
Description
Document part to include in an OPC package.
Construction
opcPartObj = OPCPart() creates an empty OPC part.
opcPartObj = OPCPart(name,sourcePath) creates a part having the specified name
whose source file is located at the specified path. Appending the part to a document using
the Document.package method causes a copy of the source file to be inserted in the
document package at the location specified by the part name.
Input Arguments
name — Name of part
string
Name of part, specified as a string.
sourcePath — Path of source file for part
string
Path of source file for part, specified as a string.
Output Arguments
opcPartObj — OPC part
mlreportgen.dom.OPCPart object
OPC part, represented by an mlreportgen.dom.OPCPart object.
12-227
12
Classes – Alphabetical List
Properties
ContentType — Content type of part
string
Specifies the content type, using a file extension. For a list of file content types, see
https://en.wikipedia.org/wiki/Open_Packaging_Conventions.
If you do not set this property is not set and the part is one of the types listed below, the
DOM interface sets the content type when you append the part to a document.
12-228
File Type
File Extension
Windows bitmap
.bmp
Cascading style sheet
.css
Plain text
.txt
Icon
.cur
Windows metafile
.emf
Encapsulated PostScript
.eps
GIF image
.gif
HTML
.html
JPEG image
.jpe
JPEG image
.jpeg
JPEG
.jpg
JavaScript
.js
JavaScript object Notation
.json
PNG image
.png
PSD
.psd
Rich Text Format
.rtf
Scalable Vector Graphics
.svg
TIFF image
.tif
TIFF image
.tiff
Truetype font
.ttf
mlreportgen.dom.OPCPart class
Id — ID for document element
string
A session-unique ID is generated as part of document element creation. You can specify
an ID to replace the generated ID.
Name — Path of part
string
Path of this part relative to the root of the package. For example, to add an image
named myimage.jpg to a document images folder, specify the path as '/images/
myimage.jpg'.
For information about OPC part names, see https://en.wikipedia.org/wiki/
Open_Packaging_Conventions.
RelatedPart — Path name of part to which specified part is related
string
For information about OPC part names, see https://en.wikipedia.org/wiki/
Open_Packaging_Conventions.
RelationshipID — Relationship ID
string
For information about OPC relationship IDs, see https://en.wikipedia.org/wiki/
Open_Packaging_Conventions.
RelationshipType — Relationship type
string
Specifies a relationship type, using a file extension. For a list of file content types, see
https://en.wikipedia.org/wiki/Open_Packaging_Conventions.
If you do not set this property is not set and the part is one of the types listed below, the
DOM interface sets the content type when you append the part to a document.
File Type
File Extension
Windows bitmap
.bmp
Cascading style sheet
.css
Plain text
.txt
12-229
12
Classes – Alphabetical List
File Type
File Extension
Icon
.cur
Windows metafile
.emf
Encapsulated PostScript
.eps
GIF image
.gif
HTML
.html
JPEG image
.jpe
JPEG image
.jpeg
JPEG
.jpg
JavaScript
.js
JavaScript object Notation
.json
PNG image
.png
PSD
.psd
Rich Text Format
.rtf
Scalable Vector Graphics
.svg
TIFF image
.tif
TIFF image
.tiff
Truetype font
.ttf
SourceFilePath — Source file path
string
Source file path, specified as a string.
Tag — Tag for document element
string
Tag for document element, specified as a string.
A session-unique ID is generated as part of document element creation. The generated
tag has the form CLASS:ID, where CLASS is the class of the element and ID is the value
of the Id property of the object. You can specify a tag to replace the generated tag.
Specify your own tag value, for example, to make it easier to identify where an issue
occurred during document generation.
12-230
mlreportgen.dom.OPCPart class
Examples
Add a File to an OPC Package
This code inserts a copy of the data.json file in the data subfolder of the mydoc
package. This example assumes that there is a data.json file in the current folder.
import reportgen.dom.*;
d = Document('mydoc','html');
package(d,OPCPart('/data/data.json','data.json'));
close(d);
See Also
mlreportgen.dom.Document.package
More About
•
“Report Packages” on page 13-17
12-231
12
Classes – Alphabetical List
mlreportgen.dom.OrderedList class
Package: mlreportgen.dom
Create ordered list
Description
Create an ordered (numbered) list.
Construction
orderedListObj = OrderedList() creates an empty ordered list.
orderedListObj = OrderedList(listItems) creates an ordered list from a cell
array of strings specifying the list items.
Input Arguments
listItems — Content to include in the ordered list
cell array of strings
Cell array containing a combination of the following:
• A string
• A number
• A Boolean value
• One of the following DOM objects:
• mlreportgen.dom.Text
• mlreportgen.dom.Paragraph
• mlreportgen.dom.ExternalLink
• mlreportgen.dom.InternalLink
• mlreportgen.dom.Table
• mlreportgen.dom.Image
12-232
mlreportgen.dom.OrderedList class
• mlreportgen.dom.CustomElement
• Horizontal one-dimensional array (for a sublist)
To append an ordered list, use an OrderedList DOM object instead of using the
listItems argument.
Output Arguments
orderedListObj — Ordered list
mlreportgen.dom.OrderedList object
An ordered list containing the specified list items.
Properties
CustomAttributes — Custom attributes of document element
array of mlreportgen.dom.CustomAttribute objects
HTML or Microsoft Word must support the custom attributes of this document element.
Id — ID for document element
string
A session-unique ID is generated as part of document element creation. You can specify
an ID to replace the generated ID.
Style — Format specification
array of format objects
Format objects that specify the format of a document element.
Stylename — List style name
string
The style specified by styleName must be defined in the template used to create the
document element to which this list is appended.
Tag — Tag for document element
string
12-233
12
Classes – Alphabetical List
Tag for document element, specified as a string.
A session-unique ID is generated as part of document element creation. The generated
tag has the form CLASS:ID, where CLASS is the class of the element and ID is the value
of the Id property of the object. You can specify a tag to replace the generated tag.
Specify your own tag value, for example, to make it easier to identify where an issue
occurred during document generation.
Methods
Method
Purpose
append
Append items to this list.
clone
Copy the list.
Use the OrderedList.clone method
similar to how you use Paragraph.clone.
Examples
Create an Ordered List
import mlreportgen.dom.*;
d = Document('test','html');
ol = OrderedList({Text('a'), 'b', 1,...
{'c', Paragraph('d')}});
append(d,ol);
close(d);
rptview('test','html');
•
“Create and Format Lists” on page 13-52
See Also
mlreportgen.dom.ListItem | mlreportgen.dom.UnorderedList
12-234
mlreportgen.dom.OuterMargin class
mlreportgen.dom.OuterMargin class
Package: mlreportgen.dom
Margin between bounding box and its surroundings
Description
Specifies the margin between the bounding box of an object and adjacent document
objects. A bounding box of an object includes the border of the object (if it has a border),
the inner margin, and the object content.
Construction
marginObj = OuterMargin() creates an unspecified margin between the bounding
box of an object and its surroundings.
marginObj = OuterMargin(all) creates the specified margin on all sides between
the bounding box of an object and its surroundings.
marginObj = OuterMargin(left,right) creates the specified margins between the
left and right sides of the bounding box of an object and its surroundings.
marginObj = OuterMargin(left,right,top,bottom) creates the specified
margins between sides of the bounding box of an object and its surroundings.
Input Arguments
all — Outer margin size on all sides
string
String specifying the margin on all sides between the bounding box of an object and its
surroundings. String must have the format valueUnits where Units is an abbreviation
for the units in which the width size is expressed. Valid abbreviations are:
• No abbreviation — pixels
12-235
12
Classes – Alphabetical List
• cm — centimeters
• in — inches
• mm — millimeters
• pi — picas
• pt — points
• px — pixels
left — Outer left margin size
string
String specifying the left margin between the bounding box of an object and its
surroundings. See the all argument for description of valid strings.
right — Outer right margin size
string
String specifying the right margin between the bounding box of an object and its
surroundings. See the all argument for description of valid strings.
top — Outer top margin size
string
String specifying the top margin between the bounding box of an object and its
surroundings. See the all argument for description of valid strings.
bottom — Outer bottom margin size
string
String specifying the bottom margin between the bounding box of an object and its
surroundings. See the all argument for description of valid strings.
Output Arguments
marginObj — Margin between bounding box and surroundings
mlreportgen.dom.OuterMargin object
A mlreportgen.dom.OuterMargin object specifying the margin between bounding box
and surroundings.
12-236
mlreportgen.dom.OuterMargin class
Properties
Bottom — Size of bottom margin
string
String specifying the bottom margin. String must have the format valueUnits where
Units is an abbreviation for the units in which the width size is expressed. Valid
abbreviations are:
• No abbreviation — pixels
• cm — centimeters
• in — inches
• mm — millimeters
• pi — picas
• pt — points
• px — pixels
Left — Size of left margin
string
String specifying the left margin. See the Bottom property for description of valid
strings.
Right — Size of right margin
string
String specifying the right margin. See the Bottom property for description of valid
strings.
Top — Size of top margin
string
String specifying the top margin. See the Bottom property for description of valid
strings.
Id — ID for document element
string
A session-unique ID is generated as part of document element creation. You can specify
an ID to replace the generated ID.
12-237
12
Classes – Alphabetical List
Tag — Tag for document element
string
Tag for document element, specified as a string.
A session-unique ID is generated as part of document element creation. The generated
tag has the form CLASS:ID, where CLASS is the class of the element and ID is the value
of the Id property of the object. You can specify a tag to replace the generated tag.
Specify your own tag value, for example, to make it easier to identify where an issue
occurred during document generation.
Examples
Add Margins to Paragraph That Has a Border
import mlreportgen.dom.*;
doctype = 'html';
d = Document('test',doctype);
p = Paragraph('Hello World');
p.Style = {Border('solid','Red'), ...
HAlign('center'),...
OuterMargin('0pt','0pt','0pt','24pt')};
append(d, p);
p = Paragraph('Greetings from MATLAB');
p.Style = {Border('solid','green'), ...
HAlign('center')};
append(d,p);
p = Paragraph('End of report');
p.Style = {Border('solid','blue'),...
HAlign('center'),...
OuterMargin('0pt','0pt','0pt','12pt')}
append(d,p);
close(d);
rptview('test',doctype);
See Also
mlreportgen.dom.InnerMargin
12-238
mlreportgen.dom.OuterMargin class
More About
•
“Report Formatting Approaches” on page 13-20
12-239
12
Classes – Alphabetical List
mlreportgen.dom.OutlineLevel class
Package: mlreportgen.dom
Level of paragraph in outline
Description
Specifies the level of a paragraph in an automatically generated outline. This class
is intended for Microsoft Word reports, because HTML does not support displaying
paragraphs in a table of contents.
Construction
outlineLevelObj = OutlineLevel() sets the outline level of this paragraph to 1.
This causes the content of the paragraph to appear at the top level in an automatically
generated outline (for example, a table of contents).
outlineLevelObj = OutlineLevel(level) sets the paragraph to the specified
outline level.
Input Arguments
level — Specify the level of a paragraph in an outline
integer
Outline level for a paragraph, specified as a positive integer, from 1 to 9.
Data Types: int16
Output Arguments
outlineLevelObj — Level of paragraph in outline
mlreportgen.dom.OutlineLevel object
Level of paragraph in outline, represented by an mlreportgen.dom.OutlineLevel
object.
12-240
mlreportgen.dom.OutlineLevel class
Properties
Id — ID for document element
string
A session-unique ID is generated as part of document element creation. You can specify
an ID to replace the generated ID.
Tag — Tag for document element
string
Tag for document element, specified as a string.
A session-unique ID is generated as part of document element creation. The generated
tag has the form CLASS:ID, where CLASS is the class of the element and ID is the value
of the Id property of the object. You can specify a tag to replace the generated tag.
Specify your own tag value, for example, to make it easier to identify where an issue
occurred during document generation.
Value — Specify the level of a paragraph in an outline
integer
Outline level for a paragraph, specified as a positive integer, from 1 to 9.
Data Types: int16
Examples
Add a Table of Contents
Add an automatically generated table of contents and set the outline level of the
“Glossary” paragraph so that the paragraph appears at the top level of the table of
contents. This example uses the default DOM Word template.
Create a document and document part for the table of contents. The document part uses
the ReportTOC building block from the default DOM Word template.
import mlreportgen.dom.*
d = Document('tocDoc','docx');
12-241
12
Classes – Alphabetical List
open(d);
dp = DocumentPart(d,'ReportTOC');
append(d,dp);
Set the OutlineLevel property internally, so that there are four levels in the table of
contents.
for i = 1:4
% set internally the OutlineLevel property
append(d,Heading(i,'My Chapter'));
append(d,Paragraph('chapter content....'));
end
Use OutlineLevel to set the level of the Glossary paragraph to 1, so that the
paragraph appears at the top level of the table of contents. Display the report.
para = append(d,Paragraph('Glossary'));
para.Style = {OutlineLevel(1)};
close(d);
rptview(d.OutputPath,d.Type);
See Also
mlreportgen.dom.Heading | mlreportgen.dom.Paragraph
More About
•
12-242
“Automatically Number Document Content” on page 13-86
mlreportgen.dom.PageBreakBefore class
mlreportgen.dom.PageBreakBefore class
Package: mlreportgen.dom
Start paragraph on new page
Description
Specifies to always start paragraph on new page. This is for Microsoft Word reports.
Construction
pageBreakBeforeObj = PageBreakBefore() always starts paragraph on a new
page.
pageBreakBeforeObj = PageBreakBefore(onOff) always starts paragraph on a
new page if onOff is true.
Input Arguments
onOff — Start paragraph on new page
true (default)
Specify one of the following logical values:
• true or 1 — Starts a paragraph on a new page.
• false or 0 — Allows a paragraph to start on the current page.
Data Types: logical
Output Arguments
pageBreakBeforeObj — Start paragraph on new page
mlreportgen.dom.PageBreakBefore object
Start paragraph on new page, represented by an mlreportgen.dom.PageBreakBefore
object.
12-243
12
Classes – Alphabetical List
Properties
Tag — Tag for document element
string
Tag for document element, specified as a string.
A session-unique ID is generated as part of document element creation. The generated
tag has the form CLASS:ID, where CLASS is the class of the element and ID is the value
of the Id property of the object. You can specify a tag to replace the generated tag.
Specify your own tag value, for example, to make it easier to identify where an issue
occurred during document generation.
Value — Start paragraph on new page
true (default)
Possible values are:
• true or 1 — Starts a paragraph on a new page.
• false or 0 — Allows a paragraph to start on the current page.
Data Types: logical
See Also
mlreportgen.dom.Paragraph
More About
•
12-244
“Report Formatting Approaches” on page 13-20
mlreportgen.dom.Paragraph class
mlreportgen.dom.Paragraph class
Package: mlreportgen.dom
Formatted block of text (paragraph)
Description
Use a mlreportgen.dom.Paragraph object to define a paragraph. You can append
document elements, such as an image, to a paragraph.
Construction
paragraphObj = Paragraph(text) creates a paragraph containing a
mlreportgen.dom.Text object with the text specified by the text string.
paragraphObj = Paragraph(text,styleName) creates a paragraph having that
specified style. The style specified by styleName must be defined in the template used
for the document element to which this paragraph is appended.
paragraphObj = Paragraph(docElementObj) creates a paragraph containing the
document element specified by docElementObj (for example, an image).
Input Arguments
text — Paragraph text
string
Paragraph text, specified as a string.
styleName — Style for the paragraph
string
The name of a style, specified as a string. The style must be defined in the template used
to create the document to which this paragraph is appended.
docElementObj — Document element to include in the new paragraph
a DOM object
12-245
12
Classes – Alphabetical List
A DOM object to include in a paragraph. You can specify these DOM objects:
• mlreportgen.dom.ExternalLink
• mlreportgen.dom.Image
• mlreportgen.dom.InternalLink
• mlreportgen.dom.Text
• mlreportgen.dom.LinkTarget
Output Arguments
paragraphObj — Paragraph
mlreportgen.dom.Paragraph object
Paragraph, represented by an mlreportgen.dom.Paragraph object.
Properties
BackgroundColor — Background color
string
Specify one of these as a string:
• The name of a color. The name must be a CSS color name. See http://
www.crockford.com/wrrrld/color.html.
• A hexadecimal RGB (truecolor) value as #RRGGBB. For example, #0000ff is a shade
of blue.
Bold — Option to use bold for text
[] (default) | logical value
To make text bold, set this property to true or 1. If this property is empty and the
StyleName property for this document element specifies a style sheet style, the weight
of the text is determined by that style. Setting the Bold property adds a corresponding
mlreportgen.dom.Bold format object to the Style property of this document element.
Removing the Bold property setting removes the object.
Data Types: logical
Color — Text color
string
12-246
mlreportgen.dom.Paragraph class
Specify one of these as a string:
• The name of a color. The name must be a CSS color name. See http://
www.crockford.com/wrrrld/color.html.
• A hexadecimal RGB (truecolor) value as #RRGGBB. For example, #0000ff is a shade
of blue.
Children — Children of this paragraph
array of mlreportgen.dom.Element objects
This read-only property lists children elements, such as an image
(mlreportgen.dom.Image) object, that the paragraph contains.
CustomAttributes — Custom attributes of document element
array of mlreportgen.dom.CustomAttribute objects
HTML or Microsoft Word must support the custom attributes of this document element.
FirstLineIndent — Indentation amount for first line of paragraph
string
Amount by which to indent the first line of this paragraph relative to succeeding lines.
To create a hanging indent, in which all the lines are indented except for the first line,
use a negative number.
The string has the format valueUnits, where Units is an abbreviation for the units
in which the indentation is expressed. Use one of these abbreviations for the units for
indentation.
• no abbreviation — pixels
• cm — centimeters
• in — inches
• mm — millimeters
• pi — picas
• pt — points
• px — pixels
FontFamilyName — Name of font family for paragraph text
string
12-247
12
Classes – Alphabetical List
The name of a font family.
To specify substitutions for this font, do not set this property. Instead create and add a
mlreportgen.dom.FontFamily object to the Style property of this document element.
Setting the FontFamilyName property adds a corresponding
mlreportGen.dom.FontFamily format object to the Style property for this document
element. Removing the FontFamilyName property setting removes the object.
FontSize — Font size for paragraph text
string
Setting the FontSize property adds a corresponding mlreportGen.dom.FontSize
format object to the Style property for this document element. Removing the FontSize
property setting removes the object.
The string has the format valueUnits, where Units is an abbreviation for the units
in which the indentation is expressed. Use one of these abbreviations for the units for
indentation.
• no abbreviation — pixels
• cm — centimeters
• in — inches
• mm — millimeters
• pi — picas
• pt — points
• px — pixels
HAlign — Horizontal alignment of this paragraph
string
Horizontal alignment for a paragraph, relative to page margins or table cell borders,
specified as a string.
12-248
String
Description
Supported Output Types
center
Center the paragraph
Word and HTML
distribute
Distribute all characters
equally
Word
mlreportgen.dom.Paragraph class
String
Description
Supported Output Types
justify
Align left side of paragraph HTML
on left side of page, and
right side of paragraph on
the right side of the page
KashidaHigh
Use widest Kashida length
Word
KashidaLow
Use lowest Kashida length
Word
KashidaMedium
Use medium Kashida length Word
left
Align paragraph left
Word and HTML
right
Align paragraph right
Word and HTML
ThaiDistribute
Thai language justification
Word
Id — ID for document element
string
A session-unique ID is generated as part of document element creation. You can specify
an ID to replace the generated ID.
Italic — Option to use italics for text
[] (default) | logical value
To use italics for text, set this property to true. If this property is empty and the
StyleName property for this document element specifies a style sheet style, the slant of
the text is determined by that style. Setting the Italic property adds a corresponding
mlreportgen.dom.Italic format object to the Style property of this document
element. Removing the Italic property setting removes the object.
Data Types: logical
OuterLeftMargin — Left indentation for paragraph
string
Space between the left outer boundary of this paragraph and the left inner boundary
of its container. This is equivalent to the left indentation property of a Microsoft Word
paragraph.
To indent a paragraph from both the left and right margin of a page, do not
set this property. Instead, add to the Style property of this paragraph a
mlreportgen.dom.OuterMargin object specifying the left and right indentations.
12-249
12
Classes – Alphabetical List
Setting the OuterLeftMargin property adds a corresponding
mlreportGen.dom.OuterMargin format object to the Style property for this
document element. Removing the OuterLeftMargin property setting removes the
object.
The string has the format valueUnits, where Units is an abbreviation for the units
in which the indentation is expressed. Use one of these abbreviations for the units for
indentation.
• no abbreviation — pixels
• cm — centimeters
• in — inches
• mm — millimeters
• pi — picas
• pt — points
• px — pixels
OutlineLevel — Outline level of this paragraph
[] (default) | numeric value
Setting the OutlineLevel property causes this paragraph to be included in
automatically generated outlines, such as a table of contents. The value specifies the
level of the paragraph in the table of contents. For example, to make a paragraph appear
as a Heading 1 (Word) or h1 (HTML), set OutlineLevel to 1.
Data Types: int32
Parent — Parent of document element
DOM object
This read-only property lists the parent of this document element.
Strike — Text strikethrough
string
The default for this property is []. You can set it to one of these values:
• none — Do not use strikethrough for Word and HTML documents
• single — Use a single line for strikethrough for Word and HTML documents
12-250
mlreportgen.dom.Paragraph class
• double — Use a double line for strikethrough for Word documents
Setting the Strike property adds a corresponding mlreportGen.dom.Strike format
object to the Style property for this document element. Removing the Strike property
setting removes the object.
Style — Paragraph formatting
cell array of format objects
A cell array of DOM format objects that specifies the formats for this paragraph style.
styleName — Paragraph style name
string
The style specified by styleName must be defined in the template used to create the
document element to which this paragraph is appended.
Tag — Tag for document element
string
Tag for document element, specified as a string.
A session-unique ID is generated as part of document element creation. The generated
tag has the form CLASS:ID, where CLASS is the class of the element and ID is the value
of the Id property of the object. You can specify a tag to replace the generated tag.
Specify your own tag value, for example, to make it easier to identify where an issue
occurred during document generation.
Underline — Type of underline, if any, for text
[] (default) | string
You can specify one of the following types of underlines.
Border String
Description
Supported Output Types
dash
Dashed underline
Word
dashedHeavy
Line with heavy dashes
Word
dashLong
Line with long dashes
Word
dashLongHeavy
Line with heavy long
dashes
Word
12-251
12
Classes – Alphabetical List
Border String
Description
Supported Output Types
dashDotDotHeavy
Line with heavy dashes
with two dots between
the dashes
Word
dashDotHeavy
Heavy dash-dot line
Word
dotted
Dotted line
Word
dottedHeavy
Thick dotted line
Word
dotDash
Dot-dash line
Word
dotDotDash
Dot-dot-dash line
Word
dashDotHeavy
Heavy dot-dash line
Word
double
Double line
Word
none
Do not use underlining
HTML and Word
single
Single line
HTML and Word
thick
Thick line
Word
wave
Wavy line
Word
waveyDouble
Double wavy line
Word
waveyHeavy
Heavy wavy
Word
words
Underline non-space
characters only
Word
If this property is empty and StyleName property of this document element specifies a
style sheet style, the type of underline is determined by that style.
To specify the color as well as the type of the underline, do not set the Underline
property. Instead, set the Style property of this document element to include an
mlreportgen.dom.Underline format object that specifies the desired underline type
and color.
Setting the Underline property adds a corresponding mlreportgen.dom.Underline
format object to the Style property for this document element. Removing the
Underline property setting removes the object.
WhiteSpace — White space and line breaks in text
[] (default) | string
12-252
mlreportgen.dom.Paragraph class
To specify how to handle white space, use one of the following strings.
Border String
Description
Supported Output Types
normal
Does not preserve white
space and line breaks
Word and HTML
nowrap
Sequences of white space
collapse into a single white
space. Text never wraps to
the next line.
HTML
preserve
Preserves white space. Text Word and HTML
wraps only on line breaks.
See below for details.
Acts like the <pre> tag in
HTML.
pre
Preserves white space. Text HTML
wraps only on line breaks.
Acts like the <pre> tag in
HTML.
pre-line
Sequences of white space
collapse into a single white
space. Text wraps.
pre-wrap
Preserves white space. Text HTML
wraps when necessary and
on line breaks
HTML
If you want to view HTML output in the MATLAB browser and you want to preserve
white space and wrap text only on line breaks, use the preserve setting rather than the
pre setting.
Setting the WhiteSpace property adds a corresponding WhiteSpace format object to
Style property. Removing the WhiteSpace property setting removes the WhiteSpace
object.
Methods
Method
Purpose
append
Append text, images, links, link targets, or
custom elements to paragraph.
12-253
12
Classes – Alphabetical List
Method
Purpose
clone
Copy paragraph.
Examples
Add Paragraphs
Add a paragraph with text and another with an external link.
import mlreportgen.dom.*
doc = Document('mydoc','html');
p1 = Paragraph('This will be bold text');
p1.Bold = true;
link = ExternalLink('http://www.mathworks.com/', 'MathWorks');
p2 = Paragraph(link);
p2.BackgroundColor = 'yellow';
append(doc,p1);
append(doc,p2);
close(doc);
rptview('mydoc','html');
•
“Add Content to a Report” on page 13-11
See Also
mlreportgen.dom.LineSpacing | mlreportgen.dom.Text
More About
•
12-254
“Report Formatting Approaches” on page 13-20
mlreportgen.dom.ProgressMessage class
mlreportgen.dom.ProgressMessage class
Package: mlreportgen.dom
Progress message
Description
Create a progress message with the specified text originating from the specified source
object.
Construction
progressMsgObj = ProgressMessage(text,sourceDOMObject) creates a progress
message with the specified text, originating from the specified source object.
Input Arguments
text — Message text
string
The text to display for the message.
source — DOM object to from which message originates
a DOM object
The DOM object from which the message originates.
Output Arguments
progressMsgObj — Progress message
mlreportgen.dom.ProgressMessage object
Progress message, represented by an mlreportgen.dom.ProgressMessage object.
12-255
12
Classes – Alphabetical List
Properties
Id — ID for document element
string
A session-unique ID is generated as part of document element creation. You can specify
an ID to replace the generated ID.
Source — Source DOM object message originates from
a DOM object
Source DOM object from which the message originates.
Tag — Tag for document element
string
Tag for document element, specified as a string.
A session-unique ID is generated as part of document element creation. The generated
tag has the form CLASS:ID, where CLASS is the class of the element and ID is the value
of the Id property of the object. You can specify a tag to replace the generated tag.
Specify your own tag value, for example, to make it easier to identify where an issue
occurred during document generation.
Text — Text of message
string
Message text, specified as a string.
Methods
12-256
Method
Purpose
formatAsHTML
Wrap message in HTML tags.
formatAsText
Format message as text.
passesFilter
Determine if message passes filter.
mlreportgen.dom.ProgressMessage class
Examples
Create a Progress Message
Create the report document.
import mlreportgen.dom.*;
d = Document('test','html');
Create a message dispatcher.
dispatcher = MessageDispatcher.getTheDispatcher;
l = addlistener(dispatcher,'Message', ...
@(src, evtdata) disp(evtdata.Message.formatAsText));
Dispatch the message.
open(d);
dispatch(dispatcher,ProgressMessage('starting chapter',d));
Add report content.
p = Paragraph('Chapter ');
p.Tag = 'chapter title';
p.Style = { CounterInc('chapter'),...
CounterReset('table'),WhiteSpace('pre') };
append(p, AutoNumber('chapter'));
append(d,p);
Run report and delete the listener.
close(d);
rptview('test','html');
Delete the listener to avoid duplicate reporting of message objects during a MATLAB
session.
delete(l);
•
“Display Report Generation Messages” on page 13-106
See Also
mlreportgen.dom.MessageDispatcher.dispatch
12-257
12
Classes – Alphabetical List
mlreportgen.dom.RawText class
Package: mlreportgen.dom
Word XML or HTML markup to insert in document
Description
Word XML or HTML markup to insert in a document.
Construction
text = RawText() creates an empty RawText object.
You can append a RawText object only to a Document object. For a Word document, the
markup specified by the DOCXText property is included in the document. For an HTML
document, the value of the HTMLText property is included. In either case, the markup
must be valid Word XML or HTML markup, respectively, that can be validly inserted
in the body element of the output document. If you insert invalid markup in a Microsoft
Word document, Word may be unable to open the document.
text = RawText(htmlMarkup) creates a RawText object containing the specified
HTML markup.
text = RawText(markup,doctype) creates a RawText object containing markup of
the specified document type (HTML or Word).
Input Arguments
htmlMarkup — HTML markup code
string
HTML markup, specified as a string. To improve the readability of your report document,
consider assigning the markup to a variable. Then use the variable as an input
argument, as shown in the example below.
markup — Word XML or HTML markup code
string
12-258
mlreportgen.dom.RawText class
Word XML markup or HTML markup, specified as a string. For a Word document, the
markup must be valid Word XML markup that can be inserted into the w:body element.
To improve the readability of your report document, consider assigning the markup to a
variable. Then use the variable as an input argument, as shown in the example below.
doctype — Type of markup to use
'html' | 'docx'
Type of markup to use, specified as a string.
Output Arguments
rawText — Word XML or HTML markup to insert in document
mlreportgen.dom.RawText object
Word XML or HTML markup to insert in document, represented by an
mlreportgen.dom.RawText object.
Properties
DOCXText — Text to output to Word document
string
Word XML markup, specified as a string. The value of this property is included in a Word
document. The markup must be valid Word XML markup that can be inserted into the
w:body element of a Word document.
HTMLText — Text to output to HTML document
string
HTML markup, specified as a string. The value of this property is included in an HTML
document. The text must be valid HTML markup that can be inserted into the body
element of an HTML document.
Id — ID for document element
string
A session-unique ID is generated as part of document element creation. You can specify
an ID to replace the generated ID.
12-259
12
Classes – Alphabetical List
Parent — Parent of document element
DOM object
This read-only property lists the parent of this document element.
Tag — Tag for document element
string
Tag for document element, specified as a string.
A session-unique ID is generated as part of document element creation. The generated
tag has the form CLASS:ID, where CLASS is the class of the element and ID is the value
of the Id property of the object. You can specify a tag to replace the generated tag.
Specify your own tag value, for example, to make it easier to identify where an issue
occurred during document generation.
Examples
Add HTML Markup
Assign HTML markup to a variable and use that variable to create a RawText object to
append to a document.
import mlreportgen.dom.*;
d = Document('test','html');
script = [ ...
'<script>' ...
'document.write("Hello World!")' ...
'</script>' ...
];
append(d,RawText(script));
close(d);
rptview('test','html');
•
“Add Content to a Report” on page 13-11
See Also
mlreportgen.dom.CustomAttribute
12-260
mlreportgen.dom.RepeatAsHeaderRow class
mlreportgen.dom.RepeatAsHeaderRow class
Package: mlreportgen.dom
Repeat table row
Description
Specifies to repeat a table row on each new page when a table flows across multiple
pages. This format applies only to Microsoft Word documents.
Construction
repeatAsHeaderRowObj = RepeatAsHeaderRow() repeats table row on each new
page when a table flows across multiple pages.
repeatAsHeaderRowObj = RepeatAsHeaderRow(onOff) repeats table row on each
new page if onOff is true.
Input Arguments
onOff — Controls table row repeating on each new page
true (default)
Specify one of the following logical values:
• true or 1 — Table row repeats on each new page when a table flows across multiple
pages.
• false or 0 — Table row does not repeat on each new page when a table flows across
multiple pages.
Data Types: logical
Output Arguments
repeatAsHeaderRowObj — Repeat table row
mlreportgen.dom.RepeatAsHeaderRow object
12-261
12
Classes – Alphabetical List
Repeat table row, represented by an mlreportgen.dom.RepeatAsHeaderRow object.
Properties
Id — ID for document element
string
A session-unique ID is generated as part of document element creation. You can specify
an ID to replace the generated ID.
Tag — Tag for document element
string
Tag for document element, specified as a string.
A session-unique ID is generated as part of document element creation. The generated
tag has the form CLASS:ID, where CLASS is the class of the element and ID is the value
of the Id property of the object. You can specify a tag to replace the generated tag.
Specify your own tag value, for example, to make it easier to identify where an issue
occurred during document generation.
Value — Repeat table row on each new page
true (default)
Possible logical values are:
• true or 1 — Table row repeats on each new page when a table flows across multiple
pages.
• false or 0 — Table row does not repeat on each new page when a table flows across
multiple pages.
Data Types: logical
Examples
Repeat Table Row
Create a table with nor repeating row.
12-262
mlreportgen.dom.RepeatAsHeaderRow class
import mlreportgen.dom.*;
doctype = 'docx';
d = Document('repeatHeader',doctype);
append(d,'Table 1');
table = Table(ones(15, 2));
table.Style = {Border('solid'),RowSep('solid')};
append(d,table);
Create a second table with repeated row with a table row that cannot break across pages.
append(d,'Table 2');
table = Table(ones(15,2));
table.entry(1,1).Children(1).Content = 'Header A';
table.entry(1,2).Children(1).Content = 'Header B';
table.row(1).Style = {RepeatAsHeaderRow(true)};
table.Style = {Border('solid'),RowSep('solid')};
append(d, table);
table.row(6).Style = {AllowBreakAcrossPages(false)};
table.entry(6,1).Children(1).Content = ...
'Start this row on new page if it does not fit on current page';
for i=2:10
table.entry(6,1).append(Paragraph(Text(i)));
end
close(d);
rptview(d.OutputPath,doctype);
Generate the report.
close(d);
rptview(d.OutputPath,doctype);
•
“Create and Format Tables” on page 13-58
See Also
mlreportgen.dom.AllowBreakAcrossPages | mlreportgen.dom.TableHeader
More About
•
“Report Formatting Approaches” on page 13-20
12-263
12
Classes – Alphabetical List
mlreportgen.dom.ResizeToFitContents class
Package: mlreportgen.dom
Allow table to resize its columns
Description
Specifies whether a table resizes its columns to fit content.
Construction
resizeToFitContentsObj = ResizeToFitContents() allows a table to resize its
columns to fit their contents.
resizeToFitContentsObj = ResizeToFitContents(tf) allows a table to resize its
columns to fit their contents, if tf is true.
Input Arguments
value — Allow table to resize its columns
logical value
A setting of true (or 1) allows a table to resize its columns to fit their contents. A setting
of false (or 0) causes the content to wrap.
Data Types: logical
Output Arguments
resizeToFitContentsObj — Allow table to resize its columns
mlreportgen.dom.ResizeToFitContents object
Specification of whether a table resizes its columns to fit content or wraps content,
represented by an mlreportgen.dom.ResizeToFitContents object.
12-264
mlreportgen.dom.ResizeToFitContents class
Properties
Id — ID for document element
string
A session-unique ID is generated as part of document element creation. You can specify
an ID to replace the generated ID.
Tag — Tag for document element
string
Tag for document element, specified as a string.
A session-unique ID is generated as part of document element creation. The generated
tag has the form CLASS:ID, where CLASS is the class of the element and ID is the value
of the Id property of the object. You can specify a tag to replace the generated tag.
Specify your own tag value, for example, to make it easier to identify where an issue
occurred during document generation.
Value — Allow table to resize its columns
logical value
A setting of true (or 1) allows a table to resize its columns to fit their contents. A setting
of false (or 0) causes the content to wrap.
Data Types: logical
Examples
Resize Table Columns to Fit Content
Create a table and specify to resize the column widths to fit the widest table entry in the
column.
import mlreportgen.dom.*;
doctype = 'html';
d = Document('test',doctype);
append(d,Heading(1,'Table 1'));
table1 = Table(ones(4,4));
12-265
12
Classes – Alphabetical List
table1.entry(1,2).Children(1).Content = 'MathWorks';
table1.Style = {ResizeToFitContents(true),Width('1in'), ...
Border('solid'),RowSep('solid'),ColSep('solid')};
table1.TableEntriesStyle = {Width('0.25in')};
append(d,table1);
Create a second table, but do not have the columns resize to fit content.
append(d,Heading(1,'Table 2'));
table2 = Table(ones(4, 4));
table2.entry(1,2).Children(1).Content = 'MathWorks';
table2.Style = {ResizeToFitContents(false),Width('1in'), ...
Border('solid'), RowSep('solid'),ColSep('solid')};
table2.TableEntriesStyle = {Width('0.25in')};
append(d,table2);
Run the report.
close(d);
rptview(d.OutputPath,doctype);
See Also
mlreportgen.dom.FormalTable | mlreportgen.dom.Table |
mlreportgen.dom.TableColSpec | mlreportgen.dom.TableColSpecGroup
More About
•
12-266
“Report Formatting Approaches” on page 13-20
mlreportgen.dom.RowHeight class
mlreportgen.dom.RowHeight class
Package: mlreportgen.dom
Height of table row
Description
Specifies the height of a table row.
Construction
rowHeightObj = RowHeight() specifies row height to be 1 inch.
rowHeightObj = RowHeight(height) sets a row to the specified height.
rowHeightObj = RowHeight(height,heightType) sets a row to be exactly
the specified height or at least the specified height. Applies only to Microsoft Word
documents.
Input Arguments
height — Height of table row
'1in' (default)
String having the format valueUnits, where Units is an abbreviation for the units in
which the height is expressed. The following abbreviations are valid:
• no abbreviation — pixels
• cm — centimeters
• in — inches
• mm — millimeters
• pi — picas
• pt — points
• px — pixels
12-267
12
Classes – Alphabetical List
heightType — Use specified height or height that is at least specified height
'exact' | 'atleast'
String that defines a row to be exactly the specified height or to be the specified height or
taller.
Output Arguments
rowHeightObj — Height of table row
mlreportgen.dom.RowHeight object
Row height, represented by an mlreportgen.dom.RowHeight object.
Properties
Id — ID for document element
string
A session-unique ID is generated as part of document element creation. You can specify
an ID to replace the generated ID.
Tag — Tag for document element
string
Tag for document element, specified as a string.
A session-unique ID is generated as part of document element creation. The generated
tag has the form CLASS:ID, where CLASS is the class of the element and ID is the value
of the Id property of the object. You can specify a tag to replace the generated tag.
Specify your own tag value, for example, to make it easier to identify where an issue
occurred during document generation.
Type — Use specified height or height that is at least specified height
'exact' | 'atleast'
String that defines a row to be exactly the specified height or to be the specified height or
taller.
Value — Height of table row
'1in' (default)
12-268
mlreportgen.dom.RowHeight class
String having the format valueUnits, where Units is an abbreviation for the units in
which the height is expressed. The following abbreviations are valid:
• no abbreviation — pixels
• cm — centimeters
• in — inches
• mm — millimeters
• pi — picas
• pt — points
• px — pixels
Examples
Specify Table Row Heights
Create a table with two rows. The first row has a variable height and the second has a
fixed maximum height.
import mlreportgen.dom.*;
d = Document('myTableDoc','docx');
t = Table(2);
t.Style = {Border('solid'),RowSep('solid'),ColSep('solid')};
t.Width = '1in';
r1 = TableRow();
r1.Style = {RowHeight('.25in','atleast')};
append(r1,TableEntry(...
'This row can expand beyond .25 inches'));
append(r1,TableEntry('x'));
r2 = TableRow();
r2.Style = {RowHeight('.25in','exact')};
append(r2,TableEntry...
('Truncated text because height is fixed'));
append(r2,TableEntry('x'));
append(t,r1);
append(t,r2);
append(d,t);
12-269
12
Classes – Alphabetical List
close(d);
rptview('myTableDoc','docx');
•
“Create and Format Tables” on page 13-58
See Also
mlreportgen.dom.TableRow
12-270
mlreportgen.dom.RowSep class
mlreportgen.dom.RowSep class
Package: mlreportgen.dom
Draw lines between table rows
Description
Draw lines (separators) between table rows.
Construction
rowSepObj = RowSep() creates unspecified row separators.
rowSepObj = RowSep(style) creates a row separator of the specified style.
rowSepObj = RowSep(style,color) creates a row separator having the specified
style and color.
rowSepObj = RowSep(style,color,width) creates a row separator having the
specified style, color, and width.
Input Arguments
style — Line style of table row separator
string
Line style of the table row separator, specified as a string.
String
Applies To
Word
HTML
'dashed'
X
X
'dashdotstroked'
X
'dashsmallgap'
X
'dotted'
X
X
12-271
12
Classes – Alphabetical List
String
Applies To
Word
HTML
'dotdash'
X
'dotdotdash'
X
'double'
X
X
'doublewave'
X
'inset'
X
X
'none'
X
X
'outset'
X
X
'single'
X
'solid'
X
'thick'
X
'thickthinlargegap'
X
'thickthinmediumgap'
X
'thickthinsmallgap'
X
'thinthicklargegap'
X
'thinthickmediumgap'
X
'thinthicksmallgap'
X
'thinthickthinlargegap'
X
'thinthickthinmediumgap'
X
'thinthickthinsmallgap'
X
'threedemboss'
X
'threedengrave'
X
'triple'
X
'wave'
X
color — Color of table row separator
string
String specifying the color of the table row separator. String can be a color, such as
'red' or a hexadecimal RGB value, such as '#0000ff'.
12-272
mlreportgen.dom.RowSep class
width — Width of table row separator
string
String specifying the color of the table row separator. String must have the format
valueUnits where Units is an abbreviation for the units in which the width size is
expressed. Valid abbreviations are:
• no abbreviation — pixels
• cm — centimeters
• in — inches
• mm — millimeters
• pi — picas
• pt — points
• px — pixels
Output Arguments
rowSepObj — Draw lines between table rows
mlreportgen.dom.RowSep object
Table rows separator lines, represented by an mlreportgen.dom.RowSep object.
Properties
Color — Text color
string
Specify one of these as a string:
• The name of a color. The name must be a CSS color name. See http://
www.crockford.com/wrrrld/color.html.
• A hexadecimal RGB (truecolor) value as #RRGGBB. For example, #0000ff is a shade
of blue.
Id — ID for document element
string
A session-unique ID is generated as part of document element creation. You can specify
an ID to replace the generated ID.
12-273
12
Classes – Alphabetical List
Style — Line style of table row separator
string
Line style for the row separator. See the description of the style input argument for a
list of possible values.
Tag — Tag for document element
string
Tag for document element, specified as a string.
A session-unique ID is generated as part of document element creation. The generated
tag has the form CLASS:ID, where CLASS is the class of the element and ID is the value
of the Id property of the object. You can specify a tag to replace the generated tag.
Specify your own tag value, for example, to make it easier to identify where an issue
occurred during document generation.
Width — Table row separator width
string
String specifying the width of the table row separator. String must have the format
valueUnits where Units is an abbreviation for the units in which the width size is
expressed. Valid abbreviations are:
• no abbreviation — pixels
• cm — centimeters
• in — inches
• mm — millimeters
• pi — picas
• pt — points
• px — pixels
Examples
Use Table Row Separators
Define the row separator as part of the Style property definition for the table.
12-274
mlreportgen.dom.RowSep class
import mlreportgen.dom.*;
doctype = 'html';
d = Document('test',doctype);
t = Table(magic(5));
t.Style = {Border('inset','crimson','6pt'), ...
ColSep('double','DarkGreen','3pt'), ...
RowSep('double','Gold','3pt'), ...
Width('50%')};
t.TableEntriesInnerMargin = '6pt';
t.TableEntriesHAlign = 'center';
t.TableEntriesVAlign = 'middle';
append(d,t);
close(d);
rptview('test',doctype);
•
“Create and Format Tables” on page 13-58
See Also
mlreportgen.dom.Border | mlreportgen.dom.ColSep | mlreportgen.dom.TableEntry |
mlreportgen.dom.TableRow
12-275
12
Classes – Alphabetical List
mlreportgen.dom.ScaleToFit class
Package: mlreportgen.dom
Scale image to fit page
Description
Specifies whether to scale an image to fit a page.
Construction
scaleToFitObj = ScaleToFit() scales an image to fit between the margins of a
Microsoft Word page.
scaleToFitObj = ScaleToFit(value) scales an image if value is true.
Input Arguments
value — Scale image to fit page
[] (default) | logical value
A setting of false (or 0) does not scale the image. A setting of true (or 1) scales the
image to fit between the margins of a Microsoft Word page.
Data Types: logical
Output Arguments
scaleToFitObj — Scale image to fit page
mlreportgen.dom.ScaleToFit object
Scale image to fit page, represented by an mlreportgen.dom.ScaleToFit object.
Properties
Id — ID for document element
string
12-276
mlreportgen.dom.ScaleToFit class
A session-unique ID is generated as part of document element creation. You can specify
an ID to replace the generated ID.
Tag — Tag for document element
string
Tag for document element, specified as a string.
A session-unique ID is generated as part of document element creation. The generated
tag has the form CLASS:ID, where CLASS is the class of the element and ID is the value
of the Id property of the object. You can specify a tag to replace the generated tag.
Specify your own tag value, for example, to make it easier to identify where an issue
occurred during document generation.
Value — Scale image to fit page
[] (default) | logical value
The possible values are:
• false or 0 — Do not scale image.
• true or 1— Scale image to fit between the margins of a Word page.
Data Types: logical
See Also
mlreportgen.dom.Height | mlreportgen.dom.Image | mlreportgen.dom.Width
Related Examples
•
“Create and Format Images” on page 13-75
12-277
12
Classes – Alphabetical List
mlreportgen.dom.Strike class
Package: mlreportgen.dom
Strike through text
Description
Specifies whether to use a strikethrough line for a text object. Strike appears as a single,
horizontal line drawn through the text.
Construction
strikeObj = Strike() draws a single, horizontal line through text.
strikeObj = Strike(type) draws a line of the specified type through text.
Input Arguments
type — Specifies strike type
string
String specifying the strike type. Choices are:
• 'single' — Single horizontal line (default)
• 'none' — No strikethrough line
• 'double' — Double horizontal line
Output Arguments
strike — Strike through text
mlreportgen.dom.Strike object
An mlreportgen.dom.Strike object representing strikethrough text.
12-278
mlreportgen.dom.Strike class
Properties
Id — ID for document element
string
A session-unique ID is generated as part of document element creation. You can specify
an ID to replace the generated ID.
Tag — Tag for document element
string
Tag for document element, specified as a string.
A session-unique ID is generated as part of document element creation. The generated
tag has the form CLASS:ID, where CLASS is the class of the element and ID is the value
of the Id property of the object. You can specify a tag to replace the generated tag.
Specify your own tag value, for example, to make it easier to identify where an issue
occurred during document generation.
Value — Specifies strike type
string
String specifying the strike type. Choices are:
• 'single' — Single horizontal line (default)
• 'none' — No strikethrough line
• 'double' — Double horizontal line
See Also
mlreportgen.dom.Underline
More About
•
“Report Formatting Approaches” on page 13-20
12-279
12
Classes – Alphabetical List
mlreportgen.dom.Table class
Package: mlreportgen.dom
Create table
Description
Use an mlreportgen.dom.Table object to define a table. Append rows and table
entries to add content to the table. You can define column properties.
Construction
tableObj = Table(nCols) creates an empty table having the specified number of
columns. Use this constructor as the starting point for creating a table from scratch.
tableObj = Table(array) returns a table whose content is specified by a twodimensional numeric array or a two-dimensional cell array of MATLAB data types and
DOM objects. The constructor converts basic MATLAB types to corresponding DOM
types, e.g., strings to Text objects.
tableObj = Table(array,'StyleName') creates a table having the specified style.
The style specified by StyleName must be defined in the template used to create the
document to which this table is appended.
Input Arguments
nCols — Number of table columns
double
Number of table columns, specified as a double.
Data Types: double
array — Array of values to include in a table
two-dimensional numeric array | two-dimensional cell array of MATLAB or DOM objects
12-280
mlreportgen.dom.Table class
The valid DOM objects are:
• mlreportgen.dom.Paragraph
• mlreportgen.dom.Text (CharEntity included)
• mlreportgen.dom.Image
• mlreportgen.dom.Table
• mlreportgen.dom.OrderedList
• mlreportgen.dom.UnorderedList
styleName — Style for table
string
The style specified by styleName must be defined in the template of the document to
which this table is appended.
Output Arguments
tableObj — Table
mlreportgen.dom.Table object
Table, represented by an mlreportgen.dom.Table object.
Properties
BackgroundColor — Background color
string
Specify one of these as a string:
• The name of a color. The name must be a CSS color name. See http://
www.crockford.com/wrrrld/color.html.
• A hexadecimal RGB (truecolor) value as #RRGGBB. For example, #0000ff is a shade
of blue.
Border — Type of border to draw
string
12-281
12
Classes – Alphabetical List
Specify one of the following as a string.
Border String
Description
Supported Output Types
dashed
Dashed line
Word and HTML
dashdotstroked
Line with alternating
diagonal dashes and dot
Word
dashsmallgap
Dashed line with a small
gap between dashes
Word
dotted
Dotted line
Word and HTML
dotdash
Line with alternating dots
and dashes
Word
dotdotdash
Line with alternating
double dots and a dash
Word
double
Double line
Word and HTML
doublewave
Double wavy line
Word
groove
3-D effect grooved line
HTML
hidden
No line
HTML
See discussion below this
table.
inset
3-D effect line
Word and HTML
none
No line
Word and HTML
See discussion below this
table.
12-282
outset
3-D effect line
Word and HTML
ridge
3-D effect ridged line
HTML
single
Single line
Word
solid
Single line
HTML
thick
Thick line
Word
thickthinlargegap
Dashed line with
alternating thick and thin
dashes with a large gap
Word
mlreportgen.dom.Table class
Border String
Description
Supported Output Types
thickthinmediumgap
Dashed line with
alternating thick and thin
dashes with a medium gap
Word
thickthinsmallgap
Dashed line with
alternating thick and thin
dashes with a small gap
Word
thinthicklargegap
Dashed line with
alternating thin and thick
dashes with a medium gap
Word
thinthickmediumgap
Dashed line with
alternating thin and thick
dashes, with a medium gap
Word
thinthicksmallgap
Dashed line with
alternating thin and thick
dashes with a small gap
Word
thinthickthinlargegap
Dashed line with
alternating thin and thick
dashes with a large gap
Word
thinthickthinmediumgap Dashed line with
alternating thin and thick
dashes with a medium gap
Word
thinthickthinsmallgap
Dashed line with
alternating thin and thick
dashes with a small gap
Word
threedemboss
Embossed effect line
Word
threedengrave
Engraved effect line
Word
triple
Triple line
Word
wave
Wavy line
Word
BorderCollapse — Collapse borders of adjacent cells into single border (HTML only)
string
A value of 'on' collapses borders of adjacent cells into a single border. A value of 'off'
keeps borders of adjacent cells.
12-283
12
Classes – Alphabetical List
BorderColor — Border color
string
You can specify:
• Name of a color. The name must be a CSS color name. See http://www.crockford.com/
wrrrld/color.html.
• A hexadecimal RGB (truecolor) value as #RRGGBB. For example, #0000ff is a shade
of blue.
BorderWidth — Table border width
string
String specifying the width of the border. The string must have the format valueUnits
where Units is an abbreviation for the units in which the width size is expressed. Valid
abbreviations are:
• no abbreviation — pixels
• cm — centimeters
• in — inches
• mm — millimeters
• pi — picas
• pt — points
• px — pixels
Children — Children of this document
cell array of mlreportgen.dom.Element objects
This read-only property lists child elements that the document element contains.
ColSep — Style of line separating columns
string
The style the line separating the columns of a table or table section (header, body, footer),
as specified by a mlreportgen.dom.ColSep object.
See the description of the Border property for a description of the possible values.
ColSepColor — Color of line separating columns
string
12-284
mlreportgen.dom.Table class
You can specify:
• Name of a color. The name must be a CSS color name. See http://www.crockford.com/
wrrrld/color.html.
• A hexadecimal RGB (truecolor) value as #RRGGBB. For example, #0000ff is a shade
of blue.
ColSepWidth — Width of line separating table columns
string
String having the format valueUnits, where Units is an abbreviation for the units in
which the width is expressed. Use one of these abbreviations for the units of a width.
• no abbreviation — pixels
• cm — centimeters
• in — inches
• mm — millimeters
• pi — picas
• pt — points
• px — pixels
For example, for a three pica wide column separator, set the ColSepWidth property to
3pi.
ColSpecGroups — Properties of group of columns in table
array of mlreportgen.dom.TableColSpecGroups objects
An array of mlreportgen.dom.TableColSpecGroups objects that specifies the width,
alignment, and other properties of a group of columns. The first object applies to the
first group of columns, the second object to the second group, etc. Specify the number of
columns belonging to each group using the Span property of the TableColSpecGroups
object. For example, if the first object has a span of 2, it applies to the first two columns.
If the second group has a span of 3, it applies to the next three columns, etc.
CustomAttributes — Custom attributes for document element
array of mlreportgen.doc.CustomAttribute objects
The custom attributes must be supported by the output type of the document to which
this document element is appended.
12-285
12
Classes – Alphabetical List
FlowDirection — Text flow direction
string
String specifying the direction for text to flow.
• 'ltr' — flow from left to right
• 'rtl' — flow from right to left
HAlign — Horizontal alignment of this table
string
Possible values are:
• center
• left
• right
Id — ID for document element
string
A session-unique ID is generated as part of document element creation. You can specify
an ID to replace the generated ID.
OuterLeftMargin — Left margin (indentation) of document element
string
String specifying the left indentation. The string must have the format valueUnits
where Units is an abbreviation for the units in which the width size is expressed. Valid
abbreviations are:
• no abbreviation — pixels
• cm — centimeters
• in — inches
• mm — millimeters
• pi — picas
• pt — points
• px — pixels
Parent — Parent of document element
DOM object
12-286
mlreportgen.dom.Table class
This read-only property lists the parent of this document element.
RowSep — Style of lines separating rows
string
The style of a line separating the rows of a table or table section (header, body, or footer).
See the description of the Border property for a description of the possible values.
RowSepColor — Color of lines separating table rows
string
String specifying one of these values:
• The name of a color. See the mlreportGen.dom.Color class reference page for a list
of supported colors.
• A hexadecimal RGB (truecolor) value as #RRGGBB. For example, #0000ff is a shade
of blue.
RowSepWidth — Width of lines separating table rows
string
The string has the format valueUnits, where Units is an abbreviation for the units in
which the width is expressed. Use one of these abbreviations for the units of a width.
• no abbreviation — pixels
• cm — centimeters
• in — inches
• mm — millimeters
• pi — picas
• pt — points
• px — pixels
Style — Format for table
array of format objects
Array of format objects (such as Bold objects) that specify the format for this table.
This property overrides corresponding formats defined by the stylesheet style specified by
the StyleName property.
12-287
12
Classes – Alphabetical List
StyleName — Style in document or document part stylesheet
string
Name of a style specified in the stylesheet of the document or document part to which
this table is appended
The style that specifies the appearance of this table in the output document, for formats
not specified by Style property.
TableEntriesHAlign — Horizontal alignment of table entries
center (default) | left | right
Data Types: char
TableEntriesVAlign — Vertical alignment of table cell content
string
Possible values are:
• top
• middle
• bottom
TableEntriesInnerMargin — Inner margin for table entries
string
The inner margin is the margin between table cell content and the cell borders.
The string must have the format valueUnits where Units is an abbreviation for the
units in which the width size is expressed. Valid abbreviations are:
• no abbreviation — pixels
• cm — centimeters
• in — inches
• mm — millimeters
• pi — picas
• pt — points
• px — pixels
TableEntriesStyle — Style to use for table entries
cell array
12-288
mlreportgen.dom.Table class
Cell array of format objects that specify the format for table entries.
Tag — Tag for document element
string
Tag for document element, specified as a string.
A session-unique ID is generated as part of document element creation. The generated
tag has the form CLASS:ID, where CLASS is the class of the element and ID is the value
of the Id property of the object. You can specify a tag to replace the generated tag.
Specify your own tag value, for example, to make it easier to identify where an issue
occurred during document generation.
Width — Table width
string
String representing a percentage (for example, '100%') of the page width (minus
margins for Word reports) or a number of units of measurement, having the format
valueUnits, where Units is an abbreviation for the units in which the width is
expressed.
• no abbreviation — pixels
• cm — centimeters
• in — inches
• mm — millimeters
• pi — picas
• pt — points
• px — pixels
Methods
Method
Purpose
append
Append a content to a table.
clone
Clone this table.
entry
Get a table entry.
12-289
12
Classes – Alphabetical List
Method
Purpose
row
Create a table row.
Examples
Create a Table
import mlreportgen.dom.*;
d = Document('myreport', 'html');
open(d);
t = Table(magic(5));
t.Style = {RowHeight('1in')};
t.Border = 'solid';
t.BorderWidth = '2pt';
t.ColSep = 'solid';
t.ColSepWidth = '1';
t.RowSep = 'solid';
t.RowSepWidth = '1';
•
“Create and Format Tables” on page 13-58
See Also
mlreportgen.dom.FormalTable | mlreportgen.dom.TableBody |
mlreportgen.dom.TableEntry | mlreportgen.dom.TableFooter |
mlreportgen.dom.TableHeader | mlreportgen.dom.TableHeaderEntry |
mlreportgen.dom.TableRow
12-290
mlreportgen.dom.TableBody class
mlreportgen.dom.TableBody class
Package: mlreportgen.dom
Body of formal table
Description
Specifies the body of a formal table
Properties
Children — Children of this document
cell array of mlreportgen.dom.Element objects
This read-only property lists child elements that the document element contains.
ColSep — Style of line separating columns
string
The style the line separating the columns of a table or table section (header, body, footer),
as specified by a mlreportgen.dom.ColSep object.
See the description of the Border property for a description of the possible values.
ColSepColor — Color of line separating columns
string
You can specify:
• Name of a color. The name must be a CSS color name. See http://www.crockford.com/
wrrrld/color.html.
• A hexadecimal RGB (truecolor) value as #RRGGBB. For example, #0000ff is a shade
of blue.
ColSepWidth — Width of line separating table columns
string
12-291
12
Classes – Alphabetical List
String having the format valueUnits, where Units is an abbreviation for the units in
which the width is expressed. Use one of these abbreviations for the units of a width.
• no abbreviation — pixels
• cm — centimeters
• in — inches
• mm — millimeters
• pi — picas
• pt — points
• px — pixels
For example, for a three pica wide column separator, set the ColSepWidth property to
3pi.
Id — ID for document element
string
A session-unique ID is generated as part of document element creation. You can specify
an ID to replace the generated ID.
RowSep — Style of lines separating rows
string
The style of a line separating the rows of a table or table section (header, body, or footer).
See the description of the Border property for a description of the possible values.
RowSepColor — Color of lines separating table rows
string
String specifying one of these values:
• The name of a color. See the mlreportGen.dom.Color class reference page for a list
of supported colors.
• A hexadecimal RGB (truecolor) value as #RRGGBB. For example, #0000ff is a shade
of blue.
Parent — Parent of document element
DOM object
12-292
mlreportgen.dom.TableBody class
This read-only property lists the parent of this document element.
Style — Format specification
array of format objects
Format objects that specify the format of a document element.
Stylename — Table body style name
string
The style specified by styleName must be defined in the template used to create the
document element to which this table body is appended.
TableEntriesHAlign — Horizontal alignment of table entries
center (default) | left | right
Data Types: char
TableEntriesVAlign — Vertical alignment of table cell content
string
Possible values are:
• top
• middle
• bottom
TableEntriesInnerMargin — Inner margin for table entries
string
The inner margin is the margin between table cell content and the cell borders.
The string must have the format valueUnits where Units is an abbreviation for the
units in which the width size is expressed. Valid abbreviations are:
• no abbreviation — pixels
• cm — centimeters
• in — inches
• mm — millimeters
• pi — picas
• pt — points
12-293
12
Classes – Alphabetical List
• px — pixels
TableEntriesStyle — Style to use for table entries
cell array
Cell array of format objects that specify the format for table entries.
Tag — Tag for document element
string
Tag for document element, specified as a string.
A session-unique ID is generated as part of document element creation. The generated
tag has the form CLASS:ID, where CLASS is the class of the element and ID is the value
of the Id property of the object. You can specify a tag to replace the generated tag.
Specify your own tag value, for example, to make it easier to identify where an issue
occurred during document generation.
Methods
Method
Purpose
append
Appends content to a table body.
entry
Get a table entry.
row
Create a table row.
See Also
mlreportgen.dom.FormalTable | mlreportgen.dom.Table | mlreportgen.dom.TableEntry
| mlreportgen.dom.TableFooter | mlreportgen.dom.TableHeader |
mlreportgen.dom.TableHeaderEntry | mlreportgen.dom.TableRow
Related Examples
•
12-294
“Create and Format Tables” on page 13-58
mlreportgen.dom.TableColSpec class
mlreportgen.dom.TableColSpec class
Package: mlreportgen.dom
Formatting for one or more adjacent table columns
Description
Define the formatting for one or more adjacent table columns. Use a TableColSpec
object to override formats specified by a TableColSpecGroup object.
Construction
colSpecObj = TableColSpec() creates a column specification having a span of 1.
Output Arguments
colSpecObj — Formatting for one or more adjacent table columns
mlreportgen.dom.TableColSpec object
Formatting for one or more adjacent table columns, represented by an
mlreportgen.dom.TableColSpec object.
Properties
CustomAttributes — Custom attributes of document element
array of mlreportgen.dom.CustomAttribute objects
HTML or Microsoft Word must support the custom attributes of this document element.
Id — ID for document element
string
A session-unique ID is generated as part of document element creation. You can specify
an ID to replace the generated ID.
12-295
12
Classes – Alphabetical List
Span — Number of adjacent table columns to which this document element applies
number of adjacent table columns
If this property is not specified (its value is []), the value is assumed to be 1.
Data Types: double
Style — Style of adjacent table columns
array of format objects
Format objects that specify the style of the columns governed by this specification.
Tag — Tag for document element
string
Tag for document element, specified as a string.
A session-unique ID is generated as part of document element creation. The generated
tag has the form CLASS:ID, where CLASS is the class of the element and ID is the value
of the Id property of the object. You can specify a tag to replace the generated tag.
Specify your own tag value, for example, to make it easier to identify where an issue
occurred during document generation.
See Also
mlreportgen.dom.FormalTable | mlreportgen.dom.ResizeToFitContents |
mlreportgen.dom.Table | mlreportgen.dom.TableColSpecGroup
Related Examples
•
12-296
“Create and Format Tables” on page 13-58
mlreportgen.dom.TableColSpecGroup class
mlreportgen.dom.TableColSpecGroup class
Package: mlreportgen.dom
Define style for group of table columns
Description
Define the style for a group of table columns. Use a TableColSpec object to override
formats specified by a TableColSpecGroup object.
Construction
colSpecGroupObj = TableColSpecGroup() creates a column specification that
spans an entire table.
Output Arguments
colSpecGroupObj — Table column specification
mlreportgen.dom.TableColSpecGroup object
Specification of formats for a group of table columns, represented by an
mlreportgen.dom.TableColSpecGroup object.
Properties
ColSpec — Type of line to draw between columns of this table
this property accepts the same set of values as the Border property
Data Types: char
CustomAttributes — Custom attributes of document element
array of mlreportgen.dom.CustomAttribute objects
HTML or Microsoft Word must support the custom attributes of this document element.
12-297
12
Classes – Alphabetical List
Id — ID for document element
string
A session-unique ID is generated as part of document element creation. You can specify
an ID to replace the generated ID.
Span — Number of adjacent table columns to which this document element applies
number of adjacent table columns
If this property is not specified (its value is []), the value is assumed to be 1.
Data Types: double
Style — Format specification
array of format objects
Format objects that specify the format of a document element.
Tag — Tag for document element
string
Tag for document element, specified as a string.
A session-unique ID is generated as part of document element creation. The generated
tag has the form CLASS:ID, where CLASS is the class of the element and ID is the value
of the Id property of the object. You can specify a tag to replace the generated tag.
Specify your own tag value, for example, to make it easier to identify where an issue
occurred during document generation.
Examples
Make the First Column Green and Remaining Columns Red
import mlreportgen.dom.*
doc = Document('mydoc', 'docx');
append(doc, 'Table');
grps(1) = TableColSpecGroup;
grps(1).Style = {Color('red')};
specs(1) = TableColSpec;
specs(1).Style = {Color('green')};
grps(1).ColSpecs = specs;
12-298
mlreportgen.dom.TableColSpecGroup class
table = Table(magic(5));
table.ColSpecGroups = grps;
close(doc);
rptview(doc.OutputPath);
•
“Create and Format Tables” on page 13-58
See Also
mlreportgen.dom.FormalTable | mlreportgen.dom.ResizeToFitContents |
mlreportgen.dom.Table | mlreportgen.dom.TableColSpec
12-299
12
Classes – Alphabetical List
mlreportgen.dom.TableEntry class
Package: mlreportgen.dom
Table entry
Description
Specifies the content and style of a table entry.
Tip To specify formatting for all table entries in a table, use the TableEntriesStyle
property of the Table or FormalTable object. For example, you can set border
formatting.
import mlreportgen.dom.*
t = Table(magic(5));
t.TableEntriesStyle = {Border('solid','black','1')};
Properties you set for a TableEntry object take precedence over TableEntriesStyle
format objects.
Construction
entryObj = TableEntry() creates an empty table entry.
entryObj = TableEntry(text) creates a table entry using the text included in the
specified mlreportgen.dom.Text object.
entryObj = TableEntry(text,styleName) creates a table entry containing
specified text using the specified style.
entryObj = TableEntry(domObj) creates a table entry containing domObj, where
domObj is a DOM object such as a mlreportgen.dom.Paragraph object.
Input Arguments
text — Table entry text
string
12-300
mlreportgen.dom.TableEntry class
String containing the text for the table entry.
textObj — Text object containing the text for the table entry
mlreportgen.dom.Text object
Text for the table entry, specified as an mlreportgen.dom.Text object.
styleName — Style for the table
string
The style specified by styleName must be defined in the template of the document to
which this table is appended.
domObject — Array of values to include in table
two-dimensional numeric array | two-dimensional cell array of MATLAB or DOM objects
The valid DOM objects are:
• mlreportgen.dom.Paragraph
• mlreportgen.dom.Text (CharEntity included)
• mlreportgen.dom.Image
• mlreportgen.dom.Table
• mlreportgen.dom.OrderedList
• mlreportgen.dom.UnorderedList
• mlreportgen.dom.CustomElement
Output Arguments
entryObj — Table entry
mlreportgen.dom.TableEntry object
Table entry, represented by an mlreportgen.dom.TableEntry object
Properties
Border — Type of border to draw
string
12-301
12
Classes – Alphabetical List
Specify one of the following as a string.
Border String
Description
Supported Output Types
dashed
Dashed line
Word and HTML
dashdotstroked
Line with alternating
diagonal dashes and dot
Word
dashsmallgap
Dashed line with a small
gap between dashes
Word
dotted
Dotted line
Word and HTML
dotdash
Line with alternating dots
and dashes
Word
dotdotdash
Line with alternating
double dots and a dash
Word
double
Double line
Word and HTML
doublewave
Double wavy line
Word
groove
3-D effect grooved line
HTML
hidden
No line
HTML
See discussion below this
table.
inset
3-D effect line
Word and HTML
none
No line
Word and HTML
See discussion below this
table.
12-302
outset
3-D effect line
Word and HTML
ridge
3-D effect ridged line
HTML
single
Single line
Word
solid
Single line
HTML
thick
Thick line
Word
thickthinlargegap
Dashed line with
alternating thick and thin
dashes with a large gap
Word
mlreportgen.dom.TableEntry class
Border String
Description
Supported Output Types
thickthinmediumgap
Dashed line with
alternating thick and thin
dashes with a medium gap
Word
thickthinsmallgap
Dashed line with
alternating thick and thin
dashes with a small gap
Word
thinthicklargegap
Dashed line with
alternating thin and thick
dashes with a medium gap
Word
thinthickmediumgap
Dashed line with
alternating thin and thick
dashes, with a medium gap
Word
thinthicksmallgap
Dashed line with
alternating thin and thick
dashes with a small gap
Word
thinthickthinlargegap
Dashed line with
alternating thin and thick
dashes with a large gap
Word
thinthickthinmediumgap Dashed line with
alternating thin and thick
dashes with a medium gap
Word
thinthickthinsmallgap
Dashed line with
alternating thin and thick
dashes with a small gap
Word
threedemboss
Embossed effect line
Word
threedengrave
Engraved effect line
Word
triple
Triple line
Word
wave
Wavy line
Word
BorderColor — Border color
string
You can specify:
12-303
12
Classes – Alphabetical List
• Name of a color. The name must be a CSS color name. See http://www.crockford.com/
wrrrld/color.html.
• A hexadecimal RGB (truecolor) value as #RRGGBB. For example, #0000ff is a shade
of blue.
BorderWidth — Table border width
string
String specifying the width of the border. The string must have the format valueUnits
where Units is an abbreviation for the units in which the width size is expressed. Valid
abbreviations are:
• no abbreviation — pixels
• cm — centimeters
• in — inches
• mm — millimeters
• pi — picas
• pt — points
• px — pixels
ColSpan — Number of table columns spanned by table entry
double
Number of table columns spanned by the table entry, specified as a double.
Data Types: double
CustomAttributes — Custom attributes for document element
array of mlreportgen.doc.CustomAttribute objects
The custom attributes must be supported by the output type of the document to which
this document element is appended.
Id — ID for document element
string
A session-unique ID is generated as part of document element creation. You can specify
an ID to replace the generated ID.
InnerMargin — Inner margin (padding) around entry
string
12-304
mlreportgen.dom.TableEntry class
String specifying the inner margin. String must have the format valueUnits where
Units is an abbreviation for the units in which the width size is expressed. Valid
abbreviations are:
• no abbreviation — pixels
• cm — centimeters
• in — inches
• mm — millimeters
• pi — picas
• pt — points
• px — pixels
RowSpan — Number of table rows spanned by table entry
double
Number of table rows spanned by the table entry, specified as a double.
Data Types: double
Style — Format for table
array of format objects
Array of format objects (such as Bold objects) that specify the format for this table.
This property overrides corresponding formats defined by the stylesheet style specified by
the StyleName property.
StyleName — Style in document or document part stylesheet
string
Name of a style specified in the stylesheet of the document or document part to which
this table is appended
The style that specifies the appearance of this table in the output document, for formats
not specified by Style property.
Tag — Tag for document element
string
Tag for document element, specified as a string.
12-305
12
Classes – Alphabetical List
A session-unique ID is generated as part of document element creation. The generated
tag has the form CLASS:ID, where CLASS is the class of the element and ID is the value
of the Id property of the object. You can specify a tag to replace the generated tag.
Specify your own tag value, for example, to make it easier to identify where an issue
occurred during document generation.
VAlign — Vertical alignment table cell content
string
Possible values are:
• top
• bottom
• middle
Methods
Use TableEntry.append and TableEntry.clone methods the same way you use
Paragraph.append and Paragraph.clone.
Method
Purpose
append
Append text, paragraphs, images, tables,
and other elements to this table entry.
clone
Clone this table entry.
See Also
mlreportgen.dom.FormalTable | mlreportgen.dom.Table | mlreportgen.dom.TableBody
| mlreportgen.dom.TableFooter | mlreportgen.dom.TableHeader |
mlreportgen.dom.TableHeaderEntry | mlreportgen.dom.TableRow
Related Examples
•
12-306
“Create and Format Tables” on page 13-58
mlreportgen.dom.TableFooter class
mlreportgen.dom.TableFooter class
Package: mlreportgen.dom
Formal table footer
Description
Specifies the content and format of a formal table footer.
Properties
Children — Children of this document
cell array of mlreportgen.dom.Element objects
This read-only property lists child elements that the document element contains.
ColSep — Style of line separating columns
string
The style the line separating the columns of a table or table section (header, body, footer),
as specified by a mlreportgen.dom.ColSep object.
See the description of the Border property for a description of the possible values.
ColSepColor — Color of line separating columns
string
You can specify:
• Name of a color. The name must be a CSS color name. See http://www.crockford.com/
wrrrld/color.html.
• A hexadecimal RGB (truecolor) value as #RRGGBB. For example, #0000ff is a shade
of blue.
ColSepWidth — Width of line separating table columns
string
String having the format valueUnits, where Units is an abbreviation for the units in
which the width is expressed. Use one of these abbreviations for the units of a width.
12-307
12
Classes – Alphabetical List
• no abbreviation — pixels
• cm — centimeters
• in — inches
• mm — millimeters
• pi — picas
• pt — points
• px — pixels
For example, for a three pica wide column separator, set the ColSepWidth property to
3pi.
Id — ID for document element
string
A session-unique ID is generated as part of document element creation. You can specify
an ID to replace the generated ID.
Parent — Parent of document element
DOM object
This read-only property lists the parent of this document element.
RowSep — Style of lines separating rows
string
The style of a line separating the rows of a table or table section (header, body, or footer).
See the description of the Border property for a description of the possible values.
RowSepColor — Color of lines separating table rows
string
String specifying one of these values:
• The name of a color. See the mlreportGen.dom.Color class reference page for a list
of supported colors.
• A hexadecimal RGB (truecolor) value as #RRGGBB. For example, #0000ff is a shade
of blue.
RowSepWidth — Width of lines separating table rows
string
12-308
mlreportgen.dom.TableFooter class
The string has the format valueUnits, where Units is an abbreviation for the units in
which the width is expressed. Use one of these abbreviations for the units of a width.
• no abbreviation — pixels
• cm — centimeters
• in — inches
• mm — millimeters
• pi — picas
• pt — points
• px — pixels
Style — Format for the table footer
array of format objects
Array of format objects (such as Bold objects) that specify the format for the table footer.
This property overrides corresponding formats defined by the stylesheet style specified by
the StyleName property.
StyleName — Style in the document or document part stylesheet
string
Name of a style specified in the stylesheet of the document or document part to which the
table footer is appended
Data Types: char
TableEntriesHAlign — Horizontal alignment of table entries
center (default) | left | right
Data Types: char
TableEntriesInnerMargin — Inner margin for table entries
string
The inner margin is the margin between table cell content and the cell borders.
The string must have the format valueUnits where Units is an abbreviation for the
units in which the width size is expressed. Valid abbreviations are:
• no abbreviation — pixels
12-309
12
Classes – Alphabetical List
• cm — centimeters
• in — inches
• mm — millimeters
• pi — picas
• pt — points
• px — pixels
TableEntriesStyle — Style to use for table entries
cell array
Cell array of format objects that specify the format for table entries.
TableEntriesVAlign — Vertical alignment of table cell content
string
Possible values are:
• top
• middle
• bottom
Tag — Tag for document element
string
Tag for document element, specified as a string.
A session-unique ID is generated as part of document element creation. The generated
tag has the form CLASS:ID, where CLASS is the class of the element and ID is the value
of the Id property of the object. You can specify a tag to replace the generated tag.
Specify your own tag value, for example, to make it easier to identify where an issue
occurred during document generation.
Methods
12-310
Method
Purpose
append
Appends a row of table entries to this table
footer.
mlreportgen.dom.TableFooter class
Method
Purpose
entry
Get a footer entry
row
Get a footer row
See Also
mlreportgen.dom.FormalTable | mlreportgen.dom.TableBody |
mlreportgen.dom.TableEntry | mlreportgen.dom.TableHeader |
mlreportgen.dom.TableHeaderEntry | mlreportgen.dom.TableRow
Related Examples
•
“Create and Format Tables” on page 13-58
12-311
12
Classes – Alphabetical List
mlreportgen.dom.TableHeader class
Package: mlreportgen.dom
Table header
Description
Table header for labeling columns.
Properties
Children — Children of this document
cell array of mlreportgen.dom.Element objects
This read-only property lists child elements that the document element contains.
ColSep — Style of line separating columns
string
The style the line separating the columns of a table or table section (header, body, footer),
as specified by a mlreportgen.dom.ColSep object.
See the description of the Border property for a description of the possible values.
ColSepColor — Color of line separating columns
string
You can specify:
• Name of a color. The name must be a CSS color name. See http://www.crockford.com/
wrrrld/color.html.
• A hexadecimal RGB (truecolor) value as #RRGGBB. For example, #0000ff is a shade
of blue.
ColSepWidth — Width of line separating table columns
string
12-312
mlreportgen.dom.TableHeader class
String having the format valueUnits, where Units is an abbreviation for the units in
which the width is expressed. Use one of these abbreviations for the units of a width.
• no abbreviation — pixels
• cm — centimeters
• in — inches
• mm — millimeters
• pi — picas
• pt — points
• px — pixels
For example, for a three pica wide column separator, set the ColSepWidth property to
3pi.
Id — ID for document element
string
A session-unique ID is generated as part of document element creation. You can specify
an ID to replace the generated ID.
RowSep — Style of lines separating rows
string
The style of a line separating the rows of a table or table section (header, body, or footer).
See the description of the Border property for a description of the possible values.
RowSepColor — Color of lines separating table rows
string
String specifying one of these values:
• The name of a color. See the mlreportGen.dom.Color class reference page for a list
of supported colors.
• A hexadecimal RGB (truecolor) value as #RRGGBB. For example, #0000ff is a shade
of blue.
RowSepWidth — Width of lines separating table rows
string
12-313
12
Classes – Alphabetical List
The string has the format valueUnits, where Units is an abbreviation for the units in
which the width is expressed. Use one of these abbreviations for the units of a width.
• no abbreviation — pixels
• cm — centimeters
• in — inches
• mm — millimeters
• pi — picas
• pt — points
• px — pixels
Parent — Parent of document element
DOM object
This read-only property lists the parent of this document element.
Style — Format for the table header
array of format objects
Array of format objects (such as Bold objects) that specify the format for the table
header.
This property overrides corresponding formats defined by the stylesheet style specified by
the StyleName property.
StyleName — Style in the document or document part stylesheet
string
Name of a style specified in the stylesheet of the document or document part to which the
table header is appended
The style that specifies the appearance of the table header in the output document, for
formats not specified by Style property.
TableEntriesHAlign — Horizontal alignment of table entries
center (default) | left | right
Data Types: char
TableEntriesInnerMargin — Inner margin for table entries
string
12-314
mlreportgen.dom.TableHeader class
The inner margin is the margin between table cell content and the cell borders.
The string must have the format valueUnits where Units is an abbreviation for the
units in which the width size is expressed. Valid abbreviations are:
• no abbreviation — pixels
• cm — centimeters
• in — inches
• mm — millimeters
• pi — picas
• pt — points
• px — pixels
TableEntriesStyle — Style to use for table entries
cell array
Cell array of format objects that specify the format for table entries.
TableEntriesVAlign — Vertical alignment of table cell content
string
Possible values are:
• top
• middle
• bottom
Tag — Tag for document element
string
Tag for document element, specified as a string.
A session-unique ID is generated as part of document element creation. The generated
tag has the form CLASS:ID, where CLASS is the class of the element and ID is the value
of the Id property of the object. You can specify a tag to replace the generated tag.
Specify your own tag value, for example, to make it easier to identify where an issue
occurred during document generation.
12-315
12
Classes – Alphabetical List
Methods
Method
Purpose
append
Appends a row of table entries to this table
header.
entry
Get a header entry.
row
Get a header row.
See Also
mlreportgen.dom.FormalTable | mlreportgen.dom.TableBody |
mlreportgen.dom.TableEntry | mlreportgen.dom.TableFooter |
mlreportgen.dom.TableHeaderEntry | mlreportgen.dom.TableRow
Related Examples
•
12-316
“Create and Format Tables” on page 13-58
mlreportgen.dom.TableHeaderEntry class
mlreportgen.dom.TableHeaderEntry class
Package: mlreportgen.dom
Entry in table header
Description
Specifies a table header entry.
This class is intended primarily to support HTML table creation. It is rendered in an
HTML document as a th (table header cell) element. Use this element to eliminate the
need to format a table header entry explicitly. TableHeaderEntry objects rely on the
browser to render the header entry appropriately. For Microsoft Word output, the DOM
interface simulates HTML behavior by rendering a table header entry as bold text.
Construction
entryObj = TableHeaderEntry() creates an empty table header entry.
Output Arguments
entryObj — Table header entry
mlreportgen.dom.TableHeaderEntry object
Table header entry, represented by an mlreportgen.dom.TableHeaderEntry object.
Properties
Border — Type of border to draw
string
Specify one of the following as a string.
Border String
Description
Supported Output Types
dashed
Dashed line
Word and HTML
12-317
12
Classes – Alphabetical List
Border String
Description
Supported Output Types
dashdotstroked
Line with alternating
diagonal dashes and dot
Word
dashsmallgap
Dashed line with a small
gap between dashes
Word
dotted
Dotted line
Word and HTML
dotdash
Line with alternating dots
and dashes
Word
dotdotdash
Line with alternating
double dots and a dash
Word
double
Double line
Word and HTML
doublewave
Double wavy line
Word
groove
3-D effect grooved line
HTML
hidden
No line
HTML
See discussion below this
table.
inset
3-D effect line
Word and HTML
none
No line
Word and HTML
See discussion below this
table.
12-318
outset
3-D effect line
Word and HTML
ridge
3-D effect ridged line
HTML
single
Single line
Word
solid
Single line
HTML
thick
Thick line
Word
thickthinlargegap
Dashed line with
alternating thick and thin
dashes with a large gap
Word
thickthinmediumgap
Dashed line with
alternating thick and thin
dashes with a medium gap
Word
mlreportgen.dom.TableHeaderEntry class
Border String
Description
Supported Output Types
thickthinsmallgap
Dashed line with
alternating thick and thin
dashes with a small gap
Word
thinthicklargegap
Dashed line with
alternating thin and thick
dashes with a medium gap
Word
thinthickmediumgap
Dashed line with
alternating thin and thick
dashes, with a medium gap
Word
thinthicksmallgap
Dashed line with
alternating thin and thick
dashes with a small gap
Word
thinthickthinlargegap
Dashed line with
alternating thin and thick
dashes with a large gap
Word
thinthickthinmediumgap Dashed line with
alternating thin and thick
dashes with a medium gap
Word
thinthickthinsmallgap
Dashed line with
alternating thin and thick
dashes with a small gap
Word
threedemboss
Embossed effect line
Word
threedengrave
Engraved effect line
Word
triple
Triple line
Word
wave
Wavy line
Word
BorderColor — Border color
string
You can specify:
• Name of a color. The name must be a CSS color name. See http://www.crockford.com/
wrrrld/color.html.
• A hexadecimal RGB (truecolor) value as #RRGGBB. For example, #0000ff is a shade
of blue.
12-319
12
Classes – Alphabetical List
BorderWidth — Table border width
string
String specifying the width of the border. The string must have the format valueUnits
where Units is an abbreviation for the units in which the width size is expressed. Valid
abbreviations are:
• no abbreviation — pixels
• cm — centimeters
• in — inches
• mm — millimeters
• pi — picas
• pt — points
• px — pixels
ColSpan — Number of table columns spanned by table entry
double
Number of table columns spanned by the table entry, specified as a double.
Data Types: double
CustomAttributes — Custom attributes for document element
array of mlreportgen.doc.CustomAttribute objects
The custom attributes must be supported by the output type of the document to which
this document element is appended.
Id — ID for document element
string
A session-unique ID is generated as part of document element creation. You can specify
an ID to replace the generated ID.
InnerMargin — Inner margin (padding) around entry
string
String specifying the inner margin. String must have the format valueUnits where
Units is an abbreviation for the units in which the width size is expressed. Valid
abbreviations are:
12-320
mlreportgen.dom.TableHeaderEntry class
• no abbreviation — pixels
• cm — centimeters
• in — inches
• mm — millimeters
• pi — picas
• pt — points
• px — pixels
RowSpan — Number of table rows spanned by table entry
double
Number of table rows spanned by the table entry, specified as a double.
Data Types: double
Style — Format for table
array of format objects
Array of format objects (such as Bold objects) that specify the format for this table.
This property overrides corresponding formats defined by the stylesheet style specified by
the StyleName property.
StyleName — Style in document or document part stylesheet
string
Name of a style specified in the stylesheet of the document or document part to which
this table is appended
The style that specifies the appearance of this table in the output document, for formats
not specified by Style property.
Tag — Tag for document element
string
Tag for document element, specified as a string.
A session-unique ID is generated as part of document element creation. The generated
tag has the form CLASS:ID, where CLASS is the class of the element and ID is the value
of the Id property of the object. You can specify a tag to replace the generated tag.
12-321
12
Classes – Alphabetical List
Specify your own tag value, for example, to make it easier to identify where an issue
occurred during document generation.
VAlign — Vertical alignment table cell content
string
Possible values are:
• top
• bottom
• middle
Methods
Use TableHeaderEntry.append and TableHeaderEntry.clone methods the same
way you use Paragraph.append and Paragraph.clone.
Method
Purpose
append
Append text, paragraphs, images, tables,
and other elements to this entry.
clone
Clone this table header entry.
See Also
mlreportgen.dom.FormalTable | mlreportgen.dom.TableBody |
mlreportgen.dom.TableFooter | mlreportgen.dom.TableHeader |
mlreportgen.dom.TableRow
Related Examples
•
12-322
“Create and Format Tables” on page 13-58
mlreportgen.dom.TableRow class
mlreportgen.dom.TableRow class
Package: mlreportgen.dom
Table row
Description
Creates a table row.
Construction
tableRowObj = TableRow() creates an empty table row.
Output Arguments
tableRowObj — Table row
mlreportgen.dom.TableRow object
Table row, represented by an mlreportgen.dom.TableRow object.
Properties
CustomAttributes — Custom attributes for document element
array of mlreportgen.doc.CustomAttribute objects
The custom attributes must be supported by the output type of the document to which
this document element is appended.
Entries — Table entries in this row
array of mlreportgen.dom.TableEntry objects
Table entries in this row.
Height — Height of table row
string
12-323
12
Classes – Alphabetical List
String having the format valueUnits, where Units is an abbreviation for the units in
which the height is expressed. The following abbreviations are valid:
• no abbreviation — pixels
• cm — centimeters
• in — inches
• mm — millimeters
• pi — picas
• pt — points
• px — pixels
Alternatively, you can specify the table row height using the TableRow.Style property.
For example:
TableRow.Style = {RowHeight('.5in')};
Id — ID for document element
string
A session-unique ID is generated as part of document element creation. You can specify
an ID to replace the generated ID.
Style — Style of table row
array of format objects
Array of format objects (such as Bold objects) that specify the style of the table row.
StyleName — Style of table row
string
Name of a style specified in the stylesheet of the HTML document or document part
containing this row. This property is ignored for Word output.
Tag — Tag for document element
string
Tag for document element, specified as a string.
A session-unique ID is generated as part of document element creation. The generated
tag has the form CLASS:ID, where CLASS is the class of the element and ID is the value
of the Id property of the object. You can specify a tag to replace the generated tag.
12-324
mlreportgen.dom.TableRow class
Specify your own tag value, for example, to make it easier to identify where an issue
occurred during document generation.
Methods
Method
Purpose
append
Append entries to this row.
clone
Clone this row.
See Also
mlreportgen.dom.FormalTable | mlreportgen.dom.Table | mlreportgen.dom.TableBody
| mlreportgen.dom.TableEntry | mlreportgen.dom.TableFooter |
mlreportgen.dom.TableHeader
Related Examples
•
“Create and Format Tables” on page 13-58
12-325
12
Classes – Alphabetical List
mlreportgen.dom.Template class
Package: mlreportgen.dom
Create document template
Description
Create a template for a document.
Construction
templateObj = Template() creates an HTML template named Untitleld.htmtx in
the current folder, using the DOM default HTML template.
templateObj = Template(templatePath) creates a default HTML template at the
specified location.
templateObj = Template(templatePath,type) creates a template of the specified
type (Microsoft Word or HTML).
templateObj = Template(templatePath,type,sourceTemplate) creates a copy
of the template at the specified location, based on the specified template type.
Input Arguments
templatePath — Path and name for the template
string
Full path of output file or folder for the template.
type — Type of output
'html' (default) | 'docx' | 'html-file'
Type of output, specified as 'html', 'docx' or 'html-file'.
• 'html'— HTML output as a zipped or unzipped folder containing the HTML
document text, image, style sheet, and JavaScript files
12-326
mlreportgen.dom.Template class
• 'docx'— Word output
• 'html-file'— HTML output consisting of a single file that contains the text, style
sheets, JavaScript®, and images for the report
If you specify a template using the templatePath input argument, the template must be
consistent with the type argument. You must specify a Word template (.dotx) for docx
output, an HTML template package (.htmtx) for HTML output, and a single-file HTML
template (.html) for html-file output.
sourceTemplatePath — Location of template to copy
string
The location of the template to copy. The source template used is based on the type of
template specified in the type input argument.
Output Arguments
templateObj — Template for document
mlreportgen.dom.Template object
Template, represented by an mlreportgen.dom.Template object.
Properties
Children — Children of this document
cell array of mlreportgen.dom.Element objects
This read-only property lists child elements that the document element contains.
CurrentHoleId — Hole ID of current hole in document
string
This read-only property is the hole ID of the current hole in this document.
CurrentHoleType — Type of current hole
string
This read-only property is the type (inline or block) of the current template hole.
• An inline hole is for document elements that a paragraph element can contain: Text,
Image, LinkTarget, ExternalLink, InternalLink, CharEntity, AutoNumber.
12-327
12
Classes – Alphabetical List
• A block hole can contain a Paragraph, Table, OrderedList, UnorderedList,
DocumentPart, and Group.
CurrrentDOCXSection — The current section of Word document
mlreportgen.dom.DOCXSection object
This read-only property for a Word document is a mlreportgen.dom.DOCXSection
object that specifies the properties, as well as the headers and footers, of the current
document section. In HTML documents, the value of this property is always [].
ForceOverwrite — Overwrite existing output file
[] (default) | logical value
Set this property to true to overwrite an existing output file of the same name for a
report from this document. If this property is false, or if the existing output file is readonly, then generating an output file using the same path as an existing output file causes
an error.
Data Types: logical
HTMLHeadExt — Custom content for HTML header
string
Data Types: char
Id — ID for document element
string
A session-unique ID is generated as part of document element creation. You can specify
an ID to replace the generated ID.
OutputPath — Path of output file or folder for this document
string
Before setting this property, close the document.
Path of output file for this document. If you do not specify a file extension, the extension
is based on the output type (for example, .docx for Word).
For zipped output packaging, the default is the current folder.
For unzipped output packaging, the path specifies the folder for the output files. The
default is the current folder.
12-328
mlreportgen.dom.Template class
PackageType — Packaging for files generated from document
'zipped' (default) | 'unzipped' | 'both'
Specifies how to package the output files generated from this document.
For zipped packaging, the document output is a zip file located at the location specified
by the OutputPath property. The zip file has the extension that matches the document
type: docx (for Word output) or htmx (for HTML output). For example, if the document
type is docx and OutputPath is s:\docs\MyDoc, the output is packaged in a zip file
named s:\docs\MyDoc.docx.
For unzipped packaging, the document output is stored in a folder having the root file
name of the OutputPath property. For example, if the OutputPath is s:\docs\MyDoc,
the output folder is s:\docs\MyDoc.
If you set PackageType to both, generating the report produces zipped and unzipped
output.
Data Types: char
StreamOutput — Option to stream output to disk
false (default) | logical value
By default, document elements are stored in memory until the document is closed. Set
this property to true to write document elements to disk as the elements are appended
to the document.
Data Types: logical
Tag — Tag for this document
session-unique tag when the document is generated (default) | string
String that identifies this document. The tag has the form CLASS:ID, where CLASS is the
document class and ID is the value of the Id property of the object.
An example of a reason for specifying your own tag value is to make it easier to identify
where an issue occurred during document generation.
TemplatePath — Path of the template used for this document element
string
The full path to the HTML or Word template to use for this document element.
12-329
12
Classes – Alphabetical List
TitleBarText — Title for HTML browser title bar
string
For HTML documents, this property specifies the text for the title bar of the browser.
Word documents ignore this property.
Set this property before opening the document for output.
Type — Type of output
'html' (default) | 'docx' | 'html-file'
Type of output, specified as 'html', 'docx' or 'html-file'.
• 'html'— HTML output HTML output as a zipped or unzipped folder containing the
HTML document text, image, style sheet, and JavaScript files
• 'docx'— Word output
• 'html-file'— HTML output consisting of a single file that contains the text, style
sheets, JavaScript®, and images for the report
If you specify a template using the TemplatePath property, the template must be
consistent with the type argument. You must specify a Word template (.dotx) for docx
output, an HTML template package (.htmtx) for HTML output, and a single-file HTML
template (.html) for html-file output.
Methods
Use the Template methods the same way you use the corresponding Document methods.
12-330
Method
Purpose
append
Append document element to the
document.
close
Close this document.
createTemplate
Create default template.
fill
Fill document hole.
getCoreProperties
Get core properties of document.
getImageDirectory
Get image directory for the document.
mlreportgen.dom.Template class
Method
Purpose
getImagePrefix
Get generated image name prefix for the
document.
getMainPartPath
Get relative path of main part of output
document.
getOPCMainPart
Get full path of main part of output
document.
moveToNextHole
Move to next template hole.
open
Open this document.
package
Append file to OPC package of document.
setCoreProperties
Set core properties of document element.
Examples
Create a Template and Use it in a Report
import mlreportgen.dom.*;
t = Template('mytemplate');
p = Paragraph('My Company');
p.FontSize = '24';
p.Color = 'DeepSkyBlue';
p.Bold = true;
p.HAlign = 'center';
append(t,p);
p = Paragraph;
p.FontFamilyName = 'Arial';
p.FontSize = '18pt';
p.Bold = true;
p.HAlign = 'center';
append(p,TemplateHole('ReportTitle','Report Title'));
append(t,p);
close(t);
rptview('mytemplate.htmtx');
•
“Create a Microsoft Word Template” on page 13-111
12-331
12
Classes – Alphabetical List
•
“Create an HTML Template” on page 13-122
•
“Use Style Sheets” on page 13-21
See Also
mlreportgen.dom.Document.createTemplate | mlreportgen.dom.TemplateHole |
rptview
12-332
mlreportgen.dom.TemplateHole class
mlreportgen.dom.TemplateHole class
Package: mlreportgen.dom
Hole to append to template
Description
Hole to append to a document template.
You can append a template hole to these kinds of DOM objects:
• Paragraph
• TableEntry
• Group
• Template
Construction
templateHoleObj = TemplateHole() creates a hole with empty properties.
templateHoleObj = TemplateHole(id) creates a hole having the specified id.
templateHoleObj = TemplateHole(id,description) creates a hole having the
specified id and description.
Input Arguments
id — ID for template hole
string
The ID for the template hole, specified by a string.
description — Description for template hole
string
Description for the template hole, specified as a string. The value of this argument
becomes the content of the hole in the template to which it is assigned to allow you to
12-333
12
Classes – Alphabetical List
determine the purpose of the hole when viewing the template in Microsoft Word (for
Word templates) or in a Web browser (for HTML templates). The description is replaced
by appended hole content in a report generated from the template.
Output Arguments
templateHoleObj — Hole to append to template
mlreportgen.dom.TemplateHole object
Hole to append to template, represented by an mlreportgen.dom.TemplateHole
object.
Properties
DefaultHoleStyleName — Name of default style for hole content
string
Name of default style for hole content. This style name is assigned to hole content that
does not specify a style name. For example, suppose you append a Text object to this
hole and the Text object does not specify a style name. Then the value of this property
is assigned to the text object as its style name. This property allows a template to specify
the appearance of appended content.
Description — Description of this hole
string
Description for the template hole, specified as a string. The value of this property
becomes the content of the hole in the template to which it is assigned to allow you to
determine the purpose of the hole when viewing the template in Microsoft Word (for
Word templates) or in a Web browser (for HTML templates). The description is replaced
by appended hole content in a report generated from the template.
HoleId — ID of this hole
string
ID of this template hole.
Id — ID for document element
string
12-334
mlreportgen.dom.TemplateHole class
A session-unique ID is generated as part of document element creation. You can specify
an ID to replace the generated ID.
Tag — Tag for document element
string
Tag for document element, specified as a string.
A session-unique ID is generated as part of document element creation. The generated
tag has the form CLASS:ID, where CLASS is the class of the element and ID is the value
of the Id property of the object. You can specify a tag to replace the generated tag.
Specify your own tag value, for example, to make it easier to identify where an issue
occurred during document generation.
Methods
Method
Purpose
clone
Clone this hole object.
Use TemplateHole.clone in a similar
way to how you use Paragraph.clone.
See Also
mlreportgen.dom.Document.createTemplate | mlreportgen.dom.Template | rptview
Related Examples
•
“Create a Microsoft Word Template” on page 13-111
•
“Create an HTML Template” on page 13-122
•
“Use Style Sheets” on page 13-21
12-335
12
Classes – Alphabetical List
mlreportgen.dom.Text class
Package: mlreportgen.dom
Text object
Description
Text string to include in a document element
Construction
textObj = Text() creates an empty text object.
textObj = Text(text) creates a text object containing the specified text string.
textObj = Text(text,styleName) creates a text object containing the specified
text string using the specified style. The style must be defined in the style sheet of the
template of the document to which this text object is appended.
Input Arguments
text — Text string
array of chars
Array of chars containing the text
Data Types: char
styleName — Style for the text
mlreportgen.dom.StyleName object
The style specified by styleName must be defined in the template used to create the
document to which this text is appended.
Data Types: char
12-336
mlreportgen.dom.Text class
Output Arguments
textObj — Text string
mlreportgen.dom.Text object
Text string, represented by an mlreportgen.dom.Text object.
Properties
BackgroundColor — Background color
string
Specify one of these as a string:
• The name of a color. The name must be a CSS color name. See http://
www.crockford.com/wrrrld/color.html.
• A hexadecimal RGB (truecolor) value as #RRGGBB. For example, #0000ff is a shade
of blue.
Bold — Option to use bold for text
[] (default) | logical value
To make text bold, set this property to true or 1. If this property is empty and the
StyleName property for this document element specifies a style sheet style, the weight
of the text is determined by that style. Setting the Bold property adds a corresponding
mlreportgen.dom.Bold format object to the Style property of this document element.
Removing the Bold property setting removes the object.
Data Types: logical
Color — Text color
string
Specify one of these as a string:
• The name of a color. The name must be a CSS color name. See http://
www.crockford.com/wrrrld/color.html.
• A hexadecimal RGB (truecolor) value as #RRGGBB. For example, #0000ff is a shade
of blue.
12-337
12
Classes – Alphabetical List
Content — Text string contained by this document element
string
Text string contained by this document element.
CustomAttributes — Custom attributes of document element
array of mlreportgen.dom.CustomAttribute objects
HTML or Microsoft Word must support the custom attributes of this document element.
FontFamilyName — Name of font family for text
string
The name of a font family.
To specify substitutions for this font, do not set this property. Instead create and add a
mlreportgen.dom.FontFamily object to the Style property of this document element.
Setting the FontFamilyName property adds a corresponding
mlreportGen.dom.FontFamily format object to the Style property for this document
element. Removing the FontFamilyName property setting removes the object.
FontSize — Font size for text
string
If you need to specify substitutions for this font, do not set this property. Instead
create and add a mlreportgen.dom.FontFamily object to the Style property of this
document element.
Setting the FontSize property adds a corresponding mlreportGen.dom.FontSize
format object to the Style property for this document element. Removing the FontSize
property setting removes the object.
String having the format valueUnits, where Units is an abbreviation for the units in
which the font size is expressed. Use one of these abbreviations for the units for the font
size.
• no abbreviation — pixels
• cm — centimeters
• in — inches
• mm — millimeters
12-338
mlreportgen.dom.Text class
• pi — picas
• pt — points
• px — pixels
Id — ID for document element
string
A session-unique ID is generated as part of document element creation. You can specify
an ID to replace the generated ID.
Italic — Option to use italics for text
[] (default) | logical value
To use italics for text, set this property to true. If this property is empty and the
StyleName property for this document element specifies a style sheet style, the slant of
the text is determined by that style. Setting the Italic property adds a corresponding
mlreportgen.dom.Italic format object to the Style property of this document
element. Removing the Italic property setting removes the object.
Data Types: logical
Strike — Text strikethrough
string
The default for this property is []. You can set it to one of these values:
• none — Do not use strikethrough for Word and HTML documents
• single — Use a single line for strikethrough for Word and HTML documents
• double — Use a double line for strikethrough for Word documents
Setting the Strike property adds a corresponding mlreportGen.dom.Strike format
object to the Style property for this document element. Removing the Strike property
setting removes the object.
Style — Text formatting
array of DOM style objects
An array of DOM style objects that specifies the format for the text.
StyleName — Style for the text
string
12-339
12
Classes – Alphabetical List
The style specified by styleName must be defined in the template used to create the
document element to which this text is appended.
Tag — Tag for document element
string
Tag for document element, specified as a string.
A session-unique ID is generated as part of document element creation. The generated
tag has the form CLASS:ID, where CLASS is the class of the element and ID is the value
of the Id property of the object. You can specify a tag to replace the generated tag.
Specify your own tag value, for example, to make it easier to identify where an issue
occurred during document generation.
Underline — Type of underline, if any, for text
[] (default) | string
You can specify one of the following types of underlines.
12-340
Border String
Description
Supported Output Types
dash
Dashed underline
Word
dashedHeavy
Line with heavy dashes
Word
dashLong
Line with long dashes
Word
dashLongHeavy
Line with heavy long
dashes
Word
dashDotDotHeavy
Line with heavy dashes
with two dots between
the dashes
Word
dashDotHeavy
Heavy dash-dot line
Word
dotted
Dotted line
Word
dottedHeavy
Thick dotted line
Word
dotDash
Dot-dash line
Word
dotDotDash
Dot-dot-dash line
Word
dashDotHeavy
Heavy dot-dash line
Word
double
Double line
Word
none
Do not use underlining
HTML and Word
mlreportgen.dom.Text class
Border String
Description
Supported Output Types
single
Single line
HTML and Word
thick
Thick line
Word
wave
Wavy line
Word
waveyDouble
Double wavy line
Word
waveyHeavy
Heavy wavy
Word
words
Underline non-space
characters only
Word
If this property is empty and StyleName property of this document element specifies a
style sheet style, the type of underline is determined by that style.
To specify the color as well as the type of the underline, do not set the Underline
property. Instead, set the Style property of this document element to include an
mlreportgen.dom.Underline format object that specifies the desired underline type
and color.
Setting the Underline property adds a corresponding mlreportgen.dom.Underline
format object to the Style property for this document element. Removing the
Underline property setting removes the object.
WhiteSpace — White space and line breaks in text
[] (default) | string
To specify how to handle white space, use one of the following strings.
Border String
Description
Supported Output Types
normal
Does not preserve white
space and line breaks
Word and HTML
nowrap
Sequences of white space
collapse into a single white
space. Text never wraps to
the next line.
HTML
preserve
Preserves white space. Text Word and HTML
wraps only on line breaks.
See below for details.
Acts like the <pre> tag in
HTML.
12-341
12
Classes – Alphabetical List
Border String
Description
Supported Output Types
pre
Preserves white space. Text HTML
wraps only on line breaks.
Acts like the <pre> tag in
HTML.
pre-line
Sequences of white space
collapse into a single white
space. Text wraps.
pre-wrap
Preserves white space. Text HTML
wraps when necessary and
on line breaks
HTML
If you want to view HTML output in the MATLAB browser and you want to preserve
white space and wrap text only on line breaks, use the preserve setting rather than the
pre setting.
Setting the WhiteSpace property adds a corresponding WhiteSpace format object to
Style property. Removing the WhiteSpace property setting removes the WhiteSpace
object.
Methods
Use the Text.append and Text.clone methods the same way you use the
Paragraph.append and Paragraph.clone methods.
Method
Purpose
append
Append a custom element to this text
object.
clone
Clone this text object
See Also
mlreportgen.dom.CharEntity | mlreportgen.dom.CustomText |
mlreportgen.dom.Paragraph
Related Examples
•
12-342
“Add Content to a Report” on page 13-11
mlreportgen.dom.Text class
More About
•
“Report Formatting Approaches” on page 13-20
12-343
12
Classes – Alphabetical List
mlreportgen.dom.Underline class
Package: mlreportgen.dom
Draw line under text
Description
Draw line under text
Construction
underline = Underline() draws a single line under text.
underline = Underline(type) draws a line of the specified type under the text.
underline = Underline(type,color) draws a line of the specified type and color
under the text. The color parameter must be a mlreportgen.dom.Color object.
Input Arguments
type — Style of underline
string
String specifying the style of the underline. Valid strings are:
String
12-344
Description
Applies To
DOCX
HTML
'single'
Single underline
X
X
'double'
Double underline
X
'words'
Words only underlined (not spaces)
X
'thick'
Thick underline
X
'dotted'
Dotted underline
X
'dottedHeavy'
Thick, dotted underline
X
mlreportgen.dom.Underline class
String
Description
Applies To
DOCX
HTML
'dashed'
Dashed underline
X
'dashedHeavy'
Thick, dashed underline
X
'dashLong'
Long, dashed underline
X
'dashLongHeavy'
Thick, long, dashed underline
X
'dotDash'
Dot dash underline
X
'dotDotDash'
Dash dot dot underline
X
'dashDotDotHeavy'
Thick dash dot dot underline
X
'dashDotHeavy'
Thick dash dot underline
X
'none'
No underline
X
'wave'
Wavy underline
X
'wavyDouble'
Two wavy underlines
X
'wavyHeavy'
Thick wavy underline
X
color — Color of underline
mlreportgen.dom.Color object
Color of the underline, specified by an mlreportgen.dom.Color object.
Output Arguments
underline — Line under text
mlreportgen.dom.Underline object
Underline, represented by an mlreportgen.dom.Underline object.
Properties
Type — Underline style
string
Underline style. See the description of the type input argument for the constructor.
12-345
12
Classes – Alphabetical List
Data Types: char
Color — Color of underline
mlreportgen.dom.Color object
Color of the underline, specified by an mlreportgen.dom.Color object.
Id — ID for document element
string
A session-unique ID is generated as part of document element creation. You can specify
an ID to replace the generated ID.
Tag — Tag for document element
string
Tag for document element, specified as a string.
A session-unique ID is generated as part of document element creation. The generated
tag has the form CLASS:ID, where CLASS is the class of the element and ID is the value
of the Id property of the object. You can specify a tag to replace the generated tag.
Specify your own tag value, for example, to make it easier to identify where an issue
occurred during document generation.
See Also
mlreportgen.dom.Text
More About
•
12-346
“Report Formatting Approaches” on page 13-20
mlreportgen.dom.UnorderedList class
mlreportgen.dom.UnorderedList class
Package: mlreportgen.dom
Unordered (bulleted) list
Description
Specifies an unordered (bulleted) list.
Construction
unorderedListObj = UnorderedList() creates an empty unordered list.
unorderedListObj = UnorderedList(items) creates an unordered list from a cell
array of strings specifying the list items.
Input Arguments
items — Content to include in each item in unordered list
cell array of strings
A one-dimensional cell array containing a string for each item in the unordered list.
The cell array can contain a combination of the following:
• A string
• A number
• A Boolean value
• One of the following DOM objects:
• mlreportgen.dom.Text
• mlreportgen.dom.Paragraph
• mlreportgen.dom.ExternalLink
• mlreportgen.dom.InternalLink
12-347
12
Classes – Alphabetical List
• mlreportgen.dom.Table
• mlreportgen.dom.Image
• mlreportgen.dom.CustomElement
• Horizontal one-dimensional array (for a sublist)
To append an ordered list, use an OrderedList DOM object instead of using the
listItems argument.
Output Arguments
unorderedListObj — Content to include in each item in the unordered list
mlreportgen.dom.UnorderedList object
An mlreportgen.dom.UnorderedList object representing an unordered list of the
specified list items.
Properties
CustomAttributes — Custom attributes of document element
array of mlreportgen.dom.CustomAttribute objects
HTML or Microsoft Word must support the custom attributes of this document element.
Id — ID for document element
string
A session-unique ID is generated as part of document element creation. You can specify
an ID to replace the generated ID.
Style — Format specification
array of format objects
Format objects that specify the format of a document element.
Stylename — List style name
string
The style specified by styleName must be defined in the template used to create the
document element to which this list is appended.
12-348
mlreportgen.dom.UnorderedList class
Tag — Tag for document element
string
Tag for document element, specified as a string.
A session-unique ID is generated as part of document element creation. The generated
tag has the form CLASS:ID, where CLASS is the class of the element and ID is the value
of the Id property of the object. You can specify a tag to replace the generated tag.
Specify your own tag value, for example, to make it easier to identify where an issue
occurred during document generation.
Methods
Method
Purpose
append
Append items to this list.
Use the UnorderedList.append
method similar to how you use
OrderedList.append.
clone
Copy the list.
Use the UnorderedList.clone method
similar to how you use Paragraph.clone.
Examples
Create an Unordered List
import mlreportgen.dom.*;
d = Document('mydoc');
ul = UnorderedList({Text('a'),'b',1,{'c',Paragraph('d')}});
append(d,ul);
close(d):
rptview('mydoc','html');
•
“Create and Format Lists” on page 13-52
12-349
12
Classes – Alphabetical List
See Also
mlreportgen.dom.ListItem | mlreportgen.dom.OrderedList
12-350
mlreportgen.dom.VAlign class
mlreportgen.dom.VAlign class
Package: mlreportgen.dom
Vertical alignment of document object
Description
Specifies vertical alignment of objects.
Construction
vAlignObj = VAlign() creates an alignment object having the value 'top'.
vAlignObj = VAlign(value) creates an alignment object having the specified value.
Input Arguments
value — Specify vertical alignment
'top' (default) | 'bottom' | 'middle'
String that specifies the vertical alignment of a document element.
Output Arguments
vAlignObj — Vertical alignment of document object
mlreportgen.dom.VAlign object
Vertical alignment of document object, represented by an mlreportgen.dom.VAlign
object.
Properties
Id — ID for document element
string
12-351
12
Classes – Alphabetical List
A session-unique ID is generated as part of document element creation. You can specify
an ID to replace the generated ID.
Tag — Tag for document element
string
Tag for document element, specified as a string.
A session-unique ID is generated as part of document element creation. The generated
tag has the form CLASS:ID, where CLASS is the class of the element and ID is the value
of the Id property of the object. You can specify a tag to replace the generated tag.
Specify your own tag value, for example, to make it easier to identify where an issue
occurred during document generation.
Value — Specify vertical alignment
'top' (default) | 'bottom' | 'middle'
String that specifies the vertical alignment of an object. Choices are:
See Also
mlreportgen.dom.HAlign
More About
•
12-352
“Report Formatting Approaches” on page 13-20
mlreportgen.dom.VerticalAlign class
mlreportgen.dom.VerticalAlign class
Package: mlreportgen.dom
Vertical alignment of text
Description
Specifies vertical alignment of text.
Construction
verticalAlignObj = VerticalAlign() creates a superscript alignment.
verticalAlignObj = VerticalAlign(align) creates an alignment of the specified
type.
Input Arguments
align — Vertical alignment of text relative to baseline
'superscript' (default) | 'subscript' | 'baseline'
String specifying the vertical alignment of text relative to the baseline.
Output Arguments
verticalAlignObj — Vertical alignment of text
mlreportgen.dom.VerticalAlignment object
Vertical alignment of text, represented by an mlreportgen.dom.VerticalAlignment
object.
Properties
Id — ID for document element
string
12-353
12
Classes – Alphabetical List
A session-unique ID is generated as part of document element creation. You can specify
an ID to replace the generated ID.
Tag — Tag for document element
string
Tag for document element, specified as a string.
A session-unique ID is generated as part of document element creation. The generated
tag has the form CLASS:ID, where CLASS is the class of the element and ID is the value
of the Id property of the object. You can specify a tag to replace the generated tag.
Specify your own tag value, for example, to make it easier to identify where an issue
occurred during document generation.
Value — Vertical alignment of text relative to baseline
'superscript' (default) | 'subscript' | 'baseline'
String specifying the vertical alignment of text relative to the baseline.
Examples
Use a Superscript
import mlreportgen.dom.*;
doctype = 'html';
d = Document('test',doctype);
p = Paragraph('e = mc');
t = Text('2');
t.Style = {VerticalAlign('superscript')};
append(p,t);
append(d,p);
close(d);
rptview('test',doctype);
See Also
mlreportgen.dom.Text
12-354
mlreportgen.dom.VerticalAlign class
More About
•
“Report Formatting Approaches” on page 13-20
12-355
12
Classes – Alphabetical List
mlreportgen.dom.WarningMessage class
Package: mlreportgen.dom
Warning message
Description
Create a warning message with the specified text originating from the specified source
object.
Construction
warningMsgObj = WarningMessage(text,source) creates a warning message with
the specified text originating from the specified source object.
Input Arguments
text — Message text
string
The text to display for the message.
source — DOM object from which message originates
a DOM object
The DOM object from which the message originates.
Output Arguments
warningMsgObj — Warning message
mlreportgen.dom.WarningMessage object
Warning message, represented by an mlreportgen.dom.WarningMessage object.
12-356
mlreportgen.dom.WarningMessage class
Properties
Id — ID for document element
string
A session-unique ID is generated as part of document element creation. You can specify
an ID to replace the generated ID.
Source — Source DOM object from which message originates
a DOM object
Source DOM object from which the message originates.
Tag — Tag for document element
string
Tag for document element, specified as a string.
A session-unique ID is generated as part of document element creation. The generated
tag has the form CLASS:ID, where CLASS is the class of the element and ID is the value
of the Id property of the object. You can specify a tag to replace the generated tag.
Specify your own tag value, for example, to make it easier to identify where an issue
occurred during document generation.
Text — Text of message
string
Message text, specified as a string.
Methods
Use WarningMessage methods similar to how you use ProgressMessage methods.
Method
Purpose
formatAsHTML
Wrap message in HTML tags.
formatAsText
Format message as text.
passesFilter
Determine if message passes filter.
12-357
12
Classes – Alphabetical List
Examples
Create a Warning Message
import mlreportgen.dom.*;
d = Document('test','html');
dispatcher = MessageDispatcher.getTheDispatcher;
l = addlistener(dispatcher,'Message', ...
@(src, evtdata) disp(evtdata.Message.formatAsText));
open(d);
dispatch(dispatcher,WarningMessage('invalid chapter',d));
p = Paragraph('Chapter ');
p.Tag = 'chapter title';
p.Style = {CounterInc('chapter'),...
CounterReset('table'),WhiteSpace('pre')};
append(p,AutoNumber('chapter'));
append(d,p);
close(d);
Delete the listener to avoid duplicate reporting of message objects during a MATLAB
session.
delete(l);
•
“Display Report Generation Messages” on page 13-106
See Also
mlreportgen.dom.MessageDispatcher.dispatch
12-358
mlreportgen.dom.WhiteSpace class
mlreportgen.dom.WhiteSpace class
Package: mlreportgen.dom
White space type
Description
Preserves white space and line breaks in text.
Construction
ws = WhiteSpace() collapses white space.
ws = WhiteSpace(option) applies the specified white space option to white space in a
Text object.
Input Arguments
option — White space type
string
String specifying the white space type.
String
Description
'preserve'
Preserves white space and line breaks.
This is the only option that works in Microsoft Word and in
the MATLAB browser.
'normal'
Sequences of white spaces collapse into a single white space.
Text wraps when necessary.
This is default.
'nowrap'
Sequences of white spaces collapse into a single white space.
Text does not wrap to the next line. The text continues on the
same line until a <br /> tag is encountered.
12-359
12
Classes – Alphabetical List
String
Description
'pre'
White space is preserved by the browser. Text wraps only on
line breaks. Acts like the <pre> tag in HTML.
'pre-line'
Sequences of white spaces collapses into a single white space.
Text wraps when necessary and on line breaks.
'pre-wrap'
White space is preserved by the browser. Text wraps when
necessary and on line breaks.
Output Arguments
ws — White space type
mlreportgen.dom.WhiteSpace object
White space type, represented by an mlreportgen.dom.WhiteSpace object.
Properties
Id — ID for document element
string
A session-unique ID is generated as part of document element creation. You can specify
an ID to replace the generated ID.
Tag — Tag for document element
string
Tag for document element, specified as a string.
A session-unique ID is generated as part of document element creation. The generated
tag has the form CLASS:ID, where CLASS is the class of the element and ID is the value
of the Id property of the object. You can specify a tag to replace the generated tag.
Specify your own tag value, for example, to make it easier to identify where an issue
occurred during document generation.
Value — White space type
string
12-360
mlreportgen.dom.WhiteSpace class
String specifying the white space type.
String
Description
'preserve'
Preserves white space and line breaks.
This is the only option that works in Microsoft Word and in
the MATLAB browser.
'normal'
Sequences of white spaces collapse into a single white space.
Text wraps when necessary.
This is default.
'nowrap'
Sequences of white spaces collapse into a single white space.
Text does not wrap to the next line. The text continues on the
same line until a <br /> tag is encountered.
'pre'
White space is preserved by the browser. Text wraps only on
line breaks. Acts like the <pre> tag in HTML.
'pre-line'
Sequences of white spaces collapses into a single white space.
Text wraps when necessary and on line breaks.
'pre-wrap'
White space is preserved by the browser. Text wraps when
necessary and on line breaks.
Examples
Include White Space Between Titles
import mlreportgen.dom.*;
doctype = 'html';
d = Document('test',doctype);
p = Paragraph('Chapter ');
p.Style = { CounterInc('chapter'),WhiteSpace('preserve') };
append(p, AutoNumber('chapter'));
append(d, p);
p = Paragraph('Chapter ');
p.Style = { CounterInc('chapter'),WhiteSpace('preserve') };
append(p,AutoNumber('chapter'));
append(d,p);
12-361
12
Classes – Alphabetical List
close(d);
rptview('test',doctype);
See Also
mlreportgen.dom.Text
More About
•
12-362
“Report Formatting Approaches” on page 13-20
mlreportgen.dom.WidowOrphanControl class
mlreportgen.dom.WidowOrphanControl class
Package: mlreportgen.dom
Widow and orphan handling
Description
Specifies whether to prevent widows and orphans. This format applies only to Microsoft
Word documents.
Construction
widowOrphanControlObj = WidowOrphanControl() prevents a page break after the
first line of a paragraph (orphan) or before the last line of a paragraph (widow).
widowOrphanControlObj = WidowOrphanControl(tf) prevents orphans and
widows if tf is true.
Input Arguments
tf — Controls orphans and widows
true (default) | false | 1 | 0
A setting of true (or 1) prevents a page break after the first line of a paragraph (orphan)
or before the last line of a paragraph (widow). A setting of false (or 0) allows a page
break after the first line of a paragraph (orphan) or before the last line of a paragraph
(widow).
Data Types: logical
Output Arguments
widowOrphanControlObj — Widow and orphan handling
mlreportgen.dom.WidowOrphanControl object
Widow and orphan handling, represented by an
mlreportgen.dom.WidowOrphanControl object.
12-363
12
Classes – Alphabetical List
Properties
Id — ID for document element
string
A session-unique ID is generated as part of document element creation. You can specify
an ID to replace the generated ID.
Tag — Tag for document element
string
Tag for document element, specified as a string.
A session-unique ID is generated as part of document element creation. The generated
tag has the form CLASS:ID, where CLASS is the class of the element and ID is the value
of the Id property of the object. You can specify a tag to replace the generated tag.
Specify your own tag value, for example, to make it easier to identify where an issue
occurred during document generation.
Value — Control orphans and widows
true (default) | false | 1 | 0
Possible values are:
• true or 1 — Prevents a page break after the first line of a paragraph (orphan) or
before the last line of a paragraph (widow).
• false or 0 — Allows a page break after the first line of a paragraph (orphan) or
before the last line of a paragraph (widow).
Data Types: logical
See Also
mlreportgen.dom.Paragraph
More About
•
12-364
“Report Formatting Approaches” on page 13-20
mlreportgen.dom.Width class
mlreportgen.dom.Width class
Package: mlreportgen.dom
Object width
Description
Specifies the width of an object, such as an image or a table cell.
Construction
widthObj = Width() creates a format object that specifies a width of 1 inch.
widthObj = Width(value) creates a width object having the specified width.
Input Arguments
value — Width of object
string
Width of object, such as an image or a table cell, specified as a string. The string having
the format valueUnits, where Units is an abbreviation for the units in which the width
is expressed. The following abbreviations are valid:
• no abbreviation — pixels
• cm — centimeters
• in — inches
• mm — millimeters
• pi — picas
• pt — points
• px — pixels
• % — percent
12-365
12
Classes – Alphabetical List
Output Arguments
widthObj — Object width
mlreportgen.dom.Width object
Object width, represented by an mlreportgen.dom.Width object.
Properties
Id — ID for document element
string
A session-unique ID is generated as part of document element creation. You can specify
an ID to replace the generated ID.
Tag — Tag for document element
string
Tag for document element, specified as a string.
A session-unique ID is generated as part of document element creation. The generated
tag has the form CLASS:ID, where CLASS is the class of the element and ID is the value
of the Id property of the object. You can specify a tag to replace the generated tag.
Specify your own tag value, for example, to make it easier to identify where an issue
occurred during document generation.
Value — Width of object
string
Width of object, such as an image or a table cell, specified as a string. The string having
the format valueUnits, where Units is an abbreviation for the units in which the width
is expressed. The following abbreviations are valid:
• no abbreviation — pixels
• cm — centimeters
• in — inches
• mm — millimeters
• pi — picas
12-366
mlreportgen.dom.Width class
• pt — points
• px — pixels
• % — percent
Examples
Set Width and Other Formats for a Table
import mlreportgen.dom.*;
doctype = 'html';
d = Document('test',doctype);
t = Table(magic(5));
t.Style = {Border('inset','crimson','6pt'),...
Width('50%')};
t.TableEntriesInnerMargin = '6pt';
t.TableEntriesHAlign = 'center';
t.TableEntriesVAlign = 'middle';
append(d,t);
close(d);
rptview('test',doctype);
See Also
mlreportgen.dom.Height | mlreportgen.dom.Image | mlreportgen.dom.Table
More About
•
“Report Formatting Approaches” on page 13-20
12-367
12
Classes – Alphabetical List
mlreportgen.ppt.BackgroundColor class
Package: mlreportgen.ppt
Background color of presentation element
Description
Specifies the background color of these presentation element PPT API objects:
• TextBox
• TextBoxPlaceholder
• ContentPlaceholder
• TablePlaceholder
• Table
• TableRow
• TableEntry
• ColSpec
• TextBox
Construction
backgroundColorObj = BackgroundColor() creates a white background.
backgroundColorObj = BackgroundColor(color) creates a background color
object based on the specified CSS color name or hexidecimal RGB color value.
Input Arguments
color — Background color
string
Background color, specified as a string. You can use:
12-368
mlreportgen.ppt.BackgroundColor class
• The name of a color, specified as a string. The name must be a CSS color name. See
http://www.crockford.com/wrrrld/color.html.
• Hexidecimal RGB (red, green, blue) color value, specified as a string. Use a string
having the format #RRGGBB. Use # as the first character and two-digit hexidecimal
numbers for each the red, green, and blue value. For example, '#0000ff' specifies
blue.
Output Arguments
backgroundColorObj — Background color
mlreportgen.ppt.BackgroundColor object
Background color for a report object, returned as an
mlreportgen.ppt.BackgroundColor object.
Properties
Id — ID for PPT API object
string
ID for PPT API object, specified as a string. A session-unique ID is generated as part of
object creation. You can specify an ID to replace the generated ID.
Tag — Tag for this PPT API object
session-unique tag generated as part of object creation (default) | string
Tag for this PPT API object, specified as a string. The generated tag has the form
CLASS:ID, where CLASS is the object class and ID is the value of the Id property of the
object.
An example of a reason for specifying your own tag value is to make it easier to identify
where an issue occurred during presentation generation.
Value — CSS color name or hexadecimal RGB value for this color
string
The name of a color, specified as a string, using one of these values:
• A CSS color name. See http://www.crockford.com/wrrrld/color.html.
12-369
12
Classes – Alphabetical List
• An RGB value, using a string having the format #RRGGBB. Use # as the first character
and two-digit hexidecimal numbers for each the red, green, and blue value. For
example, '#0000ff' specifies blue.
Examples
Use Background Colors in a Table
Create a table with different color rows and table entries.
Set up a presentation with a slide titled A Colorful Table.
import mlreportgen.ppt.*
slidesFile = 'myBackground.pptx';
slides = Presentation(slidesFile);
slide1 = add(slides,'Title and Content');
replace(slide1,'Title','A Colorful Table');
Define the table, specifying different colors for the top row and for the first entry in the
second row.
table1 = Table();
row1 = TableRow();
row1.Style = {BackgroundColor('beige')};
row1entry1 = TableEntry();
p2 = Paragraph('Beige row');
append(row1entry1,p2);
row1entry2 = TableEntry();
p3 = Paragraph('More text');
append(row1entry2,p3);
append(row1,row1entry1);
append(row1,row1entry2);
row2 = TableRow();
row2entry1 = TableEntry();
row2entry1.Style = {BackgroundColor('yellow')};
p4 = Paragraph('yellow cell');
append(row2entry1,p4);
row2entry2 = TableEntry();
p5 = Paragraph('default white background');
append(row2entry2,p5);
append(row2,row2entry1);
12-370
mlreportgen.ppt.BackgroundColor class
append(row2,row2entry2);
append(table1,row1);
append(table1,row2);
Replace the slide content with the table, generate the presentation, and open the
myBackground presentation. (The winopen code works on Windows platforms.)
replace(slide1,'Content',table1);
close(slides);
if ispc
winopen(slidesFile);
end
•
“Create and Format Tables” on page 14-89
See Also
mlreportgen.ppt.FontColor
More About
•
“Presentation Formatting Approaches” on page 14-20
12-371
12
Classes – Alphabetical List
mlreportgen.ppt.Bold class
Package: mlreportgen.ppt
Bold for text object
Description
Specifies whether to use bold for a text object.
Construction
boldObj = Bold() creates a bold object that specifies to use bold for a text object.
boldObj = Bold(value) if value is true, creates a bold object that specifies to use
bold for a text object. Otherwise, it creates a bold object that specifies to use regular
weight text.
Input Arguments
value — Bold or regular weight for text
[] (default) | logical value
Bold or regular weight for text, specified as a string. A setting of false (or 0) uses
regular weight text. A setting of true (or 1) renders text in bold.
Data Types: logical
Output Arguments
boldObj — Bold text
mlreportgen.ppt.Bold object
Bold text, returned as an mlreportgen.ppt.Bold object.
12-372
mlreportgen.ppt.Bold class
Properties
Id — ID for PPT API object
string
ID for PPT API object, specified as a string. A session-unique ID is generated as part of
object creation. You can specify an ID to replace the generated ID.
Tag — Tag for this PPT API object
session-unique tag generated as part of object creation (default) | string
Tag for this PPT API object, specified as a string. The generated tag has the form
CLASS:ID, where CLASS is the object class and ID is the value of the Id property of the
object.
An example of a reason for specifying your own tag value is to make it easier to identify
where an issue occurred during presentation generation.
Value — Option to use bold or regular weight for a text object
[] (default) | logical value
The possible values are:
• 0 — uses regular weight text
• 1 — renders text in bold
Data Types: logical
Examples
Create Paragraph With Bold and Regular-Weight Text
Create a presentation.
import mlreportgen.ppt.*
slidesFile = 'myBoldPresentation.pptx';
slides = Presentation(slidesFile);
titleSlide = add(slides,'Title and Content');
12-373
12
Classes – Alphabetical List
Create a paragraph and append text with bold text.
p = Paragraph('Hello World');
p.Style = {Bold(true)};
t = Text(' How are you?');
t.Style = {Bold(false)};
append(p,t);
Add the paragraph to the slide and close the presentation.
replace(titleSlide,'Content',p);
close(slides);
Open myBoldPresentation.pptx. On a Windows platform, you can open the
presentation in MATLAB:
if ispc
winopen(slidesFile);
end
•
“Create and Format Text” on page 14-83
See Also
mlreportgen.ppt.FontColor | mlreportgen.ppt.FontFamily | mlreportgen.ppt.FontSize |
mlreportgen.ppt.Italic
More About
•
12-374
“Presentation Formatting Approaches” on page 14-20
mlreportgen.ppt.Bold class
Introduced in R2015b
12-375
12
Classes – Alphabetical List
mlreportgen.ppt.ColSpec class
Package: mlreportgen.ppt
Formatting for table column
Description
Formatting for a table column.
Construction
colSpecObj = ColSpec() creates an empty table column specification.
colSpecObj = ColSpec(colWidth) creates a column specification having the
specified width.
Input Arguments
colWidth — Width of column
string
Width of column, specified as a string. Use a string having the format valueUnits,
where Units is an abbreviation for the width units. These abbreviations are valid:
• no abbreviation — pixels
• cm — centimeters
• in — inches
• mm — millimeters
• pi — picas
• pt — points
• px — pixels
Output Arguments
colSpecObj — Table column formatting
mlreportgen.ppt.ColSpec object
12-376
mlreportgen.ppt.ColSpec class
Table column formatting, returned as an mlreportgen.ppt.ColSpec object.
Properties
Id — ID for PPT API object
string
ID for PPT API object, specified as a string. A session-unique ID is generated as part of
object creation. You can specify an ID to replace the generated ID.
Tag — Tag for this PPT API object
session-unique tag generated as part of object creation (default) | string
Tag for this PPT API object, specified as a string. The generated tag has the form
CLASS:ID, where CLASS is the object class and ID is the value of the Id property of the
object.
An example of a reason for specifying your own tag value is to make it easier to identify
where an issue occurred during presentation generation.
Width — Column width
string
Width of table column, specified as a string.
The string must have the format valueUnits where Units is an abbreviation for the
units in which the width size is expressed. Valid abbreviations are:
• No abbreviation — pixels
• cm — centimeters
• in — inches
• mm — millimeters
• pi — picas
• pt — points
• px — pixels
Bold — Option to use bold for text
logical value
12-377
12
Classes – Alphabetical List
Option to use bold for text, specified as a logical. To make text bold, set this property to
true or 1. Setting the Bold property adds a corresponding mlreportgen.ppt.Bold
format object to the Style property of this presentation element. Removing the Bold
property setting removes the object.
Data Types: logical
Font — Default font for text in column
string
Default font for text in column, specified as a string. Specify a font that appears in the
PowerPoint list of fonts in the Home tab Font area.
ComplexScriptFont — Font family for complex scripts
string
Font family for complex scripts, specified as a string. Specify a font family for
substituting in a locale that requires a complex script (such as Arabic or Asian) for
rendering text.
FontColor — Font color for presentation element
string
Font color, specified as a string. Use either a CSS color name or a hexadecimal RGB
value.
• For a list of CSS color names, see http://www.crockford.com/wrrrld/color.html.
• To specify a hexadecimal RGB format, use # as the first character and two-digit
hexidecimal numbers for each for the red, green, and blue values. For example,
'#0000ff' specifies blue.
FontSize — Font size
string
Font size, specified as a string. Use the string format valueUnits, where Units is an
abbreviation for the font size. These abbreviations are valid:
• no abbreviation — pixels
• cm — centimeters
• in — inches
• mm — millimeters
12-378
mlreportgen.ppt.ColSpec class
• pi — picas
• pt — points
• px — pixels
Italic — Option to use italics for text
[] (default) | logical value
Option to use italics for text, specified as a logical. Set this property to true. Setting the
Italic property adds a corresponding mlreportgen.ppt.Italic format object to the
Style property of this presentation element. Removing the Italic property setting
removes the object.
Data Types: logical
Examples
Set Table Column Formatting
Create a presentation and add a slide.
import mlreportgen.ppt.*
slides = Presentation('myColSpec.pptx');
tableSlide = add(slides,'Title and Content');
Create a table. Create a ColSpec object with a specified width for the first two columns
of the table. Specify the BackgroundColor property for the two ColSpec objects. Set
the ColSpecs property of the Table object t to the colSpecs, which specifies the
formatting for the first two columns.
t = Table(magic(12));
t.Style = {HAlign('center')};
colSpecs(2) = ColSpec('2in');
colSpecs(1) = ColSpec('1in');
colSpecs(1).BackgroundColor = 'red';
colSpecs(2).BackgroundColor = 'green';
t.ColSpecs = colSpecs;
Add the table to the slide, generate the presentation, and open the myColSpec
presentation. (The winopen code works on Windows platforms.)
replace(slides,'Content',t);
12-379
12
Classes – Alphabetical List
close(slides);
if ispc
winopen(slidesFile);
end
•
“Create and Format Tables” on page 14-89
See Also
mlreportgen.ppt.ColWidth
More About
•
12-380
“Presentation Formatting Approaches” on page 14-20
mlreportgen.ppt.ColWidth class
mlreportgen.ppt.ColWidth class
Package: mlreportgen.ppt
Table column width
Description
Width of a table column.
Construction
widthObj = ColWidth() creates a format object that specifies a column width of one
inch.
widthObj = ColWidth(value) creates a column width object having the specified
width.
Input Arguments
width — Width of column
string
Width of column, specified as a string. Use a string having the format valueUnits,
where Units is an abbreviation for the width units. These abbreviations are valid:
• no abbreviation — pixels
• cm — centimeters
• in — inches
• mm — millimeters
• pi — picas
• pt — points
• px — pixels
12-381
12
Classes – Alphabetical List
Output Arguments
widthObj — Column width
mlreportgen.ppt.ColWidth object
Column width, returned as an mlreportgen.ppt.ColWidth object.
Properties
Id — ID for PPT API object
string
ID for PPT API object, specified as a string. A session-unique ID is generated as part of
object creation. You can specify an ID to replace the generated ID.
Tag — Tag for this PPT API object
session-unique tag generated as part of object creation (default) | string
Tag for this PPT API object, specified as a string. The generated tag has the form
CLASS:ID, where CLASS is the object class and ID is the value of the Id property of the
object.
An example of a reason for specifying your own tag value is to make it easier to identify
where an issue occurred during presentation generation.
Width — Width of column
string
Width of column, specified as a string. Use a string having the format valueUnits,
where Units is an abbreviation for the width units. These abbreviations are valid:
• no abbreviation — pixels
• cm — centimeters
• in — inches
• mm — millimeters
• pi — picas
• pt — points
• px — pixels
12-382
mlreportgen.ppt.ColWidth class
Examples
Set Table Column Width
Create a presentation.
import mlreportgen.ppt.*
slides = Presentation('myColWidth.pptx');
slide1 = add(slides,'Title and Content');
Create a table and specify that the first column has a width of four inches.
C = {'wide column' 17 'aaaa' 4 5 6 7 8 9 10 11;...
'long text string' 'bb' 1 3 5 7 9 11 13 15 17;...
'more text' 1 2 3 4 5 6 7 8 9 10};
t = Table(C);
t.entry(1,1).Style = {ColWidth('4in')};
Replace the slide content with the table, generate the presentation, and open the
myColWidth presentation. (The winopen code works on Windows platforms.)
replace(slide1,'Content',t);
close(slides);
if ispc
winopen(slidesFile);
end
•
“Create and Format Tables” on page 14-89
See Also
mlreportgen.ppt.ColSpec | mlreportgen.ppt.Table
More About
•
“Presentation Formatting Approaches” on page 14-20
12-383
12
Classes – Alphabetical List
mlreportgen.ppt.ContentPlaceholder class
Package: mlreportgen.ppt
Placeholder for presentation content in slide
Description
Placeholder for replaceable content in a slide. Represents slide content that can
be replaced by a paragraph, picture, or table. It can also represent slide content
that includes one or more paragraphs. Use the PowerPoint editor to create content
placeholders in a PowerPoint template or presentation for content that you want to
replace programmatically.
You can use a Presentation.find or Slide.find method to find content placeholders
in a presentation or a slide. The find method returns the content placeholders as
instances of this class. You can also access slide content placeholders by accessing
its children using its Children property. If a child is an object of this type, you
can replace it with a paragraph, picture, or table, using the replace method of the
type of object that you want to replace. If the content placeholder object is empty
or already contains paragraphs, you can add paragraphs to the content, using the
ContentPlaceholder.add method.
The text format properties of the placeholder object specify the default format for content
that replaces the placeholder.
Properties
Bold — Option to use bold for paragraphs contained in placeholder
[] (default) | logical value
Option to use bold for paragraphs contained in placeholder, specified as a logical value.
This property sets the default format, which you can override for specific Paragraph
objects. Setting the Bold property adds a corresponding mlreportgen.ppt.Bold
format object to the Style property of this presentation element. Removing the Bold
property setting removes the object.
Data Types: logical
12-384
mlreportgen.ppt.ContentPlaceholder class
FontColor — Font color for paragraphs included in placeholder
string
Font color for paragraphs included in placeholder, specified as a string. Use either a CSS
color name or a hexadecimal RGB value. This property sets the default format, which you
can override for specific Paragraph objects.
• For a list of CSS color names, see http://www.crockford.com/wrrrld/color.html.
• To specify a hexadecimal RGB format, use # as the first character and two-digit
hexidecimal numbers for each the red, green, and blue values. For example,
'#0000ff' specifies blue.
Italic — Option to use italics for paragraphs included in placeholder
[] (default) | logical value
Option to use italics for paragraphs included in placeholder, specified as a logical value.
This sets the default format, which you can override for specific Paragraph objects.
Setting the Italic property adds a corresponding mlreportgen.ppt.Italic format
object to the Style property of this presentation element. Removing the Italic
property setting removes the object.
Data Types: logical
Underline — Option to underline paragraphs included in placeholder
[] (default) | logical value
Option to underline paragraphs included in placeholder, specified as a string. This
property sets the default format, which you can override for specific Paragraph objects.
You can specify one of these types of underlines.
String
Description
'single'
Single underline
'double'
Double underline
'heavy'
Thick underline
'words'
Only words underlined (not spaces)
'dotted'
Dotted underline
'dottedheavy'
Thick, dotted underline
'dash'
Dashed underline
12-385
12
Classes – Alphabetical List
String
Description
'dashheavy'
Thick, dashed underline
'dashlong'
Long, dashed underline
'dashlongheavy'
Thick, long, dashed underline
'dotdash'
Dot-dash underline
'dotdotdash'
Dot-dot-dash underline
'dotdotdashheavy'
Thick dot-dot-dash underline
'dotdashdotheavy'
Thick dash-dot underline
'wavy'
Wavy underline
'wavyheavy'
Thick, wavy underline
'wavydouble'
Two wavy underlines
Setting the Underline property adds a corresponding mlreportgen.ppt.Underline
format object to the Style property for this element. Removing the Underline property
setting removes the object.
Name — Content placeholder name
string
Content placeholder name, specified as a string.
X — Upper-left x coordinate position of placeholder content
string
Upper-left x coordinate of placeholder content, specified as a string.
The string must have the format valueUnits where Units is an abbreviation for the
units in which the x position is expressed. Valid abbreviations are:
• No abbreviation — pixels
• cm — centimeters
• in — inches
• mm — millimeters
• pi — picas
• pt — points
• px — pixels
12-386
mlreportgen.ppt.ContentPlaceholder class
Y — Upper-left y coordinate position of placeholder content
string
Upper-left y coordinate of placeholder content, specified as a string.
The string must have the format valueUnits where Units is an abbreviation for the
units in which the y position is expressed. Valid abbreviations are:
• No abbreviation — pixels
• cm — centimeters
• in — inches
• mm — millimeters
• pi — picas
• pt — points
• px — pixels
Width — Width of placeholder
string
Width of placeholder, specified as a string.
The string must have the format valueUnits where Units is an abbreviation for the
units in which the width size is expressed. Valid abbreviations are:
• No abbreviation — pixels
• cm — centimeters
• in — inches
• mm — millimeters
• pi — picas
• pt — points
• px — pixels
Height — Height of placeholder
string
Height of placeholder, specified as a string.
The string must have the format valueUnits where Units is an abbreviation for the
units in which the height is expressed. Valid abbreviations are:
12-387
12
Classes – Alphabetical List
• No abbreviation — pixels
• cm — centimeters
• in — inches
• mm — millimeters
• pi — picas
• pt — points
• px — pixels
Style — Formatting for paragraphs included in placeholder
cell array of PPT style objects
Formatting for the paragraphs included in placeholder, specified as an array of PPT
style objects. This sets the default format, which you can override for specific Paragraph
objects. You can specify these mlreportgen.ppt style objects:
• BackgroundColor object
• FontFamily object
• FontSize object
• Bold object
• FontColor object
• Italic object
• Underline object
Children — Children of this PPT API object
cell array of mlreportgen.ppt.Element objects
This read-only property lists child elements that the object contains, specified as a cell
array.
Parent — Parent of this PPT API object
PPT object
This read-only property lists the parent of this object, specified a PPT object.
Id — ID for PPT API object
string
ID for PPT API object, specified as a string. A session-unique ID is generated as part of
object creation. You can specify an ID to replace the generated ID.
12-388
mlreportgen.ppt.ContentPlaceholder class
Tag — Tag for this PPT API object
session-unique tag generated as part of object creation (default) | string
Tag for this PPT API object, specified as a string. The generated tag has the form
CLASS:ID, where CLASS is the object class and ID is the value of the Id property of the
object.
An example of a reason for specifying your own tag value is to make it easier to identify
where an issue occurred during presentation generation.
Methods
Method
Purpose
add
Add content to the placeholder.
replace
Replace placeholder with the content.
Examples
Replace Content Using a Content Placeholder
Create a presentation.
import mlreportgen.ppt.*
slidesFile = 'myPlaceholderPresentation.pptx';
slides = Presentation(slidesFile);
add(slides,'Title and Content');
add(slides,'Title and Content');
close(slides);
% Open myPlaceholderPresentatiopresentation.pptx.
% On Windows platforms, you can run this code.
if ispc
winopen(slidesFile);
end
In the myPlaceholderPresentation.pptx presentation file, In the Home tab, select
Select > Selection Pane.
12-389
12
Classes – Alphabetical List
Select the first slide, place the cursor in the Click to add text and type Topic 1.
In the Selection pane, the placeholder is called Content.
Change the Content object name to Agenda.
In the PowerPoint editor, save and close the presentation.
In MATLAB, create a presentation that uses myPlaceholderPresentation as the
presentation template.
slides = Presentation('myPlaceholderPresentation','myPlaceholderPresentation');
Use the mlreportgen.ppt.Presentation.find method to find the slides that have
an Agenda placeholder. In this case, there is only one.
contents = find(slides,'Agenda')
ContentPlaceholder with properties:
contents =
Bold:
FontColor:
Italic:
Strike:
Subscript:
Superscript:
Underline:
Name:
X:
Y:
Width:
Height:
Style:
12-390
[]
[]
[]
[]
[]
[]
[]
'Agenda'
[]
[]
[]
[]
[]
mlreportgen.ppt.ContentPlaceholder class
Children:
Parent:
Tag:
Id:
[]
[1x1 mlreportgen.ppt.Slide]
'ppt.ContentPlaceholder:11127:4401'
'11127:4401'
Add text to the replace the content placeholder in the first slide. Make the text bold.
replace(contents(1),{'Subject 1','Subject 2','Subject 3'});
contents(1).Bold = true;
Close the presentation to generate the output.
close(slides);
if ispc
winopen(slidesFile);
end
Open myPlaceholderPresentation.pptx. On a Windows platform, you can open the
presentation in MATLAB:
12-391
12
Classes – Alphabetical List
The bullets in the first slide reflect the replaced content for the Agenda placeholder.
•
“Access PowerPoint Template Elements” on page 14-37
•
“Add and Replace Presentation Content” on page 14-76
Introduced in R2015b
12-392
mlreportgen.ppt.DebugMessage class
mlreportgen.ppt.DebugMessage class
Package: mlreportgen.ppt
Debugging message
Description
Creates debugging message text originating from the specified source object.
Construction
debugMsgObj = DebugMessage(text,sourceObject) creates a debugging message
with the specified text, originating from the specified source object.
Input Arguments
text — Message text
string
The text to display for the message, specified as a string.
sourceObject — PPT object from which message originates
a PPT object
The PPT object from which the message originates, specified as a PPT object.
Output Arguments
debugMsgObj — Debugging message
mlreportgen.ppt.DebugMessage object
Debug message, returned as an mlreportgen.ppt.DebugMessage object.
Properties
Id — ID for PPT API object
string
12-393
12
Classes – Alphabetical List
ID for PPT API object, specified as a string. A session-unique ID is generated as part of
object creation. You can specify an ID to replace the generated ID.
Source — Source object message originates from
a PPT object
Source PPT object from which the message originates.
Tag — Tag for this PPT API object
session-unique tag generated as part of object creation (default) | string
Tag for this PPT API object, specified as a string. The generated tag has the form
CLASS:ID, where CLASS is the object class and ID is the value of the Id property of the
object.
An example of a reason for specifying your own tag value is to make it easier to identify
where an issue occurred during presentation generation.
Text — Text of the message
string
Message text, specified as a string.
Methods
Use DebugMessage methods similar to how you use ProgressMessage methods.
Method
Purpose
formatAsHTML
Format message as HTML.
formatAsText
Format message as text.
passesFilter
Determine whether message passes filter.
Examples
Create a Debug Message
Create the presentation.
12-394
mlreportgen.ppt.DebugMessage class
import mlreportgen.ppt.*;
pre = Presentation('myPresentation.pptx');
Create the listener and add it to the message dispatcher.
dispatcher = MessageDispatcher.getTheDispatcher;
dispatcher.Filter.ErrorMessagesPass = true;
dispatcher.Filter.ProgressMessagesPass = false;
l = addlistener(dispatcher,'Message', ...
@(src,evtdata) disp(evtdata.Message.formatAsText));
Create the message and dispatch it before opening the presentation.
msg = ErrorMessage('Invalid slide',pre);
dispatch(dispatcher, msg);
open(pre);
Add content and close the presentation.
titleText = Text('This is a Title');
titleText.Style = {Bold};
replace(pre,'Title',titleText);
close(pre);
Delete the listener to avoid duplicate reporting of message objects during a MATLAB
session.
delete(l);
•
“Display Presentation Generation Messages” on page 14-16
See Also
mlreportgen.ppt.MessageDispatcher.dispatch | mlreportgen.ppt.MessageEventData
Introduced in R2015b
12-395
12
Classes – Alphabetical List
mlreportgen.ppt.ErrorMessage class
Package: mlreportgen.ppt
Error message
Description
Specifies error message text originating from a specified source object.
Construction
errorMsgObj = ErrorMessage(text,sourceObject) creates an error message with
the specified text originating from the specified source object.
Input Arguments
text — Message text
string
The text to display for the message, specified as a string.
sourceObject — The PPT object from which message originates
a PPT object
The PPT object from which the message originates, specified as a PPT object
Output Arguments
errorMsgObj — Error message
mlreportgen.ppt.ErrorMessage object
Error message, returned as an mlreportgen.ppt.ErrorMessage object.
Properties
Id — ID for PPT API object
string
12-396
mlreportgen.ppt.ErrorMessage class
ID for PPT API object, specified as a string. A session-unique ID is generated as part of
object creation. You can specify an ID to replace the generated ID.
Tag — Tag for this PPT API object
session-unique tag generated as part of object creation (default) | string
Tag for this PPT API object, specified as a string. The generated tag has the form
CLASS:ID, where CLASS is the object class and ID is the value of the Id property of the
object.
An example of a reason for specifying your own tag value is to make it easier to identify
where an issue occurred during presentation generation.
Source — Source object from which the message originates
a PPT object
Source PPT object from which the message originates.
Text — Text of message
string
Message text, specified as a string.
Methods
Use ErrorMessage methods similar to how you use ProgressMessage methods.
Method
Purpose
formatAsHTML
Format message as HTML.
formatAsText
Format message as text.
passesFilter
Determine whether message passes filter.
Examples
Create an Error Message
Create the presentation.
12-397
12
Classes – Alphabetical List
import mlreportgen.ppt.*;
pre = Presentation('myPresentation.pptx');
Create the listener and add it to the message dispatcher.
dispatcher = MessageDispatcher.getTheDispatcher;
dispatcher.Filter.ErrorMessagesPass = true;
dispatcher.Filter.ProgressMessagesPass = false;
l = addlistener(dispatcher,'Message', ...
@(src, evtdata) disp(evtdata.Message.formatAsText));
Add an error to the program.
titleText = Text('This is a Title');
titleText.Style = {Bold};
replace(presentation,'Title',titleText);
Create the message and dispatch it. Then open the presentation.
msg = ErrorMessage('invalid slide',pre);
dispatch(dispatcher,msg);
open(pre);
Delete the listener to avoid duplicate reporting of message objects during a MATLAB
session.
delete(l);
•
“Display Presentation Generation Messages” on page 14-16
See Also
mlreportgen.ppt.MessageDispatcher.dispatch | mlreportgen.ppt.MessageEventData
Introduced in R2015b
12-398
mlreportgen.ppt.ExternalLink class
mlreportgen.ppt.ExternalLink class
Package: mlreportgen.ppt
Hyperlink to location outside of presentation
Description
Defines a hyperlink to a location outside of the presentation.
Construction
externalLinkObj = ExternalLink() creates an empty external link object.
externalLinkObj = ExternalLink(target,linkText) creates a hyperlink with
the specified link text.
Input Arguments
target — URL of link target
string
URL of the link target, specified as a string.
linkText — Link text
string
The text to use for the link text.
Output Arguments
externalLinkObj — External link
mlreportgen.ppt.ExternalLink object
External link, returned as an mlreportgen.ppt.ExternalLink object.
12-399
12
Classes – Alphabetical List
Properties
Target — URL of link target
string
URL of the link target, specified as a string. Specify the full URL (for example, include
http://).
Content — Link text
string
The text to use for the link text.
Style — Text formatting for external link
cell array of PPT style objects
Format for the external link text, specified as an array of PPT style objects. You can
specify these mlreportgen.ppt style objects:
• FontFamily object
• FontSize object
• Bold object
• FontColor object
• Italic object
• Underline object
Id — ID for PPT API object
string
ID for PPT API object, specified as a string. A session-unique ID is generated as part of
object creation. You can specify an ID to replace the generated ID.
Tag — Tag for this PPT API object
session-unique tag generated as part of object creation (default) | string
Tag for this PPT API object, specified as a string. The generated tag has the form
CLASS:ID, where CLASS is the object class and ID is the value of the Id property of the
object.
12-400
mlreportgen.ppt.ExternalLink class
An example of a reason for specifying your own tag value is to make it easier to identify
where an issue occurred during presentation generation.
Target — Target URL of link
string
This read-only property displays the URL of the link target of this hyperlink.
Examples
Add External Link to Presentation
Create a presentation.
import mlreportgen.ppt.*
slidesFile = 'myExternalLinkPresentation.pptx';
slides = Presentation(slidesFile);
add(slides,'Title and Content');
Create a Paragraph object and an ExternalLink object.
p = Paragraph('This is a link to the');
link = ExternalLink('http://www.mathworks.com',' MathWorks site.');
Append the external link to the paragraph, and replace the Content placeholder.
append(p,link);
replace(slides,'Content',p);
Close the presentation.
close(slides);
Open myExternalLinkPresentation.pptx. On a Windows platform, you can open the
presentation in MATLAB:
if ispc
winopen(slidesFile);
end
12-401
12
Classes – Alphabetical List
•
“Create and Format Links” on page 14-96
See Also
mlreportgen.ppt.Paragraph
12-402
mlreportgen.ppt.FontColor class
mlreportgen.ppt.FontColor class
Package: mlreportgen.ppt
Font color of presentation element
Description
Specifies the font color of a presentation element.
Construction
colorObj = FontColor() creates a black font color object.
colorObj = FontColor(color) creates a font color object based on the specified CSS
color name.
Input Arguments
color — Font color
string
Font color, specified as a string. You can use:
• The name of a color. The name must be a CSS color name. See http://
www.crockford.com/wrrrld/color.html.
• Hexadecimal RGB (red, green, blue) color value. Use a string having the format
#RRGGBB. Use # as the first character and two-digit hexidecimal numbers for each the
red, green, and blue value. For example, '#0000ff' specifies blue.
Output Arguments
colorObj — Font color for presentation element
mlreportgen.ppt.FontColor object
Font color for presentation element, returned as an mlreportgen.ppt.FontColor
object.
12-403
12
Classes – Alphabetical List
Properties
HexValue — hexadecimal color value
string
This read-only property specifies a hexadecimal RGB color value. For example,
'#8b008b' specifies dark magenta. You can use either uppercase or lowercase letters as
part of a hexadecimal value.
Id — ID for PPT API object
string
ID for PPT API object, specified as a string. A session-unique ID is generated as part of
object creation. You can specify an ID to replace the generated ID.
Tag — Tag for this PPT API object
session-unique tag generated as part of object creation (default) | string
Tag for this PPT API object, specified as a string. The generated tag has the form
CLASS:ID, where CLASS is the object class and ID is the value of the Id property of the
object.
An example of a reason for specifying your own tag value is to make it easier to identify
where an issue occurred during presentation generation.
Value — CSS color name or hexadecimal RGB value for this color
string
A CSS color name or a hexadecimal RGB value, specified as a string
• For a list of CSS color names, see http://www.crockford.com/wrrrld/color.html.
• To specify a hexadecimal RGB format, use # as the first character and two-digit
hexadecimal numbers for each the red, green, and blue value. For example,
'#0000ff' specifies blue.
Examples
Create Colored Text
Create a presentation.
import mlreportgen.ppt.*
12-404
mlreportgen.ppt.FontColor class
slidesFile = 'myFontColorPresentation.pptx';
slides = Presentation(slidesFile);
titleSlide = add(slides,'Title and Content');
Create a paragraph and append text with colored text.
p = Paragraph('Hello World');
tRed = Text(' red text');
tRed.Style = {FontColor('red')};
append(p,tRed);
tBlue = Text(' blue text');
tBlue.Style = {FontColor('#0000ff')};
append(p,tBlue);
Add the paragraph to the slide and close the presentation.
replace(titleSlide,'Content',p);
close(slides);
Open myFontColorPresentation.pptx. On a Windows platform, you can open the
presentation in MATLAB:
if ispc
winopen(slidesFile);
end
•
“Create and Format Text” on page 14-83
12-405
12
Classes – Alphabetical List
See Also
mlreportgen.ppt.Bold | mlreportgen.ppt.FontFamily | mlreportgen.ppt.FontSize |
mlreportgen.ppt.Italic
More About
•
“Presentation Formatting Approaches” on page 14-20
Introduced in R2015b
12-406
mlreportgen.ppt.FontFamily class
mlreportgen.ppt.FontFamily class
Package: mlreportgen.ppt
Font family
Description
Font family for presentation text.
Construction
fontFamilyObj = FontFamily() specifies a Times New Roman font family.
fontFamilyObj = FontFamily(fontStr) specifies a font family.
fontFamilyObj = FontFamily(fontStr,complexScriptFont) specifies a font
family to use for complex scripts.
Input Arguments
fontStr — Font family
string
Font family, specified as a string. Specify a font that appears in the PowerPoint list of
fonts in the Home tab Font area.
complexScriptFont — Font family for complex scripts
string
Font family for complex scripts, specified as a string. Specify a font family for
substituting in a locale that requires a complex script (such as Arabic) for rendering text.
Output Arguments
fontFamilyObj — Font family
mlreportgen.ppt.FontFamily object
Font family, returned as an mlreportgen.ppt.FontFamily object.
12-407
12
Classes – Alphabetical List
Properties
ComplexScriptFont — Font family for complex scripts
string
Font family for complex scripts, specified as a string. Specify a font family for
substituting in a locale that requires a complex script (such as Arabic) for rendering text.
Font — Font family
string
Font family, specified as a string. Specify a font that appears in the PowerPoint list of
fonts in Home tab Font area.
Id — ID for PPT API object
string
ID for PPT API object, specified as a string. A session-unique ID is generated as part of
object creation. You can specify an ID to replace the generated ID.
Tag — Tag for this PPT API object
session-unique tag generated as part of object creation (default) | string
Tag for this PPT API object, specified as a string. The generated tag has the form
CLASS:ID, where CLASS is the object class and ID is the value of the Id property of the
object.
An example of a reason for specifying your own tag value is to make it easier to identify
where an issue occurred during presentation generation.
Examples
Set the Font Family
Create a presentation.
import mlreportgen.ppt.*
slidesFile = 'myFontFamilyPresentation.pptx';
slides = Presentation(slidesFile);
12-408
mlreportgen.ppt.FontFamily class
titleSlide = add(slides,'Title and Content');
Create a paragraph and append text with text that uses the monospace font Courier
New.
p = Paragraph('Use the ');
tFunc = Text('zeros');
tFunc.Style = {FontFamily('Courier New')};
append(p,tFunc);
tDesc = Text(' function to set an array to all zeros.');
append(p,tDesc);
Add the paragraph to the slide and close the presentation.
replace(titleSlide,'Content',p);
close(slides);
Open myFontFamilyPresentation.pptx. On a Windows platform, you can open the
presentation in MATLAB:
if ispc
winopen(slidesFile);
end
•
“Create and Format Text” on page 14-83
12-409
12
Classes – Alphabetical List
•
“Create and Format Paragraphs” on page 14-86
See Also
mlreportgen.ppt.FontColor | mlreportgen.ppt.FontSize | mlreportgen.ppt.Paragraph |
mlreportgen.ppt.Text
More About
•
“Presentation Formatting Approaches” on page 14-20
Introduced in R2015b
12-410
mlreportgen.ppt.FontSize class
mlreportgen.ppt.FontSize class
Package: mlreportgen.ppt
Font size
Description
Specifies the size of a font.
Construction
fontSizeObj = FontSize() an empty font size object.
fontSizeObj = FontSize(sizeStr) specifies the specified font size.
Input Arguments
sizeStr — Font size
string
Font size, specified as a string. Use the string format valueUnits, where Units is an
abbreviation for the units in which the size is expressed. These abbreviations are valid:
• no abbreviation — pixels
• cm — centimeters
• in — inches
• mm — millimeters
• pi — picas
• pt — points
• px — pixels
Output Arguments
fontSizeObj — Font size
mlreportgen.ppt.FontSize object
12-411
12
Classes – Alphabetical List
Font size, returned as an mlreportgen.ppt.FontSize object.
Properties
Id — ID for PPT API object
string
ID for PPT API object, specified as a string. A session-unique ID is generated as part of
object creation. You can specify an ID to replace the generated ID.
Tag — Tag for this PPT API object
session-unique tag generated as part of object creation (default) | string
Tag for this PPT API object, specified as a string. The generated tag has the form
CLASS:ID, where CLASS is the object class and ID is the value of the Id property of the
object.
An example of a reason for specifying your own tag value is to make it easier to identify
where an issue occurred during presentation generation.
Value — Font size
'12pt' (default) | string
Font size, specified as a string. Use the string format valueUnits, where Units is an
abbreviation for the units in which the size is expressed. These abbreviations are valid:
• no abbreviation — pixels
• cm — centimeters
• in — inches
• mm — millimeters
• pi — picas
• pt — points
• px — pixels
Examples
Set the Font Size
Create a presentation.
12-412
mlreportgen.ppt.FontSize class
import mlreportgen.ppt.*
slidesFile = 'myFontSizePresentation.pptx';
slides = Presentation(slidesFile);
titleSlide = add(slides,'Title and Content');
Create a paragraph and append text in a large font size.
p = Paragraph();
tWarning = Text('WARNING:');
tWarning.Style = {FontSize('40pt'),Bold(true),FontColor('red')};
append(p,tWarning);
tDesc = Text(' Unplug the machine before doing the next steps.');
append(p,tDesc);
Add the paragraph to the slide, generate the presentation, and open
myFontFamilyPresentation. (The winopen code works on Windows platforms.)
replace(titleSlide,'Content',p);
close(slides);
if ispc
winopen(slidesFile);
end
•
“Create and Format Text” on page 14-83
•
“Create and Format Paragraphs” on page 14-86
12-413
12
Classes – Alphabetical List
See Also
mlreportgen.ppt.FontColor | mlreportgen.ppt.FontFamily | mlreportgen.ppt.Paragraph
| mlreportgen.ppt.Text
More About
•
“Presentation Formatting Approaches” on page 14-20
Introduced in R2015b
12-414
mlreportgen.ppt.HAlign class
mlreportgen.ppt.HAlign class
Package: mlreportgen.ppt
Horizontal alignment of paragraph
Description
Specify the horizontal alignment of a paragraph.
Construction
alignObj = HAlign() creates a horizontal alignment object having the value 'left'.
alignObj = HAlign(value) creates a horizontal alignment object having the specified
value.
Input Arguments
value — Horizontal alignment
string
Horizontal alignment, specified as one of these values:
• 'center' — Centered
• 'left' — Left-justified
• 'right' — Right-justified
• 'justified' — Left- and right-justified, spacing words evenly
• 'distributed' — Left- and right-justified, spacing letters evenly
• 'thaiDistributed' — Left- and right-justified Thai text, spacing characters evenly
• 'justifiedLow' — Justification for Arabic text
12-415
12
Classes – Alphabetical List
Output Arguments
horizontalAlignObj — Horizontal alignment
mlreportgen.ppt.HAlign object
Horizontal alignment, returned as an mlreportgen.ppt.HAlign object.
Properties
Id — ID for PPT API object
string
ID for PPT API object, specified as a string. A session-unique ID is generated as part of
object creation. You can specify an ID to replace the generated ID.
Tag — Tag for this PPT API object
session-unique tag generated as part of object creation (default) | string
Tag for this PPT API object, specified as a string. The generated tag has the form
CLASS:ID, where CLASS is the object class and ID is the value of the Id property of the
object.
An example of a reason for specifying your own tag value is to make it easier to identify
where an issue occurred during presentation generation.
Value — Horizontal alignment
string
Horizontal alignment, specified as one of these values:
12-416
mlreportgen.ppt.HAlign class
• 'center' — Centered
• 'left' — Left-justified
• 'right' — Right-justified
• 'justified' — Left- and right-justified, spacing words evenly
• 'distributed' — Left- and right-justified, spacing letters evenly
• 'thaiDistributed' — Left- and right-justified text, adding extra spaces between
characters for languages with tone and vowel marks
• 'justifiedLow' — Justification for Arabic text
Examples
Center a Title Paragraph
The presentation title page in the PPT API default template is to left-justify the title.
This example overrides that default by centering the paragraph.
Create a presentation and add a title slide.
import mlreportgen.ppt.*
slidesFile = 'myHAlignPresentation.pptx';
slides = Presentation(slidesFile);
titleSlide = add(slides,'Title Slide');
Create a centered paragraph.
p = Paragraph('Title for First Slide');
p.Style = {HAlign('center')};
Add the paragraph to the slide, generate the presentation, and open
myHAlignPresentation. (The winopen code works on Windows platforms.)
12-417
12
Classes – Alphabetical List
replace(titleSlide,'Title',p);
close(slides);
if ispc
winopen(slidesFile);
end
MATLAB:
•
“Create and Format Paragraphs” on page 14-86
See Also
mlreportgen.ppt.Paragraph | mlreportgen.ppt.VAlign
More About
•
“Presentation Formatting Approaches” on page 14-20
Introduced in R2015b
12-418
mlreportgen.ppt.Italic class
mlreportgen.ppt.Italic class
Package: mlreportgen.ppt
Italic for text object
Description
Specifies whether to render text in italic.
Construction
italicObj = Italic() creates a format object that specifies to render text in italic.
italicObj = Italic(value) creates a format object that specifies to render text in
italic if value is true; otherwise, the text renders without italic.
Input Arguments
value — Option to use italic or text
logical value
Option to use italic or text, specified as a logical. A setting of true (or 1) renders text in
italic.
Data Types: logical
Output Arguments
italicObj — Italic format object
mlreportgen.ppt.Italic object
Italic format, returned as an mlreportgen.ppt.Italic object.
Properties
Id — ID for PPT API object
string
12-419
12
Classes – Alphabetical List
ID for PPT API object, specified as a string. A session-unique ID is generated as part of
object creation. You can specify an ID to replace the generated ID.
Tag — Tag for this PPT API object
session-unique tag generated as part of object creation (default) | string
Tag for this PPT API object, specified as a string. The generated tag has the form
CLASS:ID, where CLASS is the object class and ID is the value of the Id property of the
object.
An example of a reason for specifying your own tag value is to make it easier to identify
where an issue occurred during presentation generation.
Value — Use italic or roman for text object
[] (default) | logical value
The possible values are:
• 0 — uses roman (straight) text
• 1 — renders text in italic
Data Types: logical
Examples
Create Paragraph with Italic and Regular Text
Create a presentation.
import mlreportgen.ppt.*
slidesFile = 'myItalicPresentation.pptx';
slides = Presentation(slidesFile);
titleSlide = add(slides,'Title and Content');
Create a paragraph and append text with italic and regular text.
p = Paragraph('Hello World');
p.Style = {Italic(true)};
t = Text(' How are you?');
t.Style = {Italic(false)};
12-420
mlreportgen.ppt.Italic class
append(p,t);
Add the paragraph to the slide and close the presentation.
replace(titleSlide,'Content',p);
close(slides);
Open myItalicPresentation.pptx. On a Windows platform, you can open the
presentation in MATLAB:
if ispc
winopen(slidesFile);
end
•
“Create and Format Text” on page 14-83
See Also
mlreportgen.ppt.Bold
More About
•
“Presentation Formatting Approaches” on page 14-20
Introduced in R2015b
12-421
12
Classes – Alphabetical List
mlreportgen.ppt.MessageDispatcher class
Package: mlreportgen.ppt
PPT message dispatcher
Description
Dispatcher for presentation generation status messages.
Note: When you create a message dispatcher, the PPT API keeps the dispatcher until the
end of the current MATLAB session. Delete message event listeners to avoid duplicate
reporting of message objects during a MATLAB session.
Properties
Filter — Message filter
string
This read-only property specifies a filter that determines the types of messages the
dispatcher dispatches. You can control the types of messages that are dispatched by
setting the properties of the filter.
Id — ID for PPT API object
string
ID for PPT API object, specified as a string. A session-unique ID is generated as part of
object creation. You can specify an ID to replace the generated ID.
Tag — Tag for this PPT API object
session-unique tag generated as part of object creation (default) | string
Tag for this PPT API object, specified as a string. The generated tag has the form
CLASS:ID, where CLASS is the object class and ID is the value of the Id property of the
object.
An example of a reason for specifying your own tag value is to make it easier to identify
where an issue occurred during presentation generation.
12-422
mlreportgen.ppt.MessageDispatcher class
Methods
Method
Purpose
dispatch
Dispatch a presentation generation status
message.
getTheDispatcher
Get the message dispatcher.
Examples
Add and Dispatch a Progress Message
This example shows how to add a progress message to display when generating a
presentation.
Create the presentation.
import mlreportgen.ppt.*;
pre = Presentation('myPresentation.pptx');
Create the listener and add it to the message dispatcher.
dispatcher = MessageDispatcher.getTheDispatcher;
dispatcher.Filter.ErrorMessagesPass = true;
dispatcher.Filter.ProgressMessagesPass = false;
l = addlistener(dispatcher,'Message', ...
@(src, evtdata) disp(evtdata.Message.formatAsText));
Create the message and dispatch it before opening.
msg = ErrorMessage('Invalid slide',pre);
dispatch(dispatcher, msg);
open(pre);
Create an error in the program and dispatch the message before opening the
presentation.
titleText = Text('This is a Title');
titleText.Style = {Bold};
12-423
12
Classes – Alphabetical List
replace(pre,'Title',titleText);
close(pre);
Delete the listener to avoid duplicate reporting of message objects during a MATLAB
session.
delete(l);
•
“Display Presentation Generation Messages” on page 14-16
See Also
mlreportgen.ppt.MessageDispatcher.dispatch |
mlreportgen.ppt.MessageDispatcher.getTheDispatcher |
mlreportgen.ppt.MessageEventData | mlreportgen.ppt.MessageFilter
Introduced in R2015b
12-424
mlreportgen.ppt.MessageEventData class
mlreportgen.ppt.MessageEventData class
Package: mlreportgen.ppt
Holds message triggering message event
Description
Contains the message that triggered a message event.
Construction
messageEventDataObj = MessageEventData(msg) creates a message
event data object that contains a PPT message, such as a message of type
mlreportgen.ppt.ProgressMessage.
The PPT message dispatcher attaches an object of this type to a message event when it
dispatches a message. Attaching the object enables message event listeners to retrieve
the dispatched message. You need to create instances of this type only if you want to
create your own message dispatcher.
Input Arguments
msg — Message object
message object
A message object, such as an mlreportgen.ppt.ProgressMessage object, that
triggers a message event.
Output Arguments
messageEventDataObj — Container for message that triggering message event
mlreportgen.ppt.MessageEventData object
Container for message that triggers a message event, returned as an
mlreportgen.ppt.MessageEventData object.
12-425
12
Classes – Alphabetical List
Properties
Id — ID for PPT API object
string
ID for PPT API object, specified as a string. A session-unique ID is generated as part of
object creation. You can specify an ID to replace the generated ID.
Message — Message object
message object
The value of this read-only property is a PPT message object, such as an
mlreportgen.ppt.ProgressMessage object, that triggers a message event.
Tag — Tag for this PPT API object
session-unique tag generated as part of object creation (default) | string
Tag for this PPT API object, specified as a string. The generated tag has the form
CLASS:ID, where CLASS is the object class and ID is the value of the Id property of the
object.
An example of a reason for specifying your own tag value is to make it easier to identify
where an issue occurred during presentation generation.
Examples
Capture Message Event Data
When you add a dispatcher, the PPT API creates the evtdata object, which is an
mlreportgen.ppt.MessageEventData object.
Create the presentation.
import mlreportgen.ppt.*;
pre = Presentation('myPresentation.pptx');
Create the listener and add it to the message dispatcher.
dispatcher = MessageDispatcher.getTheDispatcher;
dispatcher.Filter.ErrorMessagesPass = true;
12-426
mlreportgen.ppt.MessageEventData class
dispatcher.Filter.ProgressMessagesPass = false;
l = addlistener(dispatcher,'Message', ...
@(src, evtdata) disp(evtdata.Message.formatAsText));
Create the message and dispatch it. Then open the presentation.
msg = ErrorMessage('Invalid slide',pre);
dispatch(dispatcher, msg);
open(pre);
Create an error in the program and dispatch the message before opening.
titleText = Text('This is a Title');
titleText.Style = {Bold};
replace(pre,'Title',titleText);
close(pre);
•
“Display Presentation Generation Messages” on page 14-16
See Also
mlreportgen.ppt.MessageDispatcher.dispatch
12-427
12
Classes – Alphabetical List
mlreportgen.ppt.MessageFilter class
Package: mlreportgen.ppt
Filter to control message dispatcher
Description
Filter for messages dispatched by the message dispatcher.
Properties
DebugMessagePass — Pass or block debug messages
logical value
Pass or block debug messages, specified as a logical.
• true — Pass debug messages.
• false — Block debug messages.
Data Types: logical
ErrorMessagePass — Pass or block error messages
logical value
• true— Pass error messages.
• false— Block error messages.
Data Types: logical
GlobalFilter — Pass or block all messages
logical value
• true— Pass all messages.
• false— Block all messages.
Data Types: logical
12-428
mlreportgen.ppt.MessageFilter class
ProgressMessagePass — Pass or block progress messages
logical value
• true— Pass progress messages.
• false— Block progress messages.
Data Types: logical
GlobalFilter — Pass or block all messages
logical value
• true— Pass all messages.
• false— Block all messages.
Data Types: logical
SourceFilter — Pass messages only for this PPT object
PPT object
Pass messages only for this PPT object, specified as a PPT object. Pass messages only
from the specified PPT object if the messages meet the other filter conditions specified by
this MessageFilter object.
Examples
Filter Messages
Create the presentation.
import mlreportgen.ppt.*;
pre = Presentation('myPresentation.pptx');
Create the listener and add it to the message dispatcher.
dispatcher = MessageDispatcher.getTheDispatcher;
dispatcher.Filter.ErrorMessagesPass = true;
dispatcher.Filter.ProgressMessagesPass = false;
l = addlistener(dispatcher,'Message', ...
@(src, evtdata) disp(evtdata.Message.formatAsText));
12-429
12
Classes – Alphabetical List
Create the message and dispatch it before opening.
msg = ErrorMessage('Invalid slide',pre);
dispatch(dispatcher, msg);
open(pre);
Create an error in the program and dispatch the message. Then open the presentation.
titleText = Text('This is a Title');
titleText.Style = {Bold};
replace(pre,'Title',titleText);
close(pre);
•
“Display Presentation Generation Messages” on page 14-16
See Also
mlreportgen.ppt.MessageDispatcher.dispatch | mlreportgen.ppt.MessageEventData
Introduced in R2015b
12-430
mlreportgen.ppt.Paragraph class
mlreportgen.ppt.Paragraph class
Package: mlreportgen.ppt
Formatted block of text (paragraph)
Description
To define a paragraph, use an mlreportgen.ppt.Paragraph object. A
paragraph can contain text strings, an mlreportgen.ppt.Text objects, or
mlreportgen.ppt.ExternalLink objects.
Construction
paragraphObj = Paragraph() creates an empty paragraph object.
paragraphObj = Paragraph(text) creates a paragraph containing a
mlreportgen.ppt.Text object with the text specified by the text string.
paragraphObj = Paragraph(pptElementObj) creates a paragraph containing the
text or external link specified by pptElementObj.
Input Arguments
text — Paragraph text
string
Paragraph text, specified as a string.
pptElementObj — Presentation element to include in paragraph
mlreportgen.ppt.Text object | mlreportgen.ppt.ExternalLink object
Presentation element to include in paragraph, specified as either an
mlreportgen.ppt.Text or mlreportgen.ppt.ExternalLink object.
Output Arguments
paragraphObj — Paragraph
mlreportgen.ppt.Paragraph object
12-431
12
Classes – Alphabetical List
Paragraph, returned as an mlreportgen.ppt.Paragraph object.
Properties
Bold — Option to use bold for text
logical value
Option to use bold for text, specified as a logical. To make text bold, set this property to
true or 1. Setting the Bold property adds a corresponding mlreportgen.ppt.Bold
format object to the Style property of this presentation element. Removing the Bold
property setting removes the object.
Data Types: logical
FontColor — Font color for presentation element
string
Font color, specified as a string. Use either a CSS color name or a hexadecimal RGB
value.
• For a list of CSS color names, see http://www.crockford.com/wrrrld/color.html.
• To specify a hexadecimal RGB format, use # as the first character and two-digit
hexidecimal numbers for each for the red, green, and blue values. For example,
'#0000ff' specifies blue.
Italic — Option to use italics for text
[] (default) | logical value
Option to use italics for text, specified as a logical. Set this property to true. Setting the
Italic property adds a corresponding mlreportgen.ppt.Italic format object to the
Style property of this presentation element. Removing the Italic property setting
removes the object.
Data Types: logical
Underline — Type of underline for text
[] (default) | string
Type of underlining for text, specified as a string. Setting the Underline property adds
a corresponding mlreportgen.ppt.Underline format object to the Style property
12-432
mlreportgen.ppt.Paragraph class
for this element. Removing the Underline property setting removes the object. You can
specify one of these types of underlines.
String
Description
'single'
Single underline
'double'
Double underline
'heavy'
Thick underline
'words'
Words only underlined (not spaces)
'dotted'
Dotted underline
'dottedheavy'
Thick, dotted underline
'dash'
Dashed underline
'dashheavy'
Thick, dashed underline
'dashlong'
Long, dashed underline
'dashlongheavy'
Thick, long, dashed underline
'dotdash'
Dot dash underline
'dotdotdash'
Dot dot dash underline
'dotdotdashheavy'
Thick dot dot dash underline
'dotdashdotheavy'
Thick dash dot underline
'wavy'
Wavy underline
'wavyheavy'
Thick wavy underline
'wavydouble'
Two wavy underlines
Level — Indentation level of paragraph
string
Indentation level of a paragraph, specified as a string.
• 1 — Top-level paragraph (no indentation)
• 2 — Second-level paragraph
• 3 — Third-level paragraph
• 4 — Fourth-level paragraph
Style — Text formatting
cell array of PPT style objects
12-433
12
Classes – Alphabetical List
Text formatting, specified as a cell array of PPT style objects. You can specify these
mlreportgen.ppt style objects:
• FontFamily object
• FontSize object
• Bold object
• FontColor object
• Italic object
• Underline object
Children — Children of this PPT API object
cell array of mlreportgen.ppt.Element objects
This read-only property lists child elements that the object contains, specified as a cell
array.
Parent — Parent of this PPT API object
PPT object
This read-only property lists the parent of this object, specified a PPT object.
Id — ID for PPT API object
string
ID for PPT API object, specified as a string. A session-unique ID is generated as part of
object creation. You can specify an ID to replace the generated ID.
Methods
Method
Purpose
append
Append text or external link to paragraph.
Examples
Add Paragraphs to Presentation
Create a presentation with two slides.
12-434
mlreportgen.ppt.Paragraph class
import mlreportgen.ppt.*;
slidesFile = 'myParagraphPresentation.pptx';
slides = Presentation(slidesFile);
add(slides,'Title Slide');
add(slides,'Title and Content');
Create a Paragraph object to use for the title of slides. Make the text bold and red.
p = Paragraph('My Title');
p.Bold = true;
p.FontColor = 'red';
Replace the title for the first slide with the paragraph.
contents = find(slides,'Title');
replace(contents(1),p);
Create a paragraph for the content of the second slide.
p1 = Paragraph('My slide content');
append(p1,' for the second slide');
Replace the content with the p1 paragraph.
replace(slides,'Content',p1);
Close the presentation.
close(slides);
Open myParagraphPresentation.pptx. On a Windows platform, you can open the
presentation in MATLAB:
if ispc
winopen(slidesFile);
end
12-435
12
Classes – Alphabetical List
•
“Create and Format Paragraphs” on page 14-86
See Also
mlreportgen.ppt.ContentPlaceholder | mlreportgen.ppt.Text | mlreportgen.ppt.TextBox
12-436
mlreportgen.ppt.Picture class
mlreportgen.ppt.Picture class
Package: mlreportgen.ppt
Create picture to include in presentation
Description
Create a picture to include in a presentation.
Construction
pictureObj = Picture() creates an empty picture object.
pictureObj = Picture(picturePath) creates a picture object containing the picture
specified by picturePath.
Input Arguments
picturePath — Path of picture file
string
Path of a picture file, specified as a string. Use one of these formats (you cannot use .svg
format):
• .bmp
• .emf
• .eps
• .gif
• .jpeg
• .jpg
• .png
• .tif
• .tiff
12-437
12
Classes – Alphabetical List
Output Arguments
pictureObj — Picture
mlreportgen.ppt.Picture object
Picture, returned as an mlreportgen.ppt.Picture object.
Properties
Name — Picture name
string
Picture name, specified as a string.
X — Upper-left x-coordinate position of picture
string
Upper-left x-coordinate position of picture, specified as a string.
The string must have the format valueUnits where Units is an abbreviation for the xposition units. Valid abbreviations are:
• No abbreviation — pixels
• cm — centimeters
• in — inches
• mm — millimeters
• pi — picas
• pt — points
• px — pixels
Y — Upper-left y-coordinate position of picture
string
Upper-left y-coordinate position of picture, specified as a string.
The string must have the format valueUnits where Units is an abbreviation for the yposition units. Valid abbreviations are:
• No abbreviation — pixels
12-438
mlreportgen.ppt.Picture class
• cm — centimeters
• in — inches
• mm — millimeters
• pi — picas
• pt — points
• px — pixels
Width — Width of picture
string
Width of picture, specified as a string.
The string must have the format valueUnits where Units is an abbreviation for the
units for the width. Valid abbreviations are:
• No abbreviation — pixels
• cm — centimeters
• in — inches
• mm — millimeters
• pi — picas
• pt — points
• px — pixels
Height — Height of picture
string
Height of picture, specified as a string.
The string must have the format valueUnits where Units is an abbreviation for the
units for the height. Valid abbreviations are:
• No abbreviation — pixels
• cm — centimeters
• in — inches
• mm — millimeters
• pi — picas
12-439
12
Classes – Alphabetical List
• pt — points
• px — pixels
Style — Picture placeholder formatting
ignored
Picture placeholder formatting. This property is ignored.
Children — Children of this PPT API object
cell array of mlreportgen.ppt.Element objects
This read-only property lists child elements that the object contains, specified as a cell
array.
Parent — Parent of this PPT API object
PPT object
This read-only property lists the parent of this object, specified a PPT object.
Tag — Tag for this PPT API object
session-unique tag generated as part of object creation (default) | string
Tag for this PPT API object, specified as a string. The generated tag has the form
CLASS:ID, where CLASS is the object class and ID is the value of the Id property of the
object.
An example of a reason for specifying your own tag value is to make it easier to identify
where an issue occurred during presentation generation.
Id — ID for PPT API object
string
ID for PPT API object, specified as a string. A session-unique ID is generated as part of
object creation. You can specify an ID to replace the generated ID.
Methods
12-440
Method
Purpose
replace
Replace picture with another picture.
mlreportgen.ppt.Picture class
Examples
Add Picture to Presentation
Create a presentation with two slides.
import mlreportgen.ppt.*
slidesFile = 'myPicturePresentation.pptx';
slides = Presentation(slidesFile);
add(slides,'Title Slide');
add(slides,'Title and Content');
Create a Picture object using an airplane image available in MATLAB. Specify the size
for the picture.
plane = Picture(which('b747.jpg'));
plane.Width = '5in';
plane.Height = '2in';
Replace the content of the second slide with the plane picture.
replace(slides,'Content',plane);
Close the presentation.
close(slides);
Open myPicturePresentation.pptx. On a Windows platform, you can open the
presentation in MATLAB:
if ispc
winopen(slidesFile);
end
12-441
12
Classes – Alphabetical List
•
“Create and Format Pictures” on page 14-94
See Also
mlreportgen.ppt.PicturePlaceholder
12-442
mlreportgen.ppt.PicturePlaceholder class
mlreportgen.ppt.PicturePlaceholder class
Package: mlreportgen.ppt
Slide placeholder to replace with picture
Description
Slide placeholder to replace with a picture. You can create a picture placeholder using
a layout slide. In the default PPT API, when you add a Title and Picture slide to
a presentation, the API creates a PicturePlaceholder object. Use the find method
with the Slide object to find the picture placeholder. You can then set properties for that
PicturePlaceholder object.
Use the PowerPoint editor to insert a picture placeholder in a presentation.
1
Select the Slide Master tab.
2
Click the layout slide you want to add the picture placeholder to. You can add the
placeholder to an existing or a new layout slide.
3
In the toolbar, click Insert Placeholder and select Picture.
Properties
Name — Picture placeholder name
string
Picture placeholder name, specified as a string.
X — Upper-left x-coordinate position of picture placeholder
string
Upper-left x-coordinate of picture placeholder, specified as a string.
The string must have the format valueUnits where Units is an abbreviation for the xposition units. Valid abbreviations are:
• No abbreviation — pixels
12-443
12
Classes – Alphabetical List
• cm — centimeters
• in — inches
• mm — millimeters
• pi — picas
• pt — points
• px — pixels
Y — Upper-left y-coordinate position of picture placeholder
string
Upper-left y-coordinate position of picture placeholder, specified as a string.
The string must have the format valueUnits where Units is an abbreviation for the yposition units. Valid abbreviations are:
• No abbreviation — pixels
• cm — centimeters
• in — inches
• mm — millimeters
• pi — picas
• pt — points
• px — pixels
Width — Width of placeholder
string
Width of placeholder, specified as a string.
The string must have the format valueUnits where Units is an abbreviation for the
units for the width. Valid abbreviations are:
• No abbreviation — pixels
• cm — centimeters
• in — inches
• mm — millimeters
• pi — picas
12-444
mlreportgen.ppt.PicturePlaceholder class
• pt — points
• px — pixels
Height — Height of placeholder
string
Height of placeholder, specified as a string.
The string must have the format valueUnits where Units is an abbreviation for the
units for the height. Valid abbreviations are:
• No abbreviation — pixels
• cm — centimeters
• in — inches
• mm — millimeters
• pi — picas
• pt — points
• px — pixels
Style — Picture placeholder formatting
ignored
Picture placeholder formatting. This property is ignored.
Children — Children of this PPT API object
cell array of mlreportgen.ppt.Element objects
This read-only property lists child elements that the object contains, specified as a cell
array.
Parent — Parent of this PPT API object
PPT object
This read-only property lists the parent of this object, specified a PPT object.
Id — ID for PPT API object
string
ID for PPT API object, specified as a string. A session-unique ID is generated as part of
object creation. You can specify an ID to replace the generated ID.
12-445
12
Classes – Alphabetical List
Tag — Tag for this PPT API object
session-unique tag generated as part of object creation (default) | string
Tag for this PPT API object, specified as a string. The generated tag has the form
CLASS:ID, where CLASS is the object class and ID is the value of the Id property of the
object.
An example of a reason for specifying your own tag value is to make it easier to identify
where an issue occurred during presentation generation.
Methods
Method
Purpose
replace
Replace picture placeholder with picture
Examples
Replace a Picture
Create a presentation.
import mlreportgen.ppt.*
slidesFile = 'myPicturePlaceholderPresentation.pptx';
slides = Presentation(slidesFile);
slide1 = add(slides,'Title and Picture');
Create an mlreportgen.ppt.Picture object.
plane = Picture(which('b747.jpg'));
plane.X = '1in';
plane.Y = '1in';
plane.Width = '3in';
plane.Height = '2in';
The default PPT API Title and Picture layout slide has a Picture object that is a
picture placeholder. Use the mlreportgen.ppt.Slide.find method to find an object
with the Name property of Picture.
contents = find(slide1,'Picture');
12-446
mlreportgen.ppt.PicturePlaceholder class
Replace the picture placeholder with the picture.
replace(contents(1),plane);
Close the presentation.
close(slides);
Open myPicturePlaceholderPresentation.pptx. On a Windows platform, you can
open the presentation in MATLAB:
if ispc
winopen(slidesFile);
end
•
“Access PowerPoint Template Elements” on page 14-37
•
“Add or Replace a Picture” on page 14-81
See Also
mlreportgen.ppt.Picture
Introduced in R2015b
12-447
12
Classes – Alphabetical List
mlreportgen.ppt.Presentation class
Package: mlreportgen.ppt
Create PowerPoint presentation
Description
Creates a Microsoft PowerPoint presentation.
Construction
presentationObj = Presentation() creates a presentation named Untitled.pptx
in the current folder, using the default PPT API default.pptx template.
presentationObj = Presentation(presentationPath) creates a presentation at
the specified location.
presentationObj = Presentation(presentationPath,templatePath) creates a
presentation using the PowerPoint template at the specified location.
Input Arguments
presentationPath — Path to presentation file
string
Path to the presentation file, specified as a string.
templatePath — Path to PowerPoint template for presentation
string
Path to the PowerPoint template for the presentation, specified as a string.
Output Arguments
presentationObj — Presentation
mlreportgen.ppt.Presentation object
Presentation object, returned as an mlreportgen.ppt.Presentation object
12-448
mlreportgen.ppt.Presentation class
Properties
TemplatePath — Path of the template used for this presentation
string
The path to the PowerPoint template to use for this presentation element, specified as a
string.
OutputPath — Path of output file or folder for this presentation
string
You set this property only before you open the presentation.
Path of this output file of the presentation, specified as a string.
Children — Children of this PPT API object
cell array of mlreportgen.ppt.Element objects
This read-only property lists child elements that the object contains, specified as a cell
array.
Id — ID for PPT API object
string
ID for PPT API object, specified as a string. A session-unique ID is generated as part of
object creation. You can specify an ID to replace the generated ID.
Tag — Tag for this PPT API object
session-unique tag generated as part of object creation (default) | string
Tag for this PPT API object, specified as a string. The generated tag has the form
CLASS:ID, where CLASS is the object class and ID is the value of the Id property of the
object.
An example of a reason for specifying your own tag value is to make it easier to identify
where an issue occurred during presentation generation.
Methods
Method
Purpose
open
Open presentation.
12-449
12
Classes – Alphabetical List
Method
Purpose
close
Close presentation.
find
Search in presentation.
Use the Presentation.find method
the same way you use the Slide.find
method.
replace
Replace content in presentation.
add
Add content to presentation.
getMasterNames
Get names of slide masters for presentation
getLayoutNames
Get names of layouts for presentation.
getTableStyleNames
Get table style names for presentation.
Examples
Create Presentation Using Default Template
Create a presentation with three slides. Use the default PPT presentation template.
import mlreportgen.ppt.*
slides = Presentation('myFirstPresentation');
add(slides,'Title Slide');
add(slides,'Title and Content');
add(slides,'Title and Picture');
Examine the slides Presentation object.
slides
slides =
Presentation with properties:
TemplatePath: 'matlab/toolbox/shared/mlreportgen/ppt/resources/...'
OutputPath: 'myFirstPresentation.pptx'
12-450
mlreportgen.ppt.Presentation class
Children:
Parent:
Tag:
Id:
[1x3 mlreportgen.ppt.Slide]
[]
'ppt.Presentation:1181'
'1181'
Examine the first slide.
slides.Children(1)
ans =
Slide with properties:
Layout:
SlideMaster:
Name:
Style:
Children:
Parent:
Tag:
Id:
'Title Slide'
'Office Theme'
''
[]
[1x2 mlreportgen.ppt.TextBoxPlaceholder]
[1x1 mlreportgen.ppt.Presentation]
'ppt.Slide:1183'
'1183'
Specify a title for the presentation. Find the Title placeholder in the first slide and
provide a title. Make the title red.
contents = find(slides,'Title');
replace(contents(1),'My First Presentation');
contents(1).FontColor = 'red';
Add content to the second slide.
contents = find(slides,'Content');
replace(contents,{'Subject A','Subject B','Subject C'});
Close the presentation to generate the output.
close(slides);
Open myFirstPresentation.pptx. On a Windows platform, you can open the
presentation in MATLAB:
if ispc
winopen(slidesFile);
end
12-451
12
Classes – Alphabetical List
Create Presentation Specifying a Template
Create a presentation with using the myFirstPresentation presentation as the
template (see the previous example).
import mlreportgen.ppt.*
slides = Presentation('mySecondPresentation','myFirstPresentation');
Change the title to My Second Presentation.
contents = find(slides,'Title');
replace(contents(1),'My Second Presentation');
Close the presentation to generate the output.
close(slides);
Open mySecondPresentation.pptx. On a Windows platform, you can open the
presentation in MATLAB:
if ispc
12-452
mlreportgen.ppt.Presentation class
winopen(slidesFile);
end
•
“Create a Presentation Object to Hold Content” on page 14-14
•
“Set Up a PowerPoint Template” on page 14-26
See Also
mlreportgen.ppt.Slide
Introduced in R2015b
12-453
12
Classes – Alphabetical List
mlreportgen.ppt.ProgressMessage class
Package: mlreportgen.ppt
Progress message
Description
Create a progress message with the specified text originating from the specified source
object.
Construction
progressMsgObj = ProgressMessage(text,sourcePPTObject) creates a progress
message with the specified text, originating from the specified source object.
Input Arguments
text — Message text
string
The text to display for the message, specified as a string.
source — PPT object to from which message originates
PPT object
The PPT object from which the message originates, specified as a PPT object.
Output Arguments
progressMsgObj — Progress message
mlreportgen.ppt.ProgressMessage object
Progress message, returned as an mlreportgen.ppt.ProgressMessage object.
12-454
mlreportgen.ppt.ProgressMessage class
Properties
Id — ID for PPT API object
string
ID for PPT API object, specified as a string. A session-unique ID is generated as part of
object creation. You can specify an ID to replace the generated ID.
Source — Source PPT object message originates from
a PPT object
Source PPT object from which the message originates.
Tag — Tag for this PPT API object
session-unique tag generated as part of object creation (default) | string
Tag for this PPT API object, specified as a string. The generated tag has the form
CLASS:ID, where CLASS is the object class and ID is the value of the Id property of the
object.
An example of a reason for specifying your own tag value is to make it easier to identify
where an issue occurred during presentation generation.
Text — Text of message
string
Message text, specified as a string.
Methods
Method
Purpose
formatAsHTML
Wrap message in HTML tags.
formatAsText
Format message as text.
passesFilter
Determine if message passes filter.
12-455
12
Classes – Alphabetical List
Examples
Create a Progress Message
Create the presentation.
import mlreportgen.ppt.*;
pre = Presentation('myPresentation.pptx');
Create a message dispatcher.
dispatcher = MessageDispatcher.getTheDispatcher;
l = addlistener(dispatcher,'Message', ...
@(src, evtdata) disp(evtdata.Message.formatAsText));
Dispatch the message.
open(pre);
dispatch(dispatcher,ProgressMessage('starting presentation',pre));
Add presentation content.
titleText = Text('This is a Title');
titleText.Style = {Bold};
replace(pre,'Title',titleText);
Close the presentation and delete the listener.
close(pre);
Delete the listener to avoid duplicate reporting of message objects during a MATLAB
session.
delete(l);
•
“Display Presentation Generation Messages” on page 14-16
See Also
mlreportgen.ppt.MessageDispatcher.dispatch | mlreportgen.ppt.MessageEventData
Introduced in R2015b
12-456
mlreportgen.ppt.Slide class
mlreportgen.ppt.Slide class
Package: mlreportgen.ppt
Presentation slide
Description
Presentation slide. To add a slide, use the mlreportgen.ppt.Presentation.add
method, specifying an output argument. You can then use mlreportgen.ppt.Slide
methods on that slide object.
Properties
Layout — Slide layout
string
This read-only property is the slide layout, specified as a string.
SlideMaster — Slide master
string
This read-only property is the slide master, specified by a string.
Name — Slide name
string
This read-only property is the slide name, specified as a string.
Style — Formatting
cell array of PPT style objects
This read-only property is the slide formatting, represented as a cell array of PPT style
objects.
Children — Children of this PPT API object
cell array of mlreportgen.ppt.Element objects
This read-only property lists child elements that the object contains, specified as a cell
array.
12-457
12
Classes – Alphabetical List
Parent — Parent of this PPT API object
PPT object
This read-only property lists the parent of this object, specified a PPT object.
Tag — Tag for slide
session-unique tag generated as part of object creation (default) | string
This read-only property identifies the slide, specified as a string. The generated tag
has the form CLASS:ID, where CLASS is the object class and ID is the value of the Id
property of the object.
Id — ID for slide
string
This read-only property is the session-unique ID generated as part of object creation,
specified as a string.
Methods
Method
Purpose
find
Search a slide.
add
Add content to slide.
replace
Replace slide content.
Examples
Create a Slide
Create a presentation.
import mlreportgen.ppt.*
slides = Presentation('mySlideAddPresentation.pptx');
slide1 = add(slides,'Title and Picture');
Create an mlreportgen.ppt.Picture object.
12-458
mlreportgen.ppt.Slide class
plane = Picture(which('b747.jpg'));
plane.X = '4in';
plane.Y = '4in';
plane.Width = '5in';
plane.Height = '2in';
Add the plane picture to slide1.
add(slide1,plane);
Close the presentation.
close(slides);
Open mySlideAdd.pptx. On a Windows platform, you can open the presentation in
MATLAB:
if ispc
winopen(slidesFile);
end
•
“Add Slides” on page 14-73
•
“Add and Replace Presentation Content” on page 14-76
See Also
mlreportgen.ppt.Presentation
12-459
12
Classes – Alphabetical List
mlreportgen.ppt.Strike class
Package: mlreportgen.ppt
Strike through text
Description
Specifies whether to use a strikethrough line for a text object.
Construction
strikeObj = Strike() draws a single, horizontal line through text.
strikeObj = Strike(type) draws a line of the specified type through text.
Input Arguments
type — Strike type
string
String specifying the strike type. Choices are:
• 'single' — Single horizontal line (default)
• 'none' — No strikethrough line
• 'double' — Double horizontal line
Output Arguments
strike — Strikethrough text
mlreportgen.ppt.Strike object
Strikethrough text, returned as an mlreportgen.ppt.Strike object.
Properties
Id — ID for PPT API object
string
12-460
mlreportgen.ppt.Strike class
ID for PPT API object, specified as a string. A session-unique ID is generated as part of
object creation. You can specify an ID to replace the generated ID.
Tag — Tag for this PPT API object
session-unique tag generated as part of object creation (default) | string
Tag for this PPT API object, specified as a string. The generated tag has the form
CLASS:ID, where CLASS is the object class and ID is the value of the Id property of the
object.
An example of a reason for specifying your own tag value is to make it easier to identify
where an issue occurred during presentation generation.
Width — Column width
string
Width of table column, specified as a string.
The string must have the format valueUnits where Units is an abbreviation for the
units in which the width size is expressed. Valid abbreviations are:
• No abbreviation — pixels
• cm — centimeters
• in — inches
• mm — millimeters
• pi — picas
• pt — points
• px — pixels
Bold — Option to use bold for text
logical value
Option to use bold for text, specified as a logical. To make text bold, set this property to
true or 1. Setting the Bold property adds a corresponding mlreportgen.ppt.Bold
format object to the Style property of this presentation element. Removing the Bold
property setting removes the object.
Data Types: logical
Font — Default font for text in column
string
12-461
12
Classes – Alphabetical List
Default font for text in column, specified as a string. Specify a font that appears in the
PowerPoint list of fonts in the Home tab Font area.
ComplexScriptFont — Font family for complex scripts
string
Font family for complex scripts, specified as a string. Specify a font family for
substituting in a locale that requires a complex script (such as Arabic or Asian) for
rendering text.
FontColor — Font color for presentation element
string
Font color, specified as a string. Use either a CSS color name or a hexadecimal RGB
value.
• For a list of CSS color names, see http://www.crockford.com/wrrrld/color.html.
• To specify a hexadecimal RGB format, use # as the first character and two-digit
hexidecimal numbers for each for the red, green, and blue values. For example,
'#0000ff' specifies blue.
FontSize — Font size
string
Font size, specified as a string. Use the string format valueUnits, where Units is an
abbreviation for the font size. These abbreviations are valid:
• no abbreviation — pixels
• cm — centimeters
• in — inches
• mm — millimeters
• pi — picas
• pt — points
• px — pixels
Italic — Option to use italics for text
[] (default) | logical value
Option to use italics for text, specified as a logical. Set this property to true. Setting the
Italic property adds a corresponding mlreportgen.ppt.Italic format object to the
12-462
mlreportgen.ppt.Strike class
Style property of this presentation element. Removing the Italic property setting
removes the object.
Data Types: logical
Strike — Strike type
string
String specifying the strike type. Choices are:
• 'single' — Single horizontal line (default)
• 'none' — No strikethrough line
• 'double' — Double horizontal line
Subscript — Display of text as subscript
[] (default) | logical value
Display of text as a subscript, specified by a logical value. A setting of true (or 1) renders
text as a subscript.
Data Types: logical
Superscript — Display of text as superscript
[] (default) | logical value
Display of text as a superscript, specified by a logical value. A setting of true (or 1)
renders text as a superscript.
Data Types: logical
Underline — Type of underline for text
[] (default) | string
Type of underlining for text, specified as a string. Setting the Underline property adds
a corresponding mlreportgen.ppt.Underline format object to the Style property
for this element. Removing the Underline property setting removes the object. You can
specify one of these types of underlines.
String
'single'
Description
Single underline
12-463
12
Classes – Alphabetical List
String
Description
'double'
Double underline
'heavy'
Thick underline
'words'
Words only underlined (not spaces)
'dotted'
Dotted underline
'dottedheavy'
Thick, dotted underline
'dash'
Dashed underline
'dashheavy'
Thick, dashed underline
'dashlong'
Long, dashed underline
'dashlongheavy'
Thick, long, dashed underline
'dotdash'
Dot dash underline
'dotdotdash'
Dot dot dash underline
'dotdotdashheavy'
Thick dot dot dash underline
'dotdashdotheavy'
Thick dash dot underline
'wavy'
Wavy underline
'wavyheavy'
Thick wavy underline
'wavydouble'
Two wavy underlines
BackgroundColor — Background color
string
The name of a color, specified as a string, using one of these values:
• A CSS color name. See http://www.crockford.com/wrrrld/color.html.
• An RGB value, using a string having the format #RRGGBB. Use # as the first character
and two-digit hexidecimal numbers for each for the red, green, and blue values. For
example, '#0000ff' specifies blue.
HAlign — Horizontal alignment
string
Horizontal alignment, specified as a string.
• 'center' — Centered
12-464
mlreportgen.ppt.Strike class
• 'left' — Left-justified
• 'right' — Right-justified
• 'justified' — Left- and right-justified, spacing words evenly
• 'distributed' — Left- and right-justified, spacing letters evenly
• 'thaiDistributed' — Left- and right-justified Thai text, spacing characters evenly
• 'justifiedLow' — Justification for Arabic text
VAlign — Vertical alignment for table entry content
'top' (default) | string
Vertical alignment for table entry content, specified as a string. Possible values are:
• 'top'
• 'bottom'
• 'middle'
• 'topCentered'
• 'middleCentered'
• 'bottomCentered'
Value — Specifies strike type
string
Strike type, specified as a string. Choices are:
• 'single' — Single horizontal line (default)
• 'none' — No strikethrough line
• 'double' — Double horizontal line
12-465
12
Classes – Alphabetical List
Examples
Create Paragraph with Double Strikethrough Text
Create a presentation.
import mlreportgen.ppt.*
slidesFile = 'myStrikePresentation.pptx';
slides = Presentation(slidesFile);
titleSlide = add(slides,'Title and Content');
Create a paragraph and append text with strikethrough formatting.
p = Paragraph('Hello World');
tStrike = Text(' strikethrough text');
tStrike.Style = {Strike('double')};
append(p,tStrike);
Create text without strikethrough formatting and append it to the paragraph.
tVisible = Text(' visible text');
append(p,tVisible);
Add the paragraph to the slide and close the presentation.
replace(titleSlide,'Content',p);
close(slides);
Open myStrikePresentation.pptx. On a Windows platform, you can open the
presentation in MATLAB:
if ispc
winopen(slidesFile);
end
12-466
mlreportgen.ppt.Strike class
•
“Create and Format Text” on page 14-83
See Also
mlreportgen.ppt.Bold | mlreportgen.ppt.FontColor | mlreportgen.ppt.FontFamily |
mlreportgen.ppt.FontSize | mlreportgen.ppt.Italic | mlreportgen.ppt.Underline
More About
•
“Presentation Formatting Approaches” on page 14-20
Introduced in R2015b
12-467
12
Classes – Alphabetical List
mlreportgen.ppt.Subscript class
Package: mlreportgen.ppt
Subscript
Description
Subscript
Construction
subscriptObj = Subscript() creates a subscript object.
subscriptObj = Subscript(value) creates a subscript object.
Input Arguments
value — Display text as subscript
[] (default) | logical value
Display text as a subscript, specified as a logical. A setting of true (or 1) renders text as
a subscript.
Data Types: logical
Output Arguments
subscriptObject — Subscript
mlreportgen.ppt.Subscript object
Subscript, returned as an mlreportgen.ppt.Subscript object.
Properties
Id — ID for PPT API object
string
12-468
mlreportgen.ppt.Subscript class
ID for PPT API object, specified as a string. A session-unique ID is generated as part of
object creation. You can specify an ID to replace the generated ID.
Tag — Tag for this PPT API object
session-unique tag generated as part of object creation (default) | string
Tag for this PPT API object, specified as a string. The generated tag has the form
CLASS:ID, where CLASS is the object class and ID is the value of the Id property of the
object.
An example of a reason for specifying your own tag value is to make it easier to identify
where an issue occurred during presentation generation.
Examples
Use a Subscript
Set up a paragraph to display H2O.
Set up a presentation.
import mlreportgen.ppt.*
slidesFile = 'mySubscript.pptx';
slides = Presentation(slidesFile);
slide1 = add(slides,'Title and Content');
Create the subscript text and append it to a paragraph with regular text.
sub = Text('2');
sub.Style = {Subscript(true)};
para = Paragraph('H');
append(para,sub);
append(para,'O');
Use the paragraph to replace the slide content, generate the presentation, and open the
mySubscript presentation. (The winopen code works on Windows platforms.)
replace(slide1,'Content',para);
close(slides);
if ispc
12-469
12
Classes – Alphabetical List
winopen(slidesFile);
end
•
“Create and Format Text” on page 14-83
See Also
mlreportgen.ppt.Superscript
More About
•
“Presentation Formatting Approaches” on page 14-20
Introduced in R2015b
12-470
mlreportgen.ppt.Superscript class
mlreportgen.ppt.Superscript class
Package: mlreportgen.ppt
Superscript
Description
Superscript
Construction
superscriptObj = Superscript() creates a superscript object.
superscriptObj = Superscript(value) creates a superscript object.
Input Arguments
value — Display text as superscript
[] (default) | logical value
Display text as a superscript, specified as a logical. A setting of true (or 1) renders text
as a superscript.
Data Types: logical
Output Arguments
superscriptObject — Superscript
mlreportgen.ppt.Superscript object
Superscript, returned as an mlreportgen.ppt.Superscript object.
Properties
Id — ID for PPT API object
string
12-471
12
Classes – Alphabetical List
ID for PPT API object, specified as a string. A session-unique ID is generated as part of
object creation. You can specify an ID to replace the generated ID.
Tag — Tag for this PPT API object
session-unique tag generated as part of object creation (default) | string
Tag for this PPT API object, specified as a string. The generated tag has the form
CLASS:ID, where CLASS is the object class and ID is the value of the Id property of the
object.
An example of a reason for specifying your own tag value is to make it easier to identify
where an issue occurred during presentation generation.
Examples
Add a Superscript
Set up a paragraph to display x .
2
Set up a presentation.
import mlreportgen.ppt.*
slidesFile = 'mySuperscript.pptx';
slides = Presentation(slidesFile);
slide1 = add(slides,'Title and Content');
Create the superscript text and append it to a paragraph with regular text.
super = Text('2');
super.Style = {Superscript(true)};
para = Paragraph('x');
append(para,super);
Use the paragraph to replace the slide content, generate the presentation, and open the
mySuperscript presentation. (The winopen code works on Windows platforms.)
replace(slide1,'Content',para);
close(slides);
if ispc
winopen(slidesFile);
12-472
mlreportgen.ppt.Superscript class
end
•
“Create and Format Text” on page 14-83
See Also
mlreportgen.ppt.Subscript
More About
•
“Presentation Formatting Approaches” on page 14-20
Introduced in R2015b
12-473
12
Classes – Alphabetical List
mlreportgen.ppt.Table class
Package: mlreportgen.ppt
Table
Description
Table to include in a presentation.
Create a table using one of these approaches:
• Create an empty table and append table rows, with table entries for each column.
• Create a table, using an array or cell array to specify the table content.
After you create a table, you can add rows to it, and add entries to each table row. The
row with the largest number of table entries determines the number of columns in the
table if there are more table entries in the row than the number of rows specified in the
mlreportgen.ppt.Table object constructor.
Construction
tableObj = Table() creates an empty table object.
tableObj = Table(nCols) creates an empty table object with the number of columns
you specify.
tableObj = Table(tableValues) returns a table whose content is specified by a
two-dimensional numeric array or a two-dimensional cell array of numbers, strings, or
mlreportgen.ppt.Paragraph objects.
Input Arguments
nCols — Number of table columns
double
Number of table columns, specified as a double.
12-474
mlreportgen.ppt.Table class
Data Types: double
tableValues — Table values
two-dimensional numeric array | two-dimensional cell array
Table values, specified as one of these:
• Two-dimensional numeric array
• Two-dimensional cell array of strings, numbers, or mlreportgen.ppt.Paragraph
objects, or a combination of these kinds of values
Output Arguments
tableObj — Table
mlreportgen.ppt.Table object
Table, returned as an mlreportgen.ppt.Table object.
Properties
NCols — Number of table columns
double
Number of table columns, specified as a double.
Data Types: double
Name — Table name
string
Table name, specified as a string.
StyleName — Table style name
string
Table style name from the template for the presentation, specified as a string.
X — Upper-left x-coordinate position of table
string
12-475
12
Classes – Alphabetical List
Upper-left x-coordinate position of table, specified as a string.
The string must have the format valueUnits where Units is an abbreviation for the xposition units. Valid abbreviations are:
• No abbreviation — pixels
• cm — centimeters
• in — inches
• mm — millimeters
• pi — picas
• pt — points
• px — pixels
Y — Upper-left y-coordinate position of table
string
Upper-left y-coordinate position of table, specified as a string.
The string must have the format valueUnits where Units is an abbreviation for the yposition units. Valid abbreviations are:
• No abbreviation — pixels
• cm — centimeters
• in — inches
• mm — millimeters
• pi — picas
• pt — points
• px — pixels
Width — Width of table
string
Width of table, specified as a string.
The string must have the format valueUnits where Units is an abbreviation for the
units for the width. Valid abbreviations are:
12-476
mlreportgen.ppt.Table class
• No abbreviation — pixels
• cm — centimeters
• in — inches
• mm — millimeters
• pi — picas
• pt — points
• px — pixels
Height — Height of table
string
Height of table, specified as a string.
The string must have the format valueUnits where Units is an abbreviation for the
units for the height. Valid abbreviations are:
• No abbreviation — pixels
• cm — centimeters
• in — inches
• mm — millimeters
• pi — picas
• pt — points
• px — pixels
Style — Table formatting
ignored
Table formatting. This property is ignored.
Children — Children of this PPT API object
cell array of mlreportgen.ppt.Element objects
This read-only property lists child elements that the object contains, specified as a cell
array.
Parent — Parent of this PPT API object
PPT object
12-477
12
Classes – Alphabetical List
This read-only property lists the parent of this object, specified a PPT object.
Id — ID for PPT API object
string
ID for PPT API object, specified as a string. A session-unique ID is generated as part of
object creation. You can specify an ID to replace the generated ID.
Tag — Tag for this PPT API object
session-unique tag generated as part of object creation (default) | string
Tag for this PPT API object, specified as a string. The generated tag has the form
CLASS:ID, where CLASS is the object class and ID is the value of the Id property of the
object.
An example of a reason for specifying your own tag value is to make it easier to identify
where an issue occurred during presentation generation.
Methods
Method
Purpose
append
Add content to table.
replace
Replace table.
mlreportgen.ppt.Table.row
Access table row.
mlreportgen.ppt.Table.entry
Access table entry.
Examples
Add a Table
Create a presentation.
import mlreportgen.ppt.*
slidesFile = 'myTablePresentation.pptx';
12-478
mlreportgen.ppt.Table class
slides = Presentation(slidesFile);
slide1 = add(slides,'Title and Table');
slide2 = add(slides,'Title and Table');
Create a table using a cell array.
table1 = Table({'a','b';'c','d'});
table1.Children(1).Style = {FontColor('red')};
table1.Children(2).Style = {FontColor('green')};
Use the mlreportgen.ppt.Presentation.find method to find the slides that have
objects with a Name property set to Table. In the default PPT API, the Title and
Table layout slide has a Table object.
contents = find(slides,'Table');
Replace the contents of the second slide with table1.
replace(contents(1),table1);
Create a second table using the MATLAB magic function.
table2 = Table(magic(9));
Replace the table in the third slide with table2.
replace(contents(2),table2);
Close the presentation to generate the output.
close(slides);
Open myTablePresentation.pptx. On a Windows platform, you can open the
presentation in MATLAB:
if ispc
winopen(slidesFile);
end
12-479
12
Classes – Alphabetical List
•
“Create and Format Tables” on page 14-89
See Also
mlreportgen.ppt.TableEntry | mlreportgen.ppt.TablePlaceholder |
mlreportgen.ppt.TableRow
Introduced in R2015b
12-480
mlreportgen.ppt.TableEntry class
mlreportgen.ppt.TableEntry class
Package: mlreportgen.ppt
Table entry
Description
Table entry to include in a table row.
To add content to a table entry, append a string or one or more
mlreportgen.ppt.Paragraph objects.
The row with the largest number of table entries determines the number of columns in
the table if there are more table entries in the row than the number of rows specified in
the mlreportgen.ppt.Table object constructor.
Construction
tableEntryObj = TableEntry() creates an empty table entry object.
Output Arguments
tableEntryObj — Table entry
mlreportgen.ppt.TableEntry object
Table entry, returned as an mlreportgen.ppt.TableEntry object.
Properties
Style — Default formatting for text appended to table entry
cell array of PPT style objects
Default formatting for text appended to table entry, specified as an array of PPT style
objects. You can include these mlreportgen.ppt style objects in the cell array:
• BackgroundColor object
12-481
12
Classes – Alphabetical List
• FontFamily object
• FontSize object
• Bold object
• FontColor object
• Italic object
• Underline object
Children — Children of this PPT API object
cell array of mlreportgen.ppt.Element objects
This read-only property lists child elements that the object contains, specified as a cell
array.
Parent — Parent of this PPT API object
PPT object
This read-only property lists the parent of this object, specified a PPT object.
Id — ID for PPT API object
string
ID for PPT API object, specified as a string. A session-unique ID is generated as part of
object creation. You can specify an ID to replace the generated ID.
Tag — Tag for this PPT API object
session-unique tag generated as part of object creation (default) | string
Tag for this PPT API object, specified as a string. The generated tag has the form
CLASS:ID, where CLASS is the object class and ID is the value of the Id property of the
object.
An example of a reason for specifying your own tag value is to make it easier to identify
where an issue occurred during presentation generation.
Methods
12-482
Method
Purpose
append
Add content to table entry.
mlreportgen.ppt.TableEntry class
Examples
Create a Table with Table Entries
Create a presentation.
import mlreportgen.ppt.*
slidesFile = 'myTableEntryPresentation.pptx';
slides = Presentation(slidesFile);
slide1 = add(slides,'Title and Table');
Create a table with three columns.
table1 = Table(3);
Create the first table row.
tr1 = TableRow();
tr1.Style = {Bold(true)};
Create three table entries for the first row.
te1tr1 = TableEntry();
p = Paragraph('first entry');
p.FontColor = 'red';
append(te1tr1,p);
te2tr1 = TableEntry();
append(te2tr1,'second entry');
te3tr1 = TableEntry();
te3tr1.Style = {FontColor('green')};
append(te3tr1,'third entry');
Append the table entries to the first row.
append(tr1,te1tr1);
append(tr1,te2tr1);
append(tr1,te3tr1);
Create the second table row.
tr2 = TableRow();
12-483
12
Classes – Alphabetical List
Create three table entries for the second row.
te1tr2 = TableEntry();
te1tr2.Style = {FontColor('red')};
p = Paragraph('first entry');
append(te1tr2,p);
te2tr2 = TableEntry();
append(te2tr2,'second entry');
te3tr2 = TableEntry();
te3tr2.Style = {FontColor('green')};
append(te3tr2,'third entry');
Append the table entries to the second row.
append(tr2,te1tr2);
append(tr2,te2tr2);
append(tr2,te3tr2);
Append the table rows to the table.
append(table1,tr1);
append(table1,tr2);
Use the mlreportgen.ppt.Slide.find method to find objects in the slide with the
Name property set to Table. In the default PPT API template, the Title and Table
layout slide has an object with the name Table.
contents = find(slide1,'Table');
Replace the table placeholder with table1.
replace(contents(1),table1);
Close the presentation to generate the output.
close(slides);
Open myTableEntryPresentation.pptx. On a Windows platform, you can open the
presentation in MATLAB:
if ispc
winopen(slidesFile);
end
12-484
mlreportgen.ppt.TableEntry class
•
“Create and Format Tables” on page 14-89
See Also
mlreportgen.ppt.Table | mlreportgen.ppt.Table.entry | mlreportgen.ppt.TableRow
Introduced in R2015b
12-485
12
Classes – Alphabetical List
mlreportgen.ppt.TablePlaceholder class
Package: mlreportgen.ppt
Slide placeholder to replace with table
Description
Slide placeholder to replace with a table. You can create a table placeholder using a
layout slide. In the default PPT API, when you add a Title and Table slide to a
presentation, the API creates a TablePlaceholder object. Use the find method
with the slide object to find the picture placeholder. You can then set properties for the
TablePlaceholder object.
Use the PowerPoint editor to insert a picture placeholder in a presentation:
1
Select the Slide Master tab.
2
Click the layout slide you want to add the picture placeholder to. You can add the
placeholder to an existing or a new layout slide.
3
In the toolbar, click Insert Placeholder and select Table.
Properties
Name — Table placeholder name
string
Table placeholder name, specified as a string.
X — Upper-left x-coordinate position of placeholder
string
Upper-left x-coordinate position of placeholder, specified as a string.
The string must have the format valueUnits where Units is an abbreviation for the xposition units. Valid abbreviations are:
• No abbreviation — pixels
12-486
mlreportgen.ppt.TablePlaceholder class
• cm — centimeters
• in — inches
• mm — millimeters
• pi — picas
• pt — points
• px — pixels
Y — Upper-left y-coordinate position of placeholder
string
Upper-left y-coordinate position of placeholder, specified as a string.
The string must have the format valueUnits where Units is an abbreviation for the yposition units. Valid abbreviations are:
• No abbreviation — pixels
• cm — centimeters
• in — inches
• mm — millimeters
• pi — picas
• pt — points
• px — pixels
Width — Width of placeholder
string
Width of placeholder, specified as a string.
The string must have the format valueUnits where Units is an abbreviation for the
units for the width. Valid abbreviations are:
• No abbreviation — pixels
• cm — centimeters
• in — inches
• mm — millimeters
• pi — picas
12-487
12
Classes – Alphabetical List
• pt — points
• px — pixels
Height — Height of placeholder
string
Height of placeholder, specified as a string.
The string must have the format valueUnits where Units is an abbreviation for the
units for the height. Valid abbreviations are:
• No abbreviation — pixels
• cm — centimeters
• in — inches
• mm — millimeters
• pi — picas
• pt — points
• px — pixels
Style — Table placeholder formatting
ignored
Table placeholder formatting. This property is ignored.
Children — Children of this PPT API object
cell array of mlreportgen.ppt.Element objects
This read-only property lists child elements that the object contains, specified as a cell
array.
Parent — Parent of this PPT API object
PPT object
This read-only property lists the parent of this object, specified a PPT object.
Id — ID for PPT API object
string
ID for PPT API object, specified as a string. A session-unique ID is generated as part of
object creation. You can specify an ID to replace the generated ID.
12-488
mlreportgen.ppt.TablePlaceholder class
Tag — Tag for this PPT API object
session-unique tag generated as part of object creation (default) | string
Tag for this PPT API object, specified as a string. The generated tag has the form
CLASS:ID, where CLASS is the object class and ID is the value of the Id property of the
object.
An example of a reason for specifying your own tag value is to make it easier to identify
where an issue occurred during presentation generation.
Methods
Method
Purpose
replace
Replace table placeholder with table.
Examples
Replace Table Using a Table Placeholder
Create a presentation.
import mlreportgen.ppt.*
slidesFile = 'myTablePlaceholderPresentation.pptx';
slides = Presentation(slidesFile);
slide1 = add(slides,'Title and Table');
Create a table.
table1 = Table(magic(9));
The Title and Table layout includes an object named Table. Use the
mlreportgen.ppt.Slide.find method to find an object with the Name property of
Table.
contents = find(slide1,'Table');
Replace the table placeholder with the table.
replace(contents(1),table1);
12-489
12
Classes – Alphabetical List
Close the presentation to generate the output.
close(slides);
Open myTablePlaceholderPresentation.pptx. On a Windows platform, you can
open the presentation in MATLAB:
if ispc
winopen(slidesFile);
end
•
“Access PowerPoint Template Elements” on page 14-37
•
“Add or Replace a Table” on page 14-80
See Also
mlreportgen.ppt.Table
Introduced in R2015b
12-490
mlreportgen.ppt.TableRow class
mlreportgen.ppt.TableRow class
Package: mlreportgen.ppt
Table row
Description
Row to include in a table.
To add content to a table row, append mlreportgen.ppt.TableEntry objects to the
row.
The row with the largest number of table entries determines the number of columns in
the table if there are more table entries in the row than the number of rows specified in
the mlreportgen.ppt.Table object constructor.
Construction
tableRowObj = TableRow() creates an empty table row object.
Output Arguments
tableRowObj — Table entry
mlreportgen.ppt.TableRow object
Table row, returned as an mlreportgen.ppt.TableRow object.
Properties
Style — Default formatting for text in table entries in row
cell array of PPT style objects
Default formatting for text in table entries in a table row, specified as an array
of PPT style objects that specifies the format for the text. You can include these
mlreportgen.ppt style objects in the cell array:
12-491
12
Classes – Alphabetical List
• BackgroundColor object
• FontFamily object
• FontSize object
• Bold object
• FontColor object
• Italic object
• Underline object
Children — Children of this PPT API object
cell array of mlreportgen.ppt.Element objects
This read-only property lists child elements that the object contains, specified as a cell
array.
Parent — Parent of this PPT API object
PPT object
This read-only property lists the parent of this object, specified a PPT object.
Id — ID for PPT API object
string
ID for PPT API object, specified as a string. A session-unique ID is generated as part of
object creation. You can specify an ID to replace the generated ID.
Tag — Tag for this PPT API object
session-unique tag generated as part of object creation (default) | string
Tag for this PPT API object, specified as a string. The generated tag has the form
CLASS:ID, where CLASS is the object class and ID is the value of the Id property of the
object.
An example of a reason for specifying your own tag value is to make it easier to identify
where an issue occurred during presentation generation.
Methods
12-492
Method
Purpose
append
Add content to table row.
mlreportgen.ppt.TableRow class
Examples
Create a Table with Table Rows
Create a presentation.
import mlreportgen.ppt.*
slidesFile = 'myTableEntryPresentation.pptx';
slides = Presentation(slidesFile);
slide1 = add(slides,'Title and Table');
Create a table with three columns.
table1 = Table(3);
Create the first table row.
tr1 = TableRow();
tr1.Style = {Bold(true)};
Create three table entries for the first row.
te1tr1 = TableEntry();
p = Paragraph('first entry');
p.FontColor = 'red';
append(te1tr1,p);
te2tr1 = TableEntry();
append(te2tr1,'second entry');
te3tr1 = TableEntry();
te3tr1.Style = {FontColor('green')};
append(te3tr1,'third entry');
Append the table entries to the first row.
append(tr1,te1tr1);
append(tr1,te2tr1);
append(tr1,te3tr1);
Create the second table row.
tr2 = TableRow();
12-493
12
Classes – Alphabetical List
Create three table entries for the second row.
te1tr2 = TableEntry();
te1tr2.Style = {FontColor('red')};
p = Paragraph('first entry');
append(te1tr2,p);
te2tr2 = TableEntry();
append(te2tr2,'second entry');
te3tr2 = TableEntry();
te3tr2.Style = {FontColor('green')};
append(te3tr2,'third entry');
Append the table entries to the second row.
append(tr2,te1tr2);
append(tr2,te2tr2);
append(tr2,te3tr2);
Append the table rows to the table.
append(table1,tr1);
append(table1,tr2);
Use the mlreportgen.ppt.Slide.find method to find objects in the slide with the
Name property set to Table. In the default PPT API template, the Title and Table
layout slide has an object with the name Table.
contents = find(slide1,'Table');
Replace the table placeholder with table1.
replace(contents(1),table1);
Close the presentation to generate the output.
close(slides);
Open myTableEntryPresentation.pptx. On a Windows platform, you can open the
presentation in MATLAB:
if ispc
winopen(slidesFile);
end
12-494
mlreportgen.ppt.TableRow class
•
“Create and Format Tables” on page 14-89
See Also
mlreportgen.ppt.Table.row | mlreportgen.ppt.Table | mlreportgen.ppt.TableEntry
Introduced in R2015b
12-495
12
Classes – Alphabetical List
mlreportgen.ppt.Text class
Package: mlreportgen.ppt
Text
Description
Text to include in a presentation.
Construction
textObj = Text() creates an empty text object.
textObj = Text(text) creates an mlreportgen.ppt.Text object with the text
specified by text.
Input Arguments
text — Text
string
Text, specified as a string.
Output Arguments
textObj — Text
mlreportgen.ppt.Text object
Text, returned as an mlreportgen.ppt.Text object.
Properties
Content — Text content
string
Text content, specified as a string.
12-496
mlreportgen.ppt.Text class
Bold — Option to use bold for text
logical value
Option to use bold for text, specified as a logical. To make text bold, set this property to
true or 1. Setting the Bold property adds a corresponding mlreportgen.ppt.Bold
format object to the Style property of this presentation element. Removing the Bold
property setting removes the object.
Data Types: logical
FontColor — Font color for presentation element
string
Font color, specified as a string. Use either a CSS color name or a hexadecimal RGB
value.
• For a list of CSS color names, see http://www.crockford.com/wrrrld/color.html.
• To specify a hexadecimal RGB format, use # as the first character and two-digit
hexidecimal numbers for each for the red, green, and blue values. For example,
'#0000ff' specifies blue.
Italic — Option to use italics for text
[] (default) | logical value
Option to use italics for text, specified as a logical. Set this property to true. Setting the
Italic property adds a corresponding mlreportgen.ppt.Italic format object to the
Style property of this presentation element. Removing the Italic property setting
removes the object.
Data Types: logical
Subscript — Format text as subscript
logical value
Format text as subscript, specifying as a logical value. A value of true renders the text
as a subscript.
Superscript — Format text as superscript
logical value
Format text as superscript, specifying as a logical value. A value of true renders the text
as a superscript.
12-497
12
Classes – Alphabetical List
Underline — Type of underline for text
[] (default) | string
Type of underlining for text, specified as a string. Setting the Underline property adds
a corresponding mlreportgen.ppt.Underline format object to the Style property
for this element. Removing the Underline property setting removes the object. You can
specify one of these types of underlines.
String
Description
'single'
Single underline
'double'
Double underline
'heavy'
Thick underline
'words'
Words only underlined (not spaces)
'dotted'
Dotted underline
'dottedheavy'
Thick, dotted underline
'dash'
Dashed underline
'dashheavy'
Thick, dashed underline
'dashlong'
Long, dashed underline
'dashlongheavy'
Thick, long, dashed underline
'dotdash'
Dot dash underline
'dotdotdash'
Dot dot dash underline
'dotdotdashheavy'
Thick dot dot dash underline
'dotdashdotheavy'
Thick dash dot underline
'wavy'
Wavy underline
'wavyheavy'
Thick wavy underline
'wavydouble'
Two wavy underlines
Style — Text formatting
cell array of PPT style objects
Text formatting, specified as a cell array of PPT style objects. You can specify these
mlreportgen.ppt style objects:
• FontFamily object
12-498
mlreportgen.ppt.Text class
• FontSize object
• Bold object
• FontColor object
• Italic object
• Underline object
Children — Children of this PPT API object
cell array of mlreportgen.ppt.Element objects
This read-only property lists child elements that the object contains, specified as a cell
array.
Parent — Parent of this PPT API object
PPT object
This read-only property lists the parent of this object, specified a PPT object.
Tag — Tag for this PPT API object
session-unique tag generated as part of object creation (default) | string
Tag for this PPT API object, specified as a string. The generated tag has the form
CLASS:ID, where CLASS is the object class and ID is the value of the Id property of the
object.
An example of a reason for specifying your own tag value is to make it easier to identify
where an issue occurred during presentation generation.
Id — ID for PPT API object
string
ID for PPT API object, specified as a string. A session-unique ID is generated as part of
object creation. You can specify an ID to replace the generated ID.
Examples
Use Text Objects in a Presentation
Create a presentation with two slides.
12-499
12
Classes – Alphabetical List
import mlreportgen.ppt.*
slidesFile = 'myTextPresentation.pptx';
slides = Presentation(slidesFile);
add(slides,'Title Slide');
add(slides,'Title and Content');
Create a Paragraph object to use for the title of the presentation. Make the text bold and
red.
p = Paragraph();
p.Bold = true;
p.FontColor = 'red';
Create a Text object and append it to the paragraph.
titleText = Text('My Presentation Title');
append(p,titleText);
Replace the title for the first slide with the paragraph.
contents = find(slides,'Title');
replace(contents(1),p);
Create a paragraph for the content of the second slide.
p1 = Paragraph('My content');
append(p1,Text(' for the second slide'));
Replace the content with the p1 paragraph.
replace(slides,'Content',p1);
Close the presentation.
close(slides);
Open myParagraphPresentation.pptx. On a Windows platform, you can open the
presentation in MATLAB:
if ispc
winopen(slidesFile);
end
12-500
mlreportgen.ppt.Text class
•
“Create and Format Text” on page 14-83
See Also
mlreportgen.ppt.Paragraph | mlreportgen.ppt.TextBox |
mlreportgen.ppt.TextBoxPlaceholder
12-501
12
Classes – Alphabetical List
mlreportgen.ppt.TextBox class
Package: mlreportgen.ppt
Text box
Description
Text box to include in a presentation.
Construction
textBoxObj = TextBox() creates an empty text box object.
Output Arguments
textBoxObj — Text box
mlreportgen.ppt.TextBox object
Text box, returned as an mlreportgen.ppt.TextBox object.
Properties
Bold — Option to use bold for text
logical value
Option to use bold for text, specified as a logical. To make text bold, set this property to
true or 1. Setting the Bold property adds a corresponding mlreportgen.ppt.Bold
format object to the Style property of this presentation element. Removing the Bold
property setting removes the object.
Data Types: logical
FontColor — Font color for presentation element
string
12-502
mlreportgen.ppt.TextBox class
Font color, specified as a string. Use either a CSS color name or a hexadecimal RGB
value.
• For a list of CSS color names, see http://www.crockford.com/wrrrld/color.html.
• To specify a hexadecimal RGB format, use # as the first character and two-digit
hexidecimal numbers for each for the red, green, and blue values. For example,
'#0000ff' specifies blue.
Italic — Option to use italics for text
[] (default) | logical value
Option to use italics for text, specified as a logical. Set this property to true. Setting the
Italic property adds a corresponding mlreportgen.ppt.Italic format object to the
Style property of this presentation element. Removing the Italic property setting
removes the object.
Data Types: logical
Underline — Type of underline for text
[] (default) | string
Type of underlining for text, specified as a string. Setting the Underline property adds
a corresponding mlreportgen.ppt.Underline format object to the Style property
for this element. Removing the Underline property setting removes the object. You can
specify one of these types of underlines.
String
Description
'single'
Single underline
'double'
Double underline
'heavy'
Thick underline
'words'
Words only underlined (not spaces)
'dotted'
Dotted underline
'dottedheavy'
Thick, dotted underline
'dash'
Dashed underline
'dashheavy'
Thick, dashed underline
'dashlong'
Long, dashed underline
'dashlongheavy'
Thick, long, dashed underline
12-503
12
Classes – Alphabetical List
String
Description
'dotdash'
Dot dash underline
'dotdotdash'
Dot dot dash underline
'dotdotdashheavy'
Thick dot dot dash underline
'dotdashdotheavy'
Thick dash dot underline
'wavy'
Wavy underline
'wavyheavy'
Thick wavy underline
'wavydouble'
Two wavy underlines
Name — Text box name
string
Text box name, specified as a string.
X — Upper-left x-coordinate position of text box
string
Upper-left x-coordinate of text box, specified as a string.
The string must have the format valueUnits where Units is an abbreviation for the xposition units. Valid abbreviations are:
• No abbreviation — pixels
• cm — centimeters
• in — inches
• mm — millimeters
• pi — picas
• pt — points
• px — pixels
Y — Upper-left y-coordinate position of text box
string
Upper —left y-coordinate position of text box, specified as a string.
The string must have the format valueUnits where Units is an abbreviation for the yposition units. Valid abbreviations are:
12-504
mlreportgen.ppt.TextBox class
• No abbreviation — pixels
• cm — centimeters
• in — inches
• mm — millimeters
• pi — picas
• pt — points
• px — pixels
Width — Width of text box
string
Width of text box, specified as a string.
The string must have the format valueUnits where Units is an abbreviation for the
units for the width. Valid abbreviations are:
• No abbreviation — pixels
• cm — centimeters
• in — inches
• mm — millimeters
• pi — picas
• pt — points
• px — pixels
Height — Height of text box
string
Height of text box, specified as a string.
The string must have the format valueUnits where Units is an abbreviation for the
units for the height. Valid abbreviations are:
• No abbreviation — pixels
• cm — centimeters
• in — inches
• mm — millimeters
• pi — picas
12-505
12
Classes – Alphabetical List
• pt — points
• px — pixels
Style — Text formatting
cell array of PPT style objects
Text formatting, specified as a cell array of PPT style objects. You can specify these
mlreportgen.ppt style objects:
• BackgroundColor object
• FontFamily object
• FontSize object
• Bold object
• FontColor object
• Italic object
• Underline object
Children — Children of this PPT API object
cell array of mlreportgen.ppt.Element objects
This read-only property lists child elements that the object contains, specified as a cell
array.
Parent — Parent of this PPT API object
PPT object
This read-only property lists the parent of this object, specified a PPT object.
Tag — Tag for this PPT API object
session-unique tag generated as part of object creation (default) | string
Tag for this PPT API object, specified as a string. The generated tag has the form
CLASS:ID, where CLASS is the object class and ID is the value of the Id property of the
object.
An example of a reason for specifying your own tag value is to make it easier to identify
where an issue occurred during presentation generation.
Id — ID for PPT API object
string
12-506
mlreportgen.ppt.TextBox class
ID for PPT API object, specified as a string. A session-unique ID is generated as part of
object creation. You can specify an ID to replace the generated ID.
Methods
Method
Purpose
add
Add content to text box.
replace
Replace text box content.
Examples
Add a Text Box
Create a presentation with two slides.
import mlreportgen.ppt.*
slides = Presentation('myTextBoxPresentation.pptx');
Add a blank slide.
blank = add(slides,'Blank');
Create a text box and define its location and size.
tb = TextBox();
tb.X = '1in';
tb.Y = '1in';
tb.Width = '8in';
tb.Height = '0.5in';
Add text to the text box and append the text box to the blank slide.
add(tb,'This is the title of my blank slide');
add(blank,tb);
Close the presentation.
close(slides);
Open myTextBoxPresentation.pptx. On a Windows platform, you can open the
presentation in MATLAB:
12-507
12
Classes – Alphabetical List
if ispc
winopen(slidesFile);
end
•
“Create and Format Text” on page 14-83
See Also
mlreportgen.ppt.Paragraph | mlreportgen.ppt.Text |
mlreportgen.ppt.TextBoxPlaceholder
12-508
mlreportgen.ppt.TextBoxPlaceholder class
mlreportgen.ppt.TextBoxPlaceholder class
Package: mlreportgen.ppt
Slide placeholder to replace with text box
Description
Slide placeholder to replace with a text box. You can create a text box placeholder
using a layout slide. In the default PPT API, when you add a Title Slide slide to a
presentation, the API creates a TextBoxPlaceholder object. Use the find method
with the slide object, to find the text box placeholder. You can then set properties for that
TextBoxPlaceholder object.
To use the PowerPoint editor to insert a picture placeholder in a presentation:
1
Select the Slide Master tab.
2
Click the layout slide you want to add the picture placeholder to. You can add the
placeholder to an existing or a new layout slide.
3
In the toolbar, click Insert Placeholder and select Text.
Properties
Bold — Option to use bold for text
logical value
Option to use bold for text, specified as a logical. To make text bold, set this property to
true or 1. Setting the Bold property adds a corresponding mlreportgen.ppt.Bold
format object to the Style property of this presentation element. Removing the Bold
property setting removes the object.
Data Types: logical
FontColor — Font color for presentation element
string
Font color, specified as a string. Use either a CSS color name or a hexadecimal RGB
value.
12-509
12
Classes – Alphabetical List
• For a list of CSS color names, see http://www.crockford.com/wrrrld/color.html.
• To specify a hexadecimal RGB format, use # as the first character and two-digit
hexidecimal numbers for each for the red, green, and blue values. For example,
'#0000ff' specifies blue.
Italic — Option to use italics for text
[] (default) | logical value
Option to use italics for text, specified as a logical. Set this property to true. Setting the
Italic property adds a corresponding mlreportgen.ppt.Italic format object to the
Style property of this presentation element. Removing the Italic property setting
removes the object.
Data Types: logical
Underline — Type of underline for text
[] (default) | string
Type of underlining for text, specified as a string. Setting the Underline property adds
a corresponding mlreportgen.ppt.Underline format object to the Style property
for this element. Removing the Underline property setting removes the object. You can
specify one of these types of underlines.
String
12-510
Description
'single'
Single underline
'double'
Double underline
'heavy'
Thick underline
'words'
Words only underlined (not spaces)
'dotted'
Dotted underline
'dottedheavy'
Thick, dotted underline
'dash'
Dashed underline
'dashheavy'
Thick, dashed underline
'dashlong'
Long, dashed underline
'dashlongheavy'
Thick, long, dashed underline
'dotdash'
Dot dash underline
'dotdotdash'
Dot dot dash underline
mlreportgen.ppt.TextBoxPlaceholder class
String
Description
'dotdotdashheavy'
Thick dot dot dash underline
'dotdashdotheavy'
Thick dash dot underline
'wavy'
Wavy underline
'wavyheavy'
Thick wavy underline
'wavydouble'
Two wavy underlines
Name — Text box placeholder name
string
Text box placeholder name, specified as a string.
X — Upper-left x-coordinate position of placeholder
string
Upper-left x-coordinate position of placeholder, specified as a string.
The string must have the format valueUnits where Units is an abbreviation for the xposition units. Valid abbreviations are:
• No abbreviation — pixels
• cm — centimeters
• in — inches
• mm — millimeters
• pi — picas
• pt — points
• px — pixels
Y — Upper-left y-coordinate position of placeholder
string
Upper-left y-coordinate position of placeholder, specified as a string.
The string must have the format valueUnits where Units is an abbreviation for the yposition units. Valid abbreviations are:
• No abbreviation — pixels
• cm — centimeters
12-511
12
Classes – Alphabetical List
• in — inches
• mm — millimeters
• pi — picas
• pt — points
• px — pixels
Width — Width of placeholder
string
Width of placeholder, specified as a string.
The string must have the format valueUnits where Units is an abbreviation for the
units for the width. Valid abbreviations are:
• No abbreviation — pixels
• cm — centimeters
• in — inches
• mm — millimeters
• pi — picas
• pt — points
• px — pixels
Height — Height of placeholder
string
Height of placeholder, specified as a string.
The string must have the format valueUnits where Units is an abbreviation for the
units for the height. Valid abbreviations are:
• No abbreviation — pixels
• cm — centimeters
• in — inches
• mm — millimeters
• pi — picas
• pt — points
12-512
mlreportgen.ppt.TextBoxPlaceholder class
• px — pixels
Style — Text formatting
cell array of PPT style objects
Text formatting, specified as an array of PPT style objects. You can specify these
mlreportgen.ppt style objects:
• BackgroundColor object
• FontFamily object
• FontSize object
• FontColor object
• Italic object
• Underline object
Children — Children of this PPT API object
cell array of mlreportgen.ppt.Element objects
This read-only property lists child elements that the object contains, specified as a cell
array.
Parent — Parent of this PPT API object
PPT object
This read-only property lists the parent of this object, specified a PPT object.
Id — ID for PPT API object
string
ID for PPT API object, specified as a string. A session-unique ID is generated as part of
object creation. You can specify an ID to replace the generated ID.
Tag — Tag for this PPT API object
session-unique tag generated as part of object creation (default) | string
Tag for this PPT API object, specified as a string. The generated tag has the form
CLASS:ID, where CLASS is the object class and ID is the value of the Id property of the
object.
An example of a reason for specifying your own tag value is to make it easier to identify
where an issue occurred during presentation generation.
12-513
12
Classes – Alphabetical List
Methods
Method
Purpose
add
Add content to placeholder.
replace
Replace placeholder content.
Examples
Replace Text Using a Text Box Placeholder
Create a presentation.
import mlreportgen.ppt.*
slidesFile = 'myTextBoxPlaceholderPresentation.pptx';
slides = Presentation(slidesFile);
slide1 = add(slides,'Title Slide');
Create a paragraph.
p = Paragraph('My Presentation Title');
The Title Slide layout includes a text box object named Title. Use the
mlreportgen.ppt.Slide.find method to find an object with the Name property of
Title.
contents = find(slide1,'Title')
contents =
TextBoxPlaceholder with properties:
Bold:
FontColor:
Italic:
Strike:
Subscript:
Superscript:
Underline:
Name:
X:
12-514
[]
[]
[]
[]
[]
[]
[]
'Title'
[]
mlreportgen.ppt.TextBoxPlaceholder class
Y:
Width:
Height:
Style:
Children:
Parent:
Tag:
Id:
[]
[]
[]
[]
[]
[1x1 mlreportgen.ppt.Slide]
'ppt.TextBoxPlaceholder:5417:755'
'5417:755'
Replace the placeholder with the paragraph.
replace(contents(1),p);
Close the presentation.
close(slides);
Open myTextBoxPlaceholderPresentation.pptx. On a Windows platform, you can
open the presentation in MATLAB:
if ispc
winopen(slidesFile);
end
•
“Access PowerPoint Template Elements” on page 14-37
•
“Add and Replace Text” on page 14-77
See Also
mlreportgen.ppt.TextBox
Introduced in R2015b
12-515
12
Classes – Alphabetical List
mlreportgen.ppt.Underline class
Package: mlreportgen.ppt
Underline text
Description
Underline text.
Construction
underline = Underline() draws a single line under text.
underline = Underline(type) draws a line of the specified type under the text.
Input Arguments
type — Style of underline
string
Underline style, specified as a string. Valid strings are:
String
12-516
Description
'single'
Single underline
'double'
Double underline
'heavy'
Thick underline
'words'
Words only underlined (not spaces)
'dotted'
Dotted underline
'dottedheavy'
Thick, dotted underline
'dash'
Dashed underline
'dashheavy'
Thick, dashed underline
mlreportgen.ppt.Underline class
String
Description
'dashlong'
Long, dashed underline
'dashlongheavy'
Thick, long, dashed underline
'dotdash'
Dot dash underline
'dotdotdash'
Dot dot dash underline
'dotdotdashheavy'
Thick dot dot dash underline
'dotdashdotheavy'
Thick dash dot underline
'wavy'
Wavy underline
'wavyheavy'
Thick wavy underline
'wavydouble'
Two wavy underlines
Output Arguments
underline — Underline text
mlreportgen.ppt.Underline object
Underline, returned as an mlreportgen.ppt.Underline object.
Properties
Type — Underline style
string
Underline style, specified as a string. See the description of the type input argument for
the constructor.
Data Types: char
Id — ID for PPT API object
string
ID for PPT API object, specified as a string. A session-unique ID is generated as part of
object creation. You can specify an ID to replace the generated ID.
Tag — Tag for this PPT API object
session-unique tag generated as part of object creation (default) | string
12-517
12
Classes – Alphabetical List
Tag for this PPT API object, specified as a string. The generated tag has the form
CLASS:ID, where CLASS is the object class and ID is the value of the Id property of the
object.
An example of a reason for specifying your own tag value is to make it easier to identify
where an issue occurred during presentation generation.
Examples
Create Underlined Text
Create a presentation.
import mlreportgen.ppt.*
slidesFile = 'myUnderlinePresentation.pptx';
slides = Presentation(slidesFile);
titleSlide = add(slides,'Title and Content');
Create a paragraph and append underlined text.
p = Paragraph('Hello World');
tWavy = Text(' wavy underline');
tWavy.Style = {Underline('wavy')};
append(p,tWavy);
tDashed = Text(' heavy dash underline');
tDashed.Style = {Underline('dashheavy')};
append(p,tDashed);
Add the paragraph to the slide and close the presentation.
replace(titleSlide,'Content',p);
close(slides);
Open the myUnderlinePresentation presentation. On a Windows platform, you can
open the presentation in MATLAB:
if ispc
winopen(slidesFile);
12-518
mlreportgen.ppt.Underline class
end
See Also
mlreportgen.ppt.Bold | mlreportgen.ppt.Italic
Introduced in R2015b
12-519
12
Classes – Alphabetical List
mlreportgen.ppt.VAlign class
Package: mlreportgen.ppt
Vertical alignment of table entry content
Description
Vertical alignment of table entry content.
Construction
vAlignObj = VAlign() creates a vertical alignment object having the value 'top'.
vAlignObj = VAlign(value) creates a vertical alignment object having the specified
value.
Input Arguments
value — Vertical alignment for table entry content
'top' (default) | string
Vertical alignment for table entry content, specified as one of these values:
• 'top'
• 'bottom'
• 'middle'
• 'topCentered'
• 'middleCentered'
• 'bottomCentered'
Output Arguments
vAlignObj — Vertical alignment of table entry content
mlreportgen.ppt.VAlign object
12-520
mlreportgen.ppt.VAlign class
Vertical alignment of table entry content, returned as an mlreportgen.ppt.VAlign
object.
Properties
Id — ID for PPT API object
string
ID for PPT API object, specified as a string. A session-unique ID is generated as part of
object creation. You can specify an ID to replace the generated ID.
Tag — Tag for document element
string
Tag for document element, specified as a string.
A session-unique ID is generated as part of document element creation. The generated
tag has the form CLASS:ID, where CLASS is the class of the element and ID is the value
of the Id property of the object. You can specify a tag to replace the generated tag.
Specify your own tag value, for example, to make it easier to identify where an issue
occurred during document generation.
Value — Vertical alignment of table entry content
'top' (default) | 'bottom' | 'middle' | 'topCentered' | 'middleCentered' |
'bottomCentered'
Vertical alignment of table entry content, specified as a string.
Examples
Add a Table
Create a presentation.
import mlreportgen.ppt.*
slidesFile = 'myVAlign.pptx';
12-521
12
Classes – Alphabetical List
slides = Presentation(slidesFile);
slide1 = add(slides,'Title and Content');
Create a table using a cell array. Set the vertical alignment for each entry.
table1 = Table();
row1 = TableRow();
p1 = Paragraph('top');
r1e1 = TableEntry();
r1e1.Style = {VAlign('top'),FontSize('.5in')};
append(r1e1,p1);
append(row1,r1e1);
p2 = Paragraph('middle');
r1e2 = TableEntry();
r1e2.Style = {VAlign('middle')};
append(r1e2,p2);
append(row1,r1e2);
row2 = TableRow();
p3 = Paragraph('bottom');
r2e1 = TableEntry();
r2e1.Style = {VAlign('bottom')};
append(r2e1,p3);
append(row2,r2e1);
p4 = Paragraph('middle centered');
r2e2 = TableEntry();
r2e2.Style = {VAlign('middleCentered'),FontSize('.5in')};
append(r2e2,p4);
append(row2,r2e2);
append(table1,row1);
append(table1,row2);
Add the table to the slide, generate the presentation, and open the myVAlign
presentation. (The winopen code works on Windows platforms.)
replace(slide1,'Content',table1);
close(slides);
if ispc
winopen(slidesFile);
end
12-522
mlreportgen.ppt.VAlign class
•
“Create and Format Tables” on page 14-89
See Also
mlreportgen.ppt.HAlign | mlreportgen.ppt.TableEntry
More About
•
“Presentation Formatting Approaches” on page 14-20
Introduced in R2015b
12-523
12
Classes – Alphabetical List
mlreportgen.ppt.WarningMessage class
Package: mlreportgen.ppt
Warning message
Description
Create a warning message with the specified text originating from the specified source
object.
Construction
warningMsgObj = WarningMessage(text,source) creates a warning message with
the specified text originating from the specified source object.
Input Arguments
text — Message text
string
The text to display for the message, specified as a string.
source — PPT object from which message originates
a PPT object
The PPT object from which the message originates, specified as a PPT object.
Output Arguments
warningMsgObj — Warning message
mlreportgen.ppt.WarningMessage object
Warning message, returned as an mlreportgen.ppt.WarningMessage object.
12-524
mlreportgen.ppt.WarningMessage class
Properties
Id — ID for PPT API object
string
ID for PPT API object, specified as a string. A session-unique ID is generated as part of
object creation. You can specify an ID to replace the generated ID.
Source — Source PPT object from which message originates
a PPT object
Source PPT object from which the message originates, specified as a PPT object.
Tag — Tag for this PPT API object
session-unique tag generated as part of object creation (default) | string
Tag for this PPT API object, specified as a string. The generated tag has the form
CLASS:ID, where CLASS is the object class and ID is the value of the Id property of the
object.
An example of a reason for specifying your own tag value is to make it easier to identify
where an issue occurred during presentation generation.
Text — Text of message
string
Message text, specified as a string.
Methods
Use WarningMessage methods similar to how you use ProgressMessage methods.
Method
Purpose
formatAsHTML
Wrap message in HTML tags.
formatAsText
Format message as text.
passesFilter
Determine if message passes filter.
12-525
12
Classes – Alphabetical List
Examples
Create a Warning Message
import mlreportgen.ppt.*;
pre = Presentation('myPresentation.pptx');
dispatcher = MessageDispatcher.getTheDispatcher;
l = addlistener(dispatcher,'Message', ...
@(src, evtdata) disp(evtdata.Message.formatAsText));
open(pre);
dispatch(dispatcher,WarningMessage('invalid slide',pre));
titleText = Text('This is a Title');
titleText.Style = {Bold};
replace(pre,'Title',titleText);
close(pre);
Delete the listener to avoid duplicate reporting of message objects during a MATLAB
session.
delete(l);
•
“Display Presentation Generation Messages” on page 14-16
See Also
mlreportgen.ppt.MessageDispatcher.dispatch |
mlreportgen.ppt.MessageEventData
Introduced in R2015b
12-526
13
Create a Report Program
• “Create a Report Program” on page 13-3
• “Document Object Model” on page 13-4
• “Construct a DOM Object” on page 13-6
• “Import the DOM API Package” on page 13-7
• “Get and Set DOM Object Properties” on page 13-8
• “Create a Document Object to Hold Content” on page 13-9
• “Add Content to a Report” on page 13-11
• “Clone a DOM Object” on page 13-13
• “Add Content as a Group” on page 13-14
• “Stream a Report” on page 13-16
• “Report Packages” on page 13-17
• “Close a Report” on page 13-18
• “Display a Report” on page 13-19
• “Report Formatting Approaches” on page 13-20
• “Use Style Sheets” on page 13-21
• “Use Format Objects” on page 13-23
• “Use Format Properties” on page 13-24
• “Format Inheritance” on page 13-25
• “Create Object Containers” on page 13-26
• “Form-Based Reporting” on page 13-28
• “Fill the Blanks in a Report Form” on page 13-29
• “Use Subforms in a Report” on page 13-31
• “Create Document Part Template Libraries” on page 13-33
• “Object-Oriented Report Creation” on page 13-38
• “Simplify Filling in Forms” on page 13-39
13
Create a Report Program
• “Create and Format Text” on page 13-41
• “Create and Format Paragraphs” on page 13-46
• “Create and Format Lists” on page 13-52
• “Create and Format Tables” on page 13-58
• “Create Links” on page 13-72
• “Create and Format Images” on page 13-75
• “Create a Table of Contents” on page 13-77
• “Create Image Maps” on page 13-84
• “Automatically Number Document Content” on page 13-86
• “Appending HTML to DOM Reports” on page 13-90
• “Append HTML Content to DOM Reports” on page 13-92
• “Append HTML File Contents to DOM Reports” on page 13-94
• “Use an HTML Cleanup Program” on page 13-96
• “HTML Code Requirements for DOM Reports” on page 13-100
• “Display Report Generation Messages” on page 13-106
• “Compile a Report Program” on page 13-110
• “Create a Microsoft Word Template” on page 13-111
• “Add Holes in a Microsoft Word Template” on page 13-112
• “Modify Styles in a Microsoft Word Template” on page 13-117
• “Create an HTML Template” on page 13-122
• “Add Holes in an HTML Template” on page 13-124
• “Modify Styles in an HTML Template” on page 13-127
• “Create Microsoft Word Page Layout Sections” on page 13-128
• “Create Page Footers and Headers” on page 13-131
13-2
Create a Report Program
Create a Report Program
The MATLAB Report Generator includes a set of functions, called the DOM (Document
Object Model) API, that allows you to generate Word, HTML, and PDF reports
programmatically. For example, the following MATLAB script uses the API to generate
and display an HTML report displaying today’s date.
import mlreportgen.dom.*;
report = Document('today');
append(report, ['Today is ', date, '.']);
close(report);
rptview(report.OutputPath);
To get started learning about creating reports with the DOM API, see “Document Object
Model” on page 13-4.
More About
•
“Document Object Model” on page 13-4
13-3
13
Create a Report Program
Document Object Model
The DOM API creates a representation of a report document in your system's memory.
Such a representation is often referred to as a Document Object Model (DOM). Hence,
the DOM API's name.
The DOM API's document object model consists of a hierarchical set of data structures,
known as objects, that represent the document and its contents. At the top of the
hierarchy is an object representing the document itself. The document object maintains a
list of objects, called its children, that represent its contents (such as paragraphs, images,
tables, lists, and so on). Each child object, in turn, maintains a list of its contents. For
example, a table lists its rows, a row lists its table entries, a table entry lists its contents,
and so on.
The DOM API contains functions that allow you to create and assemble DOM objects,
such as paragraphs, images, and tables, into a model of a specific document. You can
then use the API to write the model out to disk as an HTML or Microsoft Word document
file.
DOM Object Help and Documentation
For a list of the DOM objects, type the following at the MATLAB prompt.
help mlreportgen.dom
To get help for a specific object, such as a Paragraph, use a help command such as this.
help mlreportgen.dom.Paragraph
To get a complete list of DOM API classes and functions in the MATLAB Report
Generator documentation, open the Functions pane.
To see the documentation reference page for an object, search in documentation or in
MATLAB use a doc command such as this.
doc mlreportgen.dom.Paragraph
Related Examples
13-4
•
“Construct a DOM Object” on page 13-6
•
“Get and Set DOM Object Properties” on page 13-8
Document Object Model
•
“Import the DOM API Package” on page 13-7
13-5
13
Create a Report Program
Construct a DOM Object
The DOM API includes a special set of MATLAB functions, called constructors, for
creating DOM objects of various types, or classes.
The name of an object constructor is the name of the MATLAB class from which the
DOM creates an object. For example, the name of the constructor for a DOM paragraph
object is mlreportgen.dom.Paragraph. Some constructors do not require any
arguments. Other constructors can take one or more arguments that typically specify its
initial content and properties. For example, the following line creates a paragraph whose
initial content is Chapter 1.
p = mlreportgen.dom.Paragraph('Chapter 1.');
A constructor returns a handle to the object it creates. Assigning the handle to a variable
allows you to subsequently append content to the object or set its properties. For
example, the following line appends content to the paragraph object p created in the
previous example.
append(p,'In the Beginning');
Note that you can assign an object handle to multiple variables and hence access the
same object via multiple variables.
Related Examples
•
“Import the DOM API Package” on page 13-7
•
“Get and Set DOM Object Properties” on page 13-8
More About
•
13-6
“Document Object Model” on page 13-4
Import the DOM API Package
Import the DOM API Package
All DOM class names, and hence constructor names, include the prefix
mlreportgen.dom. To avoid the need to include the prefix in your code, insert the
following statement at the beginning of any script or function that uses the DOM API.
import mlreportgen.dom.*;
The documentation frequently refers to DOM API objects and functions without the
mlreportgen.dom prefix, assuming that you have already imported the DOM API
package.
Related Examples
•
“Create a Report Program” on page 13-3
More About
•
“Document Object Model” on page 13-4
13-7
13
Create a Report Program
Get and Set DOM Object Properties
To get or set the property of a document object, use dot notation, which involves
appending a period to the name of a variable that references the object, followed by
the property name. For example, the following line saves the current font family of a
paragraph referenced by p and sets it to a new font family.
saveFont = p.FontFamily;
p.FontFamily = 'Arial';
Related Examples
•
“Construct a DOM Object” on page 13-6
•
“Use Format Properties” on page 13-24
More About
•
13-8
“Document Object Model” on page 13-4
Create a Document Object to Hold Content
Create a Document Object to Hold Content
Every report program must create an mlreportgen.dom.Document object to hold
report content. Use the mlreportgen.dom.Document constructor to create a Document
object.
If you use the constructor with no arguments, the DOM API creates an HTML document
named Untitled.htmx in the current folder.
You can specify the file system path of the report as the first argument of the constructor.
You can specify the type of report to be generated by using a second argument. You can
specify the type to be 'html' or 'docx' (for Microsoft Word). You can then use the
rptview function to convert a Word report to PDF, or you can open the report in Word
and save it as PDF.
This Document constructor creates an HTML report called myReport.
d = Document('myreport','html');
Using a third argument, you can specify the file system path of a Word or HTML
template to be used as a basis for creating the report. You need to specify a template
only if you are using template-based formatting (using style sheets) or form-based report
generation. If you specify a template, it must be a Word template (.dotx) for Word
reports or an HTML template (.htmtx) for HTML reports. For example, this Document
constructor creates a Word report using the Word template myWordTemplate.dotx.
d = Document('myreport','docx','myWordTemplate');
See Also
Functions
rptview
Classes
mlreportgen.dom.Document
Related Examples
•
“Create a Report Program” on page 13-3
•
“Use Style Sheets” on page 13-21
13-9
13
Create a Report Program
•
“Construct a DOM Object” on page 13-6
More About
13-10
•
“Form-Based Reporting” on page 13-28
•
“Document Object Model” on page 13-4
Add Content to a Report
Add Content to a Report
The DOM append function allows you to add content to documents, paragraphs, tables,
and other DOM objects that serve as containers for report content. The append function
takes two arguments. The first argument is the object to which the content is to be
appended. The second is the content to be appended. In this example, the text Hello
World is appended to the document.
d = Document('MyReport');
append(d,'Hello World');
The append function throws an error if the second argument (the content to be
appended), is incompatible with the first argument (the object to which the content is to
be appended). For example, the append method in the following script throws an error.
% This code throws an error
image = Image('membrane.png');
append(image,Paragraph('Hello World'));
This is because you cannot add a paragraph to an image. The reference documentation
for classes lists the types of objects that you can append to instances of the classes. To
get a complete list of DOM API classes and functions in the MATLAB Report Generator
documentation, open the Functions pane. To see the documentation reference page for
an object, search in documentation or in MATLAB use a doc command such as this.
doc mlreportgen.dom.Paragraph
As shown in the preceding examples, the append method, depending on the target object
type, allows you to append strings, doubles, arrays, and other basic MATLAB data types,
without first converting the data to DOM objects. The function converts the appended
data to a DOM object before appending it to the target object. For example, the following
script appends a two-dimensional array of strings to a document as a table.
d = Document('MyDoc');
tableArray = {'a','b';'c','d'};
append(d,tableArray);
Many constructors also allow you to specify basic MATLAB data types as the initial
content of the object when you construct the object. This example is equivalent to the
preceding example.
d = Document('MyDoc');
tableArray = {'a','b';'c','d'};
13-11
13
Create a Report Program
append(d,Table(tableArray));
See Also
Functions
mlreportgen.dom.Paragraph.append
Related Examples
•
“Construct a DOM Object” on page 13-6
•
“Clone a DOM Object” on page 13-13
•
“Add Content as a Group” on page 13-14
•
“Stream a Report” on page 13-16
More About
•
13-12
“Document Object Model” on page 13-4
Clone a DOM Object
Clone a DOM Object
If you attempt to append an object more than once to the same object or to append an
object to multiple objects, the append function throws an error. If you need to append an
object multiple times, use the clone function to create copies of the object.
d = Document('MyDoc');
text = append(d,'Hello World');
text.Color = 'magenta';
text = clone(text);
text.Color = 'cyan';
append(d,text);
See Also
Functions
mlreportgen.dom.Paragraph.clone
Related Examples
•
“Add Content to a Report” on page 13-11
•
“Construct a DOM Object” on page 13-6
More About
•
“Document Object Model” on page 13-4
13-13
13
Create a Report Program
Add Content as a Group
You can use a group to include the same content in different parts of a report. The DOM
API clones the members of a group before appending them to another object.
This example shows the key code to include. After describing the steps involved in using
a group, this example includes code for a complete report that uses a group.
1
Define the DOM objects that you want to include repeatedly in a report.
disclaimerHead = Heading(2,'Results May Vary');
disclaimerIntro = Paragraph('The following results assume:');
disclaimerList = UnorderedList(...
{'Temperature between 30 and 70 degrees F',...
'Wind less than 20 MPH','Dry road conditions'});
2
Define a Group object that includes the DOM objects for the group. For example:
disclaimer = Group();
append(disclaimer,disclaimerHead);
append(disclaimer,disclaimerIntro);
append(disclaimer,disclaimerList);
3
Append the Group object in the place in the report where you want to repeat the
content. For example, if the document object is doc:
append(doc,disclaimer);
This code builds on the code shown above.
import mlreportgen.dom.*;
doc = Document('groupReport','html');
disclaimerHead = Heading(2,'Results May Vary');
disclaimerIntro = Paragraph('The following results assume:');
disclaimerList = UnorderedList(...
{'Temperature between 30 and 70 degrees F',...
'Wind less than 20 MPH','Dry road conditions'});
disclaimer = Group();
append(disclaimer,disclaimerHead);
append(disclaimer,disclaimerIntro);
append(disclaimer,disclaimerList);
append(doc,disclaimer);
p1 = Paragraph('First set of results...');
p1.Bold = true;
p2 = Paragraph('more report content...');
13-14
Add Content as a Group
p2.Bold = true;
append(doc,p1);
append(doc,p2);
append(doc,disclaimer);
close(doc);
rptview('groupReport','html');
See Also
Functions
mlreportgen.dom.Paragraph.append
Classes
mlreportgen.dom.Group
Related Examples
•
“Add Content to a Report” on page 13-11
13-15
13
Create a Report Program
Stream a Report
The DOM API supports two modes of appending content to a document:
• In-memory — Creates the document entirely in memory. In-memory is the default
mode.
• Streaming — Streaming mode writes objects to disk as they are appended to a
document. Streaming mode allows you to create large reports on systems with modest
memory.
To enable streaming mode, set the StreamOutput property of the Document object for
the report to true.
d = Document('MyDoc');
d.StreamOutput = true;
See Also
Classes
mlreportgen.dom.Document
Related Examples
•
13-16
“Add Content to a Report” on page 13-11
Report Packages
Report Packages
A Microsoft Word document packages all of its contents, text, images, style sheets, and so
on, in a single compressed file having a docx extension.
For HTML documents, the DOM API defines an analogous packaging scheme, with an
htmtx compressed file extension. By default, the DOM API generates HTML reports
as htmx files. To generate an HTML report in unzipped format or both zipped and
unzipped format, set the PackageType property of the Document object for a report to
'unzipped' or 'both', respectively.
See Also
Functions
unzipTemplate | zipTemplate
Classes
mlreportgen.dom.Document
More About
•
“Document Object Model” on page 13-4
13-17
13
Create a Report Program
Close a Report
The last step in creating a report with the DOM API is to close the report. Closing a
report writes out any content that remains in memory and closes the report file. Use the
close function.
d = Document('MyDoc');
append(d,'Hello World');
close(d);
See Also
Functions
mlreportgen.dom.Document.close
Related Examples
•
“Create a Report Program” on page 13-3
More About
•
13-18
“Document Object Model” on page 13-4
Display a Report
Display a Report
The DOM API rptview function allows you to display a generated report in a viewer
appropriate to its document type: the Microsoft Word editor for Word documents, an
HTML browser for HTML reports, and Adobe Acrobat for PDF reports.
The rptview function takes two arguments:
• The path of the report
• The output type: 'html', 'docx', or 'pdf'
If you omit the second argument (the output type), rptview uses the output type from
the report’s extension.
If an HTML report is in zipped format, rptview creates a copy of the report in your
temporary directory and displays the temporary copy. If you specify 'pdf', the function
uses Word to convert the report to PDF format. It then displays the report in Adobe
Acrobat.
See Also
Functions
rptview
Related Examples
•
“Create a Report Program” on page 13-3
13-19
13
Create a Report Program
Report Formatting Approaches
The DOM API supports three approaches to formatting document objects in reports:
• Style sheets — Assign to a document object (such as a paragraph, table, or list) a
style from a Microsoft Word or HTML template, using the StyleName property of a
document object. A style is a collection of formats.
• Format objects — Use format objects, such as a FontFamily object, with the Style
property of a document object.
• Format properties — Use format properties of a document object. For example, for a
Paragraph object p, you can specify
p.Color = 'red'
Related Examples
•
“Use Style Sheets” on page 13-21
•
“Use Format Objects” on page 13-23
•
“Use Format Properties” on page 13-24
More About
•
13-20
“Format Inheritance” on page 13-25
Use Style Sheets
Use Style Sheets
A style is a collection of formats that together define the appearance of a document
object, such as a paragraph, table, or list. Microsoft Word allows you to define styles and
then assign them to paragraphs, tables, and other documents by name. The assigned
style then determines how Word renders the document object on the screen or printed
page. Word stores the styles in a document as an object called a style sheet. HTML
browsers support a similar capability.
DOM API objects that have a StyleName property allow you to leverage Word and
HTML style sheets to format reports as follows.
1
Create a Word or HTML template, using the DOM API or a Word or HTML editor,
depending on the report type.
2
Optionally, you can change a template style definition or add a new style. For
details, see “Modify Styles in a Microsoft Word Template” on page 13-117 or
“Modify Styles in an HTML Template” on page 13-127.
3
In a DOM report, create a Document object that uses the template.
4
Assign the names of styles defined in the style sheet to the StyleName property of
objects that you want to have the specified style.
For example, the following script assigns a style named Warning to a paragraph object.
It assumes that you have defined the Warning style previously in a Word template
named MyTemplate.dotx.
d = Document('MyDoc','docx','MyTemplate');
p = Paragraph('Danger');
p.StyleName = 'Warning';
append(d,p);
close(d);
Assigning the Warning style to the DOM paragraph object causes Word to use the
Warning style to render the generated paragraph when you open the generated report.
Tip Some document object constructors allow you to specify the value of the StyleName
property as an argument. For example, this paragraph has the text Danger and uses a
style defined for the template style named Warning.
p = Paragraph('Danger','Warning');
13-21
13
Create a Report Program
Related Examples
•
“Create a Microsoft Word Template” on page 13-111
•
“Modify Styles in a Microsoft Word Template” on page 13-117
•
“Create an HTML Template” on page 13-122
•
“Modify Styles in an HTML Template” on page 13-127
More About
13-22
•
“Report Formatting Approaches” on page 13-20
•
“Format Inheritance” on page 13-25
Use Format Objects
Use Format Objects
A format object is a MATLAB program entity that defines the properties and functions
of a specific type of document format, such as a font family or font size. The DOM API
provides a set of constructors for creating format objects corresponding to most of the
formatting options available in HTML and Word documents. Most DOM document
objects include a Style property that you can set to a cell array of format objects.
Together, format objects and the document object Style property allow you to format a
document object by creating an array of format objects that define the appearance (style),
of the object and assigning this array to the Style property of the document object.
For example, the following script uses format objects to specify the style of a warning
paragraph.
p = Paragraph('Danger!');
p.Style = {Color('red'),FontFamily('Arial'),FontSize('18pt')};
You can assign the same array of format objects to more than one DOM document object.
This allows you to create a programmatic equivalent of a template style sheet. For
example:
warning = {Color('red'), FontFamily('Arial'), FontSize('18pt')};
p = Paragraph('Danger!');
p.Style = warning;
p = Paragraph('Caution!');
p.Style = warning;
The DOM API allows you to assign any format object to any document object, regardless
of whether the format applies. If the format does not apply, it is ignored.
More About
•
“Report Formatting Approaches” on page 13-20
•
“Format Inheritance” on page 13-25
13-23
13
Create a Report Program
Use Format Properties
Most DOM objects have a set of properties corresponding to the format options most
commonly used for an object of that class. You can use dot notation with format
properties to specify formats for an object. For example, the following code sets the font
and color of text in a paragraph, using the Color, FontFamily, and FontSize format
properties of a Paragraph object.
p = Paragraph('Danger!');
p.Color = 'red';
p.FontFamilyName = 'Arial';
p.FontSize = '18pt';
Assigning a value to a format property causes the API to create an equivalent format
object and assign it to the Style property of the document object. Similarly, assigning
a format object to an object's Style property causes the API to assign an equivalent
value to the corresponding format property if it exists. In this way, the API keeps format
properties for an object in sync with the Style property of the object.
Note: When you change the value of a format property, the DOM API:
• Creates a clone of the corresponding format object
• Changes the value of the clone's corresponding format object property
• Replaces the original format object with the clone in the array of format objects
assigned to the document object
In this way, the DOM prevents changing a format property in one object from changing a
style originally assigned to other objects as well.
More About
13-24
•
“Report Formatting Approaches” on page 13-20
•
“Format Inheritance” on page 13-25
Format Inheritance
Format Inheritance
The DOM API allows you to use both template-based styles and format object-based
styles (or equivalent format properties) to specify the appearance of an object. If you
set both the StyleName and the Style property of an object, the formats in the Style
property override corresponding formats specified by the template-based style of the
StyleName property. Consider, for example, the following script.
d = Document('MyDoc','docx','MyTemplate');
p = Paragraph('Danger!');
p.StyleName = 'Warning';
p.Style = {Color('red')};
append(d,p);
close(d);
Suppose that the Warning style defines the color of a warning as yellow. In that case,
this example overrides the color specified by the Warning style.
If a document object does not specify a StyleName (a template-based style), it inherits
from its container any formats that it does not itself specify. The container itself inherits
any formats that it does not specify from its container, and so on, all the way to the top of
a container hierarchy. Format inheritance allows you to use a single statement to assign
a format for all the objects