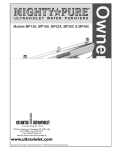
1
Massage bathtub
Heating function :This function is limited by PUMP① ,the heater can be started
normally only after PUMP① starting.When turn off the surfing function ,the heater
User’ Guide
IMPORTANT:
Read this manual before proceeding with installation of the bathtub and keep it
with the other accompanying documents.
This manual is valid for the installation of tubs both with and without whirlpool.
will be turned off at the same time .
Press ( )to turn on or off the heater .
Bubble bath :Press ( )to turn on or off the air pump .The air pump will
be turned off automatically every 60minutes .
MODEL:M-1108A/1108B
Lamp :Press ( )to turn on or off the lamp .
Tap :Press ( )or(
SIZE:2000X900X620mm
)to raise or lower the tap .
V.Items For Attention :
1、The system must be erected by qualified technical person and the leakage
switch shall be mounted in place of easy control .
2、 It must be connected firmly during erection .In the case of loss due to improper
earthling ,the manufacturer will not assume any
responsibility .
3、The mo tor mu st be erected flatly and stably and the shell shall be firmly earthed .
4、The whole set is usually under standby state. If it is not used for long time,
please pull off the master power switch.
5、During erection, it is required to consider load capacity of power supply
circuit, otherwise it may influence the normal working of the system or
cause accident.
6、During erection, all the electric appliances and electric parts shall be provided
with moisture resistant measures.
Page 7 of 7
Massage bathtub
Massage bathtub
Install the dia gram
AC220V
M
M
INPUT
connect the cold(blue)
and hot(red) pipe line
AC12V/30W
AC12V
III.CIRCUIT DIAGRAM:
AC220V3A
connect the power supply
L
N
L
N
N
L
N
L
Lifting boxes
N
L
Plane chart
LIGHT
AC12V/20W
R
M
M
Waterfall intake
N
L
N
M
M
L N
M
M
VALVE
L N
L
L
VALVE
WATER PUMP
750W
Drainage
Cold and Hot water switch
Sprinkler
Exchange switch
Pillow
WATER PUMP
750W
AIR PUMP
350W
HEATER
Level Detection
2KW
IV.CONTROL PANEL DESCRIPTION:
Blower light
Touch Contro l Panel
Touch Control Panel
Invisible Control Panel
Return net
Tap takes over sketch
PUMP①/PUMP②
AIR PUMP
HEATER
UPWARD
LAMP
DOWNWARD
5.OPERATING INSTRUCTION :
Surfing function :The water level must meets the standard to launch this
function .
r
Powe
ly
supp
Hot wate r
Cold wate r
Waterfall drain
Spri nkl er drai n
Press (
ot
and h
C o ld
e
ip
p
r
w a te
D r a in
age
PUMP② ON
PUMP① OFF
PUMP② OFF
Such loop is operated .The pump will be turned off automatically every 60 minutes.
Waterfall:After turn on PUMP①,the water is as big as both sides. 20secs. The left
side is bigger than the right side . 20secs. The right side is bigger than the left
Clear drain
1
):PUMP① ON
side. 20secs. As big as both sides.Such loop is operated until PUMP① be turned off
Page 1 of 7
Page 6 of 7
Massage bathtub
Massage bathtub
I . Safety Precautions
1、Electricity parameter
【Warning】
1. In order to prevent fire or electric shock accident, do not expose the controller to
the rain or humid environment. There are dangerous high-tension fittings inside
the controller, therefore do not open the cover. Entrust the repairing work only
to the qualified professional repairing personnel when repairing is required.
2.Without the clear approval from the controller manufacturer or its authorized units,
any change or alternation to this controller might bring various inconveniences to
the users when in use.
【Helpful suggestion】
1. In order to prolong the service life of this controller, the time interval for continuously
turning on and off the machine must be over 30 seconds.
2.Please switch off the power after use.
3.The power supply used must be consistent with the voltage specified value indicated
on this controller; otherwise it will not work, or even burn out the controller.
4.When installing this controller, carefully check if the load parameters are consistent
with the parameters required by this controller, otherwise it will not work, or even burn
out the controller.
5.If it is halted accidentally, please close and restart.
II. Brief Introduction
Model
Functions
1
Inducing technology
2
Lamp
3
Pump
Blower
5
Heater
6
Level detection
Rated power
Rated electric current
Reference circuit voltage
220VAC
950W
<4A
12V
2、Electric installation
2.1 power supply's establishment should be compled with nation security standard, voltage
and frequency also shoule be accord withproduct's nameplate.Especially install creepage protect switch and also check whether can connect with ground.
2.2 The wire collected to the massage bathtub should be fitting permanent., and the wire
should be a three-core wire, the sectional acreage of each core cannot less than 12A.
when wire pass the wall,it should be use bushing for protection until the AC outlet.
2.3 Ground wire of bathtub should be test whether works with house appliance ground wire.
2.4 The wire end of electricity control box should connect to the control panel, water bottom
light, loudspeaker, electrical engineering and the detector protection respectively.
3、Water supply device
3.1 This device's hydraulic pressure is 0.2-0.4Mpa.
3.2 The water supply characteristics on the wall: The cold or hot water supplies inside the
bathroom also establish in the shelter of the massage tub, use the hose to connect with
the cold or hot joint of the tub. the pipe towards is decide by the customer, the machine
do not go with the hose.
4、Installation introduction
4.1 Before install, must consider the place of install massage bathtub whether can support
this device's pressure.
4.2 Place the massage bathtub on the install position, adjust level to make the drain system
smooth.
4.3 Adjust the leg's screw to make sure all of the screw touch ground completely.
4.4 Install the drain hose, and make some measure to against on the connecter.
4.5 Fix cold and hot water-pipe well, then install the showerhead. And then put drain into
downcomer, finally connect with power and make sure whether device connected with
ground can work.
1.General Description of Functions
4
Rated voltage
WS-01
√
√
√
√
*
√
5、Using Method
5.1 Turn on faucet, adjust water's temperature, add water to the massage bathtub.when the
highest water level exceed the highest nozzle about 20-30mm and reach the detector,
press the switch button to let the electric machine.
5.2 Revolve the adjust switch ,and choose the proper surf pressure.
5.3 After finishing if should turn off pump at first, then open drain button,when water is all out ,
please make a clean of bathtub to keep in good.
2.SPECIFICATIONS:
1. Power supply:AC220V±10% 50-60Hz
6、Clean and keep in good condition
2 . Pump load ①:AC220V
750W
7、Jacking motor:AC12V 40W
8、Magnetic valve:DC12V 30W
3. Pump load ②:AC220V
750W
9、Dielectric strength :1500V/5MA 1min
4.Air pump load:AC220V
350W
10、Leak current:<0.25mA
11、Waterproof grade:IPX4
5.Heater power:AC220V 2000W
6. Lamp load:AC12V 20W
Page 5 of 7
6. 1 us ua lly us e sof t clot hs an d ge ne ral liqu id clea ns er can wa sh aw ay di rt , bu t for bi d to us e the
clea ns er wi th ac et on e or the ammon ia comp os ition ;wh en di sinf ec t, for bi d to us e the di sinf ec tor
con tai ne d the for mal de hy de .
6. 2 the di rty spo t of sur fac e can us e the too thp as te to wi pe wi th the sof t clot h .
6. 3 to the low -gr ad e cha fe of the sur fac e or bu rne d by ciga ret te, can soa k in wa ter to wh et wi th 20 00 #
lev iga tion san d pa pe r, the n po lishi ng .
6. 4 If the el ec trop lat e pi ec e con tai n stai n, us e the sof t clot h to wi pe ligh tly, av oi d to wi pi ng wi th coa rse clot h .
6. 5 of ten clea n up the ba ckwa ter ne t cov er, pr ev en t it from stop ;
Page 2 of 7
Massage bathtub
Massage bathtub
6. 6 Ch ec k wh et he r ha ve br ea k on pi pe an d wa ter wa y ap er iod ical ly.
6. 7 Pl ea se che ck wh et he r the re is fal l off or br ea kag e on wi re, swi tch, con ne ctor pl ug s so tha t rep ai r
in time.
6. 8 In or de r to kee p to us e in a lon g ter m ,pl ea se reme mbe r, do n' t us e mor e tha n 3 ho ur s con tinu el y.
Bathtub User’s Guide
WARNINGS
7、Fault eliminate
Fault
Cause
Machine or equipment
doesn't work
Voltage unstable
Check circuitry
Power connector didn't connect
well or open circuit
The windpipe connect air switch
fall off or break
Insert again or change
power line
The air switch failure
Power's parameter is not same as
nameplate
Big nose of machine
water pipe leak out
Way
Connect again or change
Change
Connect with supplier
Fixed screw did'n fix or fall off
Support's leg screw did not touch
ground
Aging
Fix tightly again
The joint did not fix well
Fix again
Water pipe or accessory leak
Change
1. Please follow the instruction contained in the attached installation
manual to ensure that the product is installed properly.the manufacturer will not be held liable for damages or injuries caused by improper installation.
2. Follow the instructions contained in this manual when using the product.
3.Before using the bathbub, check the local voltage that if reach to the
rated voltage(pre-installation card).
Adjust
Change
CONTENTS
Remark: except this fault, please according to situation to resolve, or find
experienced people to repair.
8、special remind
8.1 please find qualified people to install bathtub according to introduction.
8.2 when you are using it, first of all you have to inject the cold water and then inject the
hot water. Don't inject the hot water first.
2
8.3 bathtub's machine must connect on ground, support must use 1.5mm yellow/green
double wire connect with ground and check whether effective.
8.4 please do not turn on machine without water, before draining should turn off machine.
8.5 children should be looked after in bathtub.
8.6 bathtub's temperature cann't higher than people average temperature, and the best
is 32-37centigrade.
8.7 after shower ,please cut off power.
8.8 if have these situation ,please do not enter into massage bathtub.
8.8.1 younger than 4 years old's child;
8.8.2 blood circulation unstabled people;
8.8.3 sot;
8.8.4 suffer from flu;
8.8.5 heart disease;
8.8.6 already have sauna;
8.8.7 after meal in half a hour;
Remark: our company has the right to modify the above mention without further notice.
Page 3 of 7
I. Safety Precautions
II. Brief Introduction
III.CIRCUIT DIAGRAM
IV.CONTROL PANEL DESCRIPTION
V.Item s Fo r Attent ion
Page 4 of 7