1
T
PROFESSIONAL COMPhCT DISC PLAYER
OPERATING INSTRUCTIONS
CAUTION:TO REDUCE THE RISK OF ELECTRIC SHOCK, DO NOT REMOVE
COVER(OR BACK). NO USER-SERVICEABLE PARTS INSIDE.
REFER SERVICING TO QUALIFIED SERIVCE PERSONNEL.
iA
;a
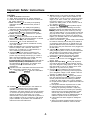
The lightning flash with arrowhead symbol, within an equilateral triangle, is intended to alert
the user to the presence of uninsulated “dangerous voltage” within the prouduct’s enclosure
that may be of sufficient magnitude to constitute a risk of electric shock to persons.
The exclamation point within an equilateral triangle is intended to alert the user to the
presence of important operating and maintenance (servicing) instructions in the literature
accompanying the appliance.
This appliance has a serial number
located on the rear panel, Please record
the model number and serial number
WARNING: TO PREVENT FIRE OF SHOCK
HAZARD, DO NOT EXPOSE THIS
APPLIANCE TO RAIN OR MOISTURE.
Contents
Important Safety Instructions ........................................................................................................... .2
Safety jnformation .............................................................................................................................. .
CAUTION ............................................................................................................................................. .
Before Use .......................................................................................................................................... 4
READ THIS BEFORE OPERATING ............................................................................................................ 4
HANDLING THE DISCS ........................................................................................................................... .
Connections ....................................................................................................................................... .
Front Panel Controls ........................... .‘. .............................................................................................. .
Operations .......................................................................................................................................... 8
PLAYINGACD.. ..................................................................................................................................... 8
SKlP AND SEARCH PLAY ....................................................................................................................... .9
MEMORIZING A CUE POINT(CUE PLAY)
................................................................................................... 9
PLAYING A SPECIFIC PASSAGE REPEATEDLY (LOOP PLAY)
....................................................................... .1(-J
SELECTING A TIME DISPLAY ................................................................................................................. .11
PLAYING TRACKS IN RANDOM SEQUENCE(RENDOM PLAY) ....................................................................... .lj
ADJUSTING THE TEMPO ....................................................................................................................... .12
COMPENSATING FOR THE PITCH ........................................................................................................... .12
PLAYING CDS IN RELAY WITH TWO PLAYERS (RELAY PLAY) ....................................................................... .12
Troubleshooting Guide.. ..................................................................................................................... .13
Specifications .................................................................................................................................... 14
Important Safetv Instructions
CAUTION:
11. Power Sources -This product should be operated
only from the type of power source indicated on the
marking label. If you are not sure of the type of power
supply to your home, consult your product dealer or
local power company. For products intended to
operate from battery power, or other sources, refer to
the operating instructions.
12. Grounding or Polarization -This product may be
equipped with a polarized alternating-current line
plug(a plug having one blade wider than the other).
This plug will fit into the power outlet only one way.
This is a safety feature, If you are unable to insert the
plug fully into the outlet, try reversing the plug. If the
plug should still fail to fit, contact your electrician to
replace your obsolete outlet. Do not defeat the safety
purpose of the polarized plug.
13. Power Cord Protection - Power supply cords should
be routed so that they are not likely to be walked on
or pinched by items placed on or against them, Pay
particular attention to the point where the cord exits
the unit and to the point where the unit is plugged into
the wall outlet.
14. Lightning - For added protection for this product
during a lightning storm. or when it is left unattended
and unused for long periods of time, unplug it from
the wall outlet. This will prevent damage to the
product due to lightning and power-line surges.
15. Overloading - Do not overload wall outlets or
extension cords, as this can result ina risk of fire or
electric shock.
16. Object and Liquid Entry - Nerver push objects of
any kind into this product through openings, as they
may touch dangerous voltage points or short out parts
that could result in a fire or an electric shock. Never
spill liquid of any kind onto the product.
17. Servicing - Do not attempt to service this product
yourself as opening or removing covers may expose
you to dangerous voltage or other hazards. Refer all
servicing to qualified service personnel.
18. Damage Requiring Service - Unplug this product
from the wall outlet and refer servicing to qualified
service personnel under the following conditions:
A. When the power supply cord or plug is damaged.
B. If liquid has been spilled, or objects have fallen into
the product.
C. If the product has been exposed to rain or water.
D. If the product does not operate normally by
following the operating instruction. Adjust only
those controls that are covered by the operating
instructions as an improper adjustment of other
controls may result in damage and will often
require extensive work by a qalified technician to
restore the product to its normal operation.
E. If the product has been dropped or damaged in
any way.
F. When the products exhibits a distinct change in
performance-this indicates a need for service.
Read all of these instructions.
Save these instructions for future reference.
Follow all warnings and instructions marked on
the audio equipment.
1. Read instructions - All the safety and operating
instructions should be read before the product is
operated.
2. Retain instructions -The safety and operating
instructions should be retained for future refernce.
3. Heed wanings - All warnings on the product and in
the operating instructions should be adhered to.
4. Follow instructions - All instructions for operation
and use should be followed.
5. Cleaning - Unplug this product from the wall outlet
before cleaning. 00 not use liquid cleaners or aerosol
cleaners. Use a damp cloth for cleaning.
6. Attachments - Do not use attachments not
recommended by the product manufacturer as they
may cause hazards.
7. Water and Moisture -Do not use this product near
water-for example, near a bath tub, wash bowl,
kitchen sink, or laundry tub; in a wet basement; or
near a swimming pool; and the like.
8. Accessories - Do not place this product on an
unstable cart, stand, tripod, bracket, or table. The
product may fall, causing serious injury to a child or
adult, and serious damage to the product. Use only
with a cart. stand. triood. bracket. or table
recommendeded’by’the’manufacturer, or sold with the
product. Any mounting of the product should follow
the manufacturer’ s instructions, and should use a
mounting accessory recommended by the
manufacturer.
9. A product and cart combination should be moved with
care. Quick stops, excessive force, and uneven
sufaces may cause the pioduct and cart combination
to overturn.
l
l
l
10. Ventilation - Slots and openings in the cabinet are
provided for ventilation and to ensure reliable
operation of the product and to protect it from
overheating, and these openings must not be blocked
or covered. The opening should never be blocked by
placing the product on a bed, sofa, rug, or other
similar surface. This product should not be placed in a
built-in installation such as a bookcase or rack unless
proper ventilation is provided or the manufacturer’s
instructions have been adhered to.
-2-
repairs to this product, ask the service technician to
perform safety checks to determine that the product
is in proper operating condition.
19. Replacement Parts -When replacement parts are
required, be sure the service technician has used
replacement parts specified by the manufacturer or
have the same characteristics as the original part.
Unauthorized substitutions may result in fire, electric
shock, or other hazards.
21. Heat -The product should be situated away from heat
sources such as radiators, heat registers, stoves, or
other products (including amplifiers) that produce
heat.
20. Safety Check - Upon completion of any service or
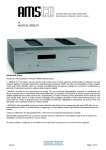
Safety Information
This product has been designed and manufactured according to FDA regulations “title 21, CFR, chapter 1, subchapter J.
based on the Radiation Control for Health and Safety Act of 1968”, and is classified as a Class 1 laser product. There is
no hazardous invisible laser radiation during operation because invisible laser radiation emitted inside of this product is
completely confined in the protective housings.
The label required for this regulation is shown below.
n For the USA
FCC WARNING
This equipment may generate or use radio frequency energy. Changes or modifications to this equipment may cause
harmful interference unless the modifications are expressly approved in the instruction manual. The user could lose the
authority to operate this equipment if an unauthorized change or modification is made.
NOTE:
This equipment has been tested and found to comply with the limits for a Class B digital device, pursuant to Part 15 of
the FCC Rules. These limits are designed to provide reasonable protection against harmful interference in a residential
installation. This equipment may cause harmful interference to radio communications, if it is not installed and used in
accordance with the instructions.
Caution:
Do not remove the protective housings using screwdriver.
Use of controls or adjustments or performance of procedures other than those specified herein may result in
hazardous rediation exposure.
. If this product begins to function abnormally, contact our servicepeople immediately and do not continue to operate it.
l
l
<Main Body>
Optical pickup: Type : KSM-213 CCM
Manufacturer : SONY CORPORATION.
Laser output : Objective Lens.
Focus length : 3.86 mm
Numerical aperture : 0.45
Working distance : 2.1 mm
Wavelength : 760 to 800nm
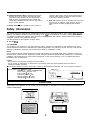
CAUTION
THIS LABEL IS ATTACHED TO THE PLACE AS ILLUSTRATED TO INFORM THAT THE APPARATUS CONTAINS A
LASER COMPONENT.
-3-
Before Use
1 READ THIS BEFORE OPERATING 1
Choose the installation location of your unit carefully.
Avoid placing it in direct sunlight or close to a source of
heat. Also avoid locations subject to vibrations and
excessive dust, heat, cold or moisture, Keep away from
such sources that hum, such as transfomers of motors.
Do not open the cabinet as this might result in damage
to the circuitry or electrical shock. If a foreign object
should get into the set, contact your dealer.
Be sure not to handle discs with dirty fingers. Nerver
insert a disc which has a crack on the surface.
When removing the power plug from the wall outlet,
always pull directly on the plug, never yank the cord.
To keep the laser-pickup clean, do not touch it, and do
not forget to close the disc cover.
Do not attempt to clean the unit with chemical solvents as
this might damage the finish, Use a clean, dry cloth.
Keep this operating instructions in a safe place for future
reference.
Beware of condensation
When the player (or a compact disc) is moved from a cold to
a warm place or used after a sudden temperature change,
there is the danger of condensation.
Water vapor in the air could condense on the mechanism or
the laser pickup. If droplets of water form on these parts,
correct playback will be impossible because the laser cannot
read the information from the disc correctly. To preven this, if
you are going to use the player in a condition where
condensation could occur, you should leave the player for 1
or 2 hours after plugging it into an AC outlet depending on
the amount of condensation. If it is done, the player will
stabilize at the temperature of its surroundings.
l
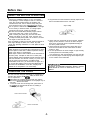
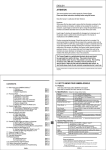
Fingermarks and dust should be carefully wiped off the
disc‘s recorded surface with a soft cloth.
Wipe radially
l
Never use such chemicals as record sprays, antistatic
sprays or fluid, benzine or thinner to clean compact
discs. Such chemicals will do irreparable damage to
the disc‘s plastic surface.
l Discs should be returned to their cases after use to
avoid serious scratches that could cause the laser
pickup to “skip”
l Do not expose discs to direct sunlight or high humidity
and temperature for extended periods.
Long exposure to high temperatures can warp the disc
l Do not stick paper or write anyting with a ballpoint pen
on the surface of the label side.
IMPORTANT(for CANADA Customers)
CAUTION: TO PREVENT ELECTRIC SHOCK, MATCH
WIDE BLADE OF PLUG TO WIDE SLOT. FULLY
INSERT.
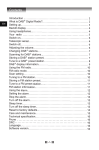
1 HANDLING THE DISCS
This unit has been designed specifically for reproduction of
compact discs bearing the “ $JJ@” mark, No other discs
can be reproduced.
•=~.,L-~o
a Always place the compact disc in the disc tray with the
label facing upward.(Compact discs can be played only on
one side.)
l To remove a disc from its storage case, press down on
the center of the case and lift the disc out, holding it
carefully by the edges.
How to remove the dis
How to hod the disc
-4-
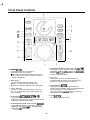
Front Panel Controls
1716lo-
-
-5
-
6
~ 18
- 1 5
I6
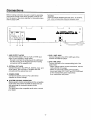
6. FORWARD/BACKWARD SEARCH BUT-TON ()) /d)
During play or pause, press and hold down the
FORWARD SEARCH (H)button or the BAKWARD
SEARCH ( 4)button to search for a specific passage
forward or backward rapidly.
1. POWER BUlTON
Press this button to turn the power on.
Press again to turn the power off.
- When a disc is loaded and the power is turned on,
the unit enters the auto play mode and the CD is
played automatically.
7. JOG DIAL
During pause, turn the JOG dial clockwise or
counterclockwise to search for the specific frame
precisely in any track forward or backward.
2. DISC DOOR
To open the DISC DOOR, press the eject
@button. To close the DISC DOOR, press
@marked on the DISC DOOR by your hand gently.
8. TIME/RANDOM BUTTON
During play or pause, each time this button is
pressed, the time display changes to the elapsed time
or the remaining time of the current track.
To play the tracks in randam sequence, press and
hold down this button for about 2 sec...
3. EJECT BUTTON
In power-on mode, press this button for about 0.5
sec., if a CD is played, the play stops and the disc
cover is opened.
9. STOP BUl-FDN
To stop play, press this button.
4. PLAY/PAUSE BUTTON/lNDlCATOR ( )/II)
To play a disc, press this button.
To interrupt play temporarily, press this button and to
restart play, press this button again.
5. FORWARD/BACKWARD SKIP BUTTON ( w / Iti )
To skip the track forward or backward, press the
FORWARD SKIP button( HI) or the BACKWARD
SKIP button( HI ).
-6-
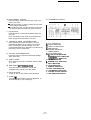
10. AUTO/NORMAL BUTTON
Press this button to select the auto play mode or the
normal play mode.
9 In auto play mode, if a track is played, the next track
will be played automatically.
9 In normal play mode, if a track is played, it will enter
the pause mode at the beginning of the next track.
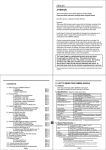
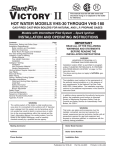
18. FLUORESCENT DISPLAY
H
A
B
M
C
D
11 CUE BUTTON
Press this button to memorize the desired point as a
cue point.
In the cue standby mode, press and hold down this
butlon to hear the sound from the cue point.
12. LOOP/PITCH BEND LEVER/INDICATORS
When adjusting the tempo temporarily, move the
LOOP/PITCH BEND lever to the left or to the right.
When memorizing a specific passage, move the
LOOP/PITCH BEND lever downward or upward at the
beginning or the end respectively.
A. PLAY INDICATOR
B. PAUSE INDICATOR
C. TRACK NO INDICATOR
D. TIME DISPLAY
E. MASTER INDICATOR
F. TEMPO DISPLAY
G. PITCH INDICATORS
b :LOW PITCH INDICATOR
4 :NORMAL PITCH INDICATOR
# :HIGH PITCH INDICATOR
H. RELAY INDICATOR
I. RANDOM PLAY INDICATOR
J. AUTO INDICATOR
K. LOOP INDICATOR
L. NORMAL INDICATOR
M. AUTO CUE INDICATOR
N. CUE-MENORY INDICATOR
0. PLAYING STATUS DISPLAY
P. JOG DIRECTION DISPLAY
13. RELOOP BUTTON/INDICATOR
Press this button to repeat the memorized passage
again during play.
14. TEMPO FADER
When adjusting the tempo as desired, slide this fader
up or down.
15. MAIN TEMPO BUTTON/lNDlCATOR
Press this button to resume the normal pitch
regardless of the change of the play speed.
16. RELAY BUTTON
To play in relay on two players, press this button.
17. CLOSE @
To close the DISC DOOR, press this @marked on
the DISC DOOR by your hand gently.
-7-
E
F G
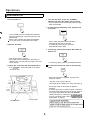
Operations
1 PLAYING A CD
1. Turn the power on.
4. Close the disc door, press the “CLOSE(x)”
marked on the disc door gently with your hand.
Then the player enters the auto play mode and play
starts automatically.
l
5. To interrupt play temporarily at the specific point
of the track.
?
f
. The FL display and the corresponding indicators
light on and the player enters the auto play mode
automatically.
When a disc is loaded, play starts automatically.
9 To turn the power off, press this button again.
l
. Then it enters the pause mode and play is
interrupted at that point of the track.
To restart play from that point, press the
PLAY/PAUSE button again.
2. Open the disc door
l
6. To stop play, press and hold down this button for
about 2 sec.
Then the disc door is opened,
. During play, press and hold down this button for
about 0.5 sec., then play will stop and the disc door
will be opened.
l
l
To start play again, press the PLAY/PAUSE button.
H To select the normal play mode or the auto play
mode.
3. Load a disc on the tray with the printed side up.
8 cm (3inch) disc can be also used on the inside
circle of the tray.
l
l
Each time this button is pressed, the play mode
change as follows;
Auto play mode: “AUTO” lights up
Normal play mode: “NORM” and “AUTO CUE” light up
. In auto play mode, all the tracks are played in
sequence.
In normal play mode, if a track is played, it will enter
the pause mode at the beginning of the next track as
a cue point automatically and the CUE-MEMORY
indicator will light up, meaning the cue standby mode.
(For the cue-stanby mode, refer to “MEMORIZING A
CUE POINT’ on page 9)
l
/
pickup protector
8 cm disc guide
-8-
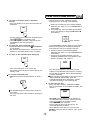
1 SKIP AND SEARCH PLAY
I
I
1 MEMORlZlNGACUEPOINT(CUEPLAY)/
n Selecting a track.
Use this function to start play from the specific point
as a cue point.
1. During play, search for a passage in the desired track.
l
Press these buttons momentarily and repeatedly
until the desired track is selected.
l
To skip backward - [ml -To skip forward
6
To search backward- [-]-To search forward
b
b
B
2. Enter the pause mode.
. During play or pause operation at the middle of the
track, if the BACKWARD SKIP( HI) button is
pressed, the player will skip back to the beginning
of the current track.
In this case, To skip back to the previous track,
press the BACKWARD SKIP button( H( )
monentarily twice.
l
B
In the pause mode, the indicator on the CUE button
is blinking
l
n Searching for a passage during play or pause
operation.
l
3, Search for the desired point precisely.
Press and hold down these buttons until the desired
passage is reached.
To search backward -
o
+ -To search forward
To search backward - [[ml] -To search forward
\
I
b
,-I)
! !I
4. Memorize the desired point
l Searching for a point during pause operation
l
Rotate the JOG dial until the desired point is
reached.
-n+
To search backward-i (
B
. The CUE-MEMORY indicator lights up in the display,
meaning the desired point is memorized as a cue
point, and it enters the cue standby mode and the
sound is muted.
“\ \-To search forward
* The cue standby mode means the pause mode at
the memorized point.
5. Start play
. By rotating the JOG dial, you can search for the
desired point precisely and easily frame by frame.
Each time the FORWARD SEARCH button(.
the BACKWARD SEARCH button{ 44) is pressed,
momentarily, you can also search for the desired
point frame by frame.
l
B
. Then the cue standby mode is canceled and the play
starts from the memorized point.
Once it enters the stop mode during playthe
memorized point is cleared.
When starting the cue play, the sound from the
OPTICAL OUT jack may be muted for 2 sec. or less.
l
l
-9-
1 PLAYING A SPECIFIC PASSAGE REPEATEDLY (LOOP PLAY) 1
n To check if the desired point is memorized
Use this funtcion to play a passage from the
biginning point to the ending point repeatedly
correctly.
In the cue standby mode, press and hold down the
CUE button.
l
1. Search for the beginning of the desired passage
performing the steps l-3 in the “MEMORIZING A
CUE POINT’.
2. At the beginning, move the LOOP/ PITCH BEND
lever to the direction of the marked ‘I LOOP IN V
and release it.
lnl
CUE
b
l
l
Then the sound can be heard from the desired point
without canceling the cue standby mode.
If the CUE button is released, it resumes the cue
stanby mode at the memorized point.
1
n To rectify the wrong memorized point.
l
l
move downward
The CUE-MEMORY indicator lights up in the display,
meaning the beginning of the desired passage is
memorized as a cue point, and play continues.
Repeat the steps l-4 in the above “ MEMORIZING
A CUE POINT’.
The previous memorized point is cleared from the
memory by memorizing another point in its place.
3. Search for the end of the desired passage
performing the steps l-3 in the “MEMORIZING A
CUE POINT”.
4. At the end of the desired passage, move the
LOOP/PITCH BEND lever to the direction of the
marked “OUT/EXIT’ and release it.
n To return to the memorized point during play.
II
CUE
I,
,I
1
CUE
b
. If the memorized point is not cleared, the
memorized point is returned to and it enters the cue
standby mode.
Then the LOOP indicator in the display and the
indicator on the RELOOP button lights up, meaning
the loop play is activated, and the desired passage
is played repeatedly.
c When searching for the beginning and the end of the
desired passage approximately, move the
LOOP/PITCH BEND lever downward or upward
around the beginning or the end during play.
l
w To clear the memorized point.
Press and hold down the STOP button for about 2
sec.
l
n To cancel the loop play.
b
l
During loop play, move the LOOP/PITCH BEND
lever to the direction of the marked ‘OUT/EXIT” and
release it.
*
\
CUE
El
9 The memorized point is cleared and it enters the
stop mode.
The memorized point is also cleared by opening the
disc door.
l
. The LOOP indicator goes off and the indicator on
the RELOOP button is blinking, meaning the loop
play is canceled but the passage remains
memorized, and play continues.
. Once it enters the stop mode during play, the
memorized passage is cleared.
When starting the loop play, the sound from the
OPITICAL OUT jack may be muted for 2 sec. or less.
l
-lO-
1 SELECTING A TIME DISPLAY
n To rectify the wrong memorized passage.’
l
. Only when the loop play is canceled and play
continues, you can rectify the wrong memorized
passage.
w To rectify the end only.
. Search for and memorize the desired end
performing the steps 3 and 4 in the above
“PLAYING A SPECIFIC PASSAGE REPEATEDLY
(LOOP PLAY)“.
The previous memorized point is cleared from the
memory by memorizing another point in its place.
During play or pause opet-tion, each time this button
is pressed, the time display changes as follows:
SEC
l
Elapsed time
of the current track
I
w To rectify the biginning and the end .
. Repeat the steps l-4 in the above “PLAYING A
SPECIFIC PASSAGE REPEATEDY (LOOP PLAY)”
The previous memorized passage is cleared from
the memory by memorized another passage in its
place.
Remaining time
of the current track
l
n To clear the memorized passage.
l
l
Press and hold down the STOP button for about 2
sec.
When displaying “0O:OO” in the stop mode, if this
button is pressed, the total tracks and the total
remaining time of the disc are displayed.
1 PLAYlNGTRACKSINRANDOMSEQUENCE(RANDOMPLAY)I
9 Press and hold down the TIME button for about 2
sec.
TlME/wI\NWM
. The memorized passage is cleared and it enters the
stop mode.
The memorized passage is also cleared by opening
the disc door.
0
l
n To repeat the memorized passage again during
l
play. Press the blinking RELOOP button.
l
l
If the memorized passage is not cleared, the
memorized passage is played repeatedly.
-ll-
Then the RANDOM indicator lights up, the player
automatically selects and plays tracks on the disc in
random sequence.
To cancel the random play, press and hold down the
TIME button or the STOP button for about 2 sec.
\
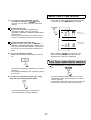
1 ADJUSTING THE TEMPO
1 COMPENSATING FOR THE PITCH
To compensate for the pitch according to the change of
the play speed, press the MAIN TEMPO button,
9 To adjust the play speed as desired, slide the
TEMPO fader up or down.
TEMPo
L
-12
=-=
cc
===
-=
==
==
==
=-=
MAIN
la
T
Regardless of the change of the play speed, the
normal pitch will be resumed.
. To cancel the master tempo function, press the
MAIN TEMPO button again.
l
0
0
=
=
==
==
for faster speed
cc
ES
EE
EC
-==
\
for slower speed
+I2
I
1 PLAYING CDS IN RELAY WITHTWO PlAVERS(RElAY
PLAY) 1
Use this function when the system control
connections are made with the compatible audio
mixer and another ADJ-600 CD player as well as
this player.(Refer to “SYSTEM CONTROL
OPERATION” on page 5).
l
J
. With the TEMPO fader, the play speed can be faster
or slower than the normal play speed within the
range of +12 % - -12%.
According to the chang of the play speed, the pitch
will be higher (#) or lower ( b )
For the normal play speed, set the TEMPO fader to
the center position marked “0%“.
1. On both the player 1 and the player 2, press the
RELAY buttons respectively.
RElA”
l
l
I!z
A
II Adjusting the tempo temporarily
To adjust the play speed as desired temporarily,
move the LOOP/PITCH BEND lever to the left or the
right.
l
l
l
+ for faster speed
Then the RELAY indicator lights up, meaning the
relay play is activated, and it enters the pause mode
at the beginning of a track.
In the relay play mode, the normal play mode is
activated automatically regardless of the pervious
play mode.
2. Select the tracks to be played respectively.
l
l
l
With the LOOP/PITCH BEND lever, the play speed
can be faster or slower than the play speed adjusted
by the TEMPO fader within the range of +4% - -4%.
According to the chang of the play speed, the pitch
will be higher (#) or lower ( b )
To resume the previous play speed, release the
LOOP/PITCH BEND lever.
3. Start play first on one of the players
. Then the relay play will continue from one player to
anther player and vice versa.
4. To cancel the relay play, press the RELAY buttons
respectively.
-12-
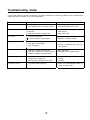
Troubleshooting Guide
If your player should not perform as expected, consult the table below to see if the problem can be corrected before
seeking help from your dealer or our service organization.
PROBLEM
No power
POSSIBLE CAUSE
. The POWER cord is disconnected.
The POWER button is not pressed correctly.
l
No play
l
l
l
No sound
Poor or distorted sound
Sound skips.
The disc is loaded upside down.
Dirty disc.
Defective or deeply scratched disc.
. Incorrect connections.
. incorrect operation of the amplifier.
The unit is connected to the PHONO
input jacks of the amplifier.
. Poor connections.
l
l
l
Defective or deeply scratched disc.
This unit is placed on a surface that is
subject to vibration or physical shock.
REMEDY
l
l
l
l
l
. Make connections correctly
Operate the amplifier correctly.
l
l
l
l
l
l
No tempo control
. The pause indicator lights up.
l
Make connections correctly
Check the connections and connect all
cords securely.
Play another disc.
Place this unit on a stable surface.
Make the system control connections
correctly.
. Try again.
-
-13-
Reload the disc with the printed side up.
Clean the disc.
Load another disc.
l
No relay play
The system control connections are not
made with the components.
. The relay play procedure is not correct.
connect the cord securely.
press the POWER button to ON.
Press the PLAY/PAUSE button to
cancel the pause mode.
Specifications
AUDIO
Number of Channels : 2
Frequency Response :
20-20,000 Hz* 0.5dB
Signal-to Noise Ratio :
Better than 105dB (1 kHz)
Dynamic Range : Better than 95dB(l kHz)
Harmonic Distortion : 0.005%(1 kHz)
Wow and Flutter :
Unmeasurable (Quartz accuracy)
Channel Separation :
Better than 95dB (1 kHz)
Output : Analog ; 2V rms
D/A Converter : 1 bit, Linear
n PICKUP
Type : Objective lens drive, optical 3-beam laser pickup
Objective Lens : 2-dimensional paeallel drive
Laser Type :
Ga-Al-As type semiconductor laser
Wave Length : 760-800nm
GENERAL
Power Requirements:
. AC, 120/230 Volt, 50160 Hz (U.S.A/Canada)
. AC, 230 Volt/50 Hz (U.K./Europe)
. AC, 240 Volt/50 Hz (Austrailia)
- AC, 127 Volt/60 Hz (Mexico)
Power Consumption : 14 watts
Dimensions ( W x H x D) :
CD Unit; 515x206x416 mm
Weight (Net.) : 4.5 kg
(Gross) : 5.8 kg
Standard Accessories :
. RCA Pin-plug cord
. System control cord
SIGNAL FORMAT
Error Correction :
CIRC (Cross Interleave Reed-Solomon Code)
Sampling Frequency : 44.1 kHz
Quantization bit : 16-bit linear/channel
Channel Modulation Code :
EFM (Eight-to-Fourteen Modulation)
Channel Bit Rate : 4.3218 Mb/set
Note : Design and specifications are subject to change
without notice for improvements.
- 14-