1
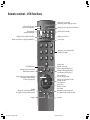
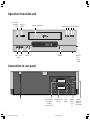
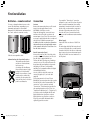
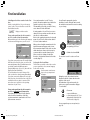
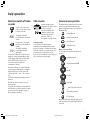
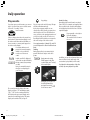
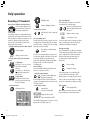
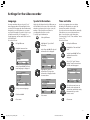
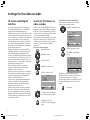
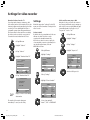
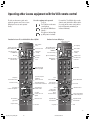
Operating instructions.
Video.
ViewVision 8106 H
233–31251.020
■
1
BA_VCR_31251_020EU_GB2
1
17.04.2003, 15:29 Uhr
Contents
Setting up
6
Recording a TV broadcast
12
Insert cassette without record protection 12
Select station
12
...with the arrow keys of the remote control 12
... via the station list
12
... on video recorder
12
Select recording speed
12
Start recording
12
... using the remote control
12
... on video recorder
12
Limit recording time
12
Interrupt recording
12
End recording
12
Cleaning
6
Direct recording
13
Batteries – remote control
7
Connections
Antenna
Euro AV connection (Scart)
Mains supply
Switching on the video recorder for the
first time
Picture and sound from the video recorder
on a TV set with a Euro AV connection
Picture and sound from the video recorder
on a TV set without a Euro AV connection
Settings for first installation
7
7
7
7
Recording from a video recorder /
Camcorder
13
Remote control – VCR functions
Operation from video unit
Connections to rear panel
Welcome
3
4
4
5
About this equipment
5
Advantages of connection to a
Loewe TV set
5
First installation
6
For your safety
6
8
8
8
Daily operation
9
Switch on/switch off video recorder
9
VHS-Cassette
Record protection
9
9
General menu operation
9
Play cassette
10
Tracking
10
Sound selection
10
Pause (still frame)/frame-by-frame advance 11
Slow motion
11
Reverse play
11
Picture search
11
Status display
11
Stop play/eject cassette
11
Fast forward/rewind
Memory Stop at 000
Record picture from VCR tuner – sound
from the HiFi
13
Control video recorder with the video
control bar of the Loewe TV set
Switch on Digital Link on video recorder
Operate with the video control bar
Functions of the video control bar:
13
13
13
13
Timer functions – overview
14
ShowView-Timer
15
Manually programme/change Timer
15
Delete Timer
15
Programme Timer on a Loewe TV set
Programming with EPG
With Teletext
16
16
16
Settings for the video recorder 17
Language
17
Special information
17
Time and date
17
TV stations with Digital Link Plus
18
Search for TV stations on the
video recorder
Set video recorder location
Automatic search for TV stations
Sort/delete
Manually set TV stations
Transfer station from TV
18
18
18
19
19
20
Settings
Colour standard
Switch on/off memory stop at 000
Switch on/off status display
Picture format via Euro AV
Picture sharpness
Parental lock
Switch off automatically
Control voltage via Euro AV cable
Decoder on the video recorder AV socket
Switch power saving standby on/off
20
20
20
21
21
21
22
22
22
22
23
Set transmitter channel of the
video recorder
23
Switch on Digital Link on the
video recorder
24
Repeat first installation
24
Operating other Loewe equipment
with VCR remote control
25
Select the equipment to be operated
Functions of Loewe TV set with
MediaPlus Chassis Q2500
Functions of Loewe DVD player
What to do, if ...
Technical data
Service addresses
11
11
2
BA_VCR_31251_020EU_GB2
2
17.04.2003, 15:29 Uhr
25
25
25
26
27
28
Remote control – VCR functions
During play: select sound
During stop: station language selection
Indicator: TV operation
Indicator: DVD operation
During stop: select picture and sound source
DVD
Select set to be
operated TV/DVD/VCR
Display/close ShowView-Timer Menu
Control 201 VTR
TV
Switch on/off in Standby
V=
SV
LP
Display/close Timer list
000
Counter reset
During stop: switch to Long Play/Standard Play
1
2
3
4
5
6
7
8
9
0
Call up VCR Menu
During play: Pause (still frame)
/frame-by-frame advance
During stop: station selection up/down
During play: manual tracking
In menu: select position
Rewind
During play: search backwards (x 3)
Press again: search backwards (normal)
Stop tape
T
M
OK
E
i
During stop: select station directly
In menu: enter digits
Status display
In menu: close menu
Start recording (and Play key)
During recording: add 30 minutes
recording time (and Play key)
Call up station list
in menu: call up/confirm
During play: slow motion forwards
In menu: select/set
or to next menu
Reverse play
In menu: select/set
Fast forward
During play: search forwards (x 2)
Press again: search forwards (normal)
Start play
3
BA_VCR_31251_020EU_GB2
3
3
17.04.2003, 15:29 Uhr
Operation from video unit
Switch on/off
in standby
mode
Stop/eject
cassette
Cassette compartment
Rewind Pause PLAY Fast forward
20:15
P–
Video Sound
input
REC
P+
Station –/+
Open flap
here
(shown
opened)
RECORD
Connections to rear panel
ENTREE
ANTENNE
EURO AV2
DECODER
AUDIO
SORTIE
OUT
G
L
EURO AV1
AUDIO/
VIDEO
D
AERIAL
SORTIE
ANTENNE
R
RF OUT
Euro AV socket 2
for decoder or
recording
from another set
Euro AV socket 1
for TV set
4
BA_VCR_31251_020EU_GB2
4
17.04.2003, 15:29 Uhr
Sound
outputs
Antenna
output
to TV
set
Antenna
input from
antenna or
cable system
Welcome
Thank you
for choosing a Loewe product.
We are happy to welcome you as a customer.
At Loewe we combine the highest standards of
technology, design and user friendliness. This
applies equally to videos, TVs, HiFis and
accessories.
Neither technology nor design is an end in
itself, but both are intended to provide our
customers with the best possible audio and
visual experience.
Our design is not influenced by short-term,
fashionable trends. Instead, you get a highquality set that you will never tire of looking at.
About this equipment
The video recorder is best operated with the
remote control provided; this can also be used
to operate Loewe TV sets and Loewe DVD
players.
ShowView is incorporated for easy
programming of Timer recordings.
VPS ensures that any alterations to the timing
of broadcasts you wish to record are taken into
consideration in the Start and End Recording
commands
Advantages of connection
to a Loewe TV set
Just like the video recorder, Loewe TV sets
incorporating the MediaPlus chassis are
equipped with Digital Link and Digital Link Plus.
Both systems control the video recorder via the
Euro AV cable.
With Digital Link you can install the video
recorder in an enclosed rack or wall unit,
without the video recorder being visible. The
VCR remote control operates the video recorder
via the Loewe TV set. To do this, Digital Link
must be switched on at the video recorder (see
Page 24).
Using the video control bar on the Loewe TV
set, you can also operate the most important
functions of the video recorder without using
the VCR remote control.
Should you wish to carry out Timer recordings
from the satellite tuner of the TV set, Digital
Link will control the recording.
With Digital Link Plus, the station data of
antenna and cable stations can be transferred
from the TV set to the video recorder, so that
the same stations appear at the same station
positions in both sets.
In this way, Timer recordings from antenna and
cable stations can be easily programmed with
the EPG (Electronic Programme Guide) on the
TV set. The Timer data is transferred to the
video recorder, which then carries out the Timer
recording independently of the TV set. In the
case of timer data for satellite broadcasts, the
TV set will start and stop the video recorder
and set it to the Euro AV 1 input.
Start of play is shown immediately on the TV
set, regardless of which station you are
watching. If the TV set is off it will be switched
on.
5
BA_VCR_31251_020EU_GB2
5
17.04.2003, 15:29 Uhr
First installation
For your safety
Setting up
Cleaning
For your safety and to avoid damage to the
video recorder, remote control and cassette,
ensure that you protect the equipment against:
• Damp and moisture
• Knocks and mechanical stresses
• Magnetic and electrical fields
• Cold, heat, direct sunlight and extreme
temperature variations
• Dust
• Blocked airways
This equipment is designed for domestic and
office environments and must not be used in
rooms with high humidity (e.g. bathroom,
sauna) or high concentrations of dust (e.g.
workshops). If the equipment is used outdoors,
ensure that it is protected against moisture
(rain, dripping, splashing, sprayed water or
dew) High levels of moisture and
concentrations of dust cause creep currents in
the equipment, which can lead to electric shock
or fire. The manufacturer’s warranty is only
valid for use in the specified permissible
environment.
This equipment must only be connected to a
mains power supply which has the same
voltage and frequency as that specified on the
rating plate. Incorrect voltages can damage the
equipment.
Lightning strikes can damage your recorder via
the antenna and the power supply. You should
therefore remove the antenna and power plugs
during thunderstorms and during long periods
of absence.
Do not open the video recorder under any
circumstances, as you could be exposed to
voltages that are life threatening. There are no
user-serviceable or exchangeable parts in the
set. Repair and servicing should only be carried
out by authorized TV technicians.
Install the video recorder horizontally and leave
enough room for ventilation.
Please note that when the recorder is pushed
across furniture made >from softwood (e.g.
spruce, fir, pine) the feet of the equipment
could leave marks. The plastic material of the
feet contains softeners, which can occasionally
affect the surface of furniture. In this event, use
a pressure resistant pad about the size of the
video recorder.
If the equipment is moved from a cold
environment to a warm room, moisture may
condense on all parts of the equipment
(condensation). Moisture on the head drum and
the tape guides can damage the tape and the
head drum. Let the video recorder stand for
about an hour and only switch it on when it
has reached room temperature.
The mains plug of the TV set must be easily
accessible so that the set can be disconnected
at any time. Lay the cable in such a way that it
will not be damaged. The mains cable must not
be bent or laid over sharp edges, trodden on or
exposed to chemicals. A mains cable with
damaged insulation can lead to electric shocks
and is a fire risk.
Please note that the recording of pre-recorded
tapes, DVDs, CDs, etc, could represent an
infringement of copyright.
Use only a soft, clean, damp cloth to clean the
video and the remote control (don’t use any
caustic or abrasive cleaning agents).
6
BA_VCR_31251_020EU_GB2
6
17.04.2003, 15:29 Uhr
First installation
Batteries – remote control
Connection
To insert or change the batteries press on the
arrow. Slide the battery compartment cover
downwards and remove it. Insert Alkali
Mangan LR 03 (AAA) batteries and ensure that
the + and – ends are connected correctly.
Antenna
Remove the antenna plug from your TV set and
insert it into the upper antenna socket
(ANTENNA) of the video recorder.
Using the cable supplied, connect the lower
antenna socket of the video recorder to the
antenna input of your TV set. This connection is
necessary to supply both the video recorder and
the television set with the antenna signal.
In addition, the video recorder has a transmitter
that transfers picture and sound and the menus
via the antenna cable to the TV set if there is no
Euro AV cable connection.
+
+
Slide the cover upwards to shut.
Information for the disposal of batteries:
The batteries provided in the
unit do not contain cadmium,
lead or mercury.
According to the Used Battery
Decree, batteries may no longer
be disposed of in household
rubbish. You can dispose of used
batteries at the commercially
provided collection points. Your
dealer will also have a collection
point for used batteries.
Euro AV connection (Scart)
Connect the lower Euro AV socket of the video
recorder to the Euro AV socket of your TV set. A
Euro AV cable is supplied with the set.
The Euro AV cable is the best way of making a
connection to your TV set. This will ensure the
best picture and sound quality. It also permits
the playing of HiFi stereo sound, and the
transmission of commands and data for Digital
Link and Digital Link Plus.
Use only a cable in which all contacts are
connected together (x 21, as in the cable
supplied).
For the new generation of Loewe TV sets
(MediaPlus) you must register the video recorder.
Use the Euro AV socket recommended by ”AV
connections” or the connection assistant
”Connections”. This information is provided in
the operating instructions of the TV set (see
”Operation of additional sets” – ”Register set”).
Your video recorder has Digital Link Plus and
Digital Link functions (you have to activate
Digital Link later on your video recorder, see
Page 24), you need this information when
registering your video recorder.
If you used the ”Connections” connection
assistant for your Loewe TV set, then all station
data for terrestrial transmitters (not satellite
transmitters) is transferred to the recorder. For
this, the video recorder must be connected to
the mains. Follow the menus on the TV set.
Note: On the TV set all terrestrial and cable
stations can be found between station numbers
1 and 88.
Mains Supply
Connect the video recorder to a 230V/50 Hz
socket.
The mains plug should still be inserted even if
you are not using the video recorder, but wish
to watch television. If the video recorder mains
plug is removed, only a weak antenna signal is
fed to the TV, which can cause interference in
the TV picture.
DIG IN
1
SAT
SERVICE
IR
2
CTRL
SAT A/D
DIG OUT
AUDIO IN
AUDIO
VHF/UHF
AV1
R
OUT
L
AV2/RGB
AV3
SUR
SUBWOOFER
STAND
C
R
SUB
L
ENTREE
ANTENNE
EURO AV2
DECODER
EURO AV1
AUDIO/
VIDEO
AUDIO
SORTIE
OUT
G
L
D
AERIAL
SORTIE
ANTENNE
R
RF OUT
7
BA_VCR_31251_020EU_GB2
7
17.04.2003, 15:29 Uhr
First installation
Switching on the video recorder for the first
time
Switch on using the blue O key on the remote
control, or the O key on the video recorder. The
first installation starts.
1.Inst
Display on video recorder
Picture and sound from the video recorder
on a TV set with a Euro AV connection.
When switching on for the first time the language
selection menu will appear on your TV screen.
––––––––––– ./Language ––––––––––
GB Language
D Sprache
F Langue
I
Lingua
E Idioma
NL Taal
OK
Set with OK
M
E
Back
End
If you have connected a Loewe TV set with Digital
Link Plus via the Euro AV socket, you will see the
menu straightaway. Other TV manufacturers also
use similar systems with different names
(EasyLink, Mega Logic, Project 50), these will also
display the menu immediately.
TV sets that detect the control voltage of the
video recorder also show the menu immediately.
If you have connected a different TV set via the
Euro AV socket, select the AV socket on the TV set
to which the video recorder is connected. This
varies from set to set. Refer to the operating
instructions of your TV set.
Picture and sound from the video recorder
on a TV set without Euro AV connection
If you have not used a Euro AV cable, then the
menu for the first installation of the video
recorder transmitter is transferred to the TV set
by the antenna connection.
Select station number 0 on the TV set. In
general, this station number is provided for the
optimal reception of video recordings.
The transmitter of the video recorder is factory
set to channel 36 in the UHF band.
If station number 0 of your TV set is not set to
channel 36, then you must search for and save
the video recorder transmitter.
Refer to the operating instructions for using the
menus of your TV set to find out how channel
36 is set to station number 0.
When you have found the transmitter, the first
installation menu will appear on the screen.
If the transmitter channel of the video recorder
suffers interference from a television station,
you must switch to another channel on the
video recorder (see Settings for the Video
Recorder– Set transmitter channel of the video
recorder, Page 23).
You will now be prompted to give the
installation location. After the station search
has ended, the stations will be sorted according
to your country.
––––––– ../Location of Set –––––––
others ...
S Sweden
SF Finland
Other Location
OK
OK
OK
Set with OK
M
E
and confirm with OK.
Back
End
M
E
Back
End
Select the country in which you
are operating your TV set.
OK
Confirm selection with OK.
The automatic search for stations will now
start.
––––– ../Automatic Search –––––
no. Chan.
Fine
Name
01
C02
00
BR3
02
C03
00
WDR
03
C05
00
KABEL
04
C06
00
RTL2
Settings for first installation
The first time you switch on the video recorder
you are requested to select a menu language
for the video recorder.
Use the remote control arrow
keys to select your preferred
language...
––––––––––– ./Language ––––––––––
GB Language
D Sprache
F Langue
I
Lingua
E Idioma
NL Taal
Select, store
with OK
Search in
progress, wait!
M
E
Back
End
During the search, the stations found are
displayed in the list. A status bar shows the
progress of the search.
On termination of the station search, the
stations are sorted. The menu then displays.
”Search ended”.
E
M
Close menu
or press the M-button,
to start data transfer if a TV set
equipped with Digital Link Plus
is connected (see page 20).
You can repeat the process at any time (see
page 24).
8
BA_VCR_31251_020EU_GB2
8
17.04.2003, 15:29 Uhr
Daily operation
Switch on/switch off video
recorder
Use the O key on the remote
control or on the video recorder
to switch on the unit.
The display on the video
recorder shows the last station
viewed.
If you press the O key again,
the video recorder switches to
standby.
The display on the video
recorder shows the time
(greyed out).
You can also set the video recorder so that it
switches to energy-saving standby (see Page
23). The display on the video recorder is then
switched off. The video recorder is still
connected to the mains, but power
consumption is reduced.
Five minutes after the last operation the video
recorder switches automatically to Standby in
Stop Mode if there is no menu open and if
”Autom. switch off” is set to ”Yes” (see Page
22).
If a Timer recording is programmed, it will not
switch off.
The video recorder also switches on if you
insert a cassette.
If a cassette has already been inserted into the
VCR, the video recorder also switches on when
you select one of the tape functions, play,
fast forward or rewind .
aRD
19:24
VHS cassette
VHS
General menu operation
Insert the cassette into the
compartment. The video recorder
draws the cassette in.
Press the eject button. The
cassette is ejected. If a play
function is active the unit
switches to STOP first.
Press again to eject the cassette.
Record protection
You can protect your cassette against
inadvertent over-recording (deletion). On the
back of the cassette is a tab that can be broken
off. Break off the tab to reveal the security slot.
You cannot now record onto this cassette.
If you cover the slot with two layers of tape, you
can record onto the cassette again.
The menus make operation of the video recorder
easier. As you saw in Initial Installation, the
menus are displayed on the screen of the TV set.
The menus are:
M
Call up VCR menu
SV
Call up ShowView menu
Call up Timer list
OK
Call up Station list
Menu selections/settings:
The lower part of the menu shows the keys for
operation
Highlight menu item
OK
Call up sub-menu with OK
or
with >
Select/set
Enter digits
M
... return to previous menu level
or...
M
Save setting, if required
E
Close all menus
Greyed out menu items cannot be called up. This
is the case when a TV set with Digital Link Plus is
connected.
9
BA_VCR_31251_020EU_GB2
9
17.04.2003, 15:29 Uhr
Daily operation
Stop playing.
Play cassette
If you have a pre-recorded cassette, you can now
play it. If you don’t have a pre-recorded cassette
refer to the ”recording” section.
Insert a cassette.
VHS
If the record protection tab on the cassette has
been broken off, play starts immediately, even if
the video recorder was switched off. When you
insert a cassette, a cassette symbol appears on
the video recorder display.
If a cassette without record
protection is inserted, start play
with the key on the video
recorder or on the remote
control.
In both cases PLAY is displayed
on the video recorder followed by
the tape counter (hours, minutes,
seconds)
Now you can watch the tape in
the video recorder playing on
your TV screen.
PLAY
0:00:12
Play also stops at the end of the tape. The tape
will then rewind automatically.
If play does not appear and the sets are
connected by a Euro AV cable, you must select
the AV socket on the TV set. This differs from
set to set. Refer to the operating instructions of
your TV set. In this case, the TV set does not
have Digital Link Plus and does not respond to
the control voltage of the video recorder.
Select station number 0 (channel 36) on the TV
to see VCR picture if no Euro AV cable has been
fitted.
Tracking
During play, tracking is set automatically. It
prevents interference stripes on the video
picture.
During automatic setting,
TRACK appears in the video
recorder display and ”Tracking”
in the status display.
TRACK
SP
Tracking
Sound selection
Normally both HiFi sound channels are played
(Stereo HiFi). If, for example, two languages have
been recorded on the cassette, both languages
are initially played via the AV sockets. Select the
required language:
Press repeatedly: select right or
left for the language.
The sound selection is shown on
the screen.
Right
In addition, you can choose between Mono and
Stereo. In Mono it is the audio track of the
cassette that is played back (no HiFi sound).
For playback via the transmitter of the video
recorder, only mono playback is possible.
0:00:12
HiFi
SP
PLAY
0:00:12
HiFi
The screen below briefly displays the status
display as follows: ”SP” standard play speed,
”Play”, ”HiFi” for the sound reproduction of
HiFi sound tracks, tape counter display and a
status bar for remaining play time. The status
display can be switched off, see Page 21.
During play, you can also set
the tracking manually by
pressing the arrow keys hg
on the remote control.
10
BA_VCR_31251_020EU_GB2
10
17.04.2003, 15:29 Uhr
Daily operation
Pause (still frame)/frame-by-frame advance
During play, you can switch to still frame. The
picture is subject to interference from the
system and has no sound. To prevent damage
to the video heads and the tape, the unit
switches back to play after five minutes.
Picture search
During play you can switch to picture search
forward or back. The picture is subject to
interference from the system and has no sound.
This way, it is easy to search for the start of
recordings.
Display on video recorder
Picture search forwards
Slow motion
Display on video recorder
Continue play
Continue play
Status display
On play, record, fast forward and rewind and on
stop, when the function is switched on, the
status display appears briefly. You can also
open and close the status display with the E
key.
E
Open/close status display
You can switch off automatic opening of the
status display, see Page 21.
Minimise interference
Reverse play
You can start reverse play directly using the <
arrow key or switch to it during normal
playback. The picture is subject to interference
from the system and has no sound.
Stop play/eject cassette
All tape play functions can be stopped on the
video recorder, or by using the remote control.
Stop with remote control
Display on video recorder
Continue normal play
When doing a fast rewind of a cassette you can
switch off using the O on/off key on the video
recorder or the remote control. When the
cassette has rewound, the video recorder
automatically switches to standby.
Memory stop at 000
You can set the counter to 000 at any point on
the tape, e.g. at the start of a new recording.
000
0:00:00
Set counter to 000 during play
Display on video recorder
If the tape is rewound it stops at 000, if the
”Stop at 000” function in the ”Settings” menu
is activated (see Page 20).
Stop on video recorder/eject
cassette
StOP
Reverse play
--PLAY
Stop winding
Picture search backwards
PLAY ‹‹ Display on video recorder
Slow motion
You can start slow motion play directly with the
> arrow key or switch to it during normal play.
The picture is subject to interference from the
system and has no sound.
Slow
Forward
PLAY ›› Display on video recorder
Frame-by-frame advance: press
repeatedly
Continue play
You can select fast forward and rewind, when no
other play function is selected, or the video
recorder is in standby mode
Rewind
Pause (still frame)
Pause
Fast forward/rewind
Display on video recorder
After a short delay the station
selected on the video recorder
is displayed.
Eject the cassette by re-pressing the key on the
video recorder.
aRD
11
BA_VCR_31251_020EU_GB2
11
17.04.2003, 15:29 Uhr
Daily operation
Highlight station
Recording a TV broadcast
Insert cassette without record protection
Insert a cassette without record
protection (tab still in place) into
the cassette compartment.
Select station
If you want to start the recording manually then
you must first select the television station on the
video recorder. If recording is in progress, it is not
possible to change the station on the video
recorder. The selected station is shown in the
display on the video recorder.
... with the arrow keys on the remote control
VHS
Display on video recorder
... with the numerical keys of the remote
control
1 digitstation
Press keys 0 – 9 for one second,
and the station changes
instantly.
or press keys 0 – 9 briefly, and
the station will change after
long
two seconds.
2 digit station
Press the two numerical keys
short short quickly one after the other and
the station changes.
7
2 7
... via the station list
OK
Call up station list.
––––––––––– Station list ––––––––––
01
02
03
OK
AVS
AV3
AV2
AV1
ARD
ZDF
WDR
04
05
06
07
08
09
10
Select, change
with OK
Switch to highlighted station
...on the video recorder
P–
P+
with the keys P+ and P– under the
flap.
Select recording speed
Use the LP key on the remote control to select the
recording speed. ”Standard-Play”(SP) is normally
used. If you select ”Long Play” (LP), the recording
time of the cassette is doubled.
Press the key to switch between
SP and LP.
LP or SP for a cassette without record protection
is shown in the display of the video recorder and
in the status display. For Long Play (LP), the
picture and sound quality will be reduced. When
playing, the video recorder will detect the
recording speed.
Start recording
You can start the recording by using the remote
control or on the video recorder.
... using the remote control
Keep the record key pressed,
+
then press the play key.
Note: if Digital Link Plus is active and the video
recorder is on standby, the station selected on the
TV will be recorded.
...on the video recorder
Open the flap.
Press the record key REC.
REC
LP
Station up/down
ZDF
OK
BR
HR
N3
MDR 3
BR-AL
PHOEN
3SAT
M
E
Back
End
Record Display on video recorder
0:00:12 Tape counter display on VCR
Limit recording time
After starting the recording you can limit the
recording time in 30 minutes steps.
Keep the record key pressed
+
when recording, then press the
play key.
0:30
1:00
12
on next press onetc.
You can set up to 4 hours 30 minutes recording
time, for Long Play up to 9 hours. Finally, the
remaining recording time is displayed.
Interrupt recording
You can interrupt the recording for a maximum
of five minutes, by pressing the Pause key. The
tape is stopped in front of the rotating video
heads. On re-pressing the Pause key the
recording continues without noticeable
interference.
Pause recording
Continue recording.
If five minutes pause is exceeded the video
recorder switches automatically to STOP.
During a pause in recording, the station for the
video recorder can be switched. The recording
can also be continued by re-starting recording.
End recording
End recording (STOP)
When the tape reaches the end, the recording
stops and the tape is rewound and ejected.
The red REC display appears on the video recorder
display when recording is in process.
12
BA_VCR_31251_020EU_GB2
Display on video recorder
17.04.2003, 15:29 Uhr
Daily operation
+
Start recording
Select socket(s), press repeatedly
AV2
AVS
Display on video recorder
AV2 for Euro AV socket 2
AVS for Cinch sockets at the
front
Loewe TV sets have a video control bar that can
be called up by the V= key. The video control bar
allows you to control the main functions of the
video recorder.
To do this Digital Link on the video recorder must
be switched on.
Switch on Digital Link on the video recorder
+
+
Start recording
P+
Keep pause key pressed down,
then press P+
LINK
and at the same time start play on the second
video recorder or camcorder.
Display on video recorder.
For further information on this setting, see Page
24.
Record picture from VCR
tuner, sound from HiFi
Operate with the video control bar
Call up video control bar on the
V=
Loewe TV set
If the sound for the TV transmission is broadcast
by radio, you can record the picture from the
receiving unit of the video recorder and the
sound from the HiFi unit. For this you must feed
the sound signal of your HiFi unit to the Cinch
sockets on the front of the video recorder.
Select the television station on
the video recorder.
Set the appropriate station on
the HiFi unit.
SC--02
+
Select socket; press repeatedly
until SC is displayed. The number
after this indicates the memory
location of the selected station.
Start recording
VCR
STOP
▼
▼
The video recorder records the station selected
on the TV set. You can now switch off the TV
set, or you can change to another station or
switch to playing a second video recorder or
DVD player.
If you are watching a satellite station on a TV
set with Digital Link Plus or a comparable
system, then picture and sound are transferred
by the Euro AV cable. The video recorder sets
the recording source as AV 1. In this case, you
can switch the TV set to standby (on Loewe TV
sets, the red and green LEDs will then come
on). You can only switch to other satellite
stations if your TV set has two satellite tuners.
You can, however switch to stations that can be
received by antenna or cable.
To do this, use the Euro AV socket 2 or the Cinch
sockets on the front of the video recorder and
select the socket.
Control video recorder with
the video control bar of the
Loewe TV set
■
▼
▼
You can record the TV station that you are
watching on the TV set directly, without having
to select the station on the video recorder. For
stations received via antenna or cable, the
video recorder detects the station that is to be
recorded and uses its own receiver.
Pre-conditions:
• The TV set is equipped with Digital Link Plus
(or is a similar system from another
manufacturer).
• The TV set and video recorder must be
connected by a Euro AV cable.
• A cassette without record protection is
inserted into the video recorder
compartment.
• The video recorder must be in standby mode
(if the unit is switched on, it will use the
station currently selected on the video
recorder)
Recording from a video
recorder/Camcorder
▼
Direct recording
OK
❚❚
●
AUX
i Info
M Menu
E End
If several AV sets are connected:
select set
Select function
OK
Execute function
Functions of the video control bar:
O VCR on/standby
Stop
Rewind
Fast forward
Play
Record
Still frame/Pause
AUX switch VCR to
AV1
13
BA_VCR_31251_020EU_GB2
13
17.04.2003, 15:29 Uhr
Daily operation
Timer functions - Overview
If you want to make recordings during your
absence, your video recorder and the Loewe TV
set offer easy programming facilities.
If you have a TV magazine with ShowView
numbers, use the ShowView Timer of the video
recorder.
You can programme single, Mon-Fri, daily (MonSun) or weekly recordings on the video recorder.
If the video recorder is connected to a new
generation Loewe TV set (MediaPlus Q2400/
Q2500), you can easily programme Timer
recordings. EPG (Electronic Programme Guide)
and Teletext are available for programming
assistance.
In the video operation mode of the TV set, call up
the video menu and select whether you want to
programme with the help of EPG or Teletext. With
EPG, you can display the broadcasts that interest
you, selected by day and time, station and theme.
Highlight the broadcasts that you want to record.
The Timer data will be transferred to the video
recorder. For programming via Teletext, select the
station, and then search through the list for the
broadcast to be recorded.
If the broadcast to be recorded is received by
satellite, the picture and sound will be transferred
from the TV set via the Euro AV cable to the video
recorder.
Up to seven programming entries per month can
be made on the video recorder.
The video recorder is equipped with a control that
ensures that in the event of a power failure the
stored stations and the programmed Timer data
are not lost.
Note the following:
• If a recording is programmed and no cassette
is loaded, the cassette symbol on the video
recorder display flashes.
• Insert a cassette without recording protection
into the cassette compartment.
• If a cassette with the tab removed (recording
protection active) is inserted, it will be ejected
again when the unit is switched to standby
mode.
• The cassette must of course have enough
capacity for the programmed recording time.
• If a Timer recording is programmed into the
video recorder, the word ”TIMER” appears
above the cassette symbol.
• When programming a timer recording on the
TV set, a cassette without recording protection
must be inserted in the video recorder. If not,
no timer data will be stored in the video
recorder.
• If a satellite recording is programmed on the
Loewe TV set, the cassette symbol will not
flash, since the video recorder’s timer does not
contain any data for this recording. The video
recorder will not eject a cassette with
recording protection if the unit is switched to
standby mode.
The recording process is controlled by the TV
set. You must check and observe these points
to ensure that a recording from the satellite
tuner of the Loewe TV set is successful. The TV
set must not be disconnected from the mains
supply or switched off at the mains, otherwise
the Timer data will be lost. The video recorder
on the other hand may be switched off, but
not disconnected from the mains (do not
remove mains plug!).
• If, for a Loewe TV set without Digital Link
Plus but with Digital Link, a recording is
programmed on the TV, Digital Link on the
video recorder must be switched on (see
Page 23). The recording will then also be
controlled by the TV set for broadcasts
received via cable or antenna. Picture and
sound will be transferred from the TV set to
the video recorder. While recording, the
station cannot be changed, unless you have
another TV tuner, or are playing from a
second video recorder or DVD player.
• If, on a Loewe TV set a Timer recording is set
to ”daily”, then ”Mon–Fri” is used on the
video recorder. If you want to record daily
from Monday to Sunday correct it on the
video recorder by selecting ”daily” here.
• Normally the VPS time is the start time of
the broadcast. If VPS is to be effective, this
time must be entered exactly. If you only
want to record part of the broadcast,
deactivate VPS on the Timer settings and
enter the appropriate time.
If, for example, a substitute broadcast was
recorded in the station, then the VPS time is
not the start time.
14
BA_VCR_31251_020EU_GB2
14
17.04.2003, 15:29 Uhr
Daily operation
ShowView-Timer
SV
Call up ShowView menu
using the numerical keys on the
remote control, enter the
number shown in the TV
magazine. Do not enter the
hyphens, they are only used to
make them easier to read.
If you programme several recordings ensure
that you do not select several broadcasts that
are on at the same time, and ensure they do
not ”overlap” and that the programmed
recordings are not too long for the cassette in
the compartment. Refer to the VCR menu under
Timer list and check the inserted cassette.
If the inserted ShowView entry does not lead to
the result expected, check the date (year) and
time in the VCR menu under ”Date and Time”.
Then move to the next menu
item respectively
Day: input; if this figure is less
than that for today, it is used
for the following month. Enter
with the numerical keys or set
with the arrow keys < >
Recording type: Select once,
Mon–Fri, daily, weekly
––––––––– SHOWVIEW ––––––––––
Code number
OK
OK
1234567??
... input,
M
proceed with OK
E
Manually programme/
change Timer
Call up Timer list
Back
End
Select free Timer (no entry, only
dashes) or highlight the Timer
to be changed.
Press the OK key, the ”Timer
data” menu is displayed.
––––––––– .../Timer-Data –––––––––
Station
Day
Record Type
Record Time
PDC
LP/SP
OK
Select or
M
E
Store
Cancel
Select the station required, or
enter the station number with
the numerical keys.
Check the day and the times
Recording type: Select Once,
MO–FR, Daily, Weekly
Use VPS: select yes or no
LP/SP: select recording speed
M
––––––––– .../Timer List ––––––––––
Pr.
Day Time
PDC
ZDF
18
23:00–00:30 ✓ SP
–
–
–
– –
–
–
–
– –
–
–
–
– –
–
–
–
– –
–
–
–
– –
–
–
–
– –
ZDF
18
Once
23:00–00:30
Yes
SP
... Input
Save
Recording time: enter with the
numerical keys of the remote
control
OK
OK
OK:Input
M
E
Use VPS: select yes or no
LP/SP: Select recording speed
M
Save
Delete Timer
Back
End
Call up Timer List
Press OK key for the input
menu
Highlight Timer to be deleted
––––––––– .../Timer-Data –––––––––
Station
Day
Record Type
Record Time
PDC
LP/SP
OK
Select or
... Input
ARD
16
Once
18:30–20:30
Yes
SP
M
E
Delete
Store
Cancel
Station: Set with the arrow keys
< > or input station number
with the numerical keys
You must also delete from the Timer list, the
Timer Data transferred from the Loewe TV set
to the video recorder. There is no Timer data in
the ”Timer delete” menu on the TV set.
You will only find Timer data there if a
broadcast from a satellite station has been
programmed.
During a Timer recording you can end the
recording with the STOP key. The Timer data
in the Timer list will be deleted.
15
BA_VCR_31251_020EU_GB2
15
17.04.2003, 15:29 Uhr
Daily operation
Programme Timer on a
Loewe TV set
16
If you have connected a video recorder to a
Loewe TV set with a MediaPlus Q2500 chassis,
you can programme Timer recordings on the TV
set as described here. A cassette without
recording protection must be inserted in the
video recorder, otherwise no timer data will be
transferred to the video recorder.
Programming with EPG
• search for the broadcast in EPG and highlight
it.
• press the red record key.
• the record menu appears.
• check the Timer data and confirm with the
OK key.
• if the broadcast is received via cable or
antenna, the Timer data is transferred to the
video recorder (message: ”Timer data
transferred to the Digital Link Plus recorder”).
If no cassette is inserted, or the cassette has
recording protection, no data will be
transferred. Message in the video recorder’s
display: ”ERROR”.
• on the video recorder you will find the Timer
data in the Timer list.
• highlight the line with the new Timer data
and press OK to ”change” if you want to
check or set recording to normal or slow
speed.
• save your setting with the M key if required.
• if the broadcast is received by the satellite
tuner of the Loewe TV set, the Timer data is
stored in the TV set (message: ”Timer data
stored”).
• how to find the timer data for satellite
recordings in your TV set: In video mode, call
up the video menu, select Timer change and
delete and call up with OK There is no entry
in the Timer list of the video recorder. Insert a
cassette without record protection. Select the
record speed, SP or LP, as described above,
because this setting cannot be done via
Digital Link Plus.
BA_VCR_31251_020EU_GB2
16
With Teletext
You want to record a broadcast and know the
TV station and start time.
• call up the video control bar (video
operation) using the V= key.
• call up the video menu using the M key.
• highlight ”Timer recording” and press OK.
• highlight ”Via Teletext” and press OK.
• in the following overview, select the TV
station and continue with OK.
• the first Teletext page with the station
listings of the selected transmitter is
displayed. Use the green key to scroll
through to find the page on which the start
time of the broadcast is given.
• when you have found the page containing
the broadcast you wish to record, highlight
the time with the arrow keys and press OK.
• the record menu now appears.
• check the Timer data and confirm with the
OK key.
• if the broadcast is received via cable or
antenna, the Timer data is transferred to the
video recorder (message: ”Timer data
transferred to the Digital Link Plus
recorder”). If no cassette is inserted, or the
cassette has recording protection, no data
will be transferred. Message in the video
recorder’s display: ”ERROR”.
• on the video recorder you will find the Timer
data in the Timer list.
• highlight the line with the new Timer data
and press OK to ”change”, if you want to
check or set the recording to be made at
normal or slow speed.
• save your setting if required with the M key.
• if the broadcast is received via the satellite
tuner of the Loewe TV set, the Timer data is
stored in the TV set (message: ”Timer data
stored”)
• how to find the timer data for satellite
recordings in your TV set: in video mode,
call up the video menu, select Timer change
and delete and call up with OK. There is no
entry in the Timer list of the video recorder.
Insert a cassette without record protection.
Select the record speed, SP or LP, as
described above,, because this setting
cannot be done via Digital Link Plus.
17.04.2003, 15:29 Uhr
Settings for the video recorder
Language
Special information
Time and date
You may remember that you selected ”your”
menu language when first installing the video
recorder. If the language has been inadvertently
changed by you or by another user, you must
re-select the language. To make it easier for you
to find the menu entry for ”language” in a
foreign language, we have made it the last line
of the VCR menu.
Proceed as follows:
Under Special Information in the VCR menu you
will find details of the state of the video heads,
whether record protection is active or not, the
number of Timers, and the next Timer for
recording with the video recorder.
To call up Special Information:
In order to programme timer recordings
(including for ShowView) you require an
accurate time and the correct date.
You only need to enter time and date manually
if the station you are receiving transfers no
data or incorrect data, or the menu item
”Autom setting.” in the ”Time and Date” menu
is set to ”No”
Proceed as follows:
M
M
Call up VCR menu
–––––––––– VCR-Menu ––––––––––
Timer list
Special info
Time and date
Stations
Settings
Language
OK
Select and
proceed with OK
M
E
OK
Back
End
OK
M
E
M
E
Back
End
M
E
E
Confirm with OK
Back
End
–––––––– ./Time and date –––––––
Adjust autom.
No
Time
21:15
Date
23.11.02
OK
E
Back
End
M
E
Back
End
Close menu
E
Close menu
Select or
... Input
Select these menu items one
after the other and enter the
current time and the date using
the numerical keys on the
remote-control.
No
Select
and call up with OK. The Time
and Date menu will be
displayed.
Select ”No” in the ”Autom.
setting” item. The menu items
for time and date appear.
––––––––– ./Special info ––––––––
Video Head Status
Record Protection
Timer Entries
Next Timer
Select your menu language
OK
OK
Highlight the required
information. The respective
information is displayed under
the menu items.
––––––––––– ./Language ––––––––––
GB Language
D Sprache
F Langue
I
Lingua
E Idioma
NL Taal
Set with OK
Select and
proceed with OK
Call up the VCR menu
Highlight the ”time and date”
item
and call up with OK. The Special
Information list is displayed
–––––––––– VCR-Menu ––––––––––
Timer list
Special info
Time and date
Stations
Settings
Language
and call up with OK. The list of
menu languages is displayed
OK
M
Highlight the ”Special info”
menu item
Highlight last menu item
OK
Call up VCR menu
Close menu
17
BA_VCR_31251_020EU_GB2
17
17.04.2003, 15:29 Uhr
Settings for the video recorder
TV stations with Digital
Link Plus
Search for TV stations on
video recorder
If you have connected your video recorder to a
TV set with Digital Link Plus or a comparable
system from another manufacturer (e.g..
EasyLink, Mega Logic, Project 50), the station list
will be transferred from the television set to the
video recorder. This occurs when you register the
video recorder with the TV set, or when you
make any changes to the stations on the TV set
(re-sorting, deleting, adding). After a change of
this sort, the TV set will ask you to start transfer
of the changed station list.
The video recorder detects a connected TV set
with Digital Link Plus or a similar system from
another manufacturer and adjusts the video
recorder accordingly. This means that you cannot
search for, delete or sort TV stations on the video
recorder. The menu items are greyed out; for an
automatic search it is only possible to download
the station data from the TV set.
Note that all stations that you receive via
antenna or cable must be stored in station
numbers 1 to 88 on the TV set.
If the TV set does not request you to transfer the
station data, then start the transfer on the video
recorder. Start the transfer in the VCR menu –
Stations –”Download from TV”.
If your TV set is equipped with Digital Link Plus
or with a comparable system from another
manufacturer, please carry out all changes to
broadcasts only on the TV set.
If the television set that you have connected to
the video recorder does not have Digital Link
Plus or a comparable system, then you should
harmonise the video recorder and TV set station
lists. This will help you to find stations on the TV
set and video recorder.
You have a TV set without Digital Link Plus or a
comparable system from another manufacturer.
In this case, you must automatically search for
the station to be received on the video recorder,
or enter the information manually.
Before carrying out the automatic search, enter
the video recorder location (country). Then on
completion of the automatic search a countryspecific sort of the stations found will be
carried out.
Set video recorder location
Call up VCR menu
M
Highlight ”Stations”
OK
Search for TV stations automatically
After you have entered the video recorder
location, start the station search.
Highlight ”automatic search”
––––––––––– ./Stations –––––––––––
Location of Set
Automatic Search
Manual Adjustment
Sort/Delete
Download from TV
OK
E
Back
End
OK
Call up ”automatic search”
OK
Press OK to start automatic
search
––––– ../Automatic Search –––––
no. Chan.
Fine
Name
01
C02
00
BR3
02
C03
00
WDR
03
C05
00
KABEL
04
C06
00
RTL2
Call up ”Stations”
Search in
progress, wait!
OK
Call up ”Location of set”
––––––– ../Location of Set –––––––
others ...
S Sweden
SF Finland
Other Location
OK
Select, store
with OK
M
E
Back
End
M
E
Back
End
During the search the stations found are
displayed in the list. A status bar gives you an
overview of the progress of the search.
After the station search, the stations are sorted.
The menu then displays a message ”Search
ended”.
E
Select the country in which you
are using your video recorder.
Confirm selection. The
”Stations” menu is displayed
again.
18
18
M
Highlight”Location of set”
OK
BA_VCR_31251_020EU_GB2
Select and
proceed with OK
17.04.2003, 15:29 Uhr
Close menu
Settings for the video recorder
Sort/delete
As mentioned in the introduction to this
section, you can only sort and delete stations
on the video recorder, if no Digital Link Plus TV
set or TV set with a comparable system from
another manufacturer is connected.
M
Call up VCR menu
Highlight ”Stations”
Manually set TV stations
Set stations manually if a new TV station can be
received, a missing station name is to be entered
or a station is to be fine-tuned. If the video
recorder is connected to a TV set with Digital
Link Plus or a comparable system, you can only
fine-tune the station. The other menu items
cannot be implemented. These settings can only
be carried out on the TV set
.
M
Call up VCR menu
If you know the channel number of the station,
highlight ”Channel” and enter the channel
number (two digits – e.g. 02 for channel 2) with
the numerical keys of the remote control.
If you don’t know the channel number, highlight
”Search for station” and press the OK key to
start the search.
When you have found a new station, check the
station name, which is normally transferred with
the station. If no name is transferred:
Highlight ”Station name”
OK
Call up ”Stations”
Highlight ”Stations”
Highlight ”Sort/delete”
OK
Call up ”Sort/delete”
OK
OK: Sort
: Delete
M
E
Back
End
Highlight the station to be moved
to another position or to be
deleted
Press OK to sort
OK
Use arrow keys to select a letter
or a number.
Call up ”Manually adjustment”
––––– ../Manual adjustment –––––
Station Number
Channel Range
Channel
Fine Tuning
Station Name
Station Search
OK
Select or
... Input
Move to the next character of the
name...
33
Cable
S21
00
ORF
M
E
... and again select a letter or
number (up to five characters).
Store
Cancel
OK
Highlight
”Station number” ...
When you have finished, press
the OK key.
... and enter a free memory
location.
Move station
OK
OK
Call up ”Stations”
Highlight ”Manually adjustment”
––––––––– ../Sort/Delete ––––––––
no. Channel Fine Name
01
C08
00
ARD
02
C07
00
ZDF
03
S17
00
WDR 3
04
C02
00
BR3
05
S09
00
HR3
06
S21
00
N3
others ...
OK
OK
Press the OK key to change. The
first character of the name has a
flashing underline. Enter the first
character here; do not enter a
space.
Close move
Highlight ”Channel range”.
To delete a highlighted station
Press the < key
For channels E02 ... E12 and
E21 ... E69 select VHF/UHF. For
cable channels S01 ... S41
select ”cable”.
19
BA_VCR_31251_020EU_GB2
19
17.04.2003, 15:30 Uhr
Settings for video recorder
Download stations from the TV
If you have made changes to antenna or cable
(not satellite) stations on the attached TV set, the
new station data must be transferred to the video
recorder (for TV sets with Digital Link Plus or
comparable systems from other manufacturers).
This ensures that for direct and Timer recordings
the video recorder records the correct station.
To transfer the station data from the TV set:
M
Call up VCR menu
Highlight ”Stations”
Settings
Behind the menu item ”settings” in the VCR
menu you will find a number of settings for the
video recorder.
Colour standard
By default, the colour standard used is the one
that was recorded. The video recorder
recognises the standard automatically.
If the video recorder does not recognise the
colour standard, you must set it manually. You
can switch between Autom., PAL and
MESECAM as follows.
M
OK
Call up ”Stations”
Switch on/off memory stop at 000
Using the 000 key you can set the counter to
zero at any point when the tape is running e.g.
at the start of a new recording. When the tape
is wound backwards, it will stop at 000, if
”Stop at 000” is set to ”On”.
M
Highlight ”Settings”
OK
Call up VCR menu
Highlight ”Settings”
––––––––––– ./Settings –––––––––––
–––––––––– VCR-Menu ––––––––––
Timer list
Special info
Time and date
Stations
Settings
Language
OK
OK
OK
Select and
proceed with OK
M
E
Back
End
Call up ”Download from TV”
Select and
proceed with OK
M
E
OK
Call up ”Settings”
Highlight ”Colour Standard”
––––––––––– ./Settings –––––––––––
please wait!
DLP
Display on video recorder during
data transfer.
The transfer of the station data starts
immediately. To cancel, use the E key.
Colour Standard
Stop at 000
Status Display
Picture Format
Decoder
Sharpness
others ...
Select
and set
Autom.
On
On
Autom.
On
Normal
M
E
Back
End
Select colour standard”,
Autom”, ”PAL” or ”MESECAM”
20
BA_VCR_31251_020EU_GB2
20
Select
and set
Autom.
On
On
Autom.
Off
Normal
M
E
Back
End
Switch on/off Stop at 000
Digital Link Plus
transmission,
Cancel
Colour Standard
Stop at 000
Status Display
Picture Format
Decoder
Sharpness
others ...
Back
End
–––––– ../Download from TV ––––––
E
Call up ”Settings”
Highlight ”Stop at 000”
Highlight ”Download from TV”
––––––––––– ./Stations –––––––––––
Location of Set
Automatic Search
Manual Adjustment
Sort/Delete
Download from TV
Call up VCR menu
17.04.2003, 15:30 Uhr
Settings for the video recorder
Switch on/off status display
You can switch on/off the display of the tape
running function, the counter, the remaining
tape, etc. If the status display is switched off, it
does not appear when the tape run functions are
operated. It can be displayed as before by using
the E key.
Picture format via Euro AV
The video recorder recognises the picture format
used for recording automatically, if the menu
item ”Picture format” is set to ”Autom.”. During
play you can set the format manually to 16:9 or
4:3.
M
M
M
Call up VCR menu
Highlight ”Settings”
Call up VCR menu
Call up VCR menu
OK
Highlight ”Settings”
Highlight ”Settings”
OK
Picture sharpness
During play, screen resolution can be set as
required. You can select normal, soft or sharp.
OK
Call up ”Settings”
Call up ”Settings”
Call up ”Settings”
Highlight ”Sharpness”
––––––––––– ./Settings –––––––––––
Highlight ”Picture format”
Highlight ”Status display”
––––––––––– ./Settings –––––––––––
––––––––––– ./Settings –––––––––––
Colour Standard
Stop at 000
Status Display
Picture Format
Decoder
Sharpness
others ...
Autom.
On
On
Autom.
Off
Normal
Select
and set
M
E
Back
End
Colour Standard
Stop at 000
Status Display
Picture Format
Decoder
Sharpness
others ...
Select
and set
Autom.
On
On
Autom.
Off
Normal
M
E
Colour Standard
Stop at 000
Status Display
Picture Format
Decoder
Sharpness
others ...
Select
and set
Back
End
Autom.
On
On
Autom.
Off
Normal
M
E
Back
End
Set picture sharpness
Select ”Picture format”
Switch on/off Status display
21
BA_VCR_31251_020EU_GB2
21
17.04.2003, 15:30 Uhr
Settings for the video recorder
Child lock
In the ”Settings” menu, you can activate the
child lock. With the child lock activated and the
video recorder set to standby, the video
recorder cannot be used. However, the remote
control can still be used for operation.
You must therefore store the remote control out
of the reach of children.
To activate/deactivate the child lock:
M
M
Call up VCR menu
Highlight ”Settings”
Call up VCR menu
OK
Highlight ”Settings”
OK
Switch off automatically
Five minutes after the last operation the video
recorder switches automatically to Standby in
Stop Mode if there is no menu open and if
”Autom. switch off” is set to ”Yes”.
Call up ”Settings”
Highlight ”Autom. Switch off”
(via ”others”)
Call up ”Settings”
––––––––––– ./Settings –––––––––––
Highlight ”Child lock” (via
”other”)
––––––––––– ./Settings –––––––––––
others ...
Child Lock
Autom. switch off
AV Control Voltage
Decoder at AV2
Power save Standby
On
Yes
On
No
Off
others ...
Child Lock
Autom. Switch off
AV Control Voltage
Decoder at AV2
Power save Standby
Select
and set
On
Yes
On
No
Off
M
E
Control voltage via Euro AV cable
The control voltage of the video recorder
causes the TV set to switch over to the display
of the signal. Therefore, at the start of play it
appears immediately on the TV set. If you
rewind or fast forward, the station received by
your video recorder will be displayed on the
screen of your TV set. In this case, you cannot
switch to another station on your TV set.
If your TV set has Digital Link Plus you may be
able to dispense with the control voltage, as
the TV set switches over without control
voltage when the video is playing.
If you have connected your video recorder to
the TV set without Digital Link Plus or a
comparable system and de-activated the
control voltage, you must select the AV
programme on the TV set when playing. This
differs from set to set; refer to the operating
instructions of your TV set.
M
Back
End
Call up VCR menu
Highlight ”Settings”
Autom. Switch off Yes/No
Select
and set
M
E
Back
End
OK
Call up ”Settings”
––––––––––– ./Settings –––––––––––
Switch child lock on/off
others ...
Child Lock
Autom. switch off
AV control Voltage
Decoder at AV2
Power save Standby
A video that is running can be watched to the
end or stopped on the video recorder.
Note that the Loewe remote controls for TV
sets and DVD players can be switched to VCR
operation, so make sure these are also stored
out of the reach of children.
Select
and set
On
Yes
On
No
Off
M
E
Highlight ”Control voltage”
(via ”other”)
Control voltage off/on
22
BA_VCR_31251_020EU_GB2
22
Back
End
17.04.2003, 15:30 Uhr
Settings for the video recorder
Decoder on the video recorder AV socket 2
A pay decoder is registered in the Loewe TV set,
as described on page 7. If you connect a pay TV
decoder to the Euro AV socket 2 (upper socket) of
the VCR, mark this with ‘Yes’ in the settings for
the menu item ”Decoder at AV2”. Select ‘No’ if
no pay TV decoder, satellite tuner or other video
recorder is connected.
M
Switch power save standby on/off
Using the O key, you can switch the video
recorder to standby. You can select either
”Normal” standby, in which the time and the
cassette symbol appear darker in the display (if a
cassette is inserted) or ”Power save standby”, in
which the display on the video recorder is
switched off.
M
Call up VCR menu
Call up VCR menu
Set transmitter channel of
the video recorder
If transmitter channel 36 of the video recorder
suffers interference from a TV station, then
another channel must be selected on both the
TV set and the video recorder.
Select it on the video recorder as follows:
Switch the video recorder to
standby (time is displayed)
Highlight ”Settings”
Highlight ”Settings”
P–
OK
Call up ”Settings”
OK
Call up ”Settings”
––––––––––– ./Settings –––––––––––
Highlight ”Decoder at AV2” (via
”Others”)
––––––––––– ./Settings –––––––––––
others ...
Child Lock
Autom. switch off
AV control Voltage
Decoder at AV2
Power save Standby
Select
and set
On
Yes
On
No
Off
M
E
others ...
Child Lock
Autom. switch off
AV control Voltage
Decoder at AV2
Power save Standby
Select
and set
RF36
On
Yes
On
No
Off
M
E
P–
Back
End
Highlight ”Power save standby”
(via ”Others”)
On the video recorder, select each TV station one
after the other. Press the M key to call up the
VCR menu each time and highlight ”Settings”.
Press OK to call up ”Settings” and highlight
”Decoder”. Select ”On”. The decoder switches
on automatically if you switch to a pay TV station
and decodes the incoming signal.
Power save standby on/off
If a Timer recording is programmed, the unit
always switches to normal standby with display
in the recorder, instead of power save standby.
P+
RF38
The selected transmitter
channel is displayed on the
video recorder
Choose another channel
(– lower, + higher channel)
e.g. display on video recorder
Save this setting with the stop/
eject key on the video recorder.
Back
End
Select decoder ”Yes/No”
P+
Press both station keys on the
video recorder (under the flap)
together for four seconds
Set the TV set for station number 0 to this
channel as well. Refer to the operating
instructions of your TV set. To find the
transmitter of the video recorder, start playing a
cassette or have it displayed by the VCR menu
by pressing the M key on the remote control of
the video recorder.
––––––––––– ./Settings –––––––––––
Colour Standard
Stop at 000
Status Display
Picture Format
Decoder
Sharpness
others ...
Autom.
On
On
Autom.
On
Normal
Select
and set
M
E
Back
End
23
BA_VCR_31251_020EU_GB2
23
17.04.2003, 15:30 Uhr
Settings for the video recorder
Switch on Digital Link on
the video recorder
Switch on Digital Link if you have connected
the video recorder to a Loewe TV set via a Euro
AV cable. The advantages are:
• the video recorder can be installed in a
concealed location;
• the video control bar of the Loewe TV can
be used;
• Timer recordings can be controlled from the
TV set (including Loewe TV sets without
Digital Link Plus. e.g. for recording from an
integrated satellite tuner.
To switch Digital Link on the video recorder on
and off:
+
Hold down the Pause key ,
P+ then press P+
Display on video recorder
(Digital Link switched on).
LINK
or
FRONT
Display on video recorder
(Operation via video recorder
switched on).
If the child lock is activated, Digital Link cannot
be switched on.
For timer recordings controlled from the Loewe
TV set the recording start time is established by
the TV set, and picture and sound are
transferred via the Euro AV cable to the video
recorder.
With Digital Link switched on point the VCR
remote control at the Loewe TV set. The
commands will be transferred to the video
recorder via the Euro AV cable. If two video
recorders are connected, you must select the
one you want to use before operating the video
recorder.
There are several ways of selecting the video
recorder to be used:
Via the video operating bar of the Loewe
TV set
Use the V= key to call up the video control bar,
and select with hg keys directly the set to be
operated. Using the E or V= key, close the video
control bar and operate the selected video
recorder via the TV set.
Via the AV selection of the Loewe TV set
Call up the AV selection with the 0 numerical
key.
Using the hg keys select the socket, which
the video recorder to be used is connected to.
You can now operate the selected video
recorder via the TV set.
Via the station list of the TV set
Using the OK key call up the station list of the
TV set.
< > highlight the
Using the arrow keys hg
hg<
AV socket (AV1 or AV2) to which the video
recorder to be operated is connected (if a DVD
player is also connected, AV3) and press OK to
switch to the socket.
You can now operate the selected video
recorder via the TV set.
Repeat first installation
It is worth repeating the first installation
procedure if you have moved house or the
video recorder is to be operated in conjunction
with another TV set.
To start the first installation:
Switch the video recorder to standby.
+
1.Inst
24
Display on video recorder
(1.Inst = First Installation)
The video recorder switches on. The language
selection menu appears.
Select ”your” language and continue with OK.
Enter the location of set if necessary. Confirm
again with OK.
Then carry out the station search procedure, as
necessary. Further information can be found on
Page 8.
24
BA_VCR_31251_020EU_GB2
Keep the „on“ key O on the
video recorder pressed down,
and press the play key on the
remote-control.
17.04.2003, 15:30 Uhr
Operating other Loewe equipment with the VCR remote-control
The video recorder remote control can be
switched to operate Loewe TV sets or Loewe
DVD players. These sets can be operated
directly.
Select the equipment to be operated:
For TV set
The TV indicator on the remote
control lights up
Press again, the DVD indicator
lights up ...
Press again, no indicators light
up, VCR operation is activated.
Functions for Loewe TV set with MediaPlus Chassis Q2500
If you switch to TV or DVD, the video recorder
cannot be used. Switch back to VCR or wait for
20 seconds, until the remote control switches
back to VCR operation automatically (no
indicators illuminated).
Functions for Loewe DVD player
Indicator: TV operation
Radio operation
on/off
Indicator: TV operation
Indicator: DVD operation
TV
Picture menu on/off
DVD
Select direct operation
for TV/DVD/VCR
PIP on/off
Control 201 VTR
V=
SV
LP
000
Switch on/off
– standby
TV/DVD/VCR
Select camera setting
Sound off/on
Repeat section/title/total
1
2
3
4
5
6
7
8
9
0
Call up menu
/in menu: back to menu
T
M
E
i
OK
Open station, time, title
of broadcast
/In menu: close menu
on/off
Pause or still frame
Call up main information
/in menu: Switch on/off Infotext
/frame-by -frame
In menu: Select up/
Personal Teletext
pages on/off
Set volume
/in menu: select or set
right/left
Station info on/off
Set picture format
Last station
Select sub-titles
DVD
Switch on/off
– standby
SV
LP
OSD menu on/off
000
Select title/section
via the menu
DVD/repeat from
DVD menu
Select station directly
/In menu: input digits
Call up station list
/in menu: Confirm
Select station
/in menu: Select up/down
Control 201 VTR
TV
V=
EPG mode
on/off
Video mode with video
control bar on/off
Teletext mode on/off
Select language
Indicator: DVD operation
Select direct operation for
1
2
3
4
5
6
7
8
9
Numerical keys
0
Remove OSD menu bar
T
down
on direct call up:
Pause/single frame
(above)
Slow motion (below)
Chapter/title back
/search backward
Stop (STOP)
M
E
i
Slow motion
Confirm menu choice
OK
In menu: select right/left
On direct call up: search
Chapter/title forward
/search forwards
PLAY
25
BA_VCR_31251_020EU_GB2
25
17.04.2003, 15:30 Uhr
What to do, if ...
Problem
Possible causes
Help
Digital Link Plus does not function
a) The video recorder has not been registered as
a Digital Link Plus set
b) The video recorder has been connected to the
wrong AV socket on the TV set
c) The Euro AV is not fully connected (Pin 10 not
assigned)
a) Enter Digital Link Plus in the menu or the
Connection Assistant
b) Attach Euro AV connection to correct socket
No stations or not all stations that are received
by antenna or cable are transferred to the video
recorder
All or some stations are stored at stations
positions ≥ 88 on the TV set
Sort stations on TV set in such a way, that those
received via antenna or cable are between 1
and 88.
The remote control is not operating
a) TV or DVD operation is selected
a) Switch to VCR operation (no indicators on
the remote-control illuminated)
b) Point remote control to TV and select AV
socket for several video recorders.
b) Digital Link switched on
c) Replace Euro AV cable with a fully assigned
cable.
The remote control does not function with the
TV and DVD
Battery discharged or incorrectly fitted
Replace batteries or install correctly
When playing, there is a mix of sound from the
TV loudspeaker
Two-sound programme is recorded on the
videotape
Select the correct sound using the L key on
the remote control.
A decoder connection does not function or is
faulty
a) Decoder is not connected to the AV2 socket of
the video recorder
b) Decoder is not registered in the video recorder
menu.
a) Connect decoder to the AV2 socket
All menus appear in the incorrect language
Menu language has been set incorrectly
Set menu language, as described in the
operating instructions, Page 17.
Automatic time and date settings are not
implemented.
a) For station position 1 a station has been stored
without time and date data, or no station is
stored
a) Implement station setting (broadcasts), as
described on Page 8 – for Digital Link Plus
on the TV set. (For satellite stations via TV,
automatic time/date setting is not possible)
b) In the ”Time and date ” menu, menu item
”Autom. Setting.” is set to ”No”
b) Set ”Autom. setting” menu to ”Yes”, see
Page 17.
b) Register the decoder as shown in the
operating instructions, Page 21.
26
BA_VCR_31251_020EU_GB2
26
17.04.2003, 15:30 Uhr
Technical data
ViewVision VV8106H
Dimensions in cm
Weight
Operating voltage
Power consumption, operation,
Standby
Power save standby
Video system
Video colour system
NTSC play
Sound systems
Internal transmitter
Video heads
Audio heads
Audio head
Tape speed
Tracking
Timer
Picture format switching
Link systems
Tuner systems
Reception ranges
Station storage locations
Tuner sound systems
Item No. 63550
36x9.5x27 (LxHxW)
4kg
200–240 a.c.
14 Watts
4,7 Watts
3 Watts
VHS
PAL/SECAM/MESECAM
only with PAL-TV
NICAM, stereo, two-sound, mono
UHF
4
2
(Mono audio track)
Long play/Standard play
automatic/manual
VPS, ShowView
Auto. /4:3/16:9
Digital Link/Digital Link Plus
PAL B/G, SECAM L
VHF/UHF/Cable/Hyperband
88
NICAM/Stereo/two-sound
Euro AV socket 1
Euro AV socket
Video input front
Audio inputs front
Audio outputs
Antenna signal
TV connection
decoder/other AV source
1 Cinch socket CVBS
2 Cinch sockets L/R
2 Cinch sockets L/R
2 IEC sockets IN/OUT
27
BA_VCR_31251_020EU_GB2
27
17.04.2003, 15:30 Uhr
Service addresses
Australia
International Dynamics Australasia Pty Ltd.
129 Palmer Street
AUS - Richmond, Victoria 3121
Tel. 03–94 29 08 22
Fax 03–94 29 08 33
Austria
Robert Bosch AG
Postfach 146
A–1011 Wien
Tel 01–79 72 24 500
Fax 01–79 72 24 599
Benelux
Loewe Opta Benelux NV/SA
Uilenbaan 84
B–2160 Antwerpen
Tel. 0902–88 00 2
Fax 03–235 48 37
Loewe Opta Nederland B.V.
Ravenswade, 54A1
NL–3439 LD Nieuwegein (Utrecht)
Tel. 0900–20 20 180
Fax 030–280 33 27
CIS
Service Center Loewe
ul. Verkhnyaya Maslovka, d. 29
RUS–125083 Moscow
Tel. 095–212 50 43, 956 67 64
Fax 095–212 47 10
Cyprus
L&M Eurappliances Ltd
P.O. Box 23426
Kennedy Avenue 1A&B
CY–Nicosia
Tel. 02–42 05 10
Fax 02–42 87 70
Czech Republic
TIPA sdruzení
Dolní nám. 9
CZ–746 01 Opava 1
Tel: 0653-62 49 44
Fax: 0653-62 31 47
Denmark
Kjaerulff 1 Development A/S
Vestre Stationsvej 9
DK–5000 Odense C
Danmark
Tel. 661 354 80
Fax 661 354 10
France
Sorep Import S.A.
11 rue de la Durance
F–67029 Strasbourg Cédex 1
Tel. 03–88 79 72 50
Fax 03–88 79 72 59
Germany
Loewe Opta GmbH
Kundendienst Zentrale
Indurstriestraße 11
D–96317 Kronach
Tel. 09261–990
Fax 09261–95411
Great Britain
Linn Products Limited
PO Box 8465
Prestwick
UK – KA 7 2YF
Tel. 01292–47 15 52
Fax 01292–47 15 54
Greece
SOUND HELLAS S.A.
Kleanthous Str. 10
GR–54642 Thessaloniki
Tel. 2310–856 100
Fax 2310–856 300
Hungary
Basys Magyarorszagi KFT
Epitok utja 2–4
H–2040 Budaörs
Tel. 023–415 637/121
Fax 023–415 182
Israel
RIF TRADING LTD
29 Izhak Sade Street
ISR–Tel Aviv 67213
Tel. 03–62 40 555
Fax 03–62 40 303
Italy
General Trading SpA
Via Vittorio Emanuele, 33
I–50041 Calenzano (FI)
Tel. 055–88 11 71
Fax 055–88 11 74 0
Malta
Mirage Holdings Ltd
Flamingo Complex
Cannon Road
M–Qormi
Tel. 49 71 82
Fax 44 59 83
Marocco
SOMARA S.A.
377, Rue Mustapha El Maani
MA–20000 Casablanca
Tel. 02–22 20 308
Fax 02–22 60 006
Norway
CableCom AS
Østre Kullerød 5
N–3214 Sandefjord
Tel. 033–48 33 48
Fax 033–44 60 44
Poland
Piotech
ul. Boh. Getta Warszawskiego 18
PL–81-609 Gdynia
Tel./Fax 058–62 43 467 / 058–62 45 009
Portugal
Videoacustica
Comercio e Representacoes de
Equipamentos Electronicos S.A.
Estrada Circunvalacao
Quinto do Paizinho, Arm. 5
P–2795-632 Carnaxicle
Tel. 21–42 41 770
Fax 21–41 88 093
Slowenia
Jadran Trgovsko Podjetje
Partizanska cesta 69
SL–6210 Sezana
Tel. 057–391 402, 391 406
Fax 057–391 400
South Africa
THE SOUNDLAB PTY LTD
P.O. Box 757
Parklands 2121
Republic of South Africa
Tel. 011–44 76 575
Fax 011–44 76 662
Spain
Gaplasa S.A.
Conde de Torroja, 25
E–28022 Madrid
Tel. 91–748 29 60
Fax 91–329 16 75
Sweden
Canseda AB
Amalia Jönssons Gata 19
S–421 31 Västra Frölunda
Tel. 031–70 93 760
Fax 031–47 65 15
Switzerland
Telion AG
Rütistrasse 26
CH-8952 Schlieren
Tel. 01–732 15 11
Fax 01–730 15 02
Turkey
Enkay Elektronik Servis Müdürlügü
Ambarlar Cad: No.: 3/C
Zeytinburnu/ Istanbul
Tel. 0212–582 36 69
Fax 0212–671 80 39
2/05.03/10,0
Subject to modification
28
BA_VCR_31251_020EU_GB2
28
17.04.2003, 15:30 Uhr