1
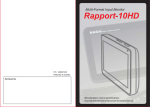
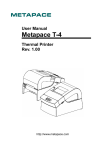
108*35mm 70*17mm SKU 1001 093 976 Model ZE00802A Non-Submersible Transfer Pump No sumergible Bomba de transferencia 115V 60Hz 1/10HP 1.8Amps THERMALLY PROTECTED PROTECCIÓN TÉRMICA logo Serial No./Serial No.: 000000 Date Code/Código de Fecha: 1439 WARNING/ADVERTENCIA • This pump is used for clean water only. • This pump is not waterproofed. Do not submerge in any liquid. • To increase impeller life, wet the impeller or fill out the inlet with water before connecting garden hoses. • Esta bomba se utiliza sólo agua limpia. • Esta bomba no está impermeabilizado. No lo sumerja en ningún líquido. • Para aumentar la vida del impulsor, mojar el impulsor o llene la entrada con agua antes de conectar las mangueras de jardín. name plate 42*42mm 60*35mm IN T WARNING/ADVERTENCIA U You MUST attach supplied clear hose onto INLET. Pump must be unplugged when water is gone. O You MUST use this suction strainer when using this pump. Push the clear hose into the rubber connection on the strainer. Failure to use this strainer WILL VOID WARRANTY! Place the strainer in at least 1/2 in. of water at the lowest point to be pumped. Debe utilizar este filtro de succión cuando se utiliza esta bomba. Empuje la manguera transparente en la conexión de goma en el colador. Si no se utiliza este filtro ANULARÁ LA GARANTÍA! Coloque el colador en al menos un medio en. De agua en el punto más bajo a bombear. WARNING/ADVERTENCIA Debe adjuntar suministrado manguera transparente en ENTRADA. La bomba debe ser desconectado cuando el agua se ha ido. warning 47mm*22mm This base will help prevent the pump from tipping over. DO NOT REMOVE! Esta base le ayudará a prevenir que la bomba de inflexión sobre. NO QUITE! warning pump lable 210*60mm WARNING SKU:1000 000 000 MODEL:ZE00802A • Connect the pump DIRECTLY to a properly grounded, 115V GFCI outlet and never use an extension cord to power this pump • Pull plug before servicing this pump • This pump has not been tested or approved for use in swimming pools or in salt-water marine areas • Do not pump flammable or explosive liquids, pump water only with this pump • To reduce risk of electrical shock, fully read, follow and save the operating and installation instructions before attempting to install or operate this pump • Do not run this pump dry • NOTICE: Do not handle pump with wet hands or when standing on a wet surface, or in water • Pump will be EXTREMELY LOUD when water is no longer pumped. UNPLUG IMMEDIATELY • This pump is not waterproofed. Do not submerge in any liquid MADE IN CHINA cord tag ADVERTENCIA SKU:1000 000 000 MODELO:ZE00802A • Conecte la bomba DIRECTAMENTE a una toma de tierra, nunca utilice un cable de extensión para proporcionar alimentación a la bomba • Desconecte la bomba antes de cualquier clase de mantenimiento • Esta bomba no se ha puesto a prueba y no ha sido aprobada para uso en piscinas o en áreas de agua salada • No bombee líquidos inflamables o explosivos, bombee solamente agua con esta bomba • Para reducir el riesgo de descarga eléctrica, lea totalmente, siga y guarde las instrucciones de uso e instalación antes de intentar instalar o utilizar la bomba • No haga funcionar esta bomba en seco • AVISO: No maneje la bomba con las manos mojadas o estando en agua o en la superficie mojada • La bomba resultar demasiado alto cuando el agua ya no se bombea. Desenchufe inmediatamente • Esta bomba no está impermeabilizado. No lo sumerja en ningún líquido. HECHO EN CHINA 90*130mm Repair Kit Item #3 – O-ring (Qty. 1) If you are noticing water leaking from the front of the pump, the O-ring may be worn. • To replace, using a Phillips head screwdriver, remove the 6 screws (#1), and then remove the impeller cover (#2). Remove the old O-ring (#3), and put in replacement. Reattach the impeller cover and the 6 screws. Item #4 – Impeller (Qty. 1) If no water is being pumped, but your pump is running, and you are using it properly, your impeller may possibly be worn or damaged. This can happen from running the pump dry or not using the suction strainer (debris enters pump and damages impeller). • To replace, using a Phillips head screwdriver, remove the 6 screws (#1), remove the impeller cover (#2), and then remove the O-ring (#3). Remove the damaged impeller (#4), and push the replacement onto the motor shaft (#5). Reattach the O-ring, impeller cover, and 6 screws. Item 1 2 3 4 5 6 7 8 9 Description Screw Impeller cover O ring Impeller Motor Shaft Brush Brush cap Washer Hose Quantity N/A N/A 1 1 N/A 2 N/A 1 N/A See reverse side for description of replacement parts. MAKE SURE PUMP IS UNPLUGGED BEFORE REPLACING ANY PARTS! IF YOU HAVE ANY QUESTIONS ABOUT REPLACING PARTS OR HOW TO OPERATE THIS PUMP, PLEASE CALL THE PUMP EXPERTS AT 1-844-241-5521. Item #6 – Brushes (Qty. 2) Brushes help your motor to work properly. However, after extended usage, it is normal for brushes to need replacement (after approximately 150 hours of usage). If you don’t replace the brushes when they become worn or dirty, your pump may not function to its fullest capability, and the life of the pump will be shortened. • There are 2 brushes (#6), one on each side of the motor. Using a flathead screwdriver, remove the brush caps (#7), then pull out the brushes (#6). Either clean the brushes, or replace with the new brushes. Thread the brush caps back on and hand tighten. Item #8 – Washer (Qty. 1) If you are noticing water leaking from the clear hose connection at the pump inlet, check to make sure the washer (#8) is in place correctly. An airtight seal is needed at the inlet in order for the pump to work. • If you are going to replace the washer, remove the old washer (#8) from the clear hose (#9), and replace it with the replacement washer. Always make sure to make a tight connection on the inlet. Quick Start Guide Non-Submersible Transfer Pump Read your manual for installation, operation, and safety information. This guide neither supplements nor replaces the Owner’s Manual. DO NOT RUN PUMP DRY! Dry running will void the warranty and damage pump. 1. Add water (approximately 1-2 Tbsp.) into the inlet to wet the impeller of the pump. 2. Attach the clear suction hose (included) to the suction strainer (included) by pushing the male threaded end into the rubber coupler on the suction strainer. Then place the strainer in at least 1/2 in. of water at the lowest point to be pumped. NOTICE: Make sure the connection is airtight. An air leak can cause the pump to run dry. 3. Thread the other end of the clear suction hose onto the suction inlet of the pump. NOTICE: Always ensure the washer in the hose connector is not damaged. An airtight seal is necessary for this pump to operate. Make sure the clear hose and suction strainer are in the water before plugging the pump in. 4. Thread a 5/8 in. or larger garden hose (sold separately, max 50 ft. length) to the discharge outlet on the pump. NOTICE: Make sure the end of the outlet hose is not under water. If the outlet is under water, the pump may not work. NOTICE: Never operate this pump unless it is secured to a solid foundation. 5. Attach the pump to a sturdy base (table, board, etc.) to prevent it from tipping over. Make sure the hoses are as straight as possible. WARNING: This pump CANNOT be submersed in water, and the motor CANNOT get wet at all. Getting the motor wet could cause electrocution, which could lead to serious injury or death! NOTICE: Do not coil or kink the hose. 6. To operate, plug the pump into a GFCI outlet. NOTICE: This pump can be very loud when plugged in. THIS IS NORMAL. Once water begins to pump, the noise will lessen. When the water level has been reduced to approximately 1/8 in., you MUST UNPLUG THE PUMP. DO NOT RUN DRY. The pump will be EXTREMELY LOUD when the pump is no longer pumping water. NOTICE: If water is not pumped in 30 seconds, unplug the power cord and check the connection on the two ends of the inlet hose to make sure there are no air leaks. Then, add water into the inlet again and repeat the process. NO COILS! NO KINKS! Guía de Referencia Rápida Bomba de transferencia para no sumergible Es importante leer el manual para obtener información sobre la instalación, la operación y la seguridad.Esta guía no complementa ni reemplaza al Manual del Propietario. NO HAGA FUNCIONAR LA BOMBA EN SECO! El funcionamiento en seco, se anulará la garantía y el daño de la bomba. 1. Añada agua (aproximadamente 1 a 2 cucharadas) en la entrada para mojar el impulsor de la bomba. 2. Conecte la manguera de succión transparente (se incluye) en el colador de succión (se incluye) al empujar el extremo roscado macho en el acoplador de goma del colador de succión. Coloque el colador al menos 1,27 cm en el punto más bajo de agua que sedebe bombear. AVISO: Verifique que la conexión esté cerrada herméticamente. Una fuga de aire puede hacer que la bomba funcione en seco. 3. Enrosque el otro extremo de la manguera de succión transparente a la entrada de succión de la bomba. AVISO: Asegúrese siempre de que el conector de la manguera no esté dañado. Es necesario un sello hermético para que esta bomba funcione. Asegúrese de que la manguera transparente y el colador de succión se encuentren en el agua antes de conectar la bomba. 4. Enrosque una manguera de jardín de 1,59 cm o más grande (se vende por separado, longitud máx. de 15,24 m) en la salida de descarga de la bomba. AVISO: Asegúrese de que el extremo de la manguera de salida no esté debajo del agua. Si la salida está bajo agua, puede que la bomba no funcione. AVISO: Nunca haga funcionar esta bomba a menos que se fije a una base sólida. 5. Adhiera la bomba a una base fuerte (mesa, tabla, etc.) para evitar que se vuelque. Asegúrese de que las mangueras estén lo más rectas posibles. ADVERTENCIA: Esta bomba NO PUEDE estar sumergida en agua y el motor NO PUEDE mojarse para nada. ¡Mojar el motor podría causar electrocución, lo que podría provocar lesiones graves o la muerte! AVISO: No enrolle ni doble la manguera. 6. Para hacerla funcionar, conecte la bomba a un tomacorriente GFCI. AVISO: Esta bomba puede ser muy ruidosa cuando se la enchufa. Cuando el nivel de agua se ha reducido a aproximadamente 3,18 mm, DEBE DESCONECTAR LA BOMBA. NO LA HAGA FUNCIONAR EN SECO. La bomba es EXTREMADAMENTE RUIDOSA cuando ha dejado de bombear agua. AVISO: Si no se bombea agua en 30 segundos, desconecte el cable eléctrico y compruebe la conexión de los dos extremos de la manguera de entrada para asegurarse de que no haya fugas de aire. A continuación, añada agua a la entrada de nuevo y repita el proceso. NO BOBINAS! Existan dobleces! al menos de 1/2 " NON-SUBMERSIBLE WATER TRANSFER PUMP . Let Us Help You ! Permítanos Help ! Do not return your product to the store. Call us first! If you have questions regarding your product or require warranty assistance, please call our customer service toll-free helpline No devuelva su proudct a la tienda. Llámenos primero! Si tiene alguna pregunta con respecto a su producto o si necesita asistencia con la garantía, por favor llame a nuestra línea de ayuda de servicio al cliente de gratis 1-844-241-5521 Contact us for assistance, we're here to help. En contacto con nosotros para obtener ayuda, estamos aquí para ayudar.