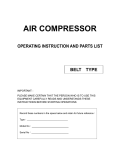
1
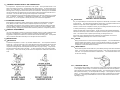
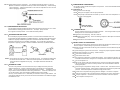
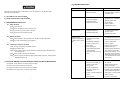
TABLE OF CONTENTS
AIR COMPRESSOR
PAGE
1:IMPORTANT SAFETY INSTRUCTION_________________________________ 3-4
2:GENERAL DESCRIPTION__________________________________________ 5
3:ON RECEIPT INSPECTION_________________________________________ 5
OPERATING INSTRUCTION AND PARTS LIST
4:GENERAL REQUIREMENT_________________________________________ 5
5:INSTALLATION___________________________________________________ 5-7
6:COMPRESSOR LUBRICATION______________________________________ 8
7:INITIAL START UP PROCEDURE____________________________________ 8
DIRECT TYPE
8:MAINTENANCE CHECK LIST_______________________________________ 9
9:STORAGE_______________________________________________________ 9
10:TROUBLE SHOOTING____________________________________________ 10-11
IMPORTANT:
PLEASE MAKE CERTAIN THAT THE PERSON WHO IS TO USE THIS
EQUIPMENT CAREFULLY READS AND UNDERSTANDS THESE
INSTRUCTIONS BEFORE STARTING OPERATIONS
Record these numbers in the space below and retain for future reference:
Type:________________________________
Model No:ˍ___________________________
Serial No:_____________________________
2
1:IMPORTANT SAFETY INSTRUCTION
IMPROPER OPERATION OR MAINTENANCE OF THIS PRODUCT COULD RESULT IN SERIOUS INJURY
AND PROPERTY DAMAGE。
● BEFORE STARTING COMPRESSOR,PULL SAFETY VALVE RING TO MAKE SURE
THE VALVE MOVES FREELY。THE SAFETY VALVE IS FACTORY INSTALLED TO
PREVENT THE AIR RECEIVER FROM DAMAGE SHOULD MALFUNCTION OCCUR IN
THE PRESSURE SWITCH,IT IS FACTORY SET AT A SPECIFIC LIMIT FOR YOUR
PARTICULAR MODEL,AND SHOULD NEVER BE TAMPERED WITH, ADJUSTMENT
BY USER WILL AUTOMATICALLY VOID WARRANTY。
1-4:RISK OF BURNS
READ AND UNDERSATND ALL INSTRUCTIONS BEFORE INSTALLING OR USING YOUR AIR
COMPRESSOR UNIT,IT CONTAINS VALUABLE INFORMATION THAT WILL HELP YOU IN THE SAFETY
INSTRUCTION RECEIVING、INSTALLATION、USE、AND MAINTENANCE OF THE UNIT,KEEP THIS
BOOKLET IN A SAFE PLACE FOR FUTURE REFERENCE。
● HOT SURFACE CAN CAUSE SERIOUS INJURY,NEVER TOUCH ANY EXPLOSED
METAL PARTS ON COMPRESSOR DURING OR IMMEDIATELY AFTER
OPERATION,TOUCHING THESE AREAS MAY CAUSE SEVER BURNS。
● DO NOT REACH AROUND PROTECTIVE SHROUNDS OR ATTEMPT MAINTENANCE
UNTIL UNIT HAS BEEN ALLOWED TO COOL。
1-5:RISK OF BREATHING
1-1:RISK OF FIRE
● DO NOT SPRAY COMBUSTIBLE OR FLAMMABLE LIQUID IN A CONFINED AREA,
SPRAY AREA MUST BE WELL VENTILATED。
● DO NOT USE COMPRESSORED AIR FOR BREATHING,WHEN SPRAING USE
RESPIRATORY PROTECTION IN A WELL VENTILED AREA。
● DO NOT SMOKE WHILE SPRAYING OR SPRAY WHERE SPARK OR FLAME IS
PRESENT。
● COMPRESSOR AIR FROM THE UNIT MAY CONTAIN POISONOUS VAPOURS
WHICH IS NOT SUITABLE FOR INHALEING AND COULD BE HARMFUL TO YOUR
HEALTH。
● ARC PARTS KEEP COMPRESSOR AT LEAST 12 ~ 18 INCHES AWAY FROM
SPRAYING AREA AND ALL EXPLOSIVE VAPORS。
● WORK IN AN AREA WITH GOOD CROSS-VENTILATION。
1-6:RISK FROM MOVING PARTS
1-2:RISK OF ELECTRICAL SHOCK
● DISCONNECT COMPRESSOR FROM ELECTRICAL SUPPLY CIRCUIT BEFORE
SERVICING。
● UNIT STARTS AUTOMATICALLY, DO NOT OPERATE WITH GUARDS OR COVERS
REMOVED OR BROKEN。
● DO NOT EXPOSE COMPRESSOR TO RAIN OR OPERATE IN A WET AREA。
● ANY REPAIRE REQUIRED ON THE PRODUCT SHOULD BE PERFORMED BY
AUTHORIZED SERVICE CENTER PERSONNEL。
● NEVER USE THE AIR COMPRESSOR WITHOUT CONNECTION TO A PROPERLY
GROUNDED OUTLET WITH THE SPECIFIED VOLTAGE AND FUSE PROTECTION。
● MOVING PARTS DO NOT TOUCH。
● THE COMPRESSOR MUST BE LOCATED A MINIMUM OF 12 ~ 18 INCHES FROM
ANY SOURCE OF POTENTIALLY EXPLOSIVE VAPOURS。
● IMPROPER GROUNDING CAN RESULT IN ELECTRICAL SHOCK。
1-3:RISK OF EXPLOSION
● DRAIN TANK DAILY ,CONDENSED WATER WILL CAUSE RUSTING AND RISK OF
TANK RUPTURE OR EXPLOSION。
● DO NOT REPAIR、MODIFY OR WELD TANK,RETURN TO AUTHORIZED SERVICE
CENTER IF REPLACEMENT IS REQUIRED。
● DO NOT ADJUST REGULATOR TO RESULT IN OUTPUT PRESSURE GREATER
THAN MARKED MAX. PRESSURE OF ATTACHMENT。
● PRESSURE SWITCH IS SET AT THE FACTORY FOR OPTIMUM PERFORMANCE OF
YOUR PARTICULAR MODEL,NEVER BYPASS OR REMOVE PRESSURE SWITCH AS
SERIOUS DAMAGE TO EQUIPMENT OR PERSONAL INJURY COULD RESULT
FROM TOO HIGH OF PRESSURE。
3
1-7:RISK FROM FLYING OBJECTS
● ALWAYS WEAR ANSI Z87.1 APPROVED SAFETY GLASSES WITH SIDE SHIELDS
WHEN USE THE AIR COMPRESSOR。ALWAYS WEAR PROPER SAFETY
EQUIPMENT WHILE USING COMPRESSORED AIR。
● DO NOT DIRECT AIR STREAM TOWARD ANY PARTS OF THE BODY OR AT OTHER
PEOPLE。
● UNPLUG POWER CORD AND DRAIN ALL AIR PRESSURE FROM TANK BEFORE
SERVICING AND AFTER EACH USE。
1-8:RISK OF PROPERTY DAMAGE WHEN TRANSPORTING COMPRESSOR
● ALWAYS PLACED COMPRESSOR ON A PROTECTIVE MAT WHEN TRANSPORTING
TO PROTECT AGAINST DAMAGE TO VEHICLE FROM LEAKS。
● NEVER OPERATE COMPRESSOR ON A ROOF OR OTHER ELEVATE POSITION。
● ALWAYS OPERATE COMPRESSOR IN A STABLE POSITION TO PREVENT
ACCIDENTAL MOVEMENT OF THE UNIT。
4
2: GENERAL DESCRIPTION OF AIR COMPRESSOR
To compress air,the piston move up and down in the cylinder, During the down-stroke,air is
drawn in through the inlet valve,The discharge valve remains closed, On the up-stroke of the
piston,air is compressed。The inlet valve closes and compressed air is forced out through the
discharge valve、through the check valve and into air receiver tank。Working air is not available
until the compressor has raised the air receiver pressure above that required at the air service
connection。The air inlet filter openings must be kept clear of obstructions。
Your air compressor can be used for operating paint spray guns、air tools、caulking guns、grease
guns、air brushes、sandblaster、or inflating tires and plastic toys、spraying weed killer and
insecticides、etc., An air regulator is usually necessary for most of these application。
5.2:ELECTRICAL
3:ON RECEIPT INSPECTION
Each PUMA air compressor outfit is carefully factory tested and inspected before shipment。
Every attempt is made to ensure safe and complete shipment of our products。 It is the
responsibility of the receiver of the goods to ensure the products has been shipped in full and
arrival in suitable condition to avoid expenses being incurred to correct such problems。With
improper handling,damage may result in transit and cause problems in compressor operation。
4:GENERAL REQUIREMENT
It is your responsibility to ensure air compressor is installed correctly,as well as maintained and
serviced on a regular basis。Information has been included in this booklet outlining the
suggested air compressor maintenance schedules and a trouble shooting guide。 It is important
that you read this information and keep it in a safe place for future reference。
5:INSTALLATION
It is your responsibility to ensure that the air compressor is electrically connected in a safe and
correct manner。 Any electrical work should be carried out by a competent electrician and
installed in a way which meets all applicable codes and regulations。
Failure to connect the air compressor correctly to your buildings electrical services may result
in serious personal injury or damage to the equipment。
Please note that under normal conditions,the air compressor will operate intermittently。
Should it be necessary to service that air compressor ensure the power source has been shut
down。This must be down to prevent personal injury or damage to the unit。
If the supply cord is damaged it must be replaced by the manufacturer or its service
agent or a suitable qualified person in order to avoid a hazard.
5-2-1:MOTOR
5.1:MECHANICAL
Located the compressor in a clean、dry and well ventilated area。 The compressor should be
located 12 ~ 18 inches from a wall or any other obstruction that would interfere with the air flow
through the cooling function。Place the air compressor on a firm and level surface。 The air
compressor is designed with heat dissipation fins that allow for proper cooling。 Keep the fins
and other parts that collect dust or dirt clean。 A clean compressor runs cooler and provides
longer service。 Allow room for easy access to the air compressor for maintenance and service
work。
Wiring must be down in a manner that full voltage nameplate ± 10% is available at the
motor terminals during startup。Use of an incorrect electrical motor for your particular
building service will result in premature motor failure and is not covered by PUMA
compressor or motor manufacture’s warranty。
5-2-2:RESET SWITCH
Ensure that all guards and shrouds are in place before pressing reset switch to restart the
motor。 If the motor shuts down because of overload ,wait 10-15 minutes so the motor can
cool down,then press the reset switch to restart motor。 The reset switch button is located
on the motor housing。
5-2-3:PRESSURE SWITCH
The pressure switch located on the compressor unit acts as a pilot device activating the coil
on the magnetic starter except on contractor and professional units where the pressure
switch would act as a pilot device activating the motor。The pressure switch cut in/cut out has
been preset at the factory,do not tamper with the settings。 Never bypass or remove this
switch ,as serious damage to equipment or personal injury could result from too high of an
air pressure。Consult your local distributor or service center should the switch not be
operating properly。
5
6
5-2-3-1:This pressure turn the compressor, it is operated manually but when it is in the “on”
position,it allows the compressor to start up or shut down automatically, without warning
upon air demand。 Always set this switch to “off” when the compressor is not in use and
before unplugging compressor。
6:COMPRESSOR LUBRICATION
Do not add or change oil while the compressor is in operation,use the recommended SAE10-30W
non-detergent oil only。
6-1:Filling the oil
6-1-1:Remove the oil filler plug。
6-1-2:Slowly pour the proper oil into the pump crankcase。
6-1-3:Always keep oil level between the marks “up” and “low” level on the oil dipstick or on the
red circle on the sight glass。
5-2-4:AIR PRESSURE REGULATOR
The air pressure regulator enables operator to adjust line pressure to the tool in use。Never
exceed maximum working pressure of the tool。 To adjust,pull up on knob
turn to right to increase pressure,and to left to decrease pressure。
5-2-5:GROUNDING INSTRUCTIONS
Do not modify the plug that has been provided,if it does not fit the available outlet,the
correct outlet should be installed by a qualified electrician。The plug must be plugged into an
outlet that is properly installed and grounded in accordance with all local cades。 If these
grounding instructions are not completely understand,or if in doubt as to whether the
compressor is properly grounded,have the installation checked by a qualified electrician。
6-2:CHANGE THE OIL
Change oil after the first 8 hours of compressor operation, then change oil after every 300
working hours or 3 months whichever comes first。
6-2-1:Remove the oil drain plug,allow oil to drain out。
6-2-2:Replace the oil drain plug,the use of a sealing compound or Teflon tape to avoid leakage is
recommended。
6-2-3:Refill with the recommended oil to the proper level。
7:INITIAL START UP PROCEDURE
Do not attempt to operate the air compressor unit without first checking the oil level in the pump,
add oil as required。Serious damage may result from use without oil。
7-1:Check to see that nuts and bolts are all snug,this must be down,as some fasteners may become
loose in transit。
5-2-5-1:This product is for use on a nominal 115 or 230 volt circuit。 A cord with a grounding plug
as shown here shall be used。 Make sure that the product is connected to an outlet
having the same configuration as the plug。 No adapter should be used with this
product。
5-2-6:EXTENSION CORDS
The use of any extension cord will cause some drop in voltage and loss of power For
optimum performance,plug the compressor power cord directly into a grounded wall
socket。 Do not use an extension cord unless absolutely necessary。 It is better to use a
long air hose to reach area where work is being performance。 If use of an extension cord
can not be avoided,refer to the following guidelines before using cordially:
Use only –3-wire extension cord。 Make sure your extension cord is in good condition。 Be
sure gauge is sufficient to carry the current the unit the unit will draw。The smaller the gauge
the heavier the cord。
7
7-2:Check that proper type and level oil is correct,see page for proper compressor lubrication。
7-3:Check that compressor is on a strong、stable level base。
7-4:Check that oil breather is clean。
7-5:Check that air filter is clean。
7-6:Do not place any materials on or against the belt guard,or the compressor unit itself。Placing
materials there will limit the cooling of the air compressor and could lead to premature failure。
7-7:Turn the compressor “on” 。
7-8:Open the air receiver outlet valve and start the unit。Ensure air is escaping to atmosphere。Allow
the unit to operate for a minimum of twenty minutes in this no load condition to lubricate
bearings and piston。
7-9:After running the compressor for twenty minutes,close the valve,and allow the unit to reach
maximum operating pressure。Ensure that the compressor shuts down at the preset maximum
pressure,and the head pressure is released through pressure switch。
7-10:Check the air compressor and piping systems for leakages,and correct as required。
7-11:Shut off of all power to the air compressor before attempting any repair or maintenance,
7-12:Stop the compressor,and check the oil level in the crankcase。Add oil as required。
7-13:Your compressor is ready for use。
8
10:TROUBLE SHOOTING:
CONDITION
Before doing any maintenance or adjustments to your air compressor,the following safety
precautions should be taken。
A:DISCONNECT ELECTRICAL POWER。
B:DRAIN AIR RECEIVER OF AIR PRESSURE。
CAUSE
CORRECTIVE
Compressor do not start 1:Loose electrical connection
Low pressure
2:Motor overheated
2:Press reset button or wait for
automatic reset。
1:Air leak in safety valve。
1:Safety valve manually by pilling
upward on ring。If condition
persists replace valve。
2:Loose tube of fittings。
3:Restricted air filter。
8:MAINTENANCE CHECK LIST
1:Check wiring connection
4:Defective check valve。
8-1:Daily checklist
2:Tighten fittings。
3:Clean or replace。
4:Replace safety valve。
8-1-1:Check oil level。
8-1-2:Drain condensation from air receiver tank。
8-1-3:Check for any unusual noise or vibration。
Safety valve releasing on 1:Defect pressure switch or
air receiver tank
improper adjustment
2:Defective safety valve。
8-1-4:Be sure all nuts and bolts are tight。
8-2:Weekly checklist
8-2-1:Clean air filter by opening air filter cap。Replace air filter if necessary。
8-2-2:Check oil level and filling up if necessary。
1:Check for proper adjustment and
if problem persists replace
pressure switch。
2:Replace safety valve。
Oil discharge and
1:Improper oil viscosity。
excessive carbon
2:Overfilling the crankcase
formation or appearance
with oil。
of water and oil in the air
3:Restricted air intake filter。
lines。
8-3:Quarterly or 300 hour checklist
1:Replace oil with SAE10W-30
non-detergent compressor oil。
2:Drain oil and fill to proper level。
3:Clean or replace filter。
4:Carbon exhaust valves。
4:Clean or replace。
5:Worn valves。
5:Replace valve assembly。
8-3-1:Change compressor oil and filter element。
6:Worn piston rings。
6:Replace piston ring。
8-3-2:Check safety valve。
7:High ambient temperature
and/or humidity。
7:Install a moisture separator and/or
dryer follow by and oil filter。
8:High percentage of running
time。
8:Check for air leakage。If no leaks
are found you may required an
additional compressor unit as
your air demand is too much for
existing unit。
1:Loose valve。
1:Inspect valve for damage replace
as required。
8-3-3:Check pressure switch unloads to ensure compressor head unloads whenever
motor shuts down。
8-3-4:Clean and blow off pump fins and motor。
8-3-5:Inspect air system for leaks by applying soapy water to all joints。Tighten joints if
leakages are observed。
9:STORAGE:WHEN YOU HAVE FINISHED USING THE AIR COMPRESSOR:
9-1:Set the “on/off” switch to “off” and unplug the cordially,
9-2:Be sure to drain the water from the air tank。
Excessive noise
2:Noisy only during start up,
Check for loose belts。
2:Adjust for proper tension
3:Piping loose。
3:Tighten as required。
9-3:Protect the electrical cord and air hose from damage。
4:Unit not installed level。
4:Ensure that unit is mounted level。
9-4:Store the air compressor in a clean and dry location。
5:Improper grade of oil in
crankcase。
5:Replace oil with SAE10W-30
non- detergent compressor oil。
6:Carbon or foreign material on 6:Clean piston。Check cylinder
walls or scoring。
piston。
7:Replace main bearings。
7:Worn bearings。
9
10
Compressor over heating 1:Undersized unit for air
requirements。
1:Contact PUMA compressor
distributor。
2:Compressor location。
2:See installation section。
3:Air leaks in the system
3:Fix leaks。
4:Restricted air filter。
4:Clean or replace filter。
5:Improper grade or level of oil。 5:Replace with SAE10W-30
non-detergent compressor oil。
6:Worn,damage,or carbon
build up on valve。
6:Clean,repair or replace valves。
7:Carbon build up at after-cooler 7:Clean or replace。
tube check valve。
Pressure switch
1:Pressure switch unloading
unloading does not
may be dirty or faulty。
function or leak air when
2:Check valve may be dirty or
unit is operating or not
faulty。
operating
1:Clean,repair or replace
pressure switch。
Water in air receiver tank 1:Condensation in the air
receiver。
1:Drain daily or install an
automatic drain。
Oil leaks or appearance 1:Spillage of oil when filling。
of oil on the compressor
2:Overfilling the crankcase。
1:Wipe unit clean。
3:Improper grade of oil。
4:Leak at oil filler plug。
2:Clean,repair or replace check
valve。
2:Drain oil and fill to proper level。
3:Replace with proper SAE10W-30
non-detergent compressor oil。
5:Oil leak at gasket,cap screw 4:Tighten or replace oil filler plug
and/or “O” ring。
,head,cylinder or crankcase。
5:Replace gaskets as required。
6:Loose valve plugs。
Use pipe dope or gasket
7:Loose side or end plate
compound on all cap screw
8:Oil seal leak。
threads。
9:Scratch or burn on the
crankshaft。
6:Tighten valve plug。
7:Tighten plates。
8:Replace oil seal。
9:File or sand with emery cloth。
2C03-071(0212)
11
12