1
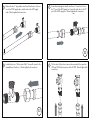
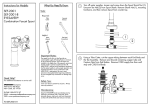
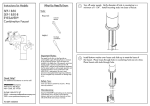
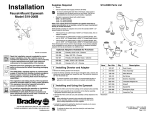
Instructions for Adding
Tepid Water Eyewash
Option to Models:
SEF-1850
SEF-1850-8
1
Start off by following steps 1 through 3 of the SEF-1850 installation
instructions. Next, prepare the SE-370 for mouniting. After applying Teflon
tape to the larger 1/2” threads, screw the adapters into the 3 ports of the
SE-370. Wrench tighten. Refer to the rough in diagram on the last page
during installation.
1
Teflon
Tape
Crescent
Wrench
Flat Head
Screwdriver
2
The supply line for the eyewash shall provide an
uninterruptible supply of flushing fluid at a minimum
of 30 psi flowing pressure. If shut off valves are
installed in the supply line of the eyewash, provisions
shall be made to prevent unauthorized shut off.
ANSI Z358.1 requires that all emergency equipment
shall be tested weekly to verify proper operation and
inspected annually to assure conformance with
ANSI Z358.1 requirements. Be sure to read
instructions thoroughly before beginning installation.
Do not overtighten any connections or damage may
occur.
Cover your drain to prevent loss of parts. Always
wear eye protection.
®
Keep the EYESAVER faucet looking new by cleaning
it periodically with a soft cloth. Avoid abrasive
cleaners, steel wool, and harsh chemicals as these
will dull the finish and void your warranty.
92-SEF-1850-TW-R1
2
3
The SE-370 can now be mounted to the wall. The unit should be fastened
to the wall using 1/2” pipe hangers with wall plates (not included), no
more than 18” below the countertop. Be sure to mount the SE-370 in a
location that will not interfere with the drain assembly or wall stops.
3
Retrieve the two 6” long stainless steel hoses from the box. Connect
one to the COLD supply valve, and the other to the HOT supply
valve. Wrench tighten both connections.
5
Locate the remaining two stainless steel hoses. Connect one hose to
the “E” port of the HOT supply tee. Connect the other hose to the “E”
port of the COLD supply tee. Wrench tighten both connections.
HOT
COLD
X2
4
Locate the two tees. The free end of the 6” hoses will connect to the
unmarked port of each tee. Wrench tighten both connections.
X2
6
The free ends of these hoses can now be connected to the respective
HOT and COLD inlet connections of the SE-370. Wrench tighten both
connections.
7
Connect the red (HOT) hose from the SEF-1850 to the “F” port
on the HOT supply tee. Repeat this process for the blue (COLD) hose
coming from the SEF-1850.
X2
8
The eyewash hose, also pre-installed in the body of the SEF-1850,
can now be connected to the outlet port on the SE-370. Wrench
tighten. At this point, turn on the water supply and check for leaks.
If the tepid water temperature needs adjustment, refer to the SE-370
instruction manual.
SE-1850-TW ROUGH-IN DIAGRAM
24” MIN - 36” MAX
COUNTERTOP HEIGHT
18” MAX
EYEWASH HOSE
HOT HOSE
COLD HOSE
HOT SUPPLY
6” LONG HOSE
COLD SUPPLY
20” LONG HOSES
6” LONG HOSE
NOTE: DRAWING IS NOT TO SCALE. BE SURE TO KEEP THE
SE-370 AS CLOSE TO THE CENTER OF THE FAUCET BODY AS
POSSIBLE.