1
MODELS QTXEN080FLT • QTXEN110FLT • QTXEN150FLT
Page 3
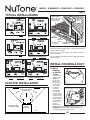
1b. Mount housing anywhere between
trusses, joists, or I-joists using hanger
bars.
Slidinghangerbarsareprovidedtoallowforaccuratepositioningofhousinganywherebetweenframing.Theycanbe
usedonalltypesofframing(I-joist,standardjoist,andtruss
construction)andspanupto24”.
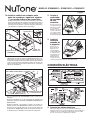
2. Attach
damper/duct
connector.
Snapdamper/
ductconnector
ontohousing.
Makesureconnectorisflushwith
topofhousingand
damperflapfalls
closed.
TAB
SCREWS(4)
3. Install
6-inch
round ductwork.
ST
D
Connect6-inch
roundductwork
todamper/duct
connector.Run
ductworktoa
roofcaporwall
cap.Tapeall
ductworkconnectionstomake
themsecureandairtight.
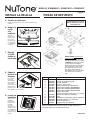
MOUNTING
CHANNEL(2)
HANGER
BAR(4)
Attach the MOUNTING CHANNELS to the housing using
theSCREWSsupplied.MakesureTABSface“up”asshown.
Usethesetofchannelmountingholes(marked“STD”)to
mountthehousingflushwiththebottomofthedrywall.Use
the other set of holes (not marked) to mount the housing
flushwiththetopofthedrywall.
HOLEFOROPTIONAL
SCREWMOUNTING(4)
NAIL(4)
CONNECT WIRING
*SCREW(2)
BOTTOMEDGE
OFFRAMING
ExtendHANGERBARStothewidthoftheframing.
Hold ventilator in place with the hanger bar tabs wrapping
aroundtheBOTTOMEDGEOFTHEFRAMING.
NAILventilatortoframingorfastenwithscrews(notprovided)
throughHOLESnearnails.
Toensureanoise-freemount:Securehangerbarstogether
*with
SCREWS or use a pliers to crimp mounting channels
tightlyaroundhangerbars.
4. Connect electrical wiring.
Run120VAChousewiringtoinstallationlocation.Use
properULapprovedconnectortosecurehousewiringto
wiringplate.Connectwiresasshowninwiringdiagrams.