1
Wall Surrounds
INSTALLATION / WALL SuRROuNdS
®
PLuMBING WALL INSTALLATION (CONTINued)
BuLLNOSe edGe FINISHeS (CONTINued)
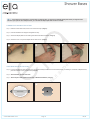
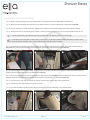
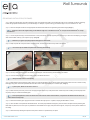
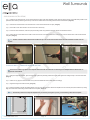
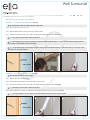
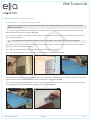
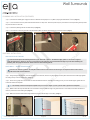
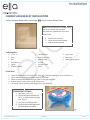
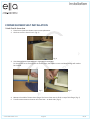
OPTION 2 – Tri-Guard under Wall Panel (Image II)
The tri-guard will need to be installed before the wall panel.
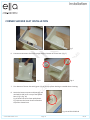
Step 1: Measure from the floor to the ceiling.
Step 2: Mark the measurement on the tri-guard and cut it with tin snips.
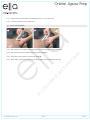
Step 3: Place a thick bead of silicone on the inside of the tri-guard and push firmly into place. (Image JJ)
Tip: Butyl tape can also be used to adhere the tri-guard.
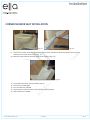
Tip: When measuring for your wall panel width, you will want to keep the bullnose edge a 1/8” to a ¼” from the return wall edge so there is a
place to apply a finishing bead of silicone. (Image KK)
Tip: Cut the bullnose edge on the wall panel during the cutting step. Cut the bullnose edge at ¼”. This allows room for 1/8” of acrylic or wall
material and 1/8” of tape and adhesive.
II
JJ
Sid
eW
all
Pa
nel
kk
Tri-Guard
(under wall panel)
Bathroom Wall
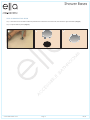
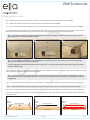
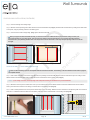
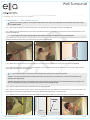
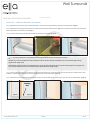
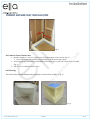
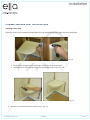
OPTION 3 – Tri-Guard Over Wall Panel (Image LL)
This will be done after the wall is installed.
Step 1: Measure from the floor to the ceiling.
Step 2: Transfer the measurements to the tri-guard, then cut with tin snips.
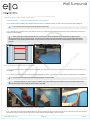
Step 3: Place a thick bead of silicone on the inside of the tri-guard and push firmly into place. (Image MM)
Tip: Butyl tape can also be used to adhere the tri-guard.
Step 4: When installation is complete, you will apply a finishing bead of silicone along the tri-guard. (Image NN)
Tip: The tri-guard comes in all color options as well as two different sizes. See product catalog for details.
LL
Sid
eW
all
Pa
nel
www.ellasbubbles.com
www.bciacrylic.com
MM
NN
Tri-Guard
(over wall panel)
Bathroom Wall
Page 2108/14
INSTALLATION / WALL SuRROuNdS
44