1
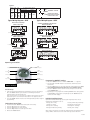
Figure 1
MIN.
MINIMUM MAX.
COPPER LOAD INSULWIRE SIZE (AMP) ATION
TEMP(°C)
(AWG)
14
12
10
8
15
20
30
40
60
60
60
105
75°C INSULATION MAX. MOTOR
LOAD (HP)
SINGLE PHASE
120 V.
240 V.
1/2
1
2
-
2
2 1/2
3
5
PRESSURE PLATE
3 PHASE
208 V.
240 V.
N/A
TERMINAL SCREW
MAKE SURE WIRE
INSULATION CLEARS
PRESSURE PLATE
N/A
Typical Wiring Diagrams—SPDT
Typical Wiring Diagrams—DPDT
Timer and Load, Same Voltage
Wired as Single Throw
120V Timer, 200/240/277V Load Double Break
Wired as Single Throw
T
T
TIMERN NC
TO POWER SUPPLY
TIMERN
H
TO 120V LINE
OC OM
TO LOAD
CN
TO 200/240/277V LINE
LOAD
N
Timer and Load, Different Voltage
Wired as Single Throw
O COM NC2 NO2 COM2
120V Timer, 120V Load and 24V Load
Wired as Single Throw
T
T
TIMERN
CN OC OM
TIMERN
H
TO 120V LINE
N
N
TO LOAD
H
TO POWER SUPPLY 2
LOAD
TO POWER SUPPLY 1
120V Two Speed Fan
Wired as Double Throw
T
CN O COM NC2 NO2 COM2
TO 24V LINE
LOAD
200/240/277V Timer, 200/240/277V Load, Double Break
Wired as Single Throw
T
H
N
TIMERN
CN OC OM
HIGH
LOW
COM
L1
Field Wiring
Timer Internab Wiring
L2
TO 120V LINE
TIMERN
CN
O COM NC2 NO2 COM2
LOAD
Operating Instructions
(Reset)
H(Hours Setting)
M(Minutes Setting)
Day
(Days Setting)
LCD
(Function Figures)
Clock
(Current Time Setting)
Timer
(9 Programs Setting)
Override
(Manual ON/OFF Switched)
Basic Settings
Initial Set Up:
1. Push the Reset button “R” before programming to clear out any settings.
Once the “Reset” button is pressed the screen will begin to flash. A
paperclip may be needed for this step.
(If the “Reset” button is shown down, use a paper clip to maneuver it until it
pops back up. The screen will flash if the button is in its proper position)
2. Press the “Clock” button and the screen will stop flashing and be ready for
programming.
Setting the Current Time:
1.
2.
3.
4.
5.
Press and Hold the “Clock” button during the entire setting.
Press the “H+” button to set the hours.
Press the “M+” button to set the minutes.
Press the “Day” button to set the day of the week.
Release the “Clock” button.
Programming ON/OFF Settings:
1. Press the “Timer” button once and the TIMER 1 ON - - : - - appears.
2. Press the “H+” and “M+” button to set the hours and minutes to the
desired time.
3. Press the “Day” button to select the day(s) the setting will be active. Refer
to the Multiple Weekday Group below to see the available settings.
4. Press the “Timer” button to store the setting and proceed to the next
setting TIMER 1 OFF - - : - -.
5. Repeat steps 1-4 to program the remaining ON/OFF times setting options
(9 Total ON/OFF settings). Once completed press the “Clock” button to
return to the main display.
Multiple Weekday Groups:
Apart from individual week days, pressing the “Day” button also selects
multiple day combinations such as:
‧ Monday thru Friday
‧ Tuesday & Thursday & Saturday
‧ Saturday & Sunday
‧ Monday thru Wednesday
‧ Monday thru Saturday
‧ Thursday thru Saturday
‧ Monday & Wednesday & Friday
‧ Monday thru Sunday
After setting a single day or a multi-day-combination the programmed timer
settings will be carried out on each of the week-days at the same time.
15136