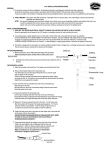
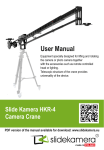
1
SolarGoesGreen SGG-PIR-28 Security Flood Light
Operation Instructions
READ AND FOLLOW ALL INSTRUCTIONS FOR FIRST USE.
SAVE IT FOR FUTURE REFERENCE.
1. PARTS INCLUDED
Solar panel box
Flood light with sensor & battery
Twin wire connected to flood light
Wall mount bracket
Screw and drywall anchor
1pc
1set
1pc
1pc
4pcs
2. INSTALLATION
2.1 Installation of solar panel box:
a) Choose a place where sunlight is abundant and unobstructed during the daytime:
The solar panel box MUST be installed in a well lit location where it can receive maximum sunlight
during daytime hours. Any cover that shades the panel will affect its ability absorb sunlight and
decrease the amount of battery charge and duration of the light ing time. The solar panel box is all weather and
will not be affected by exposure to rain, snow or temperature.
The selected location should not be near a night time ambient light source such as porch lights, street lights,
etc., as these lights might prevent the solar PIR light from automatically turning on. The solar panel can
be positioned on a flat surface with the supplied wall mount bracket.
b) Installation of wall mounting bracket:
Attach the wall mounting unit to an appropriate surface by using provided screws and drywall anchors.
c) Put the solar panel box onto the wall mount bracket:
For optimum performance the solar panel box can
be adjusted by using the adjustable joint. Make sure that the solar panel is directed towards the sun for
maximum battery charging. The angle of the solar panel box should be 45% angle with the south facing horizon.
Be sure that the solar panel box is securly mounted.
2.2 Installation of flood light:
a) Attach the flood light by using provided screws and
drywall anchors(Fig.1).
b) Adjust the angle of sensor by using the adjustable joint.
c) Adjust the angle of flood light to point to the area you want to light.
2.3 Position the lamp wire plug from the jack
positioned on the bottom of the solar panel box to the light.
2.4 After installation is finished, turn ON the switch
positioned on the back of the solar panel box.
The light installation is now finished and it will operate
automatically.
Fig.1
3. OPERATION
There are 3 knobs used to adjust Sensitivity, Lighting Time and Darkness level when the light will activate. (Fig.2)
3.1) Sensitivity:
The preset distance the light can be activated by
motion is about 5 meters. Turning the knob
Fig.2
clockwise will very slightly increase the activation distance.
3.2) Lighting Time:
The adjustable lighting time is 1~4 minutes. It can be changed
by turning the time knob. Turning clockwise increases the time.
3.3) Darkness:
The ambient luminance when the light can be activated
by motion is about 20~50 lux. It can be changed
very slightly by turning the darkness knob.
Sensitivity
Lighting Time Darkness
4. TROUBLESHOOTING INFORMATION
The performance of the solar powered PIR light depends upon the amount of sunlight available
during daylight hours. If it does not operate properly you can check it and find out the ca use as listed
below.
4.1)Make sure the solar panel box is located in an area where the solar panel gets the maximum
amount of sunlight every day.
4.2)If the weather has been rainy or overcast for a long period of time, the battery will not be charged
for operation at night. This is normal.
4.3)A dirty solar panel will not allow the battery to fully charge. This will cause the battery charging to malfunction.
Clean the solar panel regularly with a dampened cloth or paper towel. Don’t use strong detergents or acid
based cleaners.
4.4)If everything above mentioned is OK, then the battery needs replaced.
5. BATTERY CHANGING
If your light should begin to illuminate dimly or for a shorter duration of time, you should replace the
rechargeable battery in the following way:
5.1)Unscrew 4 screws and remove bottom from the battery box.
5.2)Remove wires from battery connectors. Take out the old battery.
5.3)Replace new battery and remount in reverse steps as done above, paying extra attention to the positive
and negative wire polarity.
Warning: 1) Do it carefully to prevent wires from being damaged.
2) Be sure that battery polarities are correct. Wrong polarity is dangerous.
3) Do not dispose of old battery. It should be recycled.
www.SolarGoesGreen.com