1
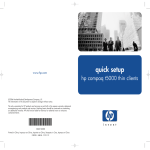
INSTRUCTION MANUAL
Thank you very much for your trust in the products of
Robitronic. Please read this user manual carfully before
using this product to avoid any problems in advance.
Please also pay attention to the technical data and limits
of this product.
SPEEDO fEATURES
# R01220
RADIO / SPEEDO SETUP
• Turn on your transmitter and adjust throttle and brake travel to
100%. Please also deactivate special function like Exponential
or ABS brake.
•
•
•
•
•
•
•
•
•
•
Lowest On-Resistance by the use of latest generation PowerFETs
Special designed Power-PCB with maximum copper amount
8 optimized power profiles developed by World Topdrivers
Sensitive adjustable Auto-Brake
Switch off from drivers stand with your transmitter
External setup button with data link
Built in Bootloader allows Firmware self-update
Temperature controlled high-flow fan
Flow-optimized heatsink reduces temperature and weight
Big power capacitor for maximum punch
led sTATUS INDICATION
Neutral - Full Throttle / Brake: Status LED green
1 to 99% Throttle / Brake: Status LED red
• Make sure that a fully charged battery is connected to the
speedo and the speedo is switched off. Let the throttle trigger
in Neutral position.
Sensor Error / no Sensor: 1. and 4. Setup LED
• Press and hold the button as long as the first setup LED lights
up and the red status LED on the left side begins to flash continiously.
Overtemperature: 2. and 3. Setup LED flash
• The speedo now starts to measure the Neutral value. After that
the second Setup LED goes on.
• Move now the trottle trigger on you transmitter to full throttle.
Hold it as long as the third Setup LED lights up.
• Now move the throttle trigger to full brake. Hold it as long as the
forth Setup LED lights up.
• After one second all 4 Setup LEDs go out. You can release the
trottle trigger, the speedo has stored the values successfully and
is now ready to use.
• If the radio setup process is not successful the speedo switches automatically back to normal driving mode after about 12
seconds. Alternating flash of the red and the green status LEDs
inicate the unsuccessful radio setup process. In this case please
check all connections, disconnect the battery from the speedo,
wait for a few seconds and repeat the whole procedure.
INSTALLATION
• Securly mount the speedo in the chassis of your car using double sided tape. Make
sure that enough fresh air can cool the speedo (openings at the body).
• To avoid interferences please make sure to have enough space between the speedo
and the motor or other electronic components inside the car.
• Mount the power capacitor also with double sided tape inside the car so that it cannot
get loose.
• Connect motor, speedo and battery like in the drawing above. Please make sure that
you do not reverse connect the speedo and the battery. This will destroy the speedo.
• If you have to change the power wires on the speedo please make sure that you use a
powerful soldering iron. Do not solder longer than 5 seconds on the speedo. Please let
the speedo cool down between each cable.
• Connect the receiver cable with the throttle channel of your receiver.
flash alternately
alternately
SPECIAL FUNCTIONS
Temperature-controlled fan: The fan of the CUBE BL
Modified Competiton is temperature controlled and switches
on only when necessary. This reduces the current consumption and makes the speedo more efficient. When the speedo
is switched on the fan runs half a second for function check.
Max. Temperature Readout: The CUBE BL Modified
Competition has a temperature read out system where you
can check the last maximum temperature of the speedo.
This system only works when the motor stands still and the
throttle trigger is in Neutral position. With switched on speedo simply press the button shortly, the temperature value is
now displayed for 3 seconds. You can do the readout after
the run or before beginning the next run, the stored value is
deleted after the first throttle event. The 11 possible values
have the following meaning: Value 1 means the speedo
was shortly before temperature cut-off. Value 11 means
that the speedo was nearly cold. So the lower the value the
hotter was the speedo. If you have values between 1 and 3
you should check you settings and your gear ratio. Values
between 1 and 3 are too hot and should not occour in normal
conditions.
Values:
1
2
3
4
5
6
7
8
9
10
11
Power capacitor: The CUBE BL Modified Competition has a special selected
power capacitor for maximum punch and protection for the speedo. Do not remove the capacitor at any time. If the capacitor is damaged for any reason it has to
be replaced immediatly. You have to use only this special selected capacitor. It is
available as spare part (Part Number: R01221).
Operation with 1S LiPo battery: The CUBE BL Modified Competition
allows the operation with 1S LiPo batteries (3.7V). Additionally you have to use
a receiver battery or a voltage booster. This is important to guarantee a reliable
supply of the servo and the receiver. The voltage from the main battery is too low
for the supply of servo and receiver.
Thick Copper PCB: The CUBE BL Modified Competition has a power
PCB with the maximum possible copper amount based on latest technology
standards. This allows a very high current rating as well as a maximum thermal
conductance. Therefore please pay attention to the speedo temperature when
replacing the power wires. Too long heat-up with the soldering iron can destroy
the speedo permanently. If possible use a high power soldering iron with a heavy
tip. This reduces the needed heat-up time.
Power Profiles: The CUBE BL Modified Competition has special optimized
power profiles. This profiles regulate situation based the needed power on the
motor. A lower profile number is for lower power and smooth response. A higher
profile number means more power and agressive response. So please do not
change the adjustable timing on the motor. Leave it at the factory or minimum
position.
Protection System: The CUBE BL Modified Competiton has a intelligent
build in safety system so that the speedo should not be damaged in an overload
condition. If the motor current gets too high the speedo automatically reduces
the current. If the speedo gets too hot in case of overload the motor function is
switched off. In this condition the speedo cannot be switched off so that the fan
can cool down the speedo to normal temperature again. After that all function are
switched on again and the speedo can be switched of normally.
Electronic Ges.m.b.H. - Brunhildengasse 1/1, 1150 Vienna, Austria - Tel: +43-1-982 09 20, Fax: +43-1-982 09 21, www.robitronic.com
MODE Programming
• To get into the programming mode press and hold the button as long as the first red Setup LED lights up
(the speedo has to be switched on before).At the same time the Status LED on the left side lights green.
You are now in the main menu.
• The main menu has 6 different points. You can navigate between them with short pressing the button.
(1 --> 2 --> 3 ...).
• If you have choosen the right menu point press and hold the button as long as the Status LED on the
left switches from green to red.
• You are now inside the choosen menu point. The actually stored value is shown by the Setup LEDs.
With short button press you can adjust this value.
• If you have setted the right value simply wait for about 4 seconds. The speedo switches back to the
main menu (the status LED changes back from red to green).
• Now back in the main menu you can now choose the next function. If you have adjusted all parameters
as you like simply wait again about 4 seconds. The speedo switches back to the operating mode and is
ready to use (all Setup LEDs are off).
Functions in Detail:
Main Menu:
1. Power Profile
2. Current Limit
3. Brake
4. Autobrake
5. Battery
6. Function
Values:
(Factory defaults gray-shaded)
1
1. Power Profile:
The power profile regulates the response and the power. A lower value means smoother response and less power, a
higher value means more power and agressive response.
Recommendations:
2
3
4
2. Current limit:
5
Allows to limit the motor current to the setted value. This can be useful in very slippery conditions
6
7
3. Brake:
8
Brake adjusts the maximum brake amount.
9
10
4. Autobrake:
With the Autobrake you have a light braking effect in Neutral band. The factory setting simulates an brushed motor
as the brushless motors itself have less braking effect. More Autobrake improves steering at the beginning of the
corner.
5. Battery:
With the battery selection you adjust the right undervoltage protection for the different battery types.
CAUTION: When setting value 1 (1S LiPo) you have to use an receiver battery or voltage booster additionally.
6. Function:
With function you can activate or deactivate the transmitter switch-off function. With value 1 you can switch off your
speedo when holding full brake more than 8 seconds on your transmitter.
REFERENCES
11
FactoryReset:
Factory reset is found as value 3 in menu point 6
(Function). This feature restores all factory default
values. To perform an factory reset you have to
choose value 3 in the Function menu and then
press and hold the button as long as you can see a
running light on the setup LEDs. The speedo switches back to operating mode and all factory defaults
are now restored. (The radio setup is not deleted!)
CAUTION: To avoid unwanted factory resets only
choosing value 3 is not enough. You have to press
and hold the button then as long as you can see the
running light.
ACCESSORY / SpARE PARTS
• Do not use this speedo on wet surfaces because the electronic inside the speedo can be permanetly
damaged if it get's wet.
R01221................Spare power capacitor
• Never leave your RC model unsupervised with switched on speedo. Switch the speedo off and disconnect the battery when it is not in use. Otherwise the model can drive uncontrolled.
R01222................Spare high-flow fan
• Always disconnect the battery from the speedo when it is not in use. As the speedo consumes also a little
current when switched off the battery would get deep discharged after a longer period of time.
RS500RT.............Silicon wire 2,5mm² red 1m
• Do not touch the heat sink after the operation. It could be very hot!
RS500SW............Silicon wire 2,5mm² black 1m
• Not suitable for children under 14 years of age! Not a toy!
RS503RT.............Silicon wire 4,0mm² red 1m
This Robitronic product is warranted to be free from defects in materials and workmanship for a period of two years from the purchase date. If there
are any defects with materials, workmanship, or assembly of this product, we will gladly repair or replace it for you at our discretion. Products which
have been worn out, abused, or improperly operated will not be covered under warranty.
RS503SW............Silicon wire 4,0mm² black 1m
Not covered by warranty:
RS515.................Gold plugs 4mm
Normal wear, abuse, neglect, crash damage or any damages arising as a result of improper use.
Robitronic shall not be liable for any loss or damage, whether direct, indirect, incidental, or consequential, arising from the use, misuse, or abuse of
this product and any accessory or chemical required to operate this product.
RS147.................USB Interface
The WEEE guideline concerning electric and electronic waste recycling has been introduced for protecting health and environment.
Complying with this guideline, please do not dispose this product through domestic waste. Instead, ask you local waste site for
proper disposal of electric and electronic waste.
Electronic Ges.m.b.H. - Brunhildengasse 1/1, 1150 Vienna, Austria - Tel: +43-1-982 09 20, Fax: +43-1-982 09 21, www.robitronic.com