Transcript
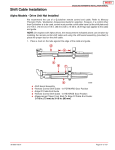
Champion4 Valve Replacement Instructions
Turn off and disconnect the
supply line. Drain the tank
by lifting tower.
Sponge out any remain-ing Disconnect the refill tube
water. Detach the hook from the tower. Detach the
from lift arm.
tank from bowl by removing
tank fasteners. (not shown)
Place the tank on it’s side,
remove
the
coupling
gasket (not shown) and
lock nut.
Remove the old flush
tower and discard.
Install a New Champion4
Flush valve with the vent
tube
positioned
as
shown.
Tighten the lock nut hand
tight plus an additional ¾
turn.
Align the lock nut “flat”
parallel to back edge of
tank.
Remove
2
inches
(50mm) from the end of
the refill tube; save the
“S” clip for the next
step.
Re-insert the “S” clip
into the end of the
refill tube.
Affix the end of the
refill tube to the valve
overflow at the location
shown.
Alternate view of the
refill tube attachment.
Remove the Hair Pin Cotter
from the new Clevis Pin
assembly. Insert the clevis
pin through the inbound
hole location.
Re-insert the hair pin
cotter through the clevis
pin hole.
Properly
configured
Champion4
Flushing
System.
Replace
the
coupling
gasket over the lock nut,
re-fit the tank assembly to
the bowl and tighten the
tank mounting fasteners in
a alternating manner. Reconnect the water supply.
Adjust the water level to 1
inch below the overflow
tube. Replace the tank lid.
ISPN 7301121-100A
1