1
Installation Instructions
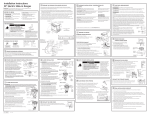
5 CHECK FOR LEAKS
6 INSTALLATION OVER BUILT-IN
OVEN
Before testing for leaks, make sure all burner knobs
are in the OFF position.
See built-in oven installation for complete
installation instructions.
After connecting the cooktop to gas, check system
for leaks with a manometer. If a manometer is not
available, turn the gas supply on to the cooktop
and use a liquid leak detector at all joints and
connections to check for leaks.
5″ To Center of
2″ Dia. Hole From
Countertop
Tighten all connections if necessary to prevent gas
leakage in the cooktop or supply line.
DO NOT USE OPEN FLAME TO CHECK FOR
LEAKS!
90° Elbow
Disconnect the cooktop and its individual shut-off
valve from the gas supply piping system during any
pressure testing of that system at test pressures
greater than 1/2 psig (3.5 kPa).
Cabinet Sides
Isolate the cooktop from the gas supply piping
system by closing its individual shut-off valve
during any pressure testing of the gas supply
system at test pressures equal to or less than 1/2
psig (3.5 kPa).
7
2″ Dia. Hole
(20 7/8″ from front
of Countertop to
Hole Center)