1
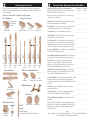
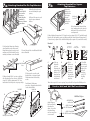
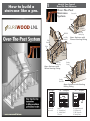
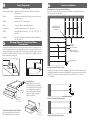
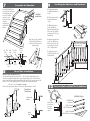
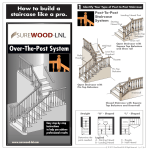
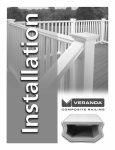
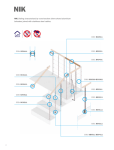
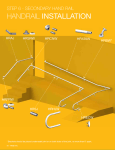
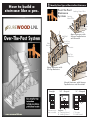
How to build a
staircase like a pro.
1 Identify Your Type of Post-to-Post Staircase:
Post-To-Post
Staircase
System Starting
Landing Newel Post
Newel Post
SUREWOOD LNL
Square Top
Balusters
~
Shoerail
Open Staircase with
Square Top Balusters
and Shoerail
Wall Rail
Level Run
Handrail
Rake
Handrail
Rosette
Pin Top
Balusters
Open Staircase with
Pin Top Balusters
Kneewall
Closed Staircase with Square
Top Balusters and Kneewall
Straight
SOM300113
Effective 11/20/2006
Determine the
parts needed.
“U” - Shaped
Legend
A - Starting Newel
B - Landing Newel
“L” - Shaped
C - Rosette
D - Half Newel
2
Selecting Your Parts:
3
Post-to-Post Staircase Parts Checklist:
There are several styles and options for your treads, risers, balusters and newel posts.
Below are the most common. Other items are available by special order. Check with your
store representative.
Check local building codes to ensure compliance.
All stair parts shown in this brochure are for interior use only.
Treads - Select one tread for each step.
Part number Quantity
Selected
Needed
_______ _______
Balusters, Newel Posts, Handrails, and Shoerails:
Risers - Select one riser for each step. Select one more riser
than treads per each staircase.
_______ _______
Landing Tread - Select sufficient lineal footage for the entire
balcony and width of stairs at each landing.
_______ _______
Return Nosing - If stair is open on one side, select one tread
return nosing per step. If two-sided, select two per step.
_______ _______
Starting Newel* - Use at the bottom of the staircase.
_______ _______
Landing Newel* - Use at the landing corner of an L-shaped
stair and at the second floor landing.
_______ _______
Pin Top Baluster:
Square Top Baluster:
Pin top balusters
used with solid
handrail.
6010-S
Solid handrail
6010-P
Plowed handrail
A
6050
Fillet 1-1/4’’
B
6045
Shoerail 1-1/4’’
A
Level Run Newel* - If the balcony is 10 feet or longer, use
a newel every 5 or 6 feet. Place a newel at every corner. The
Landing Newel may be used, but be sure to match the top block
with the newel used at the top of the stairway for consistency. _______ _______
B
Starting
Newel
48’’
Starting
Newel
54’’
Landing Pin Top Square Starting
Top
Newel Baluster
Newel
Baluster
59’’
48’’
Treads and Risers:
Newel Mounting Hardware (J-Anchor) - Select one newel
_______ _______
mounting kit for each newel post mounted on top of a tread.
3503-BT
3500-BT54
3500-BT
5205
5015
4015-BT
4012-BT*
4010-BT
Rosette or Half Newel - Select either a rosette or half newel
_______ _______
for each handrail connecting to a wall.
Starting
Newel
54’’
Landing
Newel
54’’
Wall Rails and Handrail Ends:
SUREWOOD LNL
~
Tread
6042
Wall Rail
Riser
7009
7011
Returned End Quarterturn
Wall Rail Brackets:
8080 Tread
Return Nosing
C Rosettes:
8090
Landing Tread
Mounting Hardware:
Rail
Bolt
J-Anchor with
molding
Wood
Plugs
D Half
Newel:
Round Rosette
Oval Rosette
For Wall Finishing
Half newels available to match newel style.
Rake Balusters* - Select the 34“ baluster for the front
baluster on each tread and the 36“ baluster for the back
baluster on each tread. If using 3 balusters per tread, use the
36“ baluster for the middle baluster on each tread.
_______ _______
Rake Balusters for Kneewall Staircase* - Select the 34“
baluster at a rate of 2 per tread. Standard placement is 4”on
center. Check local building code for your area.
_______ _______
Level Run Balusters* - Use the 36“ baluster for all 36“ height
balconies and the 41“ baluster for all 41“ height balconies.
Standard placement is 4”on center. Check local building code for
_______ _______
your area.
Handrail - Buy 13“ of handrail for each tread or step. Buy
enough for all level runs.
_______ _______
Shoerail for Rake - Buy 13” of corresponding shoerail for
each tread or step (shoerail or kneewall stairs only).
_______ _______
Shoerail for Balcony (optional) - Buy enough to cover all
Level Runs.
_______ _______
Plugs -Select two wood plugs for every newel mounting using
lag bolts. Select one plug for each handrail rail bolt used. Select
one plug for every handrail or shoerail mounting using a lag
_______ _______
bolt or wood screw.
*Note:
These guidelines are for a rake handrail height of 36“– 41“. Longer newels and balusters
may be required for a different handrail height.
4
6
Tools Required:
Operation:
Tools Needed:
Measuring and Leveling
Metal measuring tape, hand levels, (torpedo and 4’ level),
framing square
Cutting
Miter box and saw (fine-tooth) hand or power circular saw or
standard hand saw
Nailing
Hammer, nail set, 1/2“ and 1“ finishing nails
Gluing
Carpenter’s glue and construction adhesive
Screw Driving
Screwdriver (manual or power), 3“ wood screws
Drilling
Hand drill, drill guide and 1/8“, 1/4“, 3/8“, 5/8“, 3/4“, 1“
wood bits
Finishing
Sandpaper, steel wool, wood file, wood chisel, finishing stain,
rags, tack cloth, etc.
5
Basic Layout and Newel Post Installation:
Landing Newel Height
A) Height of the handrail should be
between 36“ and 42”. Check local
building codes.
B) Place the top of the handrail one inch
below the top block of the newel.
Tread
Return
Nosing
With newel in position where
it is to be mounted, slide
short end of framing square
along slope of stairway.
Baluster
B) Measure down 1” from
Centerline
top of newel square. Make
Face of Stringer
mark.
Mark Position of
Baluster Centerpoint
C) The difference between
Starting Newel
the two marks “A”and “B” is
what will be cut off bottom
of newel. Proceed with newel
installation.
Landing Tread
Landing
Tread
A
B
1’’ from top
of square part
of newel
36’’ to
42’’
above
front of
tread
Check local building codes for
proper handrail height.
Newel Post Attachment
Trim and Fasten the Newel Posts
Tread
Tread Return Nosing Installation
Cut and miter tread return nosing to fit.
Adds a finished look to the tread edge.
Tread
Return
Nosing
B
C
A) Slide into post as shown.
Make mark.
B
Landing tread can be used with
3/4”oak flooring along a landing
when solid oak treads and risers are
used. Landing tread can be used
along a balcony with oak flooring.
Properly cut miters and attach
directly to sub floor.
A
Mark Position of
Landing Newel and
Centerline
To properly install solid oak treads and risers, you must first remove the existing steps to
expose the rough framing. Leave the beginning riser at base of steps (A). Measure and cut
each step separately to ensure tight fit. (B). Pre-drill, apply construction adhesive and nail
into place. For added strength, screw treads to risers from behind (C). Complete each step
before continuing on to next step.
C
1’’
Layout your staircase directly on your
treads and landings. Carefully mark
Newel and Baluster positions and
centerlines.
Getting Started - Tread and Riser
Installation:
A
Starting Newel Height
Marking Your Staircase for
Installation
J-Anchor
with Molding
Wood Plugs
Lag Bolts
7a Attaching Handrail for Pin Top Balusters:
Pin top
are installed
first on the
staircase
and then the
handrail is
lowered down
onto them.
7b
Attaching Handrail for Square
Top Balusters:
Square top
balusters are
installed after
the bottom
shoerail
and plowed
handrail are
installed.
A) Mark baluster placement
on treads allowing for equal
spacing.
Drill treads the same size and
depth as pin on bottom of
baluster.
Mark and
Cut Here
A
A) Lay handrail and shoerail along
stairs, marking where they intersect
with newels. Place rail on side and
cut along marks.
A
B) Attach handrail using option #1 (3”wood screws) or option #2 (4-1/2” lag bolts through
front of rail). Both options require pre-drilling a pilot hole. Attach shoerail using option #1
(3”wood screws), option #2 (toe-nailed finishing nails) or option #3 (screwed to kneewall).
Handrail
B) Lay handrail along stairs allowing
extra length for proper fit to newels.
Using framing square, transfer tread
markings to side of handrail. Transfer
markings to bottom center of handrail.
B
Shoerail
B 1
C) Locate baluster holes in solid handrail. Mark
center of handrail
C
Mark Handrail
Here
D) Rotate handrail 180 ° on stairs so balcony
side of handrail is at base of stairs. Drill holes
using 5/8” drill bit a minimum of 3/4”deep
into handrail. Use drill guide set to proper angle
E) Using newels as guide, mark
handrail and cut to proper length.
Follow instructions for attaching
newels.
BALCONY
Mark and
Cut Here
Lag
Bolt
Wood
Screws
C
For balconies, follow same
procedures, keeping handrail on flat
surface when drilling.
Countersunk
Wood Screws
2
Wood
Plug
C) Use an
D
adjustable
square to
determine the
angle of the cut;
allow for 1/4”
plow depth on
each handrail
and shoerail.
Wood
Plug
Toe-nailed
Finishing Nails
Screwed to
Kneewall
3
2
1
D) Cut
E
balusters to
the correct
length.Once
spacing is
determined,
glue and toenail balusters
into place.
E )Cut fillet
pieces being
sure to match
angles. Glue
and nail
into place
using 1/2”
finishing
nails.
*Most codes require 4”on center spacing, but you should check your local building codes.
8
Finish to Wall and Wall Rail Installation:
D
E
Balcony end of handrail
Wall Rail Styles:
Attach rosette or
half newel directly
to handrail as
shown. Secure first
to handrail using
nails or screws, then
secure to wall.
6042 Wall Rail
with bracket
6010-S Handrail
with 7011 Quaterturn
6010-S Handrail
with 7009 Returned End
How to build a
staircase like a pro.
1
Identify Your Type of
Over-The-Post Staircase:
Over-The-Post
Staircase
Gooseneck
System
Turnout
SUREWOOD LNL
Pin Top
Balusters
~
Radius End
Starting Step
Open Staircase with
Turnout Starting Fitting
Wall Rail
Level Run
Handrail
Rake
Handrail
Rosette
Volute
Landing
Newel Post
Starting
Easing
Radius End
Starting Step
Open Staircase with
Volute Starting Fitting
Starting
Newel Post
Open Staircase with Starting
Easing Fitting
Straight
Determine the
parts needed.
“U” - Shaped
Legend
A - Starting Newel
B - Landing Newel
C- Rosette
“L” - Shaped
D - Straight Gooseneck
E - 90˚ Gooseneck
F - 180˚ Gooseneck
G - Staring Fitting
2
Selecting Your Parts:
3
Post-to-Post Staircase Parts Checklist:
There are several styles and options for your treads, risers, balusters and newel posts.
Below are the most common. Other items are available by special order. Check with your
store representative.
Check local building codes to ensure compliance.
All stair parts shown in this brochure are for interior use only.
Treads - Select one tread for each step.
Part number Quantity
Selected
Needed
_______ _______
Balusters, Newel Posts:
Risers - Select one riser for each step (except the starting
step). Select one more riser than treads per each staircase.
_______ _______
Landing Tread - Select sufficient lineal footage for the entire
balcony and width of stairs at each landing.
_______ _______
Round Rosette Oval Rosette
For Wall Finishing used
to conect Handrail to Wall
Return Nosing - If stair is open on one side, select one tread
return nosing per step. If two-sided, select two per step.
_______ _______
Mounting
Hardware:
Starting Fitting - Select either a Volute, Turnout, or Starting
Easing.
_______ _______
Starting or Landing Newel* - Use at the bottom of the
stairway and at the second floor landing. If the balcony is 10
feet or longer, use the starting newel every 5 or 6 ft. Place a
newel at every corner under a quarterturn.
_______ _______
Intermediate Landing Newel* - Use at the intermediate
landing corner of a U-or L-shaped stair.
_______ _______
Rosette - Select a rosette for each handrail connection into
a wall.
_______ _______
B
Pin Top
Balusters
Use and
Intermediate
Landing
Newel at all
landings. Each
newel must be
covered with a
fitting
3503-BT
3500-BT
(used with solid handrail)
5015
A
Use with
a Starting
Fitting at
the beginning
of a staircase.
Also use on a
level run of a
handrail
with a fitting.
Starting
Newel Post
Rosettes:
C
Rail
Bolt
Landing
Newel Post
J-Anchor with
molding
Wood
Plugs
Treads and Risers:
Tread
8090
8080 Tread
Landing Tread Return Nosing
Riser
Handrail, Ends and Wall Rails:
SUREWOOD LNL
Newel Mounting Hardware (J-Anchor) - Select one newel
_______ _______
mounting kit for each newel post mounted on top of a tread.
~
6010-S
Solid Handrail
7009
7011
Returned End Quarterturn
Wall Rails Brackets:
6042
Wall Rail
Choose Fitting Style:
With Cap
No Cap
SUREWOOD LNL
Quaterturn
With Cap
7011
7021
Tandem Cap
7009
Opening Cap
7020
7019
~
Returned End
Returned End
Choose Gooseneck Style:
No Cap
Riser With
Cap
Hand 90˚
Riser With
Cap
Hand 90˚
Riser With
Cap
Upeasing
Riser No Cap
E
7095 Right
7090 Left
7098 Straight
D
7012
Eb
7065 Right
7060 Left
Ea
7086 Right
7081 Left
7088 Straight
With Cap
D
Hand 180˚
Riser
No Cap
Each newel post must be covered with a fitting. The floor plans to the left illustrate the
fitting components needed for each landing situation.
Choose Starting Fitting:
S-7035 Right
Hand Volute
S-7030 Left
Hand Volute
S-7045 Right
Hand Turnout
S-7040 Left
Hand Turnout
S-7010 Starting
Easing
Use at the bottom of the stairway over the Starting Newel. Volutes and Turnouts are available left hand or
right hand.
Non-Stock Fittings Available UPS Quick-Ship. See store personnel.
Balusters for Starting Fittings* - Each volute requires
(6)1-1/4“ x 41“ balusters, or (4)1-1/4 or 1-3/4“ x 41“
balusters. Each turnout requires (2)1-1/4“ x 41“ balusters or
(1)1-3/4“ x 41“ baluster. Each starting easing requires (1)
41“ baluster.
_______ _______
Rake Balusters* - Select the 34“ baluster for the front
baluster on each tread and the 36“ baluster for the back
baluster on each tread. If using 3 balusters per tread, use the
36“ baluster for the middle baluster on each tread.
_______ _______
Level Run Balusters* - Use the 36“ baluster for all 36“
height balconies and the 41“ baluster for all 41“ height
balconies. Standard placement is 4“ on center. Check local
building code for your area.
_______ _______
Handrail - Buy 13“ of handrail for each tread or step. Buy
enough for all level runs.
_______ _______
Plugs - Select two wood plugs for every newel mounting using
lag bolts. Select one plug for each handrail rail bolt used.
_______ _______
Handrail Mounting Hardware - Select one Rail Bolt Kit for
each handrail-to-handrail connection required.
_______ _______
Gooseneck Fittings - Select the appropriate gooseneck
fitting for each straight, U or L-shaped staircase newel.
_______ _______
*Note: These guidelines are for a rake handrail height of 36“– 41“. Longer newels and
balusters may be required for a different handrail height.
4
6
Tools Required:
Operation:
Tools Needed:
Measuring and Leveling
Metal measuring tape, hand levels, (torpedo and 4’ level),
framing square
Cutting
Miter box and saw (fine-tooth) hand or power circular saw or
standard hand saw
Nailing
Hammer, nail set, 1“ finishing nails
Gluing
Carpenter’s glue and construction adhesive
Screw Driving
Screwdriver (manual or power), 3“ wood screws
Drilling
Hand drill, drill guide and 1/8“, 1/4“, 3/8“, 5/8“, 3/4“, 1“
wood bits
Finishing
Sandpaper, steel wool, wood file, wood chisel, finishing stain,
rags, tack cloth, etc.
5
Basic Installation:
Marking Your Staircase for Installation
Layout your staircase directly on your treads and landings. Carefully mark Newel and
Baluster positions and centerlines.
Mark Position of
Landing Newel and
Centerline
Getting Started - Tread and Riser
Installation:
Baluster
Centerline
Face of Stringer
Mark Position of
Baluster Centerpoint
To properly install solid oak treads and risers, you must first remove the existing steps to
expose the rough framing. Leave the beginning riser at base of steps (A). Measure and cut
each step separately to ensure tight fit. (B). Pre-drill, apply construction adhesive and nail
into place. For added strength, screw treads to risers from behind (C). Complete each step
before continuing on to next step.
A
B
Starting Newel
Volute Starting Fitting Layout
C
The balustrade centerline and newel centerpoints should be laid out. On a kneewall stair,
the balustrade should be centered on the kneewall. On an open-tread stair, the centerline
should be 1/2 of the baluster square in from the face of the stringer; i.e. 5/8“ for a
1-1/4’’ baluster.
Landing Tread
Landing
Tread
Landing tread can be used with
3/4”oak flooring along a landing
when solid oak treads and risers are
used. Landing tread can be used
along a balcony with oak flooring.
Properly cut miters and attach
directly to sub floor.
Tread
Return
Nosing
Turnout Starting Fitting Layout
Tread
Tread Return Nosing Installation
Cut and miter tread return nosing to fit.
Adds a finished look to the tread edge.
Tread
Return
Nosing
Starting Easing Fitting Layout
7
9
Assemble the Handrail:
Assemble the handrail on
top of the stair treads prior
to installing the newel
posts. Use rail bolts
and glue at each
fitting connection.
Complete
intructions are
included with
fittings.
Rail Bolt
Installation
Rail
Bolt
3/8’’ Dia.
Hole
A) Temporarily position
assembled handrail onto
newels.
B) Use level to mark the
handrail with baluster
centers.
A
B
C
C) While handrail is on
newels, drill baluster
holeswith drill guide. Drill
holes using 5/8“ drill bit
a minimum of 3/4“ deep
into handrail.
Apply glue to ends. Assemble
and install nut. Tighten nut
with wrench. Fill access hole
with wood plug.
1/4’’ Dia.
Hole
Installing the Balusters and Handrail:
1’’ Dia.
Hole
D) Remove handrail from
newels and drill baluster
holes in treads. Glue and
insert balusters. Toe-nail
with 1“ finishing nails.
D
Attach rosette before
installing handrail.
E
E) Apply glue to top of
newels and balusters and
attach handrail.
Nut &
Washer
2-1/8’’ Dia.
Hole
8
15/16’’
1-3/8’’ Dia.
Hole
Newel Post Installation:
Measure and Trim Newel Posts
The rake rail height should be between 36”– 42” (H1) (check local building codes).
Center the assembled handrail over the newel locations. Measure the distance between
the tread and the bottom of the handrail fitting (A1 and A2). Also measure the rake rail
thickness (T1). Use the following formula to calculate the starting newel height.
H1 + A1 – T1 = Starting Newel Height
10 Finish to Wall and Wall Rail Installation:
If the newel starts from the floor or a lower tread, add that distance as well.
Newel Post
Installation
36” to 41”
above
front edge
of tread
Wall Rail Styles:
J-Anchor with
molding
Attach rosette rosette
or half newel
directly to
handrail as
shown.
Wood
Plugs
Lag Bolts
6042 Wall Rail
with bracket
6010-S Handrail
with 7011 Quaterturn
6010-S Handrail
with 7009 Returned End