1
VI. CUTTING THE CEILING JOISTS
Before you begin
installation spot
You should now have the cut out hole in the appropriate spot.
STEP 1
ceiling joist
If the room has a ceiling in which you made the opening proceed
to step 2.
If there is no ceiling in place mark the joists according to instruction
A or B, below.
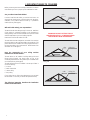
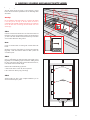
A - If the chosen location is parallel to the ceiling joists, mark the
length of the opening on the top surface of the joist as shown on
Figure 9. Do not cut the joist as marked.
Fig.8. Dotted line indicates your chosen location parallel to the joist.
installation spot
B - If the chosen location is perpendicular to the ceiling joists, mark
the width of the opening on the top surface of the joist as shown
on Figure 8. Do not cut the joist as marked.
ceiling joist
STEP 2.
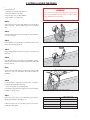
Cut 2 pieces of board similar to the size of the ceiling joist, long
enough to nail them to the ceiling joists on both ends of the
opening (Figure10). These boards will provide support to joists
which will be cut out.
STEP 3
Fig.9. Dotted line indicates your chosen location perpendicular to the
joist.
Position these boards approximately 2 ft from the opening edge
(pic 10).
"
24
Note
joist support boards
The 2 ft space is required to nail the frame.
STEP 4
Note
"
24
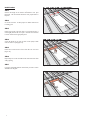
Nex decide where you will cut the joist see Figure11. The cutting
line should be away from the actual opening twice the thickness of
the frame (usually 3 inches). This will allow to install double
headers at both ends of the joist (pic 17 pg.8).
nail or screw
Fig.10. Dotted line indicates your chosen location.
In older homes the thickness of the joist might be greater than what
is currently sold in lumber yards. In such case the cutting line
should be marked at twice the thicknesses of the material which
you will use to build the frame not the joist.
STEP 5
cut here
section of joist
to be removed
2 x the joist
thickness
cut here
Cut the joist carefully, watching not to cut the ceiling board and
making sure that the cut out joist is even and vertical (square).
2 x the joist
thickness
Fig.11. Dotted line indicates your chosen location.
6