1
VII. FRAMING THE INSTALLATION OPENING
Before you begin
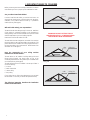
The distance between the joists should be the same as the width of installation opening. All cut joists must be attached to the joists that have not
been cut.
WARNING!
For your own safety mind all dangerous elements above your head. Do not sit on the ceiling - it is not designed do carry load.
Only joists will withstand load. In order to make a working area place several boards across the ceiling joists.
Installing the headers
If none of the joists were cut proceed to section ďsingle headerĒ.
If one or more joists were cut proceed to section ďdouble headersĒ
on page 8.
P
Single headers
STEP 1
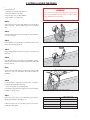
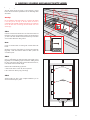
Measure the distance between the ceiling joists. The measurement
should be done perpendicular to the joist (Figure12).
STEP 2
Fig.12. P- Distance between the ceiling joists.
Cut 2 boards for headers to the measured length. Use timber
material similar in size to the joists.
header
STEP 3
Position the header at one end of the installation opening
(Figure13). The header must tightly fit between the joists. If
needed use a hammer to position the header.
ceiling joist
nails
Step 4
Align the header at 90o angle to the joists and drive 3 nails (16D)
at each end.
Fig.13. Nail the header at both ends.
header
STEP 5
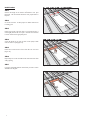
Position the second header 47Ē apart from the first one for LWSP 22/47, LWS-P 25/47 or 54Ē for LWS-P 22/54, LWS-P 25/54
and repeat step 4 (Figure 14).
7)
/4
25 4)
S-P
/5
LW P 25
7;
/4 LWS
22
;
S-P 2/54
2
(LW
-P
"
47 " (LWS
54
STEP 6
ceiling joist
The frame must have four sides where the headers are two of them.
If the ceiling joists are positioned as the other two sides check the
angles by measuring the diagonals. Both measured dimensions
should be within 1/8Ē to consider them equal.
Proceed to section 8 ďinstallation of temporary support boardsĒ.
If the ceiling joists do not make the other two sides of the frame,
you should install one or two wooden elements in order to make
the frame in the ceiling opening. Proceed to section ďinstallation of
stringersĒ.
D1 D2
nails
D1=D2
header
Fig.14.
7