1
Pre-installation information
RETAIN THESE INSTRUCTIONS FOR FUTURE REFERENCE.
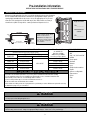
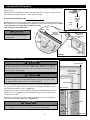
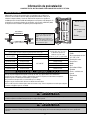
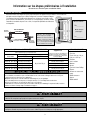
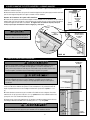
MEASURE THE ENTRYWAY
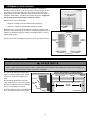
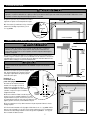
Measure the height and width of the door even with the brickmold as shown in the illustration.
Use the smallest width measurement to determine the opening width. Compare your door
opening height and width with the size chart to choose the appropriate size of your new
storm door. If the opening does not fall within any of these limits, it will be necessary to
rework the door jamb. You may wish to consult a professional carpenter to do so.
Height measurement:
H=_____________
Smallest Width measurement:
TOP VIEW
Measure A: The depth of the doorway
must be a minimum of 2-1/2". This is
required for handle clearance.
ENTRY DOOR
JAMB
A
B
B
Opening Width
(see chart below)
B
B
EXTERIOR
BRICKMOLD
W=_____________
Measure B: The mounting area for
your storm door must be a minimum of
1"x1". This space is required for
secure installation.
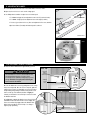
Z-bar Extender Kits
are available for
these door opening
widths from your EMCO
storm & screen door dealer.
36 3/8" to 37 3/8"
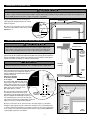
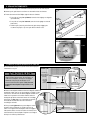
STORM DOOR TO DOOR OPENING SIZE CHART
If your door opening dimensions do not fall within these ranges, other
adjustments and reworks will be needed to provide a good fit.
NOMINAL
DOOR SIZE
36"x80" door
FITS DOOR OPENING SIZES:
WIDTH
HEIGHT
35 3/4" to 36 3/8"
34"x80" door
33 3/4" to 34 3/8"
33"x80" door
32 3/4" to 33 3/8"
32"x80" door
31 3/4" to 32 3/8"
32 3/8" to 33 3/8"
30"x80" door
29 3/4" to 30 3/8"
30 3/8" to 31 3/8"
34 3/8" to 35 3/8"
80" to 80 7/8"
33 3/8" to 34 3/8"
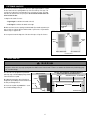
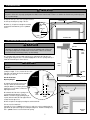
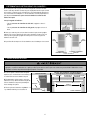
IMPORTANT — BEFORE YOU BEGIN
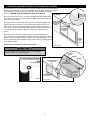
• To provide for the all-weather performance of your door, please read and follow the instructions carefully.
• If you are installing a double-door kit or sidelight storm window with your door, read those instructions first.
• Please handle your door with care to avoid damage and/or scratches.
• If your door has protective tape, do not remove it until instructed to do so.
• Be sure decorative side of molded frame faces outward.
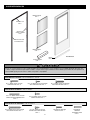
• Please double-check that you have all of your parts before you discard your carton. All fasteners required for each step
are illustrated on page 2 for your convenience.
!
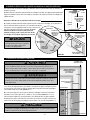
RECOMMENDED TOOLS
• Safety Glasses
• Drill
• 3/32”, 1/8", 5/32" and 5/16”
drill bits
• Center punch
• Hacksaw
• Hammer
• Level
• Phillips head screwdriver
• Square
• Scissors or utility blade
• Tape measure
• Pencil
• Tape
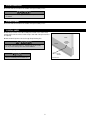
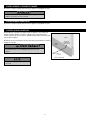
CAUTION
WARNING
The insect screen is intended for reasonable insect control and not the retention of objects or persons within the interior. The insect screen material will
not stop a person from falling through the door.
!
CAUTION
WARNING
Weight of window and door unit(s) and accessories will vary. Use a reasonable number of people with sufficient strength to lift, carry, and install window
and door unit(s) and accessories. Always use appropriate lifting techniques. Failure to do so may result in injury.
3