1
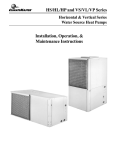
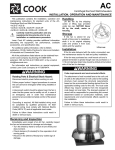
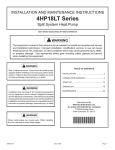
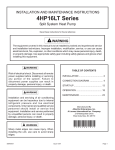
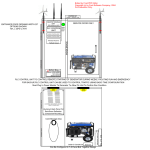
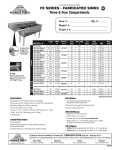
Spencer
Industravac Self-Contained
Vacuum Cleaning Systems—
Series A,B,C, D & V
®
Serial No:
®
Model No:
Filter Bags:
Handling, Installing and
Operating Instructions
Portable Models
(Series A pictured)
Stationary Models
(Series B pictured)
Important
Do not operate machine in unstable, low-flow range (surge).
Read and become familiar with this manual prior to installing your Spencer Industravac equipment. Following the instructions
detailed here will help you realize its full potential of efficient service and extended lifespan. Damage resulting from failure to
follow correct procedures will void the warranty.
The Spencer Turbine Company
Windsor, Connecticut 06095
Form UU4.1
Description
Contents
I.
II.
III.
IV.
V.
Vl.
Vll.
Warranty
General Introduction
Getting Started
Operation and Adjustments
Maintenance
Troubleshooting Guide — Separator
Troubleshooting Guide — Vacuum Producer
Page
1
1
1
7
7
10
11
I. Warranty
We warrant that this product will be free from defects in
materials and workmanship for a period of 18 months from
date of shipment or 12 months from date of start-up, whichever
comes first. Within the warranty period, we shall repair or
replace, F.O.B. our Factory, such products that are determined by us to be defective.
The Industravac unit consists of a multi-stage centrifugal
vacuum producer (Series V equipped with a Vortex® regenerative vacuum producer) with continuous duty motor; a
highly effective two-stage separator and a large capacity dirt
can, all mounted on steel legs (stationary model) or a rubber-tired carriage (portable model). These components form
a dependable, heavy-duty vacuum cleaning system that is
designed and rated for continuous operation handling dry,
free-flowing materials.
CAUTION: Standard Industravac units must not be used
for liquid pickup or for vacuuming volatile, viscous,
flammable or explosive materials. If such problems
exist, consult your Spencer Representative for a specialpurpose system utilizing either a custom-engineered
Industravac unit or a component-based design with
special separator and other modules specifically selected
for the application.
Portable Model
This warranty will not apply to any product which has been
subjected to misuse, negligence, or accident or misapplied or
improperly installed. This warranty will not apply to any product
which has been disassembled, repaired or otherwise altered
by any persons not authorized by our Service Department.
The portable Industravac model is self-contained and easily
moved to various points of use. It is equipped with a motor
starter and 50 feet of heavy-duty four-wire (three conductors
and ground wire) electrical cable, ready for your addition of a
male plug and connection to a suitable power supply. Refer
to the machine nameplate for specific electrical information.
The guarantee of the motor and control manufacturers will
govern the extent of our guarantee on such equipment.
Stationary Model
Refer to Bulletin 706 for complete terms and conditions.
II. General Introduction
Spencer®
Industravac® System
The stationary Industravac model is intended for permanent
installation in one location, where, for example, it may be
connected to a tubing network to form a central vacuum
cleaning system. Since the motor starter is separately
installed, usually in a remote location, it is not furnished as
standard equipment but is available as an optional Spencer
accessory.
NOTE: If a stationary Industravac unit is to be connected to
a tubing system, check the tubing runs for leaks before
enclosing them in walls where repairs would be difficult.
Read instructions before handling and starting equipment.
Serial No.
III. Getting Started
Model No.
Original
Filter Bag No.
Manufactured under some or all of the following United States Patent: 4,874,410; 5,045,098; 5,087,274
Registered Trademark: 62,801,;140,976; 652,701; 1,284,095
1,616,417; 134,026; 341,418; 1,348,270; 959,254
The Spencer Turbine Company, Windsor, CT 06095
860-688-8361
Made in U.S.A
Plate No. PLN-90056
Before proceeding with setup, record the machine catalog
number and serial number in the boxes on the front cover of
this manual. These numbers may be found on the nameplate
located on the vacuum producer casing. Also record the filter
bag number for convenient reordering. Having this information
easily accessible will expedite parts orders and other communication with the factory, ensuring prompt, accurate service.
2
NOTE: If any problems are encountered during installation
or start-up of your Industravac system, consult your local
Spencer Representative.
Moving and Handling
Each Industravac unit is carefully balanced and tested at the
factory. For optimum performance, it must be handled with
care during installation. Using accepted rigging practices
and safety precautions, the unit can be lifted and relocated
with a forklift, overhead crane or hoist.
Storage
If the machine is to be stored for an extended period before
use or between uses, it must be protected from dampness, dirt
and vibration. The inlet and discharge should be covered to
keep foreign matter out; the motor shaft should be periodically
rotated a few times by hand.
Typical Industravac Assembly
Filter Bag Buckle
Bag Head Spring
External
Bag Shaker
Two-Stage
Separator
Access Door
Impellers
and Deflectors
Inverted
Filter Bags
Multi-Stage Centrifugal
Vacuum Producer
(Series A, B & D)
Exhaust
Outlet
Spencer
Reverse-Curve Casing
Registered Trademark No. 1,616,417
Continuous
Duty Motor
Adjustable
Door Latches
Vacuum
Tube Inlet
Target Plate
Patent No. 4,874,410
Optional
Equilizing Line
Connector Sleeve
and Clamps
Vacuum Inlet Valve for
1-1/2" I.D. Hose (Standard)
Dirt Can
Locking Bail
Steel Frame
Dirt Can
Lift Cam
Location
Cam Arm
Lever Clamp
Industravac vacuum producers are designed for operation at or
near sea level atmospheric pressure and a nominal ambient
temperature of 70°F (21°C).When necessary, they can be factorydesigned for higher altitude or higher temperature operation.
Consideration should be given to the noise generated by
Industravac equipment and its contribution to the ambient
noise level. When desired, the exhaust can be fitted with an
optional Spencer silencer. C Series models have a built-in
silencer as standard equipment.
Note: V Series stationary models should be properly protected
from precipitation.
Portable Model. The portable Industravac unit is designed for
use on flat, dry, level surfaces. As a safety precaution, the
wheels should be blocked to prevent accidental movement.
3
Stationary Model. No special foundation is required. A level
concrete floor or pad is recommended, although any other
substantial floor is satisfactory. The Industravac base should
be placed on rubber isomode pads furnished with the unit.
In selecting an installation site for a stationary Industravac
model, be sure the unit is readily accessible for servicing by
allowing several feet of clearance around the machine. The
exhaust should discharge outdoors or into a room having
ample volume and sufficient ventilation to allow air to escape.
Avoid placing the Industravac unit in an enclosed room where
a substantial heat buildup might occur. The ambient temperature should not exceed 104°F (40°C).
Unpacking
1. Uncrate the Industravac unit, saving all literature, boxes
and parts.
NOTE: The D Series Industravac is shipped on two skids:
the frame with vacuum producer on one skid, and the
separator horizontally mounted on the other skid. To
assemble the two units, attach the rubber inlet sleeve to
the vacuum producer inlet; lift the separator at the lifting
points, position it on the frame and align the rubber
sleeve and bolt holes. Secure with bolts provided.
2. Remove packing materials, plugs, etc.
3. Use the packing slip to check off and confirm the presence of all ordered components.
4. Lower the dirt can by raising the bail arm in front of the
separator and look inside for parts and optional accessories
(e.g., equalizing line, dirt can bags, motor starter, hose,
tools) which are often shipped loose in this location.
5. Read all instructional and warning labels on the machine
before operation.
Industravac Setup
1. Vacuum producer. The upblast exhaust tubing on A, B
and D Series units will accept, if required, an air gate (throttling valve), discharge silencer, tubing connection and
weather cap. The C Series has a bottom exhaust with
silencer, Patent No. 4,874,410, as standard equipment.
(Optional adapter P/N PLT90023 can be purchased to provide a 6" O.D. tube connection.) The V Series equipped with
exhaust diffuser for
Tubing by
Clamps
weather protection
Customer
and a relief valve for
Rubber
load control. If any
Sleeve
optional items have
been purchased for
field installation, they
should be mounted
on the exhaust tubing with the air gate first, followed by a
flexible connector (see diagram and caution below), silencer
and weather cap or tubing.
CAUTION: Tubing connected to the vacuum producer
should be properly aligned and supported so there is no
stress on the machine casing. The tubing must not
touch the vacuum producer. Use a flexible connector to
create an isolating gap of approximately 1" minimum
and clamp it in place for an air-tight seal.
2. Separator. Open the separator access door to confirm
that the door gasket and filter bags are in place and secure.
With the door open, operate the external bag shaker to
check for proper action.
Lower the dirt can to see that nothing has been left inside
4
inadvertently, and check that the dirt can gasket is in place
beneath the separator. Raise the dirt can, making sure it
seals tightly against the gasket. Inspect both separator inlet
ports to be sure they are clear.
If optional dirt can liners will be used, install one liner in the
dirt can and make sure the equalizing line is in place, properly
connected to the separator and dirt can.
CAUTION: The dirt can liner must not be used without
the equalizing line (the liner will be sucked out of the
can, up against the filter bags) and vice versa (without
the liner in place, mechanical and environmental damage
may result)
CAUTION: If the separator is equipped with an optional
explosion relief port, it must be installed in accordance
with the National Fire Code and all applicable safety
regulations. The port should be positioned away from
nearby personnel and ducted to the outdoors.
3. Electrical.
NOTE: All wiring and electrical adjustments or installations
should be done by a qualified electrician in accordance with
the National Electrical Code and local codes.
The standard electrical motor furnished with the A, B and D
Series Industravac vacuum producer is a NEMA design B,
open drip proof induction type motor suitable for 60 Hz, 3phase, 200-230/460VAC operation. The C Series and V
Series have a TEFC type motor as standard. Other motors
such as TEFC and explosion-proof types, and other voltages, may be furnished as required by the application.
CAUTION: The electrical service at the installation site
must supply the voltage stamped on the motor nameplate. Operation at an incorrect voltage will result in a
damaged motor.
Industravac portable units are furnished with a starter and
50-ft cable, requiring only a suitable male plug for connection. In making the electrical connections for a stationary
Industravac, follow the wiring instructions furnished. All
wiring, power cords and circuit breakers should be of ample
capacity to ensure that proper voltage is maintained at the
motor terminals while starting and running. Starters should
have thermal overload protection and low-voltage protection.
Electrical Accessories. Certain optional accessories such as
an Electronic Modulating Bleed Control and motorized filter
bag shaker require 115VAC, single-phase electrical service.
Such accessories should be installed using the separate
instruction sheets accompanying them.
A grounding lug is provided for those Industravac units having
optional grounded filter bags. In order to effectively bleed off
static electricity charges, this lug should be securely connected
to an electrical ground.
4. Motor Rotation. Perform a pre-start check to make sure
the motor turns in the correct direction. (While the vacuum
producer will operate both ways, its performance will be
greatly diminished if it runs backward.) If V Series rotation is
incorrect, it will perform as a blower, not a vacuum producer.
A rotation direction arrow is located on the vacuum producer
casing. To see if the motor is wired correctly, momentarily
start the motor. "Bump" or jog the start button and observe
the direction of rotation at either the end bell of the motor or
the motor shaft, whichever is visible. If the rotation is incorrect, the motor wiring must be reversed.
INLET VALVE
MANUAL BAG
SHAKER
MANUAL BAG
SHAKER
INLET VALVE
INLET
VALVE
INLET
6" O.D.
EXHAUST OUTLET
STARTER
EXHAUST
DIFFUSER
HANDLE
4" O.D.
INLET
21/4 cu. ft.
DIRT
CAN
Series A
Stationary Model
INLET VALVE
21/4 cu. ft.
DIRT
CAN
INLET VALVE
MANUAL BAG
SHAKER
Portable Model
MANUAL BAG
SHAKER
INLET VALVE
INLET VALVE
INLET
6" O.D.
EXHAUST OUTLET
STARTER
EXHAUST
DIFFUSER
HANDLE
INLET
VALVE
5" O.D.
INLET
41/3 cu. ft.
DIRT
CAN
Stationary Model
Series B
41/3 cu. ft.
DIRT
CAN
Portable Model
5
5" O.D. INLET
DOWNBLAST
EXHAUST
INLET VALVE
MANUAL BAG
SHAKER
MANUAL BAG
SHAKER
(Patent No.
5,087,274)
INLET VALVE
LIFTING HOOK
INLET
LIFTING HOOK
8" O.D.
EXHAUST OUTLET
6" O.D.
INLET
41/3 cu. ft.
DIRT
CAN
INLET VALVE
LIFTING HOOK
Stationary Model
Stationary Model
Series C
Series D
71/2 cu. ft.
DIRT CAN
STARTER
EXHAUST
DIFFUSER
MANUAL BAG
SHAKER
INLET
VALVE
INLET VALVE
MANUAL BAG
SHAKER
INLET VALVE
INLET
HANDLE
2-1/2”
O.D.
INLET
INLET
VALVE
21/4 cu. ft.
DIRT
CAN
21/4 cu. ft.
DIRT
CAN
Stationary Model
Portable Model
Series V
6
IV. Operation and Adjustments
NOTE: An Industravac vacuum cleaning system consists of
the Industravac unit and its associated components. The
vacuum producer is designed for operation under load,
hence it must always be connected directly to hose and
tools or to a tubing system with hose and tools.
Machine startup
1. Turn the Industravac unit on, having fully completed the
previous setup procedures.
2. (For units equipped with discharge air gate.) With a full
vacuum system load connected to the separator inlet(s),
connect an ammeter to the motor circuit. Measure the
draw (amperage) of the motor. If it is below the full load
current rating, open the air gate until the amperage reaches, but does not exceed, the full-rated motor capacity.
The air gate should then be fixed to prevent opening
beyond this point.
3. (For units equipped with Electronic Modulating Bleed
Control.) Follow adjustment instructions in the separate
data sheet accompanying the EMBC.
4. Check the tubing system and vacuum equipment for
leaks. At the separator, check the access door, dirt can
seal and hose inlet valves. Examine all hoses, tubes,
and fittings connected to the Industravac unit. Air leaks
are highly detrimental to the overall system performance, wasting power and impairing the operating
efficiency.
CAUTION: When the vacuum producer is operating, its
housing will be hot to the touch. Use caution when
making inspections or adjustments in this area.
Hose and tools
For optimum performance, Industravac units should be used
only with complementary Spencer vacuum cleaning equipment system components—Spencer tubing, fittings, flexible
hose, tools, attachments and accessories. These products
have been designed and sized specifically for compatible
use in an Industravac system.
V. Maintenance
CAUTION: Disconnect electrical power before performing
any maintenance procedure.
2. Bag Shaker
Rod
1. Motor
1. Lubrication
1. Motor. Follow motor manufacturer's recommendations.
For following items 2 through 4, apply light lubricating oil
yearly or more often as needed.
2. Bag shaker rod. Grease yearly or more often as needed.
3. Lift
Cams
3. Lift cams, left- and right-hand.
4. Dirt can casters.
5. Wheels of portable model. Grease yearly or more often
as needed. (No lubrication is required for the fifth wheel
of large portable models.)
4. Dirt Can
Casters
5. Wheels of
Portable Model
2. Vacuum Producer – Multi-stage Centrifugal (Series A, B, C & D)
NOTE: For maintenance of the Vortex regenerative vacuum
producer, equipped on Series V models, see handling,
installing and operating instructions Form ZZ.
If operating problems are detected, notify your local Spencer
Representative, describing the situation in detail before
attempting repairs or disassembly.
NOTE: For maintenance of the motor, consult motor manufacturer's information provided with the equipment.
The Industravac vacuum producer has an overhung type
construction with multiple impellers mounted directly on the
motor shaft. The motor bearings support the shaft and
impeller assembly.
NOTE: Disassembly, repair or alteration cannot be done by
unauthorized personnel during the warranty period without
voiding the warranty. The maintenance instructions that follow
are provided as a customer service to facilitate field repair
after the warranty period.
Six impellers and five deflectors are shown in the accompanying diagram of a typical vacuum producer; the actual
number of each will vary from two to nine, depending on
the model.
7
Circled items are recommended spare parts
Exhaust
Outlet
6
1 Motor
5
2 Casing
4
1
7
3
2
3 Division Head Packing
8
4 Division Head (not available
as separate item)
9
5 Rope Packing for Deflector
6 End Head Bolts
7 End Head
8 Deflectors (A, B, etc.)
9 Impellers (A, B, etc.)
Inlet
16
10 Split Clamped Hub
11 End Head Gasket
15
10
12 Spacers
13 Front Motor Bearing
14
14 Motor Base
15 Motor Hold-Down Bolts
17
13
Disassembly (For Series V see Form ZZ)
NOTE: Read these procedures carefully before attempting
disassembly. Refer to the diagram on page 7 and the
instructions below as you proceed. Contact your local
Spencer Representative for help if any questions arise.
To facilitate repairs, disconnect the vacuum producer from
the separator and unbolt the casing from the Industravac
frame. Using adequate and safe lifting equipment, remove
the vacuum producer to a convenient work location.
CAUTION: During reassembly, parts must be installed in
exactly the same relative positions. Therefore, as each
part is removed, it should be marked or tagged and
stacked in sequence. It is especially important that the
location of each impeller, as well as its rotated position
on the shaft, be marked.
1. Begin at the intake and remove, in turn, end head #7,
(some models may have an extra spacer and half deflector
inserted during manufacturing; these must be removed
before reaching the first impeller), impeller #9A, spacer
#12, rope packing #5, deflector #8A, impeller #9B, and so
on until all impellers have been removed. (Note: division
head #4 cannot be removed.)
2. Check the division head packing #3 and replace it if damaged. Any time the motor is removed and reinstalled,
replace this packing before the motor is put in place.
3. Temporarily reconnect electrical power and run motor to
check for mechanical or electrical defects. If the motor
must be removed, disconnect electrical power, remove
bolts #15 and slide motor straight back, being careful not
to damage packing #3 around shaft or the shims (if present) under each motor attach-point.
8
12
11
16 Rear Motor Bearing
17 Half Deflector (not all models)
Reassembly (For Series V see Form ZZ)
1. Bolt the motor down tightly in its original position with the
shaft in the exact center of the vacuum producer casing.
Be sure that shims (if removed) are replaced in their
exact positions on the same attach-points as before. See
that packing #3 is in place and tight around the shaft.
2. Place the last-removed impeller #9 on the shaft and push it
toward the motor until it bottoms. Position the impeller same
distance from the division head as noted during disassembly
and tighten. Rotate once by hand to check placement.
3. Place the last-removed deflector #8 back tightly against
the stops and, with a suitable tool, caulk the rope packing
#5 firmly into the groove.
4. Place the next impeller on the shaft. Push it toward the motor
until it bottoms. Back it off approximately 1/8" and tighten it to
the shaft. Rotate once by hand to check placement.
5. Place spacer #12 into the last deflector. Place the next
deflector into position in the casing as shown, caulking
the rope packing into the groove.
Note: Make sure the spacer and deflector are pressed
back tightly and at a uniform distance from the end of the
casing at all points.
6. Repeat procedure until all stages are reassembled.
7. Align gasket #11 and division end head #7 together and
bolt to casing.
Balancing (For Series V see Form ZZ)
Turn the machine on with inlet blocked to check balance. If
there is excess vibration due to an unbalanced condition
after reassemble, use the following balancing procedure:
1. Mark the position of the end impeller hub on the shaft.
2. Loosen the bolts or screws holding the impeller on the shaft.
Changing Filter Bags
Keep a set of spare filter bags in reserve at all times.
Examine the bags in service periodically and replace them
with genuine Spencer filter bags when visibly worn. Also
look for leaks, which are signalled by dirt on the outside of
the bags or on the bag head or by dust in the discharge
airstream.
3. Rotate the impeller 90° on the shaft, retighten the bolts or
screws.
4. Run the machine again at operating speed and check
vibration.
5. Repeat this procedure until the best balance (least
vibration) is obtained. If satisfactory results are not
achieved, contact the Spencer Service Department for
recommendations.
3. Separator
Shaking the Filter Bags
NOTE: The vacuum producer must be turned off during bag
shaking, or loosened dirt will immediately redeposit on the
filter bags.
Grasp the external bag shaker handle and move it back and
forth vigorously for 5 to 10 seconds. This action loosens dirt
that has accumulated inside the filter bags, allowing it to fall
into the dirt can.
1. To install a new filter bag, compress the spring collar at
the bottom of the bag.
2. Insert the compressed spring collar into the bag head
opening and allow it to resume its original shape.
For portable Industravac models, bag shaking should be
done after each use; for stationary models, after each shift
to maintain optimum vacuum performance.
Emptying the Dirt Can
For new Industravac applications, check the rate of dirt accumulation in the dirt can and then establish a regular emptying
schedule. If the application characteristics change, modify the
schedule to suit. The can should be emptied when it is no
more than 3/4 full. Or, for convenience, it can be emptied by
weight rather than volume, at any lesser level.
To remove the dirt can, lift the bail arm in front of the separator,
lowering the container onto the floor where it can be wheeled
away on its casters for emptying. To replace the can, simply
push it into place under the separator. A self-locating guide
positions the can correctly. Lower the bail arm, lifting the can
into position and sealing it against the rubber gasket.
Changing Door and Dirt Can Gaskets
1. Peel off old gasket.
2. Clean old adhesive off gasket seat.
3. Check replacement gasket for fit; trim if necessary.
4. Coat gasket and seat with rubber cement, apply gasket.
5. Check for airtight seal after cement is dry.
3. Pull up on the bag to be sure it is properly seated. The
recess in the spring collar must be at the bag head opening.
(Entire collar should not be below bag head.)
4. Install buckle on the narrow tab of filter bag and attach to
hook on shaker plate. Pull on tab end to remove slack.
In addition to standard cotton sateen filter fabric, various
other materials are available in Spencer replacement bags.
They offer specialized properties suited to adverse conditions such as dampness, abrasion or chemical attack.
Special-purpose filters are also available, such as optional
HEPA (High Efficiency Particulate Air) filters with a filtration
efficiency of 99.97% at 0.3 micron particle size. For recommendations, consult your Spencer Representative.
Maintaining the Equalizing Line
Periodically check the equalizing line, if present, to be sure it
is clear and free of leaks, If problems occur, replacement
kits are available from Spencer.
NOTE: Spencer disposable dirt can liners must always be
used if an equalizing line has been installed or mechanical
and environmental damage will result.
9
Replacing the Target Plate
The target plate, Patent No. 4,874,410, at the bottom of the
separator is able to absorb a great deal of impact and
abrasion damage as it diverts solid litter into the dirt can.
Because it will eventually wear out, provisions have been
made for easy replacement:
1. Lower the dirt can and wheel it out of the way.
2. Swing the target plate to a horizontal position and release
it from its supporting hooks.
3. Reverse the procedure in Step 2 to install a new plate.
5. Replacement Parts
Provide full information about your Industravac equipment,
including the serial number and catalog number, when
ordering parts. When ordering replacement filter bags, be
sure to provide the bag part number. Replacement bags are
supplied in the following quantities: A Series–10 bags, B
Series–19, C Series–12, D Series–24, and V Series–10. For
other vacuum producer and separator parts, refer to the
illustrations on pages 5, 6, and 7 for the names of needed
items. Touch-up paint is also available from Spencer.
4. Machine Exterior
The nature of its work exposes the Industravac unit to dust
and dirt which should be periodically removed by washing
the exterior with soap and water. Disconnect the electrical
power before any cleaning procedure; do not spray water
directly on the motor, electrical connections or in the vacuum
producer outlet.
VI. Troubleshooting Guide - Separator
PROBLEM
AIR LEAKS
LOW
VACUUM/
NO VACUUM
DIRT
PASSING
THROUGH
SYSTEM
10
Possible Cause
Corrective Action
• Worn or poorly fitting seals.
Check access door and dirt can seals, reposition or replace if
necessary.
• Holes worn in separator by abrasive materials.
Check target plate, replace if worn; repair holes.
• Leaks.
See above.
• Separator outlet blocked.
Check dirt can, empty if more than 3/4 full. Make sure filter bags
are not blocking separator outlet. Check outlet duct.
• Dirt can liner sucked up against filter bag inlet.
Inspect equalizing line for holes and clean line to ensure proper
manifold suction under dirt can to keep liner in place.
• Machine rotating backward.
Reverse motor leads.
• Filter bags clogged.
Shake bags more frequently (only when system is shut down).
• Loose bag(s).
Reinstall bags according to instructions on page 9.
• Holes in bags.
Replace worn bags, eliminate cause if bags wear out prematurely
(e.g., wrong filter bag material, dirt can not emptied often enough).
• Leaks.
See Air Leaks, page 9.
• Incorrect filter bag material.
Consult Spencer Service Dept. with information on material
handled.
VI. Troubleshooting Guide - Vacuum Producer
PROBLEM
Possible Cause
Corrective Action
INSUFFICIENT
AIR THROUGH
SYSTEM
Indication: low vacuum as determined by gauge measurement
• Incorrect rotation.
Change motor leads to correct rotation.
• Incorrect reassembly of machine after customer
repairs.
Following instructions on pages 7-8, disassemble machine and
reassemble correctly.
• Tubing too small, causing excessive friction loss.
Increase tubing size or install machine providing higher vacuum.
• Too many operators using system at once.
Restrict number of simultaneous operators or upgrade to larger
Industravac unit.
• Too much air entering system due to improper
tools or open end hoses being used.
Use only Spencer tools, do not use open end hoses.
• Machine running slow due to low motor voltage.
Refer to motor manufacturer's instructions, check voltage supply
and connections.
• Machine air passages clogged with material.
Disassemble, clean and inspect all parts, check filter bags for holes.
• Impellers worn due to abrasion or vibration.
Replace impellers.
• Air gate (blast gate) closed.
Refer to air gate instructions on page 6 and readjust.
Indication: machine design capacity too small for the system
MACHINE
NOISY
• System requirements incorrectly calculated.
Install larger Industravac unit to handle system requirements.
• Too much leakage and/or openings.
Eliminate all leakage; see separator troubleshooting section.
Indication: external machine malfunction–bearing whining or growling
• Too much grease; motor bearings hot.
Remove drain plug and let excess grease drain out.
• Too little grease; motor bearings dry.
Grease per instructions of motor manufacturer.
• Bearing failure.
Replace bearing.
• Bearing retainers worn.
Replace bearing.
Indication: internal machine malfunction
• Impellers hitting after field reassembly and/or
slipping on shaft due to heat.
Reassemble per instructions on pages 7-8, tighten impellers.
Bleed air at low flow to reduce heat.
• Impellers coming apart due to age.
Replace impellers.
• Deflectors coming apart due to age.
Repair or replace deflectors.
• Impellers and/or deflectors coming apart due to
wear from dirty air.
Too much material passing through separator. Replace
impellers and/or deflectors. Check filter bags for holes. Check to
be sure filter bag material is correct for debris collected.
• Machine operating in surge or unbalanced flow
range.
Increase air flow to stop surge condition.
• Machine unbalanced, running rough.
Rebalance and/or clean machine, see further comments under
Machine Vibrating.
• Motor not aligned in casing, causing impellers to hit.
Reassemble and carefully realign shaft and motor.
• Foreign material in machine.
Disassemble machine, inspect and clean. Check filter bags for
holes to prevent further clogging.
Indication: motor malfunction
• Abnormal hum or whine.
Check motor manufacturer's instructions, check voltage supply
and connections.
• Wrong voltage (high voltage will burn out motor
and cause noticeable noise).
Check motor manufacturer's instructions, check voltage supply
and connections.
• Bearing noise.
See External Machine Malfunction.
• Motor rebuilt improperly, thrust taken on wrong end.
Rebuild motor properly and correct the end play.
• Loose part in motor.
Tighten, repair or replace. (Check with motor manufacturer.)
• Low frequency.
Separate power supply, correct frequency.
11
VI. Troubleshooting Guide - Vacuum Producer
(cont.)
PROBLEM
Possible Cause
Corrective Action
MACHINE
VIBRATING
• Material buildup on impellers.
Clean impellers, check filter bags for holes.
• Shaft bent (.001" max. runout per 10' of length).
Straighten shaft.
• Bearing failure.
Replace bearing(s).
• Faulty replacement motor installed.
Replace with correct motor.
• Motor imbalance.
Disassemble machine, balance motor.
• Machine reassembled incorrectly.
Disassemble machine, reassemble following instructions on
pages 7-8.
• Motor not aligned in casing, impellers rubbing.
Align motor, realign shaft.
• Bearing(s) cramped due to improper fit.
Check bearings, shaft and housing, correct bearing fit.
• Improper motor voltage causing operation at
incorrect speed.
Check voltage and wiring connections, correct voltage.
• Liquids passing through machine.
Do not use Industravac unit for liquid pickup. (Contact Spencer
representative for portable wet separator.)
• Material passing through vacuum producer.
Disassemble, clean and inspect all parts, check filter bags for holes.
• Machine operating in surge or unbalanced flow
range.
Increase air flow to stop surge condition.
• Machine not mounted on solid foundation (e.g.,
on unstable catwalk).
Reinforce the foundation.
MOTOR
HOT
12
(Check with putty and thermometer; consult Spencer Service Dept. for assistance.)
• Ambient temperature too high for insulation class.
Cool motor or replace with motor having proper insulation.
• Incorrect voltage.
Change to correct voltage.
• Incorrect cycle.
Change to correct cycle.
• Electrical short-circuit; insulation failure.
Repair or replace motor.
• Motor overloaded.
Upgrade to larger Industravac unit, or reduce amount of air in
vacuum producer. Verify amperage of motor. Set air gate.
• Leaks in system.
Check components and tubing system for leaks.
• Unbalanced voltage supply.
Consult power company for correction.
Filter Bag Maintenance Record
Date
Filter Bag Part No.
Filter Bag Material
Date Changed
13
Vacuum Accessories Record (Hoses, Tools, Valves)
Part No.
14
Description
®
Related Literature
Vacuum Cleaning Attachments and
Accessories Catalog, Bulletin 241, contains
Spencer’s product line of professional cleaning
components for use with portable and stationary Industravac systems. There are broad
selections of hoses, cleaning wands, hand and
floor tools, inlet valves, connectors, adapters
and accessories to make work easier in every
application from general floor cleaning to car
upholstery vacuuming and specialized bulk
material handling. Bulletin No. 241
Tubing, Fittings, and System Components
Catalog, Bulletin 600, covers every variety of
components for Industravac-based central
vacuum cleaning systems - metal tubing,
elbows, branches, couplings, reducers,
adapters, shrink sleeves, air gates, check
valves - everything you need for specialized
convenience in system design and installation.
Also included: layout recommendations, friction
loss data and component assembly information for your assistance. Bulletin No. 600
15
®
Products & Services
Industrially rated products offering effective solutions
for air and gas moving problems:
•
•
•
•
•
•
•
•
Modular central vacuum systems
Mobile or stationary integrated vacuum units
Dust collectors and separators
Multi-stage centrifugal blowers
Single stage centrifugal blowers
Regenerative blowers
Gas boosters
Custom-engineered products with special materials for extreme
temperatures and pressure
Complementary accessories with single source
convenience and compatibility:
• Standard and custom electrical control panels – UL and CUL Listed
and CE available.
• Comprehensive selection of tubing, fittings, vacuum hoses, valves
and tools
• Valves, gauges, couplings, shrink sleeves, vibration isolators and
other system components
Comprehensive engineering and other customer
support services:
• The industry’s largest complement of technical specialists in air and
gas moving technology
• Worldwide parts and service organization
• Application research and testing facility
• Internal computer program technology for optimum equipment and
design selection
Worldwide organization of sales representatives and
distributors offering:
• Product selection, installation and operation assistance
• Comprehensive system design services
• Follow-up services and troubleshooting
For the name and telephone number of your local
Spencer Representative, call 800-232-4321
or email [email protected]
Since 1892 moving air and gas for a cleaner environment
The
Turbine Company, 600 Day Hill Road, Windsor, CT 06095-4706
TEL 800-232-4321 ◆ 860-688-8361 ◆ FAX 860-688-0098 ◆ www.spencerturbine.com
Form UU4.1, Copyright © 2006 The Spencer Turbine Company Printed in U.S.A.
806PM1.5