1
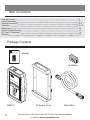
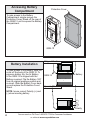
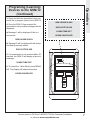
Wayne-Dalton Corp
P.O. Box 67 Mt. Hope, OH 44660
www.wayne-dalton.com
Gate System Master Controller
for use with Wayne-Dalton Remote Radio Receivers.
Models: GSM-12
Operating Instructions
and Owner’s Manual
GSM-12
MENU/NO
© Copyright 2005 Wayne-Dalton Corp.
ON/YES
Part No. 323375
New 06/09/05
Table of contents
Package Content
Safety Information
General Information
Operation
Maintenance
Service/Trouble Shooting
FCC and IC Statement
Warranty
2
3
4-5
6-12
13
13
14
15
Package Contents
Gate System Master Controller
for use with Wayne-Dalton Remote Radio Receivers.
Models: GSM-12
Operating Instructions
and Owner’s Manual
Manual
GSM-12
© Copyright 2005 Wayne-Dalton Corp.
9v
MENU/NO
ON/YES
Part No. xxxxxx
New
05/31/05
9v Battery
ME
NU
/N
O
ON
/YE
S
GSM-12
2
Protective Cover
Data Cable
You can reach us Toll Free 1-800-676-7734 for Consumer Assistance
or online at www.waynedalton.com
Definition of Symbol
Warning
Safe Operation Precautions
WARNING: To prevent electrical shock and/or fire hazards, do not
connect the GSM-12 to any device other than a Wayne-Dalton remote
radio receiver.
WARNING: To reduce the risk of severe or fatal injury:
1. READ and follow all instructions.
2. Observe all warnings, notices and notes in these instructions.
SAVE THESE INSTRUCTIONS
You can reach us Toll Free 1-800-676-7734 for Consumer Assistance
or online at www.waynedalton.com
3
Accessing Battery
Compartment
Protective Cover
To gain access to the Battery
Compartment, simple remove the
Protective Cover/ Stand off the rear of
the GSM-12 unit to expose the Battery
Compartment.
ME
NU
/N
O
ON
/YE
S
GSM-12
Shipped Position
Battery Installation
To gain access to the Battery, slide the
cover off the back of the GSM-12. To
preserve battery life, the 9v Battery
of the GSM-12 is shipped with the
Battery reversed. Flip the Battery 180°
from its original package position and
re-insert. Slide the Battery Cover back
on and replace the Protective Cover/
Stand.
9v Battery
GSM-12
Battery Cover
Operating Position
NOTE: Insure correct Polarity (+) and
(-) when inserting battery.
_
+
Polarity
4
You can reach us Toll Free 1-800-676-7734 for Consumer Assistance
or online at www.waynedalton.com
Data Cable
Insert the Data Cable into the
Communications Port on top of the
GSM-12. Place the other end of the
Data Cable in the Communications
Port of the Wayne-Dalton remote radio
receiver (sold separately).
Communication Port
ME
NU
/N
O
ON
/YE
S
Protective Cover/Stand
The protective cover of the GSM-12
has a built in Stand, which provides
hands-free operation. To use the
built-in stand, pull the Stand out from
the rear of the GSM-12.
Stand
You can reach us Toll Free 1-800-676-7734 for Consumer Assistance
or online at www.waynedalton.com
5
Genreal Information
Data Cable Connection
Operation
Activating the GSM-12
1. Press and release the ON/YES button.
GSM-12 VX.XX
PRESS MENU
a) The Display will indicate the Model and
Version numbers.
GSM-12 VX.XX
PRESS MENU
NOTE: X is the version number
GSM-12
MENU/NO
Programing (Learning)
Devices to the GSM-12
1. Press the MENU/NO button until the
display indicates the Learn Device
operation.
LEARN DEVICE?
NO
YES
ON/YES
LEARN DEVICE?
NO
YES
WAIT.....
LISTENING.....
2. Press the ON/YES button. If the receiver
is
initializing, the display will indicate a wait
message.
GSM-12
WAIT.....
MENU/NO
ON/YES
a) When the receiver is ready to receive
device signals, the display will indicate a
ready message.
6
You can reach us Toll Free 1-800-676-7734 for Consumer Assistance
or online at www.waynedalton.com
Operation
Programing (Learning)
Devices to the GSM-12
(Continued)
3. Press and hold the transmitter button you
would like to program (learn) to the GSM-12.
4. Once the GSM-12 has received the
transmission, two possible messages will be
displayed.
a) Message 1 will be displayed if this is a
new device.
NEW LEARN ID-XXX
DUPLICATE ID-XXX
LEARN TIME-OUT
LEARN CANCELLED
NEW LEARN ID-XXX
b) Message 2 will be displayed if this device
had been previously added.
DUPLICATE ID-XXX
5. If a transmission is not received within 30
seconds, the GSM-12 will display a time-out
message.
LEARN TIME-OUT
GSM-12
6. To cancel the “Listen Mode” press MENU/
NO. The display will indicate this action.
LEARN CANCELLED
MENU/NO
ON/YES
You can reach us Toll Free 1-800-676-7734 for Consumer Assistance
or online at www.waynedalton.com
7
Erasing Individual
Devices From The GSM-12
Erasing Individual Devices From The
GSM-12:
1. Press the MENU/NO button until the
display indicates the Erase Device operation.
ERASE DEVICE?
NO
YES
a) Pressing the ON/YES button will display
information about an added device.
ERASE DEVICE?
NO
YES
ID-XXX YYYYYYY
NO ERASE? YES
NO
ID-XXX ERASE
UNDO?
YES
ID-XXX YYYYYYY
NO ERASE? YES
NOTE: X is the memory location of the
device.
NOTE: Y is the serial number of the device.
3. Use the UP and DOWN buttons to search
through the memory to find the device to
erase. When the device to be erased has
been found, press the ON/YES button. A
confirmation message will be displayed
before permanently erasing the device.
ID-XXX ERASED
NO
UNDO?
YES
GSM-12
MENU/NO
ON/YES
a) To permanently erase the device, press
the MENU/NO button.
b) To restore or undo the erase operation,
press the ON/YES button.
c) An UP arrow in the top left display
indicates more devices to view.
d) A DOWN arrow in the top left display
indicates there is a previous device to view.
8
You can reach us Toll Free 1-800-676-7734 for Consumer Assistance
or online at www.waynedalton.com
ERASE ALL?
NO
YES
1. Press the MENU/NO button until the
display indicates the Erase All operation.
ERASE ALL?
NO
Operation
Erasing All Devices From
The GSM-12
YES
ERASE ALL?
NO
SURE?
YES
2. Pressing the ON/YES button will display
confirmation message before erasing all
devices.
ERASE ALL?
NO
SURE?
YES
a) To permanently erase all devices, press
the ON/YES button.
GSM-12
MENU/NO
ON/YES
b) To cancel the erase all operation, press
the MENU/NO button.
Retrieving Free Storage
Space
1. Press the MENU/NO button until the
display indicates the Get Free Memory
operation.
GET FREE MEMORY?
NO
YES
XXX RECORDS FREE
GET FREE MEMORY?
NO
YES
a) Pressing the ON/YES button will display
how many devices can be added to the
GSM-12.
XXX RECORDS FREE
GSM-12
MENU/NO
ON/YES
You can reach us Toll Free 1-800-676-7734 for Consumer Assistance
or online at www.waynedalton.com
9
Transfering Controller
Devices to Radio Remote
Receiver
1. Connect the communication cable from the
GSM-12 to the Remote Radio Receiver.
2. Press the MENU/NO button until the
display indicates the Send To Receiver
operation.
SEND TO RECEIVER
NO
YES
SEND TO RECEIVER
NO
YES
SENDING......
SENDING DONE
CHECKING COMM....
COMM ERROR
3. Pressing the ON/YES button will display
transfer operation activity.
SENDING......
a) When transfer operation is complete, the
GSM-12 will display.
SENDING DONE
b) If the communication cable is not
connected or the connection is not correct,
the GSM-12 will display.
GSM-12
CHECKING COMM.....
c) Then after two seconds the GSM-12 will
display.
MENU/NO
ON/YES
COMM ERROR
10
You can reach us Toll Free 1-800-676-7734 for Consumer Assistance
or online at www.waynedalton.com
1. Connect the Data Cable from the GSM-12
to the Remote Radio Receiver.
2. Press the MENU/NO button until the
display indicates the Get From Receiver
operation.
GET FRM RECEIVER
NO
YES
Operation
Transfering Radio Remote
Receiver Devices to
Controller
GET FRM RECEIVER
NO
YES
RECEIVING......
RECEIVING DONE
CHECKING COMM....
COMM ERROR
3. Pressing the ON/YES button will display
transfer operation activity.
RECEIVING......
a) When transfer operation is complete, the
GSM-12 will display.
RECEIVING DONE
b) If the communication cable is not
connected or the connection is not correct,
the GSM-12 will display.
GSM-12
CHECKING COMM....
MENU/NO
ON/YES
c) Then after two seconds the GSM-12 will
display.
COMM ERROR
You can reach us Toll Free 1-800-676-7734 for Consumer Assistance
or online at www.waynedalton.com
11
Turning Off GSM-12
1. Press the MENU/NO button until the
display indicates the Turn Off operation.
TURN UNIT OFF?
NO
YES
TURN UNIT OFF?
NO
YES
a) Pressing the ON/YES button will turn off
the GSM-12.
b) The controller is equipped with an auto
shut-off mechanism. After 5 minutes of
inactivity, the GSM-12 will automatically
turn off.
GSM-12
MENU/NO
12
ON/YES
You can reach us Toll Free 1-800-676-7734 for Consumer Assistance
or online at www.waynedalton.com
Service/Trouble Shooting
Maintenance
While the GSM-12 is maintenance-free, periodic cleaning of the receiver
case is suggested. To clean the GSM-12, use a soft cloth to remove any
dirt and dust.
Service
Unit contains no user serviceable parts. Contact your dealer or
Wayne-Dalton customer support for additional information.
Battery Replacement
Slide off battery cover. Replace battery, being careful to match positive
(+) symbols on Circuit Boards with battery. Slide battery cover back
into place.
NOTE: Dispose of dead battery properly.
Trouble Shooting
Symptom
Possible Solution
Displays appears DIM
Check Battery
Difficulty in programing (learning)
devices.
Insure controller is not near any
metal. Possible near-by radio
interference.
Can not transfer device
information between controller and
gate receiver.
Make sure cable is correct and
connected securely. Possible
near-by radio interference can
cause slower transfer.
You can reach us Toll Free 1-800-676-7734 for Consumer Assistance
or online at www.waynedalton.com
13
FCC and IC Statement
FCC and IC Statement
FCC Regulatory Information:
This device complies with Part 15 of the FCC Rules. Operation is
subject to the following two conditions: (1) this device may not cause
harmful interference, and (2) this device must accept any interference
received, including interference that may cause undesired operation.
IC Regulatory Information:
Operation is subject to the following two conditions: (1) this device may
not cause interference, and (2) this device must accept any interference,
including interference that may cause undesired operation of the device.
NOTE: This equipment has been tested and found to comply with limits for
Low Power Devices pursuant to FCC Rules and Regulations, IC Rules and
Regulations, and CE Directives and Standards. These limits are designed
to provide reasonable protection against harmful interference. This
equipment generates, uses, and can radiate radio frequency energy and if
not installed and used in accordance with the instruction, may cause harmful
interference to radio communications. However, there is no guarantee that
interference will not occur in a particular installation. If this equipment does
cause harmful interference to radio or television reception, which can be
determined by turning the equipment off and on, the user is encouraged to
try and correct the interference by on or more of the following measures:
reorient or relocate the receiving antenna, increase the separation between
the equipment and receiver, connect the equipment into an outlet on a
circuit different from that to which the receiver is connected. Consult the
dealer or an experience radio/TV technician for help.
WARNING: Changes or modifications to this receiver not expressly
approved by Wayne-Dalton Corp. could void the user’s authority to
operate this equipment.
14
You can reach us Toll Free 1-800-676-7734 for Consumer Assistance
or online at www.waynedalton.com
GSM-12
LIMITED WARRANTY
THE MANUFACTURER (WAYNE-DALTON CORP.) WARRANTS ALL COMPONENTS OF
THE GSM-12 FOR A PERIOD OF 90 DAYS FROM THE TIME OF INSTALLATION AGAINST
DEFECTS IN MATERIALS AND WORKMANSHIP, PROVIDED IT IS PROPERLY INSTALLED,
USED, MAINTAINED AND SERVICED UNDER NORMAL USE AND SERVICE.
THIS LIMITED WARRANTY EXTENDS ONLY TO THE ORIGINAL PURCHASER. THIS LIMITED
WARRANTY IS NOT TRANSFERABLE.
NO EMPLOYEE, DISTRIBUTOR, OR REPRESENTATIVE IS AUTHORIZED TO CHANGE THE
FOREGOING WARRANTIES IN ANY WAY OR GRANT ANY OTHER WARRANTY ON BEHALF
OF MANUFACTURER.
THE MANUFACTURER SHALL NOT BE RESPONSIBLE FOR ANY DAMAGE RESULTING TO
OR CAUSED BY ITS PRODUCTS BY REASON OF INSTALLATION, IMPROPER STORAGE,
UNAUTHORIZED SERVICE, ALTERATION OF PRODUCTS, NEGLECT OR ABUSE, ANY
ACTS OF NATURE BEYOND MANUFACTURER’S CONTROL (SUCH AS, BUT NOT LIMITED
TO, LIGHTNING, POWER SURGES, WATER DAMAGE, ETC.), OR ATTEMPT TO USE THE
PRODUCTS FOR OTHER THAN THE CUSTOMARY USAGE OR FOR THEIR INTENDED
PURPOSES. THE ABOVE WARRANTY DOES NOT COVER NORMAL WEAR OR ANY
DAMAGE BEYOND MANUFACTURER’S CONTROL OR REPLACEMENT LABOR.
CLAIMS FOR DEFECTS IN MATERIAL AND WORKMANSHIP COVERED BY THIS WARRANTY
SHALL BE MADE IN WRITING, WITHIN THE WARRANTY PERIOD, TO THE DEALER
FROM WHOM THE PRODUCT WAS PURCHASED. MANUFACTURER MAY EITHER
SEND A SERVICE REPRESENTATIVE OR HAVE THE PRODUCT RETURNED AT THE
MANUFACTURER’S OPTION. IF JUDGED BY MANUFACTURER TO BE DEFECTIVE IN
MATERIAL OR WORKMANSHIP, THE PRODUCT WILL BE REPLACED OR REPAIRED AT THE
OPTION OF THE MANUFACTURER, AT NO CHARGE. TRANSPORTATION CHARGES AND
FIELD LABOR CHARGES ARE NOT COVERED BY THIS LIMITED WARRANTY.
THE REMEDIES OF BUYER SET FORTH HEREIN ARE EXCLUSIVE AND ARE IN LIEU OF
ALL OTHER REMEDIES, THE LIABILITY OF MANUFACTURER, WHETHER IN CONTACT,
TORT, UNDER ANY WARRANTY OR OTHERWISE, SHALL NOT EXTEND BEYOND ITS
OBLIGATION TO REPAIR OR REPLACE, AT ITS OPTION, ANY PRODUCT OR PART FOUND
BY MANUFACTURER TO BE DEFECTIVE IN MATERIAL OR WORK. MANUFACTURER SHALL
NOT BE RESPONSIBLE FOR ANY DIRECT, INDIRECT, SPECIAL OR CONSEQUENTIAL
DAMAGES OF ANY NATURE.
THIS WARRANTY GIVES YOU SPECIFIC LEGAL RIGHTS, AND YOU MAY HAVE OTHER
RIGHTS, WHICH MAY VARY FROM STATE TO STATE. HOWEVER, SOME STATES DO NOT
ALLOW LIMITATION ON HOW LONG AN IMPLIED WARRANTY LASTS OR THE EXCLUSION
OR LIMITATION OF INCIDENTAL OR CONSEQUENTIAL DAMAGES SO THE ABOVE
LIMITATIONS OR EXCLUSIONS MAY NOT APPLY TO YOU.
You can reach us Toll Free 1-800-676-7734 for Consumer Assistance
or online at www.waynedalton.com
15