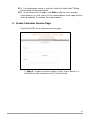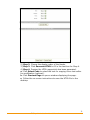
1
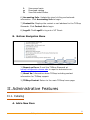
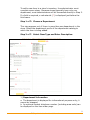
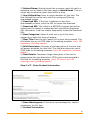
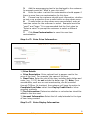
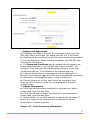
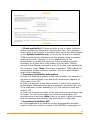
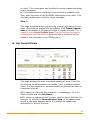
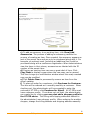
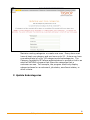
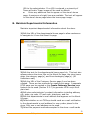
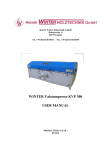
TXShop
Administrative User’s Manual
512-471-8802 • [email protected] • www.utexas.edu/business/accounting
2
TXShop Administrative User’s Manual
Contents
I.1. Introduction ......................................................................................... 5
I.2. Administrative Functions and Authorizations ....................................... 5
A.
Administrative Functions......................................................................................................................5
B.
Authorizations .....................................................................................................................................6
I.3. Administrative Options ........................................................................ 6
A.
Top Navigation Menu ...........................................................................................................................6
B.
Bottom Navigation Menu .....................................................................................................................8
II.1. Catalog ............................................................................................... 8
A.
Add a New Item ...................................................................................................................................8
B.
List Current Items ............................................................................................................................... 15
C.
Update Current Inventory .................................................................................................................. 17
D.
View Archived Items .......................................................................................................................... 17
E.
Update Categories.............................................................................................................................. 17
F.
Update Subcategories ........................................................................................................................ 18
G.
Download Catalog .............................................................................................................................. 19
H.
Upload Catalog .................................................................................................................................. 19
II.2. Store Features .................................................................................. 20
A.
Maintain Storefront ........................................................................................................................... 20
B.
Maintain Departmental Information................................................................................................... 22
C.
Maintain Discount Codes .................................................................................................................... 23
D.
Maintain Shipping Information ........................................................................................................... 24
E.
Maintain Store Customizations ........................................................................................................... 26
F.
Create Customer Service Page ............................................................................................................ 30
G.
Submit a Featured Item ...................................................................................................................... 32
II.3. Order Maintenance ........................................................................... 32
A.
Search Orders by Selected Criteria ...................................................................................................... 32
B.
Search Orders by Selected Criteria ...................................................................................................... 34
C.
Delete Unexecuted Orders ................................................................................................................. 35
D.
Process IDT Orders ............................................................................................................................. 36
E.
Process Order Refund......................................................................................................................... 36
3
TXShop Administrative User’s Manual
II.4. Shopper Info .................................................................................... 37
A.
List Shoppers ..................................................................................................................................... 37
B.
Search Shopper Order History ............................................................................................................ 37
C.
Search Phone Orders .......................................................................................................................... 38
D.
View Saved Carts................................................................................................................................ 38
II.5. Searches and Downloads .................................................................. 38
A.
Search Orders by Selected Criteria ...................................................................................................... 38
B.
View Sales Report Summary ............................................................................................................... 38
C.
List Shoppers ..................................................................................................................................... 39
D.
Search Shopper Order History ............................................................................................................ 39
E.
Search Phone Orders .......................................................................................................................... 39
F.
View Saved Carts................................................................................................................................ 39
G.
Download Catalog .............................................................................................................................. 39
H.
View Refunded Orders ....................................................................................................................... 40
II.6. Accounting Info ................................................................................ 40
II.7. Contact Us ........................................................................................ 41
II.8. Log Off.............................................................................................. 41
III. Appendix 1 - Glossary ........................................................................ 41
IV. Appendix 2 – Featured Item FAQ ........................................................ 42
4
TXShop Administrative User’s Manual
I. Welcome to TXShop
I.1. Introduction
TXShop is the centralized online shopping mall of The University of
Texas at Austin. It offers much of the same functionality as
commercial shopping carts and is fully integrated with the
university’s authentication (UT EID), accounting, and credit card
processing system.
University departments that open stores in TXShop are able to offer
their goods and services for sale to the genreal public or to a more
limited audience, and shoppers are able to purchase these items in a
convenient and secure environment. Departmental administrators
manage their stores with a variety of online tools including inventory
updates, product customizations, searches, and data downloads.
The purpose of this manual is to assist store administrators by
providing a general introduction to all the administrative functions
available in TXShop.
This manual assumes that the necessary paperwork for store set up
has already been completed and that a store profile has already been
created. It also assumes that the administrator has already received
the necessary introductory training and authorizations for an existing
TXShop store. For additional TXShop help, e-mail [email protected].
I.2. Administrative Functions and Authorizations
A. Administrative Functions
To reach the administrative functions of TXShop, go to the secure
home page at https://utdirect.utexas.edu/txshop/. Once there, click
Administration at the bottom of the page. Administrative functions
can also be reached from the public home page at
http://utdirect.utexas.edu/txshop/ through the same
Administration link, though logging in to UTDirect will still be
required. If an administrator maintains more than one store in
5
TXShop Administrative User’s Manual
TXShop, the radio button next to the store name must be selected to
access that store’s administrative functions.
B. Authorizations
When a new TXShop store is created, the TXShop Stewards will
provide authorizations to all university staff or faculty identified by
the department as needing administrative access.
If an administrator leaves the university, authorization is
automatically deleted. If a new administrator needs to be added to
an existing store, the TXShop Administrator Authorization Request
Form must be completed and sent to the TXShop Stewards via email to [email protected] or fax to 512-232-3360.
The Administrator Authorization Request Form as well as all other
TXShop forms can be found in the Handbook of Business Procedures.
I.3. Administrative Options
A. Top Navigation Menu
On the main administrative page, a gray navigation menu is
displayed at the top of the page. This menu appears throughout the
administrative system and is the directory for all administrative
functions in TXShop. Hovering over most tabs in the menu opens a
drop-down menu of available functions. The top navigation menu
tabs and their associated functions are organized into eight sections:
6
TXShop Administrative User’s Manual
1) Catalog: Create and maintain items for the store. Hover over the
Catalog tab and select one of the following functions:
a.
Add a new item
b.
List current items
c.
Update current inventory
d.
View archived items
e.
Update categories
f.
Update subcategories
g.
Download catalog
h.
Upload catalog
2) Store Features: Make changes to the entire store. Hover over
the Store Features tab and select one of the following functions:
a.
Maintain storefront
b.
Maintain departmental information
c.
Maintain discount codes
d.
Maintain shipping information
e.
Maintain store customizations
f.
Create customer service page
g.
Submit a featured item
3) Order Maintenance: Search for and update individual orders.
Hover over the Order Maintenance tab and select one of the
following functions:
a.
Search orders by selected criteria
b.
Update order status/view packing list
c.
Delete unexecuted orders
d.
Process IDT orders
e.
Process Order Refund
4) Shopper Info: Search for individual shopper information. Hover
over the Shopper Info tab and select one of the following functions:
a.
List shoppers
b.
Search shopper order history
c.
Search phone orders
d.
View saved carts
5) Searches and Downloads: Search by any of various criteria.
Hover over the Searches and Downloads tab and select one of the
following functions:
a.
Search orders by selected criteria
b.
View sales report summary
c.
List shoppers
d.
Search shopper order history
e.
Search phone orders
7
TXShop Administrative User’s Manual
f.
g.
h.
View saved carts
Download catalog
View Refunded Orders
6) Accounting Info: Update the store’s billing and subcode
information. Click Accounting Info to begin.
7) Contact Us: Displays the contact e-mail address for the TXShop
Stewards. Click Contact Us to begin.
8) Logoff: Click Logoff to log out of UT Direct.
B. Bottom Navigation Menu
1) Report an Error: E-mail the TXShop Stewards at
[email protected] to report a technical error.
2) About Us: Information about TXShop including contact
information for TXShop support.
3) TXShop Central: Return to the main TXShop home page.
II. Administrative Features
II.1. Catalog
A. Add a New Item
8
TXShop Administrative User’s Manual
To add a new item to a store’s inventory, the administrator must
complete seven steps. Because stores generally have only one
department, most administrators will be forwarded directly to Step 2.
If a field is required, a red asterisk (*) is displayed just before the
field name.
Step 1 of 7: Choose a Department.
This step appears only if there is more than one department in the
store. Select the department prefix of the department catalog to
which the item is being added.
Step 2 of 7: Select Item Type and Enter Description.
1
6
10
7
8
2
9
3
4
5
10
1) Department Information
a. The department is displayed for informational purposes only; it
cannot be changed.
b. An optional contact telephone number (including area code) can
be displayed on the item order page.
9
TXShop Administrative User’s Manual
2) Related Items: Existing items that a shopper may find useful or
appealing can be listed on the item page as related items. This is a
simple way to advertise other items within a store.
3) User Defined Key: Enter a unique identifier for this item. The
User Defined Key can be very useful for sorting and filtering
downloaded reports.
4) Download URL: If the item is software or any other
downloadable product, enter the URL to access the download.
5) Download API: This refers to a NATURAL program that will be
called when the receipt is created and will override the Download
URL information. It can be used to dynamically create the Download
URL.
6) Item Categories: Select at least one or up to five store
categories in which this item will appear.
7) Item Title: Enter the title (name) of the item being created. This
field allows the use of HTML code for formatting purposes. Limit: 150
characters (including spaces).
8) Brief Description: Compose a brief description of the item that
will appear alongside the item title. This field also allows the use of
HTML code for formatting purposes. Limit: 80 characters (including
spaces).
9) Item Details: Compose a longer description of the item to
appear below the item description. HTML code is recommended in
this field for formatting purposes. Limit: 35 lines of up to 65
characters each (including spaces).
Step 3 of 7: Enter Product Information.
1) Item Subcategories: If the store has subcategories, select a
subcategory for this item.
2) Product Information
10
TXShop Administrative User’s Manual
a. Enter the shipping weight of the item, even if the item’s weight is
irrelevant to its cost or shipping fees. The shopper will not be asked
for any shipping information if the item has a shipping weight of 0
(zero). Enter 0 (zero) if the item is not shippable.
b. If the item is a book, enter its ISBN number.
3) Method of Checkout: TXShop allows administrators to
determine the security for individual items separate from the store
security. If a store does not require the shopper to log in using a UT
EID, it is possible to require login before the purchase of a specific
item.
4) Item Customization: TXShop allows customization of individual
items in the store. These customizations exist to give further
information to the shopper, or to allow the customer to enter
necessary information (e.g., shirt size).
1.
Enter the name of the field to be filled in by the user. An
example would be “Shirt size.” Field Name will only be used
programmatically and will not be visible to the customer.
2.
Determine the length of the input field; it should be as long
as the longest possible user input but cannot be longer than 60
characters (including spaces).
11
TXShop Administrative User’s Manual
3.
Add the accompanying text to be displayed to the customer.
An example would be “What is your shirt size?”
4.
Enter the order in which this customization should appear if
there is more than one customization for this item.
5.
Choose how the customer should input information, whether
as text or as a selection from a radio button or drop-down menu.
6.
If radio button or drop-down menu was selected, enter at
least two values for the customer to select. Examples would be
“small” and “large.” It is recommended that the first value be
“Select a value” to prompt the customer to select a different
value.
7.
Click Save Customization to save this new item
customization.
Step 4 of 7: Enter Price Information.
1) Price Details
a. Price Description: Enter optional text to appear next to the
price of the item. For example, the name of the item.
b. Item Price: Enter the cost of the item including both dollars and
cents (e.g., 10.00) do not include the dollar sign ($). Note: Free
merchandise, such as a no cost membership, can be provided
through TXShop. At checkout, the customer will have the option to
Complete Free Order rather than Pay by Credit Card or other
payment methods.
2) Tax Information: Determine whether or not sales tax should be
added to the item cost.
3) Account Information: Select the bill code/subcode for the type
of item being created.
Step 5 of 7: Enter Display Information.
12
TXShop Administrative User’s Manual
1) Images and Appearance
a. To display an image of the item for customers to see, type the
URL that links to the image. The image must be 315 x 200 pixels.
b. If additional information about an item, beyond what was included
in the item description fields, needs to be added, type the URL that
links to that information.
c. If a Terms and Conditions pop-up window should appear prior
to purchase completion, type the URL that links to the text. For
example: if the customer were downloading software, terms and
conditions might be: “This software is for personal use only.”
d. If special instructions or a message should be displayed in a
banner on the category page when the item is spotlighted (see below
for information on spotlighted items), enter the text here.
e. Choose whether or not this item should be a spotlight item,
meaning that its picture will be the one displayed on a page of
multiple items.
2) Display Information
a. If the item should become available for purchase only after a
certain date, type the date here.
b. If the item should no longer be available for purchase after a
certain date, type the date here.
c. Select whether or not staff approval is required for purchase. If
approval is required, the customer will be directed to call the
department to request approval.
Step 6 of 7: Enter Inventory Information.
13
TXShop Administrative User’s Manual
1) Check availability?: Choose whether or not to check inventory
before completing a transaction involving this item. This inventory
check looks at the number of available items set by the administrator
on the Update Inventory page (or when the item is first created).
TXShop automatically subtracts from this number when a customer
makes a purchase. However, it is the responsibility of the
administrator to update the inventory count (maximum number
available) for a given item if this feature is to be used. TXShop
assures that a shopper cannot buy more of an item than indicated by
the inventory count. Note: If an order is refunded, TXShop does not
automatically update inventory numbers. The store administrator
must do this manually.
2) Inventory/Availability Information
a. Enter the maximum number of the item available. For example, if
the store is selling tickets to an event with a maximum capacity of
100 people, enter 100.
b. Enter the quantity of the item currently in stock. This number is
automatically subtracted from when a customer purchases this item.
If the maximum number available is 100, this number should also
start at 100.
c. Enter the maximum number of the item that any one shopper can
purchase. This will be the upper limit that any one shopper can
purchase at any one time. Note: there is no audit in place to ensure
that the customer not purchase the same item at a later date.
3) Inventory/Availability API
a. If the department is providing its own programmatic inventory
check for this item, enter the name of the NATURAL subprogram to
14
TXShop Administrative User’s Manual
be used. This subprogram can be called in various places and allows
return messages.
b. If the department is providing its own inventory update for this
item, enter the name of the NATURAL subprogram to be used. This
inventory update does not allow return messages.
Step 7:
This page summarizes all the previously entered information in one
page. Everything is available to be updated. Click Create/Update
item at the bottom of the page to create or update the item. Do not
forget to click Create/Update Item! The item creation process is
not complete until this is done. Once the item is created it will be
visible to the customers in the TXShop store.
B. List Current Items
This page displays the store’s complete catalog of items. From this
list of items, an administrator can update, copy, or delete existing
items. It is also possible for an administrator to purchase an item on
a customer’s behalf.
a) To search for items by title, category, or subcategory, fill in the
search criteria and click Get Items.
b) To review or update an item’s profile, click the item’s title link. For
example, by clicking on Demonstration Item on the sample page
above, a new page appears where it is possible to update item
information or archive the item.
15
TXShop Administrative User’s Manual
c) To add an accessory to an existing item, click View/Add
Accessories. The process of adding an accessory parallels the
process of creating an item. Once created, the accessory appears as
part of the parent item and can only be purchased along with it. For
example, an optional meal (including an additional fee) could be
purchased along with a conference registration. When administrators
view the items in their stores, accessories are labeled with the ID
number of the parent item.
d) Copying an existing item can save a great deal of time. Click
Copy Item to display a page where the new copy can be named.
This then brings up a confirmation window where the newly-created
copy can be modified.
e) Click Delete Item to permanently remove an item from the
store’s catalog.
f) To place an order for a customer, click Purchase for Customer.
The item will be ordered as it normally would by a customer. When
checking out, the administrator will be prompted to enter the
customer’s UT EID or click Purchase for Myself. All UT EIDs must
have a shopper profile. If one does not yet exist, the administrator
can create one by clicking you may also add a shopper profile for
the UT EID above. The billing and shipping addresses default to
the administrator’s own shopper profile. When ordering for another
shopper, change the billing address and shipping address manually.
16
TXShop Administrative User’s Manual
C. Update Current Inventory
Update the inventory information for all active items in the catalog.
1) To search for a particular item, enter the Item ID number and
click Search.
2) To view or change inventory information for individual items in
the catalog:
a.
Mark the box under Check Inventory to check item
availability before allowing a purchase.
b.
Maximum Number Available: sets the total number in
stock.
c.
Current Number Available: sets the total current number
available.
d.
Maximum Number to Purchase: sets the maximum number
that a single customer may purchase.
Note: If inventory is being tracked for a particular item, when the
Current Number Available reaches zero, the store administrator
will receive an e-mail notification that the last item has been
purchased.
D. View Archived Items
Access and update the archived items in the inventory in a variety of
ways. Archived items are items in the store catalog which do not
appear to the customer. Administrators can purchase these items on
behalf of customers.
The functionality of View Archived Items is the same as the List
Current Items function detailed in Section II.1.B.
E. Update Categories
17
TXShop Administrative User’s Manual
Maintain existing categories or create new ones. Every store must
have at least one category and can have up to 20. A store can have
a combined total of up to 100 categories and subcategories. The
Category Availability API allows administrators to provide a link to an
external NATURAL program that filters the categories that a
customer can see. For example, the program could only display
categories based on a customer’s job status, enrollment status, or
other criteria.
F. Update Subcategories
18
TXShop Administrative User’s Manual
Maintain existing subcategories or create new ones. Subcategories
are optional. To add a subcategory, enter the subcategory name and
choose the category to which it is linked. A maximum of 20
subcategories are allowed per category.
G. Download Catalog
Download the entire store catalog into an Excel spreadsheet. Click
Download Catalog to begin.
H. Upload Catalog
Upload a comma-delimited spreadsheet (.cvs file format) of the
catalog of items you wish to add to TXShop. Enter the e-mail address
for reporting the results of the upload. By default the user’s
preferred university e-mail address will be used. Then, enter the file
name to be uploaded and click Upload. The page also contains a
help link with useful upload information and a table of the store’s
current categories and subcategories.
Tips for a successful upload:
• Have a spreadsheet ready.
19
TXShop Administrative User’s Manual
• Fields must be entered in the order of the original download for
the upload to work properly.
• For new items, the Item Id field must be blank.
• When uploading new items, do not upload accessory items along
with other new items. The parent item’s Item Id must be entered in
the Item Parent Id field.
• Existing items can be uploaded, but be aware that not all fields
may be modified.
• Any field that is not required may be left blank.
• Definitions (see the second column on the upload help page table)
refer to the required format for that field.
• "A" refers to alphanumeric fields (letters, numbers, or symbols)
and "N" refers to numeric fields (numbers only). Each is followed by
a number representing how many letters or numbers the field allows.
• Alphanumeric fields may be letters, numbers or symbols, but
numeric fields may only hold numbers.
• Further examples may be found at the bottom of the upload help
page.
• Double quotes that are included in the description fields will be
replaced with the html equivalent of a double quote ("). This
will add an extra five characters to the length of the field.
• If you would like to see an example upload comma-delimited file,
go to the upload help page, and click here below the last bullet item.
This file would have to be saved as a comma-delimited file before
uploading in order to work properly.
II.2. Store Features
A. Maintain Storefront
1) Update Your Store’s Appearance.
a.
Update the store’s appearance by choosing a color scheme
and logo. TXShop accesses the store’s logo by connecting to the
image via the web address (URL) provided. The image itself must
be 65 by 65 pixels in size and should be on a secure server. If
the department does not have a secure server, TXSHOP can store
the image on its server and return a URL to the administrator.
b.
The logo appears on the top left-hand corner of the TXShop
store’s home page and on the the packing list. If no URL is
entered, the University of Texas at Austin Tower logo found on
the TXShop home page will be used by default.
2) Update Your Store’s Basic Info.
20
TXShop Administrative User’s Manual
a.
Define the store’s status as active, inactive, or deactivated.
Selecting the inactive button identifies the store as “coming soon”
on the TXShop home page.
b.
Update the department prefix assigned by the TXShop
stewards.
c.
Select the store’s security level. The secure option requires
the customer to logon with a UT EID to enter the store. Stores
may find this desirable if there is a need to know exactly who has
ordered which product, or if they want to limit sales based on a
customer’s relationship with the university.
d.
Determine whether the store will require the customer to
logon with a UT EID for checkout. If the customer will be allowed
to check out without logging in, they must also be allowed to
browse without logging in. Checking out without logging in allows
customers to purchase items without having a UT EID, but
requires the user to enter billing address information, and other
information normally stored in a customer’s profile each time they
checkout.
e.
Determine the number of days the system should store
unused shopping carts. The default is 365 days. If the field is left
blank, the default will be used.
f.
Determine the number of items allowed in a shopping cart
at one time. The default is 999 items. If the field is left blank, the
default will be used.
g.
Set the time the store closes each day. Times must be
indicated in half-hour intervals. If no time is selected, the store
will remain open 24 hours a day.
h.
If the store has a closing time, set the time the store
reopens each day.
3) Address Verification
a.
Choose whether or not TXShop should verify the customer’s
billing address.
b.
This check will verify that the address is valid with the US
Postal Service.
4) Updating Your Home Page.
a.
Enter the name of the store (use only letters and numbers
with no punctuation or other special characters). (60 characters
max)
b.
TXShop accesses the store’s home page image by
connecting to the image via the web address (URL) provided. The
image must be 315 pixels wide by 200 pixels tall and should be
on a secure server. If the department does not have a secure
server, TXSHOP can store the image on its server and return a
21
TXShop Administrative User’s Manual
URL to the administrator. If no URL is entered, a university of
Texas at Austin Tower image will be used by default.
c.
Enter any additional text to appear on the store’s home
page. A maximum of eight lines are available. The text will appear
on the store’s home page below the home page image.
B. Maintain Departmental Information
Maintain important departmental information about the store.
1) Edit the URL of the departmental home page to allow customers
to navigate to it from the About Us page.
2) Edit the text for the departmental home page link. This text also
appears above the store title on the About Us page, the store home
page, the category page(s), and the subcategory page(s). (60
characters max)
3) Edit the URL of the Customer Service page if one has been
created. There are two methods for creating this page. A separate
HTML page can be created or the Create Customer Service page
feature can be used (Section II.2.F) to generate HTML script from
plain text.
4) Edit store administrator’s contact information including address,
city, state, zip code, UT mail code, telephone, and fax.
5) Edit the departmental e-mail address that appears on the About
Us page.
6) Select whether or not TXShop should send an e-mail notification
to the departmental e-mail address for every order placed in the
store. Only one e-mail address can be used.
7) Select the payment methods accepted in the store: credit cards
22
TXShop Administrative User’s Manual
(MasterCard, Visa, and Discover), American Express credit card,
purchase orders, Interdepartmental Transfers (IDTs), or pre-pay
(check, money order, etc.).
8) Edit payment method API. If the department is providing a
program to limit the payment options by customer type, enter the
name of the NATURAL subprogram to be used.
9) Select additional options. Mark discount codes if you want the
option to allow discounts in your store. Mark tax exempt status if
you want the option to make certain items in your store tax exempt.
It is the store’s responsibility to verify that customers use valid tax
exempt codes.
10)
Enter alternate titles for the four top navigation menu tabs
displayed throughout the store. If nothing is entered, the default is
Shopping, Customer Service, Your Account, and Checkout
respectively.
11)
Enter up to ten additional links to other related pages. Links
must contain a URL and title.
12)
Enter up to eight lines of additional text to appear on the
About Us page.
C. Maintain Discount Codes
Create and update discount codes which can be used by customers.
Each discount code contains the following elements:
a. Enter the discount code name which will be provided to
customers. This is a free-form field which can consist of a word,
phrase, or combination of numbers and/or letters.
b. Choose whether the discount is a percentage or dollar amount.
23
TXShop Administrative User’s Manual
c. Enter the percentage or dollar amount of the discount (do not
enter a $).
d. Select the date on which the discount becomes valid.
e. Select the date on which the discount ends.
f. Choose the number of discounts available with this code.
g. Enter the minimum amount of the total order required to qualify
for the discount.
h. Select the item to be discounted. If this field blank is left blank,
the discount will be applied to the entire order.
D. Maintain Shipping Information
Set shipping costs for orders.
a. Choose the criteria by which shipping costs will be determined.
Shipping cost can be calculated based on number of items in the
order, total weight of the order, or total amount of the order.
b. Select the lower and upper range (of items, weight, or cost –
depending on criteria) to which the shipping costs will apply.
c. Enter the amount (in dollars or percentage of total order) to be
added as a shipping charge. Use the radio buttons to select dollar- or
percentage-based shipping charges.
d. Additional shipping options can be offered to customers. Select
24
TXShop Administrative User’s Manual
Additional Shipping at the top of the page to reach the Additional
Shipping Cost Maintenance page. These additional options can be
added to the normal shipping options or can replace the normal
shipping options. For example, if the normal shipping total was $5
for regular UPS shipping, an option for next day UPS shippping with
a set fee of $20 can be added. “Next day UPS” would be added in the
Description field, “20” in Dollar Amount field, and “DELETE all
standard shipping charges” would be selected, since the $20 option
would supersede all other shipping options.
25
TXShop Administrative User’s Manual
E. Maintain Store Customizations
The customization function allows administrators to add or modify
individualized features in the store’s shopping cart, store catalog,
order process, or shopper profile.
Display/Modify shows the details of an existing customization and
allows changes to be made. Remove deletes an individual
customization. The Delete All Cart Customizations deletes all
customizations in the given category. Add a Catalog
Customization opens a page for creating a new customization.
a. Cart Customization
All customizations added here appear on cart and order receipt
pages.
26
TXShop Administrative User’s Manual
1) Placement: Choose where, how, and in what order this customization
will appear. Start by selecting the top or bottom of the page and
choosing whether this customization will apply to the cart and order
pages as a whole (“page”) or to each individual item on the cart and
order pages (“item”). The sequence number determines the order in
which this customization will appear when there is more than one on
the page. For example, to ask for the name of the college and dorm
of a student, create two customizations: “What college are you in?”
and “Which dorm do you live in?” To display the college question
first, assign it sequence number 001. Then assign the dorm question
sequence number 002.
2) Choose who may view your customization. This feature is not yet
available.
3) Choose how the customer should input information. Choices are text
box, radio button, pull-down menu, or no user input.
4) Select whether or not the customization should appear on the receipt
page. This feature cannot be turned off at this time.
5) Field Name: Give the customization a name if input is being
requested. For example, the field name for the question “Which dorm
do you live in?” might be dorm-name.
6) Field Length: If getting input via text box, this represents the
maximum number of characters the user may enter. If getting input
via radio button or pull-down menu, this represents the number of
characters in the longest button or menu choice. The maximum
allowed is 60 characters. If input is not allowed, make sure this is set
to 0 (zero).
7) Description: Enter the text as it should appear on the page. For
example, “Please enter the name of your dorm.”
8) Text appearance: Choose the font size and color for the description.
9) Radio Button and Pull-down Menu Values: If radio buttons or pulldown menus are selected, enter the value of the buttons or menu
choices. A minimum of two values is required and a maximum of
fifteen values is allowed. For example, two values might be “Jester”
and “Kinsolving.” This feature is not yet available.
10) NATURAL subprograms: If data needs to be retrieved for the
initial display, or the user’s input needs to be audited and updated,
type in the retrieval subprogram, or the audit/update subprogram.
Note: only one subprogram can be entered.
11) If a subprogram name is entered, check the fields that TXShop
should send to the subprogram.
At the bottom of the page, click Add to add the new cart
customization, or click Return to Customizations Menu to return
to the customizations menu without making updates.
27
TXShop Administrative User’s Manual
b. Catalog Customization
All customizations added here appear on all catalog pages.
1) Placement: Choose where, how, and in what order this customization
will appear. Select the top or bottom of the page. The sequence
number determines the order in which this customization will appear
when there is more than one on the page.
2) Choose who may view your customization. This feature is not yet
available.
3) Description: Enter the text as it should appear on the page.
4) Text appearance: Choose the font size and color for the description.
5) NATURAL subprogram: If data will be retrieved for the initial display,
type in the name of the retrieval subprogram, and select whether to
retrieve the data before the regular processing.
6) At the bottom of the page, click Add to add the new catalog
customization, or click Return to Customizations Menu to return
to the customizations menu without making updates.
c. Order Customization
All customizations added here appear on the order page.
1) Placement: Choose where, how, and in what order this customization
will appear. Select top or bottom of the page. The sequence number
determines the order in which this customization will appear when
there is more than one on the page.
2) Choose who may view your customization. This feature is not yet
available.
3) Choose how the customer should input information. Choices are by
text box, radio button, pull-down menu, or no user input.
4) Field Name: Give the customization a name if input is being
requested.
5) Field Length: If getting input via text box, this represents the
maximum number of characters the user may enter. If getting input
via radio button or pull-down menu, this represents the number of
characters in the longest button or menu choice. The maximum
number of characters allowed is 60. If input is not allowed, make
sure this is set to 0 (zero).
6) Description: Enter the text as it should appear on the page.
7) Text appearance: Choose the font size and color for the description.
8) Radio Buttonand Pull-down Menu Values: If radio buttons or pulldown menus are selected, enter the value of the buttons or menu
choices. A minimum of two values is required and a maximum of
fifteen values is allowed.
28
TXShop Administrative User’s Manual
9) Choose the order pages on which the customization will appear:
credit card, registration, IDT, receipt.
10) NATURAL subprograms: If data needs to be retrieved for the
initial display, or the user’s input needs to be audited and updated,
type in the retrieval subprogram, or the audit/update subprogram.
Note: Only one subprogram can be entered.
11) If a subprogram name is entered, check the fields that TXShop
should send to the subprogram.
12) At the bottom of the page, click Add to add the new order
customization, or click Return to Customizations Menu to return
to the customizations menu without making updates.
d. Shopper Customization
All customizations added here appear on the shopper profile page.
1) Choose where, how, and in what order this customization will
appear. Select top or bottom of the page. The sequence number
determines the order in which the customization will appear when
there is more than one on the page.
2) Choose who may view the customization. This feature is not yet
available.
3) Choose how the customer should input information. Choices are by
text box, radio button, pull-down menu, or no user input.
4) Field Name: Give the customization a name if input is being
requested.
5) Field Length: If getting input via text box, this represents the
maximum number of characters the user may enter. If getting input
via radio button or pull-down menu, this represents the number of
characters in the longest button or menu choice. The maximum
allowed is 60 characters. If input is not allowed, make sure this is set
to 0 (zero).
6) Description: Enter the text as it should appear on the page.
7) Text appearance: Choose the font size and color for the description.
8) Radio Button and Pull-down Menu Values: If radio buttons or pulldown menus are selected, enter the value of the buttons or menu
choices. A minimum of two values is required and a maximum of
fifteen values is allowed.
9) Choose the pages on which the customization will appearregistration,
interdepartmental, or receipt pages.
10) NATURAL subprograms: If data needs to be retrieved for the
initial display, or the user’s input needs to be audited and updated,
type in the retrieval subprogram, or the audit/update subprogram.
Note: Only one subprogram can be entered.
29
TXShop Administrative User’s Manual
11) If a subprogram name is entered, check the fields that TXShop
should send to the subprogram.
12) At the bottom of the page, click Add to add the new shopper
customization, or click return to the customization main page without
making updates, or remove the customization.
F. Create Customer Service Page
Create the HTML for a customer service page.
1) Step 1: Create up to four blocks of text, one of which is a
bulleted list with a maximum of 10 bullet points.
30
TXShop Administrative User’s Manual
2) Step 2: Choose the display order of the blocks.
3) Step 3: Click Generate HTML to fill in the text box for Step 4.
4) Step 4: Preview the HTML page which has been generated.
a. Click Select Code to select the text for copying into a text editor
for modification (optional).
b. Click Preview Page to open a window displaying the page.
c. Follow the on-screen instructions to save the HTML file to the
desktop.
31
TXShop Administrative User’s Manual
5) Step 5: Save the final HTML script with the file extension .html.
It should be saved to the same secure server where other linked
TXShop information (e.g., store logo) is stored.
6) Step 6: Click Site Appearance to open the Updating Your
Departmental Info page (section II.2.B) and enter the URL for the
new customer service page.
G. Submit a Featured Item
This selection opens a window displaying a short page which
discusses the featured item and how the submission process works.
For more information, contact the TXShop Stewards by e-mail at
[email protected].
II.3. Order Maintenance
A. Search Orders by Selected Criteria
32
TXShop Administrative User’s Manual
Search orders by date range, order status, payment method, user
defined key, order number, or purchase order number Note: this is
NOT a POINT Plus PO number.
a. To search within a date range, enter a starting date, an ending
date, or both. Leaving date fields blank results in a search of all
dates.
b. Search for all order statuses by selecting All from the order status
drop-down menu; other options include deposited, declined,
pending, pending IDT, incomplete, cancelled, and completed.
33
TXShop Administrative User’s Manual
c. Download the order information into an Excel spreadsheet by
clicking Select Download Criteria. After selecting the download
criteria from the available options, click Download Order
Summary.
B. Search Orders by Selected Criteria
Check and update the status of an order or generate a packing list.
34
TXShop Administrative User’s Manual
a. Search orders by order date and status or order number. The
order status can be updated from this screen.View and update
shipping information by clicking the order number link, which links
to the Order Item Shipping Update page. Shipping information
that can be updated includes shipper, tracking number, and shipping
date.
b. Click the Packing List link to generate a printable packing list for
a given order.
C. Delete Unexecuted Orders
Search incomplete orders by order status and delete unexecuted
orders by checking the delete box, and then clicking Delete
Selected. View order details for declined, pending, and cancelled
orders by clicking on the order number link.
35
TXShop Administrative User’s Manual
D. Process IDT Orders
Process pending orders which will be paid for by IDT
(Interdepartmental Transfer).
a. To delete individual items mark the Delete? check-box, then click
Delete Selected.
b. To update individual items, make any changes in the text boxes,
then click Update Items.
c. To process the IDT, make any changes in the text boxes, then
click Update Order & Process IDT.
Note: when IDT is selected as the payment method for an order, the
store adiministrator will receive an e-mail notification. The
department’s electronic office manager and accounting contact will
also receive an e-mail notification listing the account number entered
by the customer.
E. Process Order Refund
TXShop allows administrators to process full or partial refunds 48
hours after the initial order is placed. Note: It is the department’s
responsibility to set its internal refund policy.
a. To refund a specific order, enter the order number in the text field
36
TXShop Administrative User’s Manual
and click Search.
b. To see a list of all orders eligible for refund within the store, click
Search next to Search for orders eligible for refund.
c. Once the order to be refunded has been located, follow the
on-screen instructions to process a full or partial refund.
Note: When an order is refunded, the customer and store
administrator will both receive an e-mail notification listing the
details of the refund as well as a link to the refund receipt.
II.4. Shopper Info
A. List Shoppers
List Shoppers provides a list of all customers who have begun or
completed an order in the store. This page also provides a link to
more detailed customer and order information. Information on this
page includes:
a. Shopper Name, which also links to the order history for the
customer.
b. UT EID, which links to incomplete orders.
c. Primary e-mail address of the customer; this matches what is
stored on the Shopper Profile.
d. Work and home phone numbers; this matches what is stored on
the Shopper Profile.
e. The Edit link for editing the Shopper Profile. All fields in the
Shopper Profile can be edited by a store administrator.
f. Download customer information into an Excel spreadsheet by
clicking Download Shopper List. The information that will be
downloaded includes UT EID, full name, home phone number, work
phone number and e-mail address for each customer.
B. Search Shopper Order History
This function allows you to search order history by the customer’s UT
EID. Note: If the customer does not have a UT EID or did not log in
with a UT EID, order history cannot be found using the UT EID.
Enter a UT EID to return the order history. If this option is chosen,
but no UT EID is entered, it will default to the user’s UT EID.
37
TXShop Administrative User’s Manual
C. Search Phone Orders
Search for phone orders by date range and UT EID. This also allows
for download of the information returned by the search. Phone
orders refer to orders where an administrator purchased the items
on behalf of the customer.
a. List orders by the UT EID submitted at checkout.
b. Download information about phone orders into an Excel
spreadsheet. The information that will be downloaded includes Order
Date, Order Number, Order Status, Administrator Name, Payment
Method, Order Tax, and Order Total.
D. View Saved Carts
Search for saved carts (incomplete orders) by UT EID. Enter the UT
EID of the customer to view a list of his or her saved shopping carts.
II.5. Searches and Downloads
A. Search Orders by Selected Criteria
See section II.3.A.
B. View Sales Report Summary
View online sales reports by date range. To generate a report, select
the Type of Report and enter the date range.
38
TXShop Administrative User’s Manual
The sales report summary can include orders for the previous week,
month to date, year to date, or a specified date range. If the user
administers more than one store, select which store(s) to include in
the report.
C. List Shoppers
See section II.4.A.
D. Search Shopper Order History
See section II.4.B.
E. Search Phone Orders
See section II.4.C.
F. View Saved Carts
See section II.4.D.
G. Download Catalog
See section II.1.G.
39
TXShop Administrative User’s Manual
H. View Refunded Orders
Displays a detailed listing of all orders refunded within the store,
including the order number, refunded amount, order status, date the
order was refunded, and the UT EID of the administrator who
processed the refund.
For each order listed, the order number is a link to the refund receipt
which displays further details about the order refund, including the
specific items or amounts which were refunded.
II.6. Accounting Info
Add and update billing code and subcode information for the store.
a. A billcode/subcode is an 8 digit number, assigned by the Office of
Accounting that identifies a specific type of charge for a department.
b. A minimum of two billcodes are required, one for tax and one for
the items in the store. These must be accompanied by a unique item
code and description.
c. A shipping billcode/subcode can also be added.
d. A store can have up to ten billcode/subcodes per store.
40
TXShop Administrative User’s Manual
Remember, the actual billcode/subcode can only be assigned by the
Office of Accounting.
II.7. Contact Us
Displays contact information for the TXShop stewards.
II.8. Log Off
Logs the user out of UT Direct.
III. Appendix 1 - Glossary
Accessory: An accessory is an item connected to a parent item that
can only be purchased with the parent item.
Application Program Interface (API): In TXShop you can add
NATURAL subprograms (computer programs) to your page to
perform various audits. This will need to be done by a NATURAL
programmer. If you don’t have a NATURAL programmer to do the
coding, please use the link below to read information about how a a
department can contract for a programmer to create needed APIs:
http://www.utexas.edu/its/eis/services/staffing.html
Archived items: Archived items are part of your store’s catalog
that your customers will not see. Administrators can purchase
archived items on behalf of customers.
Authorization: In order to use TXShop’s administrative features,
you must have the appropriate authorizations. For questions, contact
the TXShop Stewards at: [email protected]
Billing code: A billcode/subcode is an 8 digit number that identifies
a specific type of charge for a department. This is assigned by the
Office of Accounting.
Cart: The customer’s cart (elsewhere known as a shopping cart) is a
virtual storage unit that remembers items placed in it by a customer
for a predetermined period of time.
Category: Categories allow you to group the items in your store
however you choose.
41
TXShop Administrative User’s Manual
Customization: Customizations allow administrators to request
information from users or provide them with targeted messages at
specific points in the shopping process. There are five available types
of customizations: item, order, cart, store, and shopper.
Department: Usually the departmental prefix for your department
as assigned by TXShop stewards.
IDT: Inter-departmental Transfer (*DEFINE VT5)
Item: An item in TXShop is the smallest individual unit a customer
can purchase for a given price.
Item ID number: The ID number is the unique number associated
with the item when the item is created. This numbering is
incremented by one with each item created in the store.
Server: A computer which provides some service for other
computers connected to it via a network.
Secure server: A server that requires verification of a user’s
identity when logging on to the system and that allowsTXShop to
determine if the user has specific roles within TXShop and UT.
Subcategory: Subcategories group your items within categories.
Subcategories are not required. You must choose the correct
category that you want each subcategory to appear under.
Subprogram: A program written in the programming language
NATURAL that can be used to audit information passed from an
order, etc.
IV. Appendix 2 – Featured Item FAQ
What is a TXShop featured item?
A featured item is an item that appears in a prominent position on
the TXShop home page. The item is clickable and links to the Item
Details page inside the store where the item is for sale. The featured
item that appears on the home page during any given visit is
randomly selected from the overall list of featured items for all
stores.
How many featured items can my store have?
Stores are permitted one featured item at a time.
How can my store submit a featured item?
E-mail the item title and item ID of an existing item in your store to
TXShop stewards at
[email protected] and tell us that you want it to be a
featured item. Your item must have a picture and a description that
is under 25 words. You can always send TXShop stewards a new
42
TXShop Administrative User’s Manual
picture and description for an item for the purposes of the featured
item.
How often can my store change its featured item?
Stores may change their featured item no more than once per
month.
How long will it take for my store’s featured item to appear
on the TXShop home page?
Most featured items should be added to the rotation within one
business week of submission. Since the featured item is randomly
selected with each home page hit, there is no guarantee that you will
personally see your featured item on every visit to the TXShop home
page.
Who is responsible for the availability of the featured item?
A featured item belongs to the store that submitted it. If the
featured item is no longer available for purchase, then the store
must notify the TXShop stewards ([email protected])
to remove the featured item from the rotation.
43
TXShop Administrative User’s Manual