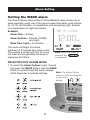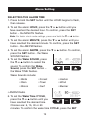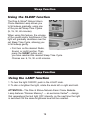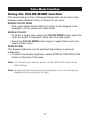
1
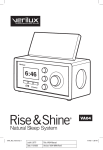
INSTRUCTION
MANUAL
Rise & Shine® Deluxe
Natural Alarm Clock® Bedside Lamp
VA02
Dear Customer,
Thank you for purchasing the Verilux® Rise & Shine® Deluxe Natural
Alarm Clock® Bedside Lamp. You have received an innovative and
quality manufactured product, backed by a three-year limited warranty.
As a Verilux® customer, your satisfaction means everything to us. We
look forward to serving you now and in the future.
Many other healthy lighting products are available through our catalog
and online. Visit us on the web at www.Verilux.com to request a free
catalog and learn more about all our quality Verilux® products, or call
our toll-free number 1-888-544-4865
Have a Bright Day!
Nicholas Harmon
President and CEO
1
IMPORTANT SAFETY INSTRUCTIONS
CAUTION:
TO REDUCE THE RISK OF ELECTIC SHOCK, DO NOT REMOVE ANY
COMPONENTS. THERE ARE NO SERVICEABLE PARTS INSIDE.
TO REDUCE THE RISK OF FIRE OR ELECTRIC SHOCK, DO NOT
EXPOSE THIS UNIT TO RAIN OR MOISTURE.
The lightning flash with arrowhead symbol, within an
equilateral triangle, is intended to alert the user to the
presence of uninsulated dangerous voltage within the
system enclosure that may be of sufficient magnitude to
constitute a risk of electric shock.
The exclamation point within an equilateral triangle,
as marked on the system, is intended to alert the
user to the presence of important operating and
maintenance instructions in this installation guide.
Batteries
Please dispose of used batteries properly, following
any local regulations.
Do not incinerate.
WARNING: TO REDUCE THE RISK OF FIRE, ELECTRIC SHOCK
OR PERSONAL INJURY:
• Turn off/unplug and allow to cool before replacing bulb, cleaning
or other maintenance.
• Light bulbs get HOT quickly! Do not touch the bulb while
the lamp is on.
• Do not look directly at the lighted bulb.
• Do not operate the lamp in close proximity to flammable or
combustible vapors, such as aerosol (spray) products or where
oxygen is being administered.
• Use only the type of bulb and maximum wattage indicated by the
manufacturer.
• Never cover the bulb when it is in operation.
2
IMPORTANT SAFETY INSTRUCTIONS
1.
2.
3.
4.
5.
6.
7.
8.
9.
10.
11.
12.
13.
14.
15.
16.
Read these instructions – before using this lamp.
Keep these instructions – for future reference.
Heed all warnings.
Follow all instructions.
Do not use this lamp in damp/humid or wet locations.
For indoor use only.
Clean only with dry cloth.
Do not block any ventilation openings. Install in accordance with the
manufacturer's instructions.
Do not place near any heat sources such as radiators, heat registers,
stoves, or other apparatus (including amplifiers)
that produce heat.
The lamp should be connected to a power supply (AC adapter) only of
the type described in the operating instructions or as marked on the lamp
and supplied with the lamp.
Do not defeat the safety purpose of the polarized or grounding-type plug.
A polarized plug has two blades with one wider than the other. A
grounding-type plug has two blades and a third grounding prong. The
wider blade or third prong is provided for your safety. If the provided plug
does not fit in your outlet, consult an electrician for replacement of the
obsolete outlet.
Protect the power cord from being walked on or pinched particularly at
plugs, convenience receptacles, and the point where they exit from the
lamp.
Only use attachments/accessories specified by the manufacturer.
Unplug this lamp during lightning storms or when unused for long periods
of time.
If the lamp has been damaged in any way, such as power-supply cord or
plug is damaged, liquid has been spilled or objects have fallen into the lamp,
the lamp has been exposed to rain or moisture, does not operate normally,
or has been dropped, it should not be operated. There are no user
serviceable parts within this lamp.
Modifications not authorized by the manufacturer will void the warranty
and may result in personal injury.
SAVE THESE INSTRUCTIONS
3
Power Supply (AC Adapter) Precautions
WARNING: To reduce risk of AC adapter (power supply) failure:
• Avoid placing the AC adapter near heat sources or in
direct sunlight.
• Keep AC adapter out of reach of small children.
• Do not allow water, moisture or foreign objects near
the AC adapter.
• Do not cover the AC adapter with any objects.
CAUTION: Always use the power adapter supplied with this
product. Do not use any other adapter. Lamp could become
damaged, and warranty would become void.
Battery Precautions
WARNING: To prevent battery leakage which may result in
bodily injury, property damage, or damage to the lamp:
• Use only the size type of batteries specified.
• When installing the batteries, be sure to follow the correct polarity
as indicated in the battery compartment. Improperly inserted
batteries may cause damage to the device.
• Do not mix different types of batteries together (alkaline and carbonzinc) or old and new batteries.
• Remove batteries when the lamp is not used for more than a week.
4
General Precautions
•
•
•
•
•
Avoid placing this lamp and AC adapter in areas that are
exposed to direct sunlight or close to heat-radiating products,
such as heaters. Do not place the lamp or AC adapter on the
top of appliances that radiate heat.
Avoid placing the lamp in areas that are dusty, humid/moist,
and lack ventilation, or are subject to constant vibration.
Not for use with light dimmers, timers, motion detectors or
extension cords.
Do NOT use lubricating agent in bulb assembly.
Close supervision is necessary when this appliance is used by
or near children or disabled persons.
WARNING: This lamp is supplied with a shade designed
specifically for this use with this product. Use of any other
shade other than the one supplied by the manufacturer may
pose a SAFETY HAZARD.
CAUTION: If outer glass of the bulb breaks, avoid touching
any metal components due to potential shock. The bulb may
continue to light, however, immediately turn power off and let
the bulb cool before removal to avoid potential burn and
discontinue use.
5
General Precautions
This device complies with part 15 of the FCC Rules. Operation
is subject to the following two conditions: (1) this device may
not cause harmful interference, and (2) this device must accept
any interference received, including interference that may
cause undesired operation.
This equipment has been tested and found to comply with the limits for
a Class B digital device, pursuant to part 15 of the FCC Rules. These
limits are designed to provide reasonable protection against harmful
interference in a residential installation. This equipment generates,
uses and can radiate radio frequency energy and, if not installed and
used in accordance with the instructions, may cause harmful
interference to radio communications. However, there is no guarantee
that interference will not occur in a particular installation.
If this equipment does cause harmful interference to radio or television
reception, which can be determined by turning the equipment off and
on, the user is encouraged to try to correct the interference by one or
more of the following measures:
• Reorient or relocate the receiving antenna.
• Increase the separation between the equipment and receiver.
• Connect the equipment into an outlet on a circuit different
from that to which the receiver is connected.
• Consult the dealer or an experienced radio/TV technician
for help.
6
Set-Up Instructions
Unpacking
Please check the shipping carton for the following items:
Shade
Bulb
AC Adapter
Lamp
Housing
Pillow Speaker
*If applicable
Battery Compartment
(under the lamp)
Selecting a location
• Place your Verilux® Rise & Shine® Natural Alarm Clock® Bedside
Lamp on a table or other flat surface near your bedside.
• For best performance, place your Rise & Shine® Natural Alarm
Clock® Bedside Lamp within two feet of a wall, and avoid placing
directly in a corner.
Note: Avoid placing your Rise & Shine® Natural Alarm Clock® Bedside Lamp
on a metal surface – It could interfere with AM reception.
Note: Avoid placing this lamp and AC adapter in areas that are exposed to
direct sunlight or close to heat-radiating products, such as heaters. Do not
place the lamp or AC adapter on the top of appliances that radiate heat.
7
Set-Up Instructions
IMPORTANT – Installation of batteries, while not required, is
recommended prior to installation of the shade and bulb.
Installation of batteries is required for backup operation.
Inserting batteries for backup
In the event that the Rise & Shine® Natural Alarm Clock® Bedside
Lamp loses power, the clock time and alarm settings are stored in
backup memory for up to 48 hours.
1. Open the battery door located on the bottom of the lamp
(do not remove screw located adjacent to battery door).
2. Insert four AA batteries (not included) according to the polarity
indicated inside the battery compartment, and replace the
battery door.
Note: With the backup battery power, the batteries provide temporary power
only for memory of the alarm settings – the light will not function.
Shade & bulb installation
1. Remove the clear cellophane protective wrap
from the lamp shade.
CAUTION – Failure to remove cellophane
protective wrap from the lamp shade may
pose a RISK OF FIRE OR PERSONAL
INJURY.
2. Attach the shade to the lamp by aligning
the ring of the shade harp with the ring
on the lamp socket – push firmly down.
3. Carefully Screw the bulb into socket.
– DO NOT FORCE.
8
Set-Up Instructions
Connecting the AC Adapter
1. Plug the AC adapter cable into the back of the power connector
labeled DC 12V/5A (see A).
2. Plug the power supply cord into the AC adapter, (see B) and then
into an AC wall outlet (see C).
Note: When AC adapter is plugged in, the lamp will not draw any power
from the batteries.
WARNING: The AC adapter should be situated so that its
location or position does not interfere with its proper
ventilation. For example, the AC adapter should not be
situated near heat sources or in direct sunlight.
WARNING: Do not cover the AC adapter with any objects
or materials.
9
Display and Controls
Light Switch
ON/Off & Dimming
Radio
ON/OFF
Nature Sounds
ON/OFF
Tuner Dial
Radio
Display
AM/FM
Display Dim
High/Low
Color
Mode
Programming
Buttons
Wake
Alarm Options
(Sound, Light)
Volume
Snooze/Alarm Reset
Sleep
Alarm Options
(5,15,30,60 minutes)
IMPORTANT – This lamp may be sensitive to high levels of
static electricity. If the lamp powers off or the display becomes
irregular, reset by unplugging the power cord for a minimum
of 15 seconds.
10
Clock Setting
IMPORTANT – Before setting the time,
confirm that the WAKE alarm setting is off Light, Sounds lights must be OFF
Setting the clock
1. Press & hold the SET button until the
HOUR begins to flash, then release.
2. To set the HOUR, press the ▼ or ▲ button
until you have reached the desired hour.
To confirm, press the SET button – the
MINUTE flashes.
SET
Note: For faster clock mode settings, press and hold the ▼ or ▲ button.
3. To set the MINUTE, press the ▼ or ▲ button until you have reached
the desired minute. To confirm, press the SET button – the AM/PM
flashes.
4. To set the AM/PM, press the ▼ or ▲ button. To confirm, press the
SET button – the MONTH flashes.
5. To set the MONTH, press the ▼ or ▲ button. To confirm, press the
SET button – the DAY flashes.
6. To set the DAY, press the ▼ or ▲ button. To confirm, press the SET
button – the YEAR flashes
Note: The day of the week will set automatically when the Month, Day,
and Year are set.
7. To set the YEAR, press the ▼ or ▲ button. To confirm, press the
SET button.
8. The Time/Date is now set.
11
Alarm Setting
Setting the WAKE alarm
The Rise & Shine® Natural Alarm Clock® Bedside Lamp allows you to
wake gradually, using one of the pre-set wake time delay cycle options
(5, 15, 30, 60 minutes), in combination with energizing Light, Sounds,
or a combination of Light and Sound.
Example:
Alarm Time = 6:30am
Alarm Options = Sounds (TOWN)
and Light
Wake Time Cycle = 30 minutes
MIN
The alarm will begin at 6:00am
(because of 30 minute time delay cycle).
The sounds and light will start at a very
low level and will gradually increase to
maximum at 6:30am.
Note: When the Alarm is
selected the
is displayed.
SELECTING THE ALARM MODE
1. To select the Alarm Options (Light, Sound)
first press the WAKE button. Use the WAKE
button to cycle through the alarm options,
Note: The Alarm Option
which illuminate to indicate settings.
choice is also represented
on the clock
display.
12
Alarm Setting
SELECTING THE ALARM TIME
1. Press & hold the SET button until the HOUR begins to flash,
then release.
2. To set the alarm HOUR, press the ▼ or ▲ button until you
have reached the desired hour. To confirm, press the SET
button – the MINUTE flashes.
Note: For faster clock mode settings, press and hold the ▼ or ▲ button.
3. To set the alarm MINUTE, press the ▼ or ▲ button until you
have reached the desired minute. To confirm, press the SET
button - the AM/PM flashes.
4. To set the alarm AM/PM, press the ▼ or ▲ button. To confirm,
press the SET button - the Wake
SOUND flashes.
5. To set the Wake SOUND, press
the ▼ or ▲ button to select the
sound. To confirm the Wake
SET
Sound, press the SET button –
the Wake TIME flashes.
Wake Sounds include:
• Birds
• Forest
• Harbor
• Rain
• Town
• Wind
• Brook
• Surf
• Buzzer
MIN
• AM/FM Radio
6. To set the Wake Time CYCLE,
press the ▼ or ▲ button until you
SET
have reached the desired time.
Choices are: 5, 15, 30 or 60
minutes. To confirm the wake time CYCLE, press the SET
MIN
13
Snooze/Alarm Reset
Using the SNOOZE/RESET function
There are three ways of switching off the alarm – (Snooze,
24 Hour Alarm Reset, Canceling the Alarm.)
However, if the alarm is not turned off after at the end of the alarm
cycle, it will continue to operate for approximately 30 minutes (then
turn off automatically).
1. SNOOZE
This restarts your alarm cycle after a 9-minute interval.
• To activate, during the alarm, tap SNOOZE/RESET button. Note:
alarm will begin again at the dimmest/quietest setting and run for
the entire wake cycle.
2. 24 HOUR ALARM RESET
If you want the alarm mode to be stopped immediately but also wish
to retain the same alarm setting for the following day:
• For Sound only and Sound & Light mode: Press and hold the
SNOOZE/RESET during the alarm cycle until the sound goes off
and the “Alarm On” icon on the display stops flashing.
• For Light Mode only: Press and hold the SNOOZE/RESET during
the alarm cycle until the “Alarm On” icon on the display stops
flashing.
In either case, the light must be turned off manually by pressing the
light switch button.
3. CANCELING THE ALARM COMPLETELY
To cancel the set alarm modes entirely:
• Press the WAKE button until there is no WAKE alarm option
(Light, Sound) illuminated.
IMPORTANT – If the LIGHT or LIGHT & SOUNDS alarm
mode is selected, the light will remain on at the level when the
SNOOZE/RESET button is activated. To turn the lamp off, press
the light switch button
14
Sleep Function
Using the SLEEP function
The Rise & Shine® Natural Alarm
Clock® Bedside Lamp allows you
to fall asleep gradually, using one
of the pre-set Sleep Time Cycles
(5, 15, 30, 60 minutes).
When using this feature, the volume
of the sound and/or brightness of the
light will gradually decrease over the
set Sleep Time Cycle, allowing you
to fall asleep gently.
• First turn on the desired Radio,
Sound, or Light function. Then,
press the SLEEP button until
you have reached the desired Sleep Time Cycle.
Choices are: 5, 15, 30 or 60 minutes.
Lamp Function
Using the LAMP function
1. To turn the light ON/OFF, push in the LIGHT knob.
2. To dim or brighten the light, rotate the knob left or right and hold.
ATTENTION – The Rise & Shine® Natural Alarm Clock® Bedside
Lamp features “Dimmer Memory” — an exclusive Verilux® — design
that remembers the last light OFF intensity, so the next time the light
is switched ON the same brightness level will be recalled.
15
Sounds Function
Using the SOUNDS function
The Rise & Shine® Natural Alarm
Clock® Bedside Lamp allows you
to listen to 8 pre-programmed
nature sounds at any time:
SOUNDS
RADIO
• Birds
• Harbor
• Town
• Brook
• Surf
• Forest
• Rain
• Wind
1. To listen to sounds at any time, press the SOUNDS button.
2. To change sounds, press the ▼ or ▲ button.
3. To change the volume, press the
+ or - button.
4. To turn sounds OFF, press the SOUNDS button again.
Radio Function
Using the RADIO function
SOUNDS
RADIO
1. To turn on the radio, press the RADIO
button.
2. Slide the AM/FM selector switch to the
desired choice.
3. To select the station, use the TUNER dial.
4. To change the volume, press the + or –
button.
5. To turn radio OFF, press the RADIO button again.
NOTE: To improve FM reception, fully unwind the FM WIRE ANTENNA
located on the back of the lamp and position it for best sound.
16
Color Mode Function
Using the COLOR MODE function
The lamp features a Color Changing Display that can be set to fade
between seven different colors or locked on one color.
SEVEN COLOR FADE
• This is the default setting. When the lamp is first plugged in the
backlight is set to seven color fade mode.
SINGLE COLOR
• To select a single color, press the COLOR MODE button when the
color you prefer is displayed (stops the color fade cycle).
• Press the COLOR MODE button again to repeat fade cycle and
select another color.
DISPLAY DIM
The display brightness can be adjusted depending on personal
preference.
• To select the display brightness, select DISPLAY DIM HIGH/LOW
button on the side of the lamp.
Note: For the best color display results, set the HIGH/LOW switch to the
HIGH setting.
Note: Orange and Red tones are preferred display colors for viewing the
display without excess light at night.
17
Warranty
Three-Year Limited Warranty
ATTENTION – ONCE OPENED, PLEASE DO NOT RETURN THIS
PRODUCT TO THE STORE WHERE IT WAS PURCHASED FOR
REPAIR OR REPLACEMENT!
Many questions may be answered by visiting www.Verilux.com, or you
may call our customer service department at 888-544-4865
This limited warranty is provided by:
Verilux, Inc., 340 Mad River Park, Waitsfield, VT 05673
Verilux® warrants this product to be free from defects in material and workmanship for
a period of three years from the date of the original retail purchase. During the limited
warranty period, Verilux, Inc. will, at its option, repair or replace defective parts of this
product, at no charge to the customer, subject to the following limitations. This limited
warranty does not include any postage, freight, insurance or delivery fees. This
warranty does not cover damage, defect or failure caused by or resulting from
accident, external destruction, alteration, modification, abuse, misuse, or
misapplication of this product.
If, during the first Three years of ownership, this product fails to operate properly, it
should be returned as specified below.
Please pack the defective product in its original protective packing and box, with a
copy of your sales receipt, along with $6.95 (check or money order to cover shipping
and handling), and send to:
For U.S. Postal Service Only:
Verilux Warranty Service Center
c/o WTB
P.O. Box 119, West Redding, CT 06896
For Fed Ex & UPS Only:
Verilux Warranty Service Center
c/o WTB
32 Henry St., Bldg 17A, Bethel, CT 06801
Please allow 4–6 weeks before you receive the repaired or replaced product.
ATTENTION – When returning a product, be aware that damage
during shipping is the responsibility of the purchaser and will void any
warranty claim. We recommend that you insure the shipment with your
post office or other shipping service when returning this product or any
parts. Be sure to return product in original packaging.
Note: Verilux® recommends using a quality surge suppressor on all electronics
equipment. Voltage variations and spikes can damage electronic components in any
system. A quality suppressor can eliminate the vast majority of failures attributed to
surges and may be purchased at electronics stores.
Due to ongoing improvements, actual product may have slight variations from the product described in this manual.
18
?
Please visit our web site at:
www.Verilux.com
Call our Customer
Service Department at
1-888-544-4865
340 Mad River Park, Waitsfield, VT 05673
Printed in China for: Verilux, Inc.
© Copyright 2007 Verilux, Inc.
All rights reserved.
VA02-MAN-Rev5