1
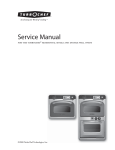
Use & Care Guide
The TurboChef 30˝ Double
Wall Speedcook Oven
Model Numbers:
TDo30 * 208 / TDo30 * 240
“*” Indicates a two letter code – OR, RD, BU, CH, IV,
WH, or SS – which refers to the oven door color.
If at any time you have questions or concerns
pertaining to your TurboChef 30˝ Double Wall Speedcook Oven,
please contact TurboChef Customer Service.
866.44serve
(866.447.3783)
For your convenience, please fill in
the information below. Having this information on hand when
calling Customer Service will help us serve you faster.
serial number
model number
date of purchase
date of install
dealer
This Use & Care Guide is designed to simply explain the operation of the TurboChef
30˝ Double Wall Speedcook Oven. We believe you will find your cooking experience with
TurboChef to be very unique, pleasing and empowering. Enjoy.
Table of Contents
i
General Safety Instructions
1Introduction
1
2
Welcome to High Performance Gourmet
Q & A – Commonly Asked Questions
4
The Top Oven
4
5
6
8
9
11
12
13
14
15
17
18
19
20
20
Control Identification & Operation – The Top Oven
Cook Modes - The Top Oven
Basic Cooking – The Top Oven
Cooking a Recently Cooked Dish
Cooking a “Favorite” Dish
Making Adjustments During a Cook Cycle
Making Adjustments at The End of a Cook Cycle
Adjusting the Cook Time
Adjusting the Temperature
Using the Advanced Cook Mode
Saving to Favorites
Renaming a Dish (in Favorites)
Deleting a Dish (from Favorites)
Self-Clean Mode – The Top Oven
Adjusting the Oven’s Sound
22
22
Adjusting the Oven’s Display
Adjusting the Oven’s Units & Measurements
23 Help Topics & General Cooking Information
2 5
The Bottom Oven
2 5
26
27
Control Identification & Operation – The Bottom Oven
Cook Modes – The Bottom Oven
Basic Cooking – The Bottom Oven
2 8
28
29
Using for Warming & Proofing
The Sabbath Mode
Self-Clean Mode – The Bottom Oven
3 0Preprogrammed Recipes
3 3Reference
3 4
37
38
Q & A - Comprehensive List of Questions
Troubleshooting Guidelines
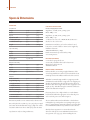
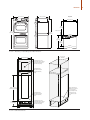
Specs and Dimensions
4 0Limited Warranty
i
General Safety Instructions
READ ALL INSTRUCTIONS BEFORE USING
Warning: For your safety, the information in this manual must be followed to minimize the risk of fire or explosion,
electric shock, or to prevent property damage, personal injury,
loss of life, or excessive exposure to microwave energy.
Safety Precautions
When using electrical appliances, basic safety precautions
should be followed, including the following:
To reduce the risk of burns, electric shock,
fire, injury to persons or exposure to microwave energy:
• Read all instructions before using this appliance.
• Read and follow “Precautions to Avoid Possible Exposure to
Excessive Microwave Energy” outlined later on this page.
•This appliance must be grounded. See Grounding
Instructions for further details.
•Install or locate this appliance only in accordance
with the provided installation instructions. Be sure your
appliance is properly installed and grounded by a qualified
technician.
•Always place oven racks in desired location while the oven
is cool. If rack must be moved while oven is hot, DO NOT
let potholder contact hot heating element in the oven.
Oversized foods or oversized metal utensils should not be
inserted in a microwave/toaster oven as they may create a
fire of risk of electric shock.
•Some products, such as whole eggs and sealed or
unopened food containers – for example, sealed glass jars
– may explode due to a build up of pressure and SHOULD
NOT be heated in this oven.
•Use care when opening oven door – let hot air or steam
escape before removing or replacing food.
•Use only microwaveable heat-resistant cookware – for
example: Pyrex Glassware, Stoneware, standard oven
cooking utensils – in the upper section of this appliance.
•This appliance should be serviced only by qualified service
personnel. Contact TurboChef Customer Service
(866-447-3783) for examination, repair, or adjustment.
•Use this appliance only for its intended purpose as
described in this manual. DO NOT use corrosive chemicals or vapors in this appliance. This oven is specifically
designed to heat or cook food, and is not intended for
laboratory or industrial use. DO NOT use the oven to
warm or heat a room.
WARNING:
•DO NOT store flammable materials in this oven or near
surface units. DO NOT store any materials, other than
manufacturer’s recommended accessories, in this oven
when not in use.
•DO NOT attempt to repair or replace any part of this oven
unless it is specifically recommended in this manual. All
other servicing should be referred to a qualified technician.
•DO NOT use aluminum foil to cover contents, racks, or
any part of the top oven. Prolonged use can cause overheating and damage the microwave components. Use in
the bottom oven is permissible.
•DO NOT use moist or damp potholders. Moist or damp
potholders on hot surfaces may result in burns from steam.
DO NOT let potholder touch hot heating elements.
DO NOT use a towel or other bulky cloth.
•DO NOT allow children to operate without adult supervision. Children should not be left alone or unattended in
the area where this appliance is in use. They should never
be allowed to sit or stand on any part of the oven.
•DO NOT operate this appliance wearing loose-fitting or
hanging garments.
•Do not operate this appliance if it has a damaged cord
or plug, is not working properly, or has been damaged or
dropped.
•Do not cover or block any openings on this appliance.
Keep oven vent ducts unobstructed.
• Do not store this appliance outdoors.
•DO NOT use this appliance near water – for example: in a
wet basement or near a swimming pool.
•DO NOT use water on grease fires. Smother fire or flame
or use dry chemicals or foam-type extinguisher.
To Reduce the Risk of Fire in the Cook Cavity:
•Use only oven-suitable containers in the oven.
DO NOT use paper products in either oven.
•Remove wire twist-ties from paper or plastic bags being
placed in the oven. For oven cooking bags – DO NOT use
wire twist-ties to close the bag.
•If materials inside the oven should ignite, keep the oven
door closed, turn the oven off and shut off power at the
fuse or circuit breaker panel. If the door is opened, the
fire may spread.
• DO NOT cook items wrapped in cling wrap or plastic film.
•DO NOT overcook food. Carefully attend to the oven if
paper, plastic, or other combustible materials are placed
inside the oven to facilitate cooking.
General Safety Instructions
Precautions to Avoid Possible Exposure to
Excessive Microwave Energy
• D
O NOT attempt to operate the top oven with the door open
since open-door operation can result in harmful exposure to
microwave energy. It is important NOT to defeat or tamper with the safety interlocks.
• DO NOT place any object between the oven front face and the door or allow soil or cleaner residue to accumulate on
sealing surfaces.
• The oven should not be adjusted or repaired by anyone
except properly qualified personnel.
• DO NOT operate the oven if is damaged. It is particularly
important that the oven door close properly and that there is no damage to the: (1) door (bent), (2) hinges and latches
(broken or loosened), (3) door seals and sealing surfaces.
WARNING: Grounding Instructions
This appliance must be connected to a grounded, metallic,
permanent wiring system, or an equipment grounding
conductor should be run with the circuit conductors and
connected to the equipment grounding terminal or lead on
the appliance.
DO NOT TOUCH HEATING ELEMENTS OR INTERIOR
SURFACES OF OVEN
Heating elements may be hot even though they are dark
in color. Interior surfaces of an oven become hot enough
to cause burns. During and after use, do not touch, or let
clothing or other flammable materials contact heating
elements or interior surfaces of oven until they have had
sufficient time to cool.
Service
Should this appliance require service, please call TurboChef
Customer Service (866-447-3783). A qualified service
representative will assist you and – if required – coordinate
a service visit by an authorized service agent in your area.
Power Connections
To avoid potential hazards, only the manufacturer, its service
agent, or a similarly-qualified person should replace a damaged
power cable. Flexible conduit, conductors and connectors are
supplied the manufacturer. Oven must be connected using
the flexible conduit and conductors provided.
Self-Cleaning Oven Guidelines
Clean the oven only in accordance with the guidelines
provided on this page, page 19, and page 27.
•Before self-cleaning the oven, remove broiler pan, grid,
racks, and other cookware. Clean only parts listed in
manual.
•Listen for fan – a fan noise should be heard sometime
during the cleaning cycle. If not, call TurboChef Customer
Service (866-447-3783) before self-cleaning again.
•DO NOT clean the door gasket. The door gasket is essential
for a good seal. Care should be taken not to rub, damage or
move the gasket. DO NOT clean with metal scouring pads.
Pieces can burn off the pad and touch electrical parts
involving a risk of electrical shock.
•DO NOT use oven cleaners. No commercial cleaner or
oven liner protective coating of any kind should be used in
or around any part of the oven. Residue from oven cleaners
will damage the inside for the oven when the self-clean
cycle is used.
•In the event the oven is malfunctioning in the self-cleaning
mode, turn off or disconnect appliance from power supply
and have serviced by a qualified technician.
•Complete instructions on the operation of the self-clean
mode can be found on pages 19 and 27.
RF Interference Considerations
The appliance has been tested and was determined to be
in compliance with applicable portions of FCC part 18
requirements and to the protection requirements of Council
Directive 89/336/EEC on the approximation of the laws of
the Member States relating to electromagnetic compatibility
at the time of manufacture. However, some equipment with
sensitivity to signals below these limits may experience
interference.
If any equipment experiences interference, the following
steps should be considered:
•Increase the physical distance between the sensitive
equipment and this oven.
•If the sensitive device can be grounded, do so following
accepted grounding practices.
•If battery-powered microphones are being affected, ensure
that the batteries are fully charged.
•Keep sensitive equipment on separate electrical circuits
if possible.
•DO NOT route intercom wires, microphone wires, or
speaker cables near the oven.
SAVE THESE INSTRUCTIONS
ii
Introduction
Welcome to High Performance Gourmet
The TurboChef 30˝ Double Wall Speedcook oven is a high performance gourmet oven including a top
Speedcook oven and a bottom conventional oven. Both ovens deliver superior cooking quality. However,
in the top oven, TurboChef uses patented Airspeed Technology to accelerate the cooking process, and
enable you to cook up to 15 times faster than in a conventional oven with exceptional quality.
n the top Speedcook oven, the
O
traditional temperature dial has been
replaced with the CookWheelTM and
Cook NavigatorTM that form the basis
of the top oven’s easy-to-use interface.
As the user, you select an item and its
specifications rather than setting the
temperature. From your selections, the
oven automatically determines the
initial cook time and temperature.
The preprogrammed settings,
developed through extensive testing
by a team of professional chefs, yield
high quality results in a fraction of the
time. As you become familiar with these results, you may wish to
make certain adjustments to account for your personal taste and
preference. The ability to make and save these adjustments to
preprogrammed settings for easy access and quick recall is one of
the many features of the TurboChef oven that enhance and simplify
your cooking experience. With every recipe you “Save to Favorites,”
the oven becomes a tool personalized and synchronized with
your needs.
You will quickly realize that cooking in the TurboChef 30˝ Double
Wall Speedcook Oven is very similar to using a regular oven. All of
the same basic principles of cooking still apply.
There is one basic difference between speedcooking and traditional
cooking: your food will cook faster and be ready sooner. In some
instances, this may mean adjusting the overall timing of your meal.
In these situations, the bottom oven can be used as a warming
drawer to hold food while you stage your meal or prepare other
items. When you’re ready to serve, everything comes out fresh, hot,
and delicious.
The bottom oven’s Warming Mode is one of several features that
truly expand your overall capabilities. As a high end conventional
oven, the bottom oven not only delivers quality results, but features
additional enhancements such as proofing and Sabbath Mode. The
bottom oven operates in the same manner as other traditional
ovens.
A few good cooking tips to remember:
• Warmer products take less time to cook than cooler ones.
•Thicker and/or dense products take longer to cook than thinner
and/or less-dense ones.
•Products cooked in metal containers will brown more on the
bottom than those cooked in glass or silicone, while food in glass
containers will cook a little faster.
•Smaller pieces of food cook faster than larger ones. For example:
when cooking chicken wings, the flats will generally cook faster
than the drumsticks.
•Different brands and recipes for the same product may or may
not cook in the same amount of time, depending on ingredients,
amounts, etc.
Welcome to the TurboChef 30˝ Double Wall Speedcook Oven –
an amazing oven for the heart of your home. Enjoy.
Introduction
Q& A – Commonly Asked Questions
As you familiarize yourself with this new technology and its advantages, you are sure to have questions.
Many of your initial questions will be answered in your first cooking experience. However, since certain
questions may arise before and during your first cook, we have taken the opportunity to answer some of
the most commonly asked questions.
Additional Q&A can be found on pages 34-37. If you need additional assistance, please call Customer
Service at 866.44serve.
Can I cook my own recipes?
What if I can’t find my specific recipe?
Yes. Anything that can be cooked in a conventional oven can be
cooked in the TurboChef 30˝ Double Wall Speedcook Oven. If you
cannot find an exact setting for your item, use a similar one.
If you cannot find an exact setting for your item, use a similar one.
At the 80% and 100% check points (pages 11-12) you will have the
ability to make adjustments and alter the programmed settings for
your specific item.
How do I turn the oven on?
For the top oven, turn the outer CookWheel knob to one of the
seven Speedcook modes – Air-Crisp, Bake, Broil, Roast, Toast,
Dehydrate, or Favorites. This will start the oven’s initial warming
process and cause the Cook Navigator screen to illuminate.
Once you have developed the settings for your specific item, don’t
forget to “Save to Favorites” (page 17). Doing this will allow you to
easily recall the settings for your specific item.
Can I set the oven’s time and temperature?
For the bottom oven, set the Oven Mode Dial to one of the five
modes – Convection Bake, Convection Broil, Broil, Bake, or Roast
– and then set the desired temperature.
Can I use my standard pots and pans with the oven?
Yes. In either oven, you can use any cooking materials that you
would in a traditional oven.
Can I use foil in the oven?
For the bottom oven, foil is fine. However, it is not recommended
for use in the top Speedcook oven due to the fact that foil can slow
down the overall cook time and affect product quality. Try parchment paper if you need to wrap a product for cooking.
How do I know which Speedcook Mode to choose?
The modes have been established to describe how you would
normally cook a product – i.e. BAKE a cake or ROAST a turkey.
So in most cases, common cooking sense should help you decide
which mode to choose. However, since we don’t all think the same
way, an alphabetical list of all Preprogrammed Recipes can be
found on pages 30-33.
In the bottom oven, yes. You select time and temperature just as
you would with any traditional oven.
In the top oven, not initially. You must select a Speedcook mode,
followed by an item and the item’s specifications in order to initiate
a cook cycle. However, once you have selected your item, there is
an option to “Adjust Settings” (pages 13-14). By selecting “Adjust
Settings” you will have the ability to alter the preprogrammed
time and temperature of the selected item.
It is recommended that you start with the preprogrammed settings
developed through testing by our staff of professional chefs. Once
you have a feel for the outcome using the preprogrammed settings,
then you might want to customize by either adjusting at the 80%
and/or 100% check points (pages 11-12) or by altering the time
and/or temperature.
Do I have to preheat the oven? How long does it take?
The top Speedcook oven needs to preheat before you place your
food item in to cook. This will take 9 to 14 minutes depending on
the cook temperature the oven must reach.
With the bottom oven, it is recommended that the oven preheat to
its cooking temperature, but not required.
Introduction
Can I check on my food while it is cooking?
Can I have more than one rack in the oven?
Yes. For either oven, you can open the door whenever you like.
Keep in mind that every time you open the door, some heat will
escape, which – in the top oven – might affect the product’s
outcome. In the top oven it is best to check your food at the
80% and 100% check points.
In the bottom oven, yes. However, the top oven is designed to only
use one rack at a time.
Both ovens also feature an Oven Light Switch, which can be
used to illuminate the oven’s cavity, allowing you to check your
food without opening the oven door. See page 4 and 25 to identify
the location of the Oven Light Switch.
Can adjustments to a preprogrammed setting be saved?
Will adjustments be saved automatically?
Yes. The last 10 cook cycles will be automatically saved under the
Favorites mode in “Last 10 Cooks” (page 8). To permanently save
adjustments made to a preprogrammed setting, you will need to
save your item to Favorites (page 17).
If I alter a preprogrammed setting, does it affect the original
setting? Can I get the original back?
Adjustments made to a cook cycle apply only to that specific cook
cycle. The oven defaults back to an item’s original preprogrammed
settings the next time that item’s preprogrammed recipe is selected.
All changes are saved in Favorites either under “View Last Cooked
(10)” (page 8) or under a recipe you “Saved to Favorites” (page 17).
Can I cook more than one item at once?
In the bottom oven, yes. In the top Speedcook oven, it depends on
what you mean by “more than one item.”
If two items are to be cooked in the same dish – like vegetables
with meat – then yes. However, you might have to add a bit of time
at the end of the cook cycle to account for the extra weight. If by
“more than one item” you mean two separate dishes, then it is not
recommended that you cook these together. Consider using the
bottom oven as a warming drawer (page 28) to keep one item hot
while the other is cooking.
Can I use both ovens at the same time?
Yes. Both ovens working together is a great way to get the most out
of your oven, expand your cooking capacity, and enrich your overall
cooking experience.
Can I use the top oven as a microwave only?
No. While the top oven does contain a microwave element, this
element is an assisting technology that is used only when it helps
improve a product’s cook time and finished quality. It cannot be
used alone.
When the oven is done cooking, does it automatically turn
off? What if I forget to turn it off?
The oven will not automatically turn itself off. For the top oven, at
the end of the cook cycle, the cooking elements will power down.
However, the oven remains at its cooking temperature until it is
turned off or another recipe is selected.
The bottom oven, like any other traditional oven, will remain at its
set temperature until you turn it off.
The Top Oven
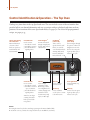
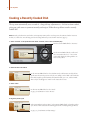
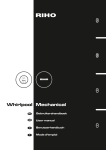
Control Identification & Operation – The Top Oven
Cook up to 15 times faster in the top Speedcook oven. The oven includes a state-of-the-art interface that
provides built-in, on-demand information and over 450 recipes with pre-calculated cook times and temperatures. For an overview of the seven Speedcook modes, see pages 5-6. For a list of all preprogrammed
recipes, see pages 30-33.
Classic Style Analog
Clock and Timer
Runs with advanced
electronic control
knobs. To operate see
Set Clock Knob and
Set Timer Knob.
Set Clock Knob
Cook Navigator TM
Used to set time.
1. Press knob to extend.
2. Turn knob to set time.
3. Press knob back into
original position.
Consists of the Cook
Navigator Display and
the Info, Back, Cancel,
and Start keys.
Set Timer Knob
Use to set timer.
1. Press knob to extend.
2. Turn knob to set timer
– up to 60 minutes.
3. Press knob back into
original position.
Timer does not begin
counting down until
knob is pressed back
into position.
CookWheel TM
(outer knob)
CookWheel TM
(inner knob)
Turn to select a
Speedcook mode, SelfClean, or to turn the
oven off. Modes include:
Air-Crisp, Bake, Broil,
Favorites, Dehydrate,
Roast, and Toast.
Turn to navigate through
the options on the Cook
Navigator Screen. Press
knob to select an option,
begin a preheat cycle, or
initiate a cook cycle.
Info Key
Back Key
Oven Light Switch
Press to display
information on the
Oven Setup (volume,
screen brightness and
contrast, language, and
standard or metric
measurement), Help
Topics, or Oven Tips.
Press to return to
previous screen.
Press to illuminate top
cook cavity.
Cancel Key
Press to terminate
a cook cycle or to return
to the main screen.
NOTES:
1. Pressing the “Start” key does the same thing as pressing in the inner CookWheel knob.
2.
To turn the oven on, you must select a Speedcook mode. See CookWheel (outer knob).
Start Key
Press to select an option,
begin a preheat cycle, or
initiate a cook cycle.
The Top Oven
Cook Modes – The Top Oven
The top oven features seven Speedcook modes – Air-Crisp, Bake, Broil, Dehydrate, Favorites, Roast and
Toast – that enable you to cook a wide variety of foods. Three of these modes – Bake, Roast, and Broil – are
traditional settings while the other four – Air-Crisp, Dehydrate, Toast, and Favorites – are new cook modes
designed to expand and enhance your cooking experience.
For a list of all preprogrammed recipes and the mode(s) under which each is located see pages 30-33.
Traditional modes
Traditionally, baking is to cook with dry heat. Hot air –
from the top and bottom of the oven – envelopes the food in a
radiant dry heat, perhaps with a little moisture from the food
which circulates as a vapor in the oven.
Bake:
In the TurboChef oven, the traditional explanation of baking
remains the same. However, in the top oven the hot air is moved
through the cook cavity at higher speeds than in a traditional oven.
It is this rapid movement of air that decreases cook times while
ensuring foods bake evenly and retain more moisture.
When in the Bake mode, keep in mind that metal cookware will
provide more bottom browning while items in glass cookware will
tend to cook a little faster. Bake pizzas on a pizza pan or place
directly on the oven rack. Some casseroles may need to be covered
with parchment paper to prevent over-browning.
Broiling directly exposes food to radiant heat (as over
a fire or on top of a grill). The heat is direct and intense, and it
differs from baking or roasting in that only one side of the food is
exposed to the heat source. Generally you broil foods that are quick
cooking, inherently tender, relatively lean, and not too thick.
Broil:
Using the Speedcook Broil mode will yield the same or superior
results as broiling in any traditional oven. The only really difference
is that your food cooks faster due to the hot air moving through the
cook cavity at increased speeds.
Cast iron grill pans, metal sheet pans, and metal broiling pans all
work well in this mode.
Roast: Traditionally, roasting implies cooking food with an open
flame, as on a spit in front of a fire. This is one of the oldest forms
of cooking.
When roasting in an oven, roasting and baking are essentially the
same thing, but roasting is used mostly for meats and vegetables. In
the top oven a combination of low and high speed air is used to
brown the outside of food while retaining moisture inside.
Roasting pans (without lids), glass casserole dishes (with or
without lids), and sheet pans all work well with this mode. Shallow
pans will allow food to brown more. An uncovered pan without
liquids will help keep the heat dry and allow foods to brown and
crisp. Setting meats and poultry directly on a rack in a pan keeps
them from steaming in their own juices.
New Cook modes
Think of Air-Crisp as air-frying. This mode is great for
foods that traditionally taste best when fried – like french fries – as
well as items containing any sort of breading or stuffing that should
toast and brown in the cooking process – like stuffed mushrooms.
Air-Crisp:
In this mode, high temperature air moves through the cook cavity
at varying speeds to brown and crisp the food product. Food comes
out with a nice caramelization and is lower in fat content than if it
had been deep fried.
Metal sheet pans work well in this mode.
The Top Oven
Considered the original form of preservation,
dehydrating food removes the product’s natural moisture by slowly
drying it with a low heat. Manually, food can be dehydrated by
placing thin slices on racks and allowing them to dry assisted only
by sun or air. To shorten the dehydrating process, the TurboChef
oven utilizes low temperature air moving at higher speeds.
Dehydrate:
This mode is ideal for products like banana chips and other
dried fruits, as well as dried meats, like beef jerky. Sheet pans,
TurboChef teflon screens, and pizza pans (with or without holes)
are all recommended for use with this mode.
it is a perfect match to a preprogrammed one or not – quickly and
easily. In addition to any settings you save, the settings for your last
ten cooks are always saved in this mode. To learn more about the
Favorites mode, see pages 9, and 16-19.
Toast: Toasting browns and crisps foods like bread, bagels and
tortillas. Using high heat and high speed air, the Toast Mode can
enhance flavor and melt cheese.
For best results, place food directly on the oven rack. For products
that may run over, like filled pastries, use a metal sheet pan.
The Favorites mode is a wonderful tool that allows
you to store and easily recall over 9,000 of your favorite recipes.
This mode truly allows you to cook any recipe – whether
Favorites:
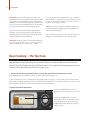
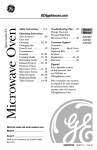
Basic Cooking – The Top Oven
Preprogrammed recipes and an easy-to-use interface allow you to cook any dish you want. Choose one
from the TurboChef Cookbook or try an old family favorite. For a complete list of preprogrammed recipes
and the mode under which each is located, see pages 30-33.
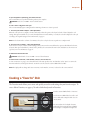
1. Turn the oven on by selecting a Speedcook mode – Air-Crisp, Bake, Broil, Dehydrate, Favorites, Roast, or Toast.
The Cook Navigator Screen will illuminate and the oven will begin its initial warming process.
If unsure of which mode to select, consult the list of preprogrammed recipes on pages 30-33. If your specific recipe is not listed on these
pages start by selecting a preprogrammed recipe for an item that closely resembles the one you wish to cook. At the 80% and 100% check
points, you will have the ability to check your item and make any necessary adjustments.
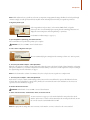
2.Select a food item and specifications.
Use the outer CookWheel knob to select the
Speedcook mode. In this example, “Roast” is selected.
Use the inner CookWheel knob to select the
item and item specifications. To make a selection,
scroll to the desired option and press the inner
CookWheel knob. In this example, the specification
“1 Rack” is selected.
The Top Oven
Unlike traditional ovens, you will not set the time or temperature. Preprogrammed settings, which have been developed through
extensive testing by our staff of professional chefs, may differ in time and temperature from what your original recipe indicates.
NOTE:
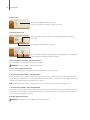
3.Begin the preheat cycle.
Select “Begin Preheat” and press “Start” (or the inner CookWheel knob) to begin the
preheat cycle. The oven automatically begins counting down the remaining preheat time and
displays the current temperature. Preheating will take 9 to 14 minutes.
For information on “Adjust Settings” see pages 13-15.
4.Upon completion of preheating, place food in the oven.
The oven will chime to let you know the preheat cycle is complete.
WARNING:
Inside of oven is HOT – insert food with caution.
5.Press “Start” to begin the cook cycle.
The oven automatically begins counting down the remaining cook time once “Start” is pressed.
6. The cook cycle is 80% complete – make adjustments.
When the cook cycle is 80% complete, a chime sounds and you have the option to check your food and, if desired, adjust the cook settings.
This option is available for 30 seconds. If an adjustment is not made within 30 seconds, the oven will complete the cook cycle according to
the original settings. For more information, see page 11.
NOTE:
For food items with a cook time of 2∂ minutes or less, the cook cycle does not stop at the 80% complete mark.
7. The cook cycle is complete – make final adjustments.
At the end of a cook cycle, a chime sounds notifying you that your item is done. You will have the option to add additional cook time,
if desired. This option is available for 3 minutes. After 3 minutes, the oven assumes the item is done and advances to the next screen
(#9 below). For more information, see page 12.
8.Remove the dish from the oven.
WARNING:
Dish and inside of oven are HOT – remove food with caution.
9.Select “Save to Favorites,” “Cook Another,” “Done,” or turn the oven off.
To “Save to Favorites” see page 17. To cook another batch of the same product select “Cook
Another.” Select “Done” to return to the first menu under the current Speedcook mode. To turn
the oven off, rotate the outer CookWheel knob to “Off.”
NOTE:
The display will not change until “Save to Favorites,” “Cook Another,” or “Done,” is selected or the oven is turned off.
The Top Oven
Cooking a Recently Cooked Dish
The top oven automatically saves a record of – along with any adjustments to – the last ten items cooked,
giving you quick access to your most recently used recipes. Follow the steps below to cook a recently
cooked dish.
Recently cooked item’s are saved in the oven’s temporary memory. If the oven loses power, the item’s saved under “View Last
Cooked (10)” will be lost. To avoid losing your favorite settings, make sure you save them in “Favorites” (page 17).
NOTE:
1.Select “Favorites” as the Speedcook mode. Under “Favorites,” select “View Last Cooked (10).”
Turn the outer CookWheel knob to “Favorites.”
Use the inner CookWheel knob to scroll to and
select “View Last Cooked (10)” – last 10 items
cooked will be displayed, starting with the one
most recently cooked.
2.Select the dish to be cooked.
Use the inner CookWheel knob to select a dish. Recently cooked items are saved by the last
specification chosen in the previous cook cycle. For example, a rack of lamb cooked under the
Roast mode, might be specified as Meat, Lamb, Rack of Lamb, 14 to 16 oz., and then 1 Rack.
This cook cycle would appear as “1 Rack” on the “Last Cooked” screen.
3.Select “Cook.”
Use the inner CookWheel knob to select “Cook.”
See page 17 for information on “Save as Favorite.”
4.Begin the preheat cycle.
Select “Begin Preheat” and press “Start” (or the inner CookWheel knob) to begin the preheat
cycle. The oven will count down the remaining preheat time. Preheating takes 9-14 minutes.
See page 13-15 for information on “Adjust Settings.”
The Top Oven
5.Upon completion of preheating, place food in the oven.
The oven will chime to let you know when the preheat cycle is complete.
WARNING:
Inside of oven is HOT – insert food with caution.
6.Press “Start” to begin the cook cycle.
The oven automatically begins counting down the remaining cook time once “Start” is pressed.
7. The cook cycle is 80% complete – make adjustments.
When the cook cycle is 80% complete, a chime sounds and you have the option to check your food and, if desired, adjust the cook
settings. This option is available for 30 seconds. If an adjustment is not made within 30 seconds, the oven will complete the cook cycle
according to the original settings. For more information, see page 11.
NOTE:
For food items with a cook time of 2∂ minutes or less, the cook cycle does not stop at the 80% complete mark.
8. The cook cycle is complete – make final adjustments.
At the end of a cook cycle, a chime sounds notifying you that your item is done. You will have the option to add additional cook time,
if desired. This option is available for 3 minutes. After 3 minutes, the oven assumes the item is done and advances to the next screen
(#9 below). For more information, see page 12.
9. Remove the dish from the oven.
WARNING:
Dish and inside of oven are HOT – remove food with caution.
10. Select “Save to Favorites,” “Cook Another,” “Done,” or turn the oven off.
To “Save to Favorites” see page 17. To cook another batch of the same product select “Cook Another.” Select “Done” to return to the
first menu under the current Speedcook mode. To turn the oven off, rotate the outer CookWheel knob to “Off.”
NOTE:
The display will not change until “Save to Favorites,” “Cook Another,” or “Done,” is selected or the oven is turned off.
Cooking a “Favorite” Dish
The Favorites mode allows you to store and quickly access the cook settings for your favorite recipes. To
save a dish to Favorites, see page 17. To cook a dish already saved in Favorites:
Turn the outer CookWheel knob to “Favorites.”
1.Select “Favorites” as the Speedcook mode.
2.Select dish to be cooked.
Use the inner CookWheel knob to scroll to and
select a dish. In this example, the dish selected is
“Rack of Lamb.”
The arrow indicates the list displayed contains
additional food items. Turn the inner CookWheel
knob left/right to scroll up/down through the list.
10
The Top Oven
4.Select “Cook.”
Use the inner CookWheel knob to select “Cook.”
See page 18 for information on “Rename” and page 19 for “Delete.”
3.Begin the preheat cycle.
Select “Begin Preheat” and press “Start” (or the inner CookWheel Knob) to begin the
preheat cycle.
For information on “Adjust Settings” see pages 13-15.
The oven automatically begins counting down the remaining preheat time and displays the
current temperature. Preheating will take 9-14 minutes.
4.Upon completion of preheating, place food in the oven.
The oven will chime to let you know the preheat cycle is complete.
WARNING:
Inside of oven is HOT – insert food with caution.
5.Press “Start” to begin the cook cycle.
The oven automatically begins counting down the remaining cook time once “Start” is pressed.
6. The cook cycle is 80% complete – make adjustments.
When the cook cycle is 80% complete, a chime sounds and you have the option to check your food and, if desired, adjust the cook
settings. This option is available for 30 seconds. If an adjustment is not made within 30 seconds, the oven will complete the cook cycle
according to the original settings. For more information, see page 11.
NOTE:
For food items with a cook time of 2∂ minutes or less, the cook cycle does not stop at the 80% complete mark.
7. The cook cycle is complete – make final adjustments.
At the end of a cook cycle, a chime sounds notifying you that your item is done. You will have the option to add additional cook time,
if desired. This option is available for 3 minutes. After 3 minutes, the oven assumes the item is done and advances to the next screen
(#9 below). For more information, see page 12.
8.Remove the dish from the oven.
WARNING:
Dish and inside of oven are HOT – remove food with caution.
The Top Oven
9.Select “Save to Favorites,” “Cook Another,” “Done,” or turn the oven off.
To “Save to Favorites” see page 17. To cook another batch of the same product select “Cook Another.” Select “Done” to return to the
first menu under the current Speedcook mode. To turn the oven off, rotate the outer CookWheel knob to “Off.”
NOTE:
The display will not change until “Save to Favorites,” “Cook Another,” or “Done,” is selected or the oven is turned off.
When re-saving an existing Favorites recipe to Favorites, previous settings will be replaced with those from the current cook cycle
unless the item is re-saved under a different name.
NOTE:
Making Adjustments During a Cook Cycle
When a cook cycle is 80% complete, the oven chimes and cooking pauses for 30 seconds. This pause gives
you the chance to make mid-course adjustments to account for differences in food products and individual
tastes, if desired. To make adjustments during a cook cycle:
NOTE:
For food items with a cook time of 2∂ minutes or less, the cook cycle does not stop at the 80% complete mark.
1.Initiate a cook cycle. (See pages 6-9 for detailed instructions)
2. The cook cycle is 80% complete. Check food for adjustments.
If you do not wish to check the food item, press the “Start” key to resume the cook cycle or do nothing and after 30 seconds, the oven will
automatically resume cooking. If an adjustment is not made, the oven completes the cook cycle according to the original settings.
A chime sounds indicating the cook cycle is 80% complete. Check the item.
If the dish requires adjustments, open the door or press/turn the inner CookWheel knob.
Four options appear: “No Change,” “Cook Less,” “Brown Less,” and “Cook and Brown Less.”
3.Select desired adjustment.
No Change: Select if dish is cooking to expectations.
Cook Less: Select if product appears to be overcooking or internal temperature is too high.
Brown Less: Select if the outside of the dish is browning faster then desired.
Cook and Brown Less: Select if dish is cooking and browning more than expected, but requires additional cooking time.
If you feel your item is done cooking at the 80% complete check point, you can remove your dish from the oven all together.
Press the “Cancel” key to end the cook cycle at this point.
NOTE:
11
12
The Top Oven
4.Press the inner CookWheel knob to confirm selection.
Turn the inner CookWheel knob to scroll to and select the desired adjustment.
In this example, “Cook Less” is selected.
NOTE:
When an adjustment is made, only the power level changes – NOT the remaining cook time.
If the cook cycle is initiated from a preprogrammed recipe, changes made during a cook cycle are saved in Favorites under “View Last
Cooked (10)” (see page 8). The original preprogrammed setting will not be altered. To permanently save your adjustments, the item must
be saved to Favorites (see page 17).
If the cook cycle is initiated from a recipe already saved in Favorites, changes made during a cook cycle are saved in Favorites under “View
Last Cooked (10).” The originally saved settings, will not be changed unless you re-save the item by its same name.
Making Adjustments at The End of A Cook Cycle
At the end of a cook cycle, the oven chimes and cooking stops. If desired, you can make final adjustments
by selecting “Cook More,” “Brown More,” or “Cook and Brown More.” To make adjustments at the end of a
cook cycle:
1.Initiate a cook cycle. (See pages 6-9 for detailed instructions.)
2. The cook cycle is 80% complete – make adjustments.
For information on making adjustments during a cook cycle, see page 11.
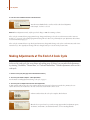
3. The cook cycle is complete. Check food for final adjustments.
A chime sounds to indicate the cook cycle is complete. Check your food item. If a selection is not made after 3 minutes, the oven
assumes the item is done and advances to the “Save to Favorites”/“Cook Another”/“Done” screen.
A chime sounds to indicate the cook cycle is complete. Check the item.
When the door is opened or after 3 seconds, a message appears with four adjustment options:
“Cook More,” “Brown More,” “Cook and Brown More,” or “Done Cooking this Dish.”
The Top Oven
4.Select the desired adjustment.
Cook More: Select if outside meets expectations, but inside needs to cook longer.
Brown More: Select if inside meets expectations, but outside needs to cook longer.
Cook and Brown More: Select if both inside and outside need to cook longer.
Done Cooking This Dish: Select if no adjustments are needed.
5.Press the inner CookWheel knob to make and confirm selection.
If “Cook More”, “Brown More”, or “Cook and Brown More” is selected, you will be asked to set the additional cook time. See step 6 below.
If “Done Cooking this Dish” is selected, the oven advances to the “Save to Favorites”/“Cook Another”/“Done” screen. See step 9, page 12.
6.Select additional time and press “Start.”
Using the inner CookWheel knob, set the additional cook time – in 5-second increments –
up to 30% of the item’s original total cook time. Press “Start” to resume cooking. The oven will
continue cooking according to the adjustments made.
NOTE:
“Cook More”, “Brown More”, and “Cook and Brown More” can be used as many times as necessary to achieve desired results.
NOTE: Any changes made during an item’s cook cycle are saved in Favorites under “View Last Cooked (10)” (page 8). To permanently save
your adjustments, the item must be saved to Favorites (page 17).
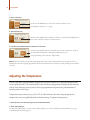
Adjusting the Cook Time
The preprogrammed cook time for each item has been calculated through extensive testing by a staff
of professional chefs to yield optimal results. It is recommend that you start with these preprogrammed
settings the first time you cook an item. However, once you develop a feel for a product’s outcome using
its preprogrammed setting, you may wish to adjust the preprogrammed cook time.
Cook times may be changed up to 30% in either direction of the preprogrammed time. Be aware that
preprogrammed cook times can vary significantly from traditional settings. To adjust the cook time:
1.Select the dish to be cooked. (See pages 6-9 for detailed instructions.)
2.Select “Adjust Settings.”
Use the inner CookWheel knob to scroll to and select “Adjust Settings.”
13
14
The Top Oven
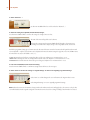
3.Select “Cook Time.”
Use the inner CookWheel knob to scroll to the cook time. Press knob to select.
For information on “Advanced. . .” see page 15.
4.Adjust the cook time.
Turn the inner CookWheel knob to adjust the cook time in 5-second increments. Original cook
time cannot be altered more than 20% in either direction.
5.Press the inner CookWheel knob to confirm the new cook time.
Press the inner CookWheel knob in to confirm the new time. Cursor advances to “Temp.” To
select and adjust the temperature, “Adjusting the Temperature” (below).
To begin preheating, scroll to and select “Begin Preheat.”
When a new cook time is selected, the change applies only to that cook cycle. Unless the item is saved to Favorites, the oven
defaults back to the item’s original preprogrammed cook time the next time the item is selected for cooking, including if “Cook Another”
is selected.
NOTE:
Adjusting the Temperature
Like the cook times, preprogrammed temperatures have been calculated by a staff of professional chefs
to yield optimal results. It is recommended to start with these preprogrammed settings the first time you
cook an item. However, you may wish to alter a preprogrammed temperature for personalization of
specific products and recipes.
Temperatures may be altered up to 25°F (10°C) in either direction. Be aware that preprogrammed
temperatures can vary significantly from traditional settings. To adjust the temperature:
1.Select the dish to be cooked. (See pages 6-9 for detailed instructions.)
2. Select “Adjust Settings.”
Use the inner CookWheel knob to scroll to and select “Adjust Settings.” To see the screen display associated with this step, see step 2,
under Adjusting the Cook Time (page 13).
The Top Oven
3.Select “Oven Temp.”
Use the inner CookWheel knob to scroll to “Temp.” Press knob in to select.
For information on “Advanced. . .” see page 15.
4. Adjust the temperature.
Turn the inner CookWheel knob to adjust the temperature in 5ºF (2ºC) increments. Original
temperature cannot be altered more than 25ºF (10ºC) in either direction.
5. Press the inner CookWheel knob in to confirm the new temperature.
Press the inner CookWheel knob to confirm new temperature. Cursor advances to
“Advanced. . .” Select to enter the Advanced Cook mode and adjust existing recipe settings.
See below for more information.
To begin preheating, scroll to and select “Begin Preheat.”
When a new temperature is selected, the change applies only to that cook cycle. Unless the item is saved to Favorites, the oven
will default back to the item’s original preprogrammed temperature the next time the item is selected for cooking, including if “Cook
Another” is selected.
NOTE:
Using the Advanced Cook Mode
The Advanced Cook mode allows you to adjust the preprogrammed air flow and microwave power levels
within a recipe setting. In addition to customizing an existing recipe, making adjustments in the Advanced
Cook mode enables you to develop new recipes from existing settings. A high level of familiarity with the
oven is suggested before attempting to make changes in this mode. To use the Advanced Cook mode:
1.Select a dish to cook. (See pages 6-9 for detailed instructions.)
2.Select “Adjust Settings.”
Use the inner CookWheel knob to scroll to and select “Adjust Settings.” To see the screen display associated with this step, see step 2,
under Adjusting the Cook Time (page 13).
15
16
The Top Oven
3.Select “Advanced . . .”
Use the inner CookWheel knob to scroll to and select “Advanced . . .”
4.Select the setting to be adjusted and make desired changes.
Use the inner CookWheel knob to scroll to the setting to be changed. Press to select.
The sum of the times will equal the total cook time.
To change the settings, turn the inner CookWheel knob left/right to decrease/increase
percentages as desired. In this example, the upper air is being adjusted for the first interval.
Each dish is programmed using up to four time intervals. The sum of the times across the four intervals will equal the total time and
are not adjustable – only the total cook time can be adjusted. Each interval contains settings for Upper Air, Lower Air, and Microwave.
If an interval is not used, it will default to zero (“0”).
UPPER AIR: Controls speed of the air coming from the top of the oven. Adjust in 10% increments from 0–100%.
LOWER AIR: Controls speed of the air coming from the bottom of the oven. Adjust in 10% increments from 0–100%.
MICROWAVE: Controls the amount of microwave power being used. Adjust in 10% increments from 0–100%.
5.Press inner CookWheel knob to confirm new setting.
Press the inner CookWheel knob to confirm new setting. Cursor will move to the next space.
6.Select “Done” to save the new settings or “Original Settings” to return to the originally-programmed settings.
Select “Done” to confirm changes. The oven will return to the “Begin Preheat” screen.
Select “Original Settings” to restore originally programmed settings.
NOTE: Unless the item is saved in Favorites, changes made in the Advance Cook mode will apply only to the current cook cycle. The
oven will default back to the original settings the next time the item is selected for cooking, including if “Cook Another” is selected.
The Top Oven
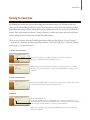
Saving to Favorites
By allowing you to store over 9,000 cook settings for your favorite recipes, the Favorites mode truly
allows you to cook anything quickly and easily. Create the perfect cook cycle for any product by using a
preprogrammed setting and then making the necessary adjustments at the 80% and 100% check points, if
desired. Once your setting is perfected, “Saving to Favorites” enables you to store and easily recall your
prefect settings for the next time you cook that old family favorite.
There are two instances when the Cook Navigator Screen offers you the ability to “Save to Favorites”
– at the end of a cook cycle and when selecting a dish from “View Last Cooked (10)” under the Favorites
mode (page 17). To save to Favorites:
1. Choose “Save to Favorites.”
At the end of a cook cycle, you will have the options to select “Save to Favorites.”
See page 6-9 for detailed information on initiating a cook cycle.
When selecting a recently cooked dish stored under “View Last Cooked (10)” you will have
the option to select “Save as Favorite.” See page 8 for detailed information on cooking a recently
cooked item.
2. Name or Rename Favorite.
Turn the inner CookWheel knob to advance the cursor to the word you wish to edit or delete or
to select the place you want to add text. Press knob to select.
To add text:
To edit individual characters:
Use the inner CookWheel knob to scroll left/right to select letters (A–Z), numbers (0–9), or
punctuation marks. Press the inner CookWheel knob in to confirm a character. Cursor will move
to the next space. Press the “Back” key to return to a previous character.
When a word is completed, press the inner CookWheel knob one more time after the final
character is confirmed.
17
18
The Top Oven
Predictive matches appear beneath text being added. Use the inner CookWheel knob to scroll to
and select a match. Otherwise, select the edit field and continue adding characters.
To change or delete an existing word:
Use the inner CookWheel knob to highlight and select the desired word. Select either “Change”
or “Delete.” If you select “Change,” follow the instructions for above for adding text.
If you do not wish to rename the item being saved, scroll to and select “Done.” The item will be saved by its current name. When
re-saving an existing Favorites recipe, previous settings will be replaced with those from the current cook cycle unless the item is re-saved
under a different name.
NOTE:
4. Select “Done.”
When all changes are completed, use the inner CookWheel knob to scroll to “Done.”
Press knob to select.
Renaming a Dish (in Favorites)
At any time – and as often as you like – you may rename any of the recipes saved in “Favorites.” To change
the name of a dish stored in Favorites:
1.Select “Favorites” as the Speedcook mode. Under Favorites, select the dish to be renamed.
Use the inner CookWheel knob to scroll to the dish to be changed. Press knob to select.
In this example “Rack of Lamb” is selected.
The Top Oven
2.Select “Rename.”
Use the inner CookWheel knob to select “Rename.”
See page 9 for information on “Cook” and below for “Delete.”
3. Rename selected item.
For instructions on how to rename an item, see step 2, “Name or Rename Favorite,” under Saving to Favorites on page 17 and 18.
4. Select “Done.”
When all changes are completed, use the inner CookWheel knob to scroll to “Done.” Press knob to select.
The oven will return to the initial “Favorites” screen, which lists all stored recipes in alphabetical order. The renamed item will now be
listed alphabetically by its new name.
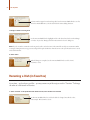
Deleting a Dish (from Favorites)
Favorite settings that you no longer use or that have replaced with improved versions may be deleted from
the Favorites mode. To delete a dish from Favorites:
1.Select “Favorites” as the Speedcook mode. Under Favorites, select the dish to be deleted.
Use the inner CookWheel knob to scroll to the dish to be changed. Press knob to select.
In this example “Rack of Lamb” is selected.
2.Select “Delete.”
Use the inner CookWheel knob to select “Delete.”
See page 9 for information on “Cook” and page 18 for “Rename.”
After “Delete” is selected, the oven returns to the initial “Favorites” screen, which lists all stored recipes in alphabetical order.
19
20
The Top Oven
Self-Clean Mode – The Top Oven
No need to scrub – the oven is self-cleaning. Using heat up to 900°F (482ºC), the oven cleans the inside
of the cook cavity in 2½ hours. To initiate a Self-Clean:
1. Make sure the cook cavity is empty, and remove oven racks.
Failure to remove the oven racks will cause the racks to discolor
2.Select “Self-Clean” as the mode.
3.Press “Start.”
During the self-clean cycle, the oven door is locked and the oven surfaces can become very hot. When cleaning cycle is complete
and the oven has returned to a safe temperature, the screen will display a message, sound a tone, and power down. Self-cleaning takes
approximately 2∂ hours.
Turn outer knob of the CookWheel to “Self Clean.”
WARNING: Oven is extremely hot during
Self-Clean. DO NOT attempt to use until self-clean
is complete.
The top and bottom ovens CANNOT be
cleaned at the same time.
NOTE:
Adjusting the Oven’s Sound
There are several sounds associated with different events throughout a cook cycle. These sounds can be
turned on and off independently of one another to suite your personal preferences. When your oven first
arrives, all of the sounds will be turned on. To turn a sound on or off:
1.Press the “Info” key.
NOTE: The only time you will not be able to access the “Info” key is when the
oven is cooking.
The Top Oven
2.Select “Oven Setup.”
Use the inner CookWheel knob to scroll to “Oven Setup.” Press knob to select.
For information on “Help Topics” and/or “Oven Tips” see page 23.
3.Select “Sound.”
Use the inner CookWheel knob to scroll to “Sound.” Press knob to select.
For information on “Display” and “Units & Measurements,” see page 22.
NOTE: The option “Installer Setup” is for qualified service technicians. By entering a six digit
code, they will have the ability to access and test different internal components of the oven.
4. Select the individual sound you wish to turn on or off.
By default, all oven sounds are turned on initially. Use the inner CookWheel knob to scroll to and select the sound to be turned on or off.
You will know if a sound is on or off by the “ON” or “OFF” located to the left of each sound
option. To change the status of a sound, press the inner CookWheel knob or “Start” key.
In this example, the “Oven Startup” sound is select. This sound is currently turned on. In the screen
below, it has been turned off.
Oven Startup: This is sound is heard the first time the oven first turned on initially. Additionally, if the oven loses power, you will hear this sound the first time the oven is turned on after power is restored.
Preheat is Done: This sound alerts you that the oven has complete the preheat cycle and is ready to cook your chosen item. When this sound is turned on, oven will chime every five minutes until you either cancel or start the cook cycle.
80% Cooking Reminder: This sound alerts you that the cook cycle is 80% complete. If you choose not to address the oven at this point, you will hear this chime at 15 seconds and 30 seconds. After 30 seconds, the oven continues the cook cycle. See page 11 for more
information on making adjustments at the 80% Cooking Reminder.
100% Cooking Reminder: This sound alerts you that the cook cycle is complete. You will hear this chime every 8 seconds until the oven door is opened or you select an adjustment option. See page 12 for information on making adjustments at the end of a cook cycle.
Valid Selection: This sound is heard every time a valid selection is made.
Invalid Selection: This sound is heard every time you attempt to select an invalid option.
NOTE:
To return to the main “Oven Setup” screen, press the “Back” key. To return to the main “Info” screen, press the “Cancel” key.
21
22
The Top Oven
Adjusting the Oven’s Display
The TurboChef 30˝ offers you the option to adjust the brightness and color of your oven’s display. To adjust
your display’s brightness or change the color:
1.Press the “Info” key and select “Oven Setup.”
When the oven is cooking, you will not be able to access the options under the “Info” key.
2. Select “Display.”
Use the inner CookWheel knob to scroll to “Display” Press knob to select. For information on “Sound” see page 20. For “Units &
Measurements” see the section below.
The option “Installer Setup” is for qualified service technicians. By entering a six digit code, they will have the ability to access
and test different internal components of the oven.
NOTE:
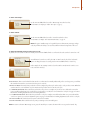
4. Select “Brightness” or “Colors” and adjust/change as desired.
To adjust brightness: Turn the inner CookWheel knob left/right to adjust the display’s
brightness. To confirm, press knob in or press the “Start” key.
To adjust color: Turn the inner CookWheel knob to scroll to the desire background color.
Press to select. The arrow to the side of the color indicates the oven’s current setting for the
display color. In this example, the display is set to “Orange.”
Press the “Back” key to return to the main “Display” screen. Press the “Cancel” key to return to the main “Info” Screen.
Adjusting the Oven’s Units & Measurements
By default when your oven arrive, temperatures will be recorded in Fahrenheit. However, if you prefer to
work in Celsius, you can change how your oven indicates temperature. To make this change:
1.Press the “Info” key.
When the oven is cooking, you will not be able to access the options under the “Info” key.
The Top Oven
2. Select “Oven Setup.”
3. Select “Units & Measurements”
Use the inner CookWheel knob to scroll to “Units & Measurements.” Press knob to select. For information on “Sound” see page 20. For
“Display” see page 22.
The option “Installer Setup” is for qualified service technicians. By entering a six digit code, they will have the ability to access
and test different internal components of the oven.
NOTE:
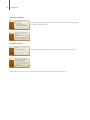
4. Select “Temperature” and change as desired.
To change the temperature: Turn the inner CookWheel knob to scroll to the desired
temperature measurement. The arrow to the side of “Fahrenheit” or “Celsius” indications the
oven’s current setting. In this example, temperature is set to “Fahrenheit.”
Press the “Back” key to return to the main “Display” screen. Press the “Cancel” key to return to the main “Info” Screen.
Help Topics and General Cooking Information
The top oven comes equipped with a variety of helpful hints that cover a range of topics. This information
is located in two places – Help Topics and Oven Tips – both of which are accessed through the “Info” key.
To access a help topic or review general cooking information:
1.Press the “Info” key.
When the oven is cooking, you will not be able to access the options under the “Info” key.
2.Select “Help Topics” or “Oven Tips.”
Help Topics: Gives you information regarding what the different Speedcook modes do
as well as the recommended types of food and cookware for each mode. You will also find
information on using Advanced Settings and Self-Clean.
OVEN TIPS: Under “Oven Tips,” you will find general cooking information.
23
24
The Top Oven
If you select “Help Topics”:
Select the mode/feature and topic you would like to learn more about. In this example, “What
does bake do?” is currently selected.
If you select “Oven Tips”:
Select “General Cooking Information” for general information on cooking with the oven.
Press the “Back” key to return to the previous screen. Press the “Cancel” key to return to the main “Info” Screen.
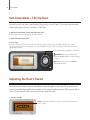
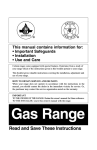
The Bottom Oven
Control Identification & Operation – The Bottom Oven
The bottom oven is both a natural and convection oven that provides uniform cooking throughout the
oven. Precise analog control knobs provide ease of use when choosing from the five cook modes, while the
display screen shows additional cooking information. The bottom oven can also be used as a proofing oven
or warming drawer.
Display Screen
Oven Mode Dial
Temperature Dial
Displays the oven and
meat probe temperature,
as well as the timer
information.
urn to choose the
T
cook mode. For a
list of cook modes,
see page 24.
Turn to set the oven
temperature.
Set Timer Knob
Lock Key
View Key
Oven Light Switch
Use to set the timer.
1. Press knob to extend.
2. Turn knob to set timer.
3. Press knob back into
original position.
When the door is locked,
a graphic ( ) appears on
the screen. Hold for 3
seconds to engage/
disengage the door lock.
Press to toggle between
the oven temperature,
meat probe temperature,
or timer in the primary
display position on the
screen.
Press to illuminate
bottom cook cavity.
Timer does not begin
counting down until
knob is pressed back
into position.
Simultaneously
press the Lock and View
key for 3 seconds to
engage Sabbath Mode.
NOTE:
25
26
The Bottom Oven
Cook Modes – The Bottom Oven
The bottom oven features five modes – Convection Bake, Convection Roast, Broil, Roast, Bake. In addition
to these five modes, there are three settings – Warm, Proof, and Sabbath Mode – which further expand the
overall capabilities of the bottom oven.
Cook modes
Traditionally, baking is to cook with dry heat. Hot air –
from the top and bottom of the oven – envelopes the food in a
radiant dry heat, perhaps with a little moisture from the food
which circulates as a vapor in the oven.
Bake:
In the bottom TurboChef oven, unlike most traditional ovens, the
bottom heating element is concealed beneath the cook cavity. This
features allows for a bigger cook cavity, easier cleaning, and more
uniform heating.
Convection Bake uses the same heating
elements as Bake with the addition of a convection fan and heater
in the back of the cook cavity. This fan and heater help heat and
circulate the air evenly throughout the chamber to produce
superior browning and crisping.
Convection Bake:
Any food cooked under the Bake mode can also be prepared using
Convection Bake and vise versa. As a general rule of thumb, items
cooked under Convection Bake will tend to cook about 33% faster
then when cooked under Bake.
Broiling directly exposes food to radiant heat (as over
a fire or on top of a grill). The heat is direct and intense, and it
differs from baking or roasting in that only the top side of the
food is exposed to the heat source.
Broil:
Generally you broil foods that are quick cooking, inherently tender,
relatively lean, and not too thick.
Roast: When roasting in an oven, roasting and baking are
essentially the same thing, but roasting is used mostly for meats
and vegetables. Hot air from the top and bottom of the oven is used
to brown the outside of food while retaining moisture inside.
However we tend to think of roast in terms of meats rather than
baked goods.
In the bottom TurboChef oven, the two top heating elements
provide better control and optimized broiling and roasting.
Convection Roast: Convection Roast uses the same heating
elements as Roast. However, unlike Roast, Convection Roast
utilizes the convection fan and heater in the back of the oven to
help heat and circulate the air throughout the cook cavity.
Any item cooked under Roast can be prepared under Convection
Roast and vise versa. The one difference to be aware of is that
Convection Roast, with the additional heating elements, will tend
to cook faster. As a general rule of thumb, items cook about 33%
faster under Convection Roast as compared to Roast.
Settings
Similar to the Bake mode, the Warm setting uses heat
from the top and bottom of the oven to keep the cook cavity at the
perfect holding temperature for food, 145ºF (63ºC).
Warm:
Proof: Similar to the Bake mode, the Proof setting uses heat from
the top and bottom of the oven to keep the cook cavity at the perfect
temperature for yeast dough to rise, 90 to 105°F (32 to 41ºC). Some
doughs require moisture to proof correctly. If moisture is needed,
place a sheet pan of water under the lower rack.
The Sabbath Mode, available for religious faiths
with “no work” requirements on the Sabbath, cooks food over a 72
hour period.
Sabbath Mode:
The Bottom Oven
Basic Cooking – The Bottom Oven
The bottom oven when used in combination with the top oven offers you an expanded capacity and can
enhance your overall cooking experience. The Proof and Warm modes are two features that truly make the
bottom oven an asset in the kitchen.
1.Set the Oven Mode Dial to one of the following: Convection Bake, Convection Roast, Broil, Roast, or Bake.
2.Set the Oven Temperature Dial to the desired setting.
Along with the various temperature settings, you will also be able to choose “Warm” or Proof.”
The oven’s current temperature is displayed
as the primary information on the screen.
3. When the oven reaches the desired cook temperature, insert the dish.
WARNING:
Insert food with caution – inside of oven is HOT.
4. Set Timer (if desired).
Press the “Timer” knob – it will pop out. Turn the knob to set the cook time. The cook time will display on the
screen as you turn and will start counting down when you stop turning.
NOTE: When the timer is set, the remaining cook time
is displayed as the primary information and the oven
temperature is secondary (the screen on the left). Press
the “View” key to switch the information displayed as
primary and secondary (screen on the right).
5. When food has finished cooking, carefully remove the food from the oven.
WARNING:
Remove food with caution – food item and inside of oven are HOT.
6. Turn oven off.
To turn the oven off, turn the Oven Mode Dial to the “Off” position.
27
28
The Bottom Oven
If the meat probe is in use, the probe temperature is displayed while
the dish is cooking. To toggle between the information displayed in the primary,
secondary, and tertiary positions on the screen, press the “View” key.
NOTE:
Using Warming & Proofing
Warming and proofing are two great features for expanding the use of your bottom oven. When used as
a warming drawer, the cook cavity is perfect for holding foods at just the right temperature (approximately
145ºF (63ºC)) until it is time to serve. When proofing, the oven temperature remains around 90 to 100°F
(32 to 38ºC), creating the perfect environment for developing yeast-based doughs. To use these functions:
1.Set the Oven Mode Dial to “Bake.”
2.Set the Temperature Dial to “Proof” or “Warm.”
When proofing, some doughs may need moisture to proof correctly. If moisture is needed, place a sheet
pan of water under the lower rack. Refer to your recipe to determine if water is needed or not.
NOTE:
The Sabbath Mode
The Sabbath mode, which is available for the bottom oven only, is for religious faiths with “no work”
requirements on the Sabbath. To use the Sabbath Mode:
1.Set the Oven Mode Dial and Temperature Dial as if cooking normally.
2.Enable the Sabbath mode.
To enable the Sabbath Mode, simultaneously press the “Lock” and “View” keys for 3 seconds. A message will be displayed concerning
enabling the Sabbath Mode. Continue to hold the “Lock” and “View” keys to enable the mode.
In Sabbath Mode, the display powers off, but the oven is still active. The oven will remain at one constant temperature for the duration
of the cooking time. At any time while in the Sabbath Mode, you may open and close the oven door to place food in or remove food from
the oven. The oven will power down after 72 hours.
NOTE:
Turning the oven off will cancel the Sabbath Mode.
The Bottom Oven
Self-Clean Mode – The Bottom Oven
No need to scrub – the oven is self-cleaning. Using heat up to 900°F (482ºC), the oven cleans the inside of
the cook cavity in 2½ hours. To initiate a Self-Clean:
1. Make sure the cook cavity is empty.
2.Remove oven racks. (Failure to do so will cause racks to discolor.)
3.Set the Oven Mode Dial to “Self-Clean.”
4.Press and hold the “Lock” key for 3 seconds. The self-clean will initiate.
Warning: During Self-Clean, the oven surfaces are extremely hot. DO NOT attempt to operate the oven
until Self-Clean is complete.
5. When self-cleaning is complete, the oven will tone and turn off automatically.
NOTE:
The top and bottom ovens CANNOT be cleaned at the same time.
29
30
Preprogrammed Recipes
Preprogrammed Recipes
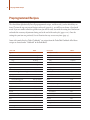
The chart below alphabetically lists all preprogrammed recipes, and the mode(s) under which they are
found. To turn the top oven on and begin a cook cycle (pages 6-9), you will have to choose a Speedcook
mode. If you are unable to find the specific item you wish to cook, start with the setting for a similar item
and make the necessary adjustments during and at the end of the cook cycle (pages 11-12). Once the
settings for your item are perfected, Save to Favorites for easy access every time (page 17).
Items with a mode listed as “Bake (Cookbook)” are recipes from the TurboChef Cookbook. All of these
recipes are located under “Cookbook” in the Bake Mode.
Food Item
Appetizer
Cheese or Filled
Cheese Melts
Mode
Air-Crisp
Air-Crisp
Dips
Salmon en Croute Toasted
Apple
Air-Crisp
Bake (Cookbook)
Air-Crisp
Dried
Crumbed-Topped Caramel Apple Pie
Asparagus
Dehydrate
Bake (Cookbook)
Roasted Roasted Red Pepper &
Steamed Bacon
Bagel, toasted
Baked Alaska
Banana
Fosters Roll-ups
Dried
Bars
Dessert
Peanut Butter
2-Step
Beans, Green Amandine
Roast
Bake (Cookbook)
Bake (Cookbook)
Bake
Toast
Bake (Cookbook)
Bake (Cookbook)
Dehydrate
Bake
Bake (Cookbook)
Bake
Bake (Cookbook)
Food Item
Beef (also see Steak)
Filet
Filet on Parmesan Crostini
Jerky
Roast
Châteaubriand Dinner
Empanadas
Wellington
Biscuits (also see Bread and Rolls) Herbs de Provence
Cheese Bites
Bread Breadsticks
Cranberry-Orange Mini Loaves
Garlic
Quick
Yeast Raised
Bread Pudding
Brownies
Burritos
Cake
Angel Food
Bundt
Mode
Broil
Bake (Cookbook)
Dehydrate
Roast
Bake (Cookbook)
Bake (Cookbook)
Bake
Bake
Bake (Cookbook)
Bake (Cookbook)
Toast
Bake
Bake (Cookbook)
Bake (Cookbook)
Bake
Bake
Bake (Cookbook)
Bake
Bake
Bake
Bake
Preprogrammed Recipes
Food Item
Mode
Food Item
Mode
Cake (Continued)
Box Mix (made from)
Cheesecake
Chocolate
Cinnamon Streusel Coffee
Coffee
Cupcakes
Pound
Bake
Bake
Bake (Cookbook)
Bake (Cookbook)
Bake
Bake
Bake
Cookies
Fresh
Frozen
Refrigerated
Refrigerated – Chocolate Chip
Refrigerated – Peanut Butter
Refrigerated – Sugar
Refrigerated – Other
Bake
Bake
Bake
Bake
Bake
Bake
Bake
Scratch (made from)
Calzone
Carrots
Dried Roasted Casserole
Breakfast Bread Pudding
Chicken and Rice
Chicken & Mushroom Wild Rice Bake
Corn Poblano
Bake
Bake
Bake
Bake
Bake (Cookbook)
Bake (Cookbook)
Fish
Green Bean
Italian Zucchini
Bake
Bake
Bake (Cookbook)
Meat or Poultry
Rice
Vegetable
Bake
Bake
Bake
Dehydrated
Roast
Châteaubriand Dinner
Cheese
Appetizers
Melts Bake (Cookbook)
Air-Crisp
Air-Crisp
Chicken
Baked
Broiled
Breasts, stuffed
Filets
Tenders
& Mushroom Wild Rice Bake
Rollatini
Wings
Roasted
Lemon-Rosemary Roasted
Bake
Broil
Bake
Air-Crisp
Air-Crisp
Bake (Cookbook)
Bake (Cookbook)
Air-Crisp
Roast
Bake (Cookbook)
Cobbler (fresh or frozen)
Corn Dogs
Cornish Game Hen
Baked
Roasted
Crabcakes
Cupcakes
Duck
Baked
Roasted
Entrées, frozen
Fish (also see individual types of fish)
Baked
Filets
Ginger Salmon with Baby Bok Choy
Monkfish Steak
Salmon en Croute (appetizer or entrée)
Salmon Steak
Sticks
Swordfish Steak
Tilapia, Parmesan-Crusted
Tuna, Sesame Crusted
Tuna Steak
Whole
French Fries
Fruit, dried
Hamburger
Hot Dogs
Lamb
Boneless, roasted
Broiled
Bake
Air-Crisp
Bake
Roast
Broil
Bake
Bake
Roast
Bake
Bake
Broil
Bake (Cookbook)
Broil
Bake (Cookbook)
Broil
Air-Crisp
Broil
Bake (Cookbook)
Bake (Cookbook)
Broil
Broil
Air-Crisp
Dehydrate
Broil
Bake
Roast
Broil
31
32
Preprogrammed Recipes
Food Item
Lamb (Continued)
Rack of
Lobster
Tails
Whole
Meat
Dried
Meatballs
Meatloaf (beef or pork)
Old-fashioned Meatloaf
Skewers
Monkfish Steak
Muffins
Banana Nut
Mushrooms
Dried
Portobello, stuffed
Stuffed
Onions
Oysters
Pasta
Baked Rigatoni
Lasagna
Mac and Cheese
Pasta with Red Sauce
Pasta with White Sauce
Stuffed or Baked
Tortellini Alfredo
Pastry, toasted
Pepper
Roasted
Bell Peppers, dried
Roasted Red Pepper and Asparagus
Pie (also see Quiche)
Crumbed-Topped Caramel Apple
Cobbler (fresh or frozen)
Custard (fresh or frozen)
Double Crust – Fruit (fresh or frozen)
Mode
Food Item
Mode
Bake (Cookbook)
Pie (Continued)
Meringue
Bake
Pecan (fresh)
Pie Crust
Bake
Bake
Pumpkin
Bake (Cookbook)
Broil
Bake
Dehydrate
Broil
Bake
Bake (Cookbook)
Air-Crisp
Broil
Bake
Bake (Cookbook)
Dehydrate
Bake (Cookbook)
Bake (Cookbook)
Roast
Bake
Bake (Cookbook)
Bake
Bake
Bake
Bake
Bake
Bake (Cookbook)
Toast
Roast
Dehydrate
Bake/Cookbook
Bake (Cookbook)
Bake
Bake
Bake
Pizza
Chicago Deep-Dish
Deep-Dish
Pesto
Refrigerated (starting state)
Scratch (made from)
Self Rising
Thai
Thin Crust
Traditional Thick Crust
Pork
Chops
Crown Roast
Loin
Roast
Tenderloin with Ginger-Apricot Glaze
Pot Pie Potato
Baked
Skins
Scalloped
Sweet Potato, Baked
Sweet Potato Soufflé
Oven-Roasted Rosemary
Roasted
Quiche
Quiche
Quiche Lorraine (9-inch or Deep-dish)
Rice
Rolls (also see Biscuits)
Crescent
Cinnamon
Dinner
Bake (Cookbook)
Bake
Bake (Cookbook)
Bake
Bake
Bake
Bake (Cookbook)
Bake
Bake
Broil
Roast
Roast
Roast
Bake (Cookbook)
Bake
Bake
Air-Crisp
Bake (Cookbook)
Bake
Bake (Cookbook)
Bake (Cookbook)
Roast
Bake
Bake (Cookbook)
Bake
Bake
Bake
Bake
Preprogrammed Recipes
Food Item
Mode
Food Item
Mode
Stromboli
Swordfish, steak
Bake
Broil
Rolls (Continued)
Salmon
en Croute (appetizer or entrée)
Ginger Salmon with Baby Bok Choy
Steak
Bake (Cookbook)
Bake (Cookbook)
Broil
Tart
Fruit
Bake (Cookbook)
Lemon
Bake (Cookbook)
Sandwiches
Toast
Toast
Bake (Cookbook)
Lemon Crust
Tarts
Bake (Cookbook)
Bake
Cheese Melts
Ciabatta Sausage
Patty
Scallops on Rosemary Skewers
Bake
Broil
Broil
Bake (Cookbook)
Skewers
Scones
Shrimp
Bake
Bake
Bake
Broil
Bake (Cookbook)
Baked
Broiled
Skewers, marinated
Snapper, en Papillote
Soufflé
Chocolate
Sweet Potato
Spare Ribs
Spinach
Creamed
Creamed Gratin
Squash
Baked Acorn
Spaghetti
Steak
Chateaubriand
Filet Mignon
Prime Rib
Ribeye
Strip
Stuffed Flank
T-bone
Strata
Bake (Cookbook)
Bake
Bake (Cookbook)
Bake (Cookbook)
Roast
Roast
Bake (Cookbook)
Bake (Cookbook)
Bake
Roast
Broil
Roast
Broil
Broil
Bake (Cookbook)
Broil
Bake (Cookbook)
Tilapia, Parmesan-Crusted
Tomatoes
Dried
Roasted
Trout (whole or filets)
Tuna
Sesame Crusted
Steak
Turkey
Turnovers
Veal
Boneless
Chops
Roast
Rib Roast
Vegetables
Dried
Mixed
Zucchini “Crostini”
Bake (Cookbook)
Dehydrate
Roast
Broil
Bake (Cookbook)
Broil
Roast or Bake
Bake
Roast
Broil
Roast
Roast
Dehydrate
Bake
Bake (Cookbook)
33
34
Reference
Q& A – Comprehensive List of Questions
Pages 2-3 addresses the common questions asked as people first begin to use the TurboChef 30˝. Below
is a comprehensive list of questions and answers collected from our experience. Should you have a question
that is not addressed below, please call Customer Service at 866.44serve.
Questions related to operating the oven:
How do I turn the oven on?
For the top oven, turn the outer CookWheel knob to one of the
seven Speedcook modes – Air-Crisp, Bake, Broil, Roast, Toast,
Dehydrate, or Favorites. This will start the oven’s initial warming
process and cause Cook Navigator screen to illuminate.
For the bottom oven, set the Oven Mode Dial to one of the five
modes – Convection Bake, Convection Broil, Broil, Bake, or Roast
– and then set the desired temperature.
Can I set the oven’s time and temperature?
In the bottom oven, yes. You select time and temperature just as
you would with any traditional oven.
When the oven is done cooking, does it automatically turn
off? What if I forget to turn it off?
The oven will not automatically turn itself off. For the top oven, at
the end of the cook cycle, the cooking elements will power down.
However, the oven remains at its cooking temperature until it is
turned off or another recipe is selected.
The bottom oven, like any other traditional oven, will remain at its
set temperature until you turn it off.
How do I know which way to turn the CookWheel?
Turn the inner CookWheel knob clockwise to move down a list and
counter-clockwise to move up. You cannot loop back around from
A to Z or Z to A.
Can I use the top oven as a microwave only?
In the top oven, not initially. You must select a Speedcook mode,
followed by an item and the item’s specifications in order to initiate
a cook cycle. However, once you have selected your item, there is an
option to “Adjust Settings” (pages 13-14). By selecting “Edit Settings”
you will have the ability to alter the preprogrammed time and
temperature of the selected item.
It is recommended that you start with the programmed settings
developed through testing by our staff of professional chefs. Once
you have a feel for the outcome using the preprogrammed settings,
then you might want to customize by either adjusting at the 80%
and/or 100% check points (pages 11-12) or by altering the time
and/or temperature.
Can I use both ovens at the same time?
Yes. Both ovens working together is a great way to get the most out
of your oven, expand your cooking capacity, and enrich your overall
cooking experience.
No. While the top oven does contain a microwave element, this
element is an assisting technology that is used only when it helps
improve a product’s cook time and finished quality. It cannot be
used alone.
How hot does the oven get?
The maximum temperature either oven reaches when cooking
is 525ºF (274ºC). When self-cleaning, the ovens can reach up to
900°F (482ºC).
How do I know if the oven door is completely closed?
For the top oven, the oven will not begin cooking if the door is
open. The message “The door is open” also appears on the Cook
Navigator Screen if the door is not properly closed. The bottom
oven will run whether the door is open or not.
Reference
Questions related to making adjustments
to preprogrammed settings:
Can adjustments to a preprogrammed setting be saved?
Will adjustments be saved automatically?
Yes. The last 10 cook cycles will be automatically saved under the
Favorites mode in “Last 10 Cooks” (page 8). To permanently save
adjustments made to a preprogrammed setting, you will need to
save your item to Favorites (page 17).
If I alter preprogrammed settings, does it affect the original
settings? Can I get the originals back?
Adjustments made to a cook cycle apply only to that specific cook
cycle. The oven defaults back to an item’s original preprogrammed
settings the next time that item’s preprogrammed recipe is selected.
All changes are saved in Favorites either under “View Last Cooked
(10)” (page 8) or under a recipe you “Saved to Favorites” (page 17).
If the top oven is preprogrammed, why do I have to check
my food at the 80% check point?
You may choose not to check your food at the 80% check point.
If, after 30 seconds, nothing happens the oven will complete the
cook cycle. However, not everyone has the same preference when
it comes to food, so the 80% check point was established to give
you the opportunity to check your item and make adjustments to
help ensure your desired outcome is achieved.
Questions related to cook modes:
How do I know which Speedcook Mode to choose?
The modes have been established to describe how you would
normally cook a product – i.e. BAKE a cake or ROAST a turkey.
So in most cases, common cooking sense should help you decide
which mode to choose. However, since we don’t all think the same
way, an alphabetical list of all Preprogrammed Recipes can be
found on pages 30-33.
What if I can’t find my specific recipe?
Start by selecting a preprogrammed recipe for an item that closely
resembles the one you wish cook. At the 80% and 100% check
points (pages 11-12) you will have the ability to make adjustments
and alter the programmed settings for your specific item.
One you have developed the settings for your specific item, don’t
forget to “Save to Favorites” (page 17). Doing this will allow you to
easily recall the settings for your specific item.
How many recipes can I save in Favorites?
The Favorites mode can store up to 9999 of your favorite recipes.
Do I have to close the door to use the Broil mode?
Whether using the Broil Speedcook mode, the standard Broil, or
the Convection Broil setting, the oven door should be closed.
What is the difference between Bake and Roast?
Both modes involve surrounding food with hot, dry air, but differ in
where the heated air comes from – the top or bottom of the oven.
In Bake heated air comes only from the bottom of the oven while in
Roast air is delivered from the top and the bottom.
If I use an existing recipe in Favorites and then re-save it
under a different name, will I keep the original recipe?
Yes. All recipes that have been “Saved to Favorites” remain in
Favorites unless you delete them (page 19). If you re-save a recipe
by a different name, the recipe will remain in Favorites under each
name until you delete one of them.
Questions related to cook cycles & Cooking:
Can I cook my own recipes?
Yes. Anything that can be cooked in a conventional oven can be
cooked in the TurboChef 30˝ Double Wall Speedcook Oven. If you
cannot find an exact setting for your item, use a similar one.
Do I have to preheat the oven? How long does it take?
The top Speedcook oven needs to preheat before you place your
food item in to cook. This will take 9 to 14 minutes depending on
the cook temperature the oven must reach.
With the bottom oven, it is recommended that the oven preheat to
its cooking temperature, but not required.
Can I cook more then one item at once?
In the bottom oven, yes. In the top Speedcook oven, it depends on
what you mean by “more than one item.”
If two items are to be cooked in the same dish – like vegetables
with meat – then yes. However, you might have to add a bit of time
at the end of the cook cycle to account for the extra weight. If by
“more than one item” you mean two separate dishes, then it is not
recommended that you cook these together. Consider using the
bottom oven as a warming drawer (page 28) to keep one item hot
while the other is cooking.
35
36
Reference
Can I check on my food while it is cooking?
Yes. For either oven, you can open the door whenever you like.
Keep in mind that every time you open the door, some heat will
escape, which – in the top oven – might affect the product’s
outcome. In the top oven it is best to check your food at the
80% and 100% check points.
What foods can I keep in the warming draw? Can foods stay
in the warming draw too long?
Any food can be kept in the bottom oven under the warming
mode. Keep in mind that this mode maintains a low temperature
of 140ºF (60ºC), which will cause products to slowly keep cooking.
Over time this can result in a dryer, chewier product.
Can I pause the cooking?
What if I forget to take my food out of the top oven?
Opening the door of the top oven will pause the cook cycle. To
start cooking again, close the door and press the “Start” key. Keep
in mind that every time you open the door some heat will escape,
which – in the top oven – might affect the product’s outcome. In
the top oven it is best to check your food at the 80% and 100%
check points.
At the end of the cook cycle, the cooking elements will power
down. However, the cook cavity remains at its cooking temperature
and continues cooking at the rate of a standard oven.
When should I put Glaze/Sauce on my product?
Do this at the 80% checkpoint. Otherwise, you risk over-cooking or
burning.
Do I need to flip my food during cooking?
Can I pop popcorn or heat water in this oven?
No. Remember, this oven cannot be used as a microwave only.
Can I reheat food in the oven?
Yes. For the top oven there is a setting under the Bake Mode. After
choosing “Bake” as the Speedcook Mode, you will select: Casseroles/Prepared Foods, Casseroles/Entrees, Fresh, Reheat. For the
bottom oven, simply put the food in the warm cook cavity and
allow it to reheat.
Not in the top Speedcook oven. Air is circulated from the top and
bottom of the oven, so products will cook evenly without being
flipped. In the bottom oven, it is recommend that you refer to and
follow your recipe.
Can I defrost in this oven?
When cooking a product (like wings), sometimes portions
of my food overcooks and undercooks.
Questions related to cooking Utensils:
In a case like wings, with smaller and larger pieces, the smaller
pieces may cook faster than the larger ones. To avoid over and
undercooking, remove the smaller food pieces at the 80% checkpoint and let the larger ones continue cooking. Use the “Cook
More” or “Brown More” function at the end of the cook cycle if
additional cook time is needed (page 12).
Why did my food product cook fine the first time under a
particular setting, but not the second time?
Several factors influence a product’s outcome including the
product’s starting temperature, weight, depth, source of ingredients, etc. Because altering one of these factors could alter the final
outcome, make sure to check your food at the 80% checkpoint and
make any necessary adjustments.
What do I do if my product’s actual weight (or serving size)
does not match up with one of the oven’s choices?
Choose the weight or serving size that is closest to what you are
cooking. Be sure to check on your food at the 80% checkpoint to
make any needed adjustments (page 11). Once you have your
setting perfect you might want to save your recipe to Favorites for
future reference (page 17).
Defrosting is not recommended in the top or bottom oven.
Can I use my standard pots and pans with the oven?
Yes. In either oven, you can use any cooking materials that you
would in a traditional oven.
Can I use foil in the oven?
For the bottom oven, foil is fine. However, it is not recommended
for use in the top Speedcook oven due to the fact that foil can slow
down the overall cook time and affect product quality. Try parchment paper if you need to wrap a product for cooking.
What if my recipe says to cook food covered with foil and
then remove the foil?
The top Speedcook oven settings are designed such that products
will not overcook on the top as they would in a conventional oven,
so foil is not necessary. If uneasy about not covering your product,
you can try parchment paper wrapped all the way around the
product or held in place with toothpicks. Otherwise, the jets of air
will most likely blow it off.
Can I have more than one rack in the oven?
In the bottom oven, yes. However, the top oven is designed to only
use one rack at a time.
Reference
Questions related to cleaning the oven:
Questions related to oven sounds:
What is the best way to clean the outside of the oven?
Is there anything that I should avoid?
Can I change the volume or turn the sounds off completely?
A mild cleaner and soft rag work best to clean the outside of the
oven. It is best to avoid anything abrasive like steel wool pads and
Comet type cleansers as they can possibly scratch the outside of
the oven.
What if I accidentally scratch the outside surface of the oven?
If it is a very shallow scratch on the stainless steel use a polishing
compound to rub it out.
You can not adjust the volume, however you can turn the different
sound on and/or off. See page 20 for further details.
Do I have to address the oven the moment I hear a tone?
No. There are only two instances where a tone indicates a limited
amount of time to address the oven – the 80% checkpoint and the
100% checkpoint. At the 80% checkpoint, the oven will continue
cooking after 30 seconds if nothing is done (page 11). At the end of
the cook cycle, you will have 3 minutes before the oven assumes
the product is done and advances (page 12).
Troubleshooting Guidelines
In the event that something is not working correctly on the oven, the display will show an error message
and suggest that you call for service. Before calling for service, reference the following table for problems
that you may be able to fix yourself.
ProblemPossible Solution(s)
Displays and indicator lights are not working
Check that oven is receiving power.
Cook Navigator Screen is too dark or light
Adjust the brightness of the display – see Oven Setup, page 20.
Sounds are not working
Check that the volume is turned on – see Oven Setup, page 20.
Oven sounds are too loud or soft
Adjust the volume – see Oven Setup, page 20.
Menus are in the wrong language
Make sure desired language is selected – see Oven Setup, page 20.
Units and Measurements are displayed in metric
and I want standard or vice versa
Change the Units and Measurements – see Oven Setup, page 20.
I forgot to save my changes to a recipe recently cooked
See Cooking a Recently Cooked Dish, page 7. Select “Save as Favorites.”
Clock is set to the wrong time
Use the Set Timer Knob to reset. See page 6.
Oven light bulb is burned out
Call Customer Service at 866.44serve to order a replacement bulb.
Instructions and all necessary components included with each bulb.
Oven Timer does not count down
Make sure the Set Timer Knob is pressed back into its original position.
I experienced interference with my wireless phone
900MHz cordless phones are recommended to limit interference also try
operating the wireless network on channel 1 if possible.
37
38
Reference
Specs & Dimensions
Dimensions
Electrical Specifications
Overall Oven
Height
Width
Depth
Depth from Wall
with top door open
with bottom door open
Weight
Electrical Supply Requirements:
50.25˝
30.00˝
23.90˝
4.25˝
17.50˝
19.50˝
410 lbs.
(127.6)
(76.2)
(60.7)
(10.8)
(44.5)
(49.5)
(186 kg.)
12.00˝
24.00˝
15.00˝
2.5 cubic feet
(30.5)
(61.0)
(38.1)
Top Oven Cavity
Height
Width
Depth Cooking Space
15.50
24.00˝
17.50˝
3.77 cubic feet
(39.4)
(61.0)
(44.5)
30.00˝
(76.2)
48.875˝
28.50˝
24.00˝
0.375˝
(124.1)
(72.6)
(61.0)
(0.9)
8.0˝/ 15.0˝
11.0˝
(20.3 / 38.1)
(27.9)
Dimensions in parentheses are in centimeters unless otherwise noted.
Due to the depth of the oven frame (23.9˝(60.7 cm)), the power supply
line location shown in the illustrations on page 5 (high or low conduit
box) must be adhered to in order to obtain a proper fit in the cabinet.
Specifications are subject to change without notice.
“*” Indicates a two letter code – OR, RD, BU, CH, IV, WH, or SS –
which refers to the oven door color.
Unit includes a 5½ foot flex conduit to be used
between the oven and conduit box. Connectors are supplied by
installation electrician.
Connection:
50 Amps
Branch circuits must be protected with a 50 Amp
over-current protector.
Total Connected Power:
1 oven rack for top Speedcook oven
2 oven racks (1 standard/1 roller rack) for bottom oven
Meat probe for the bottom oven
TurboChef Cookbook
Proper Cabinet preparation
Cabinets should be cut according to supplied dimension. If the
oven is being installed near a wall or door, there should be at least
∑-inch space between the wall/door and the side of the oven door.
Cabinet
Width (minimum)
Rough Wall Opening
Height (min/max)
Width (min/max)
Depth (minimum)
Thickness (minimum)
Cabinet Base Height
Minimum/Maximum
Recommended
Single Phase, 240 VAC, 60 Hz, 50 Amps, 4-wire
Model: TDO30 * 240
Included Accessories
Bottom Oven Cavity Height
Width
Depth
Cooking Space
Single Phase, 208 VAC, 60 Hz, 50 Amps, 4-wire
Model: TDO30 * 208
TurboChef recommends using standard 2 x 4 support posts with
a minimum of ∆-inch solid base to support the oven. Support posts
should be level with the floor line and well-secured to the base of
the cabinet. Base cabinet support must be able to support the oven’s
weight (410 lbs.). TurboChef strongly recommends a solid base as
shown in the illustrations in Figure 6.
If necessary due to a low or high conduit box, a 2-inch diameter
hole should be drilled in the appropriate area to allow the power
cord to reach the power source. Refer to Figure 6.
The oven utilizes ambient air from the kitchen – which is drawn
in through the top control panel area via openings in the top access
panel – to assist in keeping operational components cool. Please allow
a 1-inch minimum clearance for any cabinet doors above this area.
Should you have any questions or concerns about how the
cabinets are built, please contact TurboChef Customer Service
866.44serve (866.447.3783) before installing the oven.
Reference
*'%''ó.-%)Zd
Top View
)*%0'ó-'%.Zd
)/%''ó.(%.Zd
)*%0'ó
-'%.Zd
+%),ó('%0Zd
,'%),ó
().%-Zd
+/%.'ó
()*%.Zd
k_\nXcc
(0%,'ó
+0%0Zd
(.%,'ó
++%/Zd
kfgfm\e
Yfkkfdfm\e
figure 1: TurboChef 30˝ Double Wall Speedcook Oven Dimensions
)+ó-(%'Zd
d`e`dld
)/%,ó.)%-Zd
d`e`dld&dXo`dld
KffYkX`egifg\i]`kf]k_\
fm\e`ekfk_\ZXY`e\kj#aleZk`fe
YfodljkY\cfZXk\[XYfm\fi
Y\cfnk_\fm\efg\e`e^%
I\Zfdd\e[\[[i`cc
_fc\cfZXk`fe`]Zfe[l`k
Yfo\c\Zki`ZXcflkc\k `j_`^_%
+/%/.,ó()+%(Zd
d`e`dld&dXo`dld
9Xj\ZXY`e\kjlggfik
dljkY\XYc\kfjlggfik
k_\fm\eËjn\`^_k$
Xggifo`dXk\cp+('cYj%
I\Zfdd\e[\[[i`cc
_fc\cfZXk`fe`]Zfe[l`k
Yfo\c\Zki`ZXcflkc\k `jcfn%
KffYkX`egifg\i]`kf]k_\
fm\e`ekfk_\ZXY`e\kj#aleZk`fe
YfodljkY\cfZXk\[XYfm\fi
Y\cfnk_\fm\efg\e`e^%
((ó)/%(-Zd
i\Zfdd\e[\[
*'ó.-%)Zd d`e`dld
figure 2: Cabinet Measurements
KliYf:_\]jkife^cp
i\Zfdd\e[jXjfc`[
YXj\%
39
40
Limited Warranty
Limited Warranty - North America and Puerto Rico
Nature and Scope of the Warranty
This appliance is warranted to the first purchasing end-user to be free of manufacturing defects in workmanship and material for one full
year beginning the Date of Installation, provided it is purchased and installed in any of the 50 States of the United States or the District of
Columbia, Canada or Puerto Rico. As used in this warranty document, “Date of Installation” shall be the date of occupancy by the end-user,
if the appliance is installed in new construction, or for installation in an existing or refurbished home of an end-user it will be the date the
appliance is installed or ten (10) business days after the appliance is sold to the first end-user, whichever is earlier. During the warranty
period, TurboChef or its authorized service agent will repair or replace, at its sole option, without charge the appliance or any part found to
be defective or which fails under normal use. The warranties stated in this document are not transferable by the first end-user purchaser
except to a subsequent buyer of the home in which the appliance
is originally installed.
Exclusions from coverage of the Limited Warranty
This limited warranty does not cover any defects in or damage to the appliance resulting from (A) use of the appliance other than in its
normal and customary manner as a household appliance (commercial use is deemed not a normal or customary use), (B) accident, flood,
fire, or Acts of God, (C) misuse, abuse, failure to follow operating instructions, mishandling, or alteration (including obliteration or
alteration of model and serial number tag), (D) failure to install the appliance in strict conformity with local, state and federal building or
safety codes and regulations or our installation instructions, (E) ordinary wear and tear resulting from use, or (F) improper or incorrectly
performed maintenance or service. This limited warranty does not cover damage resulting from weather or climate-related conditions
(including rust, corrosion or deterioration of the functional and cosmetic components) as might occur, for example, when the appliance
is installed in a marine application (pleasure boats, yachts, etc.).
Disclaimers; Limitation of Remedies
YOUR SOLE AND EXCLUSIVE REMEDY UNDER THIS LIMITED WARRANTY SHALL BE REPAIR OF THE APPLIANCE AS PROVIDED HEREIN. IMPLIED WARRANTIES, INCLUDING WARRANTIES OF MERCHANTABILITY AND FITNESS FOR A PARTICULAR
PURPOSE, ARE LIMITED TO THE ONE-YEAR TERM OF THIS LIMITED WARRANTY.
Neither TurboChef nor the dealer from whom you are purchasing the appliance will be responsible for any incidental or consequential
damages occurring to persons or property resulting from the use of the appliance. Some states do not allow the exclusion or limitation of
incidental or consequential damages, or limitations on how long an implied warranty lasts, so the above limitations or exclusions may not
apply to you. This warranty gives you specific legal rights, and you may also have other rights which vary from state to state.
No Coverage outside the USA, Canada or Puerto Rico
This limited warranty provides no coverage if the appliance is purchased or installed outside the United States, Canada or Puerto Rico.
How to Obtain Service
If you find that there is a defect in the material or workmanship in your appliance within the period of the warranty, contact your
authorized TurboChef dealer or TurboChef at the number shown below. Our support staff will direct you to the proper person to assist
you.
Customer Service: 866-447-3783
Please have all related information on your purchase available at that time. You may be asked to provide proof of purchase or installation
date to receive warranty service.
Limited Warranty
End-user Lic ense Agreeme nt
The controller display in this appliance generates text in various Lucida™ licensed typefaces generated
by Monotype® truetype font software under license. Lucida is a trademark of Bigelow and Holmes, which
may be registered in certain other jurisdictions. Monotype is a trademark of Monotype Imaging, Inc.,
registered in the United States Patent and Trademark Office and may be registered in certain other
jurisdictions.
Use of this controller constitutes the end-user’s agreement to the following license terms:
“Software” means the font software incorporated into, bundled with or otherwise offered
for use exclusively with other hardware of software products acquired by you, which Software may
include, but is not limited to, Font Software, Typefaces and Font Software scaling and rasterizer software
and all documentation related to such software. “Font Software” means a software program which, when
used in conjunction with appropriate hardware and software, renders a human readable version of a
Typeface. “Typefaces” means a set of pre-determined characters (alphanumerics, design-related
characters and universal symbols) in one single weight and version letter.
Definitions:
License and Ownership: You agree to accept a non-exclusive, perpetual (subject to the termination
clause), non-transferable, non-assignable license to use the Software solely (i) to reproduce and display
Typefaces, (ii) in connection with the particular hardware or software products with which the Software
was purchased (the “Designated Product”), (iii) for your own customary internal business or personal
purposes. You have the right to use the Software on only one Designated Product. You agree not to
extract or separate the Software or any part thereof from the Designated Product for any purpose. You
agree not to duplicate, copy, modify, alter, disassemble, decrypt, reverse engineer, or decompile the
Software, and you agree not to make any attempt to discover or obtain access to the source code of the
Software. You agree not to transfer, sublicense or distribute the Software or any part thereof.
Monotype retains all right, title and interest to the Software and no rights are granted to you other than
a license to use the Software on the terms expressly set forth in this Agreement. Monotype reserves all
rights not expressly granted to you pursuant to this License Agreement. You are on notice that Monotype
claims protection of the Software under U.S. copyright laws and you shall not remove any copyright or
other proprietary rights notices on the Software. Monotype may enforce this License Agreement
directly, at its option.
Term: This License shall continue perpetually until your last use of the Software, unless terminated
earlier pursuant to the terms hereof. The license to use the Software may be terminated by Monotype
or its suppliers if you fail to comply with the material terms of this License Agreement. When this
License Agreement expires or is terminated, you shall either return to Monotype or its suppliers or
destroy all copies of the Software and documentation. You agree to certify your destruction of the
Software if requested.
Warranty Disclaimer and Limitation of Remedies: MONOTYPE MAKES NO WARRANTIES,
EXPRESS OR IMPLIED, INCLUDING WARRANTIES OF FITNESS FOR A PARTICULAR PURPOSE,
MERCHANTABILITY, AND NON-INFRINGEMENT. Monotype does not warrant that the Software is
free from all bugs, errors and omissions. IN NO EVENT WILL MONOTYPE BE LIABLE FOR LOST
PROFITS, LOST DATA, OR ANY OTHER INDIRECT, INCIDENTAL OR CONSEQUENTIAL
DAMAGES, OR ANY DAMAGES CAUSED BY MODIFICATION, ABUSE OR MISAPPLICATION OF
THE SOFTWARE. IN NO EVENT SHALL MONOTYPE BE LIABLE IN A TOTAL AMOUNT IN
EXCESS OF THE ACTUAL AMOUNT PAID BY YOU FOR THE SOFTWARE. Your exclusive remedy
and the sole liability of Monotype in connection with the Software is repair or replacement of defective
Software upon return of the defective Software to Monotype.
Some states or jurisdictions do not allow the exclusions of limitations of incidental, consequential or
special damages, so the above exclusion may not apply to you. Also, some states or jurisdictions do not
allow the exclusions of implied warranties or limitations on how long an implied warranty may last, so
the above limitations may not apply to you. To the greatest extent permitted by law, any implied
warranties not effectively excluded by the Agreement are limited to ninety (90) days. Some jurisdictions
do not permit a limitation of implied warranties where the product results in physical injury or death so
that such limitations may not apply to you. In those jurisdictions, you agree that Monotype’s liability for
such physical injury or death shall not exceed One Hundred Thousand Dollars (U.S. $100,000), provided
that such jurisdictions permit a limitation of such liability. This warranty gives you specific legal rights.
You may have other rights that vary from state to state or jurisdiction to jurisdiction. The Software is
non-returnable and nonrefundable.
This License Agreement shall be governed by the laws of the Commonwealth of Massachusetts
of the United States of America. This License Agreement constitutes the entire agreement between the
parties with respect to the subject matter hereof and supersedes any prior agreements with respect to the
subject matter hereof. This Agreement may only be changed by mutual agreement of authorized
representatives of the parties in writing. You will be responsible for compliance with U.S. Export
Control Regulations as enacted by the Export Administration Act of 1979, as amended, and any other
applicable export laws and will not export or re-export the Software without first fulfilling the
requirements of law.
General:
41
www.turbochef.com
Sales & Marketing:
866.54enjoy
Customer Service:
866.44serve
Revision 2 - 013107