1
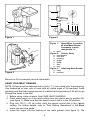
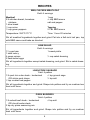
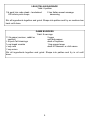
READ AND SAVE THESE INSTRUCTIONS
WARNING: A risk of fire and electrical shock exists in all electrical appliances
and may cause personal injury or death. Please follow all safety instructions.
Meat Grinder Accessory
Use and Care Guide Model 999201U
Please refer to the following information in addition to the Model 1770U
Heavy Duty Stand Mixer Use and Care Guide for complete instructions.
IMPORTANT SAFEGUARDS
When using electrical appliances, basic safety precautions should always be followed
to reduce the risk of fire, electric shock and injury to persons, including the following:
• Do not contact moving parts. Never feed food by hand. Always use food pusher.
• Do not use fingers to scrape food away from disk while appliance is operating.
Cut-type injury may result.
SAVE
THESE INSTRUCTIONS
THIS PRODUCT IS FOR HOUSEHOLD USE ONLY
THIS MEAT GRINDER ACCESSORY IS DESIGNED FOR
USE ONLY WITH THE TOASTMASTER MODEL 1770U
HEAVY DUTY STAND MIXER.
Thank you for purchasing this Meat Grinder Accessory for the Toastmaster Heavy
Duty Stand Mixer.
Featuring superior technology and craftsmanship, the Global Design Collection is an
exceptional line of kitchen appliances. The state-of-the-art design of the appliances and
accessories is matched only by their excellent performance. Enjoy!
a
b
a
c
d
e f g
Figure 2
Figure 1
Figure 1 -
a
Stand Mixer in position
#5 with Meat Grinder
Accessory in drive
mechanism “a”
a. latch
Figure 2 - Grinder Body
a. food pusher
b. food tray
c. housing
d. auger
e. blade
f. disk
g. ring
Figure 3 - Attaching Meat Grinder
a. latch
b. notches
b
Figure 3
Be sure to fill out warranty service information.
USING YOUR MEAT GRINDER
NOTE: All food must be deboned and cut into 1-11⁄2 inch cubes prior to processing.
Use tenderized or lean cuts of meat with all visible signs of fat removed. Avoid
grinding meat that has a large amount of marbled fat.Large pieces of fat will not go
through the holes in the disk.
1. Before using, clean all parts. See CARE AND CLEANING.
2. Place stand mixer on a dry level surface and turn swivel arm to position #5,
(see figure 1). Make sure that the speed control dial is in the Off position.
3. Plug into 120 V ~ 60 Hz outlet. Hold the speed control dial in the
park
setting. For further details, refer to “Park Setting Operations” in the stand
mixer use and care guide.
4. Insert the auger into the housing of the meat grinder, (see figure 2). The
2
notches should protrude from the back and be parallel with the leg of the
housing.
5. Place the blade on the auger with the cutting edge facing outward. Then put
the disk on by aligning the notch on the outer edge of the disk with the pin on
the inside of the housing, and twist ring onto housing. Make sure all parts fit
together securely.
6. Attach the assembled grinder by inserting the notches on the auger into the
drive slots of mixer drive mechanism “a”, (see figure 3).
7. Turn counterclockwise until meat grinder locks into place. Note the directions
of the arrows on the meat grinder. Firmly tighten the ring, (see figure 1).
8. Attach the food tray to the top of the meat grinder body and fill with food, do
not over-fill. Place a plate under the grinder.
9. To start the meat grinder, turn the speed control dial to Speed 4.Use the food
pusher to guide the food down into the grinder.
NOTE: If food does not go through easily, it may be necessary to stop and clean
the grinder. Turn Off and unplug.Remove ring, disk, and blade, clean out food and
reassemble.
10. When finished, turn speed control dial to Off position.
11. To help clean the grinder body of remaining food, put 1-2 slices of bread
through the grinding process.
CARE AND CLEANING
1. Turn stand mixer to Off position and unplug.
2. Before first use or immediately after each use, disassemble all parts for
cleaning.
3. Remove food tray, lift up on latch and turn meat grinder clockwise and remove,
use the arrows on the meat grinder as a guide, (see figure 1).
4. After loosening the ring, remove the disk, blade and auger from housing of
meat grinder.
5. Carefully wash all parts in warm, sudsy water. Rinse and immediately dry
thoroughly. Do not use abrasive cleaners on any part of the food processor.
6. Coat blade and disk with vegetable oil.
7. See stand mixer use and care guide for further cleaning instructions.
A ny servicing disassembly other than the above cleaning should be perfo r m e d by an authorized service center. Failure to follow this instruction may
result in a fire, electric shock or injury to persons.
3
RECIPES
BBQ CHICKEN MEATLOAF
Yield: 6 servings
Meatloaf
2 lb chicken breast, bonelessskinless
1 slice bread
1
⁄2 cup onion
1
⁄2 cup green peppers
1 egg
1
⁄2 cup BBQ sauce
salt and pepper
Temperature: 350°F/177°C
Time: 1 hour 20 minutes
Topping
2 TBL BBQ sauce
Stir all meatloaf ingredients together and grind. Pat into a 9x5-inch loaf pan, top
with BBQ sauce and bake as directed.
HAM SALAD
Yield: 4 servings
11⁄2 cups ham
1 stalk celery
4 green onions
2 hard-boiled eggs
1 sweet pickle
⁄3 cup salad dressing
1
Stir all ingredients together except salad dressing, and grind. Stir in salad dressing.
LEAN PORK SAUSAGE
Yield: 6 patties
1 lb pork loin cube steak - tenderized
OR sirloin pork chops
1
⁄2 tsp crushed red pepper
⁄4 tsp ground sage
⁄2 tsp salt
1
1
Stir all ingredients together and grind. Shape into patties and fry on medium-low
heat until done.
PIZZA BURGERS
Yield: 4 patties
1 lb cubed beef steak - tenderized
OR chuck tender steak
2 tsp dry pizza seasoning mix
⁄2 tsp salt
1
Stir all ingredients together and grind. Shape into patties and fry on medium
heat until done.
4
LEAN ITALIAN SAUSAGE
Yield: 6 patties
1 lb pork loin cube steak - tenderized
OR sirloin pork chops
2 tsp Italian sweet sausage
seasoning
Stir all ingredients together and grind. Shape into patties and fry on medium-low
heat until done.
GAME BURGERS
Yield: 8 servings
1
1 ⁄2 lb game (venison, rabbit or
2 eggs
squirrel)
salt and pepper
1
⁄2 lb pork fat trimmings
dash of cayenne
1 cup bread crumbs
1 tsp ground sage
1
⁄2 cup milk
dash of Tabasco® or chili sauce
1
⁄2 cup onion
Stir all ingredients together and grind. Shape into patties and fry in oil until
done.
5
SERVICE INFORMATION
Please refer to warranty statement to determine if in-warranty service applies. This
appliance must be serviced by a Toastmaster authorized service center.
Unauthorized service will void warranty. Consult your phone directory under
“Appliances-Household-Small-Service and Repair,” or call 1-800-947-3744 in the
U.S. and Canada, 52-5-397-2848 in Mexico.
If an authorized service center is not available locally, your appliance may be
returned postage prepaid to our National Service Center at the address shown on
the back of this book.
Products must be adequately protected to avoid shipping damage. Surround your
appliance with three inches of protective padding and include a copy of your dated
sales receipt and a note explaining the problem you have experienced. We recommend insuring your package. No CODs accepted.
ONE YEAR LIMITED WARRANTY
Toastmaster Inc. warrants this product, to original purchaser, for one year from purchase date to be free of defects in material and
workmanship.
This warranty is the only written or express warranty given by Toastmaster Inc.This warranty gives you specific legal rights. You may
have other rights which vary from state to state. ANY OTHER RIGHT WHICH YOU MAY HAVE, INCLUDING ANY IMPLIED WARRANTY OF MERCHANTABILITY OR FITNESS FOR A PARTICULAR PURPOSE IS LIMITED IN DURATION TO THE DURATION OF
THIS WARRANTY.
Defective product may be brought or sent (freight prepaid) to an authorized service center listed in the phone book, or to Service
Department, Toastmaster Inc., 708 South Missouri St., Macon, MO 63552, for free repair or replacement at our option.
Your remedy does not include: cost of inconvenience, damage due to product failure, transportation damages, misuse, abuse, accident
or the like, or commercial use. IN NO EVENT SHALL TOASTMASTER INC. BE LIABLE FOR INCIDENTAL OR CONSEQUENTIAL
DAMAGES.
Some states do not allow limitations on how long an implied warranty lasts, or allow the exclusion or limitation of incidental or
consequential damages, so the above limitations or exclusions may not apply to you.
For information, write Consumer Claims Manager, at the Macon address. Send name, address, zip, telephone area code and
daytime number, model, serial number, and purchase date.
KEEP DATED SALES RECEIPT FOR WARRANTY SERVICE.
Keep this booklet. Record the following for reference:
Date purchased
Model number
Date code (stamped on bottom)
Horario:8:00 a.m.hasta 4:30 p.m., hora del
National Service Center
Centro
708 South Missouri St.
Toastmaster de México, SA de CV
Macon, MO 63552
Cerrada de Recursos
In USA and Canada call:
Hidráulicos Numero 6
Consumer Service 1-800-947-3744
La Loma Industrial
Consumer Parts 1-800-947-3745
Tlalnepantla de Baz, C.P. 54060
Hours:8:00 a.m.- 4:30 p.m.CST
Estado de México
Aux É.-U. et au Canada, veuillez appeler
Service consommateur :1-800-947-3744
Piéces détachées consommateur :1-800-947-3745
Heures ouvrables :8 h - 16 h 30 Heure Centrale
En México - 52-5-397-2848
PART NO. 32841P01
FOR SPANISH SECTION ONLY
ESPECIFICACIONES TECNICAS
Potencia Nominal (Watts)
Tension de Alimentacíon o Tensíon Nominal (Volts)
Frencuencia de Operacion o Frecuencia Nominal (Hertz)
510 W
127 V ~
60 Hz