1
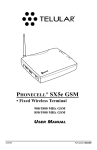
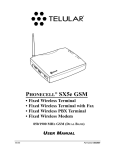
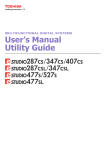
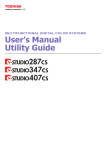
Wi PATHTM SX7T Terminal and SX7M Modem
User Guide
CDMA/EVDO
12/19/07
Part Number 56038602
Contents
Table of Contents
Introduction . . . . . . . . . . . . . . . . . . . . . . . . . . . . . . . . . . . . . . . . . . . . . . . . . . . . . . . .1
Getting Started With the Wi PATH SX7 . . . . . . . . . . . . . . . . . . . . . . . . . . . . . . . . . . .1
Your Wi PATH SX7 Components . . . . . . . . . . . . . . . . . . . . . . . . . . . . . . . . . . . . . . . . . . . . . .1
Set Up Your SX7 . . . . . . . . . . . . . . . . . . . . . . . . . . . . . . . . . . . . . . . . . . . . . . . . . . . . . . . . . .2
SX7Connections:An Overview . . . . . . . . . . . . . . . . . . . . . . . . . . . . . . . . . . . . . . . . . . . . . . .2
Connect the SX7 to Your Computer . . . . . . . . . . . . . . . . . . . . . . . . . . . . . . . . . . . . . . . . . . .5
Power Up the SX7 . . . . . . . . . . . . . . . . . . . . . . . . . . . . . . . . . . . . . . . . . . . . . . . . . . . . . . . . .6
Using the Telular Device Manager . . . . . . . . . . . . . . . . . . . . . . . . . . . . . . . . . . . . . .7
Activating Your Wireless Services on the SX7 . . . . . . . . . . . . . . . . . . . . . . . . . . . . .9
Setting Up Your Wireless WAN Data Connection . . . . . . . . . . . . . . . . . . . . . . . . . .10
Status LEDs . . . . . . . . . . . . . . . . . . . . . . . . . . . . . . . . . . . . . . . . . . . . . . . . . . . . . . .12
Using the USB Connection Option . . . . . . . . . . . . . . . . . . . . . . . . . . . . . . . . . . . . .13
Install the USB Drivers . . . . . . . . . . . . . . . . . . . . . . . . . . . . . . . . . . . . . . . . . . . . . . . . . . . .13
Connect the SX7 to Your Computer With a USB Cable . . . . . . . . . . . . . . . . . . . . . . . . . . .14
Set Up a Dial-Up Networking (DUN) Connection . . . . . . . . . . . . . . . . . . . . . . . . . . . . . . . .14
Using the Voice and Fax Options (SX7T Only) . . . . . . . . . . . . . . . . . . . . . . . . . . .17
Using the Voice Calling Features on Your SX7T . . . . . . . . . . . . . . . . . . . . . . . . . . . . . . . . .17
Using the Fax Function on Your SX7T . . . . . . . . . . . . . . . . . . . . . . . . . . . . . . . . . . . . . . . .18
Voice/Fax Programming . . . . . . . . . . . . . . . . . . . . . . . . . . . . . . . . . . . . . . . . . . . . . . . . . . .20
Advanced Data Connection Options . . . . . . . . . . . . . . . . . . . . . . . . . . . . . . . . . . .23
Setup Options . . . . . . . . . . . . . . . . . . . . . . . . . . . . . . . . . . . . . . . . . . . . . . . . . . . . . . . . . . .23
Activation Options . . . . . . . . . . . . . . . . . . . . . . . . . . . . . . . . . . . . . . . . . . . . . . . . . . . . . . . .27
Network Options . . . . . . . . . . . . . . . . . . . . . . . . . . . . . . . . . . . . . . . . . . . . . . . . . . . . . . . . .28
Administration Options . . . . . . . . . . . . . . . . . . . . . . . . . . . . . . . . . . . . . . . . . . . . . . . . . . . .32
Status Options . . . . . . . . . . . . . . . . . . . . . . . . . . . . . . . . . . . . . . . . . . . . . . . . . . . . . . . . . .34
PSTN Options . . . . . . . . . . . . . . . . . . . . . . . . . . . . . . . . . . . . . . . . . . . . . . . . . . . . . . . . . . .37
Advanced Settings . . . . . . . . . . . . . . . . . . . . . . . . . . . . . . . . . . . . . . . . . . . . . . . . . .39
Configuring TCP/IP Settings . . . . . . . . . . . . . . . . . . . . . . . . . . . . . . . . . . . . . . . . . . . . . . . .39
Glossary . . . . . . . . . . . . . . . . . . . . . . . . . . . . . . . . . . . . . . . . . . . . . . . . . . . . . . . . . .40
Wi PATHTM SX7
User Guide
Getting Started
Introduction
Thank you for choosing the Wi PATHTM SX7 as your wireless data connection solution.
The SX7T Voice/Fax/Data Terminal and the SX7M Modem each provide high-speed wireless
WAN connectivity, taking advantage of your current CDMA wireless services to deliver the best
performance available, including EVDO high-speed data service. The SX7 adapts to changing
locations and service availability and always uses the best possible data connections available
through your wireless service provider.
In addition to providing a reliable data connection, the SX7T EVDO terminal version offers
voice and fax options that you can use without terminating your connected wireless data
services (network dependent).
Getting Started With the Wi PATHTM SX7
Your Wi PATH SX7 Components
Here’s what’s included with your Wi PATHTM SX7 purchase:
Wi PATHTM SX7
2 TNC Antennas
Power Supply Adapter
Power Line Cord
Rechargeable
Battery Pack
Ethernet Cable (RJ-45)
(not pictured)
USB Cable (A to B)
(not pictured)
RJ-11 Phone Cable
(not pictured)
Wi PATHTM SX7
Rechargeable
Battery Pack
TNC Antennas
Quick Start Guide
(not pictured)
CD (contains User Guide and support materials)
(not pictured)
Power Line Cord
Power Supply Adapter
Make sure you have everything listed before continuing. If any items are missing or damaged,
please contact your authorized distributor for assistance.
Activation – You will also need to have an activated voice or data services account with
your wireless service provider. When you set up your wireless account, your service
IMPORTANT provider will provide you with the information necessary to set up and begin using the SX7
on your account. (See “Activating Your Wireless Services on the SX7” on page 8.) For
more account information, please contact your wireless service provider.
Wi PATHTM SX7
1
User Guide
Getting Started
SX7 Connections: An Overview
WiPATH SX7
Rear Panel View and Connectors
Antenna
Ethernet
USB
(Type A)
USB
(Type B)
Phone
Antenna
(SX7T only)
Power Switch
Phone/Fax
Power Input
(SX7T only)
(inactive / future use)
Set Up Your SX7
1. Install the Rechargeable Battery Pack into the battery compartment.
Remove the battery compartment door.
Insert the battery connector into the battery terminal.
Tip
The battery connector will have the rounded corner side on the left when inserted into the
battery terminal.
Arrange the battery pack in the battery compartment, so the battery connector wire is in
the top right of the compartment and the label is facing up.
Replace the battery compartment door.
Wi PATHTM SX7
2
User Guide
Getting Started
Battery
Compartment
(open)
Battery Terminal
Battery
Connector
Rechargeable
Battery Pack
E911 (Enhanced 911) Information – Your unit is equipped with a GPS (Global Positioning
System) antenna for utilizing E911 emergency location services where available. When
you place an emergency 911 call from your device (SX7T only), the GPS feature will
calculate and transmit your approximate location.
IMPORTANT When you set up your unit for the first time, it is recommended that you position your SX7
near a window to receive the necessary GPS data with less interference.
Always report your location to the 911 operator when placing an emergency call.
Some designated emergency call takers, known as Public Safety Answering Points
(PSAPs) may not be equipped to receive GPS location information from your SX7T.
2. Connect and hand-tighten the TNC Antennas. Once they are installed, orient the antennas
so they point upward (vertical orientation). This is the typical desktop application.
Note
As marked on the back of the unit, the Antenna 1 terminal primarily handles voice and data
services. The Antenna 2 terminal provides radio diversity for optimized data speeds, as well as
GPS functionality for E911 and potential future location-based applications. Either TNC Antenna
may be used in either terminal.
Wi PATHTM SX7
3
User Guide
Getting Started
TNC Antennas
Power
Input
Power Supply Adapter
Power Line Cord
(to power outlet)
3. Connect the Power Supply Adapter to the unit’s Power Input and connect the Power
Line Cord to the Power Supply Adapter. Then, connect the Power Supply Adapter plug
into a power outlet.
4. (Optional) For optimal performance and protection, you may elect to connect a copper wire
(not included) to the protective earth Ground Connector Screw to ground the device.
In a building environment, connecting to an earth ground (such as a cold water pipe)
can protect the device and peripherals from static and conducted electricity. It can also
reduce static or buzzing during voice calls (SX7T only).
In a vehicle environment, grounding to the frame and battery or alternator can reduce
static or buzzing during voice calls (SX7T only).
Ground Connector Screw
SX7 Bottom View
Wi PATHTM SX7
4
User Guide
Getting Started
5. Connect the Ethernet (RJ-45) cable to the Ethernet Port on the SX7. (This cable will
serve as the connection to your computer in most configurations, including the primary
Wireless WAN data connection.)
Ethernet Port
Note
It is recommended that you use the Ethernet connection for your primary Wireless WAN data
connection; however, you may also use Dial-Up Networking (DUN) using the supplied USB cable
(see “Using the USB Connection Option” on page 12). Before connecting with a USB, install
the SX7 USB drivers included on the CD that was packaged with your device (see “Install the
USB Drivers” on page 12).
7. Depending on your usage needs, connect RJ-11 phone cables to the Phone (J1) and
Phone/Fax (J2) ports (SX7T only).
Phone/Fax (J2)
Note
Phone (J1)
The Phone (J1) and Phone/Fax (J2) RJ-11 ports are only available on the SX7T terminal model.
See “Using the Voice and Fax Options (SX7T Only)” on page 16 for information about setting
up your RJ-11 Phone and Phone/Fax jacks.
Connect the SX7 to Your Computer
Before you connect your computer, ensure you do not have an existing landline data
connection and that you have either Internet Explorer or FireFox Web browser installed on
your computer.
Connect the Ethernet (RJ-45) cable from the SX7 to an available Ethernet port on your
computer.
Note
It is recommended that you use the Ethernet connection for your primary Wireless WAN data
connection; however, you may also use Dial-Up Networking (DUN) using the supplied USB cable.
Wi PATHTM SX7
5
User Guide
Using the Telular Device Manager
Power Up the SX7
1. With the Ethernet cable connected to both
your computer and the SX7, ensure that your
SX7 is off, and power up your computer.
2. Slide the Power Switch from right to left to
power up your SX7.
3. Wait a few minutes for the SX7 to initialize.
Once the signal strength LEDs are illuminated,
you are ready to proceed.
Power Switch
Signal Strength LEDs
Note
If your computer is configured with a preset IP address, you may need to adjust your network
settings to automatically retrieve an IP adddress from the SX7. See “Configuring TCP/IP
Settings” on page 38.
Wi PATHTM SX7
6
User Guide
Using the Telular Device Manager
Using the Telular Device Manager
The Telular Device Manager will allow you to configure all your connections, view your status,
and manage all your connection options in one place.
1. Connect to the Telular Device Manager.
Launch your Web browser (Internet Explorer or FireFox).
Note
When you launch the browser, you may get a “Cannot display web page” or similar error.
This is normal.
Go to the browser’s address bar, type http://192.168.1.1, and press Enter or click the
green Go arrow. A “Connect to” dialogue will be displayed.
Enter the default User name (“telular”) and Password (“1234”) and click OK.
The Telular Device Manager will start and display the Home screen.
It is recommended that you bookmark the Telular Device Manager access page
(http://192.168.1.1) so you can easily reconnect your data service, access your status,
and customize additional features such as Firewall and Port Forwarding.
Tip
When adding or changing settings in the Telular Device Manager, click Save whenever you
change a setting, and then move on to the next item you want to change. When you have finished
making all your changes, click Save again and then click Restart. The SX7 will power down and
restart, and all your new settings will be in effect.
Wi PATHTM SX7
7
User Guide
Data Connection: The Basics
2. On the Home screen (see below), you will see the unit’s Model number, the Time, and
your Wireless WAN connection status.
3. Click an item in the column on the left (1) to display a Main Menu subject screen
(such as Setup, below). From a main menu screen, click a Sub Menu item in the
tabs at the top (2) to display the corresponding settings menu.
4. After selecting or adjusting your desired settings and clicking Save (1), you will need to
click Restart (2). The unit will power cycle and your new settings will be in effect.
1
Wi PATHTM SX7
2
8
User Guide
Data Connection: The Basics
Activating Your Wireless Services on the SX7
Before you can set up a data connection, you will need to enter your account activation
information in the Telular Device Manager.
Note
If you purchased your SX7 through your wireless service provider, it may already be provisioned
with your account information. If it has been provisioned, please skip ahead to “Setting Up Your
Wireless WAN Data Connection” on page 9.
1. Connect to the Telular Device Manager. (See “Using the Telular Device Manager”
on page 6.)
2. From the Home screen (or from any other screen), click Activation (1).
3. Wait 5–10 minutes to see if your unit will auto-register itself on the wireless network.
If the Activation Status field displays ACTIVE (2), your SX7 is ready for use. Proceed to
“Setting Up Your Wireless WAN Data Connections” on page 9.
1
2
4
4a
4b
4c
6
5
3
4. If your SX7 is not active, click Carrier Provisioning – IOTA (3) to initiate “over-the-air”
provisioning by your wireless service provider. Monitor your progress by checking the
Activation Status display (2).
5. If your service provider does not offer IOTA provisioning, manually enter your
MSL/SPC Code (4a), your MDN (10-digit wireless phone number) (4b), and your
MIN/MSID (usually also your 10-digit wireless phone number) (4c). Contact your
wireless service provider for your account settings.
6. Click Save (5). If you have no additional changes, click Restart (6) to complete
Activation. The SX7 will power down and restart.
Wi PATHTM SX7
9
User Guide
Data Connection: The Basics
Setting Up Your Wireless WAN Data Connection
Once the computer and the SX7 are connected and powered up, you will need to set up your
Wireless WAN data connection. The Wireless WAN connection is the primary data service
connection for your SX7.
1. Connect to the Telular Device Manager. (See “Using the Telular Device Manager” on
page 6.)
2. From the Home screen, click Setup (1) > Wireless WAN (2).
2
1
3a
3b
4
5
6
3. If required by your wireless service provider, enter your Username (3a) and
Password (3b).
4. For PSD Auto Connect, click Always On (3).
Tip
If you do not have an unlimited data plan with your wireless service provider, you may want to
select On Demand instead of Always On. On Demand connects to the network automatically
anytime you are using data services, but disconnects whenever no data is being transferred.
5. Click Save (5) and then click Restart (6) to save your settings and restart the SX7.
Tip
If you have additional settings to enter, you can continue entering settings and clicking Save.
When you have finished making all your changes, click Restart.
Note
If you are connecting through a USB Dial-Up Networking (DUN) connection (see “Using the
USB Connection Option” on page 12), your dial-up connection will be terminated and the
dial-up window will appear when you restart the SX7. Re-enter your information (if it is not
automatically populated) and click Connect.
Wi PATHTM SX7
10
User Guide
Status Indicators
6. To confirm your data connection, click Status (1). The Status > Router page will
auto-refresh every few seconds. Your WAN address from your wireless service provider
will be displayed next to WAN IP Address (3).
Note
Tip
If the Current WAN Connection Status (2) indicates Not Connected or Unknown Connection
Problem, go back through the previous steps to verify your information. If you are still
experiencing connection problems, please contact Telular Tech Support at 1-800-229-2326 or
your wireless service provider’s customer service center if you purchased your SX7 through your
carrier.
Only the Status page auto-refreshes when viewing the Telular Device Manager. From any other
page, right-click your mouse and select Refresh or Reload to refresh the current page.
7. Close the browser window, reopen it, and go to a website (such as www.telular.com) to
verify Internet connectivity.
Tip
Note
Any time you want to verify your connection status, go to the Telular Device Manager
(http://192.168.1.1) and sign on.Your status will appear on both the Home screen (next to
“Wireless WAN”) and the Status page.
For additional data connection options, settings, and features, see “Advanced Data Connection
Options” on page 22.
Wi PATHTM SX7
11
User Guide
USB Connection Option
Status LEDs
In addition to checking your status through the Telular Device Manager on your computer, you
can also use the LED indicators on the unit for a quick check of valuable connection and
coverage information.
WiPATH SX7T LED Indicators
Signal Signal Signal
Strength Strength Strength
1
2
3
Power
Messaging
Phone/Fax/Data
Service/SIM
The following table explains how the LED colors and blink rates indicate your device’s coverage
and connection status.
LED Reference Table
Power
Off
Messaging
Phone /
Fax
No Messages
On Hook /
No WAN
Solid
AC / Batt
Normal
Voicemail
Slow
Batt Only
SMS
Fast
Both
Service
On-Hook / WAN Service / 2G
Service / 2.5 G
On-Hook /
WAN Tx
Service / 3G
Solid
AC / Battt
Charging
Off-Hook / WAN
Roam / 2G
Slow
Low Batt
Off-Hook /
No WAN
Roam / 2.5G
Off-Hook /
WAN Tx
Roam / 3G
No Service
Fast
Solid
Batt fault
Off-Hook / WAN
Slow
Batt crit
Off-Hook /
No WAN
Fast
Wi PATHTM SX7
Signal
Strength 1
Signal
Strength 2
Signal
Strength 3
1 Bar
2 Bars
3 Bars
1 Bar
1 Bar
2 Bars
Off-Hook /
WAN Tx
12
User Guide
USB Connection Option
Using the USB Connection Option
The preferred method for establishing a data connection with the SX7 is through the Ethernet
Port (see “Connect the SX7 to Your Computer” on page 4). However, you may also use the
supplied USB cable instead of the Ethernet connection.
The USB connection uses Dial-Up Networking (DUN) to achieve Wireless WAN connectivity to
the network. Before setting up a USB connection, you must install the SX7 USB Modem drivers
from the CD that was packaged with your SX7.
Install the USB Drivers
1. Insert the CD into your computer’s CD drive.
2. Click Install USB Modem (or explore the CD contents and double-click
SX7 Driver Installer.exe). (The installer will launch.)
3. Click Next. (The drivers will be installed.)
4. Click Finish.
Wi PATHTM SX7
13
User Guide
USB Connection Option
Connect the SX7 to Your Computer With a USB Cable
1. With your computer and the SX7 powered on, connect the terminal end of the USB cable
to the USB Type B Port on the SX7.
USB
(Type B)
Note
The USB host (Type A) port on the SX7 is not currently active. It is reserved for future use
2. Connect the other end of the USB cable to an available powered USB Type A port on
your computer.
3. A Found New Hardware Wizard will open. Select “Install the software automatically
(Recommended)” and click Next.
If a Windows Logo testing warning appears, click Continue Anyway.
4. Click Finish to complete the installation.
Set Up a Dial-Up Networking (DUN) Connection
1. With the drivers and USB modem installed and connected, click Start > Control Panel >
Network Connections.
2. Click File > New Connections.... (The New Connection Wizard will start.)
3. Select the following settings and click Next after each selection:
Connect to the Internet.
Set up my connection manually.
Connect using a dial-up modem.
Set up my connection manually.
Wi PATHTM SX7
14
User Guide
USB Connection Option
On the Select a Device screen, select Modem - SX7 USB Modem and deselect any
other hardware listed.
On the Connection Name screen, enter a name for the connection (such as
SX7 USB Modem).
On the Phone Number to Dial screen, enter *telular* (with asterisks).
Leave the User name and Password blank, click Next, and then click Finish.
Wi PATHTM SX7
15
User Guide
Voice and Fax Options (SX7T Only)
4. The Connect dialog will open. Click Properties > Options. Uncheck Prompt for phone
number and Prompt for name and password, certificate, etc.. Set Time between
redial attempts to 10 seconds and click OK.
5. Your computer will dial the new connection.
6. Follow the instructions found in “Using the Telular Device Manager” on page 6 and
“Setting Up Your Wireless WAN Data Connection” on page 9 to launch the Telular
Device Manager and complete your USB data connection.
Wi PATHTM SX7
16
User Guide
Voice and Fax Options (SX7T Only)
Using the Voice and Fax Options (SX7T Only)
The Wi PATH SX7T Voice/Fax/Data terminal lets you use your wireless service provider for
voice calling and faxing (similar to standard PSTN telephone operation) in addition to using the
Wireless WAN data features.
Note
Before proceeding, please confirm with your wireless service provider that your account has
been provisioned for voice services.
Using the Voice Calling Features on Your SX7T
1. To use the SX7T’s voice calling feature, plug an RJ-11 phone cable into the Phone (J1) or
Phone/Fax (J2) input on the back panel.
Phone/Fax (J2)
Phone (J1)
2. Connect the other end of the phone cable into your phone’s RJ-11 input jack.
3. Lift the phone handset off the receiver (or press the TALK or ON button on a cordless
phone) and listen for a dial tone.
4. If you hear a dial tone, make a call to confirm your service is active.
Your voice service and calling options should be the same as those on your wireless phone.
For additional programming and setup options, please see “Voice/Fax Programming” on
page 19.
Note
Your SX7T should be configured to accept voice signals on both the phone and the phone/fax
inputs by default. For questions about your voice service, please contact your wireless service
provider.
Tip
If you experience a buzzing in your phone’s earpiece, try moving your phone farther away from
the SX7T, and make sure the RJ-11 phone cable is routed away from the antennas.
Wi PATHTM SX7
17
User Guide
Voice and Fax Options (SX7T Only)
Using the Fax Function on Your SX7T
Note
Before proceeding, please confirm with your wireless service provider that your account has
been provisioned for CSD (Circuit Switched Data) and WFAX and that your service provider
supports these technologies. The CSD feature in the SX7T is dependent on the technology
deployed in your service providers network and only functions when CSD is enabled as part of
your cellular service plan.
1. To use your SX7T’s fax feature, you will first need to set up your device to support fax
data. The Telular Device Manager allows you to configure the necessary settings.
From your Web browser, launch the Telular Device Manager. (See “Using the Telular
Device Manager” on page 6.)
From the home page, click PSTN (1).
Click Basic (2) to display the Basic programming page.
2
1
For MT Call Type (3) select FAX Next Call or FAX Always.
3
Wi PATHTM SX7
18
User Guide
Voice and Fax Options (SX7T Only)
For RJ-11 Jack Mode (4) select the appropriate combination of J1 Voice, J2 Voice or
J2 FAX, J2 Data.
Click Save (5), and then click Restart (6) to save your settings and restart the SX7T.
2. Plug an RJ-11 cable into the Phone/Fax input on the back panel.
Phone/Fax
3. Connect the other end of the RJ-11 cable into your fax machine’s RJ-11 input jack.
4. If the fax machine has a handset, lift it off the receiver and listen for a dial tone.
(Depending on your fax machine, you may also press TALK, ON, Hook, or Speaker.)
5. If you hear a dial tone, send a test fax to confirm your service is active.
The SX7T is only compatible with Group 3 (G3) fax machines transmitting at 2,400 to
14,400 bps/baud.
Note
Please confirm your SX7T and fax machine settings before calling your service provider or
Telular Tech Support.
Wi PATHTM SX7
19
User Guide
Voice and Fax Options (SX7T Only)
Voice/Fax Programming
The Telular Device Manager allows you to program all the voice and fax options for service on
your SX7T.
1. From your Web browser, launch the Telular Device Manager. (See “Using the Telular
Device Manager” on page 6.)
2. From the home page, click PSTN (1).
3. Click Basic, Call Control, and POTS Setup (2) to display the programming pages (see
“PSTN Options” on page 36 for examples of each page).
2
1
3
4
4. Select your desired settings (see table below), click Save (3), and then click Restart (4) to
save the settings to your SX7T.
PSTN Settings
Basic
Select a setting for the phone jack:
Voice Always to use the jack for voice calls only (default
setting).
FAX Next Call to set the jack to send or receive a fax
MT Call Type with the next call (reverts to previous setting after call).
FAX Always to use the jack for fax calls only.
Data Next Call to set the jack to send or receive Circuit
Switched Data (CSD) with the next call (reverts to
previous setting after call).
Data Always to set the jack for CSD data calls only.
Allows the unit to be used with TTY (TeleTypewriter)
devices for the deaf or hard of hearing. Modes include
TTY Mode
TTY VCO (voice carry over), TTY HCO (hearing carry
over), and TTY Only.
Wi PATHTM SX7
20
User Guide
Voice and Fax Options (SX7T Only)
Basic (cont.)
Select a configuration for the Phone jack (J1) and the
Fax jack (J2):
J1 Voice, J2 Voice to set both jacks for voice calls only
(default setting).
RJ-11 Jack Mode J1 Voice, J2 FAX to set the phone jack for voice calls
and the fax jack to send and receive fax data.
J1 Voice, J2 Data to set the phone jack for voice calls
and the fax jack for CSD data calls.
One Minute Alert Beep
Voice Privacy Tone
Select Enabled to hear a beep once every minute during
a voice call.
Select Enabled to hear an alert tone if Voice Privacy
encryption is not available during a voice call.
Call Control
Dialtone after Remote Disconnect
Select Enabled to hear a dial tone if a call is terminated
from the other end.
Auto Send Delay
Delay between when you finish dialing and the call is
sent; select from 0 to 10 seconds (3 seconds is default).
Select Enabled to have the SX7T remember numbers
Zero Delay Dialing (EOD) you have dialed at least twice and send calls to those
numbers with no delay when you finish dialing.
Glare Control
Select Enabled to enable automatic handling of “callcollision” (2 calls coming in at the same time).
Length of time a dialtone will remain active when the
Dialtone Duration receiver is off-hook (10–90 seconds) (40 seconds is
default).
Length of time the Receiver Off Hook (ROH) tone
ROH Duration will sound after the dialtone duration is complete
(10–90 seconds) (40 seconds is default).
Continuous ROH
Exit E911 Mode
Wi PATHTM SX7
Select Enabled to allow for continuous ROH tone until
the unit is returned to the on-hook state.
Click Exit E911 Mode button to return the unit to normal
state after an emergency 911 call.
21
User Guide
Advanced Data Connection Options
POTS Setup
Select a dialtone frequency based on region:
Normal Dialtone 350Hz +440Hz – North American standard (default).
425Hz – European standard.
POTS Coarse Volume
Adjusts phone volume in large increments (Low,
Normal, or High).
Audible ring pitch for an incoming call: 20Hz (low),
25Hz (medium), 50Hz (high) (20Hz is default).
Line Impedance Select setting to match phone (600 ohms is default).
Carrier tone sent to inform the unit a call has been
Disconnect Pulse Duration
disconnected (700 ms is default).
Line Ring Frequency
Select a Caller ID signal format based on region:
Caller ID Mode Bellcore (North America), Euro (Europe), UK (United
Kingdom), or select DTMF to use a tone-based signal.
Provides Caller ID options, depending on carrier and
regional capabilities. MDMF (Multiple Data Message
Format) allows multiple data types to be sent with Caller
Caller ID Format
ID, such as name, phone number, location, etc.; SDMF
(Single Data Message Format) allows only a single data
type to be sent (phone number).
Sets the Caller ID type for the SX7T:
During Ring (default)
Caller ID Type DT-AS (Dual Tone Alerting System)
RP-AS (Ring Pulse Alerting System)
LR, RP-AS (Line Reverse, Ring Pulse Alerting System)
Standard ring cadences by region (US, UK, Europe)
(Off is default).
DTMF Blanking [advanced]
Metering Pulse Gain [advanced]
Line Ring Format
Note
Tip
Your SX7T also allows Circuit Switched Data (2G) access across the CDMA network via the
RJ-11 connections on the unit. CSD connections can be useful for machine-to-machine
communications, for example, when using hyper terminal to send a file from one PC to another.
Your CSD options are accessed via the PSTN programming pages, along with your voice and
fax options.
You can also program certain voice and fax options for your device using POTS (Plain Old
Telephone Set) commands on your phone.
Wi PATHTM SX7
22
User Guide
Advanced Data Connection Options
Advanced Data Connection Options
The following pages outline all the advanced programming options and settings available
through the Telular Device Manager interface. For information about accessing and using the
Telular Device Manager, please see “Using the Telular Device Manager” on page 6.
Note
The default settings of the SX7 accommodate most common configurations. Many of the
advanced settings should be implemented or supervised by qualified IT specialists.
Setup Options
Setup > LAN
As an alternative to the preferred Wireless WAN data connection, the SX7 offers LAN (Local
Area Network) connectivity via the Ethernet port or via a USB connection (using Dial-Up
Networking).
LAN Features
MAC Address: The unit’s MAC address (also the serial number). This cannot be changed.
IP Address: The address the unit uses to identify itself to the computer. (192.168.1.1 is the
default.)
Subnet Mask: Identifies the subnet class on the network; class 3 (255.255.255.0) or
class 4 (255.255.255.255).
Wi PATHTM SX7
23
User Guide
Advanced Data Connection Options
DHCP Settings
DHCP Server (Ethernet only): Dynamic Host Configuration Protocol. Select Enable to
allow the unit to receive IP address, subnet mask, default gateway, and other settings
dynamically through a server.
Number of DHCP Users: Maximum number of connections allowed. (Default is 50.)
Client Lease Time: Amount of time new DHCP settings remain in effect.
(Default of 0 minutes signifies 1 day [24 hours].)
Static DNS 1–3: Allows you to enter known fixed DNS (Domain Name System) addresses.
WINS: Allows you to enter a known fixed WINS (Windows Internet Name Service) address.
Currently Assigned: Click DHCP Clients Table to display currently connected
DHCP client information.
Timezone: Shows currently assigned time zone (assigned by the network). Can be
changed by user.
Time Server: Use to select time server for the unit. (Default is Wireless Network Time [NITZ].)
Setup > Wireless WAN
The settings for Wireless WAN setup are covered in “Setting Up Your Wireless WAN Data
Connection” on page 9.
Wi PATHTM SX7
24
User Guide
Advanced Data Connection Options
Setup > Keep Alive
Keep Alive lets you prevent the wireless network from closing your data connection during
extended periods of inactivity by having the unit ping a DNS address at set intervals.
Keep Alive: Select Enable to enable this feature. Select Disable to allow your connection
to terminate when the DHCP lease expires (usually 24 hours).
Ping Address: Select DNS1 to use the assigned address. To enter an alternate address,
select User Defined and then enter a ping IP address in the User Defined Ping IP
Address field that will appear.
Ping Interval: Select an interval for pinging. (Default is 120 seconds.)
Wi PATHTM SX7
25
User Guide
Advanced Data Connection Options
Setup > DDNS
DDNS (Dynamic Domain Name Server) settings allow the SX7 to be accessed via the Internet
even when dynamic IP addresses are being assigned. DDNS allows a static domain name to
be used in place of the unit’s IP address.
DDNS Service: Select a DDNS server option (such as Telular) or select Off to disable.
User Name: Enter the user name.
Password: Enter the password.
Host Name: This is the name of the server you are connecting to.
DDNS Status: This indicates the number of active DDNS connections.
Wi PATHTM SX7
26
User Guide
Advanced Data Connection Options
Activation Options
The Activation settings may be preconfigured by your wireless provider.
ESN: This is your unit’s Electronic Serial Number. It is generated internally and cannot be
changed.
Activation Status: This reflects your wireless account activation status. Active indicates
that the network recognizes your account and it is ready for use. If Inactive appears, please
contact your wireless service provider for assistance.
Enter MSL/SPC Code: If required by your provider, enter the appropriate 6-digit Master
Subsidy Lock (MSL) or Service Programming Code (SPC).
Enter MDN: This is your Mobile Digital Number (your 10-digit phone number). Enter it in the
space provided if necessary.
MDN Status: Indicates whether your MDN has been successfully initialized. If
unsuccessful, please contact your wireless service provider for assistance.
Enter MIN/MSID: Your Mobile Identification Number (MIN) or Mobile Subscriber
Identifcation (MSID) are numbers associated with your account. If required, enter the
provided number.
MIN/MSID Status: Indicates whether your MIN or MSID has been successfully initialized.
If unsuccessful, please contact your wireless service provider for assistance.
SID: This is your unit’s System ID. It should be prepopulated.
NID: This is your unit’s Network ID. It is based on the default location for your device.
Carrier Provisioning – IOTA: If your wireless service provider offers “over-the-air”
programming (IOTA), click this button to automatically retrieve your activation information.
Wi PATHTM SX7
27
User Guide
Advanced Data Connection Options
Network Options
Network > Routing
1
Routing settings allow you to control the unit’s network routing configuration. There are
two primary options available, by selecting a Working Mode (1): Gateway (NAT on) and
Router (NAT off).
Gateway (NAT on): Select this option (above) only if you need to use a Network Access
Translator (NAT) to alter IP packets as they pass through a router or firewall. The following
options are available under this configuration:
● Static Routing: Select a Route Entry number (1–20).
● Destination IP: Enter a destination IP address for the selected Route Entry number.
● Subnet Mask: Enter a subnet mask for the selected Route Entry number.
● Default Gateway: Enter the IP address of the default gateway or router.
Repeat for as many Static Routing numbers you wish to set up. To see your currently
configured routes, click Show Routing Table.
Wi PATHTM SX7
28
User Guide
Advanced Data Connection Options
Router (NAT off): (Default setting) In addition to the options available under Gateway
mode, Router mode offers the following options:
● Dynamic Routing (RIP): Select Enable to use Dynamic RIP (Routing Information
Protocol) to adjust to changing network environments. (Default is Disable.)
●
●
RIP Transmit: Select Enable to allow the SX7 to communicate its RIP. (Default is
Disable.)
RIP Version: Select v1 or v2 (default).
Wi PATHTM SX7
29
User Guide
Advanced Data Connection Options
Network > Firewall/Filters
The Firewall/Filters settings allow you to customize the following access settings for the SX7
on your network.
Firewall (SPI): Select Enable to use the SPI (Stateful Packet Inspection) firewall to monitor
network connections and reject any that do not match its criteria.
LAN Port Filter Range: Select an option (see below) and a range (from 0 to 65535) of
ports through which to allow connections.
● Disable: Do not apply a LAN port filter range.
● Both: Use both TCP and UDP port numbers for filtering.
● TCP: Use only TCP (Transmission Control Protocol) port numbers for filtering.
● UDP: Use only UDP (User Datagram Protocol) port numbers for filtering.
LAN IP Filter: Select Enable and either Only Allow IP Addresses on the List or Only
Deny IP Addresses on the List to allow or deny connections with specific IP addresses.
Click Edit IP Filter List to enter the IP addresses to allow or deny (up to 50).
LAN MAC Filter: Select Enable and either Only Allow MAC Addresses on the List or Only
Deny MAC Addresses on the List to allow or deny connections with specific MAC
addresses. Click Edit MAC Filter List to enter the MAC addresses to allow or deny (up to 50).
IPSec Pass Through: Select Enable to allow connections to pass through IP Security.
PPTP Pass Through: Select Enable to allow connections to pass through Point-to-Point
Tunneling Protocol.
Wi PATHTM SX7
30
User Guide
Advanced Data Connection Options
Network > Port Forwarding
This screen allows you to enter an Application Name, Port Extension range, select TCP or
UDP protocols (or both), and complete an IP Address for up to 10 forwarded ports.
Network > DMZ
This screen allows you to enable and define a DMZ (Demilitarized Zone or Perimeter Network)
host to act as a buffer between an internal network and any external networks (usually the
Internet). Select Enable and enter a DMZ Host IP Address to use this feature.
Wi PATHTM SX7
31
User Guide
Advanced Data Connection Options
Administration Options
Admin > Management
The Administration > Management screen allows you to change the following settings.
Device Manager User Name: For security purposes, you may want to change your user
name for the Telular Device Manager from the default (telular). Enter a user name in this
field.
Device Manager Password: For security purposes, you may want to change the SX7
password from the default (1234). Enter a new password and then re-enter it in the
Confirm Password field.
Remote Web Managment: Select Enable to allow remote access to the SX7 from another
computer via the Internet, using the specified Port Number.
Wi PATHTM SX7
32
User Guide
Advanced Data Connection Options
Admin > Factory Defaults
Click Restore Defaults to reset all the device settings to the factory default settings. Any
settings you have customized through the Telular Device Manager will be reset.
Admin > Firmware Upgrade
If you have received a firmware upgrade for the SX7, click Browse to locate the upgrade file on
your computer, select the file, and then click Proceed with Upgrade to update your unit.
Wi PATHTM SX7
33
User Guide
Advanced Data Connection Options
Status Options
The screens available under the Status menu provide information about your unit. The fields in
the Status screens cannot be edited directly, but they may be changed as a result of other
settings you select using the Telular Device Manager.
Status > Router
The Status > Router page displays most of the unit’s important information.
Firmware Version: Displays the firmware version and release date for your SX7. This
information is useful if you ever need to contact your wireless service provider’s customer
care department or Telular Tech Support.
Current Time/Date: Displays the current time and date as provided by your wireless
service provider’s network.
Router Uptime: Displays how long the unit has been powered on and connected. Router
uptime is reset any time the unit restarts, such as when you have made changes to settings
in the Telular Device Manager and click Restart.
LAN MAC Address: Displays the unit’s Media Access Control (MAC) address.
LAN IP Address and LAN Subnet Mask: Shows the LAN settings as defined on the
Setup > LAN page. See “Setup > LAN” on page 22.
DHCP Server: Shows whether the DHCP server option (see “DHCP Settings” on
page 23) is enabled or disabled.
Current WAN Connection Status: Displays your current connection status: Connected,
Disconnected, or Unknown Connection Problem.
Wi PATHTM SX7
34
User Guide
Advanced Data Connection Options
Radio Service Type: This displays your current data service type (such as EVDO DATA for
full EVDO service or 1X DATA for 1xRTT CDMA data service).
RSSI: This is the signal strength, which is recorded in negative numbers. The farther away
from zero, the better the signal strength (for example, -90 dBm represents a fairly weak
signal strength; -20dBm represents good signal strength).
Roam Status: This indicated whether your unit is “roaming” off your service provider’s
network area on another network where your service provider has implemented roaming
agreements.
Phone Number (MSISDN or MDN): This is the phone number assigned to the unit by your
wireless service provider.
ESN: This is your unit’s Electronic Serial Number.
WAN IP Address: This is the WAN IP address assigned to the unit by your wireless service
provider. It may change depending on your service provider’s network.
WAN DNS 1 and WAN DNS 2: These are the Domain Name Server addresses assigned by
your wireless service provider.
The LAN Ethernet Status, LAN USB Status, and Wireless WAN Status pages provide
usage statistics for each of the connection types.
Status > LAN Ethernet Status
Wi PATHTM SX7
35
User Guide
Advanced Data Connection Options
Status > LAN USB
Status > Wireless WAN Status
Wi PATHTM SX7
36
User Guide
Advanced Data Connection Options
PSTN Options
See “Voice/Fax Programming” on page 19 for available PSTN (Public Switched Telephone
Network) options. Below are examples of each of the PSTN programming pages.
PSTN > Basic
PSTN > Call Control
Wi PATHTM SX7
37
User Guide
Advanced Settings
PSTN > POTS Setup
Wi PATHTM SX7
38
User Guide
Glossary, References
Advanced Settings
This section explains some of the advanced configuration settings that may be required in
some instances to make the SX7 operational on your computer.
Configuring TCP/IP Settings
If your computer is set up with a preset IP address (as may be the case with certain DSL and
cable subscribers), you will need to configure your TCP/IP settings to automatically retrieve an
IP address from the SX7.
Windows XP
1. In the Windows taskbar, click Start > Control Panel.
2. Classic View: Double-click Network Connections.
Category View: Click Network and Internet Connections > Network Connections.
3. Double-click the network interface card icon (usually labeled Local Area Connection)
and then click Properties.
4. Highlight Internet Protocol (TCP/IP), make sure the box next to it is selected, and then
click Properties.
5. Select Obtain an IP address automatically and Obtain DNS server address
automatically, click OK, and then click OK again to save your settings.
Wi PATHTM SX7
39
User Guide
Glossary, References
Glossary
CDMA - Code Division Multiple Access. Digital cellular phone technology.
DDNS - Dynamic Domain Naming System
DHCP - Dynamic Host Configuration Protocol
Dial Tone - The tone heard when a phone receiver is off-hook.
DMZ - Demilitarized Zone. A perimeter network area (subnetwork) that acts as a buffer
between an internal network and an external network such as the Internet.
DTMF - Dual-Tone Multi-Frequency. The standard keytones used by telephones in tone dialing.
DUN - Dial-Up Networking.
EVDO - Evolution Data Optimized. Broadband (3G) data transmission technology utilizing
CDMA networks.
LAN - Local Area Network.
MDMF - Multiple Data Message Format. A caller ID format in which several elements of
information can be included in the caller ID, such as a name, a phone number, and a location.
MO - Mobile Originated call
MT - Mobile Terminated call
NAT - Network Access Translator
PDP - Packet Data Protocol
POTS - Plain Old Telephone Set
PPTP - Point to Point Transfer Protocol
PSD - Programmable Sharing Device.
PSTN - Public Switched Telephone Network
RSSI - Received Signal Strength Indicator. This indicates your signal strength.
SDMF - Single Data Message Format
Static DNS - Static Domain Naming System
TCP - Transmission Control Protocol
UDP - User Datagram Protocol
USB A Host - Universal Serial Bus type A host connector. (The “USB-in” connector on a
Wi PATHTM SX7
40
User Guide
Glossary, References
computer.)
USB B Device - Universal Serial Bus type B device connector. (The “USB-out” connector on
the SX7.)
WINS - Windows Internet Name Service.
Wi PATH - Wireless Premise Access Transport Hub.
Wireless WAN - Wireless Wide Area Network. This provides data and Internet access over a
GSM cellular network.
Wi PATHTM SX7
41
User Guide