1
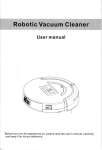
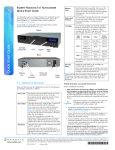
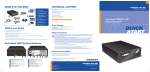
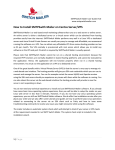
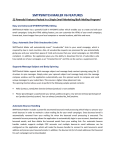
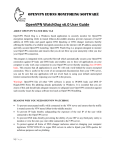
StorageLoader 2U LTO
Quick Start Guide
Accessories — These accessories are included with your library
Power cord
LVD SCSI 68-pin HD
to HD cable and LVD
terminator*
Ethernet cable
Shipping
lock
Rack-mount kit
(fasteners and instructions included)
Bar code labels**
Multi-language packet
and Warranty
* LVD SCSI configuration only. Important: Both LTO-2 and LTO-3 tape drives require Ultra 160 rated SCSI cabling, and an Ultra 3 or LVD 160 Active
SCSI terminator. The StorageLoader 2U LTO ships from the factory with these accessories.
** To prepare your own labels, refer to the Tandberg Data Bar Code Label Specification for LTO Cartridges available at: www.tandbergdata.com.
Additional Items — You must have -or- obtain some or all the following items to complete the installation
Host computer with
adapter card installed
You need a host computer with a host bus adapter card installed. Refer to the
documentation that came with the computer and LVD SCSI or Fibre Channel (FC) adapter
card. The StorageLoader 2U LTO is configured for LVD SCSI or Fibre Channel.
Important: Both LTO-2 and LTO-3 tape drives are Ultra 160 SCSI devices and require a
minimum Ultra 160 non-RAID SCSI host bus adapter card (LVD SCSI configuration only).
Hybrid cable
If your SCSI controller has a 68-pin VHDCI connector, you will need to obtain a VHDCI-to-HD SCSI cable.
HD Connector
VHDCI Connector
Tools
You will need a #1 Phillips screwdriver.
Fibre Channel cable
If you have a Fibre Channel adapter card installed, you need to obtain a FC cable.
Power cord (for use
outside Europe)
If you plan to use the library outside Europe, you must supply your own power
cord (see the Product Manual at www.tandbergdata.com for information about an
International 220 VAC power cord).
Backup software
You need a backup software application to manage your backup operations. Refer to
the documentation that came with the backup software and make sure it supports the
library. See www.tandbergdata.com for compatibility information.
Data and Cleaning
cartridges (available
from Tandberg Data or your supplier)
Tape
Ultrium 3
(slate blue)
Ultrium 2
(purple)
Ultrium 1
(black)
LTO Ultrium
Drive
Read
Write
Read
Write
Read
Write
Cleaning Cartridge
LTO-3
Yes
Yes
Yes
Yes
Yes
No
Yes
LTO-2
No
No
Yes
Yes
Yes
Yes
Yes
WARNING! The library weighs 44 lbs (20 kg). Two people are needed to move or lift the library. Most of the weight is toward the back of the library.
WARNUNG! Die Library wiegt 20 kg. Es sind mindestens 2 Personen erforderlich, um die Library zu bewegen oder zu heben. Der hintere Teil der
Library hat das Größte Gewicht.
¡PRECAUCIÓN! La biblioteca montada sobre bastidor pesa 20 kg. Se necesitan dos personas para mover o levantar la biblioteca. La parte trasera
de la biblioteca es la de mayor peso.
Page 1 of 8
StorageLoader 2U LTO Quick Start Guide
Step 1 — Before you begin
1 — Ensure that you have all the required items before you proceed (see Accessories and Additional Items on page 1).
2 — Locate an appropriate area for the unit that has adequate clearance for ventilation, minimal dust and debris, and an appropriate power source. The unit is designed for installation in a standard 4 post, 19-inch rack.
3 — Ensure that the work area is free from conditions that could cause electrostatic discharge (ESD). Discharge static electricity from your body by touching a known grounded surface, such as a computer’s metal chassis.
4 — The unit must be operated in the horizontal position. Do not place it on its side, and do not place objects on top of it.
Step 2 — Unpacking
1 — Remove foam and accessories:
LVD SCSI cable and terminator*
Barcode labels and warranty
Ethernet cable
Power cables
Rack mount kit
2 — Lift unit only by the 2 sides
•LVD SCSI configuration only
Important: Save all original packing materials in
case you need to ship or move the library later.
Step 2a — Rack-mounting (optional)
If you plan to install the library in a rack, see the Rack-mount Instructions (complete prior to Step 3).
WARNING! Before performing any installation or maintenance procedures, be sure that the library power switch is in the off position and that the
power cord is disconnected from the library and the outlet.
WARNUNG! Vor der Ausführung von Installations- oder Wartungsarbeiten ist darauf zu achten, daß der Library-Netzschalter auf “Aus” gestellt ist
und daß das Anschlußkabel vom Library und der Steckdose entfernt ist.
¡PRECAUCIÓN! Antes de realizar cualquier procedimiento de instalación o de mantenimiento, comprobar que el interruptor de alimentación de la
biblioteca está apagado y que el cable de alimentación no está enchufado ni a la biblioteca ni a la toma de corriente.
Step 3 — Connecting the cables
Fibre Channel connections:
SCSI connections (LVD only):
1 — Connect SCSI cable S and Terminator* T
2 — Connect Power cord
E
1 — Connect Fibre Channel cable
FC
2 — Connect Power cord
E
P
P
T
S
P
Power switch (Off=0 On=I )
FC
E
Ethernet port (see Product Manual for addressing; the default setting is DHCP enabled)
Important: Both LTO-2 and LTO-3 tape drives require Ultra 160 rated SCSI cabling, and an Ultra 3 or LVD 160 Active SCSI terminator to function
properly on the SCSI bus. An inadequate terminator will result in various SCSI bus issues, including bus hangs and Read/Write failures. See the
“Troubleshooting” chapter of the Product Manual for additional information.
Page 2 of 8
StorageLoader 2U LTO Quick Start Guide
Step 4 — Powering on and Removing the Shipping Lock
1 — Power on the library by pressing the power switch on the back of the unit (press the I).
When you apply power with the shipping lock installed, the library displays a message and ejects both left magazines.
2 — Pull the left magazine straight out of the library.
3 — Power the library off (press the 0).
4 — Remove the screw securing the shipping lock.
Shipping Lock
Page 3 of 8
StorageLoader 2U LTO Quick Start Guide
Step 4 continued — Powering on and Removing the Shipping Lock
Important: Some views show the library with the
top cover removed for clarity —DO NOT remove
the top cover or you will void your warranty!
TOP VIEWS FOR REFERENCE ONLY
5 — Rotate the robot by pushing the lock handle
toward the back of the library. This moves the locking “tab” out from under the rail.
a. Gently push the lock handle to the right approximately 1 inch (2.5cm).
Important: If you do not remove (rotate and lift) the shipping lock as described in steps b and c, you can catch and damage cables inside the library
and render it useless.
b. Rotate the back of the lock up toward the top of the library 2 inches (5cm), and then lift the front of the lock up 2 inches (5cm).
c. Slowly pull the shipping lock out of the opening.
6 — Slide the left magazine straight back into the library.
7 — Power the library on (press the I).
8 — Power the host computer on.
Reinsert the screw in the shipping lock and store
them with these instructions in case you need to
move or ship the library later.
Page 4 of 8
StorageLoader 2U LTO Quick Start Guide
Step 5 — Adding bar code labels and loading cartridges
1 — Apply bar code labels to cartridges.
2 — Press the eject button to unlock the magazine (magazine releases and moves a short distance out of the library). This may take a few minutes.
3 — Pull the magazine straight out of the library (no side-to-side or up/down motion).
4 — Load cartridges in slots as shown.
Note: The last two slots in each magazine
are blocked.
5 — Slide the loaded magazine back into the library. The library performs an inventory after the magazine is installed.
Note: Refer to the Product Manual for important information about the cleaning slot location and the I/E port.
CARTRIDGE
BAR CODE LABEL
ENTRY/EXIT PORT
EJECT
BAR CODE LABEL
Step 6 — Verifying the hardware installation
1 — Download and install LibTool and LTOTool onto
your Host (select the version for your operating
system). Available at www.tandbergdata.com.
2 — Use LibTool to:
• Detect the library • View the library’s cartridge inventory
• Move tapes into and out of the tape drive
3 — Use LTOTool to: a. Detect the tape drive
b. Perform a Read/Write test
Note: The readme files that accompany LibTool and LTOTool provide instructions.
Preparing for and Performing a Backup
Congratulations! You have successfully installed your new library! We recommend that you follow these steps:
1 — Read Exabyte’s Basic Backup Guide, which is available at: www.tandbergdata.com.
2 — Select and install a backup application. Software compatibility information is available at: www.tandbergdata.com.
3 — Perform a backup. For questions regarding software installation, configuration, or operation (including how to perform a backup) — contact your software provider.
Note: 1) Driver installation may not be necessary and depends on the backup application that you use in your system. Refer to the installation instructions for your backup application for verification.
2) You can configure the library for a customized operation to fit your particular needs. See the Product Manual at www.tandbergdata.com.
Page 5 of 8
StorageLoader 2U LTO Quick Start Guide
Home Screen Menu and Buttons
Home I/E Port
Screen Release
Left Magazine
Eject
I/E Port
Home Screen Buttons
Function
Exterior Buttons
Function
OK
Accept the change
I/E Port
Unlock I/E Port
Select
Accept the choice
Back
Return to previous screen
Magazine
Unlock magazine
Right Magazine
Eject
Home Screen
Menu
Move
(Move Cartridges)
Load Drive(s)
Unload Drive(s)
Maint
Lib
(Library Properties)
Library ID
[Library type, serial number,
code level, and SCSI ID
(and LUN) or WWNN]
Library Maintenance
Library Status
Library History
Import Cartridges
Export Cartridges
Move Cartridges
Drive
(Maintenance/
Diagnostics)
Inventory
(Tape Drive
Properties)
Drive ID
(Drive type, code level,
and serial number)
Interface
Library Diagnostics
View Slots
View Drives
View I/E Ports
Re-Inventory
Drive SCSI ID
-orFibre Channel
Digital Self Test
Motions Test
Run System Demo
Library Statistics
Password
Drive
Configuration
View Slots
View Drives
Select Language1
Library Settings
Park For Shipping
Library SCSI
Bridge
Drive Maintenance
Operation Mode
Drive Diagnostics
Mode2
Emulation
Sequential Mode3
Drive Self Test
Cleaning Options
Ethernet
Clean Drive
Fixed Cleaning Slot
Auto Cleaning
Cleaning Tape
DHCP4
IP Address
Subnet Mask
Gateway
MAC Address
Display Settings
Display Brightness
Display Contrast
Reverse Video
System Reset
USB Options
Storage Settings
I/E Port
Slot Count
Label Media Type
Restore Defaults
Mag 224 Main Menu.vsd
Page 6 of 8
New Library Code
New Drive Code
Save Configuration
Get Configuration
Save Library Logs
1)
2)
3)
4)
Default = English
Default = Native Mode
Default = Random Mode
Default = DHCP Enabled
StorageLoader 2U LTO Quick Start Guide
Troubleshooting Tips
If the library did not power
on as described
If the library displays an
error on the front panel
• Is the power cord inserted correctly and is the power switch on (press the I on the back of the unit)?
• Did you remove the shipping key?
Refer to the Product Manual for a list of error messages and corrective actions.
If the Diagnostic tools
(LIBTool and LTOTool) are
not communicating with the
library
• Host adapter card installation—Make sure that you installed your host adapter card
correctly, that the card is securely seated, and that the appropriate drivers for the
adapter are installed. Refer to the documentation that came with your controller for
installation instructions.
• SCSI ID*—If additional SCSI devices are attached to the same SCSI bus as the library,
you may need to change the SCSI IDs of the tape drive(s) in the library.**
• Termination*—Make sure the SCSI bus is properly terminated (see step 3).**
Make sure the terminator is securely connected.
• SCSI connections*—Make sure that all SCSI cables are securely connected.
• Fibre Channel connections—Make sure that the GBICs and cables used to connect
the tape drives in the library to the Fibre Channel loop are compatible. Make sure that
the FC cables are firmly connected to the tape drives and the FC hub or switch.
• SCSI controller type*—Make sure that the SCSI controller is an LVD controller.
DO NOT connect the tape drive(s) in the library to a single-ended controller, a RAID
controller, or an HVD controller.
• LVD SCSI devices*—The tape drives in the library are LVD (low-voltage differential)
device(s), and all other devices on the SCSI bus must also be LVD (controller card,
terminator, and all other devices on the bus).
If your backup software is
not communicating with the
library
• Bus configuration and cables—Refer to the installation instructions (and tips above).
Improper bus configuration or bad cables often cause these issues:
- Devices not being seen in the operating system
- Losing communication with a tape drive during backup
- Event ID 9 or 11 errors in Windows operating systems
- Unexpected bus resets
- Intermittent or unexpected “I/O” errors
- Parity errors
• Software compatibility—Make sure that your library and tape drive are compatible with
the backup software you plan to use. Check www.tandbergdata.com.
• Control mode—Use Random mode (the default) with an application that controls the
library. Use sequential mode only if your backup application will not control the library.**
• Tape Drive Configuration—Make sure that the Drive Configuration (Drive/Drive
Configuration) matches the tape drive(s) installed.**
• Driver installation—Some applications provide their own drivers, some do not,
and some require installation of the Tandberg Data provided drivers. Refer to the
documentation for your backup application and Tandberg Data Knowledge base item
#2003 (www.tandbergdata.com) for more information.
If your library displays a
Clean Tape Drive message
on the front panel
Use one of the following options to clean the tape drive:
• Instruct your backup software to issue a Clean the Tape Drive command. Refer to the software documentation and the library Product Manual for instructions.
• Use the library’s Autoclean option.**
• Manually install a cleaning cartridge when the tape drive requires cleaning.**
* All references to SCSI are for the SCSI library only.
** Refer to the Library’s Product Manual for instructions or additional information.
Page 7 of 8
StorageLoader 2U LTO Quick Start Guide
Additional Information
Contact Tandberg Data for general information, sales, service and support at:
www.tandbergdata.com
Always check the website for the most up to date information.
IMPORTANT! Before moving or shipping the library, you must first “Park the Robot” and replace the shipping key or you will void your warranty.
• From the library’s front panel, press the Maint / Library Maintenance / Park the Robot buttons.
• After you receive the confirmation message (Park for Shipping Good), insert the shipping key by following the instructions in Step 4 in reverse order. See the Product Manual for additional information.
REGISTER YOUR LIBRARY AT:
www.tandbergdata.com
Copyright 2007 Tandberg Data, Exabyte, the Exabyte logo, EZ17, M2, VXA, and VXAtape are registered trademarks; ExaBotics, MammothTape, and SmartClean are trademarks; SupportSuite is a service mark. Linear Tape-Open, LTO, the LTO Logo, Ultrium and the Ultrium Logo
are trademarks of HP, IBM, and Quantum in the US and other countries. All other product names are trademarks or registered trademarks of
their respective owners.
P/N 1016989 A
#1016989A#
April 2007
Page 8 of 8