1
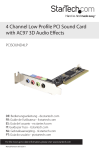
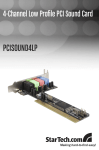
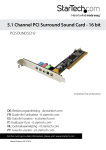
5.1 Channel PCI Sound Card
PCISOUND5CH
Instruction Manual
FCC Compliance Statement
This equipment has been tested and found to comply with the limits for a Class B digital
device, pursuant to part 15 of the FCC Rules. These limits are designed to provide
reasonable protection against harmful interference in a residential installation. This
equipment generates, uses and can radiate radio frequency energy and, if not installed
and used in accordance with the instructions, may cause harmful interference to radio
communications. However, there is no guarantee that interference will not occur in a
particular installation. If this equipment does cause harmful interference to radio or
television reception, which can be determined by turning the equipment off and on, the
user is encouraged to try to correct the interference by one or more of the following
measures:
• Reorient or relocate the receiving antenna.
• Increase the separation between the equipment and receiver.
• Connect the equipment into an outlet on a circuit different from that to which the
receiver is connected.
• Consult the dealer or an experienced radio/TV technician for help.
Use of Trademarks, Registered Trademarks, and
other Protected Names and Symbols
This manual may make reference to trademarks, registered trademarks, and other
protected names and/or symbols of third-party companies not related in any way to
StarTech.com. Where they occur these references are for illustrative purposes only and
do not represent an endorsement of a product or service by StarTech.com, or an
endorsement of the product(s) to which this manual applies by the third-party company in
question. Regardless of any direct acknowledgement elsewhere in the body of this
document, StarTech.com hereby acknowledges that all trademarks, registered
trademarks, service marks, and other protected names and/or symbols contained in this
manual and related documents are the property of their respective holders.
Instruction Manual
Table of Contents
Introduction . . . . . . . . . . . . . . . . . . . . . . . . . . . . . . . . . . . . . . . . . . . . . . . . . . . . .1
Features . . . . . . . . . . . . . . . . . . . . . . . . . . . . . . . . . . . . . . . . . . . . . . . . . . . . .1
Before You Begin . . . . . . . . . . . . . . . . . . . . . . . . . . . . . . . . . . . . . . . . . . . . . . . . .1
System Requirements . . . . . . . . . . . . . . . . . . . . . . . . . . . . . . . . . . . . . . . . . . .1
Contents . . . . . . . . . . . . . . . . . . . . . . . . . . . . . . . . . . . . . . . . . . . . . . . . . . . . .1
Installation . . . . . . . . . . . . . . . . . . . . . . . . . . . . . . . . . . . . . . . . . . . . . . . . . . . . . .2
Installing the Sound Card on the Motherboard . . . . . . . . . . . . . . . . . . . . . . . .2
Installing the Sound Card drivers . . . . . . . . . . . . . . . . . . . . . . . . . . . . . . . . . .3
Installing the Audio Rack software . . . . . . . . . . . . . . . . . . . . . . . . . . . . . . . . .4
Troubleshooting . . . . . . . . . . . . . . . . . . . . . . . . . . . . . . . . . . . . . . . . . . . . . . ..5
Using the Sound Card . . . . . . . . . . . . . . . . . . . . . . . . . . . . . . . . . . . . . . . . . . . .4
Overview . . . . . . . . . . . . . . . . . . . . . . . . . . . . . . . . . . . . . . . . . . . . . . . . . . . . .4
Speaker configuration . . . . . . . . . . . . . . . . . . . . . . . . . . . . . . . . . . . . . . . . . . .4
Specifications . . . . . . . . . . . . . . . . . . . . . . . . . . . . . . . . . . . . . . . . . . . . . . . . . . .5
General Specifications . . . . . . . . . . . . . . . . . . . . . . . . . . . . . . . . . . . . . . . . . . .5
Ports/Connections . . . . . . . . . . . . . . . . . . . . . . . . . . . . . . . . . . . . . . . . . . . . . .5
Jumper settings . . . . . . . . . . . . . . . . . . . . . . . . . . . . . . . . . . . . . . . . . . . . . . . .5
Troubleshooting . . . . . . . . . . . . . . . . . . . . . . . . . . . . . . . . . . . . . . . . . . . . . . . . .5
Accessory Products from StarTech.com . . . . . . . . . . . . . . . . . . . . . . . . . . . . .6
Technical Support . . . . . . . . . . . . . . . . . . . . . . . . . . . . . . . . . . . . . . . . . . . . . . . .6
Warranty Information . . . . . . . . . . . . . . . . . . . . . . . . . . . . . . . . . . . . . . . . . . . . .6
i
Instruction Manual
Introduction
Thank you for purchasing a StarTech.com Sound Card. This product allows you to add
sound capabilities (5.1 channel) to your computer system as well as the ability to use a
microphone/other auxiliary device.
Features
•
Compliant to PCI Version 2.1 Bus Master and Advanced Power Management (PPMI)
specification
•
Maintains clear audio and video signals for excellent performance
•
Legacy Audio SBPro compatible
•
True Full-Duplex playback/capture with different sampling rate up to 48KHz stereo
•
Supports Full-Duplex operation for simultaneous recording and playback
•
Supports EAX, Karaoke Key and Echoing
•
Supports 5.1 speakers, C3DX positional audio in 6CH speaker mode
Before You Begin
System Requirements
• An available PCI slot
• Necessary cabling to connect speakers to card port
• Speakers
Contents
This package should contain:
• Sound Card (1)
• Driver CD (1)
• Instruction manual (1)
1
Instruction Manual
Installation
Connecting the PCI Multi Channel Sound Card to your computer motherboard:
1. Shut down all power connected to the computer, as well as all devices connected to
the computer peripherally (i.e. Printers, Monitors, Scanners etc.). As an added step to
ensure safe installation, unplug the power supply from the computer.
2. Remove the computer cover. For more detailed instruction on how to perform this
step, please refer to the documentation that was included with your computer at the
time of purchase.
3. Locate an empty PCI slot, removing the metal bracket covering the accompanying
empty port/socket.
4. Position the sound card above the open PCI slot, ensuring that the card is aligned with
the entire slot. Insert the card firmly into the slot, distributing force evenly across the
length of the board. Once inserted, secure the card into the adjoining socket
(previously covered by metal bracket), using the correct size screw (please consult
documentation that accompanied purchase of computer).
5. Note: To utilize the Audio-Out signal from a pre-existing CD-ROM drive, attach
the audio cable (supplied with CD-ROM drive purchase) to the appropriate CDROM pins (normally designated as ‘digital out’), as well as to the corresponding
Sound Card pins (marked as CD-ROM IN)
6. Replace the computer cover.
7. Connect your speakers to the appropriate speaker jacks on the sound card.
8. If unplugged, plug computer and all peripherals back in to power source. Turn your
computer on.
Installing the PCI Multi Channel Sound Card drivers:
For Windows XP/2000/ME Users:
1. After restarting your computer, a message should appear indicating that Windows XP
has detected a hardware change. Click the Next button to continue with the
installation.
2. Put the CD entitled Drivers and Utility - Installation into your CD-ROM drive.
3. Select Specify the location of the driver (Advanced), followed by the Next button.
4. Select Specify a location and click the Browse button to designate the location of the
necessary files. Once the Browse for Folder window appears, select the drive
designated for your CDRom drive. Open the CMEDIA folder, followed by
\CMEDIA\CMI8738-6CH
2
Instruction Manual
5. Open the WIN2K-ME folder, followed by the DRV folder.
6. Click OK. Once Windows has located the driver, click the Next button. Following this,
the installation is automated. Follow the Windows prompts to finish installation.
For Windows 98/95 Users:
1. Upon starting the computer, the Windows 98/95 Plug-and-Play feature will
automatically detect the newly-installed sound card. Insert the Drivers and Utility Installation CD into the CDROM drive and click on the Next button.
2. When the Add New Hardware wizard loads, allow it to search for the driver. When
available, choose the Search for the best driver for your device (Recommended)
option and click the Next button.
3. The wizard will prompt for the location of the sound card driver. Choose Specify a
location, and click the Browse button to continue.
4. Once the Browse for Folder window appears, select the drive designated as your CDROM drive. Open the CMEDIA folder, followed by :\CMEDIA\CMI8738-6CH
5. Open the WIN95-98 folder, followed by the DRV folder.
6. Click OK. Once the Add New Hardware Wizard locates the driver, click the Next
button. Following this, the installation is automated. Follow the Windows prompts to
finish installation.
For Windows NT 4.0 Users:
1. Start Windows NT and open the Control Panel.
2. Double-click on the Multimedia icon. From here, click on the Devices tab.
3. In the Devices window, click on the Add button.
4. Select Unlisted or Update Driver, followed by the OK button.
5. Insert the Drivers and Utility - Installation CD into your CDROM drive.
6. Click on the Browse button in the Install Driver window, then select the drive
designated as your CD-ROM drive.
7. Once the contents of the CD are displayed, double-click open the CMEDIA folder.
From here, select the driver that corresponds with this Sound Card:
\CMEDIA\CMI8738-6CH
8. Open the NT40 folder, followed by the DRV folder. Click “OK”
9. Once you have selected the correct driver, click the OK button. Following this, the
installation is automated. Follow the Windows prompts to finish installation.
3
Instruction Manual
Additional Software:
To Install Audio Rack:
1. Locate the directory that corresponds with this Sound Card:
CMEDIA/CMI8738-6CH/(W95/W98/W2k/ME/NT40)/APP/
2. Double-click on SETUP.EXE. Installation will then be automated, follow all the prompts
to complete the installation.
Using the Sound Card
Overview
1
2
3
4
The PCISOUND5CH has 6 ports. 3 input
(to be used with microphones, musical
equipment, stereo equipment), and 3 output
ports for your speakers. All are 3.5mm
audio jacks, with the exception of the midi/game
port.
To configure speakers:
1. LINE IN: Connect auxiliary devices, (such as
CD Players, Cassette Decks, Stereo
Receivers etc.)
2. MIC IN: Connect a microphone
5
3. F-OUT: Connect the speakers you wish to use
for your front-channel sound
4. R-OUT: Connect the speakers you wish to use
for your rear-channel sound
6
5. CEN/SUB: Connect the center channel/subwoofer.
6. GAME/MIDI: Connect a MIDI device, such as a
MIDI keyboard or synthesizer.
Alternatively, use a Serial joystick
or other gaming device requiring a
game port.
4
Instruction Manual
Specifications
General Specifications
Bus Type
Chipset
Certification
OS Compatibility
Jumper Settings
PCI
CMI8738/PCI 6CH-LX
FCC, CE
Windows 95/98/NT/2000/XP
Ports/Connections
Input
Line In
MIC In
Game/MIDI
Output
Front Out
Rear Out
Centre/Subwoofer
Port
External 3.5mm (Blue)
External 3.5mm (Pink)
External 15-pin Midi/Game
Jumper
J3 & J4
J15
J6
J11
J7
J22
J23
J16
J19
Function
CD-ROM Audio-in
Center/Woofer
AUX-In
CDROM Digital-In
PC Speaker
Digital Module connector
Modem Module connector
Internal MIC
Internal Front Speaker
External 3.5mm (Green)
External 3.5mm (Orange)
External 3.5mm (Black)
Troubleshooting
If you’re having difficulty using the Sound Card, try the following solutions based on the
nature of the problem.
No Sound:
1. Ensure the speakers are connected to the proper Sound Card port (shaded green).
2. Ensure the speakers are turned on and functioning properly.
3. Check to see that the volume control is set properly in Windows. This can be accessed
by locating the speaker icon near your system clock (typically in the bottom, right
corner of your screen). Make sure the “mute” box is not checked.
Poor sound quality:
1. Ensure the speakers are connected tightly.
2. Examine the speaker cord for any frays/damage.
5
Instruction Manual
Accessory Products from StarTech.com
Contact your local StarTech.com dealer or visit www.startech.com for cables or other
accessories that will help you get the best performance out of your new product.
MU6MF
6 ft. Stereo Extension Cable 3.5mm Male to 3.5mm Female
MU12MF
12 ft. PC Speaker Extension Cable
JXT100
6 ft. Joystick Extension Cable
CDAUDIO2
30-inch MPC2 CD-ROM Audio Cable
CDAUDIO3
24-inch MPC3 2-pin Internal Digital Audio Cable
6
Technical Support
StarTech.com’s lifetime technical support is an integral part of our commitment to provide
industry-leading solutions. If you ever need help with your product, visit
www.startech.com/support and access our comprehensive selection of online tools,
documentation, and downloads.
Warranty Information
This product is backed by a one-year warranty. In addition, StarTech.com warrants its
products against defects in materials and workmanship for the periods noted, following
the initial date of purchase. During this period, the products may be returned for repair, or
replacement with equivalent products at our discretion. The warranty covers parts and
labor costs only. StarTech.com does not warrant its products from defects or damages
arising from misuse, abuse, alteration, or normal wear and tear.
Limitation of Liability
In no event shall the liability of StarTech.com Ltd. and StarTech.com USA LLP (or their
officers, directors, employees or agents) for any damages (whether direct or indirect,
special, punitive, incidental, consequential, or otherwise), loss of profits, loss of business,
or any pecuniary loss, arising out of or related to the use of the product exceed the
actual price paid for the product.
Some states do not allow the exclusion or limitation of incidental or consequential
damages. If such laws apply, the limitations or exclusions contained in this statement
may not apply to you.
About StarTech.com
StarTech.com is “The Professionals’ Source for Hard-to-Find Computer
Parts”. Since 1985, we have been providing IT professionals with the
quality products they need to complete their solutions. We offer an
unmatched selection of computer parts, cables, server management
solutions and A/V products and serve a worldwide market through our
locations in the United States, Canada, the United Kingdom and Taiwan.
Visit www.startech.com for complete information about all our products
and to access exclusive interactive tools such as the Parts Finder and the
KVM Reference Guide. StarTech.com makes it easy to complete almost
any IT solution. Find out for yourself why our products lead the industry in
performance, support, and value.
Revision Date:July 15 2008 rev:b