1
USERS MANUAL
NX-2480
QBF
80825591
RAINBOW
COLOUR
I
Federal Communications Commission
Radio Frequency Interference Statement
12f)\’
\u!+ion
has ht’t’n
k-std
and
found
to compl>
with [hc linlits I“ma cla5s B digital
of”FCC [3u1?s.These limits are cfcsignmi to wmkfc rwsonahl? protmtion
against
harm(”ill
interf’c,
rcn(u, in a lresidmtial
ill..’ tallation.
This rquifmlmt
gmmltes.
Llscs ami
can
r.adi.
if not inst.allcciand used in accordance wittl (hc irl.stn]rtiml.s may
:I(C radio
I“requcnc,},
rIIe:-~.
and,
rausc tlarnllill irlterf?rcnm to radio cmmmunirations.
However.
lhrm
is nc guaranter
{hat
interkencr
will
not omllr
in a partirldar installatiorl. If this ?quiprnent dot’s <:lLIsc harmful in(erfcrrncc (0 radio or
trlcwisiml. n,hicb (an be cletmmined by turning off and on, thr u!+rr is FImouragmi to Iry to corrwt the
intmfrrcmw hy one or mcmf of the follcwringmeasurvs.
“l-he
cfmicc,
.
.
.
.
c,quipnwnt
pursuant
[<emimt
or
[o Part
rckwatr
15
the rccriving
antenna
Incrcasc the srpamtion bclweru Ibc cquipmrnt and rcw,iwr.
Connrrt ill? equifxncnl intn an cn)tlc! ml a rireuit clil’fmt=ntl“ronlthat to wbich the.rrmiwr is con
ne(lmf
C’cmsl]lt the cfcakr or an t’xpericn<wi radio/TV (cchr!iriim for help.
Urlatlthorized moclili(aticms o{ this prmtuc( by (he user will wid his authority to opt’ra{r [bc t,quipnwnt
Link’ss cxprt>ssly approwd by the party r?sponsibk klr IYmlplianw
For cmnplia,lrc wi[h tb? t’?dmal Noise>Intt’rfcrcmce Standard. tbis equipmrn[ r(,c]uires a sbit,klrd rahle.
The 220!: XY’rsicmrcp]ipmrnl has bw’n lcstml and t’oumi (o comply witb the Iimi[s f“ora Class A digikd
dmi(c,. pumuant to Pari 15 of lb,, FCC’ RUICS.These limits arc dt’signed to prmid? rrasonabk pmter
lion against Imrmfu] intrrf’r,-cmm’
W)lC,II
lbr
cquipmer)t is opcra[cci ill a rommcrcial rrh.imnm(m(. Ttlis
equip mc.n[ grnm.at?s. USCS,amt ran radiate radio hcqwrlc.v encr~ aml. ii’rmt inslallrd and usml in
acwmlarlrr with lht, mstru(.tion !II:Inual. may cause harml’,)t irllerfcrcnw 1(] radio (~O1l]n,
[,, l],.:ltiorl.~,
Operation of this rc~uipmcnt in a resicfcntm] ar?a is Iikcl} to rausc’ bmll)f’(11inlctfcrcrwr iII whi(.tl C:IW
the,user will he rccluirrd to roImcrt tbc intrrrmtmc? at bis OWI ?xpensc.
For rompliancr with thr Federal ?Joisr Int?rferenc? Standarct. this cc]uipmt’nt rrqllirt>s a shiekfcd cahlr.
The choLY, Slalerm>nl
applies
OIII!I [o pri, tters mcukelwi
in the
U.S.A
Statement of The Canadian Department of Communications Radio Interference
1,<,p,-~sent apparril num[.ri(p]c r]”t+nctpas cl<>hmits r->)ciioFl?(tiqllc.s<l~passanl Ics Iir?,itc-sapplicahles
au.x app, areilsnumwiqu’?s cfc la classe B prcsrrites dams k. R@mlltmt sllr k hrouilkig<, radioelcrtriquc.
edirtc paI. 1{,Minist?rr d<%C.olllrll~llli(,tllic)llsdu Canada.
The abmw statenwnl applies OFII!I10prinlws mclrk$>t<,d
ill [’(I,I<zd<I.
Trademark acknowledgments
NX-2480 Rainbow/Colour,NX-2420Rainbow/Colour,NX-2420,SF-1ODW,
SPC-SK:
Star Mi(r(llli(s
co. Ltd.
L9S50, L9S60, LQ105O, L9106O: Seiko EIMmI Corpora(im,
IBM PC, IBM Froprfnter X24E, IBM Pmprinter XL24E,IBMProprinter X24,
IBM Proprinter XL24:internationalBusiness Machines Cmporatiorl.
TrueTypeMacintosh: Appk. Computer Inc.
PostScript: AdobeS@t’rnslnco~orated
MS-DOS, Microsoft Windows, Windows 3.1: Microsoft Corporation
Grappler:OrangeVicrc,[m
Notice
.
Allrights
rwwnrct.
Reproduction
of any pa!l of this man[ml in any kwm u,tla@n?\vr. without
STt\R’s mprt’ss pwmissicm is strictly forbktckm
.
Tbc ([),ltrnts
.
All rf’forls tlaw Ixwt madr (c>ensure [ht. acrurary o[”the cmlmts
of’ this man,lal at the (imr of’
prin[inq. I Icmewr, S11OCIM
any crmrs be founci. STAR would grcatlv appreciate Ixing infmmcd of’
therll.
.
The ahc)w rlOILL-illlsl:
!llcli,lg. STAR can assllnl? no rlW(l,lsit~ilitY (Or a~y ,7rl-Orsi,, this 1ll:lrlll:ll.
11(
[bis ,llarlua1arc,suhjmt (o rhang? witboul notim.
~, Copyigbt
1993 Star Mim(mics Cm I.td
Guide to this manual
Even though the NX-2480 Rainbow/Colour is basically
a very simple printer to use, it is also capable of many
complex functions. We have grouped this manual into
two main sections. divided into seven chapters and an
appendix.
For normal everyday use, you may never need to refer to
Section II at all. We strongly recommend however that
you read through Section-I-(Chapters 1, 2 and 3) before
connecting and–using the printer for the first time.
SectionI
Chapter 1
Features and parts
Chapter 2
Unpacking and setting up the printer,
including setting up your computer
software
Chapter 3
Using the printer, including loading paper,
using the display and control panel, and
printing
‘“”l
Guide to this manual... ...........................................................................iii
1
Introduction
Features ........... .................. ........... .................................................... . . I
Parts ............. . ...... .........................................................................................4
Unpacking
and
setting
7
up
Choosing a place for the printer., ....................................................... 7
Unpacking the printer ............................................................................. 8
Setting up your printer ...........................................................................9
Fitting the platen knob ...............................................................,.............9
Removing the front cover ...................................................................... 70
Installing the ribbon cartridge ...................................... . . . .
. . . 70
Removing the ribbon cartridge ............................................................ 72
Installing the roller unit. ......................................................................... 72
Removing the roller unit ........................................................................13
Replacing the front cover ......................................................................73
Installing the paper guide ...................................................................... 74
Installing the mute cover ............................................. .. . . . . . . . . 74
Connecting the printer to the computer ....................................... 15
Setting up your printer with your computer .............................. IT
Setting up with MS. DOS.. ..................................................................... 77
MS-DOS ............................ .
.
. . . .................................................... 77
MS-DOS application software ................................................................ 77
Setting up the printer in Windows ..................................................... 79
Installing TrueType fonts (for Windows) ...............................................27
Selecting different fonts .......................................................................... 22
Using
your
printer
23
Loading paper ...........................................................................................23
Adjusting the print gap ................................................,.........................24
Loading cut sheet paper .................:. .....................................................26
Loading and parking fanfold paper .....................................................27
Loading paper from the rear of the printer ............................................28
Loading paper from the bottom of the printer ......................................30
Parking paper .......................................... . ...... .................. . .
. . . 31
Unparking the paper ................................ ...............................................32
Using the control panel
33
Ready and not-ready modes .........................................,.......................33
Pageiv
Pausing printing.....,
................................................................................. 33
Feeding paper through the printer .....................................................34
One line or several lines at a time .......................................................... 34
A page at a time .......................................................................................34
Individual form tear-off ........................................................................... 34
Loading paper ..........................................................................................35
Micro-feeding paper (backwards and forwards) ............................. ..... 35
Setting the top of a form ....................................................................... 5’5
Changing the autoloading position .................................................... 36
Eject and park ........................................................................................... 37
Quiet printing ................................................................. ......................... 37
Changing the way your printout looks ............................................. 38
Selecting
Changing
Changing
Selecting
the
the
the
the
different fonts ................................................................... 38
pitch of the font ...............................................................39
zoom size .......................................................................... 40
print color ..........................................................................41
Controlling the printer’s memory ....................................................... 42
Saving Macros ..........................................................................................42
Removing the macro ...................................................... .. ......... ........... 43
Clearing the buffer ...................................................................................43
Setting the printer back to default settings .......................................... 44
Locking the printer ..................................................................................45
Font
Font
Pitch
Pitch
Pitch
Pitch
lock ...................................................................................................45
unlock ............................................................................................... 45
lock ..................................................................................................45
unlock ......................................................................... .................... 46
and font lock ...................................................................................46
and font unlock ...............................................................................46
Test printing .................................. .......................................................... 47
Short test. .................................................................................................47
Long test. .................................................................................................. 47
Print area test mode ................................................................................48
Hexadecimal dump mode .......................................................................49
Adjusting the dot alignment ................................................................ 50
Electronic DIP switches ................................................... .... ......... ..... 52
Using the Electronic DIP switches ......................................................53
Banks and numbers .................................................................................53
Selecting the switch bank. ......................................................... ............ 53
Seiecting the switch number ............................................. .................... 54
Changing a switch’s value ......................................................................54
An example ................................................................................ ......... .... 54
Exiting Electronic DIP Switch mode ......................................... ............ 54
What you can change with the Electronic DIP Switch mode. ..... 55
Meanings of the switches ..................................................................... 56
A 1- Emulation ..........................................................................................56
Pagev
I
AZ - Auto Emulation Change (AEC) mode.............................................56
A3- RAM usage .......................................................................................57
A4 - Color and zoom ................................................................................57
A5 - Auto LF with CR.. ............................................................................. 57
A6 - Auto sheet feeder ............................................................................ 57
BI - Graphics direction ............................................................................57
B2 - Paper-out ..........................................................................................58
B3 - Tear-o ff.. ............................................................................................ 58
B4 - Reserved ...........................................................................................58
B5 and B6 - Multi-part mode .................................................................. 58
Cl and C2 - Print mode ........................................................................... 59
C3 through C5 - Page length.. ................................................................. 59
DI - Character table .................................................................................59
D2 through D4 - character code tables .................................................. 60
D5 -CR centering .....................................................................................61
El through E5 - LQ Font selection .........................................................61
FI - Electronic DIP switch settings ......................................................... 62
Optional accessories
63
Accessories available ............................................................................. 63
The SF-IODW ............................................................................................63
Unpacking ............................ ....... ............... ............................................63
Installing the SF- IODWASF..........
..........................................................64
Using the SF- IODW. .................................................................................65
The SPC-8K serial/parallel
converter ..................................................67
Baud rate. ...................................... ........................................................... 68
Number of bits in a word ......... .... .........................................................68
Parity .. ........................ .................. s.......... .............. ............................ . . 68
Handshaking ................. .... . .......... . ............ . ..... . ............ ............ .. ... 69
Connecting the SPC-8K converter ..........................................................69
Using the SPC-8K. ................. . ............ . .......... ............ ....... .................70
The serial connector on the SPC-8K... ....................................................71
Setting up an MS-DOS computer ........................................................... 72
Setting up a Windows computer ............................................................73
Troubleshooting
75
Common problems and solutions ................................................... 76
Power switch is on, but POWER indicator is neither lit nor flashing.. 76
Printer sounds as if it is printing, but is not ..........................................76
Printing is weak. .......................................................................................76
Printer tests work, but printer will not print out data from attached
- computer ................................................................................................. 77
Font selection changes unexpectedly .................................................... 77
Printer will not feed paper properly .......................................................78
Pagevi
The printer will not print in color ........................................................... 78
Line spacing is incorrect..................,....
...................................................79
Over-printing occurs ................................................................................79
Incorrect number of lines per page ........................................................80
Malformed text or graphics .................................................................... 80
Poor printing quality ................................................................................80
Forms are smudged .................................................................................81
Printing is too dark ..................................................................................81
Printer case is hot ....................................................................................81
Printer makes excessive noise ................................................................ 82
Printer prints beyond the edge of the paper .........................................82
Left margin moves towards the right during printing ......................... 83
Some incorrect characters are being printed ........................................84
Printer behaves erratically ...................................................................... 85
Printing ceases .........................................................................................85
Display messages (non-error) ..............................................................85
Display messages (error) .............................................................. .. ..... 87
Beep tones ................................................................................................. 88
Checking system software settings ............................................... 89
In Windows ...............................................................................................89
In MS. DOS.. ........................................................................ ........ ........... 90
Software commands
91
Introduction ............................................................................................... 9I
Font control commands ........................................................................ 93
Character set commands ...................................................................... 98
Character size and pitch commands ................................................ 70Z
Vertical position commands .............................................................. 770
Horizontal position commands ......................................................... 717
Graphics commands ............................................................
......... 721
Download character commands ....................................................... 725
Other printer commands ................................................................. .729
Appendix
Specifications ..........................................................
Parallel interface ..............................................................................
Character sets. ...........................................................................
135
135
740
141
Standard character set #2 ................................................................... 742
International character sets. ............................................................... 744
IBM character set #2 ............................................................................. 145
Code page #437(U. S.A.).. .................................................................... 745
Code page #850 (Multi.lingual) .....................................................
.147
Pagevii
Code
Code
Code
Code
page
page
page
page
#860
#861
#863
#865
(Portuguese) ............................................................... 148
(Icelandic) .................................................................... 149
(Canadian French) ...................................................... 150
(Nordic) ....................................................................... 151
Character set #1 ..................................................................................... ?52
IBM special character set.. ................................................................... 753
Pageviii
Glossary
155
Index
167
Costumer service information
171
Chapter 1
Introduction
‘ Thank you for buying a STAR NX-2480 Rainbow/Colour
printer. We are confident that it will provide you with
years of reliable, high-quality printing. We think we have
made the NX-2480 Rainbow/Colour one of the fastest,
quietest, and easiest to use dot matrix printers ever. We
hope you agree with us.
Features
colon
You only need to add a color ribbon cartridge
to print vibrant, full-color documents. You
can choose from up to 256 colors, depending
on your computer software.
Fast:
The NX-2480 Rainbow/Colour speeds
through drafts at 330 characters per second
(15 pitch). When printing in its 360 dpi letterquality mode (that’s more dots per inch than
some laser printers!), it turns out beautifullyfinished work at up to 100 characters per
second.
Easy to use: With clearly labeled buttons, an informative
LCD screen, and easy paper loading, the NX2480 Rainbow/Colour can be used by anyone, even without previous computer or
printer experience.
With the NX-2480 Rainbow/Colour’s Electronic DIP Switch feature, you can change the
printer’s default power-on settings from the
front panel.
Page1
LCfl screen: You can see your printer’s settings at a glance
by looking at the informative LCD screen. It
shows what font you are using, how big it is
(the font pitch) and other useful information
(this feature does not apply when you use the
printer with Windows 3.1 or later).
Fonts: ~ÓZ•˜Ḋ•
The NX-2480 Rainbow/Colour is a multi-font
printer, which means that it can print text in
a variety of different type styles (fonts)—10 in
all.
These include:
SanSerif
Prestige
Roman
Courier
Swp-t
ORATOR
Orator-2
H-Got h i c
SLQ Roman
Draft
You can print these fonts in different styles,
such as emphasized, bold, shadow, and outline, as well as being able to change the size
of the font.
Graphics:
The advanced 24.-pinprint head can print up
to 360 dots per inch (and in color too!) making it an ideal printer for graphics programs,
and for programs running under Windows
3.1 and later.
Zooming:
You can print documents at 50?Z0or 67?40of
their actual size. As a result, you need only
use a single sheet of paper to print large documents, such as spreadsheets.
Paper types:
You can print on a wide variety of different
paper types and sizes; from fanfold computer
paper, to single sheets and stationery, to
multi-part forms. Even when fanfold paper is
loaded, the NX-2480 Rainbow/Colour allows
Page2
you to print on single sheets, saving you time
and effort. A tear-off function allows you to
tear off single printed fanfold paper sheets
from the printer without wasting paper. You
can feed fanfold paper from either the rear or
the bottom of the printer.
h optional automatic sheet feeder is also
available, which holds up to 50 sheets of
paper.
Compcdiblity:By emulating the industry-standard Epson
and IBM printers, the NX-2480 Rainbow/
Colour allows you to print just about anything your computer software can generate.
The NEC graphics command set is also supported for even better graphics compatibility.
The Automatic Emulation Change feature
means that the printer can automatically
change to the appropriate printer emulation
for the application software, depending on
the data received.
Special drivers and scalable fonts are
included to allow you to produce high-quality
printout from Windows 3.1 and later applications.
Page3
Parts
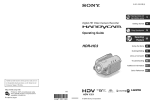
This is what your new printer looks like. These diagrams
may be useful in the next few sections to identi~ the different parts mentioned.
front
r
power
Theprinter(withinterfacecableconnected)
pa
ad
r
ver
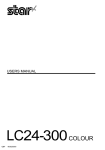
The printer
Page4
with
the front
and rear covers
cable connected
removed
and no interface
Parts - an explanation
The paper guides hold single sheets and sets their posi-
tion so that they are fed into the printer correctly.
The paper entrances
are where paper feeds into the
printer. There is one for single sheets, and two for computer (fanfold) paper—rear and bottom.
The release lever grips single sheets as they are fed in.
The lever should be pushed towards the back of the
printer to hold single sheets properly, and released
(pulled forward) when fanfold paper is in use.
The platen knob lets you feed paper through the printer
manually. Usually, though, you will find that the
FEED] button (see “Feeding paper through the
printer” on page 34) is the most efficient way of doing
this.
[PAPER
The front cover protects internal components and
reduces printing noise.
The mute cover further reduces printing noise.
The display screen
shows information about the prin-
ter’s current setting.
The control
panel has buttons to control the printer.
The power switch turns the printer on and off.
The interface
connector accepts the cable connector
that links the printer to the host computer.
The print head transfers
the image to the paper.
The ribbon cartridge
contains the ribbon which the
head uses to mark the paper.
The paper thickness
adjustment lever lets you adjust
the position of the print head for different paper thicknesses and for multi-part forms.
The roller unit helps to grip paper and pull it through
the printer.
Page5
The tractor unit grips the sides of fanfold computer
paper. When you use the tractor unit, the tractor
ers must be closed.
Page6
cov-
Chapter 2
Unpacking and
setting up
Choosing a place for the printer
Before you start unpacking and setting up your printer,
make sure that you have a suitable place to put it. By a
“suitable place”, we mean:
A firm, level surface where the printer will be stable,
and vibration-free.
●
Away from any heaters.
●
Away from direct sunlight.
●
Not in an excessively humid area.
●
Somewhere that is clean, dry and dust-free. Basically, computer equipment works best in the same
kind of temperature and humidity as you do.
●
Allow 6“ (15cm) of free space either side of the
printer and adequate space for paper behind the
printer, if you want to use fanfold (computer) paper.
●
If you want to use the bottom feed for fanfold (computer) paper, you should locate the pile of paper at
least one page length (about 12” (30cm)) below the
printer.
●
Make sure the printer is connected to a steady
power supply. It should not be on the same electric
circuit as appliances like copiers or refrigerators
that cause power spikes and surges.
●
Use a power supply of the correct voltage as specified cm the printer’s identification plate.
Page7
I
Unpacking the printer
As you unpack the printer from the box, make sure that
you have all the following items:
3 Ribbon cartrid~e
2 Printer driver
and fontdisk
1 Printer
‘
\\
//
~
//h
~~
\\\\\?
Ifany of these are missing, please contact your supplier.
Optional accessories that you may have purchased are:
●
Serial-Parallel converter (SPC-8K)
●
Automatic sheet feeder (SF- IODVVl
For details of how to install these optional accessories,
see Chapter 5.
You will also need a cable to connect the printer to your
computer (available separately). For IBM or IBM-compatible computers, this will generally be a parallel cable,
with a 25-pin ‘D’ connector at one end and a 36-pin
Amphenol-type (Centronics) connector at the other end
(a “Centronics” printer cable). This cable should be no
longer than about 6’ (2m).
Page8
If your computer has no parallel port available, you will
need to use the Serial-Parallel converter (SPC-8K) and a
cable to connect your computer to the printer. See “The
SPC-8K serial/parallel converter” on page 67 for full
details.
Setting up your printer
Remove the printer and all supplied parts from the
packing material. Put the printer on the place you have
prepared for it. Save the packing material and carton in
case you need to move the printer in the future.
Fitting the platen knob
This knob is packed into a recess of the packaging material in the printer box.
To fit the knob, rotate the knob on the shaft (lining up
the flattened side of the shaft with the flattened part of
the hole on the knob). After you have lined up these flattened sides, push the knob firmly onto the shaft.
Page9
Removing the front cover
You will need to remove the front cover (the smoked
plastic cover on the top of the printer) to install and
change ribbon cartridges. Lift the cover from the rear
using the grips on the sides, then lift up to remove the
cover from the body of the printer.
Installing the ribbon cartridge
You have the choice of using a color or a black ribbon
with the NX-2480 Rainbow/Colour. Both ribbons are
installed and removed in the same way.
●
Take the slack out of the ribbon by turning the knob
on the ribbon cartridge clockwise (as shown by the
arrow).
Page10
Place the cartridge on the cartridge carrier inside
the printer. Make sure that the ribbon is between
the print head and the print head shield. Press the
cartridge so that it “clicks” into place. If the cartridge does not “click” into position on both sides,
you may need to turn the cartridge knob about 1/4
of a turn clockwise.
●
Once the cartridge is in the carrier, tighten the ribbon again by turning the cartridge knob clockwise
(about 1/2 a turn). Check once more to make sure
that the ribbon is between the print head and print
head shield (if it isn’t, take the cartridge out, and try
again).
Page11
I
Removing the ribbon cartridge
●
To remove the ribbon cartridge, press the cartridge
grips inward and lift the cartridge upward out of the
printer.
Installing the roller unit
● . Open the rear cover by pushing the cover grips
backward and upward.
●
Pick up the roller unit so that the small illustration
is on top of the roller unit, and the smoked plastic
side (with six small black rollers) is facing you.
●
Hold the roller unit so that the top is tilted slightly
away from you. Slide the hooks on either side of the
back of the roller unit over the platen (the large
black roller) and under the silver bar behind and
above the platen. The hooks should both be between
the metal plates at either end of the silver bar.
Page 12
●
Push the front of the roller unit down firmly, so that
the unit “clicks” into place. If it does not fit properly,
remove it and try again.
Removing the roller unit
●
Pull both gray locking tabs towards you and lift the
front of the roller unit slightly to remove the roller
unit. Pull the roller unit out of the printer towards
you.
Replacing the front cover
Once you have fitted the ribbon and roller unit, you
should replace the front cover.
Note:
Even though you can operate the printer with the front cover
removed, we do not suggest that you do this. The printer will
be noisy and it is also possible to drop things into the printer,
which may damage the mechanism.
●
Hold the cover by the grips, so that the grips are on
the side of the cover furthest from you. Tilt the top
of the cover towards you a little.
●
Insert the tabs into the slots in the case.
●
Lower the rear of the cover into position.
Page13
I
Installing the paper guide
You can set the paper guide on the NX-2480 Rainbow/
Colour in one of two positions: horizontal for fanfold
paper and vertical for single sheets.
●
Hold the paper guide, either horizontally, or vertically, depending on the type of paper used.
●
Fit the tabs into the slots on the printer body to
install the paper guide.
●
Make sure the guide is firmly in position.
Installing the mute cover
The mute cover helps reduce the noise from your printer
when you are printing.
Page 14
●
Hold the mute cover upright so that the ridges on
the cover are towards you and at the top.
●
Slide the left tab on the mute cover into the left hole
on the front cover.
●
Drop the right tab on the mute cover into the right
slot on the front cover. Close the mute cover by
swinging it down.
Connecting the printer to the computer
We assume here that you are connecting the printer to
an IBM or IBM-compatible computer, using the parallel
interface, If you are connecting using a serial interface,
or connecting to any other type of computer, read Chapter 5.
Note:
Before connecting or disconnecting the printer and the computer, make sure that the power to both the printer and the
computer is turned OFF. If the power is on when you make or
break these connections, there is a risk that you will damage
the circuitry of the computer and/or the printer. Repairs can
be expensive!
Page15
●
Press the cable plug into the printer socket:
●
Clip the cable into the socket using the wire clips on
either side of the socket.
●
Connect the ‘D’ connector on the other end of the
cable to the parallel (printer) port on your computer.
This will probably be labelled Printer, Parallel,
PRN, LPT1 or something similar. Refer to your computer’s instruction manual for details of how to
secure the cable.
●
Now you can turn on your printer and computer.
Page16
I
Setting up your printer with your computer
In this section, you will learn to setup your printer wtth
two different computer environments: MS-DOS or
Microsoft Windows 3.1 (or a later version of Windows). If
your computer uses a different operating system, you
should refer to Chapter 5 for details of setting up your
. printer. Refer to your computer operating system manuals for details of configuring the operating system.
Setting up with MS-DOS
Every program that you use with MS-DOS must be
“told” separately what printer is connected to your computer. This is usually done in an INSTALL or SETUP program or menu option within your application software
(word-processor, spreadsheet, or whatever).
Look for an option called “Add printer”, “Install printer”
or “Configure printer” in your application software. If
you can’t find this option easily, read your software
manual to find out how to do it.
MS-DOS
MS-DOS needs no specific commands to make it work.
To test that the printer is connected properly to the
computer, try entering the following command from the
C> prompt:
PRINT \AuTOExEc.BAT (~]
If the computer answers with:
Name of list device [PRN]:
hit [~]
again. The printer should then print the
contents of the file AUTOEXEC.BAT. If the file
AUTOEXEC. BAT does not exist, you will get an error message on your computer. Most MS-DOS computers do
have a file called AUTOEXEC. BAT,however.
MS-DOS application software
The NX-2480 Rainbow/Colour can emulate (pretend to
be) a member of one of two printer families: Epson or
Page17
I
IBM. When you open the box containing your NX-2480
Rainbow/Colour, the printer is set to Epson emulation.
This is commonly supported by most software. If your
software package gives you a list of printers to choose
from, choose one printer from the following list (in order
of preference):
Star NX-2480 Rainbow/Colour
I
StarNX-2420Ranbow/Colour
I
The shaded printers are not color printers, so if you
select one, you will not be able to print in color.
If none of the printers above is listed, choose one of the
following, in order of preference:
These two printers are not color printers, so if you select
either, you will not be able to print in color.
Note:
The printers in shaded boxes do not support color. If you
select them, all output will be in black only, regardless of the
ribbon installed or the software settings.
If you select either of these IBM Proprinter models, you
may need to change your printer emulation.The Auto
Emulation feature (page 56) of the NX-2480 Rainbow/
Colour should take care of this for you. See “Al- Emulation” on page 56 on how to change the emulation if you
have trouble with your printer.
Page18
If your software doesn’t list printer names, but asks you
questions about your printer, you should answer “Yes”
to the following two questions:
●
“Can your printer perform a backspace?”
●
“Can your printer do a hardware form feed?”
The answers to any other questions are not so important. Answer these using the default settings in the
software.
When you’ve set up your software, try a few test prints,
using features like bold, italic, etc. to see how it works. If
you find you have problems making your software work
with your hardware, the best source of help is usually
your software supplier.
Setting up the printer in Windows
The-NX-2480 Rainbow/Colour is ideally suited for use
with computers running Microsoft Windows system software. It works best with Windows version 3.1 or later. If
you are running an earlier version of Windows, we recommend you upgrade your computer to the latest version. In particular, this will allow you to use the 15
TrueType fonts included on the floppy disk packaged
with this printer.
~~
To use the printer with Windows, you need to install a
file known as the printer driver file onto your computer.
This file is supplied on the floppy disk packaged with the
printer.
The following description assumes that you are using a
mouse. (Click and double-click refer to the action of
using the mouse to point at an item with the on-screen
pointer, and then pressing the left mouse button either
once, or twice in quick succession.)
If you are not using a mouse, you can still carry out the
installation. Refer to the Microsoft Windows User’s Guide
to find out how to use the keyboard instead of a mouse
to operate Windows.
Page19
To install the printer driver under Windows 3.1, do the
following:
●
Turn on the printer and start up your computer.
●
If Windows does not start up automatically, type
WIN and then press [~]
or [~].
●
Double-click the Control PaneZicon in the Main window.
●
Double-click the Printers icon
●
If you have never previously installed a printer on
your system under Windows, a list of supported
printers is displayed. (If you have already installed
one or more printers, select the Add button to display the list of supported printers.)
●
Click on InstaZZUnlisted or Updated Printer in the
list, so that this option is highlighted.
●
Click InstaZL A window prompts you to put in the
floppy disk supplied with the printer.
●
Insert the disk with the printer driver file on it and
click OK. A new list of printers appears.
(If you have inserted the disk into a drive other than
drive A, you must type in the drive letter followed by
a colon and a backslash, e.g. “B:\”before selecting
OK.)
●
Select NX-2480 Rainbow/Colour
from the new list
of printers.
●
Click OK. The list of installed printers appears,
including the NX-2480 Rainbow/Colour.
●
Click on Set As Default Printer.
●
Click on Close to return to the ControZPanel window.
For instructions on how to configure the printer, see the
section of the Microsoft Windows User’s Guide called
Control Panel.
Page20
If you cannot print from your applications programs
after installing the driver, refer to the section “In Windows” on page 89.
Note:
Unless the user chooses a different printer from within the
application, Windows applications always print to the currently selected default printer.
Installing TrueType fonts (for Windows)
To install the TrueType fonts that are on the floppy disk
accompanying this printer, follow the procedure below.
●
Double click the Contro[ PaneZin Windows.
●
Double click on Fonts. The Fonts dialog box appears.
●
Click Add. The Add Fonts dialog box appears.
●
Insert the disk in your computer’s floppy disk drive.
●
Select the drive by letter (this is usually “A:”, sometimes “B:”). The names of the fonts stored on the
disk are displayed in the List of Fonts window. Each
font name is followed by the word “TrueType”
●
Select the fonts you wish to install. If you want to
install all of them, click SelectAZZ.
●
Click OK. The Fonts dialog box reappears and installation is carried out. The names of the newly
installed fonts are automatically added to the
Installed Fonts list.
●
Within your applicationprogram, select Printer Setup
from the application’sFile menu, and reselect the
printer.The applicationcan now display text on-screen
and print text on your printer using the new fonts.
Note:
The TrueType fonts that are supplied can only be used on IBM
PC compatible computers running Windows 3.1 or higher.
Page21
Selecting different fonts
If you are running applications software under
Windows, you will select fonts from within your application (refer to your application’s manual for details].
Your application software manual will tell you the various ways in which you can type-set your text on-screen
so that it is ready to print out on the printer.
Your Windows system already includes several fonts,
such as Arial, Times New Roman and Symbol. You can
also use the 15 True~pe fonts included with the
printer. If you have installed Adobe Type Manager software on your computer, you can also display and print
Adobe PostScript fonts.
Page22
Chapter 3
Using your printer
Loading paper
The NX-2480 Rainbow/Colour can print on a variety of
paper types, as explained below:
Cut sheet paper
The NX-2480 Rainbow/Colour can use single sheets of
paper (cut sheets) or letterheaded stationery. Use the frictionfeed or the optional SF- 10DW automatic sheet feeder.
Fanfold paper
It can also accept fanfold (continuous) computer stationery. Fanfold stationery has the sheets joined together,
with perforations between sheets, and holes (“sprocket
holes”) along each edge to help the printer grip the
paper. You should not print too close to the sprocket
holes. Otherwise, you run the risk ofjamming the paper
in the printer.
Multi-part
forms
You can print continuous multi-part forms which are
either carbon backed or pressure-sensitive carbonless
(NCR), with up to five copies (including the top copy). If
you use multi-part forms, we suggest that you feed them
through the bottom paper feed slot, as this will help to
prevent premature separation of the forms. There
should be a difference in thickness of not more than
0.05mm between the side edges.
Note:
If you use multi-part sets, set up the Multi-Part setting using
the Electronic DIP switches as described in “B5 and B6 - Multipart mode” on page 58.
Page23
Where you can print on each kind of paper
Single sheets
Fanfold forms
5 1>,,,,
Ix
111111
5,11111
k!!!!!!
If you print outside these limits, you run the risk of
damaging the printer mechanism (and tearing the paper
or jamming it as it goes through the printer).
Adjusting the print gap
Note:
Important. If you do not adjust the print gap properly, you run
the risk of shortening the life of the print head.
Different paper thicknesses need a different gap
between the print head and the paper. The NX-2480
Rainbow/Colour allows you to make six different settings, using the adjustment lever at the left of the
printer. If you push this lever towards the back of the
Page24
printer, the gap is narrowed (thin paper), and if you pull
it towards the front. the ~a~ is widened [thick DaDer).
As you move the lever, you can feel it click between the
six different positions. Position number 2 (starting from
the rearmost position) is the one you will generally use
for single sheets of paper (fanfold or cut sheet). Here is a
table for the adjustment lever when you use multi-part
sets.
Thickness
(total in mm)
Recommended
Paper
type
Weight of each
Single
14 to 24 Ibs (52 to 90 gsm)
0.07
2-part
11 to 14 Ibs (40 to 52 gsm)
012 to 014
2 or 3
3-part
11 to 14 Ibs (40 to 52 gsm)
0.18 to 0.21
3 or 4
4-part
11 to 14 Ibs (40 to 52 gsm)
0.24 to 0.28
4 or 5
5-part
11 to 14 Ibs (40 to 52 gsm)
0.30 to 0.35
5 or 6
Note:
sheet
,
to 012
;;:e;e::::;;
2 or 3
if you use multi-part sets, setup the Multi-Part setting using
the Electronic DIP switches as described in “B5 and B6 - Multipart mode” on page 58.
Page25
Loading cut sheet paper
This procedure shows you how to load cut sheet paper
using the paper guide. If you are using the SF- 10DW
automatic sheet feeder, please refer to “Using the SF10DW’”on page 65.
. This is how cut sheet paper is fed through the printer:
. Make sure that the paper guide is in the vertical position. See “Installing the paper guide” on page 14.
. If no fanfold paper has been loaded, and no cut sheet
paper has been loaded, the display will show “PF’
alternating with the character pitch when the printer
is turned on. The printer will also beep.
●
Make sure that the release lever is at the back position ( “+).
. Adjust the left and right paper guides to the position
you want. Allow the paper to feed through the guides
smoothly, but without allowing it to move from side to
side while feeding through. A gap of less than a millimeter (0.04”) is ideal.
s Place a sheet of paper in the guides (upside down,
and printing side towards the rear of the printer), and
gently push it down between the guides until you feel
it stop.
Page26
●
Press the [SET/EJECT] button. This should make the
printer feed the paper round the platen until it is in a
position suitable for printing. The ON LINE indicator
should come on. If this does not happen, you have
probably not loaded the paper correctly. Take the
sheet out and try loading it again.
●
If the paper is at the wrong place to start printing (for
instance, if the address printed on the top of your letterhead takes up a lot of space), put the printer not-
ready mode (press the [~]
button) and use the
micro-feed function, as described in Chapter 4.
●
You can now start printing.
Loading and parking fanfold paper
You can use fanfold paper up to 25cm (10”) wide with
this printer. You can feed this paper from the bottom or
the rear of the printer.
These are the ways in which fanfold paper is fed through
the printer:
I
Page27
Loading paper from the rear of the printer
Always load fanfold paper with the printer’s power
turned OFF.
●
Place the stack of fanfold paper behind and below the
printer.
●
Pull the release lever at the right of the printer
towards YOU ( p“ ). This releases the paper from the
platen and allows it to feed through the tractor rollers.
●
Open the mute cover and the rear cover
●
Grip the gray tractor position locking levers on both
sides of the tractor unit and rotate the tractor unit as
far as it will go (about 20 degrees) so that the top is
tilted slightly towards you:
●
Open the tractor pin covers and align the holes in the
fanfold paper with the pins on the tractor unit. You
will probably need to slide the tractor pin units left
and right to align the paper properly. Use the gray
locking levers on each tractor pin unit to allow the
unit to slide left and right along the rail. Remember to
Page28
lock each tractor pin unit in place again when you
have finished moving it.
. Close the pin unit covers after you have made sure
that the paper holes are properly lined up with the
tractor pins. If the holes and pins are not correctly
lined up, you may find that the paper tears and jams.
Note:
If the paper is too tightly stretched or too loose between the
pin holders, the paper will tear or jam as it is fed through the
printer. You may need to experiment to find the ideal tension.
. Close the rear and mute covers, and insert the paper
guide in the horizontal position. See “Installing the
paper guide” on page 14.
●
When you turn on the printer (using the switch at the
front), the display wiil show “PF’ alternating with the
character pitch. The printer will also beep.
. Press the ISETIEJECT]
button to load the paper into the
printer. The printer will go into ready mode.
●
If you want to adjust the paper position, put the
printer into not-ready mode (use the [~]
button)
and use the micro-feed function (described in Chapter 4).
Page29
Loading paper from the bottom of the printer
Always load fanfold paper into the printer with the printer’s power turned OFF.
●
Remove the front cover and the roller unit. See
“Removing the front cover” on page 10 and “Removing
the roller unit” on page 13 for details.
“ Grip the gray tractor position locking levers on both
sides of the tractor unit. Rotate the front of the tractor unit upward so that the top is horizontal.
. With a stack of fanfold paper below the printer, feed
the top sheet of the stack through the feed slot at the
bottom of the printer and pass it over the platen.
●
●
Open the tractor pin covers and align the holes in the
fanfold paper with the pins on the tractor unit. You
will probably need to slide the tractor pin units left
and right to align the paper properly. Use the gray
locking levers on each tractor pin unit to allow the
unit to slide left and right along the rail. Remember to
lock each tractor pin unit in place again when you
have finished moving it.
Close the pin unit covers after you have made sure
that the paper holes are properly lined up with the
Page30
tractor pins. If the holes and pins are not correctly
lined up, you may find that the paper tears and jams.
Note:
If the paper is too tightly stretched or too loose between the
pin holders, the paper will tear or jam as it is fed through the
printer. You may need to experiment to find the ideal tension.
s
Replace the roller unit (see “Installing the roller unit”
on page 12).
●
Replace all the covers that you have removed.
●
Turn on the printer.
●
Put the printer into not-ready mode (use the [~]
button) and use the [PAPER FEED] button to advance
the paper so that the print head is just below a perforation. Put the printer into ready mode again.
Parking paper
Paper parking allows you to print single cut sheets even
when fanfold paper is loaded. The fanfold paper is temporarily “parked” out of the way while the cut sheet is
fed through the printer.
Note:
●
●
You can only use the paper parking function when fanfold
paper is loaded from the rear. You cannot use it when you are
feeding fanfold paper from the bottom slot.
The power should be ,ON.The release leaver should be
pulled forward [ ~ ) and the fanfold paper loaded.
Put the printer into not-ready
mode (use the (~]
button).
9
Tear off the last page of the fanfold paper. If the paper
is not in a suitable position to be torn off, use the
FEED) button to feed the paper forwards to a
suitable position.
[PAPER
Page31
I
c Press the (sET/EJEcTj button. The printer will feed the
fanfold paper back until it is out of the way.
●
Move the release lever to the back ( ~ ) position.
●
Place the paper guide in the upright position.
Load single sheets as described in “Loading cut sheet
paper” on page 26.
Unparking the paper
When you have finished printing on cut sheet paper and
you want to start printing again on fanfold paper, here’s
how you do it:
●
Remove any cut sheets which may still be in the
printer.
●
Place the paper guide in the horizontal position.
●
Move the release lever to the front ( N ) position. The
printer will beep if you move the lever while paper is
still loaded ready for printing.
●
Press the [SET/EJECT] button. The parked fanfold paper
will be fed into the correct position ready for printing
again.
Page32
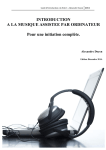
Using the control
panel
Chapter 4
The NX-2480 Rainbow/Colour control panel has five
buttons, which have white labels above them to indicate
their primary functions. Other functions are available as
alternative functions (labelled in brown) or by pressing
combinations of buttons (labelled in yellow).
.—-—
MICRO FEED
1
SETEJECT
FONT
ALT
PITCH
MACRO
PARK
COLOR
QUIET
PAPER FEED
ON LINE
ZOOM
CLEAR
There are two indicators: the POWER indicator shows
that power is supplied to the printer. When steadily lit, it
means that paper is correctly positioned for printing.
When flashing, it means that paper is not correctly positioned for printing.
Ready and not-ready modes
When the ON LINE indicator is lit, it means that the
printer is ready to accept data to be printed from the
computer. If it is not lit, the printer is in not-ready
mode, and it will not be able to accept
computer. You can usually only make
printer’s settings using the front panel
tor is not lit. You set the printer ready
with the (~)
button.
data from the
changes to the
when this indicaand not-ready
Pausing printing
You can make the printer not-ready
if you want to
pause in the middle of a printing job. Printing will
Page33
restart from the point where it left off when you make
the printer ready again.
Feeding paper through the printer
There are a number of ways in which you can feed paper
through the printer.
One line or several lines at a time
Make the printer not-ready by pressing the (~]
button, and press the [PAPER FEED] button. This will feed
the paper forward one line. If you continue to hold down
[PAPER FEED] button, the printer will continue to feed
the paper one line at a time.
the
Make the printer ready again to continue printing.
A page at a time
‘T~is will either eject a cut sheet or feed fanfold paper to
the top of the next sheet. To determine where the top of
a sheet should be, see “Setting the top of a form” on
page 35.
●
If you want to feed a page of paper through the
printer. make the printer not-ready. Press and hold
down the [PAPER FEED] button.
While holding down the [PAPER
m
button.
FEED]
button, press the
Release both buttons at the same time. The paper will
feed through.
Individual form tear-off
You can tear off individual sheets (for instance, sales
invoices) from fanfold paper.
●
While the printer is in ready mode, press and hold
down the [~]
button.
Press the [PAPER FEED] button. The paper will move
- forward about 2 inches (50mm), so that you can tear
off the sheet.
●
Page34
●
When you press the [~]
button again, the paper
will move back to its original position.
Loading paper
For the most part. paper loading is described in Chapter
3. However, one important point to note is that if paper
has not been loaded, the printer will indicate that it is
not-ready. Pressing the [SET/EJECT] button will start
loading paper, and automatically enter the ready mode.
Micro-feeding
paper (backwards and forwards)
It is often useful to be able to feed the paper backwards
or forwards in the printer by very small amounts. For
example, to get the correct printing position on preprinted stationery.
. Put the printer in not-ready
c Press and hold down the [~)
mode.
button.
. While holding down the [~]
button, press the
[PAPER FEED] button to advance the paper in a series of
small steps.
. While holding down the (~]
button, press the
[SET/EJECT]
button to move the paper backwards in a
series of small steps.
. Release both buttons (the [~]
and the
[PAPER FEED] or [SET/EJECT]
buttons) when the paper
reaches the place you want.
. Put the printer back into ready mode.
Setting the top of a form
Very often, when feeding fanfold paper through a page at
a time (see “A page at a time” on page 34), the printer’s
top of a page does not correspond with the actual top of
a page. This is how you “tell” the printer about the top of
a page:
. Put the printer in not-ready
mode.
Page35
●
Set the paper position to the top of a page (where you
want the printing to start on each page) using the
micro-feed functions (page 35).
. Press and hold down the (~]
button.
While holding down the (15iTEF@button, press the
m
button.
. Release both buttons. The display will show “--”,
which means that the top of the form has been set.
●
. Put the printer back into ready mode.
Note:
The printer now “knows” the top of a page, but it doesn’t
know the exact page unless you tell it, which means that
when you do a page feed, the printer will not necessarily
move to the correct position on the next page. You must set
the page length using the Electronic DIP Switch mode
described on page 53.
Changing the autoloading position
When you load cut sheet paper, the printer automatically loads the paper so that printing starts one line
from the top of the paper, unless you tell it otherwise.
This is how you tell it otherwise (for example, if you’re
printing a lot of letters on letterhead paper):
c With the printer in not-ready mode, load cut sheet
paper using the [SET/EJECT] button.
“ Use the micro-feed functions (page 35) to alter the
print position. Notice that a number will appear in
the LCD window. This means you can remember that,
for instance, “we should print starting from 67 steps
down on headed invoices”. If the value goes over 99
steps, the display changes from “99” to “--”.
●
Set the printer back in ready mode.
●
All cut sheet paper loaded from now on will be loaded
so that printing starts at.this position, until you
Page36
change the position again using this procedure, or
until the power to the printer is turned off.
●
Ifyou want to save this value for future use (after the
printer has been turned off and on again), you must
save it as a macro. See “Saving Macros” on page 42.
Note:
This function will only work if you use it immediately afier you
have loaded paper as described above. If paper has already
been fed into the printer, this function will not work.
Eject and park
If paper has already been loaded, and the printer is notready, the (SET/EJECT] button has two different functions,
depending on the setting of the release lever.
“ If the release lever is set to the back position for cut
sheet paper ( > ), pressing the [SET/EJECT] button will
eject the sheet.
. If the release lever is set to the forward position for
fanfold paper ( ,1$), pressing the [SET/EJECT] button will
park the fanfold paper to allow you to print on cut
sheets. See “Parking paper” on page 31.
Note:
If you are feeding fanfold paper through the bottom slot of the
printer, this button will have no effect.
Quiet printing
Even though the NX-2480 Rainbow/Colour is a quiet
printer, it also has a “quiet” mode, which allows it to
print at a reduced noise level. Setting the quiet mode
requires that the printer is in ready mode. This is an
exception to the general rule that settings are made
when the printer is in not-ready mode.
Page37
I
●
Press the [PAPER FEED] button. The printer will beep
once and ~
will appear on the display.
. To cancel quiet mode, the printer must be in the
ready mode. Press the [PAPER FEED) button. The
printer will beep twice and ~
will disappear from
the display.
Changing the way your printout looks
The following section describes how you can change the
look of the printout from your printer.
Selecting the different fonts
The NX-2480 Rainbow/Colour has a range of different
fonts, which can be selected using the front panel controls. The display highlights the currently-selected font
by enclosing the font name with lines:
ThePrestigefont
SLQ DRAFT
SCJ!,LIJZ
has been selected
Roman
ORATOR
PITCH
=:::’
:=i?st”i~]
:%3:
OPTION
70
\
●
●
Set the printer to not-ready.
Press the [~]
button. The printer will highlight the
font names in the display in the following order:
Font name
Draft
Page38
Display highlights
B
I
Roman
~Roman
Sans-serif
~Sanserif
~
Courier
~Courier
~
Prestige
~Prestige/
Scrpt
/ SWLLpt
Orator
10RATOR
Orator-2
~Oratar-2
[
j
Display highlights
Font name
] H-Gothic ~
H-Gotblc
I
SuperLetTerOuality
Roman
I
~
+~Roman
1
I
. When you have highlighted the font you want to use,
press [-]
again to make the printer in ready
mode again.
Changing the pitch of the font
The font “pitch” means “how many characters can be
printed in one inch”. 10-pitch, for instance, means “10
characters can be printed in one inch across the page.”
There are two special modes on the NX-2480 Rainbow/
Colour: Proportional and Condensed proportional. In
these modes, you cannot say exactly how many characters will fit into one inch, because each character takes
up a different amount of space. The opposite of “proportional” is “fixed-pitch” or “monospaced”. Look at these
two examples:
Fixed-pitch
Proportional
MMMMMMMMMM
1111111111
NMMMNMMMMM
1111111111
Even though there are 10 characters in each line, the
“M”S in the proportional column take up more space
overall than the “1”s.The space between letters is proportional to the letter itself.
However, in the fixed-pitch column, although each “M”
also takes up more space than each “I”, the space
between letters is fixed, no matter what the letter, so
that a row of 10 “1”stakes up the same amount of space
as 10 “M”s.
Page39
I
Usually, it is easier to read proportional text than text
which is fixed–pitch.However, if you are trying to
line up columns of figures, fixed-pitch has definite
advantages.
To change the pitch:
. Put the printer into the not-ready
●
mode.
When you press the [Fii7%i)button, the pitch will
change in the following way:
Pitch
Display
Pica (1O cpi)
/0
Elite (12 cpi)
12
(15 cpi)
15
Condensed
pica (17 cpi)
17
Condensed
elite (20 cpi)
l?a
Semi-condensed
Super-condensed
(24 cpi)’
l?v
P5
Proportional
Condensed
PE
proportional
*. Only available in IBM emulation
mode
. Make the printer ready again.
Changing the zoom size
The zoom feature allows you to print at 100Yo(full-size),
67v0 (two-thirds size) or 50Y0(half-size) of the nOrmal
size. The “normal size” is the size that the computer
“thinks” the printout will be.
Page40
T
s
c
au
t
z
●
P
●
P
a
●
W
h
t
E
p
h
y
[
b
[
b
p
t
t
(
F
b
s
y
t
d
D
t
p
i
f
a
c W
h
z
s
w
r
t
w
t
o
H
m
p
h
y
a
e
s
p
t
t
m
p
c
p
p
. P
w
c
R
y
t
z
a
t
u
I
p
r
t
. P
t
s
N
t
m
t
s
C
S
w
p
c
p
N
e
p
b
y
t
T
b
r
f
d
d
t
w
W
f
n
i
F
Z
●
p
an
l
p
[
●
w
r
i
h
n
d
d
m
t
t
[
[
b
b
p
t
b
S
P
4
. W
c
e
w
p
c
t
[
b
t
a
c
p
p
D
C
B
c
M
c
C
V
i
Y
O
C
C
G
W
●
y
m
r
C
t
T
m
t
r
j
p
c
p
t
f
y
h
w
m
f
a
y
c
t
p
M
S
f
w
e
t
T
P
t
t
o
c
t
t
e
p
y
w
y
C
p
3
C
p
3
C
p
4
4
f
an
e
h
t
y
r
t
o
s
w
S
p
S
z
s
y
y
“
s
t
a
c
t
r
u
m
t
“
S
p
y
t
s
a“
s
am
d
t
“
ap
f
p
t
t
z
f
s
. C
p
●
T
p
“
s
6
c
c
t
●
P
a
●
W
m
“
t
h
b
t
f
S
3 A
p
t
h
t
p
t
b
(
t
d
b
b
r
d
T
t
u
P
t
“
b
m
a
m
“
m
i
P
●
P
a
●
W
m
“
b
h
b
M
[
a
p
●
●
f
f
p
s
t
b
r
R
a
s
m
d
d
a
b
c
s
a
n
h
t
f
am
a
w
●
c
p
s
p
t
t
p
p
a
t
t
y
P
M
w
a
s
R
C
u
t
●
●
t
a
a
h
R
a
“
4
T
●
S
t
s
f
t
t
n
p
h
t
t
h
f
d
t
a
y
m
d
d
a
d
[
b
[
t
b
b
d
t
p
d
T
t
u
p
w
t
b
t
b
a
r
p
t
b
W
t
t
d
p
t
ab
“
m
g
a
d
b
t
f
p
t
c
i T
m
s
t
P
4
c
p
b
f
a
d
t
i T
a
t
p
j
t
n
j
T
w
p
p
p
u
s
t
m
p
Y
c
c
●
P
●
P
a
●
M
d
t
b
h
t
d
t
T
b
l
r
w
●
s
w
S
t
m
y
c
[
a
4
a
b
s
y
p
“
u
(
h
b
d
t
n
(
c
t
s
w
t
c
n f
y
r
p
t
t
p
R
al
a
w
w
y
c
f
t
n
s
(
a
b
f
h
b
b
t
c
t
s
b
a
b
h
s
w
t
o a
w
p
C
o
a
O
i
p
ab
b
(
m
a
w
p
m
t
h
n
t
[
[
b
n
m
t
H
t
t
w
m
m
d
f
y
y
k
t
c
s
c
j
s
[
w
(
w
t
d
d
c
t
t
t
p
–t p
i b
ab
d
w
N
●
h
c
s
t
m
n
y
c
y
●
t
h
p
b
t
p
d
(
w
f
f
h
t
f
b
j
p
d
b
y
●
c
p
t
t
b
f
f
u
t
w
c
t
t
c
n
e
t
d
s
a
P
f
c
p
t
t
b
p
j
j
a
d
s
t
c
t
b
p
h
d
f a
4
t
t
s
e
t
r
a
t
L
y
F
t
T
t
I s
~t
f
m
h
c
b
p
t
p
d
w
w
s
b
p
u
a
p
t
y
a
w
l
c
s
u
s
s
c
u
c
H
l
T
s
s
y
●
T
t
●
P
a
. W
p
h
●
a
c
t
f
w
p
O
h
(
d
s
t
d
(
t
b
[
b
t
t
a
K
b
Y
u
p
p
p
F
f
c
h
d
a
m
t [
3
b
t
t
t
d
[
s
t
p
n
c
t
b
a
b
u
t
c
c
t
p
c
(
s
t
f
d
f
w
f
f
y
c
i
t
u
R
d
p
P
t
p
S
s
“
t
p
l
(
b
y
f
4
p
w
T
a
b
r
t
l
T
s
s
a
c
t
p
w
c
. T
t
. P
a
p
h
O
d
(
t
s
(
b
P
4
I
9
W
p
●
h
. K
b
h
Y
t
t
y
i
t
d
p
u
a
c
p
f
c
[
t
t
b
[
s
d
t
t
[
p
3
t
p
b
n
b
s
c
p
t
t
P
t
A
t
u
m
(
t
p
a
t
c
p
c
t
f
p
w
u
R
d
l
P
t
p
f
t
●
p
f
P
b
a
W
b
h
a
t
f
O
h
t
d
t
p
p
u
f
f
p
[
a
b
t
a
[
t
[
[
t
a
[
d
[
b
f
c
i
y
w
b
u
s
b
m
a
a
t
p
t
c
[
3
t
p
t
u
p
S
s
a
t
d
t
f
b
n
c
t
a
a
t
a
(
t
[
p
b
p
f
s
t
d
h
a
(
d
t
p
_
t
c
p
a
4
b
r
c
s
t
c
R
d
l
T
a
w
t
. K
t
a
P
4
p
w
l
y
T
Y
f
b
s
c
t
p
s
●
“
a
a
●
S
s
(
T
P
d
a
“
p
t
f
l
t
4
T
p
w
b
r
t
p
A
T
p
T
w
c
S
f
m
o t
s
a
c
g
t
y
w
p
y
o
p
t
p
a
s
t
p
a
t
.
t
●
●
p
p
t
T
o t
P
p
a
R
T
s
c
s
t
y
●
[
w
m
t
b
t
[
d
w
t
T
R
b
b
d
w
v
n
s
r
r
p
t
s
“ 1
v
e
c
f
e
ad
s
T
(
7l
f
ag
ac
w
t
p
L
d
h
p
b
o
(
h
c
o
f
p
h
w
p
i
t
l
c
“
t
(
p
c
4
t
N
T
s
p
T
f
t
t
p
s
a t
p
p
i y
(
f
al
p
a
al
w
o p
t r
5
a t
a
W
t
t
c
t
s
t
y
l
E
p
D
o
s
P
4
I
M
a
●
s
p
t
●
P
●
W
h
t
p
●
R
s
p
n
a
d
w
[
F
t
d
t
l
p
t
[
(
T
d
c
t
b
F
b
F
T
b
w
e
t
“
s
w
t
s
f
p
W
t
w
t
b
a
s
s
f
a
t
t
p
t
a
t
T
“
p
t
o t
a
t
a
t
p
y
T
i
l
b
w
P
a
●
W
a
h
●
T
d
w s
“
a
w
+* * Th Is
‘ 1s first llne **‘
h
t
t
t
s
p
a
t
b
[
b
t
t
p
p
c
t
s
p
b
p
(
t
t
w
a
p
p
t
p
p
(
w
f
“
e
* * * This is line 068. ***
●
T
n
t
l
P
4
l
i
p
b
t
n
o
a
p
c
p
u
b
t
t
d
t
a
p
d
t
w
●
y
t
h
M
s
t
p
t
t
O
s
w
●
t
p
m
f
●
f
O
h
p
●
P
t
t
t
c
O
=
6
l
6
—
— —
6
= I1
f
6l
.
c
g
f
t
i
.
y
m
T
h
●
u
t
w
f
t
p
p
w
f
p
o
t
t
p
p
p
r
t
H
s
m
b
d
T
p
r
d
c
p
t
s
p
n
a
m
f
s
m
u
f p
a
s
w
n
c
t
t
p
r
t
e
d
t
m
t
p
n a
s
“
c
c
w
t
p
p
a
s
f
C
a p
t
f
w
A s
m
v
i p
(
6E
72
7
65
6D
69
64
69
6E
66
6<1
65
67
61
7
72
65
6E
61
6E
67
6F
6C
73
20
6D
7
2C
73
74
74
74
2E
72
20
20
79
73
6F
20
20
20
61
65
OA
6
64
28
69
75
6F
20
72
57
“O
74 20
73 65
75 74
74 68
20 69
68 65
61 20
63
6
63
65
6F
64
64
20
65
6F
73
75
29
74
20
20
s
h
c
t
f
D
i
h
If
72 65 20 77 72 69 7
49 66 20 79 6F 75
P
v
k
M
w
6F
73
68
73
75
74
74
20
20
65
20
61
63
72
69
66
20
61
73
6E
68
6
69
77
65
65
20
6C
68
20
7.2
79
78
61
63
6F
65
6E
6E
20
73
20
65
74
65
6F
61
6C
74
6E
20
20
64
70
6F
74
20
68
63
75
64
6C
65
74
70
a p
70
20
72
6D
6F
72
65
65
20
65
20
72
72
72
a
72
6F
69
65
20
61
20
69
70
63
63
20
6F
69
6F
75
6E
74
70
77
70
76
65
69
6F
63
6C
6E
67
74
74
69
72
20
72
69
72
6D
64
6F
20
7
p
You
a
re
o
s
wr i ti
p
o
er , i t i
m
u
i
o
d
t
in
i
n
.
m a h
e
(
c
e
o
w
)
s someti
U +
p
t
r
t t
P
r
y
p
e
i
a 1 c
a
c
c
a r
p in
1 n h
t
v
a
l
a
f
c
p
t
w
t
c
a
w
h
t
h
r
u
T
t
I
e
●
●
t
i
h
l
T
t
p
P
a
[
]
W
●
h
b
h
a
A
N
t
y
t
h
p
i
[
a
F
t
[
p
t
b
T
t
a
d
u
a
F
t
d
Y
m
i p
s
S
t
t
A
s
t
F
d
d
t
d
m
O
b
R
d
m
p
h
[
●
d
t
p
u
w s
w c
y
t
d
p
m
w
t
t
S
“
(
p
o a
a
n
n
t
s
a
u
t
(
f
i t
U
i o
i
i g
b
o
a
b
u
y
p
y
m f
t
w
y
p
g
d
a s
o
l
w
e
w
y
i
l
l
t
f
o
Illli
m
c
o
l
t
l
IIIIII
t
,
1
1
T
i
y
o
d
s
m
n
m
a
s t
p
. L
p
5
f
t
h
s
n
t
P
t
o
w
H
a
a
p
w
v
y
r
c
–
d
c
w
as
a
p
t
t
(
p
l
f
O
p
i
t
●
P
a
h
d
b
t
a
[
-
b
●
T
t
●
A
●
T
d
w s
“
(
a
p
w t
p
s
l
* * * DOT ADJUSTMENT SETTING ***
af
p
s
r
LQ
●
●
T
b
d
p
p
-3
n
w
“
w f
c
E
t
v
b
i
A
t
T
1
:
t
v
w
t
b
t
LQ
p
b
m n
a
s
h
b
p
t
y
c
s
a
t
b
Y
●
p
t
t
w
c
u
b
t
r
m
[P
S
f
p
t
t
p
p
A
F
a
p
f
t
p
p
t
y
t
i
a
y
w
w
b
r
t
r
p
t
b
w g
y
t
f
p
* * * DO’T.W)JUSTMENT SETTING ***
LQ
“
t
t
t
-3 : 1’
f’f’1!
1’.1.
I‘d’
:+”
I‘1
‘1’
1.
/‘/’
41:/‘4i’
II
+[sET/EJEcTl
B
r
p
1
1
v
b
b
a
t
b
[
m
t
b
t
l
(
F
b
t
r
* * * DOT ADJUSTMENT SETTIN(2***
●
t
s
w
t
c
m
(
t
F
-2 : /1’/I11 ////////I/////I
P
5
. T
a
d
w n
s
“
n
K
u
t
b
u
t
t
L
Y
m
r
h
n
p
t
T
a
t
[
t
d
y
Q
c
L
d
L
t
p
E
a
S
(
n
c
a t
[
i
c
d
n
C
C
h
L
d
a
e
T
p
m
r
w
m
n
w
p
s
C
s
u
w
p
(
s
v
u
t
t
y
w
p
y
(
c
–
p
a
s
a “
–h
p
t
5
w
s
h
t
y
c
R
s
“
m
w
w
p
t
p
g
p
h
s
M
D s
y
l
w
t
m
s
s
“
2
“
t
c
N
a
I
s
f
h
as
f
e
t
A
f
d
H
v
h
P
I
s
P
a
m
m
t
y
h
a
t
m
p
“ * END ***“a
E
●
w
D
a
F
r
b
t
m
[
a
b
a
d a
D
D
(
G
Aa
G
a
t
m
p
[
(
m
t
y
a
t
l
m
G
a
y
p
[
t
p
w
b
T
d
m
m
h
d
a
b
t w
t
t
p
e
t
m
p
c W
f
p
s
b
p
a
a
c
T
s
m
a
D
s
y
y
T
l
5
aM
“
p
4
n ac
e
a
f
a
t
H
I
U
—t
E
u
●
p
●
●
●
P
a
D
a
t
T
t
D
h
d
[
S
t
m
t
t
[
t
[
F
b
t
p
W
af
T
s
t
E
O
d
w
h
a
s
w
d
r
t
b
t
s
E
●
T
m
h
B
m
t
b
a
t
s
E
1
n
s
D S
A (
b
O
“
n
C
b
2
t
D s
an
C
t
w
c
R
h
B
B
i
t
t
S
t
s
t
a
w
s
h
l
R
p
f
a
d
c
B
B
N
r
p
b
“
n
“
a
n
a
a
b
E
s
t
D
N
s
;
B
s
a
r
b
as
b
E
D S
[
b
W
e
p
t
t
d
w c
f
“
“
b
“ a
y
h
s
o
t
“l t
n
w
c
y
t
n
b
m
[
t
as
P
5
S
t
s
e
f
s
p
“l
C
n
n
[
t
r
b
t
t
t
[
d
b
W
w c
t
c
s
s
b
F
v
y
c
s
p
p
b
n
o
(
as
W
A
s
as
h
c
p
v
t
f
s
t
b
a
s
b
[
y
t
O
w
t
(
O
t
d
y
e
S
t
5
y
D
b
h
S
Cf
j
m
“
t
“
t
w
H
Y
a
y
●
P
t
[
b
t
●
P
s
t
(
b
5
f
P
s
t
●
s
E
s
c
h
a
t
y
i
n
Y
b
h
n
b
b
[
p
o
T
d
s
O
E
A
t
E
E
P
a
w
t
P
i
D
t
e
n
E
5
[
t
o
S
m
b
s
D S
m
y
m
E
D
t
S
t
“
m
h
j
s
p
T
s
w
W
y
c
c
w
t
E
E
A
]2
A
m
A
13
R
u
A
14
C
a
A
L w
A
s
1
G
B
2
P
+B
3
T
B
4
B
5
B
6
c
II
c
12
c
3
O
S
II
B
M
w
A
16
S
M
F
A
D
o
w
(
O
I
z
N
f
I
I
B
d
3=
E
D
C
I U
L
R
M
m
t
s
S
p
5
P
m
S
p
5
P
l
S
p
5
O
I
I
*c
C
D
1
t
I s
I I
D
2
D
+
3
C
t
m
p
c
I
G
m
(
s
I
#
S
p
I
#
6
P
5
M
w
M
w
O
O
I
/ D
I 5
D
I CRcentering
E
IE 1’ I
IE
12 I
\ E
13
m
IE Is
N
t
6
E
L
F
s
I
E
S
1
F
S
“
o p
I LQfcmtselection
D
U
s
D
s
s
(
l
t
. A “
S
c
a
O
s
s
s
w
s
f
. Y
w
w s
s
M
t
c
l
t
a s
O
e
h
n
t
t
c
A
t
f
O
m
s
o
r
w
s
s
B
s
A1 E
T
b
N
a
s
d
e
R
O
w
I
A
P
O
t
s
w
w
A
R
t
O
L
e
m
N
b
d
p
(
t
c
5
N
W
E
C
R
C
s
t
s
t
b
N
X
E
t
p
e
t
P
- A
a
a
O
h
w
(
t
r
d
w
R
t
w
e
t
e
s
y
I
A
- R
T
m
p
(
d
A
u
p
f
- y
t
c
- C
a
(
p
a
O
s
4
a e
n z
z
c
y
.
A
t
- A
s
y
(
w
h
s
G
W
t
U
p
w
t
p
p
y
c
y
h
4
a
a
i
o
b
c
t
m
c
i
c
O
(
s
a
s
t
z
n
az
t
c
l
s
c
n
s
b
r
c
t
e
O
t
p
w a
e
t
r
ac
y
s
o
n
t
e
al
d
w
s
y
y
t
a
s
b
t
e
s
s
O
s
o
s
al
a
n
p
t
s
O
f
i
y
l
1
b
n
l
a
9
ac
o
m
y
o
e
f
c
a
al
f
ar
r
b
s
d
d
C
y
s
s
p
y
s
p
am
s
w
L w
O
f
l
p
r
c
c
a
z
O
s
t
- A
m
p
c
i
u
t
t
A
i
–t
(
t
o
t
s
t
a
s
s
f
O
O
p
s
m
b
(
t
t
a
O
d
y
a
p
g
(
a
g
h
p
p
f
a
y
r
p
l
p
c
f
(
r
f
l
t
n
l
P
5
T
i
d
al
f
b
m
m
p
a
t
p
b
p
y
a
p
t
f
b
e
B - P
W
O t
p
s
p
t
s
w
t p
i
e
t
t
b
an
s
t
f
i
p
n
i
i
t
e
s
a
w
o
p
p
a
p
s
t
c
O
p
B - T
y
f
O
s
t
s
t
f
t
O
(
f
t
a
3
y
y
t
a
t
u
t
s
d
B - R
L
t
B a
s
o
B - M
m
W
u
m
y
c
m
d
a f
t
M
N
P
m
(
f
t
t
t
p
n
o
s
s
y
t
B
m
B
s
O
O
M
1(
t
3 s
O
O
u
M
2 (
t
5 s
O
O
u
5
C a
C - P
Y
s
c
m
t
d
p
P
a
f
s
w
I1
m
t
I
C
1
1 c
d
O
O
c
d
O
O
1 c
L
O
O
1
N
A
p
a
w b e
4
C t
f
C - P
y
a u
a t
f
l
f
i
y
t
s
d
U
1
(
i
1 i
1
U
(
(
i
e
l
e
l
(
A
1 i
1 i
(
l
D - C
(
f
s
p
t
s
C
C
O
O
O
O
O
O
O
O
O
O
O
O
O
O
O
O
O
iO
O
O
O
O
O
O
t
e
c
i am
s
s
C
L
(
i
s
p
1l
O Y
s
s
p
8 I
8
h
c
l
l
P
7
s
i y
u
e
o
t
m
c
t
R
N
t
T
c
t
P
5
I
w
t
y
s
W
t
i
c
t
p
C1
b t
t
W
s
g
(
m
t
c
d
y
D
s
t
t
t
t
t
p
y
y
n
5
a
c
t
a m
t
I
s
C
e
c
5
w
t
t
U
c
c
7
m
f
f
1
s
s
t
c
D
(
p
–C
ac
y
e
p
I
D
(
1O
(
I
D
I
U
I
I
\ ON
I
#
M
IO
I
/ON
I u
P
O
O
O
#
I
O
O
O
#
C
#
N
6
O
t
#
F
S
E
(
s
c
s
t
p
d
(
S
e
s
t
m
“
t
p
t
t
p
t
w
s
t
c
s
c
c
“ a
s
o
s
w
t
s
c
n
u
t
(
s
as
s
D - c
t
s
s
a
w
s
O
s
(
i
s
e
“
e
e
S
C
s
t
i
a
“
f u
p
w
t
I
I
C
t
5
p
(
t
O
I
“
t
a
s
d
s
s
W
c
e
s
E
(
p
s
t
A
d
p
t
a
n
P
w
o
I
I
I OFF
I
I OFF
ION
I OFF
I
t
(
t
f
O
s
w
t
s
m
I
S
o
c
f
t
(
s
s
D
C
e
I O
D
D
U
O
O
O
F
O
O
O
G
O
O
O
E
O
O
O
O
O
O
S
O
O
O
I
O
O
O
O
O
O
D
S
D -
W
p
c
o
l
p
W
w
I
I
c
t
s
t
t
f
T
O
p
E - L
s
F
n
w
w
a
t
s
s
y
w
p
t
p
f t
f
w
w
(
5
E t
T
w
O
p
t
b
F
a
t
t
i
p
p
f
h
p
m
y
l
p
f
h
f
m
q
s t
e
f
d
n
t
O
p
m
s
y
m
s
E
t
d
E
f
E
u
E
R
O
O
O
O
O
S
O
O
O
O
O
C
O
O
O
O
O
P
O
O
O
O
O
P
6
F
E
E
E
E
S
O
O
O
O
O
O
O
O
O
O
O
O
O
O
O
O
O
H
O
O
O
O
O
O
O
O
O
O
S
R
F - E
y
f
P
E
n
6
D
s
t
s
s
-
s
s
O
(
a s
e
f
s
A
w
s
C
5
A
a
T
s
f
T
N
R
a
a
C
f
S
t
i
h
t
S
t
A
1
S
o
a
s
c
S
T
w
p
S
a
y
f
a
l
o
c
s
s
p
at
w
f
U
M
t
s
S
t
c S
H
a
●
S
a
. P
S
h
t
f
w
y
u
f
●
●
y
1
c
1
U
m
P
6
a
T
w
r
u
t
i
S
1
t
s
a p
S 1
I
U
f
E
A
O
t
L
p
L
h
P
6
c
p
t
S
t
E
“
1
r
t
f
a
s
t
t
t
s
p
5
s
p
t
f
f
t
r
u
r
t
c
(
p
1
t
r
S
1
b
t
s
m
M
b
s
a
t
s
y
t
y
s
W
S
a
c
t
f
s
y
p
f
m
D
f
R
T
p
m
u
t
b
t
(
s
“
5
c
t
p
1
s
p
S
1
“
p
g
f
–
L
t
b
s
t
a
r
t
e
t
t
(
f
p
A
p
i
(
a
a
t
. M
s
t
t
m
S 1
a p
h
b
p
k
t
t
t
t
p
1
●
I
. I
h
t
f
s
. K
a
h
c
m
b
s
t
p
c
u t
t
S
y
e
r
s
w
a
t
t
S
t
.
S
s
s
t
a
a
s
i
f
f
g
t
Y
al
p
S
y
p
t
t
p
t
.
p
s
. F
t
t
U
t
b
m
c
t
f
m n
f i
m
p
f
g
s
c
r
f
u
u
W
h
(
a
3
l
f
p
p
t
P
6
. P
P
t
t
h
. A
y
w
●
. T
f
i
s
a
t
P
t
6
p
S
t
a
t
t
j
p
r
1
f
p
l
t
l
p
l
t
l
g
e
s
a
s
S 1
T
s
t
b
l
t
p
(
o b
d
t
s
f
a f t
p
( ‘
f
p
p
w
p
t
t
t
w
t
p
s
y
t
s
t
t
f
i
●
●
I
f
n
t
t
s
f e
a
A
t
m
(
t
r
t
f
f
p
p
r
s
a
Ag
a
p
s
d
a
t
p
a
t
am
w
l
l
n
l
r
s
a
t
p
r
w
t
t
s
p
t
S
c
s
c
c
s
t
f
s
S
s
i
S
T
m
p
n
t
s
s
S
y
w
1
s
s
a
T
f
n
S
g
f
f
t
. Y
A
i
t
t
i
i
t
P
p
T
p
h
b
c
c
a
c
t
u
o
t
b
y
e
c
t
s
s
p
D
S
s
w
t
P
6
T
s
c
t w
e
t
d
c
f
y
r
d
y
c
w
m
a
m
s
y
c
t
s
y
m
t
S
Y
(
w
n
as
c
w
t
S
c
n
a
Y
s
p
a
t
w
m
S
7
B
r
Y
p
f
m
U
d
s
“
t
s
S
p
y
t
(
f
c
e
y
r
t
t
r
8f
t
p
S
S
6
S
7
S
O
O
O
3
O
O
O
6
O
O
O
1
O
O
O
2
O
O
O
4
O
O
.
9
O
O
O
1
O
O
O
o b
S
w
O
s
i
d
7
t
8
a w
1
m
t
f
c
b
150
N
r
c
6t
B
b
f
8d
b
c
as
s
S
w
S
(
1
u
P
A “
t
c
l
P
6
b
c
b
v
t
U
s
a
e
e
o
d
w
T
t
2a
5
s
t
m
a
o
t
f
t
e
s
S
s
s
O
y
y
h
w
s
t
s
y
w
2 O
s
a
S
t
O
2
O
O
y
u
t
c
a
m
c
o
p
o
p
a
u e
p
e
e
w
S
5w
s
p
c
2
g
O
s
w
p
s
y
5
d
u
w
h
H
“
w
t
s
“
y
r
“
I
n
“
d
O
t
t
t
o
b
g
–w
–I
r
(
s
w
a
o
a
A
c
l
t
U
(
m
3a
“
4
c
s
I
m
(
(
f
P
s
3
I1
t
X
O
O
E
O
O
h
C
t
T
p
t
S
p
v
–
a
o
T
h
c
p
t
a
c
c
c
E
t
D
h
l
E
m
4
II
O
(
w
“
h
O
D
”
t
t
d
(
m
X
u
t
p
p
h
D
w
a
o
c
a
d
d
t
w
d
”(
c
c
i
t
m
M
d
w
c
w
l
y
am
n
w
O
d
o
e
f
t
s
u
“
c
a
t
.
t
d
I
h
c
a
t
c
O
u
t
s
P
6
I
. D
p
C
c
c
t
i
●
s C
t
s
d
t
t
M
t
2
t
k
t
p
t
t
o
e
c
t
(
t
c
S
b
p
t
m
“
s
c
y
w h
7 f d
S
l
s
h
S
S
f
a2
t
c
y
c
t
c
C
a9
r
w
y
a
s
t
t
m
at
f
s
t
w p s
d
t
p
n
w
c
C
u
i t
a2
c
S
c
i
t
s
l
c
I t
o b
c
u
c
y
(
p
p
c
(
S
p
t
c
‘
as
t
e
c
t
7
f
t
c
c
S
t
M
t
t
s
s
P
c
c
b
2
M
i
m
r
W
p
t
p
p
t
c
p
S
n
m
U
i
( c
“ C
s
N
p
r
h
c
p
p
s
S
w
m
D
b
S
y
u
y
t
t
m
s
S
r
n
w
y
t
t
p
c
a
y
p
a
p
y
c
t
T
T
c
c
o
N
t
R
ap
t
T
S
c
u
(
h
a
m
c
Y
t
T
o
c
r
t
a
t
n
y
w
m
ap
ab
ap
b
j
w
s
j
p
t
b
S
S
p
as
d
h
u a“
h
c
y
c
m
4
h
t
i
d
p
b
o
5
c
p
c
b
m
w
c
(
y
S
f
t
a
t
s
T
c
c
s
p
r
C
b
b
c
f
u
2
y
s
as
2
2
c
y
y
y
p
s
n
w
a
u
h
e
t
d
s
s
c
~
#
S
b
t
w
m
c
w
f
S
n
1
G
2
T
b
h
I o
o
o
c
c
o
y
e
c
w
i
F
P
O
a
y
D
c
f
g
t
p
P
7
~
I o
o
S
n
#
3
R
I
D
4
R
O
A
5
C
—
S
d
6
N
7
G
8
N
1
R
1
-
u
M
t
c
p
d
t S
(
w
D
t
w
i r
n c
t
s
t
p
g
p
r
t
p
r
t
(
U
O
T
r
S
U
M
u
e
c
I
t
c
B
A
f
r
i
e
1 o 2
al
r
M
L
( i t
T
s
:=
7
w
N
s
s
p
p
t
i
o
t
t
C
l
baud,pari ty,data length,stopbitsrp
C
s
o t
a
p
t
:
n
l
M
P
w
T
T
r
O
a
a
p
s
S
N
y
t
U
D
S
t
U
N
2
i
F
t
t
C
s
p
m
t
c
D
s
F
s
e
e
M
w
d
t
p
C
s
l
C
r
8b
a
c
w c
o
e
S
O
u
a W
9
1s
T
‘
t
r
D
d
t
C
P
●
D
t
P
i
●
M
s
s
t
t
●
C
C
●
C
t
t
●
C
●
C
●
D
●
C
p
t
c
●
C
S
●
F
a
y
●
C
●
C
a
b
t
d
s
C
p
t
s
t
f
P
R
r
d
b
a
w
t
s
B
s
m
d
p
s
t
P
t
S
a
(
w
P
t
s
w
P
D
(
t
y
r
C
p
(
t
w
P
t
c
t
w
T
P
C
w
M
l
t
n
t
(
c
r
s
F
i
P
r
C
p
R
N
I
c
e
a
s
c
w
M
c
●
B
b
b (
i
C
P
w
P
7
P
7
6
C
‘
w
w
l
g
N
R
a
w
a
b
Af
s
s
p
s
a
N
t
C
f
s
y
p
o
c
t
a e
i
p
h
t
v
o c
s
s
c
t
y
d
s
t
p
t
y
c
n
y
t
s
w
W
w
p
s
c
r
a
s
H
c
f s
t
Al
s
s
T
a
r
w
t
t
s
t
p
m
c
s
w
(
t
C
p
f
D
i t
d
p
p
f
c
f
n t a
r
c
Y
c
t t
p
o
T
w
P
7
C
p
P
s
c
A
C
c
i
L
P
p
sn
P
T
t
b
t
P
r
C
s
u
p
w
t
p
p
p
w
t
a
p
a
d
A
r
j
n
t
s
p
p
h
p
g
7
t
c
c
c
T
c
w
c
t ad
p
h
a
s
n
s
M
s
c
i
t
r
p
1
t
t
c
S “
c
r
U t
s t
l
s
p
g
a
l
p
g
M
al
(
S “
p
2
t
t
P
A
c
T
s
w
T
s
a
s
C
s
E
C
e
w
p
y
p
h
t
p
t
y
5
p
s
s
S
s
8
a
s
s
“
s
s
“
n
C
b
e
S
p
—
T
s
p
f
c
c
t
t
t
T
i
d
y
i
a
o
t
s
c
s
a
W
s
“
s
8
s
t
p
c
c
i t
a
c
A
c
f
n
s
S
C
i
c
d
c
Y
t
p
c
P
p
d
r
C
s
s
s
s
p
i
a u
n
f t
T
s
U
l
a
“
t
f
c
p
s
s
l
S
p
4
P
7
P
c
T
w
A
r
l
t
p
M
p
p
s
t
s
p
u
P
j
f
P
g
n
s
p
R
c
r
i
t
d
h
c
(
y
a
t
g
p
f
p
p
t
R
2
p
g
u t
l
s t
S “
g
p
2
A
Am
c
Ap
s
s
C
n
a
p
t
a
s
R
p
p
l
a
s
y
f
p
T
c
t
y
b
n
b
W
a
I
c
ac
r
S
d
p
p
ad
S “
W
1
p
t
p
E
s
c
P
D
p
7
S
u
C
–C
p
t
s
a
5
S
z
“
I
P
c
A
P
j
C
1n
a
p
t
T
l
f
p
w
A
r
l
P
s
b
y
P
A
r
l
h
t
g
p
C
ad
a
y
s
p
g
u t
l
s t
S “
g
p
2
s
a
f
s
w
c
f
n
j
C
S
s
“
–A
p
5
S
s
“
–A
p
5
C
A
c
l
T
w
w
w
s
c
T
w
w
C
n
a
p
t
C
C
t
g
p
p
g
u t
l
s t
S “
g
p
2
P
7
P
A
c
P
w
s
f
p
A
r
t
l
T
l
f
p
f
s
w
w
l
h
P
p
t
P
p
8
l
“
t
af
p
S
s
“
–A
p
5
C
C
a“
a
y
3
s
a
A
g
n
s
U
a
“
t
a
p
t
t
p
T
a
S
C
s
c
T
c
A
p
t
T
w
w
c
s
b
y
t
p
h
d
R
d
g
p
l
S
g
2
t
f
p
r
y
The print gap is not set
correctly.
Use the adjustment lever to
set the print gap. Move the
lever to a higher (lighter)
setting. See “Adjusting the
print gap” on page 24.
The ribbon is jammed,
twisted or not set properly
between the print head and
the print head shield.
Make sure that the ribbon
cartridge is correctly
installed. See “Installing
the ribbon cartridge” on
page 10.
Print head shield is
damaged or missing.
Return the printer to your
dealer for repair.
—
P
!
The printer’s air vents are
I blocked or obstructed.
Switch off the printer and
allow it to cool down. Check
the air vents on the
underside of the printer to
see if they are clogged or
obstructed in any way.
Remove the obstruction or
clogging material if
possible.
If the problem persists,
return the printer to your
dealer for repair.
Page
P
The front cover and mute
covers are off.
The printer is vibrating.
Move any unrelated objects
that are touching the
printer.
Make sure that the printer
is on a level, steady
surface.
P
The paper guides are
positioned incorrectly.
Remove the paper, adjust
the position of the paper
guides. Reload the paper.
The ribbon is jammed,
causing the print head to
jam.
Make sure that the ribbon
cartridge is correctly
installed. See “Installing
the ribbon cartridge” on
page 10.
Page
Thepaper is jamming,
causing the print head to
jam.
~
printer. Reload paper.
Check the print gap. If
necessary, use the
adjustment lever to set the
print gap. See “Adjusting
the print gap” on page 24.
Inappropriate margin
~“Choose d-ifferentrn”argin
settings have been selected settings in your
application.
from your application
program.
I
P
The ribbon cartridge is
incorrectly installed,
causing the print head to
jam.
Make sure that the ribbon
cartridge is correctly
installed. See “Installing
the ribbon cartridge” on
page 10.
Remove all paper from the
The paper is not loaded
properly, causing the print ~printer. Reload paper.
I
head to jam.
The print gap is not set
correctly.
~Use the adjustment lever to
~set the print gap. See
“Adjusting the print gap”
on page 24.
Page
interference from nearby
electrical devices or by a
low level of humidity is
affecting the printer’s
operation.
.Inappropriate settings have
been selected from your
application program.
not too close to any devices
with electric motors, or
raise the humidity level.
Choose different settings in
your application.
P
Check the emulation
selection. See 6’Al–
Emulation” on page 56.
The wrong emulation is
selected.
The wrong character table,
code page or international
character set is selected.
..————.
Static electricity caused by
interference from nearby
electrical devices or by a
low level of humidity is
affecting the printer’s
operation.
Inappropriate settings have
been selected from your
application program.
There are wires missing
from the print head.
Page
t
Check Electronic DIP
Switch settings. See “D2
through D4 – character
code tables” on page 60.
1-
Make sure that the printer
is not too close to any
devices with electric
motors, or raise the
humidity level.
-.
+
Choose different settings in
your application.
Return the printer to your
dealer for repair.
P
Action
The interface cable is
incorrectly connected, or
damaged
Check that the printer
Static electricity caused by
interference from nearby
electrical devices or by a
low level of humidity is
affecting the printer’s
operation.
Make sure that the printer
is not too close to any
devices with electric
motors, or raise the
humidity level.
D
interface cable is correctly
connected. If it is, try a
different cable.
m
(
The following messages do not indicate an error in the
printer, but this table provides a quick lookup to determine the meaning of messages:
Message
B
1
Meaning
Draft mode has been selected. You cannot select proportional pitch
[
I Roman
Roman LO font has been selected
~Roman I ~-
Roman SLQ font has been selected
~Sanserif ~
Sans-serif LQ font has been selected
~Courier ~
Courier LQ font has been selected
[
Prestige LQ font has been selected
/
/
sc@Jt (I
I ORATOR
I
1
] Oratar-2 ]
Script LQ font has been selected
Orator LQ font has been selected
Orator-2 LQ font has been selected
Page
Meaning
~H-Gothic\
H-Gothic LQ font has been selected
~
The zoom mode has been selected. The message
below indicates the current size.
The current pitch size. The message below Indicates
the current size.
EDS
The electrorvc DIP switch mode is selected (see
page 53)
Font changes cannot be made from application
grams. See “ Font lock” on page 45.
pro-
~.
Changes to the font pitch cannot be made from application programs See “ Pitch lock” on page 45.
ON
Displayed in Electronic DIP Switch mode to show the
status of the currently-selected
switch. See “ Changing
a switch’s value” on page 54.
m
The quiet print mode is selected.
on page 37.
m
The front panel settings have been saved as a macro.
See “Saving Macros” on page 42.
Pl
The short test mode has been selected.
test” ot I page 47
P2
The long test mode has been selected, See “ Long
test” on page 47.
Pd
The print area test mode has been selected
area test mode” on page 48.
I-Id
The hexadecimal test dump mode has been selected.
See “Hexadecimal dump mode” on page 49.
-—
Top of form is being set manually with the control
panel. See “ Setting the top of a form” on page 35.
See “Quet
prntlng”
See “Short
See “ Print
The buffer has been cleared manually with the control
panel. See “Clearing the buffer” on page 43.
W
Dot adjustment mode has been selected. See “Adjusting the dot alignment” on page 50.
D
m
The following messages all show that some error has
occurred in the printer
Message
Meaning
PIE
No paper loaded in the printer. Load paper (“ Loading
CUTsheet paper” on page 26 and “ Loading and parking
fanfold paper” on page 27)
Er
The release lever has been moved whale the paper IS in
printing position. Park the paper and try again (“ Parking
paper” on page 31)
El
Print head error. Turn off the printer, wait a few seconds
and try prlntlng again.
E2
Carriage home posltlon error. Turn off Ihe printer, wat a
few seconds and try printing again
E3
Paper handling error Turn off the printer, wait a few
seconds and try prlntlng agan
EY
S.W. I error. Turn off the printer, wait a few seconds and
try printing again
ES
EEPROM or RAM (memory) error Turn off the printer,
wait a few seconds and try prntlng again
E7
“Watchdog”
(Internal software error). Turn off the
printer, wait a few seconds and try printing again
If any of these errors persist, consult your supplier.
In addition to the display, the printer also uses its internal beeper to alert you of problems and internal conditions. Here’s a summary of the different tones:
Beep tones
Meaning
2-second tone
The printer has detected an error condition. Turn off the printer, wait a few seconds and try printing again.
One long tone
The printer has detected an error condltion. Turn off the printer, wait a few seconds and try prlntlng again
Four short tones, repeated twice
The printer is out of paper.
One short tone
The buffer has been cleared. See “ Clearing the buffer” on page 43,
The top of form has been set. See “Setting the top of a form” on page 35.
The quiet mode has been selected. See
“Quiet printing” on page 37
The zoonl size has been changed. See
“Changing the zoom size” on page 40.
The Electronic DIP Switch mode has been
selected. See “Using the Electromc DIP
switches” on page 53.
Two short tones
The macro definition has been selected.
See ‘;’Saving Macros” on page 42.
The quiet mode has been cancelled. See
“Quiet printing” on page 37
Three short tones
The macro definition has been cancelled.
See “Removing the macro” on page 43.
The printer has been reset. See “Setting
the printer back to default settings” on
page 44
Hexadecimal dump mode has been
selected. See “Hexadecimal dump mode”
on page 49.
One shorter tone
Page
Pitch lock mode has been selected See
“PItch lock” on page 45.
Font lock mode has been selected. See
“Font lock” on page 45.
I
Beep tones
I
Meaning
Two shorter to~es
p and font lock have been selected
together. See “ Pitch and font lock” on
page 46.
Intermittent
The release lever has been moved while
the fanfold paper IS not parked. See “Parking paper” on page 31.
tone
Checking system software settings
W
If you cannot print from your Windows application,
there are three things that you can check. You may also
wish to refer to the Microsoft Windows User’s Guide.
Firstly, check that the printer has been set as the
Default Printer.
●
Double-click the Control Panet icon in the Main win-
dow.
●
Double-click the Printers icon
●
Click on NX-2480 R
installed printers.
●
Make sure that Set As Default Printer is checked. If it
is not, click on the check box, and try printing from
your application again.
●
Click on CZoseto return to the Control Panel window.
in the list of
Secondly, check that the printer is correctly selected in
your application.
●
●
Select Print from the application’s File menu. A dialog box appears listing available printers.
Make sure that NX-2480 R
l
If it is not, click on it and try printing again.
Thirdly, check that the correct port is selected.
●
Double-clickthe Control Panel icon in the Main window.
●
Double-click the Printers icon
Page
●
Click on NX-2480 R
installed printers.
●
Click Connect.
●
Make sure that your cable is connected to the port
highlighted in the list of ports. If you are using a
parallel cable, you will probably be using LPT1. If
you are using the SPC-8K serial-to-parallel converter, you will be using COM1 or COM2. Click on
the appropriate port name.
●
Click OK.
●
Click on Close to return to the ControZPanel window.
in the list of
If you still cannot print successfully, consult your software dealer for assistance.
If you cannot print a text file using the MS-DOS
command, check the AUTOEXEC. BAT file to see
whether it contains any of the following statements:
MODE LPT1 : =COM1 :
or
MODE LPT1 : =COM2 :
These indicate
that the computer
is set up to print to a
printer via a serial cable, not a parallel cable. So, if you
are using a parallel cable, delete the line from
AUTOEXEC.BAT.
Resave AUTOEXEC.BAT,
and restart
your computer.
Try printing
again.
Conversely, if you are using the SPC-8K serial-to-parallelconverter, make sure that a statement is included in
AUTOEXEC.BAT. See “Setting up an MS-DOS computer” on page 72.If you still cannot print, refer to the
MS-DOS User’s Guide, or consult your software dealer.
If you can print from MS-DOS but cannot print from
your application, check to see which printer driver is
selected in the application. Check the application’s
manual for details of printer selection.
If you still cannot
Page
print,
consult
your
software
dealer.
7
C
Software commands
Introduction
The NX-2480 Rainbow/Colour has two emulation
modes: Standard/Epson mode and IBM mode.
In the Standard/Epson mode, the printer emulates the
Epson LQ-860/850, and can also recognize the graphics
commands of NEC 24-wire printers. In IBM mode, the
printer emulates the IBM Proprinter X24E. Some additional command codes, which are a superset of these
emulations, are also supported.
The emulation can be changed by changing Electronic
DIP Switch (EDS) setting Al. When Al is ON, the printer
is in Standard/Epson mode; when it is OFF, the printer
is in IBM mode (see Chapter 4).
In addition, when EDS switch A2 is ON, the printer can
automatically sense which emulation is required and
will change emulation as necessary.
This chapter describes the printer’s control commands.
Some commands are common to both Standard and
IBM modes. All commands will grouped by function. The
name of each command is followed by a table like the
one below:
ASCII
Std.
<E SC>
“X”
<1>
Decimal
27
120
:
Hexadecimal
IB
78 01
MODE:
Indicates the mode in which the command is
recognized.
Std.
Standard/Epson mode (EDS switch Al is ON)
IBM
IBM mode (EDS switch Al is OFF)
Page
Both
Both Standard/Epson and IBM modes
ASCII:
Indicates the ASCII coding of the command.
Control characters are enclosed in angle
brackets: For example, <1> means character
code 1.
Decimal: Gives the command in decimal character
codes.
Hexadecimal: Gives the command in hexadecimal character codes.
Parameters for which values must be supplied are indicated by letters such as n, m or d.
Page
c
Select
MODE
Std
Decimal
ASCII
<E SC> “x” n
27
120
n
Hexadecimal
IB
78 n
Changes the print quality according to the value of n, as
shown below:
Print quality
n
10
I
I Draft
Ignored if the FONT LOCK mode was selected during
power-up.
ASCII
MODE
IBM
<ESC>
<1>
Decimal
‘< [ ‘s 4,d ”
n
<O>
27
I
91
100
On
Hexadecimal
1B .5B 64
01 00 n
Changes the print quality according to the value of n, as
shown below:
n
Print quality
o
1
L’ncianged
127
128
254
255
Draft
Letter
quality
Draft
Ignored if the FONT LOCK mode was selected during
power-up.
Page
Both
<E SC>
“k”
Hexadecimal
Decimal
ASCII
MODE
27
.~
107
IB
r]
6B
n
Selects an LQ font according to the value of n. In draft
mode, this command remains dormant and takes effect
later when LQ is selected. Ignored if the FONT LOCK
mode was selected during power-up or the corresponding font is not installed.
I
In
Font
o
Roman
1
Sanserif
2
Courier
3
Prestige
4
script
7
Orator
I
c
Std.
Decimal
ASCII
MODE
<E SC>
“4”
27
52
Hexadecimal
II! 34
Causes subsequent characters (except IBM block
graphic characters) to be printed in italics.
Page
c
<E SC>
Std
Decimal
ASCII
MODE
‘
j
,!
,) 7
-
,< .,
, .,
Hexadecimal
1 B
2>5
Cancels italic printing and causes subsequent characters to be printed upright.
E
ASCII
MODE
Both
<z s c >
,4.+.!.
..
Decimal
;~~ ~g
Hexadecimal
1 B 45’
Causes subsequent characters to be emphasized by
adding extra thickness to horizontal strokes.
e
ASCII
MODE
<~~!: >
Both
‘~+ J
Decimal
;? y
7G
Hexadecimal
] 1< ~ 6
Cancels emphasized printing.
D
ASCII
MODE
Both
<E SC >
,, &
.T!,
Decimal
~ ,, ~ 1
Hexadecimal
~ ~ ,, ,
Causes subsequent characters to be printed in doublestrike mode with a slight horizontal motion in between,
causing a thickening of vertical strokes.
For bold print, use of double-strike is recommended in
LQ mode, and combined use of emphasized and doublestnke is recommended in draft mode.
d
ASCII
MODE
Both
(~~(-)
,,J+,,
Decimal
,, .
‘ /
~ ,.,
,.
Hexadecimal
1B 4‘!
Cancels double-strike printing.
Page
I
U
ASCII
MODE
Both
<~~c>
“-,,
Decimal
~
2.7 45
Hexadecimal
n
IB
2D
r]
Causes subsequent characters to be underlined when n
is 1, and cancels underlining when n is O. Block graphics characters and spaces skipped by horizontal tabulation are not underlined.
O
IBM
Decimal
ASCII
MODE
<E SC>
“-”
27
r]
95
Hexadecimal
n
IB SF n
Causes subsequent characters to be overlined when n is
1, and cancels overlining when n is O. Spaces skipped by
horizontal tabulation are not overlined.
Std.
Decimal
ASIN
MODE
‘ (~~̇¬ÃJ•¸ÏL•äËL•
“-,, <:3>
2; (*(j45
<~s~>
<0>
~~~
<1>
0
n2
r]1
1 r]1
Hexadecimal
3
IB
28
2D 03
00 0: 121
n2
Start score according to the values of nl and n2, as
shown below.
Function
Page
n2
Function
1
Underlining
o
Cancel score
2
Strike-through
1
Single continuous
3
Overlinlng
,2
Double continuous
5
Single broken line
6
Double broken line
line
line
c
ASCII
Std
<E SC>
“ q“
Decimal
27
r]
113
~
Hexadecimal
IB 71 n
Selects an ornament character according to the value of
n, as shown below.
n
Character
Norma 1
o
Out line
2
Shadow
~
Shadow
and out line
S
ASCII
MODE
<~sc>
Both
‘, s ,, <0>
Hexadecimal
Decimal
27
83
0
IB
53
00
Causes subsequent characters to be printed as superscripts. Does not change the character pitch.
S
ASCII
MODE
Both
<E SC>
“S”
<1>
Decimal
27
83
1
Hexadecimal
1B 53
01
Causes subsequent characters to be printed as subscripts. Does not change the character pitch.
s
ASCII
MODE
Both
<E SC>
“T”
Hexadecimal
Decimal
27
84
IB
54
Cancels printing superscripts or subscripts and returns
to normal printing.
Page
C
c
c
MODE
Decimal
ASCII
Hexadecimal
Selects a character table according to the value of n as
shown below:
I d
I
Character table
c
ASCII
MODE
Both
(Esc>
“ 7“
Hexadecimal
Decimal
27
~~
:3
37
Selects character set #1.
c
Both
<Z5C>
., ~ ..
Selects character set #2.
Page
Decimal
ASCII
MODE
~;
>4
Hexadecimal
:3
36
i
ASCII
MODE
<~~~)
Std.
“R. “
.?,
Decimal
Hexadecimal
~ J $J2 ~]
i 3
:) 2 r]
Selects an international character set according to the
value of n.
n
Character set
n
Character set
o
U,S.A
8
Japan
1
France
9
Norway
2
Germany
10
Denmark II
3
England
11
Span II
4
Denmark I
12
Latin America
5
Sweden
13
Korea
6
Italy
14
Irish
7
Span I
64
Legal
Any one of the first eight of these character sets (from
U.S.A. to Spain I) can be selected as the power-up
default using EDS switches D2 to D4.
International character set variations are shown in the
Appendix.
Page
I
MODE
Both
ASCII
I
<E SC>
“ :“
“T”
<4)
<o>
<o>
nl
n2
<O>
I
Decimal
27
~
91
84
00
O nl
n2
I
Hexadecimal
IB
5B
04
00
00 rll
54
00
nz
Changes the code page of the current IBM character set
according to the values of nl and n2, as shown below.
Code page
nl
n2
1
181
#437 U.S.A.
3
82
#850 Multi-Lingual
3
92
#860 Portuguese
3
93
#861 Icelandic
3
95
#863 Canadian French
3
97
#865 Nordic
One of these code pages can be selected as the power-up
default using EDS switches D2 to D4.
The various code pages are shown in the Appendix.
Page100
ASCII
MODE
Decimal
Hexadecimal
Std.
<FS>
“ \ “
Iil
112
28 92 nl
n2
IC 5C n]
IBM
<E SC>
“\”
nl
n2
27 92 nl
n2
1B 5C II1 n2
n2
Enables printing of all characters in the IBM character
set, including those characters which are normally considered control codes. This command remains in effect
for the next n] + n2 x
characters, where nl and n2
are between Oand 255. During this time no control
functions are executed. If a code with no assigned character is received, the printer prints a space. -
MODE
ASCII
Decimal
Hexadecimal
Std.
<FS>
“A”
n
28 94 n
IC
5E n
IBM
<E SC>
“A”
n
27 94 n
1 B 5E n
This command operates like the previous command,
Enable printing of all character codes, except that it
remains in effect for only one character.
Page101
C
c
MODE
Std.
IBM
Decimal
ASCII
<E SC>
“ F“
<3C2 >
Hexadecimal
-,T.’ ~ ,:!
II?
:8
12
50
In Standard mode, changes from either elite or semicondensed to pica pitch (10 cpi) or from condensed elite
to condensed pica (17 cpi). In IBM mode, changes from
elite or condensed to pica (10 cpi).
Ignored if the PITCH LOCK mode was selected during
power-up.
ASCII
MODE
Std.
IBM
<Esc>
<Esc>
Decimal
Hexadecimal
“!”:”
z.7,
~?
IH
4D
“ :“
~
- -,
,, :j ~
:3
~~
In Standard mode, changes from either pica or semicondensed to elite pitch (12 cpi) or from condensed pica
to condensed elite (20 cpi). In IBM mode, changes from
pica or condensed to elite (12 cpi).
Ignored if the PITCH LOCK mode was selected during
power-up.
S
Std.
Decimal
ASCII
MODE
<E SC>
“ g“
27
103
Hexadecimal
:3
67
Changes from either pica or elite to semi-condensed
pitch (15 cpi).
Ignored if the PITCH LOCK mode was selected during
power-up.
Page
C
ASCII
MODE
Decimal
< S1>
; s
<ESC :> < S I >
~;,
L
Both
Hexadecimal
OF
,J
1 B c?
. In Standard mode, changes from pica to condensed pica
(17 cpi) or from elite to condensed elite [20 cpi). In IBM
mode, changes from pica to condensed pica.
Ignored if the PITCH LOCK mode was selected during
power-up.
c
ASCII
MODE
Both
Decimal
18
<DC2>
Hexadecimal
12
In Standard mode, changes from condensed pica to normal pica or from condensed elite to normal elite. In IBM
mode, always changes to normal pica.
Ignored if the PITCH LOCK mode was selected during
power-up.
P
ASCII
MODE
Decimal
Std.
<5 s c > “ p “ r]
27
112
IBM
<E SC>
21
80
“ P“
~]
Ii
n
Hexadecimal
1 B 7 c l-)
i 3
50
n
Causes subsequent characters to be proportionally
spaced when n is 1, and cancels it when n is O.
Ignored if the PITCH LOCK mode was selected during
power-up.
Page
S
MODE
IBM
Decimal
ASCII
<E SC>
“ I“
n
27
73
n
Hexadecimal
: B 49
r]
Changes the print font and pitch according to the value
of n, as shown below:
n
Pitch
Font
o
Draft
2
Letter
Quality
Pica
3
Letter
Quality
Proportional
4
Draft
Jownloai
Pica
6
L e: ter Qua 1iTy 3 o-m
Load
?:ca
7
Let te r Qua 1iry Down
load
Propo rt ionai
8
graft
Elire
10
Letter
12
Draft
14
Let te r Q,Ja1iTy Doim
load
Elite
16
Draft
Pica condensed
18
Let:er
Draft
22
Letter
1oad
Pica
Quality
Elite
Download
IElite
Quality
]PIca condensed
Download
Ip ~ca condensed
Q~ality
Down-
Pica condensed
Ignored if the PITCH LOCK mode was selected during
power-up.
ASCII
MODE
IBM
<E SC>
<II >
Decimal
27
“ [ “ “ I “ <2>
.ml’j
,,1~
91
73
!0 n 1 .-12
Hexadecimal
2
IB
5Y3 49
00
n 1
02
n2
Changes the print mode according to the values of rtl
and rL2,as shown below:
nl
n2
o
11
Courier
Normal
Pica
o
12
Prestige
Normal
Pica
o
18
Courier
Italic
Pica
o
46
Courier
Emphasized
Pica
o
57
Courier
Italic emphasized
Pica
o
60
Prestige
Ernphaslzed
Pica
o
85
Courier
Normal
Elite
o
86
Prestige
Normal
Elite
o
92
Courier
Italic
Elite
o
108
Courier
Emphasized
Elite
o
111
Prestige
Emphasized
Ellte
o
112
Prestige
Italic
Elite
o
116
Courier
Italic emphasized
Elite
o
164
Prestige
Normal
Proportional
o
171
Courier
Normal
Proportional
o
172
Courier
Italic
Proportional
o
184
Courier
Emphasized
Proportional
o
185
Courier
Italic emphasized
Proportional
o
221
Prestige
Normal
Semi-condensed
o
253
Courier
Emphasized
Pica condensed
o
254
Courier
Normal
Pica condensed
Mode
Font
Pitch
Page
nl
n2
Mode
Font
Pitch
1
1
Prestige
Normal
Pica condensed
1
201
Prestige
Normal
Pica condensed
1
202
Prestige
Normal
Elite condensed
‘1
235
Courier
Normal
Elite
1
236
Courier
Normal
Semi-condensed
1
237
Courier
Normal
Pica condensed
1
238
Courier
Normal
Elite condensed
1
239
Prestige
Normal
Elite
1
240
Prestige
Normal
Semi-condensed
Both
Decimal
ASCII
MODE
<E SC>
“h’”
n
27
87
n
Hexadecimal
15 57 n
Causes subsequent characters to be expanded to double
width when n is 1, and cancels it when n is O.
Decimal
ASCII
MODE
Hexadecimal
OE
Both
<E SC>
<SO>
27
14
IB
OE
Causes subsequent characters in the current line to be
expanded to double width. Characters return to normal
width after the next line feed (<LF>). The <DC4>, <VT>,
<FF>, and <ESC> “W” O commands also cancel
expanded printing.
Page
ASCII
MODE
Both
Hexadecimal
Decimal
<DC$>
20
14
Cancels one-line expanded printing set with <S0> or
<ESC> <S0>. Does not cancel expanded printing set
‘with <ESC> “W” 1.
c
ASCII
MODE
Std.
<FS>
“3“
Hexadecimal
Decimal
28
n
69 n
1 c 45
n
Selects a character width according to the value of n as
shown below.
n
Character width
o
NO rma 1-wide
1
Do~b ie wide
2
Triple
wide
Select
ASCII
MODE
Std.
<Esc>
“ !“
Hexadecimal
Decimal
27
n
33
~
1B 2 :
n
Selects a combined print mode according to the value of
n. The value of n is the sum of the values given below for
the desired characteristics.
Function
Underline
I
n value
Function
28
I Emphasized
n value
I
8
Italic
64
Condensed
4
Expanded
32
Proportional
2
Double strike
16
Ellte
I
Page
c
MODE
Std
Decimal
ASCII
<E SC>
<SP>
n
27
32 n
Hexadecimal
IB 20 n
Increases the space between characters by n dots, where
n is a number from O to 127. Used in micro-justification.
d
c
Decimal
ASCII
MODE
<ESC>
“W”
<FS>
“v” <1>
<1>
Hexadecimal
27 119 i
IB 77 01
28
IC 56 01
Std.
86 1
Prints subsequent characters double height without
moving the base line and without changing the line
spacing.
MODE
Decimal
ASCII
<ESC>
“W”
<O>
Hexadecimal
27 119 0
IB 77 00
28
IC 56 00
Std.
86 0
Cancels double-height printing and prints subsequent
characters normal height.
Page
c
ASCII
MODE
IBM
<E SC>
<4>
<o>
Decimal
c’ [ c’ “@”
<0> <0>
n
27
m
91
Hexadecimal
IB
5B
40
400
64
04
00
00
Onm
00
n
m
Selects a combination of character height, width and
line spacing according to the values of n and m, as
shown below. Does not move the base line.
n
Line spacing
Character
o
Unchanged
Unchanged
1
Unchanged
Single height
2
Unchanged
Double height
16
Single line
Unchanged
17
Single hne
Single height
18
Single hne
Double height
32
Double line
Unchanged
33
Double line
Single height
34
Double hne
Double heght
Character width
m
12
height
o
Unchanged
1
Single width (same as cESC>
I Double
width (same as <ESC> “W”
1)
I
V
p
c
Set
ASCII
MODE
Both
<E SC>
“C”
Decimal
27 48
Hexadecimal
1B 30
Sets the distance the paper advances or reverses in subsequent line feeds to 1/8 inch.
MODE
Std.
Decimal
ASCII
<E SC>
“2”
27 50
Hexadecimal
IB 32
Sets the distance the paper advances or reverses in subsequent line feeds to 1/6 inch.
ASCII
Decimal
<E SC> “+” n
27 43 n
IB
28
1 c 33 r]
MODE
Std.
<FS>
“3”
n
51 n
Hexadecimal
2B n
Sets the distance the paper advances or reverses in subsequent line feeds to n/360 inch, where n is between O
and 255.
Page110
base unit for line spacing
ASCII
MODE
IBM
<E SC>
“ [“
“ \ “
<4>
<c>
<o>
<O>
nl
n2
Hexadecimal
Decimal
27
91
92
400
O nl
n2
IB
55
5C
04
00
00
00
nl
n2
Sets the base unit for the line spacing commands,
<ESC> “3” and <ESC> “J”, as shown below:
nl
n2
o
180
1 / 180
inch
o
2:6
1 /216
inch
1
104
1 / 360
i:lc i
Line spacing unit
T-hiscommand becomes effective only after <ESC> “3” or
<ESC> “J” is received. The default base unit is set to
1/216”.
Set line spacing
ASCII
MODE
Both
<~ Sc>
“ 3,,
;,
Hexadecimal
Decimal
27
5:
n
IB
33
n
Sets the distance the paper advances or reverses in subsequent line feeds to n/ 180 inch (STD and IBM mode),
n/216 inch or n/360 inch (IBM mode only) according to
the preceding base unit.
The value of n is between O and 255. If n = O, in Standard mode the line-feed distance is set to O, but in IBM
mode the command is ignored.
Page 111
I
Set line spacing to n/60 inch or n/72 inch
MODE
Both
ASCII
<E SC>
“A”
n
Decimal
27
65
II
Hexadecimal
1 B 41
.n
In Standard mode, sets the distance the paper advances
or reverses in subsequent line feeds to n/60 inch, where
n is between O and 255. If n = O, the line spacing is set to
o.
In IBM mode, this command defines the distance the
paper advances or reverses in subsequent line feeds to
n/72 inch, where n is between 1 and-85. The new line
spacing does not take effect until the next <ESC> “2”
command.
Execute<ESC> “A”
MODE
IBM
ASCII
<E SC>
“2“
Decimal
27
50
Hexadecimal
IB
32
Sets the line spacing to the value defined by the last preceding <ESC> “A” command. Sets the line spacing to
1/6 inch if there is no preceding <ESC> “A” command.
Line feed
Mom
Both
ASCII
<LF>
Decimal
10
Hexadecimal
OA
Prints the current line and advances the paper to the
next line. The line spacing is set by one of the commands listed previously.
Page 112
Reverseline feed
ASCII
MODE
Decimal
Hexadecimal
Std.
<Z SC>
<:F>
2!
: c
IB
IBM
(~~t:)
“
27
93
1B 5D
,
Oil
Prints the current line and moves the paper in the
reverse direction to the preceding line. Ignored when the
printer is in friction feed mode.
The line spacing is set by one of the commands listed
previously.
Select forward feed mode
ASCII
MODE
Std.
<FS>
Decimal
28
“F”
Hexadecimal
1~
73
46
Cancels the reverse feed mode and selects forward feed
mode. This is the default setting at power-on.
Selectreverse feed mode
ASCII
MODE
Std.
<?s>
“3”
Decimal
28
Hexadecimal
IC
82
52
Selects reverse feed mode. Reverses the direction of all
vertical movements. Ignored when friction feed is used.
Pe~formone-time line feed
ASCII
MODE
Both
<Esc>
“J“
1,
Decimal
27
74
11
Hexadecimal
:~
~lj
]]
Feeds the paper once by n times the defined base unit
(n/180 inches in Standard mode). The value of n is
between O and 255. If n = O, the line-feed distance is set
to O. Does not move the print position right or left. Does
not change the line-spacing setting.
Page 113
Perform one n/180-inch reverse line feed
MODE
Decimal
ASCII
Std.
<E SC>
‘4j “
n
27
106
Hexadecimal
n
1B 6A
r]
Feeds the paper once by n/ 180 inches in the reverse
direction, where n is between O and 255. If n = O, the
line~feed distance is set to O. Does not move the print
position right or left. Does not change the line-spacing
setting.
Set page length ton lines
I
MODE
I
ASCII
I
Decimal
I
Hexadecimal
I
Sets the page length to n lines at the current line spacing, where n is between 1 and 127.
Changing the line spacing later does not alter the physical page length. The current line becomes the first line of
a new page.
Set page length ton inches
MODE
Both
ASCII
<E SC>
“C”
<O>
Decimal
n
27
67
0 n
Hexadecimal
1B 43
00
r]
Sets the page length to n inches, where n is between 1
and 32 in Standard mode or between 1 and 64 in IBM
mode. The current line becomes the first line of a new
page.
Set top of page at current position
MODE
IBM
Decimal
ASCII
<E SC>
“4”
27
52
Hexadecimal
IB
34
Sets the current position as the top-of-page (top-of-form)
position.
Page 114
Set bottom margin
Mom
Both
ASCII
<E SC>
“N”
n
Hexadecimal
Decimal
27
78
1P) 4E
rl
n
Sets the bottom margin to n lines, where n is between 1
and 127 in Standard mode or between 1 and 255 in IBM
‘mode. The bottom margin is reset when you change the
page length.
Cancelbottom margin
MODE
Both
Decimal
ASCII
<E SC>
27
“O”
79
Hexadecimal
IB
4F
Cancels the bottom margin.
Form feed
MODE
Both
Decimal
ASCII
<FF>
12
Hexadecimal
Oc
Feeds the paper to the top of the next page according to
the current page length, and moves the print position to
the left margin. When the automatic sheet feeder (ASF)
is selected with EDS switch A6, this command ejects the
current page.
Set verticaltab stops
MODE
Both
ASCII
<E SC>
.n2
“’B”
nl
<o>
Hexadecimal
Decimal
27 66
~1>,
111
~
1
B 42
r]2
n1
00
Cancels all current vertical tab stops and sets new vertical tab stops at lines n], n2, etc., where nl, n2, etc. are
numbers between 1 and 255. A maximum of 16 vertical
tab stops can be set. The tab stops must be specified in
ascending order; any violation of ascending order terminates the tab stop list. Standard termination is by the
<0> control code. The vertical tab stops are set in terms
of the current line spacing and do not move if the line
spacing is changed later.
Page 115
Set verticaltab stops in channel
MODE
Std.
ASCII
<Esc>
n1
“b”
no
,,]~? ,.. <o>
Decimal
27 98 nO
,,1~ n 2
. 0
Hexadecimal
IB
62
1-11II 2
nO
00
Cancels all current vertical tab stops in channel no,
(where nOis between O and 7) and sets new vertical tab
stops in this channel. (A channel is a set of vertical tab
stops selected with the <ESC> “/” command.) See the
<ESC> “B” command for parameters nl, n2, ... <0>.
Select verticaltab channel
MODE
ASCII
Decimal
Hexadecimal
Selects a set of vertical tab stops designated by a channel number (nO) from O to 7. The tab stops in each channel are set by <ESC> “b”.
Verticaltab
MODE
Both
ASCII
<v’:>
Decimal
11
Hexadecimal
OB
Feeds the paper to the next vertical tab stop and moves
the print position to the left margin. Performs a line feed
if no ,vertical tabs are set, such as at power-up. Feeds to
the top of the next page if vertical tabs are set but the
current line is at or below the last vertical tab stop.
Page 116
Horizontal position commands
Set left margin
MODE
Std.
ASCII
<E SC>
“1“
Hexadecimal
Decimal
27
IT
108
,q
1J3 6C
n
Sets the left margin at column n (where n is between O
and 255) at the current character pitch (pica pitch if
proportional spacing is selected). The left margin does
not move if the character pitch is changed later. The left
margin must be at least two columns to the left of the
right margin and within the limits given below:
Pica
o < ~< 76
Expanded pica
0 <
Elite
~ < ~, <
9:
Expanded ellte
o < fl < 45
Semi-condensed
0 5 n s
114
Expanded semi-condensed
0 s Ii 5
Condensed
pica
O < n <
1] O
Expanded condensed
p!ca
~ g ,q < (j q
Condensed
elite
o < ,7 <
152
Expanded condensed
elite
O < ~ < 76
11
<
38
57
Set right margin
ASCII
MODE
Std
<E SC>
“Q”
n
Hexadecimal
Decimal
27
81
IB
n
51
n
Sets the right margin at column n in the current character pitch (pica pitch if proportional spacing is currently
selected). Column n becomes the last character position
in the line. The right margin does not move if the character pitch is changed later. The right margin must be
within the limits below:
Pica
4< ~ < go
Expanded pica
2< n <40
Ellte
5 s n s 96
Expanded elite
3 s n s 48
Semi-condensed
6 s n < 12(I
Expanded semi-condensed
3< n <60
Condensed
pica
~ < n < J37
Expanded condensed
pica
4< ~ < (33
Condensed
elite
8< n < 16Ll
Expanded condensed
elite
4 s n s 80
Page 117
Set left and right margins
MODE
ASCII
IBM
<Esc>
“ x“
nl
Decimal
1,2
27
88
nl
Hexadecimal
n2
1B 58
[] 1 n2
Sets the left margin at column nl and the right margin
at column n2. See the preceding commands for margin
restrictions and other notes.
Carriagereturn
MODE
ASCII
Both
<CR>
Decimal
13
Hexadecimal
OD
Prints the current line and sets the print position to the
left margin. If EDS switch A5 is set to OFF, this command also performs a line feed.
Set automatic line feed
MODE
ASCII
IBM
<E SC>
“5“
<1>
Decimal
27
53
1
Hexadecimal
1B 35
01
Causes the printer to perform both a carriage return
and line feed each time it receives a <Cm code. This
command overrides EDS switch A5.
Cancelautomatic line feed
ASCII
MODE
I IBM
I <Zsc>
“5”
<0>
Decimal
I 27
53
0
Hexadecimal
I IB
35
00
Causes the printer to perform only a carnage return
when it receives a <Cfi code. This command takes priority over EDS switch A5.
Backspace
MODE
Both
ASCII
CBS >
Decimal
8
Hexadecimal
08
Moves the print position one column to the left. Ignored
if the print position is at the left margin. This command
can be used to overstrike or combine characters.
Page 118
Set horizontal tab stops
ASCII
MODE
Both
<5 SC>
“3”
32
Decimal
rll
27
<0>
n2
68
n1
0
Hexadecimal
1B 4 L ,~1
.q~ . . 00
Cancels all current horizontal tab stops and sets new
tab stops at columns nl, n2, etc. in the current character pitch (pica pitch if proportional spacing is currently
selected), where nl, n2, etc. are numbers between 1 and
255. The maximum number of horizontal tab stops
allowed is 32 in Standard mode and 28 in IBM mode.
The tab stops must be specified in ascending order; any
violation of ascending order terminates the tab stop list.
Standard termination is by the <0> control code. To
clear all tab stops, specifj <ESC> “D” <0>.
Reset all tab stops
ASCII
MODE
IBM
<E SC>
“R”
Decimal
27
82
Hexadecimal
IB
52
Resets the horizontal tab stops to their power-up values
in which a tab stop is set every 8 columns starting at
column 9. Also clears all vertical tab stops.
Horizontal tab
ASCII
MODE
Both
<ET>
Decimal
9
Hexadecimal
09
Moves the print position to the next horizontal tab stop.
Ignored if there is no next horizontal tab stop on the
current line. Note that when underlining is selected,
spaces skipped by horizontal tabulation are not underlined.
Page 119
I
Relativehorizontal tab
MODE
Std.
Decimal
ASCII
<E SC>
“ \ “
n 1 ;12
27
92
Hexadecimal
II 1 11,2 1B 5 c
.nl
112
Moves the print position right or left a specified distance. Ignored if the resulting position is beyond the
right or left margin. The formula for the distance and
direction are as follows:
If rL2is between O and 63, the print head moves right by
(nl + n2 x 256) dots.
If you want to move the print head to the left, nl and n2
are obtained by subtracting the value from 65536, and
dividing the result into high and low bytes.
The unit of movement is fixed at 1/120 inch in draft
mode and 1/180 inch in LQ mode.
Relativehorizontal tab in inches
MODE
IBM
Decimal
AS(N
<E SC>
“ d“
nl
:22
Hexadecimal
27 100 n 1 n2
IB
64
nl
n2
Sets the next print position to (n] + n2 x 256)/120
inches from the current position.
Ignored if this position is beyond the right margin.
The maximum tab position is 8 inches.
Absolute horizontal tab in inches
MODE
Std.
Decimal
ASCII
<E SC>
“$”
nl
n2
27
36
nl
Hexadecimal
n2
IB
2b
Ill
n2
Sets the next print position to (n] + n2 x 256)/60 inches
from the left margin on the current line. Ignored if this
position is beyond the right margin.
Page 120
Graphics commands
Print normal-density 8-bit graphics
MODE
Both
ASCII
<3 SC>
112
“K”
mi
Decimal
,,2j
~J
m2
II 2 mi
~ ~ :] ]
m2
Hexadecimal
1B 4 B r] J
112 m1 !T12
Prints bit-image graphics at 60 dots per inch horizontally. The graphic image is 8 dots high and (nl + n2 x
256) dots wide. Maximum width is 8 inches (480 dots).
ml, M2, ... are the dot data, each a l-byte value from O
to 255 representing 8 vertical dots, with the most significant bit at the top and the least significant bit at the
bottom. The number of data bytes must be nl + n2 x
256. Dots beyond the right margin are ignored. On completion of bit-image printing the printer returns automatically to character mode.
Print double-density 8-bit graphics
MODE
Both
ASCII
<E SC>
rlz
“L”
ml
Decimal
nl
27
,712
n 2 *71 m2
76
[11
Hexadecimal
1B 4C
n1
II 2 m Z ,m2
.
Prints bit-image graphics at 120 dots per inch horizontally (maximum 960 dots wide). See the <ESC> “K” command for other information.
Print double-densit~ double-speed 8-bit graphics
MODE
Both
ASCII
<~~(=)
nz
-y,,
ml
nl
m2
Decimal
27 89 nl
,q2 ,71 mz
Hexadecimal
1B 59
Ii1
n 2 ml
m2
Prints bit-image graphics at 120 dots per inch horizontally (maximum 960 dots wide), skipping every second
dot in the horizontal direction. See the <ESC> “K” command for other information.
Page 121
Print quadruple-density 8-bit graphics
Both
Decimal
ASCII
MODE
<E~c>
,’z,.
ni?
,Tll
Hexadecimal
nl
27
90
n]
1B 51)
r] 1
,m2
r12
ml
m2
n 2 ml
m2
,..
Prints bit-image graphics at 240 dots per inch horizontally (maximum 1920 dots wide), skipping every second
dot in the horizontal direction. See the <ESC> “K” command for other information.
Print hex-density 24-bit graphics
Std.
Decimal
ASCII
MODE
<FS>
n:
.m.~
“Z”
ml
Hexadecimal
~]~
28
m2
n 2 .m1 m2
n 2 ml
1713 . . .
m3
90
nl
IC
5A
nl
m2
Prints 24-bit dot graphics at 360 dots per inch horizontally.The graphics image is 24 dots high and n] + n2 x
256 dots wide. Maximum width is 8 inches (2880 dots).
In the data ml, m2, ti ... each three bytes represent 24
vertical dots. In the leftmost position, the most significant bit of ml is the top dot; the least significant bit of
ml is the eighth dot from the top; the most significant
bit of m2 is the ninth dot; the least significant bit of m2
is the sixteenth dot from the top; the most significant bit
of A is the seventeenth dot from the top; the least significant bit of m3 is the bottom dot. The rest of the data
is organized in the same way. The number of data bytes
must be 3 x (n] + n2 x 256). Dots beyond the right margin are ignored. On completion of dot graphics printing,
the printer returns automatically to character mode.
Page 122
Selectgraphics mode
MODE
Decimal
ASCII
Std.
<E SC>
~q~
“ . .,
I-12
Hexadecimal
nO
27
42
110
1B
,ml
nl
n2
ml
II 1 n 2 m1
.7]2 .
m2
,m2’
2’4 110
.Selects one of eleven graphics modes depending on the
value of nOand prints bit-image graphics in this mode.
See the <ESC> “K” command (for 8-bit graphics) or the
<FS> “Z” command (for 24-bit graphics) for information
on nl, n2, ml, m2, etc.
I
I
nO
I
Graphics mode
0
I 8blt N~rmalden~itY
1
8-bit Double-density
2
8-bit Double-density,
(60 dots per inch)
(120 dots per Inch)
double-speed
(120 dots per inch)
I
3
I 8btQu~dr”Pedensi~Y
(240 dots per inch)
I
4
\ 8-bltcRT~r~~hi@
(80 dots per inch)
I
6
I 8-bi t CRT graphics, mode II
(9O dots per inch)
I
32
I 24-bit Normal-density
(6O dots per inch)
I
33
124-bit”Double-density
(120 dots per inch)
I
38
I 24-bit CRTgraphcs
(9O dots per inch)
39
24-bit Triple-density
(180 dots per inch)
40
24-bit Hex-density
(360 dots per inch)
~ode,
I
Selectgraphics mode
IBM
Decimal
ASCII
MODE
<E SC>
“ :“
‘nl
r] 2
ml
,m2
“ g“
m[1
Hexadecimal
2 ~ g 1 1~3
II?
L 1 II 2
n 1 II 2 ,x O
ml
mu
m2
53
67
m1 m2
Selects one of eight graphics modes depending on the
value of mO and prints bit-image graphics in this mode.
The graphics image is (nl + n2 x 256) – 1 dots wide. See
the <ESC> “K” command (for 8-bit graphics) or the <FS>
“Z” command (for 24-bit graphics) for information on
ml, m2, etc.
Graphics mode
mO
I
0
I
(60 dots per inch)
I 8-bit N~malden~itY
I
(120 dots per inch)
1
8-bit Double-density
2
8-bit Double-density,
3
8-bit Quadruple-density
(240 dots per inch)
8
24-bit Normal-density
(6O dots per Inch)
9
I 24-bit DOuble-den5ty
11
24-bit Triple-density
(180 dots per inch)
12
24-bit Hex-density
(360 dots per inch)
double-speed
(120 dots per inch)
(120 dots per inch)
I
Convert graphics density
Std.
Decimal
ASCII
MODE
<E SC>
“ ?“
.~ m
27
63
n m
Hexadecimal
13
3 F r] m
Converts graphics defined by subsequent <ESC> “K”,
<ESC> “L”, <ESC> “Y” or <ESC> “Z” commands to a density mode defined by <ESC> “*”. n is “K”, “L”, “Y” or “Z”,
indicating the mode to be converted. m is a code from
<O> to <4> or <6> indicating one of the modes of
<ESC> “*”.
Page 124
Download character commands
Define download characters
MODE
Std.
ASCII
<E SC>
“ L“
<0>
.~1
n2
m1
m2
d]
dz
.,
dx
mO
Defines one or more new characters and stores them in
RAM for later use. EDS switch A3 must be set to OFF;
otherwise RAM is used as an input buffer only, not for
storing downloaded characters, and this command is
ignored.
nl is the character code of the first character to be
defined and n2 is the character code of the last character to be defined. nl must be equal to or less than n2.
The data for each character starts with three bytes speci~ing proportional spacing attributes: the first byte, rnO,
specifies the left of the character; the second byte, ml,
specifies the character width; the third byte, M2, specifies the right of the character.
These values must not exceed the following maximum
limits:
ml
mO + ml + m2
9
12
LQ pica
31
36
LO elite
27
30
L() semi-condensed
19
24
LQ proportional
37
42
7
:2
LQ super/subscript
19
36
LQ prop. super/subscript
~~
42
Character
Draft
Draft super/subscript
mode
Page 125
Next comes the dot data. Normal character height is 24
dots, so there must be 3 x ml bytes of dot data. If the
printer is in super/subscript mode, however, the character height is 16 dots, so there must be 2 x ml bytes of
dot data.
Each data byte represents eight vertical dots, with the
most significant bit representing the top dot, and the
least significant bit representing the bottom dot.
Define download characters
MODE
IBM
ASCII
<E SC>
“= “
Decimal
Hexadecimal
n1
27
61
nl
n2 “//”
n3 n4
<O> n5 ml m2
n2
35
n3
0 n5
m9 d 1 d2
m9 d 1 d2 .,. dx
dx
ml
1B 3D
n4
rn2
II 1
n2
23
n3
n4
00
n5
ml
m2 . .
m9 dl
a2
.
dx
Defines new characters and stores them in RAM for later
use. EDS switch A3 must be OFF; otherwise RAM is
used as an input buffer, not downloading characters,
and this command is ignored.
Downloading characters in IBM mode requires Dot Pattern data and Character Index Table data. Dot Pattern
data controls which pins fire when printing a character.
Inddx Table data is placed in a “lookup table” that provides information on where Dot Pattern data is stored in
memory and defines certain attributes of the character.
(n] + n2 x 256) gives the number of bytes to be downloaded.
n3 and n4 indicate the low order and high order
addresses in which data is to be stored. n3 should be 15
and n4 should be 128 for this printer.
Page 126
n5 determines the character mode to be downloaded, as
shown below:
n5
Character
o
Draft
1
LQ pica
2
LQ proportional
3
LQ ellte
mode
Character width
9
35
17 to 41
29
ml through m9 indicate Index Table data.
ml and M2 indicate the address where Dot Pattern is
stored. ml is the high-order byte. m3 indicates the number of columns in the character memory, and m4 indicates the number of columns in the character.
m5 through m9 are compression mask bits. Data compression allows the efficient use of memory in storing
downloaded characters providing space for more characters than would be available without compression. The
printer repeats the previous dot column in the current
column when the current column compression mask bit
is set to 1.
It is necessary to define all of Index Table data before
the Dot Pattern data to download many characters.
dl, d2, . .. dx is the Dot Pattern data being downloaded.
Each data byte indicates eight vertical dots, with the
most significant bit being the top dot, and the least significant bit being the bottom dot.
Copy characterset from ROM into RAM
MODE
Std.
Decimal
ASCII
<E SC>
“ :“
<0>
n
<o>
27
58
Hexadecimal
0 r] o : 3
3A 00 n 00
Copies the character set selected by n, as shown below,
to the corresponding download character RAM area,
Page 127
overwriting any downloaded data already there.
when EDS switch A3 is set to ON.
Font
n
o
Roman
1
Sanserif
2
Courier
3
Prestige
4
Script
7
Orator
8
Orator 2
12
H-Gothic
32
SLQ Roman
Select download characterset
MODE
Std.
ASCII
<E SC>
‘c:,”
<1>
Decimal
27 37 1
Hexadecimal
IB 25 01
Selects the download character set. Ignored when EDS
switch A3 is ON.
SelectROM characterset
MODE
Std.
ASCII
<E SC>
“’’:’.”
<o>
Decimal
27 37 0
Hexadecimal
IB 25 00
Stops using the download character set and returns to
the built-in ROM character set. Ignored when EDS
switch A3 is ON.
Page 128
Other printer commands
Selectprint color
I Both
I <ESC>
“r”
n
I 27
114
n
I IB
72
n
I
Selects the printing color according to the value of n as
shown below. Ignored if EDS switch A4 is OFF or if a
color ribbon is not installed.
Inl
Inl
Color
o
Black
4
Yellow
1
Magenta
5
Orange
121
Cyan
161
Green
3
Violet
I
Color
I
Set MSB to 1
I
MODE
Std.
I
ASCII
,
I
Decimal
1
<Esc>
“ >“
I
Hexadecimal
I
1
27
62
IB
3E
Sets the most significant bit of each subsequent byte
received to 1, allowing users with a 7-bit interface to
access characters with ASCII codes greater than 127.
Set MSB to O
MODE
Std
ASCII
<Zsc>
“=. !
Decimal
27 61
Hexadecimal
IB
3D
Sets the most significant bit of each subsequent byte
received to O.
AcceptMSB as is
MODE
Std.
ASCII
<ESC>
“#”
Decimal
27 35
Hexadecimal
IB
23
Cancels the preceding commands and accepts the most
significant bit as it is when it is sent to the printer.
Page 129
Delete last charactersent
MODE
Std
ASCII
<DEL>
Decimal
127
Hexadecimal
7?
Deletes the last character received. Ignored if the last
character received has already been printed, or if the
last character received was part of a command.
Cancellast line
I
MODE
Both
Decimal
ASCII
<CAN>
24
Hexadecimal
18
Deletes the last line currently in the print buffer.
Set printer off-line
MODE
Decimal
ASCII
Std.
<DC3 >
IBM
<E SC>
19
“Q”
“ S“
27
Hexadecimal
13
81
36
15
5L
24
Sets the printer off-line (into not-ready mode). The
printer disregards all subsequent characters and commands except <DC 1>, which puts it back on-line (into
ready mode). The printer’s ON LINE indicator will not go
off.
Set printer on-line
MODE
Both
Decimal
ASCII
<DC: >
17
Hexadecimal
11
Puts the printer back on-line (into ready mode), allowing it to receive and process all subsequent characters
and commands. This command is ignored if the printer
was set off-line (into not-ready mode) by pressing the
m
button on the control Panel.
Page 130
I
Stop printing
MODE
IBM
ASCII
<E SC>
“ .. .,
.
Decimal
27
106
Hexadecimal
IB
6A
Prints the entire contents of the input buffer, then sets
the printer off-line (into not-ready mode). The ON LINE
indicator on the control panel will go off.
Bell
MODE
Both
Decimal
ASCII
~
<BEL>
Hexadecimal
07
Sounds a brief beep tone on the printer.
Bi-directionalprinting
MODE
Both
ASCII
<Esc>
“u” <0>
Decimal
27
85
0
Hexadecimal
IB
55
00
Causes subsequent printing to be performed in the normal bi-directional mode, which is faster than uni-directional printing.
Uni-directionalprinting
MODE
Both
Decimal
ASCII
<5 SC>
“u”
<1>
27
85
1
Hexadecimal
IB
55
01
Causes subsequent printing to be performed uni-directionally, ensuring maximum vertical alignment precision.
One-1ineuni-directionalprinting
MODE
Std
ASCII
<E SC>
‘6< “
Decimal
27
60
Hexadecimal
IB
3C
Immediately returns the print head to the left margin,
then prints the remainder of the line from left to right.
Normal bi-directional printing resumes on the next line.
Page 131
Manual feed
MODE
ASCII
Both
<zsc>
Decimal
<EM> <o>
Hexadecimal
27 25 0
IB :9 00
Selects manual sheet feeding even when the sheet feeder
is used. Ignored if EDS switch A6 is ON (ASF is not
installed).
Auto feed
MODE
ASCII
Both
<ES C,> <El!>
Decimal
<4>
27
25
Hexadecimal
4
IB
19
04
Selects the automatic sheet feeder. Ignored if EDS
switch A6 is ON (ASF is not installed).
Ejectpaper
I
MODE
I
ASCII
I
1
Both
I <E SC>
‘ecimai
1
<EM>
“R”
27
25
/
Hexadecimal
I
82
IB
19
I
52
Ejects the current page. Ignored if EDS switch A6 is ON
(ASF is not installed).
Set print start position on ASF
MODE
Both
I
I <ESC>
ASCII
<EY>
I
“T”
n
Decimal
I 272584
I
I
Hexadecimal
I B
1954
n
Skips n/6 inches at the top of the page, where n is equal
to or greater than 1. Ignored if EDS switch A6 is ON
(ASF is not installed).
Resetprinter
MODE
I
ASCII
I
Decimal
I
Hexadecimal
I
Both
I <ESC>
“@”
I 2764
I IB
40
I
Std.
I <FS>
“@”
I 2864
I IC
40
I
Re-initializes the printer. Clears the print buffer and
returns settings to their power-up values. Does not
clear the input buffer or change ASF selections.
Page 132
Set initial conditions
MODE
Decimal
ASCII
IBM
<E SC>
“ [“
“K”
<3>
<C!>
<0>
<3>
,7
27
9:
00
Hexadecimal
/ 5 3
13
5B
4B
03
3 r,
00
00
03
:2
Re-initializes the printer to the initial conditions determined by the value of n.
The value of n is the sum of the values given below for
the desired characteristics.
Function
In I
value
Function
n value
Disable alarm
I
32
112-inchforms
)*
Auto CR with LF
I
16
I Slashedzero
2
.Auto LF with CR
8
Character set #2
I
I
I
J____
Page 134
Appendix
Specifications
Printing system
Printing speed
Draft
Letter Quality
Serial Impact Dot-matrix
10 cpi
(Pica)
220 Cps
67 CPS
12 cpi
(Elite)
264 CPS
80 CPS
15 cpi (Semicondensed)
330 Cps
100 Cps
Print direction
Bi-directional, logic-seeking
Uni-directional, logic-seeking
(selectable)
Print head
Life
24 pins
200 million dots/pin
Line spacing
1/6, 1/8, n/60, n/72, n/ 180,
n/2 16, n/360 inches
Typeface
families
Draft, Roman, Sanserif, Courier,
Prestige, Script, Orator, Orator-2,
H-Gothic, SLQ Roman
Page 135
I
Characters
ASCII
International
IBM special
IBM block graphic
IBM code page
Download
96
16 sets (*)
111
50
6 sets (**)
256
* USA, France, Germany, England, Denmark I,
Sweden, Italy, Spain I, Japan, Norway,
Denmark II, Spain II, Latin America, Korea,
Irish, Legal
** #437 (USA), #850 (Multi-Lingual),
#860 (Portuguese), #861 (Icelandic),
#863 (Canadian French), #865 (Nordic)
Number of columns
Pica (10 CPI)
Elite (12 CPI)
Semi-condensed (15 CPI)
Condensed pica (17 CPI)
Condensed elite (20 CPI)
Proportional
Character matrix
Pica
Elite
Semi-condensed
Condensed pica
Condensed elite
Proportional
Page 136
Draft
24 X 9
24 X 9
16 X 7
24 X 9
24 X 9
80
96
120
137
160
Variable
LQ
24 X 31
24 X 27
16 X 21
24 X 16
24 X 16
24 x n
Bit image dot-matrix
8-pin normal (60 DPI)
8-pin double (120 DPI)
8-pin high-speed double (120 DPI)*
8-pin quadruple (240 DPI)*
8-pin CRT I (80 DPI)
8-pin CRT II (90 DPI)
24-pin normal (60 DPI)
24-pin double (120 DPI)
24-pin CRT III (90 DPI)
24-pin Triple (180 DPI)
24-pin Hex (360 DPI)*
8 X 480
8 X 960
8 X 960
8 X 1920
8 X 640
8 X 720
24 X 480
24 X 960
24 X 720
24 X 1440
24 X 2880
*. It is impossible to print adjacent dots in modes
marked with an asterisk (*).
Paper feed
Standard
Option
Paper feed speed
Friction feed with paper guide
Push tractor feed from the rear
of the printer
Pull tractor feed from the bottom of the printer
Friction feed with SF- 10DW
automatic sheet feeder
3.4 inches/second maximum
Page 137
I
Paper specifications
Cut sheet
Width
5.5” - 11.0” (139.7 -279.4 mm)
5.5” - 14.0” (139.7 -355.6 mm)
Length
Thickness
0.07-0.12 mm
14-24 lb, 52-90 g/m2, 45-77 kg
Weight
Fanfold (continuous)
4.0” - 10.0” (101.6 -254.0 mm)
Width
Minimum 5.5” (139.7 mm)
Length
Single-ply paper 0.07-0.12 mm
Thickness
Total for multi-part forms 0.35 mm
14-22
lb, 52-82 g/m2, 45-70 kg
Weight
Original + 4 copies
Copies
Maximum buffer size
Without Download
With Download
Emulations
Standard mode
IBM mode
Interface
Ribbon type
Page 138
46.7 kB
256 bytes
Epson LQ-860, NEC 24-wire
graphics commands
IBM Proprinter X24E
Centronics parallel (standard)
RS-232C serial (option)
On-carriage, dedicated
Monochrome
(black only)
Color
(black, magenta, cyan, violet,
yellow, orange, green)
Ribbon life
Monochrome (Z24HD)
Long life Monochrome
(LZ24HD)
Color (X24CL)
Dimensions and Weight
Width
Depth
Height
Weight
3 million characters (draft
pica)
4.5 million characters (draft
pica)
1 million characters/color
(draft pica)
473 mm (18.6”)
371 mm (16.6”)
174 mm (6.8”)
7.6 kg (16.7 lb)
Power supply
120VAC, 220VAC, 230VAC, 240VAC,
50/60 Hz
(varies according to the country of
purchase)
Options
Automatic sheet feeder (SF- IODw
Serial-Parallel Converter (SPC-8K)
Page 139
Parallel interface
Name
Pin
1
I Function
!
1
STROBE
Goeslow for> 0.51Js
when active
2
DATAO
Highwhen active
3.
DATA1
Highwhen active
] DATA2
,
DATA3
I Highwhen active
I
I
4
5
Highwhen active
6
DATA4
Highwhenactive
7
DATA5
Highwhen active
8
DATA6
Highwhen active
9
DATA7
Highwhen active
10
ACK
10LSto acknowledgereceiptof data
11
BUSY
Printersets line low when readyto
receivedata.
12
PAPER
Highwhen paperrunsout. Can be
disabledwith EDS setting.
13
I SELECT
I Highwhen printeris on-line
17
CHASSIS
Chassisground
18
+5V
+5V DC outputfrom printer
19-30
GND
Twistedpair groundreturn
31
RESET
—
Whenthissignalis setlow,theprinter
is reset
I
1
33
Page 140
I
Lowwhenprintercannotcontinuedue
to an error
ERROR
32
1
EXT GND
Externalground
Character sets
The following tables show the Standard and IBM character sets. Also shown are the IBM code pages (international variations of IBM character set #2) and the
standard (Epson) mode international character sets
(international variations of the Epson Standard character set).
The decimal character code for each character is shown
in an inset at the bottom right of the character.
The hexadecimal character code for a character can be
found by reading the hexadecimal column and row
numbers, which are at the top and on the left of the
table. For example, the character “A” is in column 4 and
row 1, so its hexadecimal character code is 41. This is
equivalent to decimal 65 (4 x 16 + 1 = 65), which is the
decimal number shown in the inset.
Control codes are indicated by abbreviations in angle
brackets, e.g. <LF>.
Page 141
Standard character set#2
Page142
Standard character set #2 (continued)
Page 143
I
International character sets
The character codes are shown in decimal.
Page 144
IBM character set #2
Code page #437 (U.S.A.)
1541 [701 1861 I102I1118]
I
w
I 241 t401 I%1 I721 I881 IMI
81
:
l/ul\I/cM\ \
n
T
v
I 531
I74]
IWI
I[20
..
11041 1122]
Page 145
Code page #437 (U.S.A.) - continued
Page 146
Code page #850 (Multi-lingual)
The other characters are the same as in code page #437.
8
9
A
B
c
D
E
F
Page 147
I
Code page #860 (Portuguese)
The other characters are the same as in code page #437.
8
9
B
A
c
D
11
E
F
1---1a
T
I1771 I1931 1209[ 12251 !2411
-1
11781 11941 I21OI 1226[ 12421
I?-J’,---l
11791 ]1931 12111 12271 12431
-1
u
7
’-l
-1
-1
11321 11481 11641 118QI 1196]
_- 12121 12281 1244]
J -1
Ilml I1491 1165! 11811 11971 1213! 12291 12451
+ -1
1134 Iixl 1166 1182 J198
]214
Q
Qb
‘~
n
F7
Ikifl
It
Iii
m
12M ]24$
it
T 231“
ITS
1-m
11691 11851 12011 1217] 12331 12491
11871 12031 12191 !23S1 !2511
lli39t 12051
12211 12371
!253\
I1591 I1751 11911 17JJ7112231 12391 12551
Page 148
Code page #861 (Icelandic)
The other characters are the same as in code page #437.
Page 149
Code page #863 (Canadian French)
The other characters are the same as in code page #437.
Page 150
Code page #865 (Nordic)
The other characters are the same as in code page #437.
I
o
1
I I
L
3
a
II a
11301 11461 I 1621 11781 11941
&
6
I
t
Iii
6
Iir7 Iii (iii I’iE
H — i— -—
Ia
Io
11331
I0 I
I
1134 11521 11691 [1841 Iml
11491
11651 11811 11971
11341115)111661 11821 11%31
7
{
I
11371
I
11381 IH41
H
11531
116? I
11851 IZJll
11701
11861 ml
IDI
113911155111711 11871 12031
I
11421 1158111741 11’%1 12MI
L
I
F
Page 151
Character set #1
The other characters are the same as in each version of
character set #2
a
o
1
2
3
4
5
6
7
8
~
A
B
c
D
~
F
Page 152
‘7
(tiw
k
b
(ml)
l-ii
h
(Cl@
Iii
Iii
m)
l-iii ~
(WA)
Iii
m ~
I’m
Iii
ml)
Iii
i-ii
(BED
l-ii
iii
(6s) (w
i-iii
Iii
(w)
(En)
hi
Iiii
{1.F)
hi
Iii
(ESO
(w
Iii
l-iii
(FF} (l%)
I’m
F
(CR}
F
G’ (s0}
i-iii
Iiii
(51)
E
IRi
IBM special character set
Additional characters that can be printed using software
commands.
Page 153
Page 154
Glossary
‘This section gives a brief explanation of some of the
terms used in this manual.
Adobe Type Manager
Software for Windows and Macintosh which allows you to print
PostScript fonts.
Adjustment lever
Lever which lets you adjust the
position of the print head for differing paper thicknesses.
AEC mode
See Automatic Emulation
Change mode.
Application
Software program, such as a
word-processor, from which you
can print out documents.
Auto line feed
Printer function in which the
printer automatically performs
a carriage return and line feed
whenever it receives a carriage
return control code.
Auto load position
Position of the print head after
paper is loaded, relative to the
physical top of the page.
AUTOEXEC.BAT
MS-DOS set-up file containing
statements which determine to
which port the printer output is
to be sent.
Page 155
Automatic Emulation Change mode
Printer mode in which the
printer automatically senses
which emulation mode (Standard or IBM) the computer
requires, and changes mode
accordingly.
Automatic Sheet
Feeder
An optional device which allows
a number of cut sheets to be
stacked into a hopper, and fed
one at a time through the
printer.
Bi-directional
printing
Mode in which the printer prints
graphics both from left to right
and from right to left.
Bit
Short for “binary digit”. The
smallest unit of information
(“On” or “Off’ - “l” or “O”).
Bitmap fonts
Fonts that can only be printed at
a particular size. The fonts
which you can select from the
printer’s control panel are bitmap fonts.
Bottom feed
The way in which fanfold paper
is fed upward through the bottom of the printer (as opposed to
the way in which it is fed from
the back of the printer).
Carnage return
An instruction from the printer
which tells the printer to move
the print position to the start of
the current line. See auto line
feed.
Centronics connector The type of connector which
plugs into the printer’s interface
connector socket.
Page 156
Character code
A number which stands for a letter, digit or symbol. A computer
sends text to the printer in the
form of character codes.
Character set
A fixed set of printable characters. A character set normally
includes upper and lower case
letters, the digits O-9 punctuation symbols and various other
characters, for example accented
characters for foreign languages
or block graphic characters.
Character table
See character set.
Code page
A variant of the IBM character
set with characters for a particular country or region, for example, code page #860 Portuguese.
Compatible
See IBM compatible.
Computer paper
See fanfold paper.
Control code
A code number which instructs
the computer to perform a particular operation. For example,
the computer sends the printer a
form feed control code (12) to
make it eject the current page.
Control panel
1) Panel on the printer that displays information about the
printer’s current working and
allows you to operate the
printer.
2) Windows utility which allows
you to make system settings,
such as printer selection and
port set-up.
Page J57
Cut sheets
Single sheets of paper.
Default Printer
The printer which is automatically used by Windows applications.
Default setting
Feature setting adopted if no
user setting has been made
(sometimes called “factory setting”).
DOS
See MS-DOS
Dot adjustment mode Mode in which you can realign
the print head in bi-directional
graphics mode.
Double-spacing
Printing text with a blank line
between each printed line.
Downloaded
character
User-defined character, created
on the computer. Sent to and
stored in the printer for later
printing.
Draft
Printing mode in which only the
Draft font is used. The printer
can print more quickly in Draft
mode than in Letter Quality
mode.
Electronic DIP
Switch settings
Printer settings which take effect
when you switch on the printer.
You can make these settings
using the control panel.
Emulation
Imitation by one type of printer
of the functions of another type
of printer.
Epson L~-860
Dot matrix printer which the NX2480 Rainbow/Colour can emulate.
. .
Page 158
Epson emulation
mode
See Standard mode.
Factory settings
See Default settings
Fanfold paper
Sheets of paper joined by perforations. Fanfold paper has small
holes at the edges.
Fixed pitch font
See monospaced font.
Font
A set of characters of a particular typeface, which you can
select for printing.
Font lock mode
Mode in which font selection can
only be made from the printer’s
control panel.
Form feed
Printer operation which ejects
the current page and feeds the
next sheet into position, ready
for printing.
Forward micro feed
Control panel operation which
feeds paper through the printer
in small steps.
Graphics direction
The printer’s method of printing
graphics. See bi-directional and
uni-directional printing.
Handshaking
See protocol.
Hexadecimal dump
A printout of all character codes
and control codes as they are
received by the printer, along
with their hexadecimal (base 16)
values.
IBM emulation mode
Mode in which the printer emulates an IBM Proprinter X24E.
Page 159
IBM compatible
A personal computer that can
run the same system and applications software as an IBM PC.
IBM PC
Personal computer made by
IBM capable of running MS-DOS
and Windows system software.
See also IBM compatible.
IBM Proprinter X24E
Dot matrix printer which the NX2480 Rainbow/Colour printer
can emulate.
Icon
On-screen symbol in Windows or
Macintosh which represents a
program or document. You can
double-click on an icon to start
the program or open the document.
Interface
Physical link between the printer
and the computer.
International
character set
Variant of the Standard character set containing characters for
a particular country or region.
Landscape
Landscape mode is when a document is printed on paper with
the longest sides of the paper at
the top and bottom.
Letter @mlity
Printing mode in which the builtin fonts are used to produce
high-quality (suitable for correspondence) text output.
Line feed
h instruction from the computer which tells the printer to
advance the paper by one line.
Page 160
LOng test
Repetitive printer test showing
every available font and pitch
setting, all characters sets, current vertical alignment and current Electronic DIP switch
settings.
Macintosh
Easy-to-use personal computer
which allows you to print using
TrueType and PostScript fonts
(to use PostScript fonts you
must have installed Adobe Type
Manager). To use the printer
with a Macintosh, you need an
additional interface cable.
Macro
Printer function which allows
you to save the font, pitch, zoom
resolution, single-sheet auto
load position and fanfold auto
load position. Macro settings
come into effect each time the
printer is switched on.
Micro feed
See forward micro feed and
reverse micro feed.
MODE statement
Statement in an MS-DOS
AUTOEXEC.BAT file that determines to which port the computer should send printer
output.
Monospaced font
Font in which all characters are
of the same width.
MS-DOS
The most common operating
system software for the IBM PC
and compatible machines.
Page 161
1
Multi-part form
Forms (such as invoices) consisting of several sheets, one on
top of another, enabling several
copies to be made simultaneously.
NCR sets
“No Carbon Required” – multipart forms which use pressuresensitive chemicals to mark the
lower copies.
Not-ready mode
Printer mode in which you can
change printer settings using the
control panel. The printer cannot
print in not-ready mode.
Orientation
The rotation in which paper is
loaded. See landscape orientation and portrait orientation.
Over-printing
Printing text on top of existing
text. This may be caused by an
incorrect auto line feed setting.
Paper feed
Control panel operation which
allows you to feed paper through
the printer one line at a time.
Paper guides
Devices which hold single sheets
so that they are fed into the
printer correctly.
Paper out
Printer function which automatically detects when the paper has
run out and stops printing.
Parallel cable
Standard cable for connecting
the printer to a computer.
Parallel interface
An interface which transfers
data between the computer and
the printer 8 bits at a time.
Page 162
Parity checking
A way of checking that information sent over a serial interface
has been received correctly.
Parking paper
Printer function that allows you
to print on single sheets without
removing fanfold paper.
Pitch
The number of characters in a
one-inch line of text.
Pitch lock mode
Mode in which font selection can
only be made from the printer’s
control panel.
Platen
Roller that guides paper through
the printer and provides a solid
surface against which the print
head can make an impression on
the paper.
Platen knob
Printer wheel that allows you to
advance paper manually.
Port
Socket in the back of a computer
through which a computer communicates with other devices,
such as the printer.
Portrait
Portrait mode is when a document is printed on paper with
the longest sides of the paper at
the sides.
PostScript font
Type of scalable font similar to
Tfie’&pe fonts. PostScript fonts
can be printed if you have
installed the Adobe Type Manager program on your computer.
Page 163
I
Print gap
The distance between the print
head and the platen. This distance can be adjusted to suit different thicknesses of paper.
Print head
Printer part that transfers the
image to the paper.
Print head shield
A thin metal plate between the
print head and the platen.
Print pitch
See pitch.
Printable area
The part of the page on which
the printer can print.
Printer driver
Computer file which enables system or application software to
print to a particular printer.
Proportionally spaced Font in which different characters can be of different widths.
font
Protocol
Method of regulating information
transfer between the computer
and the printer. Sometimes
called “handshaking”.
Quiet mode
Mode in which the printer prints
more quietly (and slightly more
slowly).
Ready mode
Printer mode in which the
printer can receive and print
data from the computer.
Release lever
Lever that grips single sheets as
they are fed into the printer.
Reverse micro feed
Control panel operation which to
feeds paper backwards through
the printer in small steps.
Page 164
Ribbon cartridge
Cartridge that contains the ribbon which the head uses to
mark the paper.
Scalable fonts
Fonts which you can print at any
size. TrueType fonts are scalable.
Serial interface
A computer interface which
transfers data one bit at a time.
Serial-to-parallel
interface converter
Optional accessory that allows
you to connect the printer to a
serial port on your computer.
Short test
Printer test in which seven lines
of characters are printed. If you
have fitted a color ribbon, each
line will be printed in a different
color.
Standard mode
Mode in which the printer emulates an Epson LQ-860 printer.
System software
Software that runs on your computer to control basic computer
functions (screen display, keyboard input, disk access and
printer output).
Tear-off function
Printer function which allows
you to remove fanfold output
without altering the current
position of the fanfold paper.
Tractor
Part of the unit which grips the
fanfold paper.
TrueType font
Type of scalable font which you
can install on your computer
and print on the printer (provided you are using Windows 3.1
or later).
Page 165
Typeface
The design style of a font. Common typefaces are Times and
Helvetica.
Uni-directional print- Mode in which the printer prints
graphics from left to right only.
ing
Vertical alignment
See dot adjustment mode.
Weight
The thickness of the lines which
make up a font’s characters.
Common weights are Medium,
Bold and Black.
Windows
System software for the IBM PC
which has an easy-to-use interface.
Zoom mode
Printer mode that allows you to
print documents scaled to 500/0
or 670/o.
Page 166
Index
A’
graphics 121
Adjusting dot alignment 50
Adjusting the print gap 24, 79,
80
Adobe me Manager 22
Auto LF 57, 79, 80
Auto LF with CR 55
Auto sheet feeder 55, 57
Autoloading position 36
Automatic emulation change
55, 56
Available fonts 2
horizontal position 1I 7
B
Baud rate 68
Buffer 57, 71
c
Changing an Electronic DIP
switch value 54
Changing the zoom size 40
Character code tables 60
Character set commands 98
Character size and pitch
commands 102
Character table 55, 59, 84
Clearing the buffer 43
Code page 55, 84
Color printing 41
Commands
character set 98
character size and pitch
.,
102
download character 125
font control 93
other 129
vertical position 110
Control panel 5
CR centering 56, 61
Cut sheet paper 23, 26
D
Default Printer 89
Default settings 44, 62
Display screen 5
Dot alignment adjustment 50
Download character
commands 125
E
Ejecting paper 37
Electronic DIP switches 52
Emulation 17,55, 56, 84
Epson emulation mode 91
Epson LQ-860/ 106018
F
Factory settings 44
Fanfold paper 23, 27
Fixed-pitch fonts 39
Font control commands 93
Font lock 45
Font pitches 40
Font selection 38, 56, 61
Font selection in Windows 22
Front cover 5, 10, 13
Page 167
I
G
Graphics commands 121
Graphics print direction 55, 57
H
Handshaking 69
Hardware handshaking 69
Hexadecimal dump mode 49
Horizontal position commands
117
I
IBM Proprinter 18
Individual form tear-off 34
Interface connector 5
International character set 55
L
Line feed 34
Loading cut sheet paper 26
Loading fanfold paper 27
Loading paper 23
Locking font selection 45
Locking pitch and font 46
Locking the pitch 45
Long test print 47
M
Macros 42
Memory usage 55, 57
Micro-feeding paper 35
Microsoft Windows software 19
Monospaced fonts 39
MS-DOS 17, 72, 90
MS-DOS application software
17
Multi-part forms 23, 55, 58
Mute cover 5, 14
Paper guide 14, 26
Paper length test 48
Paper release lever 66
Paper tear-off 55
Paper thickness adjustment
lever 5
Paper-out 55, 58
Parallel cable 8, 15
Parity 68
Parking paper 31, 37
Pausing printing 33
Pitch and font lock 46
Pitch lock 45
Pitch selection 39
Platen knob 5, 9
PostScript fonts 22
Power switch 5
Print area test mode 48
Print buffer 43
Print gap adjustment lever 24
Print head 5
Print mode 55, 59
Printer driver (Windows) 20
Printer environment 7
Printer parts 4
Proportional fonts 39
Proportional pitch fonts 39
Q
Quiet printing 37
R
usage 55, 57
,IWiVl
P
Ready and not-ready modes 33
Ready mode 33
Reducing printout size 40
Release lever 5, 78
Ribbon cartridge 5, 10
Roller unit 5, 12
Pa~e feed 34
Page length 55, 59
Paper entrances 5
s
Saving macros 42
Page 168
SelectingElectronicDIP
Switchbank 53
Selecting Electronic DIP
Switch number 54
Selecting fonts in Windows 22
Selecting the print color 41
Serial cable 71
Serial-Parallel converter (SPC8K) 9.67
Setting the top of a form 35
Short test print 47
Software handshaking 69
SPC-8K serial/parallel
converter 9.67
Standard emulation mode 91
Storingsettings42
T
Tear-off 58
Tensioning the ribbon 11
Test printing 47
Tractor covers 6
Tractor unit 6
TrueType fonts 21
u
Unpackingthe printer8
Unparking paper 32
v
Vertical position commands
110
w
Windows 21, 73, 89
Word length 68
Page 169
Customer service information
If you experience some technical difficulty with your
Star printer, please refer to “Common problems and
solutions” on page 78. This chapter provides you with
easy methods to diagnose and resolve problems which
you may encounter.
‘For further technical support, you should first contact
your Authorized Star Dealer. If you require additional
support, Star Micronics offers a wide variety of technical
support services. Please use the phone numbers listed
below, based on the country which your Star printer
was purchased.
Star MicronicsTechnicalHotline:
1-908-572-3300
North America:
Hong Kong:
852-795-2335
Australia:
61-2-748-4300
New Zealand:
64-9-570-1470
Star MicronicsFaxBack(DocumentRetrieval)System:
Requires access to a facsimile machine or board with receive
capability
1-908-572-4004
North America:
Star MicronicsBulletinBoardService:
Requires a computer modem
North America:
United Kingdom:
France:
Germany:
Netherlands:
Australia and New Zealand:
1-908-572-5010
44-494-461395
33-1-305807
49-69-780929
31-73-424485
61-2-748-2960
Customer response
Star Micronics Co., Ltd. invites your suggestions and comments on your printer and this manual. Please address your
correspondence to:
WorldwideHeadquarters
STAR MICRONICS CO., LTD.
20-10 Nakayoshida
Shizuoka, Japan 422-91
Attn. Product Manager
Northand SouthAmericaMarkets
STAR MICRONICS AMERICA, INC.
70- D Ethel Road West
Piscataway, NJ 08854
Attn. Product Manager
EuropeanMarket
STAR MICRONICS DEUTSCHLAND GMBH
Westerbachstraj3e 59
D-60489 Frankfurt
F.R. of Germany
Attn. Product Manager
U.K. Market
STAR MICRONICS U.K., LTD
Star House
Peregrine Business Park
Gomm Road, High Wycombe
Bucks. HP13 7DL, U.K.
Attn. Product Manager
FrenchMarket
STAR MICRONICS FRANCE S.A.R.L.
25, rue Michael Faraday
F-78182 St-Quentin en Yvelines Cedex
Attn. Product Manager
Asian Market
STAR MICRONICS ASIA LTD.
18/F Tower 2, Enterprise Square
9 Sheung Yuet Road, Kowloon Bay, HONG KONG
Attn. Product Manager
PRINTED IN JAPAN