1
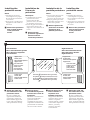
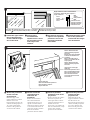
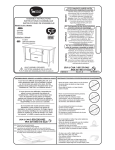
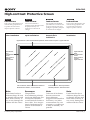
SCN-61X2
High-contrast Protective Screen
English
Français
Español
Chinese
Instructions
Instructions
Instrucciones
Instructions
This screen is designed for use
with the Sony projection TVs
to protect the screen and
improve picture contrast.
Cet écran est destiné à
protéger l’écran des téléviseurs
de projection Sony et à
améliorer le contraste de
l’image.
Esta pantalla está diseñada
para utilizarse con televisores
de proyección de Sony para
proteger la pantalla y mejorar
el contraste de la imagen.
This screen is designed for use
with the Sony projection TVs
to protect the screen and
improve picture contrast.
Ecran de protection
après installation
Pantalla protectora
después de la
instalación
Protective screen after
installation
Protective screen
after installation
Upper frame bar / Barre d’encadrement supérieure / Barra del marco superior / Upper frame bar
Left frame bar
Barre
d’encadrement
gauche
Barra del marco
izquierdo
Left frame bar
Right frame bar
Barre
d’encadrement
droite
Barra del marco
derecho
Right frame bar
Lower frame bar / Barre d’encadrement inférieure
Barra del marco inferior / Lower frame bar
Protective screen / Ecran de protection
Pantalla protectora / Protective screen
Note
Remarque
Nota
Note
Each frame bar has a
different shape. Be sure
to identify the bars and
their sides correctly. If
not, it may damage the
cabinet and the screen.
Chaque barre
d’encadrement présente
une forme différente. Par
conséquent, identifiez
correctement les barres et
leurs côtés. Vous risquez
sinon d’endommager le
châssis du téléviseur et
l’écran.
Cada una de las barras
de marco tiene una
forma diferente.
Asegúrese de identificar
las barras y sus lados
correctamente. En caso
contrario, es posible que
se dañe el mueble y la
pantalla.
Each frame bar has a
different shape. Be sure
to identify the bars and
their sides correctly. If
not, it may damage the
cabinet and the screen.
© 1997 by Sony Corporation
3-800-433-41 (1)
Installing the
protective screen
Notes
• Installing the protective
screen requires two people.
Do not attempt to install the
screen alone.
• Wear gloves to avoid leaving
fingerprints on the inside of
the screen.
1 Remove the protection
film on both surfaces
of the protective
screen.
Installation de
l’écran de
protection
Instalación de la
pantalla protectora
Installing the
protective screen
Notas
Notes
Remarques
• Son necesarias dos personas
para instalar la pantalla
protectora. No la instale solo.
• Póngase guantes para evitar
dejar huellas dactilares en el
interior de la pantalla.
• Installing the protective
screen requires two people.
Do not attempt to install the
screen alone.
• Wear gloves to avoid leaving
fingerprints on the inside of
the screen.
• L’installation de l’écran de
protection nécessaire
l’intervention de deux
personnes. Aussi, ne tentez
pas d’installer seul l’écran.
• Portez des gants de manière à
ne pas laisser de traces de
doigts sur la face intérieure de
l’écran.
1 Retire la película de
protección de las dos
superficies de la
pantalla protectora.
1 Enlevez le film
protecteur apposé sur
les deux faces de
l’écran de protection.
1 Remove the protection
film on both surfaces
of the protective
screen.
2
Left frame bar
Barre d’encadrement gauche
Barra del marco izquierdo
Left frame bar
Right
Barre
Barra
Right
Upper front
Avant, haut
Parte frontal superior
Upper front
Upper front
Avant, haut
Parte frontal superior
Upper front
Hole at the back
Orifice à l’arrière
Orificio de la
parte posterior
Hole at the back
Hole at the back
Orifice à l’arrière
Orificio de la
parte posterior
Hole at the back
Lower front
Avant, bas
Parte frontal inferior
Lower front
2 Attach the right and
left frame bars to the
protective screen.
Be sure to identify the
right and left frame bars
respectively, and attach
them with the upper and
lower, and front and back
sides positioned correctly.
frame bar
d’encadrement droite
del marco derecho
frame bar
The mark
Le symbole
indicates the front (your side).
indique l’avant (face à vous).
La marca
indica la parte frontal (su lado).
The mark
indicates the front (your side).
2 Fixez les barres
d’encadrement gauche
et droite sur l’écran de
protection.
Identifiez correctement les
barres d’encadrement
gauche et droite et
assemblez-les aux barres
supérieure et inférieure en
positionnant correctement
les faces avant et arrière.
Lower front
Avant, bas
Parte frontal inferior
Lower front
2 Fije las barras de los
marcos derecho e
izquierdo en la
pantalla protectora.
Asegúrese de identificar
las barras de los marcos
derecho e izquierdo
respectivamente, y fíjelas
con los lados superior e
inferior, y frontal y
posterior colocados
correctamente.
2 Attach the right and
left frame bars to the
protective screen.
Be sure to identify the
right and left frame bars
respectively, and attach
them with the upper and
lower, and front and back
sides positioned correctly.
3
Upper frame bar / Barre d’encadrement
supérieure / Barra del marco superior /
Upper frame bar
Back
Arrière
Front
Parte posterior
Avant
Back
Parte frontal
Front
The mark
La marca
indicates the front (your side). / Le symbole
indica la parte frontal (su lado). / The mark
3 Attach the upper frame
bar to the protective
screen with the longer
face at the back.
Protective screen
Ecran de protection
Pantalla protectora
Protective screen
indique l’avant (face à vous).
indicates the front (your side).
3 Fixez la barre
d’encadrement
supérieure sur l’écran
de protection avec la
face longue vers
l’arrière.
3 Fije la barra del marco
superior en la pantalla
protectora con la cara
más larga orientada
hacia atrás.
3 Attach the upper frame
bar to the protective
screen with the longer
face at the back.
4
Narrow slit between the
cabinet and the projection
TV screen
Etroite fente entre le châssis
et l’écran du téléviseur de
projection
Ranura estrecha entre el
mueble y la pantalla del TV
de proyección
Narrow slit between the
cabinet and the projection
TV screen
Upper front of the right
frame bar
Face avant supérieure de la
barre d’encadrement droite
Parte frontal superior de la
barra del marco derecho
xxxxxxxxxxxxxxxxxxxxxxx
xxxxxxxxxxx
Upper frame bar
Barre d’encadrement supérieure
Barra del marco superior
Upper frame bar
4 Mount the protective
screen onto the
projection TV.
Slide the edge of the
upper frame bar so that it
fills the narrow slit
between the projection TV
cabinet and the projection
TV screen. Then fit the
bottom of the protective
screen into the cabinet.
4 Montez l’écran de
protection sur le
téléviseur de
projection.
Insérez le rebord de la
barre d’encadrement
supérieure de façon à ce
qu’elle s’insinue dans la
fente étroite entre le châssis
et l’écran du téléviseur de
projection. Ajustez ensuite
le bas de l’écran de
protection dans le châssis.
4 Instale la pantalla
protectora en el TV de
proyección.
Deslice el borde de la barra
del marco superior de
forma que llene la ranura
estrecha existente entre el
mueble del TV de
proyección y la pantalla de
éste. A continuación, encaje
la base de la pantalla
protectora en el mueble.
4 Mount the protective
screen onto the
projection TV.
Slide the edge of the
upper frame bar so that it
fills the narrow slit
between the projection TV
cabinet and the projection
TV screen. Then fit the
bottom of the protective
screen into the cabinet.
5
1
Space between the protective
screen and cabinet
Espace entre l’écran de protection
et le châssis
Espacio existente entre la
pantalla protectora y el mueble
Space between the protective
screen and cabinet
Protective screen / Ecran de
protection / Pantalla protectora /
Protective screen
Lower frame bar
Barre d’encadrement
inférieure
Barra del marco inferior
Lower frame bar
Screen
Ecran
Pantalla
Screen
Cabinet
Châssis
Mueble
Cabinet
Lower frame bar / Barre d’encadrement Hole / Orifice / Orificio / Hole
inférieure / Barra del marco inferior / Lower frame bar
2
3
Hole
Orifice
Orificio
Hole
5 While the protective
screen is raised by the
other person, fit the
lower frame bar into
the space between the
protective screen and
the bottom of the
cabinet, and then slide
down the screen.
1 Insert the lower frame bar
with a hole positioned at
the upper right.
2 Turn the frame bar in the
direction of the arrow so
that it fits into the bottom
of the cabinet.
3 Slide down the protective
screen.
5 Pendant que l’autre
personne soulève
l’écran de protection,
insérez la barre
d’encadrement
inférieure dans
l’espace compris entre
l’écran de protection et
le bas du châssis. Faites
ensuite coulisser
l’écran vers le bas.
1 Insérez la barre
d’encadrement inférieure
qui comporte un orifice
dans le haut, à droite.
2 Tournez la barre
d’encadrement dans le sens
de la flèche de façon à ce
qu’elle s’insinue dans le
bas du châssis.
3 Faites coulisser l’écran de
protection vers le bas.
5 Mientras la otra
persona levanta la
pantalla protectora,
encaje la barra del
marco inferior en el
espacio existente entre
dicha pantalla y la base
del mueble y, a
continuación, deslice la
pantalla hacia abajo.
1 Inserte la barra del marco
inferior con un orificio
orientado hacia la parte
derecha superior.
2 Gire la barra del marco en
el sentido de la flecha de
forma que encaje en la base
del mueble.
3 Deslice la pantalla
protectora hacia abajo.
5 While the protective
screen is raised by the
other person, fit the
lower frame bar into
the space between the
protective screen and
the bottom of the
cabinet, and then slide
down the screen.
1 Insert the lower frame bar
with a hole positioned at
the upper right.
2 Turn the frame bar in the
direction of the arrow so
that it fits into the bottom
of the cabinet.
3 Slide down the protective
screen.