1
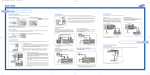
BP68-00335A_Atlantis_QG
6/4/04
2:22 PM
Page 1
Quick Guide
Your New Wide TV (DLP)
Connections
Remote Control
Connecting Cable TV and VCR
You can use the remote control up to about 23 feet from the TV. When using the remote control, always point it directly at the TV. You can also use your remote
control to operate your Set-Top box, VCR, Cable box or DVD player.
You can connect different cable systems to your TV, including cable without a cable box, and cable with a cable box that descrambles some or all channels.
1. POWER
Turns the TV on and off.
2. S.MODE
Adjust the TV sound by selecting one of the preset
factory settings (or select your personal,
customized sound settings.)
3. P.MODE
Adjust the TV picture by selecting one of the
preset factory settings (or select your personal,
customized picture settings.)
4. +100
Press to select cable channels over 100 on TV.
5. VOL +, VOL Press to increase or decrease the volume.
17. …, †, œ, √, ENTER
Press to select highlight up, down, left, or right.
While using the on-screen menus, press the ENTER
to activate (or change) a particular item.
18. MTS (Multichannel Television Stereo)
Press to choose Stereo, Mono or SAP (Separate
Audio Program).
7. FAV.CH (Favorite Channel)
Press to switch between your favorite channels.
22. PIP (Picture In Picture)
Activates PIP.
8. MENU
Displays the main on-screen menu.
23. SET
Used during set up of this remote control, so that it
will work compatibly with other devices (Set-Top
box, VCR, Cable box, DVD, etc.)
12. PRE-CH
Tunes to the previous channel.
13. SOURCE
Press to display all of the available video sources
(i.e., TV, Set-Top box, VCR, DVD, DTV, PC).
26. VCR/DVD Controls
Controls VCR or DVD functions: Rewind, Stop,
Play/Pause, Fast Forward.
14. CH
, CH
Press to change channels.
27. RESET
If your remote control is not functioning properly,
take out the batteries and press the reset button
for about 2~3 seconds. Re-insert the batteries
and try using the remote control again.
15. INFO
Press to display information on the TV screen.
NOTES
• When you use a converter box with your TV, there may be features that you can not program
using the remote control, such as programming your favorite channels and blocking channels.
• The output from “ANT 1 OUT” is available when select “Ant.2” in the “Antenna“ channel menu.
Connecting a Cable Converter Box and a VCR
TV Rear Panel
This connection allows you to watch and record basic and premium cable channels, as well as
watch videotapes. You should keep your TV selected to “ANT 1 IN” so that you can use the TV’s
features. When viewing premium channels or recording with the VCR, select “ANT 2 IN” (whichever
channel is vacant in your area), then use the converter box to change channels.
From
Cable
Caution: If you want to record one channel while watching another channel, a splitter (not included)
must be added between the cable and “ANT 1 IN”. One output of the splitter goes to “ANT 1 OUT”
and the second output is connected to IN on the cable converter box.
If you have a mono VCR, connect L/Mono to VCR Audio OUT using only one audio cable.
24. DNIe (Digital Natural Image engine)
Activates DNIe.
25. PIP Controls
SIZE; Press to select the size of PIP window.
SWAP; Press to exchange the video signal that is
currently displayed on the main screen with the
signal in the PIP window.
CH
/
; Press to display the available
channels in sequence. (These buttons change
channels in the PIP window only.)
11. MODE
Selects a target device to be controlled by the
Samsung remote control (i.e., TV, STB, VCR,
CABLE, or DVD).
From Cable
20. ADD/DEL
Press to add or erase channels in the TV’s
memory. Use the ADD/DEL button to memorize
and erase the fine tuning after fine tuning
channels.
21. SLEEP
Press to select a preset time interval for automatic
shutoff.
10. P.SIZE
Press to change the picture size.
This connection allows you to watch cable and premium channels. You should keep your TV selected
to “ANT 1 IN” so that you can use the TV features. When viewing premium channels, select “ANT 2
IN” and tune the TV to channel 3 or 4 (whichever channel is vacant in your area), then use the
converter box to change channels. You will need two coaxial cables.
19. SRS
Activates TruSurround.
6. MUTE
Press to mute the TV sound.
9. STILL
Press to stop the action during a particular scene.
Press again to resume normal video.
Connecting a Cable Converter Box
TV Rear Panel
If you have a S-VHS VCR, use the S-Video connections and remove the video cable. Do not connect
the video cable and the S-Video cable to video1 simultaneously.
When you use a converter box with your TV there may be features that you can not program using
the remote control, such as programming your favorite channels and blocking channels.
Second VCR
Connecting a DVD Player
The rear panel jacks on your TV make it easy to connect a DVD player to your TV.
16. EXIT
Press to exit the menu.
Operation
Connecting to Y, PB, PR
Connecting to Audio and Video Jacks
Connect a set of audio cables between the COMPONENT (1 or 2) audio
(L,R) in jacks on the TV and the AUDIO OUT jacks on the DVD player.
To enable Component video viewing, connect a set of video cables
between the COMPONENT (1 or 2) VIDEO (Y, PB, PR) in jacks on the TV
and VIDEO (Y/PB/PR or Y/CB/CR) OUT jacks on the DVD player.
Connect a set of audio cables between the Audio in (1 or 2) jacks on the
TV and the AUDIO OUT jacks on the DVD player.
Connect a video cable between the VIDEO IN (1 or 2) jack on the TV and
the VIDEO OUT jack on the DVD player.
TV Rear Panel
TV Rear Panel
Selecting the Video Signal Source
Storing Channels in Memory (Automatic Method)
Before your TV can begin memorizing the available channels, you must
specify the type of signal source that is connected to the TV (i.e., an
antenna or a cable system).
First, select the correct signal source (“Air”, “STD”, “HRC” or “IRC”) as
described before.
Press the MENU button. Press the … or †
button to select “Channel”, then press the
ENTER button.
Channel
Input
Picture
Sound
Press the … or † button to select
“Air/CATV”, then press the ENTER button.
If you are connected to an antenna, press
the … or † button to select “Air”.
If you connected cable, press the … or †
button to select the type of cable system:
“STD”, “HRC” or “IRC”.
Channel
Setup
Move
Enter
√
√
√
√
√
√
√
Return
Channel
Input
Picture
Sound
Channel
Press the EXIT button to exit.
Antenna
: Ant.1
Air/CATV
: Air
Auto Program
Add/Delete
Favorite Channels
Name
Fine Tune
▼ More
Setup
Antenna
: Air
Ant.1
Air/CATV
: STD
Air
Auto Program
HRC
Add/Delete
IRC
Favorite Channels
Name
Fine Tune
▼ More
Move
Enter
Return
Press the MENU button. Press the … or †
button to select “Channel”, then press the
ENTER button.
Channel
Input
Picture
Sound
Press the … or † button to select “Auto
Program”, then press the ENTER button.
Press the ENTER button to start the auto
program.
The TV begins memorizing all of the
available stations.
Press the ENTER button at any time to
interrupt the memorization process.
Incoming Cable or
Antenna
Incoming Cable or
Antenna
Channel
Setup
√
√
√
√
√
√
√
Antenna
: Ant.1
Air/CATV
: Air
Auto Program
Add/Delete
Favorite Channels
Name
Fine Tune
▼ More
Move
Enter
Return
Auto Program
Start
Enter
Return
DVD Player
Auto Program
Air 11
Press the EXIT button to exit.
Stop
Enter
Return
NOTE : For an explanation of Component video, see your DVD player's
owner's manual.
DVD Player
BP68-00335A_Atlantis_QG
6/4/04
2:22 PM
Page 2
Quick Guide
How to Replace the Lamp
Front Panel LED Indicators
•
A Projection TV lamp is a consumable item, and should be replaced from time to time for best projector operation. If the screen image becomes dark, or
timer, lamp and Temp LEDs flicker off at the same time, you may have to replace the lamp.
•
When changing the lamp, you should first verify the type/model, and then use only the correct lamp replacement. The code for lamp regulation and usage is
marked on the label. If you remove the lamp, you can identify this replacement code. You should only replace the lamp with the one of the same regulation
code.
•
If you wish to buy a new lamp, please phone your Service Center or a nearby TV dealer, and tell them the model of your projection unit.
•
You can identify the lamp type on the left side of TV and the lamp cover.
•
The TV will be damaged if you use a lamp that is different from the original supplied by the manufacturer.
•
Please don't remove the lamp except when replacing with a new one.
•
Please turn off TV power before changing a lamp and then unplug after waiting 1 minute.
•
The cooling fan will help cool the lamp so you can safely remove it. The surface of the Lamp is very hot. Please wait for 30 minutes after turning off your
projection TV to handle the lamp.
•
Please keep the old lamp away from flammable articles and children. Dispose of properly.
•
Don't allow dirt or dust to accumulate inside the lamp cover or on the Lamp.
•
A dirty cover or lamp can catch fire, explode and cause electric shock.
•
Please don't touch the front glass of a new lamp or the glass of the lamp container.
LAMP
: Light is Off
Indication
STAND BY/TEMP
Standby state.
The picture will automatically appear in about 15 seconds.
Auto Timer ON/OFF has been set and the set will automatically be turned on in about 25 seconds.
Lamp cover on rear of the set is not properly shut.
Check if the ventilation hole on the rear of the set is blocked, because if the inner temperature is too high,
the power will shut off.
Lamp may be defective. Please contact a certified technician.
•
•
It takes about 30 seconds for the TV to warm up, so normal brightness may not appear immediately.
The TV has a fan to keep the inside lamp from overheating. You’ll occasionally hear it working.
Notes
•
If a new lamp is improperly handled, the quality of the screen image can be affected and the expected life span of the lamp can be reduced.
Be sure to tighten the lamp cover on the TV after changing the lamp. Note that the TV will not function if the lamp cover is not securely attached. Please
tighten the holding screw on the lamp cover after it has been attached to the TV.
Unplug TV, then use a screwdriver to remove the screw.
TIMER
: Light is Blinking,
A cooling fan inside the set is not operating normally.
•
1
: Light is On,
4
Separate the Lamp from the engine by holding the handle and pulling
it out.
Watching a DTV through Set-Top Box
Operation
Example 1 : Connecting antenna to DLP directly.
Change channels of the DLP.
Use cable converter for specific chargeable channels.
Example 2 : Viewing TV with cable converter.
DLP : Select the channel 3 with DLP remote control.
Change channels with remote control of cable converter.
Viewing a DVD Home Theater
DLP : Press the SOURCE button on the DLP remote control and select
“Component1” or “Component2”. Turn on the DVD Home Theater,
insert the CD and press the PLAY button.
* When you are viewing DVD Home Theater, DLP will not make a
sound. Adjust the volume from Home Theater.
Viewing a VCR
2
Listening to the Set-Top Box
through Home Theater
Press the MODE button on the remote control of Home Theater, select
“AUX1”.
* Press the FUNCTION button on the Home Theater, select “AUX1”.
Listening to the TV through Home Theater
DLP : Press the SOURCE button on the DLP remote control and select
“AV1”. Turn on your VCR, insert the tape and press the PLAY button.
Remove the Lamp cover.
DLP : Press the SOURCE button on the DLP remote control and select
“Component1” or “Component2”.
Press the SOURCE button on the Set-Top Box and select channel to display
on the front display window.
Change channels with remote control of the Set-Top Box.
Channels will be displayed, for example,6-1,7-1,9-1,10-1,11-1.
Press the MODE button on the remote control of Home Theater, select
“AUX2”.
* Press the FUNCTION button on the Home Theater, select “AUX2”.
Q&A
3
White spot appears on the center
of the screen.
DLP model is made up with 2 screens (exterior/interior screen). When power is turned off, fluorescent light or
light reflected from interior screen by sunlight is shone on exterior screen.
Therefore, white spot appears on the center of the screen. All projection TV use sun screen separately to
prevent the screen from reflection. But, DLP does not use sun screen and white spot may appear.
When you install your TV, light should not shine directly on screen. This phenomenon does not appear while
TV is turned on and doe not have any effects on picture quality.
Black dot / bright dot on a screen
Your TV may have a small number of irregular pixels (1~2) due to technical limitation of DMD manufacturing
process. This does not necessarily mean that your monitor is defective. If the manufacturer's quality control
only accepted perfect monitors, the cost to produce each monitor would be significantly increased.
Therefore, the quality control department of each manufacturer will allow each DMD to have up to a certain
number of irregular pixels. This does not have an effect on the function of your TV.
Watching TV for a long time
When you watch TV for a long time, please keep at a enough distance. For projection TV, you'd better watch
from 5~7 times as far as vertical length of the screen. But, for HD broadcasting, you can watch from about 4
times as far as vertical length of the screen. If you watch TV for a long time at a short distance, your eyes can
be wearied.
Remove the screws securing the Lamp by using a screwdriver.
5
To reinstall the Lamp, follow these steps in reverse order.
NOTE : Be sure the replacement Lamp is the same model.
BP68-00335A-01