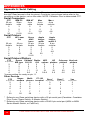
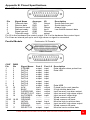
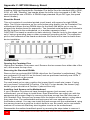
1
INSTALLATION AND OPERATIONS MANUAL 10707 Stancliff Road Phone: (281) 933-7673 Houston, Texas 77099 Internet: WWW.ROSE.COM Limited Warranty ® Rose Electronics warrants the Caretaker Plus™ to be in good working order for one year from the date of purchase from Rose Electronics or an authorized dealer. Should this product fail to be in good working order at any time during this one-year warranty period, Rose Electronics will, at its option, repair or replace the Unit as set forth below. Repair parts and replacement units will be either reconditioned or new. All replaced parts become the property of Rose Electronics. This limited warranty does not include service to repair damage to the Unit resulting from accident, disaster, abuse, or unauthorized modification of the Unit, including static discharge and power surges. Limited Warranty service may be obtained by delivering this unit during the one-year warranty period to Rose Electronics or an authorized repair center providing a proof of purchase date. If this Unit is delivered by mail, you agree to insure the Unit or assume the risk of loss or damage in transit, to prepay shipping charges to the warranty service location, and to use the original shipping container or its equivalent. You must call for a return authorization number first. Under no circumstances will a unit be accepted without a return authorization number. Contact an authorized repair center or Rose Electronics for further information. ALL EXPRESS AND IMPLIED WARRANTIES FOR THIS PRODUCT INCLUDING THE WARRANTIES OF MERCHANTABILITY AND FITNESS FOR A PARTICULAR PURPOSE, ARE LIMITED IN DURATION TO A PERIOD OF ONE YEAR FROM THE DATE OF PURCHASE, AND NO WARRANTIES, WHETHER EXPRESS OR IMPLIED, WILL APPLY AFTER THIS PERIOD. SOME STATES DO NOT ALLOW LIMITATIONS ON HOW LONG AN IMPLIED WARRANTY LASTS, SO THE ABOVE LIMITATION MAY NOT APPLY TO YOU. IF THIS PRODUCT IS NOT IN GOOD WORKING ORDER AS WARRANTIED ABOVE, YOUR SOLE REMEDY SHALL BE REPLACEMENT OR REPAIR AS PROVIDED ABOVE. IN NO EVENT WILL ROSE ELECTRONICS BE LIABLE TO YOU FOR ANY DAMAGES INCLUDING ANY LOST PROFITS, LOST SAVINGS OR OTHER INCIDENTAL OR CONSEQUENTIAL DAMAGES ARISING OUT OF THE USE OF OR THE INABILITY TO USE SUCH PRODUCT, EVEN IF ROSE ELECTRONICS OR AN AUTHORIZED DEALER HAS BEEN ADVISED OF THE POSSIBILITY OF SUCH DAMAGES, OR FOR ANY CLAIM BY ANY OTHER PARTY. SOME STATES DO NOT ALLOW THE EXCLUSION OR LIMITATION OF INCIDENTAL OR CONSEQUENTIAL DAMAGES FOR CONSUMER PRODUCTS, SO THE ABOVE MAY NOT APPLY TO YOU. THIS WARRANTY GIVES YOU SPECIFIC LEGAL RIGHTS AND YOU MAY ALSO HAVE OTHER RIGHTS WHICH MAY VARY FROM STATE TO STATE. NOTE: This equipment has been tested and found to comply with the limits for a Class A digital device, pursuant to Part 15 of the FCC Rules. These limits are designed to provide reasonable protection against harmful interference when the equipment is operated in a commercial environment. This equipment generates, uses, and can radiate radio frequency energy and, if not installed and used in accordance with the instruction manual, may cause harmful interference to radio communications. Operation of this equipment in a residential area is likely to cause harmful interference in which case the user will be required to correct the interference at his own expense. IBM, AT, and PS/2 are trademarks of International Business Machines Corp. Microsoft and Microsoft Windows are registered trademarks of Microsoft Corp. Any other trademarks mentioned in this manual are acknowledged to be the property of the trademark owner. Copyright Rose Electronics 1990-2002. All rights reserved. No part of this manual may be reproduced, stored in a retrieval system, or transcribed in any form or any means, electronic or mechanical, including photocopying and recording, without the prior written permission of Rose Electronics. Rose Electronics Part # MAN-CTP 1.0 Printed In the United States of America Table of Contents Contents Disclaimer.................................................................................................................... 1 Introduction.................................................................................................................. 1 Features ...................................................................................................................... 1 Model Number and Options......................................................................................... 2 First Steps ................................................................................................................ 2 Caretaker Plus Front Panel Display............................................................................. 3 Serial Set-Up for PCs .................................................................................................. 4 Serial Set-up For Other Computers or Terminals ........................................................ 4 Caretaker Plus Rear Panel – Serial Model .................................................................. 5 Parallel Set-Up ............................................................................................................ 6 Caretaker Plus Rear Panel – Parallel Model ............................................................... 6 Parallel Cabling ........................................................................................................... 7 Serial Cabling .............................................................................................................. 7 CONFIGURATION .......................................................................................................... 7 Initial State.............................................................................................................. 16 Normal Operation ................................................................................................... 16 Buffer Characteristics ............................................................................................. 17 Printer Initialization Signal (Parallel Models Only) ..................................................... 17 Timeout...................................................................................................................... 18 Initialization String ..................................................................................................... 19 Form Feed.............................................................................................................. 19 Adding More Memory ............................................................................................. 19 Changing the Serial Baud Rate .............................................................................. 19 Power Up Initial Display.......................................................................................... 20 Program Checksum Test........................................................................................ 20 Buffer Memory Sizing and Read/Write Test ........................................................... 20 Static Ram Read/Write Test ................................................................................... 21 Front Panel Switches ............................................................................................. 21 Data LED, Busy LED, and Error LED ..................................................................... 21 Buffer Overflow Error Display (Serial Models Only)................................................ 21 Flow Control Display Mode (Serial Models Only) ................................................... 22 Troubleshooting......................................................................................................... 23 Common Problems and Solutions .......................................................................... 23 Maintenance and Repair ........................................................................................ 25 Technical Support .................................................................................................. 25 Diagnostic Modes................................................................................................... 26 Short Test............................................................................................................... 26 Restore To Factory Default .................................................................................... 26 Print Configuration/Test Pattern Function............................................................... 27 Long Test Without Loopback.................................................................................. 28 Long Test with Loopback........................................................................................ 29 Appendices Appendix A: Serial Cabling............................................................................................ 30 Appendix B: Pinout Specifications ................................................................................. 31 Appendix C: MP1000 Memory Board ............................................................................ 32 Appendix D: Factory Defaults ........................................................................................ 34 Appendix E: General Specifications .............................................................................. 34 Introduction Disclaimer While every precaution has been taken in the preparation of this manual, the manufacturer assumes no responsibility for errors or omissions. Neither does the manufacturer assume any liability for damages resulting from the use of the information contained herein. The manufacturer reserves the right to change the specifications, functions, or circuitry of the product without notice. The manufacturer cannot accept liability for damages due to misuse of the product or other circumstances outside the manufacturer’s control. The manufacturer will not be responsible for any loss, damage, or injury arising directly or indirectly from the use of this product. Introduction Thank you for choosing Caretaker Plus. Designed with your needs in mind, your new Caretaker Plus will make it possible for you to connect up to eight computers to a single printer, plotter, or other serial or parallel device for fast, efficient printer sharing. This manual contains information for the installation and operation of the Caretaker Plus buffered automatic switch. The unit allows several computers or terminals to have shared access to a common printer, plotter, or other device. Accessing the shared device is done simply by sending data to the unit. Since the Caretaker Plus has buffer memory, each computer may simultaneously send data to the unit. The data is sent to the shared device in the order it was received. All equipment is connected by cables to connectors on the Caretaker Plus rear panel. The unit's external power adapter connector and on-off switch are also on its rear panel. The Caretaker Plus front panel has 13 LEDs which display status information and 2 switches which are used to control the Led display, run the unit's diagnostics, and configure the unit. Features Two to eight computers share one printer, plotter, or other device Serial (RS232) or parallel (Centronics), RS422 optional Uses commonly available cables Compatible with any computer – PCs, Macs, minis Compatible with all software and operating systems Compatible with all printers and plotters Simultaneous input from all computers Up to two megabyte buffer Serial units have programmable baud rate and flow control Programmable initialization strings and end-of-job form feed Units can be linked for more than 8 computers Special noise protection features Mode, data, busy, and error LEDs show data activity and status Self-test and diagnostic features Made in USA CARETAKER PLUS INSTALLATION AND OPERATIONS MANUAL 1 Model Number and Options The Caretaker Plus consists of a switch unit and a separate wall mounted power adapter. It is available in several models: 2 to 8 ports, either serial or parallel, and Centronics tyhpe connectors or Db25 type connectors. The base model has a 16K buffer expandable to 2MB. The model number is described below. First Steps Contents You should have received the Caretaker Plus system unit, a power adapter, and this manual. Save the cardboard box and its polystyrene inserts. If you have ordered any additional cables they usually arrive in the same package. Connecting the Cables Cabling is one area to which you must pay careful attention. Consult the cabling guides in this manual for the correct pinouts. If you are not sure, give us a call, we will be happy to assist you. The shared device connects to the port labeled "0". The computers connect to port number 1 and higher. Configuring the Caretaker Plus The factory default settings (see Appendix D) are sufficient for most applications. To change the defaults, you configure the unit through port 1. To configure the unit you access the configuration menu or send commands as described later. Configuring the computers The final step in installation is to make sure that your computer's software is configured correctly, by setting the proper communication settings. If you use serial ports on PCs, you should have the proper DOS MODE statement in your AUTOEXEC.Bat file. Where to Go from Here Those experienced in switch installation may take advantage of the Quick Setup List on the next page. If you are less experienced, however, we recommend that you follow the step-by-step instructions, beginning with the Cabling section on page 6. If you Have a Problem Installation should go smoothly. If you have a problem, however, check first to see if the error light is on. If it is, refer to Table 7 on page 19 to determine which type of error occurred. You will find the front panel of the Caretaker Plus very useful in diagnosing problems. Please refer also to the appropriate installation step. Then, if you are still unable to resolve the problem, refer to the Troubleshooting section on page 18. 2 CARETAKER PLUS INSTALLATION AND OPERATIONS MANUAL FRONT PANEL DISPLAY Caretaker Plus Front Panel Display POWER LED is lit whenever the unit is powered on. ADVANCE and SELECT switches are used to enter the configuration menu, go into diagnostic modes, or clear the buffer. MODE LED is lit to indicate the unit is in the configuration or flow control display mode. DATA LED lights as data is sent to the unit. BUSY LED is lit when the printer is on-line or busy while accepting data ERROR LED indicates an error has occurred, with LEDs 1-8 indicating which error. LEDs 1-8 indicate data activity on ports 1-8. When an Led is flashing, that port is sending data to the printer. If an Led is steady, that port has data waiting to be sent to the printer. CARETAKER PLUS INSTALLATION AND OPERATIONS MANUAL 3 QUICK SETUP LIST – Serial Units Serial Set-Up for PCs 1. 2. Connect your PC to port 1 on the Caretaker Plus with the proper cable. Connect the power adapter to the Caretaker Plus and turn the Caretaker Plus on. Verify that the power LED is on. The other LEDs light in various patterns as the power up tests are performed and then all go off. The ERROR LED will be lit for any errors. Run a communication program such as Procomm with the serial protocol set to 9600 baud, no-parity, 8 bits, and one stop bit. Momentarily press in the advance and select switches on the Caretaker Plus. The MODE and BUSY LEDs will light. Hit return on your keyboard. The configuration menu should appear. Select the desired items from the menu. Exit from the configuration menu with the X command, making sure to save any parameters you changed. Setup your application software to print to LPT1. Put the following DOS mode commands in your AUTOEXEC.BAT file. The example below uses COM1, Substitute with COM2 if you are using COM2 on your PC. 3. 4. 5. 6. 7. MODE LPT1:+COM1 (Redirects LPT1 port to your serial port) MODE COM1:9600,N,8,1,P (Sets serial port baud rate to 9600 baud) 8. Connect the Caretaker Plus port 0 to your shared device with the correct cable. Connect your computers to ports 1-8. 9. Send data from your application or print program. Data will be routed to the shared device automatically. 10. Re-enter the configuration menu to change any other parameters, such as the baud rate, initialization string, form feed, or the timeout value. See the section on "CONFIGURATION" for further information. Serial Set-up For Other Computers or Terminals 1. 2. Connect your PC to port 1 on the Caretaker Plus with the proper cable. Connect the power adapter to the Caretaker Plus and turn the Caretaker Plus on. Verify that the power LED is on. The other LEDs light in various patterns as the power up tests are performed and then all go off. The ERROR LED will be lit for any errors. Set your computer or terminal to 9600 baud, no parity, 8 bits, and one stop bit. Momentarily press in the advance and select switches on the Caretaker Plus. The MODE and BUSY LEDs will light. Hit return on your keyboard. The configuration menu should appear. Select the desired items from the menu. Exit from the configuration menu with the X command, making sure to save any parameters you changed. Connect the Caretaker Plus port 0 to your shared device with the correct cable. Connect your computers to ports 1-8. Send data from your application or print program. Data will be routed to the shared device automatically Re-enter the configuration menu to change any other parameters, such as the baud rate, initialization string, form feed, or the timeout value. 3. 4. 5. 6. 7. 8. 9. 4 CARETAKER PLUS INSTALLATION AND OPERATIONS MANUAL Caretaker Plus Rear Panel – Serial Model The diagram below shows the connector arrangement for model #CTP-8S. It has nine serial ports. The CTP-4S is similar but it doesn't have ports 5-8. Port 0, the rightmost port, is where you connect the printer. The computers connect to the ports labeled 1-8. the serial cables shown below are the most common ones. For other cables, see Appendix A. CARETAKER PLUS INSTALLATION AND OPERATIONS MANUAL 5 QUICK SETUP LIST – Parallel Units Parallel Set-Up 1. Connect the Caretaker Plus port 0 to your printer with the correct cable. Connect your computers to ports 1-8 with the correct cables. Connect the power adapter to the Caretaker Plus and turn the Caretaker Plus on. Verify that the power LED is on. The other LEDs light in various patterns as the power up tests are performed and then all go off. The ERROR LED will be lit for any errors. For PCs you should install your software package(s) to use the parallel port when printing. Also put the following statement in your AUTOEXEC.Bat file: MODE LPT1:,,P This statement will set the parallel port for infinite retry. Send data from your application or print program. Data will be routed to the shared device automatically. To optimize your installation, you can later configure any of the programmable parameters such as initialization string, form feed, or the timeout value. See the section on "CONFIGURATION" for further information 2. 3. 4. 5. Caretaker Plus Rear Panel – Parallel Model The diagram below shows the connector arrangement for model #CTP-8P. It has nine parallel ports with Centronics connectors. The CTP-4P is similar but it doesn't have ports 5-8. Port 0, the rightmost port, is where you connect the printer. The computers connect to the ports labeled 1-8. 6 CARETAKER PLUS INSTALLATION AND OPERATIONS MANUAL CABLING One of the most important steps in installing the Caretaker Plus is to connect the correct cables. We have tried to give as much information as possible to specify the correct cable. Please refer to Appendix A and B. Also refer to the previous section. Parallel Cabling Parallel units with Centronics connectors use standard IBM parallel cables to connect from PCs to the switch (port 1-8). A straight through cable with male Centronics connectors on each end is used to connect from the switch (port 0) to the printer. Parallel units with female DB25 connectors use a straight through cable with male DB25 connectors on each end to connect from PCs to the switch (ports 1-8). A standard IBM parallel printer cable is used to connect from the switch (port 0) to the printer. Parallel cabling in excess of 25 feet in length should be routed with caution. The maximum distance that a cable may be run is dependent upon the construction of the cable and its routing. For extended distances, shielded cable or ribbon cable should be used. Routing near machines that may create electrical noise, such as elevator motors, fluorescent lights, or air conditioning compressors should be avoided. Typically a cable run for 100 feet will work reliably but is not guaranteed. Low capacitance cable should be specified for long lengths of cable. Rose Electronics can construct the proper cabling to your specified length. Serial Cabling Proper serial cabling and pinout is crucial in the installation of your serial port peripheral. Appendix A gives a comprehensive list of the cable pinouts required for a successful installation. Serial cabling in excess of 100 feet should be routed with caution. The maximum cable length depends upon the construction of the cable and its routing. For extended runs, shielded cable should be used. Avoid routing near fluorescent lights, air conditioning compressors, or machines that may create electrical noise. Cable length and baud rate are inversely proportional: the longer the cable, the slower the baud rate must be. The RS-232-C specification recommends a maximum cable length of 50 feet at 9600 baud, however, with low capacitance cables, runs of greater distance are often successful. Rose Electronics can construct the proper cabling to your specified length. CONFIGURATION Configuration is unnecessary if the factory default settings are acceptable (see APPENDIX D for the FACTORY DEFAULT SETTINGS. The most common items to be configured are the timeout, initialization string, form feed, and for serial units the protocol. There are two methods to configure the unit --by menu and by command. The configuration menu can only be accessed through a serial port. Parallel units are required to be configured by command. Serial units can be configured by command, but it is usually more convenient to use the configuration menu. To access the configuration menu, a dumb terminal or a PC emulating a dumb terminal must be connected to port 1. The PC or terminal must be set to 9600 baud, 8 bits, noparity, 1 stop bit. After connecting your terminal or PC, power up the Caretaker Plus and wait for the power up tests to complete. When no LEDs on the front panel are lit, press both front panel switches at the same time. The MODE and BUSY LEDs will illuminate CARETAKER PLUS INSTALLATION AND OPERATIONS MANUAL 7 to indicate entry into configuration mode. Entering configuration mode will stop data transfer to the shared device, and also erase all data in the buffer. No new data can be loaded into the unit while in configuration mode. Press carriage return on your terminal to call the menu. The DATA LED will light indicating entry into the menu mode. You will be prompted for the proper responses. The configuration menu displays the setup parameters for all ports and allows you to change them. The item to be changed is selected with a single character, followed by a carriage return. You are further prompted to answer questions appropriate for each menu item. Possible responses to each prompt are listed in parentheses. Responses may be entered in either upper or lower case. You may use the backspace key to correct your entry. A carriage return is required to enter the response Entering only a return to a prompt will leave that parameter unchanged except for the initialization string entry, which will clear the string. Replying with a return only to a Y/N (yes/no) prompt will be interpreted as a no. A sample configuration display is shown in TABLE 1. Table 1. Configuration Menu Display CARETAKER PLUS CONFIGURATION Rev 3.8 COPYRIGHT 1986-91 ROSE ELECTRONICS Installed memory ....... 64K Front panel switches .. ENABLED Timeout ................ 20 Seconds Form teed ............. DISABLED Initialization String.. DISABLED ------ Current protocol ---------- Powerup protocol -----Port Baud Parity Length Stop Flow Baud Parity Length Stop Flow 1 9600 NONE 8 1 DTR 9600 NONE 8 1 DTR 2 9600 NONE 8 1 DTR 9600 NONE 8 1 DTR 3 9600 NONE 8 1 DTR 9600 NONE 8 1 DTR 4 9600 NONE 8 1 DTR 9600 NONE 8 1 DTR P - Change port formal T - Change timeout F - Change form feed I - Change init. String Configuration Menu part 1 D - Disable operator switches A - Advanced features K - Keep new configuration X - Exit configuration CARETAKER PLUS CONFIGURATION Rev 3.8 COPYRIGHT 1986-91 ROSE ELECTRONICS ----- Advanced Features -----Unidirectional Xon/Xoff ............. ENABLED Reverse Channel Data Timeout ........ DISABLED Allow Timeout On Busy (Ports 1-8) ... Yes Filter size ......................... 0 Characters U - Change unidirectlon Xon/Xoff R - Change reverse channel data timeout A - Change allow timeout on busy F - Change filter size X - Return to previous menu Enter choice (U.R.A,F.X, or H for help) Configuration Menu part 2 8 CARETAKER PLUS INSTALLATION AND OPERATIONS MANUAL Configuration Menu Items In the examples below, <ENTER> means "press the ENTER key", not "type the characters <ENTER>. Output from the Caretaker Plus is shown in courier type. Input from the user is shown in underlined courier type. Protocol The protocol consists of the baud rate, parity, word length, number of stop bits, and flow control. The factory default is 9600 baud, no parity, 8 bits, 1 stop, and DTR flow control. You may configure the protocol separately for each port. The port is changed to the new protocol, but the change is not saved in non-volatile memory until the Keep command is issued. To change the protocol enter P to the choice prompt. You will be asked which port you want to change. Enter the port number or R to change a range of ports. The range option will set any changed item(s) (i.e. baud rate, parity, etc.) to the new common value(s) for all the ports selected; however, any unchanged item(s) will remain at the previous setting(s). If you enter 'R', you will be asked for the range of ports you want to change. The ending port number must be greater than or equal to the starting port number. Note that if you hit just a return to the ending port number, that port number will be the same as the starting port number and only one port will be changed. After entering the port(s) to be changed, answer the subsequent prompts. Note that protocol changes are made when you exit the configuration menu. Single Port Enter choice (P.T,F,I,D,A,K.X, or H for help) <ENTER> Enter the port number (0-8 or R) 3<ENTER> Enter baud rate (19200, 9600, 7200, 4800, 3600, 2400. 1800, 1200, 600, 300, 150, 134.5, 110, 75, 50) 1200<ENTER> Enter parity type (N=None, E=Even, O=Odd, M=mark, S=Space) E<ENTER> Enter word length (5, 6, 7, 8) 7<ENTER> Enter stop bits (1,2) 1<ENTER> Enter flow control (D=DTR X=XONIXOFF) X<ENTER> Range of Ports Enter choice (P.T,F,I.D,A.K,X, or H for help) P<ENTER> Enter the port number (0-8 or R) R<ENTER> Enter the starting port number (0-8) 3<ENTER> Enter the ending port number (0-8) 4<ENTER> Enter baud rate (19200, 9600, 7200. 4800, 3600. 2400, 1800, 1200, 600, 300, 150, 134.5. 110, 75, 50) 2400<ENTER> Enter parity type (N=None, E=Even, O=Odd, M=mark. S=Space) (ENTER> Enter word length (5, 6, 7, 8) <ENTER> Enter stop bits (1, 2) <ENTER> Enter flow control (D=DTR X=XON/XOFF) D<ENTER> Timeout The timeout is used to automatically disconnect a port that is inactive (not sending or receiving data) from the shared device. The timeout specifies the length of time a port must remain inactive before the Caretaker Plus disconnects it from the shared device and connects the next port in the queue. The factory default is 20 seconds, but may be changed to be from 2 to 255 seconds. To change the timeout, enter T to the choice prompt and enter the new timeout value. Enter choice (P,T,F,I,D.A,K,X, or H for help) T<ENTER> Enter timeout (2-255) IO<ENTER> CARETAKER PLUS INSTALLATION AND OPERATIONS MANUAL 9 Form Feed The form feed, when enabled, sends a form feed character to the shared device to eject the last page printed when a port is disconnected. The factory default is a disabled form feed. When enabled the last character sent to the shared device is examined. If it is a form feed no action is taken. If it is not a form feed, one is supplied. To change the form feed, enter F to the choice prompt, and answer Y or N to enable or disable the form feed. Enter choice (P,T,F,I,D.A,K,X, or H for help) F<ENTER> Use auto form feed between jobs (Y/N) ? Y<ENTER> Initialization String The initialization string is used to initialize the shared device to a desired state. The factory default is to disable sending of the string. This string is sent to the shared device, before buffer data, when a port is connected. The string may be up to 8 characters long. Entering return only to the 'Enter initialization string' prompt will disable the sending of the string. To change the initialization string enter I to the choice prompt and enter the string. Unprintable characters such as escape may be entered and will be displayed on the configuration menu as periods. Note that neither the ASCII NULL character (code 00), carriage return, nor line feed characters are allowed in an initialization string. er choice (P,T,F,I,D.A,K,X. or H for help) <ENTER> er initialization string (CR only to disable) ? .E<ENTER> Disable Operator Switches This command inhibits usage of configuration mode or the clear buffer function, starting on the next power up. The factory default enables the operator switches. Use this command to prevent unauthorized change of the configuration parameters once you have set them properly. Once this state has been set, the only way to configure the unit is by resetting the unit to default settings and configuring again from those settings; see 'RESTORE TO DEFAULT FUNCTION'. Enter D from the choice prompt, then confirm your selection. Also, to doubly confirm this, you must also enter the KEEP command afterwards. Enter choice (P,T.F.I.D,A,K,X. or H for help) D<ENTER> WARNING! This option will disable the operator command CONFIGURATION MODE. After this command is executed, you will not be able to return to configuration mode without having to restore the unit to DEFAULT CONFIGURATION, thus erasing your custom configuration. Are you sure? (Y/N) Y<ENTER> Keep The keep command is used to store your changes in non-volatile memory. subsequently powering up the unit will use the newly saved parameters as the power up settings. If you do not use this command at the conclusion of your configuration, the unit will not remember your changes on the next power-up. To save the parameters enter K to the choice prompt. A prompt to enter yes or no to prevent accidental entry has been included. You must answer Y to this prompt for the parameters to be saved. Enter choice (P,T.F.I.D,A.K.X, or H for help) K<ENTER> Are you sure ? (Y/N) <ENTER> 10 CARETAKER PLUS INSTALLATION AND OPERATIONS MANUAL Exit This command is used to exit the configuration menu and return the unit to normal (data transfer) mode. Enter X to the choice prompt. A termination message will print, and the BUSY, DATA, and MODE LEDs will return to the state they were in before entry to configuration mode. The unit is then ready to accept data. Enter choice (P.T,F,I,D,A,K.X, or H for help) X<ENTER> Configuration terminated Help (Main Menu) This option gives a brief description of what each command does. Enter choice (P,T,F,I.D.A.K,X, or H for help) H<ENTER> The configuration menu shows the amount of memory installed, other various settings, and the current and power-on protocol settings for each port. Configure the Caretaker Plus by entering the letter of an item on the menu. P-PROTOCOL T-TIMEOUT F-FORMFEED I-INIT STRING D-FRONT SWITCHES A-ADV. FEATURES K-SAVE CHANGES X-EXIT H-HELP The protocol... After this ... Sends a ... Sent out ... To disable/enable ... Calls up... Puts current ... Exit from ... Displays ... Hit enter key to see configuration parameters or enter choice Advanced Features This command is used to call another menu with a list of 5 commands that are detailed below. Enter A to choice prompt. Another menu will print. Enter choice (P.T.F.I,D,A.K.X, or H for help) A<ENTER> Unidirectional X-on/X-off This command (on the advanced features menu) determines whether X-onlX-off are interpreted as data flow control characters or simply as data. This command is applicable only on the Caretaker Plus serial ports which are configured to use the Xon/X-off software handshaking protocol. When this feature is enabled, all X-on/X-off characters received on any port are interpreted as data flow control characters and are not transmitted to their destination port. When this feature is disabled, X-on/X-off characters received on port O will be used as data flow control characters; however, Xon/X-off characters received on ports 1-8 will be interpreted as data and passed through to port 0 for transmission. This is useful when plotting or printing graphics that contain Xon/X-off characters as part of the graphics data. The factory default is enabled. To change this feature, enter U to the choice prompt and answer Y or N to enable or disable the unidirectional X-on/X-off. Enter choice (U.R.A.F,X. or H for help) U<ENTER> Use unidirectional X-on/X-off (Y/N)? Y<ENTER> CARETAKER PLUS INSTALLATION AND OPERATIONS MANUAL 11 Reverse Channel Data Timeout This command (on the advanced features menu) determines whether or not to reset the timeout clock when data is received on port O "reverse channel data". When this feature is enabled, reverse channel data resets the timeout clock. When this feature is disabled, reverse channel data does not reset the timeout clock. Because some printers, particularly the HP LaserJet. send X-on codes at timed intervals (robust X-on/X-off), this feature is useful when the Caretaker Plus is connected to equipment which uses robust X-on/X-off. When this option is disabled, the Caretaker Plus allows the port to timeout; otherwise, the port would never timeout because of the robust X-on/X-off. The factory default is the reverse channel data timeout is disabled. To change the reverse channel data timeout, enter R to the choice prompt and answer Y to enable or N to disable reverse channel data timeout. Enter choice (U.R,A,F.X, or H for help) R<ENTER> Use reverse channel data timeout (YM)? N<ENTER> Allow Timeout On Busy (Ports 1-8) This command (on the advanced features menu) allows any serial port (except port O) to timeout even when the port is busy, i.e. DSR is low. The factory default is allow timeout when busy is enabled. Enter A to the choice prompt and answer Y or N to enable or disable allow timeout on busy. Enter choice (U.R.A,F,X, or H for help) <ENTER> Use allow timeout on busy (ports 1-8) (Y/N)7 Y<ENTER> Filter Characters This command (on the advanced features menu) allows a user-definable number of characters to be received before the characters are transmitted out port O. It is used if there is a problem of computers sending spurious data to a printer when the computer is turned on or off. The factory default is 0 characters, but may be changed to be from 1 to 255 characters. Enter F to the choice prompt and enter the new filter character size. Enter choice (U,R,A.F.X, or H for help) <ENTER> Enter the filter size (0-255) <ENTER> Return To Previous Menu This command (on the advanced features menu) exits the advanced features menu and returns to the previous configuration menu. Enter X to the choice prompt. Enter choice (U,R,A,F.X, or H for help) X<ENTER> 12 CARETAKER PLUS INSTALLATION AND OPERATIONS MANUAL Configuration Commands Configuration commands allow changing of the unit's setup parameters without the Use of a menu. They may be used on serial or parallel units. To enable processing of configuration commands, depress both of the unit's front panel switches. The MODE and BUSY LEDs will light. This indicates that the unit is in configuration mode. The unit must be in this mode to process configuration commands. To leave the configuration mode, depress both switches again. The MODE and BUSY LEDs will return to the state they were in prior to entering configuration mode. While in configuration mode, but not in the menu, the DATA LED will flicker in response to data received on port 1. Entering configuration mode will stop data transfer to the shared device, and also erase all data in the buffer. No new data can be loaded into the unit while in configuration mode. Configuration commands are recognized when input to PORT 1 ONLY. If a configuration command contains any syntax or value errors, it is ignored. A valid command is processed immediately upon receipt of the last character of the command and does not require a carriage return or line feed terminator. With serial units, carriage return is an illegal character in a configuration command, as it will cause entry into the configuration menu. Table 2. Configuration Commands Command Syntax Serial Protocol !@FPabcd Parallel Protocol !@FPabcd Timeout !@Txxx xxx=002 to 255 Initialization string !@Ixxxxxxxx Formfeed enable Formfeed disable Keep command Filler characters Unidirectional XON/XOFF enable Unidirectional XON/XOFF disable Reverse data timeout enable Reverse data timeout disable Timeout on busy enable Timeout on bust disable Parallel enable logic enable Parallel enable logic disable Operator switch disable Comments See table 3 for full syntax See table 4 for full syntax Leading zeroes required See explanation for syntax !@NY !@NN !@K Must be used to save !@Cxxx xxx=000 to 255 Leading zeroes required !@UY !@UN !@RY !@RN !@BY !@BN !@PY !@PN !@L CARETAKER PLUS INSTALLATION AND OPERATIONS MANUAL 13 Protocol Command This command changes the communication protocol of a given port. If you enter a protocol that blocks communication with the unit or is otherwise undesirable, and you have not used KEEP, you may restore the previous format by powering the unit down and back up. Protocol codes differ for serial and parallel models. In the parallel models only port 0 has a changeable protocol. In the serial models any port may be changed. For command syntax see TABLE 3 for serial models and TABLE 4 for parallel models. Keep in mind that protocol changes are made when you exit the configuration mode. Table 3. Serial Protocol Command Syntax Command Syntax: !@Fpabcd where p = Port number a= Parity b = Flow control 0 = none 0=DTR/DSR 2 = odd 8=X-on/X-off 6 = even A = mark E = space c = Data format 0 = 1 stop,8 bits 2 =1 Stop,7 bits 4 = 1 stop,6 bits 6 = 1 stop,5 bits 8 = 2 stop,8 bits A = 2 stop,7 bits C = 2 stop,6 bits E = 1.5 stop,5 bits d = Baud rate 0 = reserved 1= 50 2= 75 3= 110 4= 134.5 5= 150 6= 300 7= 600 8= 1200 9= 1800 A= 2400 B= 3600 C=4800 D=7200 E= 9600 F= 19200 Examples: To set port 3 to 4800 baud, 1 stop. 7 data bits, even parity, X-on/X-off the command is !@ F3682C To set port 5 to 1200 baud, 1 stop, 8 data bits, no parity, DTR/DSR the command is !@F50008 Table 4. Parallel Protocol Command Syntax In a parallel unit only port 0 can have its protocol changed. This protocol command is used to support printers that do not have an acknowledge or busy signal. Command syntax: !@F00x00 where x = 0 to use busy and acknowledge (Standard parallel interface) 1 to use busy, ignore acknowledge 2 to use acknowledge, ignore busy 3 to ignore busy and acknowledge Example: To ignore busy the command would be:!@F00200 14 CARETAKER PLUS INSTALLATION AND OPERATIONS MANUAL Parallel Enable Logic Command This command allows the Caretaker Plus to recognize when a computer that is connected to a parallel port on the Caretaker Plus is turned off so that the Caretaker Plus will not accept data from the PC. The factory default is to enable parallel enable logic. When this feature is enabled, the Caretaker Plus requires the INIT line to be high and the SELECT line to be low before receiving any data from the port. If a character other than Y or N is used no action is taken. Initialization String Command This command is used to change the initialization string. Enabling of the initialization string occurs when a valid string is entered. Disabling of the string is done by entering a string with the first character set to ASCII 00 (NULL). To enter the characters of the string, you type the ASCII number of each character in hexadecimal followed by an H without commas or spaces in between. Note that NULL serves as a terminator to the initialization string, so it will not be printed along with the string, and any characters following a NULL will be ignored. Command syntax is: !@issssssss where ssssssss is the new init string. To disable the string the first char must be 00. Examples: To enter the string <ESC>E .. . . · · · · · · · !@llBH45H<ENTER> To disable the string .... · · · · · · · · · · · . . . !@I<ENTER> CARETAKER PLUS INSTALLATION AND OPERATIONS MANUAL 15 OPERATIONS Initial State Following the successful completion of the power up tests, the Caretaker Plus turns all the port LEDs off. The BUSY LED may be lit if the shared device is busy. Normal Operation Input devices, usually computers, initiate requests to connect to the shared device by sending data to the Caretaker Plus. If no other ports are currently connected, connection with the shared device is made immediately. If other ports are currently connected, the requesting port must wait for all other ports ahead of it to use the shared device before it will be connected. An input device may send data to the unit's buffer while it is waiting to be connected. When data is received from the currently connected port, it is sent to the shared device if it is not busy; otherwise, the data is stored in the buffer until the shared device becomes ready. Data from a queued port is stored in the port's buffer until the port becomes active; at that time, the data is sent to the shared device whenever it is not busy. For serial models only, data that is received from the shared device is sent to the currently connected port if it is not busy; otherwise, the data is stored in the buffer until the port becomes ready. For serial models, when a port is connected to the shared device, full duplex communication is in effect; data can flow in either direction between the connected port and the shared device. For parallel models, data can flow only in one direction, from the connected port to the shared device. The LED corresponding to the port currently connected to the shared device will flash and LEDs corresponding to ports waiting for use of the shared device will be lit steadily. If no data is sent to or from the currently connected port for the duration of the timeout setting and the shared device and the connected input device are not busy, the current port will be disconnected and its LED will go from the flashing state to the unlit state. The next port in the queue will become connected and its LED will go from the steadily lit state to the flashing state. Any data sent to the buffer while waiting will now be sent to the shared device. The timeout is reset by four possible conditions: 1. Data is transmitted by the connected input device 2. Data is transmitted by the shared device (if REVERSE CHANNEL DATA TIMEOUT is enabled) 3. The shared device is busy 4. The connected input device is busy (if TIMEOUT ON BUSY is disabled). The timeout period begins only when none of these conditions exist. To determine the state of the unit by its LEDs see TABLE 5. 16 CARETAKER PLUS INSTALLATION AND OPERATIONS MANUAL Buffer Characteristics The switch may have a buffer memory of 16K, 256K, 512K, 1 megabyte, or 2 megabytes. The Caretaker Plus uses an intelligent algorithm to allocate memory. The buffer is dynamically allocated which means that any port can utilize as much buffer as required. The buffer is reclaimed to be used again as the data in the buffer is sent to its destination. As the memory becomes full, the reclaimed memory is first distributed to a currently active port, then to the queued ports as needed. However, the currently active port always has priority over the queued ports for memory. If the memory used for the queued ports becomes full, the queued ports are flow controlled off until the memory available for the queued ports becomes available. If all the memory available becomes full, the active port is flow controlled off until some memory becomes available. The buffer is divided in 32 memory allocation units. Each input port will always have one memory unit allocated to it. Unit Software Reset Function By entering and then immediately leaving configuration mode, (pressing both switches and releasing them to illuminate the MODE and BUSY LEDs, then pressing them again), a software reset is performed. All buffers are flushed; flow control flags are reset, and the unit restarts normal operation. Printer Initialization Signal (Parallel Models Only) At the completion of the power up test on parallel models, the INIT signal on the parallel interface is pulsed. This resets most printers. Table 5. LED operation Display Legend: M = Mode LED D = Data LED B = Busy LED E = Error LED ● = LED on O = LED off ☼ = LED flashing X = may vary, described below M D B E 1 2 3 4 5 6 7 8 EXPLANATION O O O O O O O O O O O O Note 1 O X X X X X X X X X X X Note 2 ● X X ● X ● ● ● ● O X X X X X X X X Note 3 O O O O O O O O O Note 4 O O O O O O O O O Note 5 O ☼ X X X X X X X X Note 6 O X Note 1: Normal operation - unit is idle. All LEDs off. Note 2: Normal operation - unit handling data. Data LED is on when data being transmitted or received on the shared device. Busy LED is on when the shared device is busy. Error LED is on when a parallel unit has an Interface error. Port LEDs fash when connected to shared device; glow steadily when waiting for connection. Note 3: Normal operation - unit in Row control display mode. Data LED operates as above. Busy LED lights when the shared device input buffer is full. Port LEDs light when the corresponding buffer is full. Note 4: Unit in configuration mode. Data LED lights in response to data input on Port 1. Note 5: Unit is in configuration mode and the menu is in use. Note 6: Buffer overflow has occurred. Port LEDs corresponding to overflowed ports will Rash rapidly in unison with the Error LED. Busy LED flashes in unison with the Error LED to indicate an overflow on the shared device's input buffer. CARETAKER PLUS INSTALLATION AND OPERATIONS MANUAL 17 Timeout The default setting of 20 seconds is sufficient for most applications. Some computers, however, start printing and then pause to do some type of calculation or processing and then resume printing. If this pause is greater than the timeout setting of the switch. then another computer could start printing and possibly interrupt the printing of the first job and ruin its printout. In this case, it is necessary to increase the value of the timeout through the configuration process. Please refer to the timeout in the section on CONFIGURATION for more information. NOTE: In the following examples (CR) means hit the enter key, (F6) means hit the F6 key (this will echo on the computer as hZ) The example is given for COM1 of the PC connected to a serial unit. Substitute with COM2 if your serial port is COM2 or LPTI or LPT2 if you have a parallel unit. To set the timeout to 60 seconds from a PC, do the following steps: 1. Momentarily hold in the advance and select switches until the mode and busy lights light up. 2. From the computer connected to port 1 on the unit type in the following: COPY CON COM1(CR) When typed at the DOS prompt. you get a blank line !@T060!@(F6)(CR) Enter the timeout command and keep command 1 file(s) copied This message displays and you return to DOS 3. Momentarily hold in the advance and select switches until the mode and busy lights turn off. 18 CARETAKER PLUS INSTALLATION AND OPERATIONS MANUAL Initialization String The initialization string is used to reset the printer to a defined state at the beginning of each job. In this way the printer settings of the last person to print do not affect the print settings of the next person to print. The most common string used is the reset command in the printer. The reset sequence for HP laser printers is ESC E. For Epson printers the reset sequence is ESC O. To configure the switch to use the initialization string you must send the proper command to the switch. The following example will set the string for an HP laser printer. To set the initialization string to ESC E from a PC do the following steps: 1. Momentarily hold in the advance and select switches until the mode and busy lights light up. 2. From the computer connected to port 1 on the unit type in the following: COPY CON COM1(CR) When typed at the DOS prompt, you get a blank line !@@1BH45H(CR) Enter the initialization string !@K(F6) Enter the keep command 1 Flle(s) copied This message displays and you return to DOS 3. Momentarily hold in the advance and select switches until the mode and busy lights turn off. Form Feed The form feed is used to automatically eject the page when your application is not capable of doing so. Most modern word processors do so. Some of the older applications do not. If you get a lot of jobs where two printouts are on the same page, then you may need to enable the form feed. To enable the form feed, do the following steps: 1. Momentarily hold in the advance and select switches until the mode and busy lights light up. 2. From the computer connected to port 1 on the unit type in the following: COPY CON COM1(CR) When typed at the DOS prompt, you get a blank line !@NYI@K(F6)(CR) Enter the form feed enable and keep command 1 File(s) copied This message displays and you return to DOS Momentarily hold in the advance and select switches until the mode and busy lights turn off. Adding More Memory If your computer seems to be slow to print and you are sending a lot of data or there are many people printing at once, then you may need more memory. Please refer to Appendix C for more information. Changing the Serial Baud Rate If your computer seems to be slow to print and you are sending a lot of graphics or downloading laser printer fonts, then you should make sure the baud rate is set to 19,200 baud and not 9600 baud This will significantly improve the print speed. Please refer to the CONFIGURATION section for more information CARETAKER PLUS INSTALLATION AND OPERATIONS MANUAL 19 Power Up Initial Display When powering on, the Caretaker Plus goes through a power up self-test which checks the main functions of its electronics. The leftmost LED labeled POWER should glow green and the other red LEDs should all turn on. Then the unit will cycle through four tests lighting up LEDs 1 through 4 as each test is performed. Errors are indicated by the ERROR LED lighting and the unit halting. See TABLE 6 for the full sequence of the power up LED display and TABLE 7 for error displays. Table 6. LED Power Up Display Legend: M = Mode LED D = Data LED B = Busy LED E = Error LED ● = LED on O = LED off X = may vary, described below M D B E 1 st ● ● ● ● 2 nd O O O O 3 rd O O O O 1 2 3 4 5 ☼ = LED flashing 6 7 8 4 th O O O O 5 th O O O O ● ● ● ● ● ● ● ● ● O O O O O O O O ● O O O O O O O ● O O O O O ● O ● O O O O ● ● O ● O O O ● ● ● O ● O O ● ● ● ● O ● O ● ● ● ● ● O O ● O O O O O O O O ● O O O O 6 th O O O O O O O O O O O O O O O O O O O O O O O O O O O O O O O O EXPLANATION All LEDs on Test 1: EPROM checker Test 2: 16K RAM buffer Test 2: 64K RAM buffer Test 2: 256K RAM buffer Test 2: 512K RAM buffer Test 2: 1M RAM buffer Test 2: 2M RAM buffer Test 3: Static RAM Non-volatile RAM Unit ready NOTE: The BUSY LED may be lit when the unit enters the ready state. This is dependent upon the state of the shared device. Program Checksum Test This test verifies that the unit's internal program is valid by performing a checksum test. If a fault exists, a program checksum error shows on the LEDs as error 1, as shown in TABLE 7. The unit will immediately halt. This error requires that the unit be serviced. Buffer Memory Sizing and Read/Write Test In this test, the Caretaker Plus automatically determines amount of buffer memory present and indicates the amount via the status LEDs as shown in TABLE a. The buffer memory is then tested to ensure that the memory system is operational. Any failure will cause the error 2 condition to be displayed, as shown in TABLE 7, indicating that a buffer memory data error has occurred. The unit will not continue its further tests and will halt. An error indicates that the unit requires servicing. 20 CARETAKER PLUS INSTALLATION AND OPERATIONS MANUAL Static Ram Read/Write Test The next test is for static ram. Since the Caretaker Plus has no static ram, this test is displayed as shown in TABLE 6 for consistency with other Rose products. Non-volatile Ram Tests The fourth and final power up test is for the non-volatile memory. A series of tests are performed. An error shown by the LEDs as error 4 indicates that the data in the nonvolatile memory has been corrupted. To attempt to rewrite the default parameters push SELECT switch then the ADVANCE switch. If the error condition goes out, the unit may be powered up again to see if it halts at error 4 again. If it still displays error 4, a fatal error has occurred and servicing is required. If the unit displays an error 45, the default parameters were not written correctly. This is a fatal error and servicing is required. If the unit recovers from the error the configuration parameters have been returned to their default settings and the unit must be configured again if these default settings are unacceptable. This condition should not normally occur. If it does it indicates that possibly the unit has been subjected to a strong static discharge or surge on its incoming power or signal lines. The other possibility is an internal chip failure. In addition to the data in the non-volatile ram, several others tests on the non-volatile ram are done. If any error 4 occurs and a reset to default does not correct it, the unit needs servicing. The additional errors listed below are for technical support purposes only. Front Panel Switches The front panel switches, labeled SELECT and ADVANCE, are used to enter and exit the configuration menu and to enter and exit the flow control display mode. These switches can be disabled under program control. This is done by either using the 'Operator Switch Disable' command or through the configuration menu. Note that if these switches are disabled and the setting is stored in non-volatile memory, the only way to re-enable the switches is by resetting the Caretaker Plus to the factory default settings. See the 'Diagnostics' section for more information. Data LED, Busy LED, and Error LED The DATA LED flickers when data is sent in or out the shared device's port. When large blocks of data are sent to or received from the shared device, the DATA LED will be on continuously. The BUSY LED lights when the shared device is telling Caretaker Plus not to send data. For parallel models only, the ERROR LED lights to indicate a printer error or device off-line. Buffer Overflow Error Display (Serial Models Only) If any device fails to follow flow control protocol and transmits data when the Caretaker Plus is instructing it not to, an overflow may occur. If this happens, the ERROR LED and the overflowed port's LED will flash rapidly in unison. If the overflow was on the input buffer for the shared device, the BUSY LED will flash along with the ERROR LED. This indicates a buffer overflow has occurred and data may have been lost. This display will remain until acknowledged by pressing the advance switch. Other than lost data on the overflowed port, operation of the unit is not affected by this display. If the buffer is not cleared, data transfer continues, but the data may be unreliable. If more than one port overflows, multiple port LEDs will flash in unison with the ERROR LED. When this display occurs, the cabling may be incorrect, or a program that uses only X-on/X-off flow control may be accessing a port that is configured for DTR flow control. CARETAKER PLUS INSTALLATION AND OPERATIONS MANUAL 21 Flow Control Display Mode (Serial Models Only) By pressing the ADVANCE switch during normal operation, the LED display is switched to the flow control display mode. The MODE LED illuminates to indicate this mode is active. You may return to normal display mode by pressing the ADVANCE switch again. During flow control display mode, the corresponding port LEDs light only when the Caretaker Plus has instructed the connected device to stop sending data via the port's currently selected protocol. Thus, an input device should not be transmitting data to the Caretaker Plus when its LED is lit. The only time Caretaker Plus instructs a device to stop sending data is when the device's buffer is full. Thus this display may be used to monitor buffer status. Also, in this mode the BUSY LED reflects the flow control status of the shared device's input buffer. 22 CARETAKER PLUS INSTALLATION AND OPERATIONS MANUAL TROUBLESHOOTING Troubleshooting Common Problems and Solutions I. Missing blocks of data on shared device and/or buffer Overflow error display occurs - serial only A. Flow control is not set or wired properly If your device uses X-on/X-off, ensure that the corresponding port is set for X-on/X-off. If you are using DTR you have a miswired cable, see Section IIA below. II. Nothing happens when sending data A. Improper cabling See 'CABLING' section. B. Protocol does not match Protocol on serial units is the baud rate, parity type, number of stop bits, bit size of the characters (5, 6, 7, or 8), and the handshaking type (DTR or X-on/Xoff). Protocol in your device must match the protocol in the unit. See 'CONFIGURATION' section. C. Printer or computer connected to wrong port. Input ports are 1-8, output port is O. Ensure devices are connected to proper ports. III. Garbled data received at shared device A. Protocol does not match See Section ll B above. B. Flow control See Section IA above. C. Wiring interference This may occur on computers which are a long distance from the Caretaker Plus. See 'CABLING' section for information on cable routing. IV. Computer locks up A. Buffer is full Place unit in flow control display mode. If the computer port's LED is lit, the buffer is full. The shared device must accept some data to empty the buffer and allow the unit to accept more data from the computer. This will unlock the computer. B. Flow control improperly wired See Section IA above. CARETAKER PLUS INSTALLATION AND OPERATIONS MANUAL 23 V. Port(s) do not time out A. 'Robust' X-on/X-off present. Some printers, particularly the HP LaserJet, send X-on codes at timed intervals. Set the 'REVERSE CHANNEL DATA TIMEOUT' feature to Y. See 'CONFIGURATION' section for information on 'REVERSE CHANNEL DATA TIMEOUT'. Other options are disconnect pin 3 on port O, configure the printer for normal X-on/X-off, or configure port O to X-on/X-off. B. Improper wiring A computer which is powered off is making a port busy. Do not connect this computer's pin 6 to the unit. Alternately, enable ALLOW TIMEOUT ON BUSY. See 'CONFIGURATION' section for information on 'ALLOW TIMEOUT ON BUSY'. Table 7. LED Error Display Legend: M = Mode LED D = Data LED ● = LED on O = LED off X = may vary, described below M D B E 1 2 O O O O O O O O O O O O O O O O O O O O O O O O O O O O O O ● ● O ● O ● ● O O ● O O ● ● O ● O O ● O O ● O O ● O O ● O O B = Busy LED E = Error LED ☼ = LED flashing 3 4 5 6 7 8 EXPLANATION O O O O O O Error 1 O O O O O O Error 2 ● O O O O O Error 3 O ● ● ● ● ● ● ● O O O O Error 4 O O O O Error 41 O O O O Error 43 ● O O O Error 45 O ● O O Error 46 O O ● O Error 47 O O O ● Error 48 O ● O O O O Error 1 EPROM checksum failure Error 2 RAM buffer memory failure Error 3 Static ram failure Error 4 Non-volatile ram checksum failure Error 41 Non-volatile ram signature doesn't match EPROM signature Error 43 Non-volatile ram memory failure Error 45 Restore to default configuration failure Error 46 Unable to recognize all ports Error 47 Number of ports doesn't match number listed in the non-volatile ram Error 48 Wrong EPROM version Any error not listed requires that the unit be serviced 24 CARETAKER PLUS INSTALLATION AND OPERATIONS MANUAL Maintenance and Repair The exterior surface of the unit may be wiped with a damp cloth to keep it clean. The unit does not contain any jumpers or serviceable parts inside. Opening the unit invalidates the warranty except in the case of an authorized memory upgrade or firmware updates. Any malfunction of the unit should be reported to a factory authorized repair center for service. Any discrepancies in the operation of the unit according to this manual should be reported to the Technical Support department of Rose Electronics. Technical Support If you cannot determine the nature of a problem, please call Rose Electronics and ask for Technical Support. If possible, call from a phone located near the unit--we may be able to solve your problem directly over the phone. If we cannot solve your problem, and determine that the fault is in the unit, we will issue a Return Authorization (RA) number which must appear on the outside of all returned products. The unit should be doublepacked in the original container, insured, and shipped to the address given to you by our Technical Support representative. To speak to a Technical Support representative, call (713) 933-7673 from 8:O0-Noon and 1:00-5:00 CST, Monday through Friday. CARETAKER PLUS INSTALLATION AND OPERATIONS MANUAL 25 DIAGNOSTICS Diagnostic Modes The Caretaker Plus has an extensive self-test diagnostic capability. Normally these features are only accessed by a technician to determine a failure with the unit. Through the diagnostic modes, you can: Print the configuration menu Print a repeating test pattern on the printer Restore the non-volatile memory to its factory defaults Test the EPROM, buffer memory, and non-volatile memory Test all signals on each I/O port There are three diagnostic modes that can be entered. 1. Short test - Print configuration menu, printer test pattern, and reset non-volatile memory to factory default are accessed through this mode. This test is called the short test because its test of the dynamic memory (test #2) is not as long as the other tests. 2. Long test with loopback connectors - tests all functions of the unit except the I/O ports are only tested for open loop conditions. 3. Long test with no loopback connectors - tests all functions of the unit including that the I/O port drivers and receivers are all functional. Short Test This mode is entered by holding down both front panel switches while turning the unit's power on. The unit will continuously go through its power up sequence and stop if it encounters an error, displaying the error on the LEDs and indicating servicing is required. Note that the memory test (test t2) performed in this mode is more extensive and thus takes more time to execute than in the power up test. It is not as extensive as the long tests. To leave this mode power down the unit, then power back up with no switches pressed. Restore To Factory Default There are two ways to reload the factory default configuration. The first is if an error occurs in powering up the unit and the unit halts with error 4 (ERROR LED and LED 4 are lit). To reload the defaults push the advance switch, the unit is then ready for operation. if this occurs frequently, it indicates excessive static electricity or poor power to the unit. The other method of reloading the factory defaults is through the short test diagnostic mode. This mode is entered by powering the unit off and pressing both the advance and select switch and then powering up the unit. Release the advance switch (the one on the left) and continue to hold the select switch (the one on the right) while the switch cycles through its normal power up sequence. The switch will halt with LED 4 lit. Release the select switch. Momentarily press the advance switch and all lights should come on to indicate a successful reload of the factory defaults. The unit stays in this short diagnostic mode and continuously cycles through the 4 tests. On a subsequent cycle, It you receive an error 4 (restore to default failure), the unit must be serviced. To resume normal operation, you must power the unit off and back on. The unit is now set at its factory defaults. You must reconfigure the unit, if necessary, to correspond to your equipment settings. 26 CARETAKER PLUS INSTALLATION AND OPERATIONS MANUAL Print Configuration/Test Pattern Function Holding both switches down at the end of test 4 causes the unit to print its configuration out to port O, as shown in TABLE 8. Holding both switches down a second time at the end of test 4 causes a print exerciser to run, which sends a repeating test pattern out to the device on port O. To stop the exerciser, press both switches again. The exerciser may be started and stopped again the same way. The exerciser follows the protocol assigned to port O. Table 8 Print Configuration Serial Units CARETAKER PLUS CONFIGURATION Rev 3.8 COPYRIGHT 1986-91 ROSE ELECTRONICS Installed memory 64K Front panel switches … ENABLED Timeout ........········ 20 Seconds Form feed ......... DISABLED Initialization String .. DISABLED ....-. Current settings ----Port Baud Parity Length Stop Flow 0 9600 NONE 8 1 DTR 1 9600 NONE 8 1 DTR 2 9600 NONE 8 1 DTR 3 9600 NONE 8 1 DTR 4 9600 NONE 8 1 DTR Unidirectional Xon/Xoff .············ ENABLED Reverse Channel Data Timeout…… DISABLED Allow Timeout On Busy (Ports 1-8) ... Yes Filter size ............·········--·· 0 Characters Parallel Units CARETAKER PLUS CONFIGURATION ReV 3.8 COPYRIGHT 1986-81 ROSE ELECTRONICS Installed memory ....··· 64K Front panel switches.. ENABLED Timeout .........---- 20 Seconds Form feed .......······ DISABLED Initialization String .. DISABLED Ignore ACK .... NO Ignore BUSY ... NO Parallel Enable Logic ... ENABLED CARETAKER PLUS INSTALLATION AND OPERATIONS MANUAL 27 DIAGNOSTICS Long Test Without Loopback This group of tests are entered by pressing the select switch only while powering up the unit with the on/off switch. All equipment should be disconnected from the unit prior to running this test. Test 1 - EPROM program checksum test is the same as described previously. Test 2 - Dynamic ram test checks the dynamic ram more extensively than the short test or the power up test. The test takes longer to perform. If this test fails (ERROR LED and LED #2 are lit) then the unit must be serviced. Other LEDs #5-#8 may also be lit indicating the amount of memory that is installed. The failing board and memory device can be determined by pressing the advance switch. The MODE LED will be lit if the failing board is the base mother board or the bottom-most memory board installed. The DATA LED will be lit if the failing board is the second from the bottom. The BUSY LED will be lit for the third board, and the ERROR will be lit for the fourth board. The LEDS 1-8 correspond to the physical placement of the failing chip. If the failing chip is the one all the way to the left, then LED 1 will be lit. If the failing chip is the one all the way to the right, then LED 8 will be lit. The chips in the middle correspond appropriately. Hitting the select switch will retry the test. In order to bypass this test completely, both the advance and the select switches must be pressed. Test 3 - Same as static ram read/write test above Test 4 - Same as non-volatile ram checksum test above Test 5 - Port addressing test checks if the contents of non-volatile memory agree with the port configuration. If this test fails (ERROR LED and LED #5 are lit) then the configuration memory has been corrupted or a port communication chip has failed. Reload the factory default settings as described below and retry the test. Make sure there are no cables connected to the caretaker Plus. Re-run the test, if the test still fails then the unit must be serviced. The advance switch may be pressed to determine which port is the failing port. The MODE, DATA, and BUSY LEDs will be lit. The LEDs of all ports which pass will be lit (ERROR led is used for port 0). A failing port will have its corresponding LED off. The select switch may be pressed to execute the test again. In order to bypass this test completely, both the advance and the select switch may be pressed. Test 6 - Module test ensures that there are no signal shorts on a port, in order for this test to pass, no equipment should be connected to the Caretaker Plus. If this test fails (ERROR LED and LED B6 are lit) then a port communication chip has failed and the unit must be serviced. The advance switch may be pressed to determine which port is the failing port. MODE, DATA, and BUSY will all be flashing. The LEDs or all ports which pass will be flashing (ERROR LED is used for port 9). A failing port will have its corresponding LED steadily lit. Ports not installed will have their corresponding LEDs off. The select switch may be pressed to execute the test again. In order to bypass this test completely, both the advance and the select switches may be pressed. 28 CARETAKER PLUS INSTALLATION AND OPERATIONS MANUAL Long Test with Loopback This test is entered by pressing the advance switch only while powering up the unit with the on/off switch. Special loopback connectors should be connected to each Caretaker Plus port. Tests 1-5 - These are the same as tests 1-5 of long test without loopback. Test 6 - The loopback test assures that all port signals are functional. In order for this test to pass, special loopback connectors must be installed on each port, see TABLE 9. if this test fails (ERROR LED and LED #6 are lit) then a port communication chip has failed and the unit must be serviced. The advance switch may be pressed to determine which port is the failing port. MODE, DATA, and BUSY will all be flashing. The LEDs of all ports which pass will be flashing. A failing port will have its corresponding LED steadily lit (ERROR LED is used for port O). Ports not installed will have their corresponding LEDs off. The select switch may be pressed to execute the test again. In order to bypass this test completely, both the advance and the select switched may be pressed. Table 9. Loopback Test Connectors Serial Loopback Connector Male 25 Pin D Parallel Loopback Connector Male 36 Pin Centronics Parallel Loopback Connector Male 25 Pin D 2……..….3 6……….20 1……..….8 2……….13 3……….32 4……….12 5……….31 6……….36 7…..10, 14 9……….11 1…..…….8 3……….15 4……….12 5……….16 6……….17 7…..10, 14 9……….11 CARETAKER PLUS INSTALLATION AND OPERATIONS MANUAL 29 APPENDICES Appendix A: Serial Cabling The diagrams below show the Caretaker Plus pinout on the left and all other devices on the right. Read across to find the pinout. Connector types shown below refer to the connector on the device, not on the cable. NOTE: Caretaker Plus is abbreviated CTP. Serial Computers CTP 25 pin female 2 3 7 20 IBM PC 25pin male 3 2 7 5-6-8 IBM AT 9 pin male 2 3 5 1-6-8 Mac 9 pin female 9 5 3-8 7 Mac+ 8 pin circular 5 3 4-8 2 Serial Printers CTP HP Laser Jet 25 pin female 2 3 7 6 4 25 pin female 3 2 7 20 - Xerox 4045 laser 25 pin female 3 2 7 20 5-6-8 Apple Imagewriter 25 pin female 3 2 7 20 - Apple Imagewriter II 8 pin circular 5 3 4-8 1 - Serial Printers/Plotters Epson Okidata* Diablo NEC HP Calcomp Hou.Inst. 630 spinwr. plotters plotters plotters MX type 82-193 2 3 3 3 3 3 3 3 3 2 2 2 2 2 2 2 7 7 7 7 7 7 7 7 6 11 11 11 19 20 20 20 4 6 5-6 6 5-6-8 5-6 5-6 5-6 *Jumper setting for ready on pin 11. CTP 25 pin female Other Devices CTP 25 pin female 2 3 4 6 7 20 Hayes modem 2 3 4 6 7 20 Multiplexers 2 3 4 6 7 20 VT-100 terminal 3 2 7 - Rose* Rose** Vax 25 pin female 8 pin female 25 pin female 3 2 20 7 6 6 4 3 5 2 3 2 7 - * Refers to any Rose switching device with a 25 pin serial port (Caretaker. Caretaker Plus, Porter, Super Switch, or Master Switch). ** Refers to any Rose switching device with a RJ45 8 pin serial port (MSU or MSN Series Master Switch, or FastPrint). 30 CARETAKER PLUS INSTALLATION AND OPERATIONS MANUAL Appendix B: Pinout Specifications Serial Models DB25 Female Pin Signal Name Acronym I/O Description 2 Transmit data TXD Output Serial data from port 3 Receive data RXD Input Serial data to port 4 Request to send RTS Output Always high 6 Data set ready DSR Input Low inhibits transmit data 7 Signal ground GND Common 20 Terminal ready DTR output Pin 20 is the hardware flow control output. Pin 6 is the hardware flow control input. Pin 6 has an internal pull-up to set it high when no signal is connected. Parallel Models Centronics 36 Female DB25 Female C36F Pin 1 2 3 4 5 6 7 8 9 10 11 12 13 14 16 19-30 31 32 33 36 DB25 Pin 1 2 3 4 5 6 7 8 9 10 11 12 13 14 18-25 16 15 17 Signal Name STROBE DATA 0 DATA 1 DATA 2 DATA 3 DATA 4 DATA 5 DATA 6 DATA 7 ACK BUSY PAPER END SELECT OUT AUTOFEED GROUND GROUND INITIAL ERROR GROUND SELECT IN Port 0 output output output output output output output output output input input input input output --------------output Input -------output Port 1-8 input input input input input input input input input output output output output input --------------Input output -------input Description Data transfer when pulsed low Data LSB Data MSB Pulsed low for next transfer If high inhibits data flow Input unused, low when output Input unused, high when output Input unused, output high Wired common all ports Wired common all ports Must be high to receive data Input unused, high when output Wired common all ports Must be low to receive data CARETAKER PLUS INSTALLATION AND OPERATIONS MANUAL 31 Appendix C: MP1000 Memory Board This memory board provides optional, add-on buffer expansion for the Caretaker Plus. Installing this board expands the Caretaker Plus buffer from the standard 64K to 256K, 512K, or 1 MB. "Stacking" two boards allows the buffer to be increased to 2 MB. This card requires the use of 256K x 4 DRAM chips (standard 20-pin DIP type; the speed doesn't matter). About the Board This unit consists of a socketed printed circuit board, with spaces for eight DRAM chips. Two 20-pin extensions on the unit's bottom plug directly into the Caretaker Plus motherboard (where the two DRAM chips for the basic 64K buffer go) or may be plugged into another board for expansion. Two threaded metal spacers are included to secure the board to the motherboard, or to another expansion board. CAUTION! This board is sensitive to static electricity. Handle it only by the edges, and only if using a grounding strap or other commercial grounding device. The expansion pins on the underside of the board are delicate. Be careful not to bend or break them during installation. Installation Opening the Caretaker Plus Unplug the Caretaker Plus power cord. Remove the two screws from either side of the unit, and remove the top cover. Removing the Standard DRAMs Remove the two socketed 64K DRAM chips from the Caretaker's motherboard. (They are numbered U13 and U14 on the board, and are positioned vertically near LEDs 7 and 8). These will not be reused. Setting the Jumper Black For each board you're using, position the jumper block's small wire jumper. If using only one board, it should be in Position 1 (far left). For two boards, the second (top) board's jumper should be at Position 2 (second from left). Installing Jack Screws on the Motherboard If your Caretaker Plus does not have threaded spacers (jack screws) on the motherboard. you will have to install them. Rose Electronics can supply you with the appropriate jack screws. Begin by removing the three screws from the lower rear of the Caretaker Plus. Remove any screws from the bottom of the cabinet, noting where they came from. The motherboard and back panel will now separate from the front/bottom cabinet. You may now install the jack screws onto the motherboard, using the memory board as a guide as to which holes to use. Be careful not to use metallic washers of a size such that they short together circuits on the motherboard. Reassemble the mother-board/back panel by reversing the steps taken to remove it. 32 CARETAKER PLUS INSTALLATION AND OPERATIONS MANUAL Installing the Board Carefully plug the expansion pins of the board (the first board, if using two) onto the motherboard's sockets where the 64K chips were removed. Fasten the board down using the two threaded spacers. Screw them into the motherboard's existing spacers (after removing two small Philips-head screws that may be in place). The spacers should be finger-tight. If using two boards, stack them by plugging the expansion pins of one into the expansion sockets of another. (Be sure the jumpers are correct!). Screw and tighten the spacers for each board. Once Completed... Replace the top cover and re-fasten the outside screws. Plug the power cord back in and turn the switch "On". Your Caretaker Plus will now use the full amount of buffer you have installed. Adding Chips to an Empty Board or Adding Additional Chips A board can be upgraded from 256K to 512K, from 2561< to 1MB, or from 512K to 1MB. To obtain 2MB an additional board must be installed. The sockets are numbered 1 through 8 from left to right. Pin 1 of each socket is at top left; match this with Pin 1 of the chip itself. located to the left of a small indentation at the top end of the chip. The memory chips are very sensitive to static electricity. Avoid touching their pins. Use an anti-static bag or work pad and/or wrist grounding strap when handling the chips. For a 256k buffer, chips must be installed in sockets U1 and U5. For a 512K buffer, chips must be installed in sockets U1, U2, U5, and U6. For a full 1 MB, chips must be installed in all eight sockets. If more than one board is used all sockets on each board must be filled. Verification of Installation As usual, when the switch is powered on, it will perform four self-tests including a buffer check (Test #2). If the self-test locates a DRAM problem, the LED display will show an error status on its LEDs. This display not only indicates a particular board but a particular chip or part of a chip that is defective. See the 'Troubleshooting' section for more information. CARETAKER PLUS INSTALLATION AND OPERATIONS MANUAL 33 Appendix D: Factory Defaults Upon receiving the Caretaker Plus from the factory, or restoring the unit to default parameters (see 'RESTORE TO DEFAULT FUNCTION'), The factory default settings are: Timeout: 20 seconds Protocol Serial: 9600 baud, no parity, 8 bits, 1 stop, DTR flow control Protocol Parallel: Use busy and acknowledge Form Feed: Off Initialization String: None Unidirectional X-on/X-off: Yes Parallel Enable Logic: Yes Reverse Channel Data Timeout: No Flow Timeout on Busy (Ports 1-8): Yes Filter Size: O characters Appendix E: General Specifications Serial Models Electrical: RS232 -9 to +9 volts Protocol: Asynchronous; DTR/DSR, X-on/X-off flow control Baud Rate: 50-19200 baud Word Length: 5, 6. 7, or 8 Parity: odd, even, mark, space, or none Stop bits: 1 or 2 Parallel Models Electrical: TTL levels protocol Centronics compatible STBIACWBUSY interface Size and Weight 0.5" wide X 3.5" high X 5.0" deep 5 ports: 7 Ibs 9 ports: 8 Ibs Chassis Steel tan painted enclosure, rear mounted connectors Aluminum black anodized 5.25" X 19" rack mount (optional) Power 110 volt, 10 VA external wall mount adapter (standard) 220 volt, 10 VA external floor mount adapter (optional) 110 volt, 10 VA external floor mount adapter (optional) Display Port status LEDS: 1-8 Unit status LEDs: Power, Mode, Data, Busy, Error Environment 0-70 degrees C., 0-95% relative humidity Connectors Serial: DB25 female Parallel: Centronics 36 female or DB25 female Warranty 1 year parts and labor. Extended warranty available 34 CARETAKER PLUS INSTALLATION AND OPERATIONS MANUAL 10707 Stancliff Road Houston, Texas 77099 Phone: (281) 933-7673 WWW.ROSE.COM