1
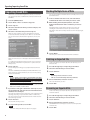
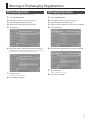
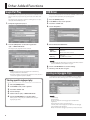
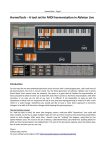
JUPITER-80 Version 1.10 Supplementary Manual
This manual explains the functions that have been added in version 1.10 of the JUPITER-80.
Read this manual in conjunction with the JUPITER-80 Owner’s Manual.
Exporting/Importing Sound Data (P.1)
Registrations, live sets, and tones (SuperNATURAL Synth Tones only) that you edit on the JUPITER-80 can now be exported to a USB flash drive.
From the data exported to a USB flash drive, you can also select the desired registrations, live sets, and tones, and import them back into the JUPITER-80.
Moving or Exchanging Registrations (P.3)
Registrations saved in the JUPITER-80 can now be moved or reordered.
Single Part Play (P.4)
A registration that is optimal for playing only a single part has been added.
If you select this registration, only a single part will sound; when you select the sound of a different part, the previously selected part will automatically turn off.
USB Driver (P.4)
In addition to the dedicated JUPITER-80 USB driver, you can now use the default driver provided by the operating system (MIDI only).
Erasing an Arpeggio Style (P.4)
You can now erase a user arpeggio style.
Exporting/Importing Sound Data
Exporting Sound Data
From the registrations, live sets, and tones saved in the JUPITER-80, you
can select the desired items and export them to a USB flash drive.
5. Touch <Export>.
You can rename the file that will be exported.
To rename the file, touch <RENAME>.
When you export a registration, the live sets and tones used by that
registration will also be exported.
In the same way, when you export a live set, the tones used by that live
set will also be exported.
1. Press the [MENU] button.
2. Touch <Next>/<Prev> to switch to “Page 2/2.”
3. Touch <Export>.
4. Mark the sound data that you want to export.
Select the desired registration, live set, or tone, and touch <Mark>. If the
item was already marked, the mark will be cleared.
You can also use the tabs to switch between registrations, live sets, and
tones.
MEMO
• The exported sound data will be saved together in a single file named
***.SVD, located below /ROLAND/SOUND in the USB flash drive.
• If you export a registration that uses a user arpeggio style, the two
files ***.SVD and ***.BIN will be created.
6. Touch <EXEC>.
The screen will ask “Are you sure?”
7. To carry out the export, touch <OK>.
NOTE
Never turn off the power while the export operation is in progress.
When you mark an item, an “*” will appear at the left of the Number/
Name.
A “+” symbol will automatically appear for the live sets or tones used by
sound data marked with an “*” symbol. The “+” symbol cannot be directly
erased.
MEMO
The only tones that can be exported are SuperNATURAL Synth tones.
Copyright © 2011 ROLAND CORPORATION
All rights reserved. No part of this publication may be reproduced in any form without the written permission of ROLAND CORPORATION.
1
Exporting/Importing Sound Data
Importing Sound Data
Here’s how to select the desired registrations, live sets, or tones from
a file that was exported to a USB flash drive, and import them into the
JUPITER-80.
1. Press the [MENU] button.
2. Touch <Next>/<Prev> to switch to “Page 2/2.”
3. Touch <Import>.
4. Select the data file from which you want to import, and
touch <Select>.
5. Select the sound data that you want to import.
Marking Multiple Items of Data
You can select multiple consecutive items of sound data, and set or clear
the marks for them.
1. In the sound data selection screen, select the lowest-
numbered item of the sound data you want to select.
2. While holding down the [SHIFT] button, select the
highest-numbered item of the sound data you want to
select.
Everything from the sound number selected in step 1 up to and
including the sound number selected in step 2 will be selected.
The number of data items currently selected is shown in the upper right
of the list.
When you select a data file, all of the sound data will be selected.
To de-select unwanted sound data, touch <Mark> to clear the mark.
You can use the tabs to switch between registrations, live sets, and
tones.
3. Touch <Mark>.
This allows you to add or clear the marks from the sound data.
When you mark an item, an “*” will appear at the left of the Number/
Name.
A “+” symbol will automatically appear for the live sets or tones used
by sound data marked with an “*” symbol. The “+” symbol cannot be
directly erased.
6. Touch <Import>.
A screen will appear, allowing you to specify the destination for the
import.
The names “INIT REGIST,” “INIT LIVESET,” and “INIT SYNTH” will be used
when assigning the import destinations; this occurs in order, starting
with the lowest number.
NOTE
If you’ve edited a sound and have saved it with the name “INIT
REGIST,” “INIT LIVESET,” or “INIT SYNTH,” it may be automatically
selected as the destination for the import.
If you then execute the import, this data will be overwritten and
lost. The lost sound data cannot be recovered.
Please save your important sound data using names other than “INIT
REGIST,” “INIT LIVESET,” and “INIT SYNTH.”
7. If you want to change the destination of the import, clear
the specified mark, and then select and mark the desired
destination for the import.
Select the same number of import destinations as the sound data you’re
importing. (Importing is not possible if the number is insufficient.)
You cannot select more import destinations than the number of sound
data items being imported.
8. Touch <Execute>.
The screen will ask “Are you sure?”
9. To carry out the operation, touch <OK>.
NOTE
Never turn off the power while the import is in progress.
2
Deleting an Exported File
In the screen where you select the data file to be imported, you can
delete data files.
1. Proceed through step 3 of “Importing Sound Data.”
2. Select the data file that you want to delete.
3. Touch <UTILITY>.
NOTE
Data that you delete cannot be recovered.
Take care not to inadvertently delete important data.
4. Choose “Delete File,” and touch <Select>.
The screen will ask “Are you sure?”
5. Touch <OK>.
Renaming an Exported File
In the screen where you select the data file to be imported, you can
rename the data file.
1. Proceed through step 3 of “Importing Sound Data.”
2. Select the data file that you want to rename.
3. Touch <UTILITY>.
4. Choose “Rename File,” and touch <Select>.
The RENAME FILE screen will appear. Use the on-screen keyboard to
rename the file.
5. Touch <OK>.
Moving or Exchanging Registrations
Moving a Registration
Here’s how to rearrange the order of the registrations.
Exchanging Registrations
Here’s how to exchange the numbers of two registrations.
1. Press the [MENU] button.
2. Touch <Next>/<Prev> to switch to “Page 2/2.”
3. Touch <Registration Move/Exchange>.
4. Touch the sound data that you want to move.
5. Touch <Move>.
1. Press the [MENU] button.
2. Touch <Next>/<Prev> to switch to “Page 2/2.”
3. Touch <Registration Move/Exchange>.
4. Touch one of the registrations that you want to exchange.
5. Touch <Exchange>.
6. Use the value dial to select the destination for the move.
6. Touch the other registration that you want to exchange.
The numbers of the registrations between the source of the move and
the destination of the move will automatically be revised.
7. Touch <Execute>.
7. Touch <Execute>.
The screen will ask “Are you sure?”
The screen will ask “Are you sure?”
8. To execute, touch <OK>.
8. To execute, touch <OK>.
3
Other Added Functions
Single Part Play
The JUPITER-80’s sound generator plays four parts in combination. If you
want to sound only one part (live set), you’ll need to turn off the other
parts.
USB Driver
Here’s how to switch between the dedicated JUPITER-80 USB driver and
the generic driver provided by the operating system.
1. Call up the registration [01]A-1.
1. Press the [MENU] button.
2. In the MENU screen, touch <System>.
3. Touch the <SETUP> tab.
4. Touch <Beep/Misc>.
2. Press the [DEC] button to select the registration
5. Choose the desired USB Driver.
The single part play registration limits the sounding parts to one part;
other parts will automatically be off.
“[00]---: SINGLE PART PLAY.”
The single part play registration will be selected.
Driver
Description
The dedicated JUPITER-80 driver provided by Roland
will be used.
VENDER
(MIDI+AUDIO)
MIDI and audio will be available.
The generic driver provided by the operating system
will be used.
GENERIC
(MIDI only)
Only MIDI will be available.
MEMO
This setting will take effect after you perform System Write and then
turn the JUPITER-80’s power off, then on again.
MEMO
• When using single part play, the Split function and Harmony
Intelligence function are unavailable.
• The results of editing a single part play registration can be saved as a
conventional registration ([01]A-1–[08]D-8).
6. Touch <SYSTEM WRITE> to save the settings.
7. Turn the power off, then on again.
Erasing an Arpeggio Style
In the Registration Common/Control (ARPEGGIO) screen, an [ERASE]
button has been added, allowing you to erase a user arpeggio style.
Starting up with single part play
1. Press the [MENU] button.
2. In the MENU screen, touch <System>.
3. Touch the <SETUP> tab.
4. Touch <Startup>.
5. Set the value to “[00]---: SINGLE PART PLAY.”
6. Touch <SYSTEM WRITE> to save the setting.
When you turn on the power, the JUPITER-80 will start up in
single part play mode.
MEMO
If the message
“Cannot import.
No place to import the user arpeggio styles included in the
registration.
Please delete user styles to create free space.”
is shown, there is not enough space to import the user arpeggio
styles included in the registration.
Delete unneeded user arpeggio styles before you import the data.
4
*
5
1
0
0
0
2
7
3
8
8
-
0
1
*