1
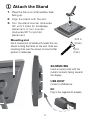
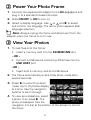
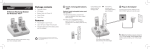
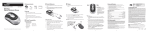
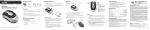
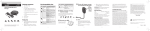
TM 16-1003 User’s Guide 7” High-Resolution Digital Photo Frame One demo photo included, as illustrated Please read this user’s guide before using your new photo frame. Package contents • Photo Frame • AC Adapter • User’s Guide • Quick Start Features • High resolution display in 4:3 aspect ratio shows pictures without streching or cropping. • Compatible with SD/ MMC/ MS memory cards up to 8GB. • USB port allows you to connect and view photos stored on USB mass storage devices. Navigate up and down. Rotate a photo clockwise or counter clockwise. Navigate left/ right. Select the previous/ next photo. Play/ Pause/ Confirm. MENU Press to enter menu. Press to exit menu/ slideshow. ON/OFF Turn the photo frame on/ off. Adjustable Stand Pull and rotate to position the frame vertically or horizontally. 1 Attach the Stand 1. Place the frame on a flat surface, back facing up. 2. Align the stand with the slot. 3. Turn the stand counter clockwise 45° until it locks for landscape placement, or turn counterclockwise 90° for portrait placement. Mounting slot Use 2 screws (not included) with heads the size shown to hang the frame on the wall. Slide two mounting slots over the screws to mount either portrait or landscape. 0.23 in (6 mm) .04 in (1mm) SD/MMC/MS Insert a memory card with the metallic contacts facing towards the display. USB HOST Connect a USB device. DC Plug in the supplied AC adapter. 2 Power Your Photo Frame 1. Connect the supplied AC adapter to the DC – -C -+ jack and plug in to a standard household outlet. 2. Slide ON/OFF to ON to turn on. 3. Select a display language. Use or and to select and confirm the language. The demo photo appears after language selection. n Note: Always unplug the frame and disconnect from the adapter when the frame is not in use. 3 View Your Photos 1. To load files onto the frame: • Insert a memory card into the SD/MMC/MS slot – OR – • Connect a USB device containing JPEG files into the USB HOST port –OR – • Insert both a memory card and USB device 2. The frame automatically enters Slide Show mode after several seconds. 3. Press to enter Thumbnail mode. Up to 15 photos display at a time. Use the navigation buttons to scroll through. 4. To view as a slideshow, select a photo, then press . The photo is displayed. Use the navigation hint bar at the bottom of the screen to control the show: • Press to play/ pause. • M: press MENU to reveal toolbar. • Press or to rotate a photo. • Press or to skip to the next/ previous photo. 5. If you are using both a memory card and a USB device, press and hold until the menu appears showing SD/MMC/MS and USB. Use the navigation buttons or to select a source. Press to confirm and enter thumbnail mode. Press again to start slideshow. n Note: The demo photo appears if no memory card or USB device is connected. To exit demo photo mode, either insert a card or USB device, or press or MENU. 4 Use the Toolbar 1. Press to pause viewing a photo or slideshow. The pause icon appears. 2. Press MENU. The toolbar appears on the bottom of the screen. 3. Use or and to navigate and select a toolbar option. Then press again to: Pause or resume slideshow. ´ Magnify a photo. Rotate a photo clockwise. Rotate a photo counterclockwise Change to full screen or standard display if the resolution is higher than 800×600. Delete a photo. Delete successful! appears and the photo is directly deleted from your memory card or USB device. Close the toolbar. w CAUTION: Delete with caution. Make sure you have backup copies saved elsewhere. L.P. Ignition is not responsible for any loss of your original photos. n Note: The demo mode photo cannot be deleted. 5 Set Your Photo Frame Options 1. In photo view mode, press and hold until Setup Menu appears, then press . 2. Use the navigation buttons and to select and confirm a setting. Use these buttons again to select suboptions, or press to exit. Slide show time: 3, 5, or 15 seconds, 1 minute, or 15 minutes for each photo. Transition effect: options for displaying a slide show: Random, Snake, Partition, Erase, Blinds, Random lines, Grid, Cross, Spiral, Rect(angle). Language: English, French, or Spanish. Brightness: –3 to +3 Contrast: –3 to +3 Saturation: –3 to +3 Hint time: 0, 5,10, or 20 seconds. Options for how long to display the navigation hint bar for button operations. Default: Restore all default settings. The photo frame will automatically switch off, then on again and show the language selection screen. Select your language to proceed. n Notes: • The demo photo appears if you remain in the Setup Menu for several seconds and have not pressed to proceed. • Do not set Hint time to 0 if you want the photo frame to display the navigation hint bar. Troubleshooting Memory card is inserted, but the photo frame is not able to read it • Use only SD/ MMC/ MS memory cards containing photos in JPEG format. Non-JPEG files are shown as “Not Support” in Thumbnail mode. • Check that the memory card is inserted correctly. Screen is blank • Check that you have turned ON/OFF to ON • Check the AC adapter connection is secure between your photo frame and power outlet. Why do some photos load faster than others? • Higher resolution photos take longer. Use photos with lower resolution to speed up the loading time. The optimum resolution is 800 × 600, and the maximum resolution supported is 8000 × 8000 pixels. Cautions and Warnings • To reduce the risk of electric shock, do not remove the cover or back. There are no user-serviceable parts inside. Refer servicing to qualified personnel. • Do not expose the frame to rain or moisture to prevent fire or electric shock hazard. • Do not insert any foreign objects into the frame through openings; do not spill or spray any liquids on or in the frame. • Do not place anything heavy on the frame. • To ensure proper ventilation and proper operation, never cover or block slots or openings. Keep the frame away from open flames (fires, candles, etc.), direct sunlight, and heat sources such as radiators or stoves. • To avoid damaging your photo frame, use the provided power adapter or an adapter with proper specifications. • When cleaning, make sure the frame is unplugged from the power source. Do not use liquid cleaners or aerosol cleaners. Use a cloth lightly dampened with water for cleaning the housing only. Specifications File format.......................................................................................JPEG Compatible RAM................................................................SD/MMC/MS Operating temperature & humidity....... 14 to 104°F (-10 to 40°C), <85% Dimensions (W × H × D)..................................8.46 × 7.08 × 1.37 inches ................................................................................ (21.5 × 18 × 3.5 cm) Weight.............................................................................. 1.45 lbs (656g) Screen Resolution.................................................................. 800 × 600 Screen aspect ratio............................................................................. 4:3 Power supply AC Adapter............... Input: 100~240V AC, 50~60Hz; Output: DC 5V 1A Specifications are subject to change and improvement without notice. Actual product may vary from the images found in this document. FCC Information This equipment has been tested and found to comply with the limits for a Class B digital device, pursuant to Part 15 of the FCC Rules. These limits are designed to provide reasonable protection against harmful interference in a residential installation. This equipment generates, uses and can radiate radio frequency energy and, if not installed and used in accordance with the instructions, may cause harmful interference to radio communications. However, there is no guarantee that interference will not occur in a particular installation. If this equipment does cause harmful interference to radio or television reception, which can be determined by turning the equipment off and on, the user is encouraged to try to correct the interference by one or more of the following measures: •Reorient or relocate the receiving antenna. •Increase the separation between the equipment and receiver. •Connect the equipment into an outlet on a circuit different from that to which the receiver is connected. •Consult the dealer or an experienced radio/TV technician for help. Changes or modifications not expressly approved by Ignition L.P. may cause interference and void the user’s authority to operate the equipment. This device complies with Part 15 of the FCC Rules. Operation is subject to the following two conditions: (1) This device may not cause harmful interference, and (2) this device must accept any interference received, including interference that may cause undesired operation. Limited Warranty Ignition L.P. warrants this product against defects in materials and workmanship under normal use by the original purchaser for ninety (90) days after the date of purchase. IGNITION L.P. MAKES NO OTHER EXPRESS WARRANTIES. This warranty does not cover: (a) damage or failure caused by or attributable to abuse, misuse, failure to follow instructions, improper installation or maintenance, alteration, accident, Acts of God (such as floods or lightning), or excess voltage or current; (b) improper or incorrectly performed repairs by persons who are not a Ignition L.P. Authorized Service Facility; (c) consumables such as fuses or batteries; (d) ordinary wear and tear or cosmetic damage; (e) transportation, shipping or insurance costs; (f) costs of product removal, installation, set-up service, adjustment or reinstallation; and (g) claims by persons other than the original purchaser. Should a problem occur that is covered by this warranty, take the product and the sales receipt as proof of purchase date to the place of purchase. Ignition L.P. will, at its option, unless otherwise provided by law: (a) repair the product without charge for parts and labor; (b) replace the product with the same or a comparable product; or (c) refund the purchase price. All replaced parts and products, and products on which a refund is made, become the property of Ignition L.P. New or reconditioned parts and products may be used in the performance of warranty service. Repaired or replaced parts and products are warranted for the remainder of the original warranty period. You will be charged for repair or replacement of the product made after the expiration of the warranty period. IGNITION L.P. EXPRESSLY DISCLAIMS ALL WARRANTIES AND CONDITIONS NOT STATED IN THIS LIMITED WARRANTY. ANY IMPLIED WARRANTIES THAT MAY BE IMPOSED BY LAW, INCLUDING THE IMPLIED WARRANTY OF MERCHANTABILITY AND, IF APPLICABLE, THE IMPLIED WARRANTY OF FITNESS FOR A PARTICULAR PURPOSE, SHALL EXPIRE ON THE EXPIRATION OF THE STATED WARRANTY PERIOD. EXCEPT AS DESCRIBED ABOVE, IGNITION L.P. SHALL HAVE NO LIABILITY OR RESPONSIBILITY TO THE PURCHASER OF THE PRODUCT OR ANY OTHER PERSON OR ENTITY WITH RESPECT TO ANY LIABILITY, LOSS OR DAMAGE CAUSED DIRECTLY OR INDIRECTLY BY USE OR PERFORMANCE OF THE PRODUCT OR ARISING OUT OF ANY BREACH OF THIS WARRANTY, INCLUDING, BUT NOT LIMITED TO, ANY DAMAGES RESULTING FROM INCONVENIENCE AND ANY LOSS OF TIME, DATA, PROPERTY, REVENUE, OR PROFIT AND ANY INDIRECT, SPECIAL, INCIDENTAL, OR CONSEQUENTIAL DAMAGES, EVEN IF IGNITION L.P. HAS BEEN ADVISED OF THE POSSIBILITY OF SUCH DAMAGES. Some States do not allow limitations on how long an implied warranty lasts or the exclusion or limitation of incidental or consequential damages, so the above limitations or exclusions may not apply to you. This warranty gives you specific legal rights, and you may also have other rights which vary from State to State. You may contact Ignition L.P. at: Ignition L.P., 3102 Maple Ave. Suite 450, Dallas, TX 75201 02/09 For product support, call 1-866-315-0426 Protect the environment by recycling used electronics. Go to E-CyclingCentral.com to find an electronic recycling center near you. © 2009. Ignition L.P. All rights reserved. Gigaware is a trademark used by Ignition L.P. 10 Printed in China 09A09 16-1003