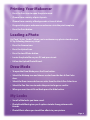
1
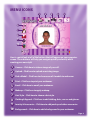
INSTRUCTION MANUAL
N0504
N0504
For
For 11 or
or 22 User
User // Ages
Ages 66 and
and Up
Up
Rev.C
Rev.C
Table of Contents
Installation ……………………………………………………………...
2
Warnings …………………………………………………….................
2
Product Features …………………………………………………........
3
Menu Icons …………………………………………………………......
4-5
Taking Your Photo ……………………………………………………..
6
Your Makeover ………………………………………….....................
6-9
Caution …………………………………………..................................
9
Warranty …………………………………………………….................
11
Installation
PC Requirements:
Supported OS: …………………………........................... Windows XP/Vista
Processor: …………………................................................ 1 GHz Processor
RAM ……………………………………………………................ 256 MB RAM
Hard Drive Space: ………………………………………....... 60 MB HD Space
CD-ROM or DVD: ……………………………….............................. Required
Ports: ………………………………………………........................... USB port
Printer: ………………..................... Color Printer (Recommended to print)
Internet Access: ……………………....................... Recommended to email
Page 1
Installing Girl Tech® Stylin’ Studio™
NOTE: DO NOT PLUG IN Girl Tech® Stylin’ Studio™ INTO THE USB PORT
UNTIL PROMPTED!
To install Girl Tech® Stylin’ Studio™, insert the game disc into your CD/
DVD drive. Follow the wizard to successfully install the game on your PC.
When prompted, plug in Girl Tech® Stylin’ Studio™ to the USB port on your
computer. Adult supervision is recommended when connecting cables to
your PC.
If Girl Tech® Stylin’ Studio™ does not automatically launch, go to My
Computer, Program Files, Radica, Stylin’ Studio or type the following path
in your browser C:\Program Files\Radica\Stylin’ Studio. Launch the software
and follow the setup wizard to successfully install the game on your PC.
Note: If your computer has multiple USB ports, use the port in the back of
the PC for better performance. Set your PC resolution to 1024 X 768 for best
results.
Uninstalling Girl Tech® Stylin’ Studio™
To uninstall Girl Tech® Stylin’ Studio™, open the Control Panel and double
click on the Add or Remove Programs icon. Select Girl Tech® Stylin’ Studio™
from the list displayed and click on the Change/Remove button. Follow the
wizard to uninstall from your computer.
WARNING
Epilepsy and Seizures – Read Before Operating Girl Tech® Stylin’ Studio™.
A few people may experience epileptic seizures when viewing flashing
lights or patterns in our daily environment. These persons may experience
seizures while watching TV pictures or playing games on their computers.
Players who have not has any seizures may nonetheless have an undetected
epileptic condition.
Consult your physician before playing video games if you have an epileptic
condition or experience any of the following symptoms while playing
video games: altered vision, eye or muscle twitching, other involuntary
movements, loss of awareness of your surroundings, mental confusions
and/or convulsions.
Page 2
Create Your Own Style and Share It
With Your Friends!
Girl Tech® Stylin’ Studio™ allows you to take your photo with the built-in
digital camera and create a virtual makeover. You can change everything
from your hair and makeup to clothing, hats and jewelry. You can even add
a cool background! Plus, you can makeover various models included with
the program. Since Girl Tech® Stylin’ Studio™ plugs into your PC, you can
print your make-overs as well as email them to your friends!
Check out www.girltech.com for any updates and the latest information on
Girl Tech® Stylin’ Studio™ and other Girl Tech® products
PRODUCT FEATURES
Note: This game is powered by a USB port on your PC.
Mirror
Camera
Power Button
Shutter
Button
Stylus
Touch Pad
Page 3
MENU ICONS
1
2
3
4
5
6
7
8
9
10
Here’s a quick look at all of the buttons that will appear on your computer
screen. These buttons will help you navigate quickly and easily while
creating your new style!
1
2
3
4
5
6
7
8
9
10
Camera – Click here to take an image of yourself.
Upload – Click here to upload an existing image.
Pick a Model – Click here to choose one of 6 models to makeover.
Print – Click here to print your makeover.
Email – Click here to email your makeover.
Makeup – Click here to apply makeup.
Hair Style – Click here to choose a hairstyle.
Clothing & Apparel– Click here to add clothing, hats, scarves and glasses.
Jewelry & Accessories – Click here to add jewelry and other accessories.
Backgrounds – Click here to add a background to your makeover.
Page 4
11 12 13 14 15 16
22
17
19
23
20
21
18
11
12
13
14
15
16
17
Left Arrow – Click to rotate the accessory to the left.
18
Hair & Pen Color Area – Choose your hair colors and drawing colors with the color wheel.
19
20
21
22
23
Save Look – Save the makeover that you created.
Right Arrow – Click to rotate the accessory to the right.
Plus – Click to make the accessory bigger.
Minus – Click to make the accessory smaller.
Wide – Click to make the accessory wider.
Narrow – Click to make the accessory more narrow.
Light to Dark – Drag the circle up or down to either lighten or darken
the image displayed.
My Looks – See all of your saved makeovers.
Hide/Draw – Activates and deactivates the drawing tool.
Clear All – This will erase all makeover changes you have made.
Selection box – Displays current selected accessory.
Page 5
LET’S BEGIN
Are you ready to give yourself a new style?
1. Let’s start with a clean palette, your face! Remove any makeup you
may have on your face and pull your hair away from your face or into a
ponytail.
2. Girl Tech® Stylin’ Studio™ includes cool apparel. In order to get the best
result take your picture in a tank top, strapless shirt or wrapped in a
towel.
2. Lights, Camera, Makeover! For the best photo turn on all lights in the
room while taking your photo. The brighter the lights, the brighter your
picture!
3. Now you are ready to take your picture with the built-in digital camera.
Press the Camera icon to activate the camera feature. Sit directly in front
of Girl Tech® Stylin’ Studio™ and position your face within the oval on the
screen. Remember to keep your mouth closed, but be sure to smile! This
will help when you apply your lipstick later. When you are ready press the
shutter button on the stylus pen. Your photo will be taken in 5 seconds.
Preparing Your Photo
After taking your picture you will be prompted to follow several steps to
line up all make up assets. For optimal results follow all steps and refer to
the example image.
Note: Anytime during your makeover you can select the redraw button to
adjust your makeup assets.
Your Makeover
Using the Girl Tech® Stylin’ Studio™ makeover touch pad and stylus allows
you to choose and apply your makeup.
Applying Make-up
• Select the make-up icon.
• Choose the shade of makeup. Feel free to try them all and use the Light
and Dark slider for more color variety.
Page 6
Applying Hair
• Select the hair icon.
• Choose the style that is right for you .
• Change hair color with the color wheel on the Hair & Pen Color Area.
Applying Clothing and Apparel
• Choose from an assortment of fashion looks by selecting the category
then select the item you want to wear.
Applying Jewelry and Accessories
• Choose jewelry and accessories by selecting the category then select the
item you want to wear.
Applying Backgrounds
• Girl Tech® Stylin’ Studio™ comes with a variety of backgrounds to spice up
your makeover.
• Pick A Look – Choose from 5 themed makeovers.
Note: Once you have created your makeover and added apparel and
accessories you can still change or remove items. Simply click on the item
you want to remove. The name of that item will appear in the Selection Tool
field then press
.
Saving Your New Look
• Once you are happy with your new look, simply press the Save Look
button.
• Press the My Looks button to see all of your saved makeovers.
• You can save up to 7 looks. Once all 7 slots are filled, you will have to
delete images to make room for new makeovers.
Page 7
Printing Your Makeover
• Press the Print icon to open the print wizard.
• Choose from a variety of print layouts.
• Choose from a variety of backgrounds or leave it blank.
• Drag and drop your makeover or makeovers into the print template.
• Press the Print button.
Loading a Photo
Girl Tech® Stylin’ Studio™ allows you to makeover any photo stored on your
PC by following these easy steps.
• Press the Camera icon.
• Press the Upload icon.
• Press the Load Photo button.
• Locate the photo file on your PC and press insert.
• Follow the Upload Photo Wizard.
Draw Mode
• To open the Draw Mode press the Draw button.
• Select the Makeup icon and choose a color from the Hair & Pen Color
Area.
• Select the Draw icon and choose a color from the Hair & Pen Color Area.
• Select the Pen Size icon to make the pen size larger or smaller.
• When you want to exit Draw Mode press the Hide button.
My Looks
• See all of the looks you have saved.
• Photo Booth Mode gives you 3 options to take funny pictures with
friends.
• Photo Effects allows you to add fun effects to your picture.
Page 8
Hair Salon
Hair Salon can be found in the Hair Application Mode and gives you the
ability to cut and streak your hairstyle!
• Select Length, Bangs or Streaks.
• Select one of the hairstyles located in the window directly below the
Length, Bangs and Streaks buttons.
• Length and Bangs allows you to see your style in Long, Medium or Short.
Simply press the button to cut your hair.
• Streaks allows you to add cool highlights to your hair. Simply press
Streaks 1, Streaks 2 or Streaks 3.
Note: You can change hair or highlight color by using the Hair & Pen Color
tool.
Email Your Looks
• Finalize and save your makeover.
• Press the Email icon.
• Type your email address ([email protected]).
• Type your friends email ([email protected]).
• Type a personal message in the message box.
• Press the send button!
CAUTION
• Sometimes, a build-up of static electricity (from carpets, etc) may cause
the unit to stop working. Close down the software and restart, it will work
again.
• In an environment with radio frequency interference, the product may
malfunction and require user to restart the software.
• The unit may malfunction when there is radio interference on the power
line and signal line. The unit will revert to normal operation when the
interference stops.
Page 9
This device complies with Part 15 of the FCC Rules. Operation is subject
to the following two conditions: (1) this device may not cause harmful
interference, and (2) this device must accept any interference received,
including interference that may cause undesired operation.
WARNING: Changes or modifications to this unit not expressly approved
by the party responsible for compliance could void the user’s authority to
operate the equipment.
NOTE: This equipment has been tested and found to comply with the limits
for a Class B digital device, pursuant to Part 15 of the FCC Rules. These
limits are designed to provide reasonable protection against harmful
interference in a residential installation. This equipment generates, uses
and can radiate radio frequency energy and, if not installed and used in
accordance with the instructions, may cause harmful interference to radio
communications. However, there is no guarantee that interference will
not occur in a particular installation. If this equipment does cause harmful
interference to radio or television reception, which can be determined by
turning the equipment off and on, the user is encouraged to try to correct
the interference by one or more of the following measures:
• Reorient or relocate the receiving antenna.
• Increase the separation between the equipment and receiver.
• Connect the equipment into an outlet on a circuit different from that to
which the receiver is connected.
• Consult the dealer or an experienced radio / TV technician for help.
Keep these instructions for future reference as they contain important
information.
Protect the environment by not disposing of this product with
household waste (2002/96/EC). Check your local authority for
recycling advice and facilities.
Page 10
6-MONTH LIMITED WARRANTY FOR USA
(This product warranty is valid in the United States and Canada only)
Radica Games Limited warrants this product for a period of 6 months
from the original purchase date under normal use against defective
workmanship and materials (batteries excluded). This warranty does not
cover damage resulting from accident, unreasonable use, negligence,
improper service or other causes not arising out of defects in material
or workmanship. Radica Games Limited will not be liable for any
costs incurred due to loss of use of this product or other incidental or
consequential costs, expenses or damages incurred by the purchaser. Some
states do not allow the exclusion or limitation of incidental or consequential
damages, so the above limitations may not apply to you. This warranty
gives you specific legal rights and you may also have other legal rights,
which vary from state to state.
In the event of a defect covered under this warranty, first call the tollfree number listed below. Many problems can be solved in this manner. If
necessary, you will be instructed to return the product, postage prepaid
and insured, to the address below. Enclose your name, address, dated sales
receipt, and a brief explanation of the defect. Replacement, and return
shipment, will be free of charge.
TOLL-FREE NUMBER: 1-800-803-9611. Hours: 9:00 AM - 7:00 PM Eastern
Time; Monday - Friday; 11:00 AM - 5:00 PM; Saturday.
ADDRESS FOR RETURNS: CONSUMER RELATIONS, 636 GIRARD AVENUE,
EAST AURORA, NY 14052.
IMPORTANT: Before returning the unit for repair, test it with fresh alkaline
batteries. Even new batteries may be defective or weak and low battery
power is a frequent cause of unsatisfactory operation.
Page 11
© 2008 Mattel, Inc. All Rights Reserved.
RADICA USA Ltd., 16650 Westgrove Dr., Suite 500, Addison, TX 75001. www.radicagames.
com Helpline 1.800.803.9611 or service.mattel.com
Retain this address for future reference.
Mattel Canada Inc., Mississauga, Ontario L5R 3W2.
You may call us free at 1-800-803-9611.
Mattel U.K. Ltd., Vanwall Business Park, Maidenhead SL6 4UB.
Helpline 01628500303.
Mattel Australia Pty., Ltd., Richmond, Victoria. 3121.
Consumer Advisory Service - 1300 135 312.
Mattel East Asia Ltd., Room 1106, South Tower, World Finance Centre,
Harbour City, Tsimshatsui, HK, China.
Diimport & Diedarkan Oleh: Mattel SEA Ptd Ltd.(993532-P) Lot 13.5, 13th Floor,
Menara Lien Hoe, Persiaran Tropicana Golf Country Resort, 47410 PJ.
Tel:03-78803817, Fax:03-78803867.
Mattel, Inc., 333 Continental Blvd., El Segundo, CA 90245 U.S.A.
Consumer Relations 1-800-803-9611.