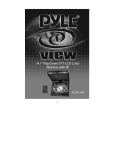
1
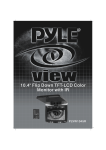
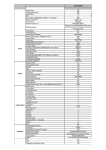
1
TABLE OF CONTENT
1. INSTALLATION GUIDE
2. FUNCTION KEYS
2.1 FUNCTIONS OF FRONT PANEL
2.2 FUNCTIONS OF REMOTE CONTROL
3. TROUBLE SHOOTING
3.1 NO POWER
3.2 NO FUNCTION OF REMOTE CONTROL
3.3 NO DISPLAY OR NOT CLEAR
4. ACCESSORIES
5. SPECIFICATIONS
2
1. INSTALLATION GUIDE
1. On a towel or soft cloth, gently place the monitor unit "facedown" on a
stable work surface.
2. Locate the pigtail with the DIN connector.
3. Connect the DIN connector to the interface cable provided.
4. Connect the RED wire to the positive (+) battery terminal.
5. Connect the Black wire to a chassis electrical ground point.
6. Connect the cable with YELLOW RCA jack to Video Input sources for
your Video Program material.
7. Connect the cable with RED and WHITE RCA jack to Audio sources for
your Audio Program material.
3
2. FUNCTION KEYS
2.1 FUNCTIONS OF FRONT PANEL
POWER: 1. Press the "POWER" button once; it will be "POWER ON."
Press it again; it will be "POWER OFF."
MENU:
1. Pop up the OSD menus. Press the "Menu" button again to
enter the OSD menus. When in sub-menu, press.
"EXIT" to go back to the main menu.
UP/DN:
1. Press the "UP/DOWN" key to increase or decrease value
2. Make item selection in OSD menus to increase or decrease
parameters as well..
2.2 FUNCTIONS OF REMOTE CONTROL
4
Brightness:
→ Brightness adjustment
Contrast:
→ Contrast adjustment
Display adjust:
→ Sharpness hue, saturation adjustment
OSD display:
→ OSD adjustment and display methods
Input select:
→ Switch the source of signal AV1 and AV2 Inputs.
Audio:
→ Only control Mute
Recall:
→ Return to the initiatives
Exit:
→ Exit
Press "Menu key", it will display a crosswise bar with digits. To use U/D key
to adjust value and press "Menu key" to confirm the adjustment and then the
crosswise bar and digits will disappear, or press "Exit" to leave OSD function
directly.
3. TROUBLE SHOOTING
5
3.1 NO POWER
1. Make sure the power cable has been pluged in.
2. Make sure the plug has 12V~14V, may use another electrical appliance
to test it.
3.2 NO FUNCTION OF REMOTE CONTROL
1. Make sure the batteries are in good condition and installed properly.
2. Make sure the remote control is aiming at the receiver, and there are no
obstacles in between.
3. Perhaps, it is too far away from the receiver. Normal distance is within 7
meters.
3.2 NO DISPLAY OR NOT CLEAR
1. Check the video signal wires if they are connected properly.
2. Check the antenna or adjust it.
3. Make sure the TV/Video being in proper position.
4. ACCESSORIES
PS2/CAR CABLE
INSTALLATION BRACKET
USER MANUAL
SCREW PACK
REMOTE CONTROL
5. SPECIFICATIONS
6
ITEM
LCD Panel
Active Area:
Resolution:
Display Colors:
Pixel Pitch (mm):
Backlight Unit:
Contrast Ratio:
Brightness (cd/m2):
Viewing Angle:
Power Supply:
IR Transmitter:
Power management:
User's Control:
System:
Dimensional Outline (mm):
Weight
Safety Certifications:
Environmental Condition:
DESCRIPTION
13.3" TFT
270.3 (W) x 202.8 (H) mm
1024(H) x 3(RGB) x 768(V)
262,144 colors
0.264 (H) x 0.264 (V) mm
CCFL Side-light type (single lamp)
200 : 1
180
Horizontal:60O (typ.,Lift side), 60O (typ.,right
side)
Vertical: 30 O (typ.,up side), 45 O (typ.,down side)
DC12V + 10% less than 1.3A
Yes
15W power consumption (typ.), less than 3W
when in backlight sleep mode.
Power on/off, OSD control
1. Auto detection between NTSC/PAL
2. Sceam is available
329.0mm (W) x 360mm (H) x 42mm (D)
2.6 kg
UL, FCC, CE, TUV
Operation Temp.:0~50 degree C
Storage Temp.: -20~60 degree C
Humidity: 10~90%
* Recommend for use with PYLE'S PLVWH1 wireless headphones.
7