1
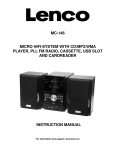
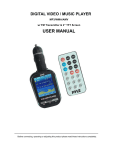
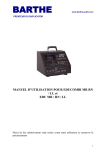
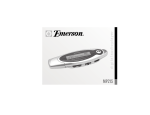
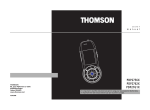
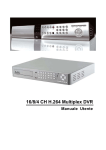
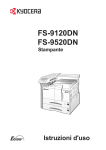
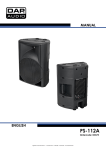
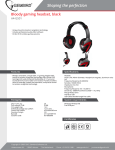
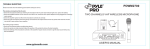
PWMA-820
OPERATING INSTRUCTIONS
SINGLE VHF WIRELESS
BATTERY POWERED PA SYSTEM
WITH MP3 PLAYER
WWW.PYLEAUDIO.COM
WWW.PYLEAUDIO.COM
GENERAL DESCRIPTIONS
PARTS DESCRIPTION
1. This ALL-IN-ONE karaoke system is suitable for karaoke, meeting,
schools, presentation, aerobics etc.
2. Built-in 512MB MP3 player. With USB port which can play flash
drive, Mp3 player etc. With SD/MMCcard reader. With 3.5mm
AUX in jack which can connect with iPod, CD player etc.
With recording function.
3. 8" woofer and 3" tweeter. 150WRMS, 300W peak power.
4. Built-in one set of wireless microphone.
5. Two MIC-IN, one guitar in and one 6.35mm audio in jacks.
6. Built-in 7AH/12V rechargeable battery which can work
continuously for about 4 hours. Suitable for indoor and outdoor
activities.
7. Treble, bass and echo controls
8. 110V/220V voltage switchable.
9. Telescoping handle and caster wheels. Easy for transportation.
15. Tweeter
16. MP3 player
17. Bass control
18. Treble control
19. Echo control
20. Mp3 volume control
21. Master volume control
22. W/MIC 1 volume control
23. MIC 2 volume control
24. Trolley
25. Handle
26. 110V/220V voltage switch
27. AC IN
28. Fuse
1. Metal corner for protection
2. Input jack for Mic 1
3. Input jack for Mic 2
4. RF signal indicator
5. Charge indicator
6. Low battery indicator
7. Power indicator
8. Power switch
9. GUITAR INPUT 1
10. Audio input jack
11. Guitar volume control
12. Audio volume control
13. Grille
14. Woofer
20 191817
23 22 21
IMPORTANT SAFEGUARDS
1. Correct power must be used. Don't use any other power
except the specified one.
2. Don't drag the power cable when pull out the plug. Hold the
plug to pull it out from socket.
3. Don't open chassis: it is very dangerous either open the
chassis or put your hand inside the chassis. If the device is
not under normal working, pull out the plug at once and contact
your retailer or the nearest distributor.
4. Don't take volatile solvent such as toluene, alcohol, gasoline to
24
25
1
2
3
4
5
6
7
8
9
10
11
12
DIGITAL MP3 PLAYER
MENU
USB
ENTER
PLAY/PAUSE PREVIOUS
SD/MMC
NEXT
FLASH DRIVER
AUX IN
RECORD
16
26
27
28
15
13
14
clear the surface.
5. Please don't put it in an unventilated environment or at direct
sunlight in summer.
29
6. Avoid moisture or rain.
---1---
---2---
220V
110V
AC
+
FUSE
OPERATION
OPERATION
7) To play guitar, connect guitar to GUITAR IN jack. Guitar volume
1. POWER SUPPLY
1) AC Power: Before operation, please confirm the voltage is same
as the specified one marked on the label.
2) Built-in Rechargeable Battery: You can use built-in rechargeable
battery without plug in AC power.
3) When the Low Voltage Indicator comes on yellow, it indicates the
can be adjusted by Guitar Volume control.
8) External audio device can also be connected to AUDIO IN jack.
Audio volume can be adjusted by AUDIO volume control.
9) To play MP3 player, refer MP3 player instruction.
3. OPERATION OF WIRELESS TRANSMITTER
battery voltage is low. Please plug in AC power to charge the
1) Insert attached 9V battery into wireless transmitter.
battery. When battery is fully charged, low voltage indicator will
2) Insert headset MIC or clip-on MIC to body pack transmitter
MIC-IN jack. Adjust body pack transmitter volume switch to
extinguish.
4) If the unit is not going to be used for a long time, please charge
the battery every 2 months. Charging time is 8-10 hours for each
suitable level.
3) Move Power Switch to ON position. Power indicator will flash
once then extinguish. RF indicator on amplifier will light to
time.
2. OPERATION OF AMPLIFIER
1) Use provided AC cord to connect this unit to suitable power
socket. Pay attention to the voltage. Charge indicator will light.
indicate receiving signal. Now you are ready to talk.
4) To mute the sound, move power switch to middle.
5) To turn off the transmitter, move power switch to OFF position.
6) If Power indicator of wireless transmitter lights red, it indicates
Or use built in battery.
2) Turn on amplifier power switch, power indicator comes on red.
the battery power is low. Please replace new battery.
3) Adjust MASTER volume control to suitable level.
4) Turn on handheld microphone, RF indicator on receiver will
light. Wireless microphone volume can be adjusted by
W/MIC 1.
1
3
2
5
6
2
3
5) Adjust BASS, TREBLE and ECHO to the suitable level. Now you
4
are ready to talk.
Headset MIC
6) Wired microphone(not included) can be connected to MIC 1 and
MIC 2 jack. MIC volume can be adjusted by W/MIC 1 and MIC 2
volume control respectively. You can use the wireless MIC and
the two wired MIC at the same time.
---3---
Lavalier MIC
4
(Optional)
1. MIC grill(capsule inside)
2. Power indicator
3. Power Switch
(Optional)
4. Battery cover
5. Volume control
6. MIC-IN jack
---4---
(Optional)
OPERATION
OPERATION
DIGITAL MP3 PLAYER
1) FEATURES
(1) Big LCD screen with blue backlight.
(2) Built-in flash memory, USB flash disc player and
SD/MMC card reader.
(3) A-B repeat and high quality recording function.
(4) Support MP3 and WMA music files.
(5) File administration function can support 5 levels
folders.
(6) Seven play mode: all, repeat all, one, repeat one,
shuffle, folder, repeat folder.
(7) Program upgrade function. End user can upgrade the
MP3 player with our upgrade software.
(3) Two hard disc symbols will display in the PC screen.
One is Flash, another is SD/MMC card. You can
download music from your PC into Flash memory or
SD/MMC card.
(4) MP3 player can not play music when connected with
PC. To play music please disconnect MP3 player from
PC.
3) PARTS DESCRIPTION
2) DATA DOWNLOADING
MENU
CAUTION: Please turn off MP3 player before connecting
with PC.
USB
ENTER
PLAY/PAUSE PREVIOUS
SD/MMC
NEXT
FLASH DRIVER
RECORD
AUX IN
(1) Use attached USB cable to connect MP3 player with PC.
LCD screen
Function button
USB port
SD.MMC slot
Flash drive port
3.5mm audio in jack
3.5mm/3.5mm cable
USB cable
DIGITAL MP3 PLAYER
MENU
USB
ENTER
PLAY/PAUSE PREVIOUS
SD/MMC
NEXT
FLASH DRIVER
MP3 player can be powered by PC when connected
with PC. (Please use win 2000 or above)
(2) MP3 player LCD screen will display " USB ON LINE".
USB ON LINE
---5---
RECORD
AUX IN
01:46:00
Play State
Volume size
EQ effect
Media
Play mode
001 / 008
Play time
Playing song no. /Total songs no.
Playing song name
Schedule of playing
--6---
OPERATION
OPERATION
7) MEDIA SELECTION
MENU
ENTER
PLAY/PAUSE PREVIOUS
Menu
Enter, Login
Play/Pause/Stop
NEXT
RECORD
Last/Reward
Next/Forward
Record/Delete/Repeat
4) TURN ON/OFF PLAYER
First turn on amplifier power switch. Power LED indicator in
front panel of main unit will light.Then press and hold
PLAY/PAUSE button for more than 2 seconds. The LCD
screen will light blue and display DIGITAL MP3 PLAYER.
To turn off player, press down PLAY/PAUSE and hold for 3
seconds. The screen shows POWER OFF. The Player is
turned off.
5) VOLUME ADJUSTMENT
To adjust the volume, press MENU lightly and choose figure .
Press PREVIOUS lightly to increase the volume. Press NEXT
lightly to reduce the volume. Volume range is from 0 to 20.
Press ENTER to confirm. Press MENU to choose the next
function. It will automatically return to original interface if there
is not any operation within 20 seconds.
6) EQ SET UP
To adjust EQ effect, press MENU and choose JAZZ. Press
lightly PREVIOUS/NEXT to choose the EQ mode you like.
There are 7 EQ modes: Flat/Jazz/Rock/Pops/Classic/
Live/Dance. Press ENTER to confirm. Press MENU to choose
the next function. It will automatically return to original interface
if there is not any operation within 20 seconds.
---7---
The MP3 Player's default setting is Flash when turned on. If you
want to play SD card or USB, press MENU lightly and choose
Flash. Then press PREVIOUS/NEXT lightly to choose CARD,
USB or FLASH.
You can choose CARD only after you have inserted SD or MMC
card into SD card slot. You can choose USB only after you
have inserted USB device to USB slot. Press ENTER to confirm.
Press MENU to choose the next function. It will automatically
return to original interface if there is not any operation within 20
seconds.
8) PLAY MODE
To change play mode, press MENU lightly and choose
. Then press PREVIOUS/NEXT lightly to choose the
play mode you want. Press ENTER to confirm. Press
MENU to choose the next function. It will automatically
return to original interface if there is not any operation
within 20 seconds.
Play all tracks in selected memory format in order and stops.
Play all tracks in selected memory format in order repeatedly.
ONE
Play selected track and stops.
ONE
Play selected track repeatedly.
SHUFFL
Play all tracks in selected memory format in random order.
FOLDER
Play all tracks within selected folder in order and then stops.
FOLDER
Play all tracks within selected folder in order repeatedly.
9) START PLAYING
(1) Press PLAY/PAUSE to open your MENU(catalog menu)
and enter into navigation to choose whatever song you like.
Press PLAY/PAUSE slightly. The player will start to play.
Press again to pause.
---8---
OPERATION
OPERATION
(2) During playing press PREVIOUS to select the last
song. Press and hold PREVIOUS for 2seconds to
reward the song.
When flash has no more space for recording, it will display DISK
FULL. Available recording time depends on available Flash
memory size and the recording sampling rate.
(3) During playing press NEXT to select the next song.
Press and hold NEXT for 2seconds to forward the
song.
CAUTION: During recording do not turn off Mp3 player. Data
could be lost and MP3 player may be damaged.
10) A-B REPEAT
12) MENU
During playing press RECORD lightly and choose repeat
starting point A. In the top middle of LCD screen it will
display A
. Press RECORD again to select the ending
point B. In the top corner of LCD screen it will display
A
B. The player will repeat playing the music between
A and B. Press RECORD for third time to cancel repeat.
Press MENU and hold for 2 seconds, screen will display as
following.
1.
2.
3.
4.
File menu
Rec menu
Settings
F/W Upgrade
11) RECORD
Recording can be started up only when MP3 Player is in
Flash mode and in PAUSE or STOP mode. Press
RECORD slightly to enter record mode. Screen will
display as following.
Record Mode
Total available
Time for recording
Recorded
File Name
Recorded
Time
Recording
State
Recording State:
Stop
Recording
Pause Recording
During recording press PLAY lightly to pause recording.
Press PLAY again to continue recording. Press RECORD
lightly to stop recording and save the recorded file.
Recorded files will be saved in LINEIN folder. Recorded
files will be arranged like this :LINE001, LINE002...
---9---
Press PREVIOUS/NEXT to choose the option you want to set up.
Press ENTER to confirm. Press MENU to return. It will
automatically return to original interface if there is not any
operation within 20 seconds.
(1) File menu
Select 'File menu' by 'previous/next' keys and then 'enter' key . A
menu of all folders/files in memory opens. Select track by
'previous/next' keys and then 'enter' key. Track loads but does not
play until 'play' key is pressed. Or select folder by 'previous/next'
keys and then 'enter' key. The folder opens showing all files within
that folder. A track is then selected by 'previous/next' keys and then
'enter' key. Track loads but does not play until play key is pressed.
Menu key steps back one level (file-sub folder-folder-menu- normal
operation). This Mp3 player can support 5levels folders.
---10---
OPERATION
OPERATION
To delete song, first choose the song you like to delete. Then press
RECORD to delete the song. Delete interface will display and ask
you to confirm delete or not. Default is NO. Press
PREVIOUS/NEXT to choose YES or NO. Press ENTER to confirm.
Folder can not be deleted. During playing no song can be deleted.
-Varispeed.
(2) REC menu
-3,-2,-1 slower speed
0
normal speed
1, 2, 3 faster speed
When you choose REC MENU, you can choose recording
sampling rate by pressing PREVIOUS/NEXT. There are four
options: 32Kbps, 64Kbps, 128Kbps, 192Kbps. Default sampling
rate is 192Kbps.
This function enables the users to adjust the playing speed of MP3
player. There are 7 different kinds of playing speed: -3,-2,-1,0,1,2,3.
Default is 0.
Press PREVIOUS/NEXT to choose the playing speed you need.
Press ENTER to confirm.
(3) Settings
CAUTION: Only in Flash media, you can adjust the playing
speed. This function does not work when playing USB or SD/MMC
card.
Choose SETTINGS and press ENTER. LCD screen will display as
following.
- Information: Choose this option and press ENTER. LCD screen
will display as following.
CAUTION: Recording can be functioned only in FLASH media.
System Information
1.Backlight time
2.Auto power off
3.Varispeed
4.Information
Firmware Ver 0.50
Total:
0500MB
Free:
012MB
Software version
Total flash memory
Free flash memory
(4) F/W Upgrade--Software Upgrade
-Backlight time: to set up backlight auto off time
Always on,10s, 20s, 30s, 40s, 50s, 60s,70s
-Auto off: to set up Mp3 player auto power off time. Default is
OFF.
'Off': player switches off only when switched off manually on
player or by amplifier being switched off on
'Power/Volume' control)
'10 mins'
'20 mins'
'30 mins'
In each case player switches off after stated time delay.
---11---
Download upgrade software into your PC. Connect the MP3
player to PC. Build Firm_UP folder in Flash. Copy upgrade file
firmware.bin into Firm_UP folder.
Restart MP3 player. Enter into MENU mode and choose F/W
Upgrade. Press ENTER. System will ask Upgrade or not. Default
is NO. Press PREVIOUS/NEXT to choose YES. Press ENTER to
confirm. Mp3 player will be turned off automatically after upgrade.
CAUTION: During upgrade do not turn off the machine.
---12---
SPECIFICATIONS
AMPLIFIER
Power supply:
AC 110V/220V switchable
built-in 12V7AH rechargeable battery
Frequency response: 35Hz-20KHz
SPL:
94dB
1W/M
T.H.D:
<1%
Input wired mic:
- 58dBV 600
Speaker:
8 " woofer, 3" tweeter
RMS power:
150W
Input jack:
2 x 1/4" MIC IN, 1x 1/4" GUITAR IN,
1x 1/4" AUDIO IN jack
RECEIVER
Carrier frequency range:
170-216 MHz.
RF sensitivity:
-101dB
Image rejection:
60dB
S/N ration:
65dB
Operation range:
100 ft
TRANSMITTER
Carrier frequency range:
170-216 MHz
RF power output:
less than 10mW
Modulation level:
15K
Operation temperature:
-18
Power supply:
9V
Unit Battery Life:
Approx.3 Hours
Mic Battery Life:
Approx. 45 Hours
---13---
_ 60