1
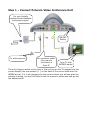
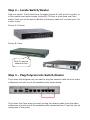
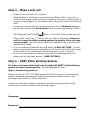
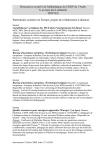
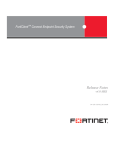
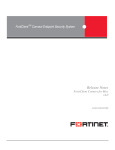
Polycom VSX7000s
Video Conference Unit
Quick Install Guide
Manitoba First Nations SchoolNet
March 14, 2006
Author: Theodore Baschak
Version: 1.0
Introduction
Whats in the box?
✔
Polycom Video Conference unit
✔
subwoofer/power unit
✔
microphone
✔
remote control
✔
power cord
✔
svideo cable
✔
microphone cable
✔
network cable
✔
documentation CD
✔
accessories
This video conference unit will allow you to:
●
●
●
●
conduct teacher interviews remotely
participate in distance education initiatives
participate in meetings without leaving your community
bring guest speakers into your classroom who are otherwise not able to
travel to your community
Step 1 – Connect Polycom Video Conference Unit
I'm your friendly
neighborhood subwoofer
and power supply!
ON/OFF
Switch
I'm a Microphone!
I'm a network cable!
Plug me into
the switch in
Step 3!!
I'm a TV with
SVIDEO inputs!
The only things to watch out for here is that you've got the TV plugged into the
correct output (the one marked [ 1 ] on the back of the unit as show with the
GREEN arrow). If it is not plugged into the correct output you will see what the
camera is seeing, but won't be able to see the menus to make calls and go into
the address book.
Step 2 – Locate Switch/Router
Find your switch. It will either be a Fortigate (picture A) with a built in switch, or
a Cisco switch and router combo (picture B). If there is more than one Cisco
switch, then you will be able to identify it because a cable will run from port 1 to
a cisco router.
Picture A: Fortinet
Picture B: Cisco
Ports 10 and up
should be free
Step 3 – Plug Polycom into Switch/Router
If you have the fortigate unit you want to plug the network cable from the video
conference unit into one of the available ports shown below:
If you have the Cisco setup you want to plug the network cable from the video
conference unit into one of the available ports numbered from 10 and up (do not
unplug any of the ports)
Step 4 – Make a test call
●
●
●
Power on the unit and let it initialize.
When its done it will be at a screen that says “Place a Call” on the top, a
small view of whats visible to remote viewers on the right, a field to enter a
number to call, buttons for the address book (Directory) and a list of Recent
calls.
To test out that everything is working properly hit the Directory button on
the remote, and use the arrow keys on the remote to go down to “MFNS –
KTC Winnipeg” and hit the
●
●
(
↵)
key in the center of the arrows (we call
this key the “enter” key). This will call our office in Winnipeg. Since this
call isn't using the video booking system the quality of the call may
not be optimal, but it will ensure that the conference unit is working and
hooked up correctly.
If no one answers please call our help desk at 1-866-397-5446. You will
want to make sure that your microphone isn't muted, but hitting the button
in the center of the microphone (and making sure it isn't lit up red).
If you have any problems setting up the unit or completing a test call
please call the help desk as well: 1-866-397-5446.
Step 5 – KNET Video Booking System
All video conference calls need to be booked with KNET's Video Booking
system to ensure proper quality. The web address for that is
http://videobooking.knet.ca/
Please call Lyle @ 1-877-737-5638 extension 51387 to get your video booking
system username and password. Please write that information down in the
provided blanks below for future reference.
A video will soon be provided on the above website containing step by step
instructions on how to use the video booking system.
Username: _____________________________________________
Password: _____________________________________________