1
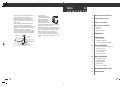
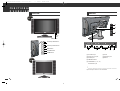
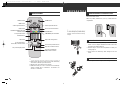
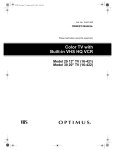
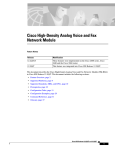
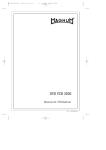
polaroid LCD1550/1750(NT)
03.6.19 9:56 AM
˘
` A
mac001
1200DPI 90LPI
LCD Flat Panel HDTV
LCD-1550 & LCD-1750
Operation Manual
polaroid LCD1550/1750(NT)
03.6.19 9:56 AM
˘
` 1
mac001
1200DPI 90LPI
I M P O R T A N T
INFORMATION
WARNING
TO REDUCE THE RISK OF FIRE OR ELECTRIC SHOCK, DO NOT EXPOSE THIS PRODUCT TO RAIN OR MOISTURE.
CAUTION
RISK OF ELECTRIC SHOCK,
DO NOT OPEN.
CAUTION : TO REDUCE THE RISK OF
ELECTRIC SHOCK, DO NOT REMOVE COVER
(OR BACK). NO USER-SERVICEABLE PARTS
INSIDE. REFER SERVICING TO QUALIFIED
SERVICE PERSONNEL.
The lightning flash with arrowhead symbol, within
an equilateral triangle, is intended to alert the user
to the presence of uninsulated “dangerous voltage”
within the product’s enclosure that may be of
sufficient magnitude to constitute a risk of electric
shock to persons.
The exclamation point within a triangle is intended
to alert the user to the presence of important
operation and maintenance (servicing) instructions
in the literature accompanying the product.
FCC RF INTERFERENCE STATEMENT
NOTE : This equipment has been tested and found to comply with the limit for a Class B digital device,
pursuant to Part 15 of the FCC Rules. These limits are designed to provide reasonable protection
against harmful interference in a residential installation.
This equipment generates, uses and can radiate radio frequency energy and, if not installed and
used in accordance with the instructions, may cause harmful interference to radio
communications. However, there is no guarantee that interference will not occur in a particular
installation.
If these equipment does cause harmful interference to radio or television reception which can
be determined by turning the equipment off and on, the user is encouraged to try to correct the
interference by one or more of the following measure.
• Reorient or relocate the receiving antenna.
• Increase the separation between the equipment and receiver.
• Correct the equipment into an outlet on a circuit different from that to which the receiver is
connected.
• Consult the dealer or an experienced radio, TV technical for help.
• Only shielded interface cable should be used.
WARNING : FCC regulations state that any unauthorized changes or modifications to this equipment
not expressly approved by the manufacturer could void the user’s authority to operate
this equipment.
U.S.A. ONLY
Note to CATV system installer : This reminder is provided to call the CATV system installer’s attention
to Article 820-40 of the National Electrical Code that provides
guidelines for proper grounding and, in particular, specifies that the
cable ground shall be connected to the grounding system of the
building, as close to the point of cable entry as practical.
This product utilizes tin-lead solder, and fluorescent lamp containing a small amount of mercury.
Disposal of these materials may be regulated due to environmental considerations. For disposal or
recycling information, please contact your local authorities or the Electronic Industries Alliance :
www.eia.org
1
polaroid LCD1550/1750(NT)
03.6.19 9:57 AM
˘
` 2
mac001
1200DPI 90LPI
safety precautions
S A F E T Y
PRECAUTIONS
The present set has been designed and
manufactured to assure personal safety. Improper
use can result in electric shock or fire hazard. The
safeguards incorporated in the present unit will
protect you if you observe the following procedures
in installing, using and servicing. The present unit
is fully transistorized and does not contain any
element that can be repaired by the user.
• Read these instructions : All functional
instructions must be read and understood
before operating the product.
• Keep these instructions : It is recommended
to keep these safety guidelines and operating
instructions in a safe place for future reference.
• Heed all warnings : All warnings on the
product and in the instructions must be
observed closely.
• Follow all instructions : All operating
instructions must be followed.
• Attachments / Accessories : Only use the
attachments / accessories specified by the
manufacturer. Using inadequate attachments
can result in accidents.
• Power source : This product
AC 100~240V
must operate according to
the power source indicated
on the specification label. If
you are not sure of the type
of power supply used in your
home, consult your dealer or local electric
company. For the units designed to operate on
batteries or another power source, refer to the
operating instructions.
• Power cord protection :
Protect the power cord
from being walked on or
pinched particularly at plugs, convenience
receptacles, and the point where they exit from
the apparatus.
• Overloading : Do not
overload AC outlets or
extension cords.
Overloading can cause fire or electric shock.
• Influx of objects and liquids : Never let
2
objects into the product
through vents or openings.
Due to the high voltage
flows in the product,
inserting a foreign object in
the product can cause electric shock and/or
shorten internal elements. For the same reason,
be careful not to spill water or other liquids
over the product.
• Servicing : Do not attempt
to service the product
yourself. Removing covers
can expose you to high
voltage and other
dangerous conditions. Request a qualified
service person to perform servicing.
• Repair : Unplug the AC cord
from the outlet, and request
a qualified service person to
perform repairs when:
a. The power cord or plug is
damaged.
b. A liquid is spilled on or an
object is dropped into the
product.
c. The product has been
exposed to rain or water.
d. The product does
not function
properly as
described in the
operating instructions. Do not touch the
controls other than those described in the
operating instructions. Improper adjustment
of controls out of the instructions can cause
damage, which often requires a qualified
technician for extensive adjustments.
e. The product has been dropped or damaged.
f. The product displays an abnormal condition.
Any noticeable abnormality in the product
indicates that the product needs servicing.
• Replacement parts : In case the product
SERVICE DEPT
needs certain parts to be
replaced, make sure that
the service engineer uses
the replacement elements
either specified by the
ALL SETS RECEIVE
OUR OK
SAFETY CHECK.
manufacturer, or with the
same characteristics and
performance as original ones. Using
unauthorized parts can result in fire, electric
shock and/or other danger.
• Safety checks : Upon completion of service or
repair work, request the service technician to
perform safety checks to ensure that the
product is in proper operating condition.
• Polarization : Do not defeat the safety
purpose of the polarized or grounding type
plug. A polarized plug has two blades with one
wider than the other. A grounding type plug
has two blades and a third grounding prong.
The wide blade or the third prong is provided
for your safety. When the provided plug does
not fit into your outlet, consult an electrician
for replacement of the obsolete outlet.
Caution : To prevent electric shock, match
wide blade of plug to wide slot, fully insert.
Attention : Pour éviter les choc électriques,
introluire la lame la plus large de la fiche dans
la borne correspondante De la prise et pousser
jusqu’au pond.
• Cleaning : Unplug the
AC cord from the AC
outlet before cleaning
the product. Use only
with a dry cloth to clean
this apparatus. Do not use liquid or aerosol
cleaners.
• Water and moisture : Do
not use this product near
water such as bathtub,
washbasin, kitchen sink
and laundry tub,
swimming pool and in a
wet basement. TV set shall not be exposed to
dripping or slashing and no objects filled with
liquids, such as vases, shall be placed on the TV
set.
• Stand : Do not place the
product on an unstable
cart, stand, tripod or
table. Unstable
installation is likely to
make the product fall resulting in serious
injuries as well as material damage. Use only
the cart, stand, tripod, bracket, or table
specified by the manufacturer, or sold with the
apparatus.
• When a cart is used, use
caution when moving the
cart / apparatus
combination to avoid
injury from tip-over.
• Ventilation : The vents
and other openings in the
cabinet are designed for
ventilation. Do not cover
or block them since
insufficient ventilation can
overheat and/or shorten the product’s life
span. Do not place the product on the bed,
sofa, rug or other similar surfaces since they
can block ventilation openings. This product is
not designed for built-in installation; do not
place the product in an enclosed place such as
a bookcase or rack unless proper ventilation is
provided or the manufacturer’s instructions are
followed.
• The LCD panel used in this product is made of
glass. Therefore, it can be broken when the
product is dropped or gets shock. Be careful
not to be injured by glass pieces in case the
panel is broken.
• Heat sources : Do not
install near any heat
sources such as radiators,
heat registers, stoves, or
other apparatus
(including amplifiers) that produce heat.
• The LCD panel is a product of very high
technology with 2,359,296 (15”)/ 2,949,120
(17” Wide) thin film transistors, giving you fine
picture details. Occasionally, a few non-active
pixels may appear on the screen as a fixed
blue, green or red point . Please note that this
3
polaroid LCD1550/1750(NT)
03.6.19 9:57 AM
˘
` 4
mac001
1200DPI 90LPI
safety precautions
does not affect your product’s performance.
• If an outside antenna is connected to
television equipment, be sure the antenna
system is grounded so as to provide some
protection against voltage surges and built-up
static charges.
Section 810 of the National Electrical Code
provides information concerning proper
grounding of the mast and supporting structure
as well as of the lead-in wire to an antenna
discharge unit, the size of grounding
conductors, the location of antenna-discharge
unit, the connection to grounding electrodes
and the requirements for grounding electrode.
EXAMPLE OF ANTENNA
GROUNDING
ANTENNA LEAD
IN WIRE
• As a measure of
additional protection of
this television equipment,
unplug this apparatus
during lightning storms or
when unused for long
periods of time. This will
prevent the equipment from being damaged by
lightning and power-line surges.
• Outside antenna system should not be located
in the vicinity of overhead power lines or other
electric or power circuits including the place
where it can fall onto such power lines or
circuits. Installing outside antenna system
requires a full care to keep such power lines or
circuits out of reach as it may be fatal to touch
them.
TABLE
OF
C O N T E N T S
1
IMPORTANT INFORMATION
2
SAFETY PRECAUTIONS
5
TABLE OF CONTENTS
6
FUNCTIONAL OVERVIEW
6
FRONT VIEW
7
REAR VIEW
8
REMOTE CONTROL
9
PREPARATION
11
CONNECTIONS
11
MAIN CONNECTION
11
ANTENNA CONNECTION
12
CONNECTING EXTERNAL EQUIPMENT
GROUND CLAMP
ANTENNA DISCHARGE UNIT
(NEC SECTION 810-20)
ELECTRIC
SERVICE
EQUIPMENT
GROUNDING CONDUCTORS
(NEC SECTION 810-21)
GROUND CLAMPS
NEC - NATIONAL ELECTRICAL CODE
4
POWER SERVICE GROUNDING
ELECTRODE SYSTEM
(NEC ART 250 PART H)
14
BASIC OPERATIONS
14
WHEN THE TV IS INITIALLY POWERED ON,
14
SWITCHING ON/OFF
14
TV/AV MODE SELECTION
15
VOLUME CONTROL
15
CHANNEL SELECTION
16
MENU ADJUSTMENT
16
CHANNEL ADJUSTMENT
18
PICTURE ADJUSTMENT
20
SOUND ADJUSTMENT
22
PC ADJUSTMENT
24
FUNCTIONS ADJUSTMENT
30
TROUBLESHOOTING GUIDE
32
SPECIFICATION
5
polaroid LCD1550/1750(NT)
03.6.19 9:57 AM
˘
` 6
mac001
1200DPI 90LPI
FUNCTIONAL
O V E R V I E W
FRONT VIEW
REAR VIEW
LCD-1750
17”
!
PC AUDIO
@
DC 12V
#
Remote
Sensor
PC RGB
POWER indicator
VOL
Volume up/down buttons
CH
Channel up/down buttons
MENU button
MENU
TV/VIDEO
TV/VIDEO button
$
%
^
&
*
POWER button
POWER
LCD-1550
15”
! PC AUDIO input
^ AV IN
@ Power (DC 12V) input
& Headphone jack
# PC RGB input
* ANT IN
$ MONITOR OUTPUT
% COMPONENT (Y, Pb, Pr)
Video&Audio input
!
Adjust the angle to where it is most comfortable.
6
7
polaroid LCD1550/1750(NT)
03.6.19 9:57 AM
˘
` 8
mac001
1200DPI 90LPI
PREPARATION
REMOTE CONTROL
INSERTING BATTERIES INTO THE REMOTE CONTROL
Insert supplied batteries via the battery compartment on the
back of the remote control.
Make sure polarity matches the (+) and (-) marks inside the
compartment.
POWER
DISPLAY
DISPLAY button
POWER button
CH
MENU
MENU button
Volume Up/Down buttons
VOL
VOL
MUTE
PIC.SIZE
MUTE button
TV/VIDEO/S-VIDEO input mode
selection button
Channel Up/Down buttons
Picture size selection button
TV/VIDEO
CH
PC
CAPTION
COMPONENT
CAPTION button
1
2
3
PC input mode button
4
5
6
7
8
9
COMPONENT input mode button
!
To avoid damage from possible battery
leakage, remove the batteries during
storage.
Number buttons
+100
0
SLEEP
+100 button
Sound mode (Mono/
Stereo/SAP) selection button
Sleep timer setting button
MTS
PIP
INPUT POSITION
CH-
PIP channel Up/Down buttons
PIP position selection button
PIP picture display button
USING THE REMOTE CONTROL UNIT
CH+
PIP source (TV/VIDEO/SVIDEO) selection button
!
1) DISPLAY button displays the current channel number, broadcasting
sound mode (or external input mode) and time.
• Use the remote control by pointing it towards the remote
sensor on the TV. Objects between the remote control and
the sensor may disrupt operation.
• Effective range is 20 feet but is dependant on what your
viewing angle is.
• Range can also be affected by direct sunlight on the TVs
sensor.
CAUTIONS REGARDING REMOTE CONTROL UNIT
• Do not expose remote to liquids, direct sunlight or shock.
2) See page 28 for more information of PIP function.
3) SLEEP button allows you to set a time when the TV automatically
switches to standby: OFF ➔ 30 MINUTES ➔ 60 MINUTES ➔ 90
MINUTES ➔ 120 MINUTES
8
9
polaroid LCD1550/1750(NT)
03.6.19 9:58 AM
˘
` 10
mac001
1200DPI 90LPI
preparation
CONNECTIONS
SUPPLIED ACCESSORIES
MAIN CONNECTION
Make sure the following accessories are provided with the
product.
Remote control unit
AAA Batteries
DISP
LAY
CH
MENU
POWE
R
VOL
MUTE
VOL
TV/V
IDEO
PIC.
SIZE
CH
PC
COMPON
ENT CAPTI
ON
1
2
4
3
5
7
6
8
9
+100
0
SLEE
P
MTS
CH+
PIP
INPU
T POSITIO
N
CH-
Plug the mains cable into the power socket with AC100V 240V , 50/60Hz .
Instruction manual
AC cord
ANTENNA CONNECTION
• 75-ohm coaxial cable connected
to the ANT-IN terminal
Standard Cable TV (CATV) and outdoor antenna
hookup options:
• 300-ohm flat cable to an antenna
converter (not included) and
connected to the ANT-IN terminal
AC Adapter
Turn clockwise to
tighten.
antenna
converter
coaxial cable
75Ω round cable
300Ω flat cable
OPTIONAL ACCESSORIES
PC signal cable (D-sub 15pin)
wall connecting port
PC Audio cable
!
• Use one of the two following
diagrams if you connect an
outdoor antenna.
A : Using a VHF/UHF combination
outdoor antenna.
B : Using separate VHF and/or UHF
outdoor antennas.
A
Combination VHF/UHF
Antenna
75Ω round cable
300Ω flat cable
B
Turn clockwise to
tighten.
coaxial cable
antenna
converter
UHF
VHF
Signal Amplifier
10
11
polaroid LCD1550/1750(NT)
03.6.19 9:58 AM
˘
` 12
mac001
1200DPI 90LPI
connections
connections
!TV output terminal [MONITOR OUT]
CONNECTING EXTERNAL EQUIPMENT
These jacks have TV, VIDEO/AUDIO outputs. These jacks are
used to connect a TV Monitor.
You can enjoy picture and sound by connecting VCR, DVD
player (or DTV Set-Top Box) and PC to the terminals located on
the back of TV set.
The image signals coming into COMPONENT, S-VIDEO or PC
will not be transmitted to MONITOR OUT terminals.
Before connecting an external device, turn the TV set off to
avoid any possible damage.
@DVD or DTV Set-Top Box input terminal [COMPONENT IN]
These jacks have Y/Pb(Cb)/Pr(Cr) inputs and AUDIO inputs.
These jacks are used to connect a DVD player, DTV Set-Top
Box. (Available input mode : 480i, 480p, 720p, 1080i)
PC AUDIO
!
%
#External AV devices input terminal [AV IN]
These jacks have VIDEO/AUDIO/S-VIDEO inputs. Connect
them to VCR, Camcorder or Video game with RCA or S-VIDEO
cable.
VIDEO and S-VIDEO in AV IN share the
same jack with AUDIO input. Thus, they
can’t be used at the same time.
DC 12V
Personal Computer
PC RGB
!
* If your AV device has both VIDEO OUT terminal and SVIDEO OUT terminal, S-VIDEO connection is recommended
for better picture quality.
Whenever you connect external equipment system to TV, make sure
that all elements are switched off. Refer to the documentation
supplied with your equipment for detailed connection instructions and
associated safety precautions.
$Headphone Jack
Insert the headphone plug (3.5mmØ) into this jack. The
sound from the speaker will be automatically cut off. You
can control the headphone sound with Volume Up/Down
(œ/√) buttons.
TV Monitor
!
* Headphones are not included in the supplied accessories.
DVD
@
% PC In
$
Headphone
DTV Set-Top Box
Connect the D-sub 15 pin cable and the audio cable with
personal computer.
* See page 22 for more information of PC mode.
#
Camcorder
VCR
Video game
12
13
polaroid LCD1550/1750(NT)
03.6.19 9:58 AM
˘
` 14
mac001
1200DPI 90LPI
basic operations
B A S I C
OPERATIONS
WHEN THE TV IS INITIALLY POWERED ON,
When your TV is powered on for the first time, the left figure is
displayed.
1 Pressing VOL up/down (œ/√) buttons makes a selection
between AIR or CABLE mode which automatically starts a
channel search.
2 Wait until the searching ends.
!
• If you press power button while channel searching, this process
stops and goes back to initial status.
With the remote controller, you can select the mode as below.
• TV/VIDEO button : Selection for TV/VIDEO/S-VIDEO input
mode.
• PC button : Selection for PC monitor input mode.
• COMPONENT button : Selection for Component input mode.
!
• If CH(…/†) buttons are pressed in external mode, it turns to TV
mode.
3
VOLUME CONTROL
Adjust the volume with VOL (œ/√) buttons.
TO MUTE THE SOUND
1
SWITCHING ON/OFF
SWITCHING ON
1 If the indicator is not lit, the TV set is powered off.
You must press the POWER button of the TV set.
2 Press the POWER button on the remote controller, or VOL
(…†) / CH (…†) button on the TV set when the indicator
is red. The TV set will be switched on and the indicator will
be changed to green.
!
If you don't use the set for extended
periods of time, unplug the AC cord from
power outlet.
Press the MUTE button on the remote controller to cut the
sound off. The MUTE will be displayed for 3 seconds. By
pressing either the MUTE button or VOL (œ/√) buttons, you
can get sound back.
4
CHANNEL SELECTION
The TV set has 68 channels [AIR02 ~ AIR69] in AIR mode and
125 channels [CATV01 ~ CATV125] in CATV mode. (Refer to
next page for each selection.)
SWITCHING OFF
1 To set the TV set back to stand-by mode, press the POWER
button on the remote controller or press the MENU button
on the TV set for 2 seconds. The indicator will become red.
2 Press the POWER button on the TV set to switch the TV set
off completely.
* If you turn the TV off, the present time that you have set
will disappear.
2
TV/AV MODE SELECTION
By pressing the TV/VIDEO button on the TV set, you can
change the mode as follows:
TV ➔ VIDEO ➔ S-VIDEO ➔ COMPONENT ➔ PC ➔ TV ➔ ....
DIRECT SELECTION
The numeric buttons are used for direct channel selection.
To select two-digit channels, press the second number button
within 2 seconds after the first number.
To select 3-digit channels, press ‘+100’ button before pressing
the rest of number buttons in order.
• Channel number in green : Memorized channels by automatic
search or added channels by user
Channel number in white : Skipped channels by automatic
search or deleted channels by user
UP/DOWN SELECTION
You can also select a memorized channel by pressing the CH
(…/†) buttons.
14
15
polaroid LCD1550/1750(NT)
03.6.19 9:58 AM
˘
` 16
mac001
1200DPI 90LPI
MENU adjustment
M
E
N
U
ADJUSTMENT
1
CHANNEL ADJUSTMENT
(ONLY IN TV MODE)
Press MENU ( ) button to display the MENU screen.
Press CH down (†) button to enter into the items below. The
color of selected items becomes yellow.
AIR/CABLE SELECTION
1 Move to “AIR/CABLE” by pressing CH (…/†) buttons.
2 Press VOL (œ/√) buttons to select either AIR or CABLE
which is appropriate to your antenna system.
ADD OR DELETE CHANNEL
You can add additional channels or erase unwanted channels
from TV memory.
1 Move to “CURRENT CHANNEL” by pressing CH (…/†) buttons
and select desired channel.
2 By pressing VOL (œ/√) buttons, select ADD for adding the
current channel to the TV’s memory or select DEL for
erasing the channel from the TV’s memory.
3 Exit with MENU( ) button. The change is stored.
CHANNEL AUTO SEARCH
CHANNEL AUTO SEARCH function memorizes all the channels
which are being received at real time. Before operating this
function, select one between AIR and CABLE.
1 Move to “AUTO SEARCH” by pressing CH (…/†) buttons.
!
To interrupt AUTO SEARCH, press MENU
button. SEARCH will stop at the current
channel and will not add any higher channels.
2 Press VOL up (√) button to operate the searching. Wait
until the searching ends.
CURRENT CHANNEL NUMBER SELECTION
1 Move to “CURRENT CHANNEL” by pressing CH (…/†)
buttons.
2 Press VOL (œ/√) buttons to select a current channel
number you want.
FINE TUNING
If you are unable to get a good picture or sound because of a
poor broadcast signal, it is possible to adjust the channel with
FINE TUNE.
1 Move to “FINE TUNE” by pressing CH (…/†) buttons.
2 Press VOL (œ/√) buttons to tune for a better picture and
sound. The change is stored automatically.
16
17
polaroid LCD1550/1750(NT)
03.6.19 9:58 AM
˘
` 18
mac001
1200DPI 90LPI
MENU adjustment
2
NOISE REDUCTION
PICTURE ADJUSTMENT
Press MENU ( ) button to display the MENU screen.
Select “PICTURE” by pressing VOL (œ/√) buttons and press CH
down (†) button to enter into below items.
CONTRAST
1 Move to “CONTRAST” by pressing CH (…/†) buttons.
2 Press VOL (œ/√) buttons to adjust the picture contrast.
← For less contrast
For more contrast
BRIGHTNESS
This function is to reduce the noise remains in the background
picture.
1 Move to “NOISE REDUCTION” by pressing CH (…/†)
buttons.
2 Press VOL (œ/√) buttons to select among HIGH, LOW or OFF.
• OFF : Off this function.
• LOW : Reduce the picture noise more or less.
• HIGH : Reduce the picture noise a little more.
PRESET
1 Move to “BRIGHTNESS” by pressing CH (…/†) buttons.
1 Move to “PRESET” by pressing CH (…/†) buttons.
2 Press VOL (œ/√) buttons to adjust picture brightness.
2 Press VOL (œ/√) buttons to preset picture mode among
VIVID, USER, SOFT or NORMAL.
← For less brightness
For more brightness
←
• VIVID : bright indoor mode
COLOR
• USER : the mode set by the user
1 Move to “COLOR” by pressing CH (…/†) buttons.
• SOFT : dark indoor mode
2 Press VOL (œ/√) buttons to adjust color intensity.
• NORMAL : normal indoor mode
← For less color intensity
For more color intensity
←
For PC or COMPONENT mode (except 480i
mode), only “CONTRAST” and
“BRIGHTNESS” can be selected.
←
!
MENU adjustment
TINT
1 Move to “TINT” by pressing CH (…/†) buttons.
2 Press VOL (œ/√) buttons to adjust skin color to a more
natural tone.
←
← Skin tones become purplish Skin tones become greenish
SHARPNESS
1 Move to “SHARPNESS” by pressing CH (…/†) buttons.
2 Press VOL (œ/√) buttons to adjust picture sharpness.
18
For more sharpness
←
← For less sharpness
19
03.6.19 9:58 AM
˘
` 20
mac001
1200DPI 90LPI
MENU adjustment
3
MENU adjustment
BALANCE
SOUND ADJUSTMENT
Press MENU ( ) button to display the MENU screen.
Select “SOUND” by pressing VOL (œ/√) buttons, then press CH
down (†) button to enter into the items below.
1 Move to “BALANCE” by pressing CH (…/†) buttons.
2 Press VOL (œ/√) buttons to adjust audio output between
left and right speakers.
MTS
!
• MTS item can be activated only when
TV mode is selected.
• When “MONO” mode is selected, the
sound remains mono even if the TV set
receives a stereo broadcast. You must
switch the mode to “STEREO” if you
want to hear stereo sound.
• If you get some strange sound on
stereo mode in poor signal area or nondual signal service area, make sure to
select MONO mode.
!
• Bilingual (dual language) signal
- This contains the secondary language
signal in addition to the primary one.
- There are the primary and secondary
languages and stereo modes in
bilingual signal.
• STEREO or SAP mode is available only
when broadcasting signal contains the
data.
The System has a feature that allows a sound reception
different from the main audio for programs. This feature is
called Multi-channel Television Sound (MTS). The System with
MTS can receive mono sound, stereo sound and Secondary
Audio Programs (SAP). The SAP feature allows a TV station to
broadcast other information, which could be audio in another
language or something completely different like weather
information. You can enjoy hi-fi stereo sound or SAP
broadcasts in the available location. If stereo sound is difficult
to hear, select MONO.
← Decrease right speaker
sound
Decrease left speaker
sound
←
polaroid LCD1550/1750(NT)
SPATIAL
This function is to work virtual surround sound effect.
1 Move to “SPATIAL” by pressing CH (…/†) buttons.
2 Press VOL (œ/√) buttons to select.
SOUND SOURCE
1 Move to “MTS” by pressing CH (…/†) buttons.
Select sound output between Main Picture Sound and PIP
Picture sound.
2 Press VOL (œ/√) buttons to select among STEREO, SAP or
MONO.
* This item is available while PIP picture exists. (Refer to page
26 for PIP mode)
• STEREO broadcasts : Watch programs like live sports, shows
and concerts in dynamic stereo sound.
2 Press VOL (œ/√) buttons to select.
• SAP broadcasts : Listen to the second language,
supplementary commentary and other information. (SAP is
mono sound.)
• MONO : Obtain clearer sound by switching the mode into
fixed mono-sound manually.
* You can select one directly with MTS button on the remote
controller.
1 Move to “SOUND SOURCE” by pressing CH (…/†) buttons.
PRESET
This function is to select the sound appropriate to your TV
program.
1 Move to “PRESET” by pressing CH (…/†) buttons.
2 Press VOL (œ/√) buttons to select among USER, NEWS,
MOVIE and MUSIC.
TREBLE
To stress high frequency sound
1 Move to “TREBLE” by pressing CH (…/†) buttons.
2 Press VOL (œ/√) buttons to adjust the treble weaker or
stronger.
For stronger treble
←
← For weaker treble
BASS
1 Move to “BASS” by pressing CH (…/†) buttons.
2 Press VOL (œ/√) buttons to adjust the bass weaker or
stronger.
For stronger bass
←
← For weaker bass
20
21
polaroid LCD1550/1750(NT)
03.6.19 9:58 AM
˘
` 22
mac001
1200DPI 90LPI
MENU adjustment
4
PC ADJUSTMENT
MENU adjustment
Press MENU ( ) button to display the MENU screen.
Select “PC” by pressing VOL (œ/√) buttons and press CH down
(†) button to enter into the items below.
(ONLY IN PC MODE)
PC mode input format
VGA
SVGA
XGA
Resolution
640*480
640*480
640*480
640*480
720*400
800*600
800*600
800*600
800*600
1024*768
1024*768
1024*768
V freq. (Hz)
60
72
75
85
70
60
75
85
72
60
70
75
H freq. (KHz)
31.5
37.9
37.5
43.3
31.5
37.9
46.9
53.7
48.1
48.4
56.5
60.2
H-POSITION
1 Move to “H-POSITION” by pressing CH (…/†) buttons.
before adjustment
after adjustment
V-POSITION
1 Move to “V-POSITION” by pressing CH (…/†) buttons.
In case of inputting the PC signal other than above signals,
“OUT OF RANGE” will appear on the screen.
Before adjustment, please setup your PC software...
2 Press VOL (œ/√) buttons to adjust the horizontal position of
displayed image.
before adjustment
after adjustment
Even if your actual display-settings screen looks different from
the windows below, basic setup methods will be applied in
most of the cases.
2 Press VOL (œ/√) buttons to adjust the vertical position of
displayed image.
H-SIZE
1 Move to “H-SIZE” by pressing CH (…/†) buttons.
1 First, click on “Settings” on the Windows Start menu.
While “Settings” is selected, move the cursor to submenu
“Control Panel”.
2 Press VOL (œ/√) buttons to adjust the horizontal size of
displayed image.
PHASE
(Fine image adjustment in PC monitor mode)
1 Move to “PHASE” by pressing CH (…/†) buttons.
2 When the control panel screen appears, click on “Display”
and a display dialog box will appear.
2 Press VOL (œ/√) buttons to adjust the phase to get a clearer
picture.
SCREEN EXPAND (only 17” wide model)
1 Move to “SCREEN EXPAND” by pressing CH (…/†) buttons.
3 Navigate to the “Settings” tab on the display dialog-box.
The correct setting of size (resolution) is “1024 x 768
pixels”. (optical resolution)
expand OFF
expand ON
2 Press VOL (œ/√) buttons to select screen expand type. You
can select a Screen Expand successively that has its own
aspect ratio.
Check the vertical frequency of your PC. (Available vertical
frequency at 1024*768 mode : 60Hz, 70Hz, 75Hz)
22
23
polaroid LCD1550/1750(NT)
03.6.19 9:58 AM
˘
` 24
mac001
1200DPI 90LPI
MENU adjustment
5
MENU adjustment
LANGUAGE
FUNCTION ADJUSTMENT
You can select a language from the FUNCTION menu as well.
Select one among English, French and Spanish.
Press MENU ( ) button to display the MENU screen.
Select “FUNCTION” by pressing VOL (œ/√) buttons, and press
CH down (†) to enter into the items below.
1 Move to “LANGUAGE” by pressing CH (…/†) buttons.
2 Press VOL (œ/√) buttons to select the displayed language
among ENGLISH, FRENCH and SPANISH.
PICTURE SIZE
* This function doesn’t work in PC mode and some COMPONENT
modes. (see left tables)
TIME
By selecting the “TIME” menu, you can set the clock to have
the actual time displayed. If you want to use automatic on/off
timer, you must set “ON TIME” and “OFF TIME” as well.
1 Move to “PICTURE SIZE” by pressing CH (…/†) buttons.
Picture size control in COMPONENT modes
15” model
480i/480p 720p/1080i
NORMAL
O
O
WIDE
O
O
ZOOM
O
X
NORMAL
WIDE
ZOOM
17” Wide model
480i/480p 720p/1080i
O
X
O
O
O
X
2 Press VOL (œ/√) buttons to select the picture size among
NORMAL, WIDE and ZOOM.
2 Press VOL right (√) button. TIME screen will come out. You
can confirm actual time.
WIDE : Setting for the 16:9 screen format
ZOOM : Expansion of 16:9 picture to full screen format
[17inch wide model]
!
• If you turn the TV set off by pressing
POWER switch or by unplugging the
cord, the clock will be reset to the
default value.
NORMAL(4:3)
WIDE(16:9)
ZOOM
NORMAL(4:3)
3 Select and adjust the items below as you want using
UP/DOWN and LEFT/RIGHT buttons.
• ON TIME : You can turn on the TV at desired time.
• OFF TIME : You can turn off the TV at desired time.
• ON TIME CHANNEL : You can set the channel number when
the TV turns on automatically.
• ON TIME VOLUME : You can set the sound volume when the
TV turns on automatically.
[15inch model]
24
1 Move to “TIME” by pressing CH (…/†) buttons.
NORMAL : Setting for normal 4:3 format
WIDE(16:9)
ZOOM
25
polaroid LCD1550/1750(NT)
03.6.19 9:58 AM
˘
` 26
mac001
1200DPI 90LPI
MENU adjustment
MENU adjustment
PIP
CLOSED CAPTION
Allows you to watch two pictures simultaneously. See chart
below for available PIP modes.
• This TV set is equipped with an internal closed caption
decoder. Closed caption is the system which allows you to
view conversations, narration and sound effects of TV
programs and home videos in the form of subtitles on your
Display.
Available PIP setting mode
MTS
CH+
PIP
INPUT POSITION
CH-
sub
main
TV
VIDEO
S-VIDEO
COMPO- 480i
NENT others
PC
TV
X
X
X
X
O
O
VIDEO S-VIDEO COMPONENT
480i others
X
X
X
0
X
X
X
0
X
X
X
0
X
X
X
X
O
O
X
X
O
O
X
X
PC
• Not all the programs and videos offer closed caption. Please
look for the “CC” symbol to ensure that captions will be
shown.
X
X
X
X
X
X
• “CC1” or “CC2” displays the subtitles of TV dramas and news
programs while allowing a full picture view.
You want some bread?
✍ O : Available, X : not available
Gray blocks are available for POP function.
Other COMPONENT modes : 480p, 720p, 1080i mode
1 Move to “PIP” by pressing CH (…/†) buttons.
2 Press VOL right ( √) button. PIP screen will be displayed.
- PIP POSITION-
• PIP : Turn PIP mode on or off. When MAIN Picture is in
COMPONENT mode of 480p, 720p and 1080i, POP function
works. ➝ PIP on ➝ POP ➝ PIP off When MAIN Picture is in PC mode, only PIP function works.
• INPUT : Select the PIP input signal among TV, VIDEO or SVIDEO.
- POP -
1 Move to “CLOSED CAPTION” by pressing CH (…/†) buttons.
!
• You can’t select this item in PC mode
and COMPONENT (480p, 720p, 1080i)
mode.
!
• CLOSED CAPTION function does not
work when OSD is displayed.
• CAPTION MODE : Select the CAPTION MODE in CAPTION or
TEXT.
• CHANNEL : For each caption mode, two channels are
available ; 1&2.
! Poor reception conditions.
CAPTION
26
3 Select and adjust the items below as you want using CH
(…/†), VOL (œ/√) buttons.
• The TV may not receive CLOSED CAPTION signals normally in
the following situations.
• CHANNEL : Select the channel of PIP picture when PIP
input is TV mode.
sub (POP)
2 Press VOL right (√) button. CLOSED CAPTION screen will be
displayed.
• CAPTION : Turn CAPTION mode ON or OFF.
• In the event you receive a poor signal,
an empty black box may appear even
when the TEXT mode is selected. This is
normal in such an event.
• POSITION : Select the picture position among R-BOTTOM, LBOTTOM, R-TOP or L-TOP.
main picture
• “T1” or “T2” superimposes other information (e.g. TV guide,
weather) on the screen, which is independent from the
program in progress.
CLOSED CAPTION on/off button on
the remote control
@ As old, bad or illegally recorded tape is played.
# Strong, random signals from a car interface with the TV
signal.
$ The program wasn’t captioned when it was produced,
transmitted or taped.
27
polaroid LCD1550/1750(NT)
03.6.19 9:59 AM
˘
` 28
mac001
1200DPI 90LPI
MENU adjustment
MENU adjustment
V-CHIP (Parental control)
!
V-CHIP is an electronic filtering device built into your System.
This tool gives parents a great degree of control over the
broadcasts within their children’s reach. It allows parents to
select programs judged suitable to child while blocking the
other judged unsuitable. It does so automatically once you
activate the V-CHIP feature in your LCD Television.
FV : Fantasy violence
V : Violence
S : Sexual situation
L : Adult language
D : Sexually suggestive dialog
“V-Chip” will not be selectable from the menu if you do not
first configure your secret number.
• The U.S. has two rating systems for viewing content: TV
Parental Guidelines and movie ratings.
• The TV Parental Guidelines work in conjunction with the VCHIP to help parents screen out inappropriate television
shows for their children.
• Movie ratings are used for original movies rated by the
Motion Picture Association of America (MPAA) as watched
on cable TV and not edited for television. The V-CHIP can
also be set to block MPAA-rated movies
O : Content rating can be set.
O : The content rating can be set, but
O
this rating is not normally broadcast
by TV station.
!
• If you select “PG-13”, this will
automatically block higher ratings “R”,
“NC-17” and “X”.
• Voluntary movie rating system uses
only an age-based rating.
1 Move to “V-CHIP” by pressing CH (…/†) buttons.
2 Press VOL right (√) button. ENTER PASSWORD screen will be
displayed. Input 4-digit number password.
(If this item is selected the first time NEW PASSWORD
screen will be displayed. Input 4-digit number and repeat it
to register the password in the CONFIRM screen.)
• V-CHIP ON/OFF : ON or OFF selection for V-CHIP function.
• TV RATING : Select the desired TV Rating among UNBLOCK,
TV-Y, TV-Y7, TV Y7 FV, TV-G, TV-PG, TV-14 and TV-MA.
• TV CONTENTS : Adjust each TV Rating with detailed contents.
See the table at next page for detailed TV RATING and
CONTENTS.
Rating
Suggested age
TV-Y (All children)
TV-Y7 (Directed to older children)
TV-Y7 FV (Directed to older children)
TV-G (General audience)
TV-PG (Parental Guidance suggested)
TV-14 (Parents strongly cautioned)
TV-MA (Mature audience only)
Contents
V S L D
O
O
O
O
O
O
O
O
O
O
O
O
O
O
O
O
O
O
O
O
O
O
O
O
O
O
O
O
O
O
O
O
O
O
O
O
• MPAA RATING : Select the desired TV Rating among G, PG,
PG-13, R, NC-17 and X. See the table below for details.
Set up V-CHIP
3 V-CHIP menu will be appeared and set up the V-CHIP items
below.
TV Parental Guidelines
Voluntary movie rating system (MPAA)
Rating Description
G
General audiences. All ages admitted.
PG Parental guidance suggested. Some materials
may not be suitable for children.
PG-13 Parents strongly cautioned. Some materials
Age
may be inappropriate for children under 13.
R
Restricted. Under 17 requires accompanying
parent or adult guardian (age varies in some
jurisdictions).
NC-17 No one under and at the age of 17 admitted.
X
A rating that has now been superseded by NC17.
• CHANGE PASSWORD :
!
If you forget the password, input 5050 to
initialize the password.
i) Press VOL right (√) button when CHANGE PASSWORD
item is selected.
ii)
OSD will be displayed.
Enter new 4-digit secret number.
iii)
OSD will be displayed.
Enter new 4-digit secret number again.
After “THE PASSWORD WAS CHANGED” message is
displayed, you will have previous menu automatically.
◆ Clear the V-CHIP block while V-CHIP block is activated.
1. Press MENU button then ENTER PASSWORD will be
displayed.
2. Input the password to clear the V-CHIP block.
28
29
polaroid LCD1550/1750(NT)
03.6.19 9:59 AM
˘
` 30
mac001
1200DPI 90LPI
Troubleshooting Guide
TROUBLESHOOTING
G U I D E
Please check the following items before asking for repair service.
Symptom
IN PC MODE
Check items
Symptom
Neither picture
- Check the contact of sockets is all right.
“OUT OF RANGE”
nor sound.
- Check the TV main power is on.
appears on the
screen.
Check items
- Check the resolution and frequency of your PC. Then, adjust
them to optimum condition for LCD TV ; 1024 x 768 and 60Hz.
- Refer to the table of PC mode input format indicated on page
22. (Not being registered resolution and frequency on the table
Picture is OK,
won’t be displayed.)
- Check the Volume control is set to minimum or mute.
but no sound.
“NO SIGNAL” appears
- Ensure that the signal cable is firmly connected to PC and TV.
on the
Sound is OK, but
- Check the color control and adjust it properly.
no color.
- Check the program is in color or in black & white.
The picture is
- Check the antenna is installed correctly and if not, adjust the
screen.
Image is not
overlapped image.
clear.
- Adjust the PHASE control. (Refer to the PC ADJUSTMENT of
page 23.)
antenna toward the broadcasting station.
- Check the “FINE TUNE” is set up correctly and if not, adjust the
fine tuning properly.
Image is not
centered.
Picture has “snow
noise”.
- Adjust the H-POSITION, H-SIZE and V-POSITION control. (Refer
to the PC ADJUSTMENT on page 23.)
- Check the antenna or its connection is correct and if not,
correct the antenna fault or connection cable fault.
- Check if car traffic or neon sign disturbs the sound effect.
Stripes on
picture.
- Check the susceptible interference by other electronic devices
such as radio and television and keep magnetic or electronic
devices away from the TV.
Bad stereo or SAP
sound.
- Long distance from the station or other radio waves can
generate bad sound reception. If so, change the mode to
Mono.
Remote control
- Check if the batteries in the Remote control die.
does not
- Check if any object between IR sensor of the TV and the
work.
30
Remote control does not obstruct.
31
polaroid LCD1550/1750(NT)
03.6.19 9:59 AM
˘
` 32
mac001
1200DPI 90LPI
LIMITED WARRANTY- ELECTRONICS
SPECIFICATION
Petters Consumer Brands, LLC (PCB) warrants this Product (including any accessories) against defects in material or
workmanship as follows:
MODEL
LCD-1550
LCD-1750
PANEL
15.1” TFT LCD
17”WIDE TFT LCD
1. LABOR: For a period of 1 year from date of purchase, if this Product is determined to be defective, PCB will
repair or replace the Product, at its option, at no charge to the customer, or pay the labor charges to any
PCB authorized service facility. After the warranty period, you must pay for all labor charges.
1024 X RGB X 768 (XGA)
1280 X RGB X 768 (WXGA)
2. PARTS: In addition, PCB will supply, at no charge to the customer, new or rebuilt replacements in exchange
for defective parts for a period of 1 year from date of purchase.
307.0 x 230.4
372.5 x 223.5
RESOLUTION
LCD
ACTIVE AREA [mm]
VIEWING ANGLE
[°, U / D/ L/ R]
BRIGHTNESS [cd/m2]
DIMENSION
WITH STAND
[mm, W X H X D]
WITHOUT STAND
[mm, W X H X D]
WEIGHT [WITHOUT ACCESSORIES]
45/ 45/ 60/ 60
45/ 45/ 60/ 60
400
450
484 X 360 X 185
532 X 352 X 185
484 X 303 X 59.7
532 X 297 X 58
12.8lbs [5.8kg]
13.7lbs [6.6kg]
TV STANDARD
TUNING SYSTEM
After the warranty period, you must pay for all parts costs.
3. ACCESSORIES: Parts and labor for all accessories are for 1 year from date of purchase.
To obtain warranty service, visit our website at www.polaroidelectronics.com or in the US call 1-(866) 289-5168 and
in Canada call 1-866-301-7922.
This Warranty does not cover customer instruction, installation, set-up, adjustments or signal reception problems.
This Warranty does not cover cosmetic damage or damage due to acts of God, accident, misuse, abuse, negligence,
commercial use, or modification of, or to any part of the Product, including the antenna. This warranty does not
cover products sold AS IS or WITH ALL FAULTS, or consumables (such as fuses or batteries). This Warranty is valid
only in the United States and in Canada.
Proof of purchase in the form of a bill of sale or receipted invoice, which is evidence that the unit is within the
Warranty period, MUST be presented to obtain service.
NTSC-M
ELECTRIC TUNING SYSTEM WITH PLL 181 CHANNELS
TV-FUNCTION
This Warranty is invalid if the factory-applied serial number has been altered or removed from the
Product.
STEREO
MTS + SAP
CATV
125 CHANNELS
INPUT POWER
DC12V, AC 100-240V~, 50/60Hz
SOUND OUTPUT
2W + 2W
POWER CONSUMPTION
AV IN
COMPONENT
43W
44W
VIDEO (COMPOSITE), S-VIDEO (Y/C), AUDIO L&R
REPAIR OR REPLACEMENT AS PROVIDED UNDER THIS WARRANTY IS THE EXCLUSIVE REMEDY OF THE CONSUMER.
PETTERS CONSUMER BRANDS, LLC AND POLAROID CORPORATION WILL NOT BE LIABLE FOR ANY INCIDENTAL OR
CONSEQUENTIAL DAMAGES FOR BREACH OF ANY EXPRESS OR IMPLIED WARRANTY ON THIS PRODUCT. EXCEPT TO THE
EXTENT PROHIBITABLE BY LAW, ANY APPLIED WARRANTY OF MERCHANTIBILITY OR FITNESS FOR A PARTICULAR
PURPOSE ON THIS PRODUCT IS LIMITED IN DURATION OF THIS WARRANTY.
Some states do not allow the exclusion or limitation of incidental or consequential damages, or allow limitations on
how long an implied warranty lasts, so the above limitations or exclusions may not apply to you. In addition, if you
enter into a service contract with the Petters Consumer Brands, LLC Partnership within 90 days of sale, the limitation
on how long an implied warranty lasts does not apply to you. This Warranty gives you specific rights, and you may
have other rights, which vary from state to state.
Y, Pb(Cb), Pr(Cr) [480i, 480p, 720p, 1,080i], AUDIO L&R
MONITOR OUT
VIDEO (COMPOSITE) OUT
HEADPHONE
3.5G STEREO MINI-JACK
To locate the servicer or dealer nearest you, or for service assistance or resolution of a service problem, or for
product information or operation:
TERMINALS
PC IN
D-SUB 15PIN RGB IN, PC AUDIO IN
ANT. IN
ACCESSORIES
F-TYPE
REMOTE CONTROLLER, BATTERIES, AC ADAPTER, AC CORD,
INSTRUCTION MANUAL
* Design and specifications are subject to change without notice.
32
Electronics Consumer Care Center
www.polaroidelectronics.com
in the US call 1-866-289-5168
in Canada call 1-866-301-7922
CUSTOMER’S RECORD
(retain for your records)
Date of Purchase
Store/Dealer
Model No.
Serial No.
Important Keep all original product packaging materials and a copy of original receipt in the event that your product
needs service.
ELEC110602
polaroid LCD1550/1750(NT)
03.6.19 9:59 AM
˘
` 34
mac001
1200DPI 90LPI
GARANTIE LIMITEE - EQUIPEMENTS ELECTRONIQUES
GARANTÍA LIMITADA-PRODUCTOS ELECTRÓNICOS
Petters Consumer Brands, LLC (PCB) garan tit ce produ it (y comp ris tou t accesso ire ) contre les vices d e m ate riau x et
d fabrication dans les conditions suivantes:
Petters Consumer Brands, LLC (“PCB”) garantiza este producto (incluyendo cualquier accesorio) contra defectos en sus
materiales o en su fabricacion según los terminos siguientes:
1. MANO DE OBRA: Si se determina que este producto está defectuoso, durante un periodo de un año posterior a la
fecha de compra PCB tendrá la opción de repararlo o reemplazarlo sin costo alguno para el cliente, o pagar los
gastos de mano de obra a cualquier centro de reparaciones autorizado por PCB. Una vez que el periodo de
garantia haya expirado, los gastos de mano de obra son responsabilidad del cliente.
2. PIEZAS DE REPUESTO: Durante un período de un ano a partir de la fecha de compra, PCB proveerá además, sin
costo alguno para el cliente, piezas de repuesto nuevas o reconstruidas a cambio de las piezas defectuosas. Los
gastos de envío para hacer llegar las piezas al centro de reparaciones autorizado correrán por cuenta del cliente.
Una vez que el periodo de garantia haya expirado, el cliente debera pagar el costo de todas las piezas de repuesto.
Para obtener servicio de garantía, visite nuestro sitio en Internet, www.polaroidelectronics.com o, en los Estados Unidos
llame al 1-866-289-5168; en Canadá, llame al 1-866-301-7922.
Esta garantía no cubre los costos de instrucción al cliente, instalación, configuración, ajustes o problemas con la recepción
de la señal.
Esta garantía no cubre daños que alteren la estética del equipo o daños fortuitos causados por las fuerzas de la naturaleza;
tampoco los debidos a uso erróneo, accidentes, abuso, negligencia, ni aquellos causados por uso comercial o por la
modificacion del producto mismo o cualquiera de sus partes, incluyendo la antena. Esta garantia no cubre los productos
vendidos ”ta l como se ven” o “co n tod os sus defectos” , ni tampoco los pro ductos con sumib les tales como fu sib les o
bateris.
Esta garantia es válida únicamente en los Estados Unidos y Canadá.
Para obtener servicio se DEBE presentar una prueba de compra, tal como una factura o recibo, con la cual se demuestre que
la unidad se encuentra dentro del periodo de cobertura de la garantía.
Esta garantía se invalida si el número de serie asignado en fábrica al producto se ha modificado o extraído.
LAS REPARACIONES O CAMBIOS PROVISTOS BAJO ESTA GARANTÍA CONSTITUYEN LA ÚNICA SOLUCIÓN JURIDÍCA PARA EL
CLIENTE. PETTERS CONSUMER BRANDS, LLC Y POLAROID CORPORATION NO SE HARÁ RESPONSABLE DE CUALQUIER DANO
CONSECUENTE O INCIDENTAL DEBIDO AL INCUMPLIMIENTO DE CUALQUIER GARANTIA EXPLICITA O IMPLICITA DE ESTE
PRODUCTO. EXCEPTO EN LA MEDIDA EN QUE LA LEY LO PROHIBA, CUALQUIER GARANTÍA DE ESTE PRODUCTO QUE SE
APLIQUE A SU MERCANTIBILIDAD O IDEONIDAD PARA UN FIN ESPECIFICO QUEDA LIMITADA A LA DURACIÓN DE ESTA
GARANTIA.
1. MAIN-D’OE UVRE : Pendan t une periode d'1 an a compter de la date d'achat, si ce produit s'avere defectueux, PCB
repare ou remplace le produit, a sa discretion, sans frais pour l'acheteur ou prend en charge le cout de la maind'oeuvre de tou t etab lissemen t d 'en tretien agree par PCB . Apres exp iration de l periode de garantie,
l'acheteur assume le cout de toute main-d'oeuvre
2. PIECES: En outre, PCB fournit, sans frais pour l'acheteur, des pieces de rechange neuves ou reusinees, en echange
des pieces defectueuses pendant une periode d'1 an a compter de la date d'achat. L'acheteur assume les frais
d'expedition encourus pour l'envoi de l'unite au centre d'entretien agree. Apres expiration de la periode de
garantie, l'acheteur assume le cout de toute piece de rechange.
Pour obtenir une prestation de garantie, visiter le site Internet a www.polaroidelectronics.com ou appeler le 1-866-289-5168
aux Etats-Unis ou le 1-866-301-7922 au Canada.
Cette garantie ne couvre pas la formation de l'acheteur, les problemes d'installation, de configuration, de reglage ou de
reception du signal.
Cette garantie ne couvre pas les dommages esthetiques ou les dommages resultant de cas fortuits, d'accidents, de
mauvaise utilisation, d'abus, de negligence, d'une utilisation commerciale, d'une modification de toute piece du produit, y
compris l'antenne. Cette garantie ne couvre pas les produits vendus EN L'ETAT ou SANS GARANTIE QU'ILS SONT EXEMPTS DE
DEFAUT ou les consommables (tels que les fusibles ou les piles). Cette garantie n'est valable qu'aux Etats-Unis et Canada.
Une preuve d'achat sous la forme d'un acte de vente ou d'une facture acquittee, prouvant que la periode de garantie n'est
pas expiree, DOIT etre presentee pour beneficier du service de garantie.
Cette garantie est nulle si le numero de serie appose en usine a ete altere ou retire du produit.
LA REPARATION OU LE REMPLACEMENT TELS QU'ASSURES PAR CETTE GARANTIE CONSTITUENT LE RECOURS EXCLUSIF DE
L'ACHETEUR. PETTERS CONSUMER BRANDS, LLC ET POLAROID CORPORATION N'EST PAS RESPONSABLE DE TOUT DOMMAGE
ACCESSOIRE OU INDIRECT CONSECUTIF AU NON-RESPECT DE TOUTE GARANTIE EXPRESSE OU TACITE DE CE PRODUIT. A
L'EXCEPTION DES CAS LEGALEMENT INTERDITS, L'APPLICATION DE TOUTE GARANTIE DE QUALITE MARCHANDE OU D'APTITUDE
A UNE UTILISATION PARTICULIERE DE CE PRODUIT EST LIMITEE A LA DUREE DE CETTE GARANTIE.
Certains etats n'autorisent pas l'exclusion ou la limitation de garantie des dommages accessoires ou indirects ou
permettent des limitations de la duree d'une garantie tacite de sorte que les limitations et les exclusions ci-dessus peuvent
ne pas s'appliquer. En outre, si l'acheteur souscrit un contrat d'entretien avec le partenariat PCB dans les 90 jours de la
vente, la limitation relative a la duree de la garantie tacite cesse de s'appliquer. Cette garantie accorde a l'acheteur des
droits particuliers et d'autres droits, variant d'un etat a l'autre, peuvent s'appliquer.
Pour trouver le centre d'entretien ou le distributeur le plus proche ou pour toute assistance ou resolution d'un probleme
d'entretien ou pour obtenir des informations complementaires concernant le produit et son fonctionnement:
Centre de Service a la Clientele de Electronics
www.polaroidelectronics.com
Aux Etats-Unis, appeler le: 1-866-289-5168
Au Canada, appeler le: 1-866-301-7922
3110 Crossing Park Rd, Norcross GA 30071
DOCUMENT DU CLIENT
(a conserver pour vos archives)
Date d'achat
Magasin/Distributeur
N°du mode le
N°de serie
Important Conserver tous les materiaux de l'emballage original du produit et une copie du recu d'origine dans
l'eventualite d'une reparation du produit.
Algunos estados no permiten la exclusión o limitación por daños consecuentes o incidentales ni permiten que existan
limitaciones respecto a la duración de una garantia implícita, de manera que es posible que las limitaciones o exclusiones
mencionadas no se apliquen en su caso. Por otra parte, la limitación de la duración de la garantía implícita no se aplica si
el cliente ha establecido un contrato de mantenimiento con “PCB Partnersh“ meno s d e 9 0 días después de la fech a d e
com pra Esta garantia le confiere al cliente derechos legales específicos pero, dependiendo del estado en cuestión, puede
tener otros derechos adicionales.
Para localizar el centro de reparaciones o de ventas más cercano, para obtener ayuda en una reparación o en la resolución
de un problema relacionado a ella, o para obtener información acerca del producto o de su funcionamiento:
Centro de atención al cliente del departamento de electrónica
www.polaroidelectronics.com
En los Estados Unidos, llamar al: 1-866-289-5168
En Canadá, llamar al: 1-866-301-7922
3110 Crossing Park Rd, Norcross GA 30071
DATOS DEL PRODUCTO
(el cliente debe guardarlo para sus archivos)
Fecha de compra
Tienda donde se compró
N° de mode lo
N°de serie
Importante Guardar todo el material de empaque original y una copia de la factura original del producto por si éste
necesita ser reparado.
polaroid LCD1550/1750(NT)
M
E
03.6.19 9:59 AM
M
O
˘
` 36
mac001
1200DPI 90LPI