1
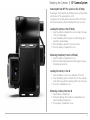
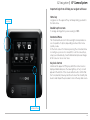
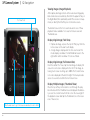
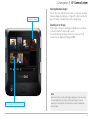
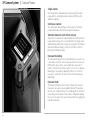
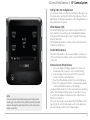
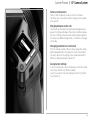
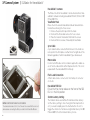
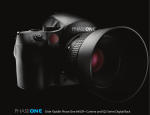
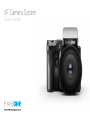
XF Camera System
Quick Guide
“Our key objective is to help the worlds best photographers capture more epic images,
stand out as an artist and have fun in the process.Our new XF Camera System is designed to be like a
“Stradivarius” in the hands of an expert”
Henrik O. Håkonsson Phase One President.
2
Content | XF Camera System
Overview - Names and Functions
4
Assembling the camera system
6
Readying the camera system
8
Navigation12
OneTouch User Interface
14
Prism Viewfinder Display
16
IQ Navigation
18
Camera defaults
22
HAP-1 AF Focusing system
23
Capture Modes
24
ISO and White Balance
25
Exposure Compensation
26
Long Exposure
27
Live View
Custom Presets
Flash Photography
Focal Plane and Leaf Shutter Lenses
Capture One Pro
Activating Capture One Pro
Capture One Tethered capture
Import Images into Capture One Pro
IQ Backs for Mamiya RZ PRO II D
IQ Backs for Hasselblad H
IQ Backs for Hasselblad V
IQ General Technical Camera Use
System Maintenance
28
29
30
31
32
33
34
35
36
37
38
39
40
Learning More
Warranty and Uptime Guaranty
41
42
3
XF Camera System | Overview - Controls, Keys and Dials
Dials, and controls do not have hard coded labels outside of the camera - thus functions
and features can be customized and configured, to fit the photographer’s requirements
and shooting style.
4
Overview - Controls, Keys and Dials | XF Camera System
The top screen of the XF is a touch display, providing direct access to shortcuts
and specific features. The front and rear keys, dials and controls are all customizable and have multiple functions according what is displayed on screen.
5
XF Camera System | Assembling the Camera System
Remove the IQ back from the XF camera body
1. Slide the back release lever forward toward the front of
the camera while pushing in the back release button.
2. Tilt the IQ back slightly backwards from the top and gently
lift the IQ back off the lower interface hook of the XF camera
Attach the IQ back to the XF camera body
1. Gently place the lower interface of the IQ back onto the
bottom hook channel of the XF.
2. Tilt the IQ back toward the camera until the top latch
clicks into position
3. Use the slider and the release button to hook it firmly
in position
Removing the lens
Depress the lens release button on the front left-hand side of
the camera, and keep depressed.
Rotate the lens counter-clockwise until it stops, and lift it out.
Attaching a lens
Align the red or blue index point on the lens with the red or
blue index points located on bayonet mount of the XF camera.
Two different colored index points are available to allow easier
attachment of the lens to the camera. Either when looking
downwards from above the camera (blue) or in front of the
camera looking from the side (red)
NOTE:
After removing the IQ back or the lens from the camera body, remember to protect the optical parts by reattaching the caps and covers.
Also remember to attach the front and back port cover on the XF to
protect the the camera from dust entering the mirror box
6
Assembling the Camera System | XF Camera System
Interchangeable viewfinders
In addition to the Prism Viewfinder, the XF features an optional
Waist Level Finder (Part # 73090)
To remove the Viewfinder
1. Turn the power of the XF System OFF.
2. Grasp the viewfinder securely with your right-hand and
push the viewfinder release slider forwards, towards the
lens with the right thumb.
3. Lift the viewfinder up and out carefully, beginning with
the rear of the viewfinder then moving up and away from
the camera body to re-attach the viewfinder
4. Ensure the power of the XF System is OFF..
5. Hold the viewfinder securely with your right hand, with
the viewfinder tilting downwards slightly.
6. Place the front edge of the viewfinder so that it is resting
on the front edge of the body.
7. Ensure that the viewfinder’s front locating pins are
aligned with the body’s pin registration recesses, located
in the front of the XF Viewfinder port. (Both the electrical contacts and prism of the viewfinder must be aligned
with the body’s contacts and viewfinder screen recess.)
8. Carefully lower the rear of the viewfinder until level with the
body, press the viewfinder down firmly until it clicks into place.
NOTE:
Ensure the viewfinder is securely attached before turning the power on
and using the camera. Failure to ensure the viewfinder and body are
not properly secured could result in a camera malfunction. There is also
a risk of dropping either the camera or the viewfinder if the viewfinder
is not securely attached! Always remember to protect the optical elements with the supplied covers.
7
XF Camera System | Readying the Camera
Charging the batteries
When working untethered, the standard power source of both
the XF and IQ back is the 7.2v (3400mAh) BP-911/914/915 type
rechargeable Li-ion battery.
To maximize battery performance, charge both batteries before
use with the supplied Twin V Pro charger. Approximately 2.5 to 3
hours are required to fully recharge exhausted batteries.
1. Slide open the charger base cover and fold back to form
a stand.
2. Slide the batteries into the charger slots from the top
down. If charging only one battery, either slot can be
used.
3. The charge percentage indicator will blink and display the
capacity of the battery that’s charging.
4. Charging is complete when the charge indicator stops
blinking and the capacity level displays “100%”.
Two batteries in the system
Both the XF and the IQ use identical 7.2v (3400mAh) BP-915
rechargeable Li-on batteries and therefore share the same
charger for additional convenience.
XF and IQ3 Power Share
The XF and IQ3 digital back are designed to share power from
the two batteries in the system, thereby providing improved
operation time for the full system. Another benefit of having
separate batteries is that the IQ backs can be operated independently on a separate camera system by using their own,
independent, power source.
NOTE:
In low temperatures, keep spare batteries close to body temperature by storing in
an inside jacket pocket - Li-Ion tend to lose efficiency under cold conditions.
8
IQ1 and IQ2 backs cannot share power with the XF camera, and therefore
operate on their own battery, independent from the camera body.
Readying the Camera | XF Camera System
Powering ON and OFF the system on the XF body
Powering on the XF and the IQ simultaneously is achieved with
a short press of the power button on XF.
A long press of the same button will power off the XF, the IQ
will follow and power-off automatically after a few seconds.
Loading the battery in the XF Body
1. Open the battery compartment cover located in the base
of the XF camera grip.
2. Insert the battery with the power contacts facing up towards the camera handle.
3. Push the battery up until it locks into position
4. Close the battery compartment cover.
Removing the battery from the XF body
1. Open the battery compartment cover
2. Push the metal retaining catch inside the grip to release
the battery and pull out.
Loading the battery in the IQ
1. Open the battery cover on the underside of the IQ3.
2. Insert the battery, power contacts first, into the compartment all the way until the retaining catch locks into place.
3. Close the compartment cover.
Removing a battery from the IQ
1. Open battery compartment
2. Push the retaining catch inside the compartment to release the battery and pull out.
3. Close battery compartment cover.
9
XF Camera System | Readying the Camera
Setting the time zone in the IQ digital back
Date and time parameters are set and controlled via the IQ
digital back Menu.
If the IQ back has been without power for a long period of
time, it will automatically ask you to set the time and date on
the next occasion it is powered up.
Tap the screen and scroll through the numbers to attain the appropriate date and time. Tap the check mark, which will appear
in the bottom right hand corner of the screen, to confirm your
entry. The time and date is applied to the EXIF data in all files
captured with the IQ back.
Setting language in the IQ digital back
The XF is delivered, by default, with the language set to English. Follow the steps below to change the language of the
IQ menus to one of nine others available, including German,
French, Swedish, Italian, Spanish, Chinese (simplified), Japanese, Korean and Russian.
1. From the Home Screen on the IQ back, press ‘Menu’.
2. Navigate to Language by touching the screen and scrolling down.
3. Select the Preferred Language option.
NOTE:
If you choose a wrong language by mistake, and you cannot read the
menu system, to find the language menu, look for the menu item with
and (L). This is the Language menu. Enter this menu where you can
select the first option, which is always English
10
Readying the Camera | XF Camera System
Using Memory cards
The Phase One XF System supports Type 1 CompactFlash (CF)
cards only. Phase One recommends UDMA 7 type cards (800x
speed or better) for optimal performance, however slower
cards can be used. Microdrives and CF Type II cards are not
recommended for use with IQ backs.
Installing and removing the CF Card(illustration)
Insert the CF card into the media storage slot on the left-hand
side of the IQ back.
Remove the card by pressing the black release lever just above
the card - this will extract the lever and you can now use it
to eject the card. Make sure the eject lever is correctly closed
before loading another card.
LED Lights
IQ digital backs feature two main LEDs located below the bottom left corner of the screen.
Green:
When capturing an image the Green LED will blink rapidly
to indicate that the IQ back is busy. When the IQ screen is
dimmed this Green light will continuously display to indicate
that the camera is still ready to shoot.
Red:
A Red LED indicates that the IQ back is writing to the storage
media, and therefore the buffer has not been emptied. There is an
additional Red LED indicator located next to the CF card slot (beneath the cover). It is assigned to indicate CF card activity only.
NOTE:
Do not remove a CF card from the card slot when this Red LED is on.
Removing a CF card whilst the Red LED is on can damage the formatting of the card, images or data may be lost or corrupted.
11
XF Camera System | Navigation
Release Button
Half press will activate the exposure meter as well as autofocus, by default.
Full press releases the shutter.
Activating the shutter release button (quick press) will return
the camera to instant readiness at any time.
Secondary Release Button
The secondary release button replicates the functionality of the
main shutter release button. When the secondary shutter release
function is enabled, the primary release button remains active.
Top Touch Screen
The Top Touch Screen controls capture setup, and displaying the
current settings. Current Shutter Speed, ISO and Aperture val-ues
are displayed. These values can be changed directly from the
touch screen, or using the Front, Rear and Side Dials respectively.
Camera functions, depicted by icons include Capture, Metering,
and AF area modes. These are selected by the following:
Front Dial
By default the Front Dial is used to adjust the Shutter Speed,
however it is mode dependent, and after pressing the Front
or Rear Key it is then used for navigation of the camera
function settings.
Side Dial
Secondary release button
12
The Side Dial is set to adjust the Aperture value by default,
and it is also used for making selections from both the Camera
Function settings and Camera Menu. The Side Dial is customizable by pressing the rear key on the XF top and navigate to
Camera Utilities>Control Setup.
Navigation | XF Camera System
Rear Dial
This dial is principally used to adjust ISO, and like the mode
dependent Side Dial, is also used for making selections from
both the Camera Function settings and Camera Menu. The
Rear Dial is customizable by pressing the rear key on the XF
top and navigate to Camera Utilities>Control Setup.
Front Button
The Front Button is a mode dependent control set to activate
the depth of field function, per default. The Front User control
is customizable by pressing the rear key on the XF top and
navigate to Camera Utilities>Control Setup.
Rear Button
The Rear Button is programmed, per default, to activate the
Mirror Up (MUP). The Rear User control is customizable by
pressing the rear key on the XF top and navigate to Camera
Utilities>Control Setup.
Front Key
A short press on this key activates the camera function icons
displayed on the top touch screen. By default the function
icons cannot be accessed directly until they’re enabled.
Rear Key
On/Off Button
The Rear Key is used to gain access to the camera menu. A
short press and release of the Rear key is required to access
the menu. The Rear key’s function is repurposed for navigation
when in this mode.
Camera On/Off Button
Press the button to power up the camera. If left untouched, the
camera will enter Sleep mode after some seconds. Press and
hold the button for 2 seconds to power the camera down. The
IQ back will power down after 3 seconds.
13
XF Camera System | OneTouch User interface
The XF Camera body’s top user interface consists of:
1
A
B
2
Release button at the front right-hand side,
3 Customizable dials (default is Shutter Speed, Aperture and ISO)
1. Front dial
2. Rear dial
3. Side dial
A touch sensitive screen with 2 control keys
A. Front key
B. Rear key
C
3
Operational user controls on front and rear:
C. Rear Button
D. Front Button
The basic logic of operation (with default settings):
1. Set the camera up with required settings using touch
screen or using Front and Rear key (A, B)
2. Operate ISO, Shutter Speed and Aperture with the dials
(1, 2, 3)
3. Half press the release button to focus (AF mode on lens)
4. Apply exposure lock or focus lock with front and rear user
controls.
5. Fully press the release button to shoot...
D
14
NOTE:
A secondary shutter release control is available on the front lower-right
side of the camera if you want to shoot handheld in portrait orientation
or using waist level finder
OneTouch User interface | XF Camera System
Classic layout (Default)
Close Menu
Toggle Auto On/Offf
The XF OneTouch UI is setup by default with a “Classic” layout
on the top screen. Apart from Shutter speed, Aperture and ISO,
the Classic layout is also showing the Mode, Drive, Light Metering, Focus Area and M.UP. Settings.
Tapping on any item on the screen lets you set the parameters
for that function.
Shutter Speed, Aperture and ISO Auto Function
Set time upper limit
Set time lower limit
Tapping on Shutter Speed, Aperture or ISO lets you turn on
Auto functonality and adjust the allowed value limits.
If Shutter Speed, Aperture or ISO is set to Auto, they will be
highlighted in blue on the screen. Setting these parameters
to Auto mode will also change the mode indicator re-spectively to indicate this.
Simple layout
You can switch to a “Simple” layout via the XF menu or the
IQ3 XF camera menu. The simplicity of this layout may be
preferred because it is very easy to decode, and does not show
fixed settings like Drive, Metering Area, Focus Area and M.UP.
Change Screen layout
On the XF click the rear key and select [Camera Utilities >
Screen Layout] or access the XF menu on the IQ3 back.
NOTE:
With “Simple” layout you can use the same
Auto on/off feature as in “Classic” without
having the screen cluttered with settings you
rarely change. In both views you can get an
overview of the battery and storage status by
tapping on the battery icon.
15
XF Camera System | Prism Vewfinder display
Auto focus area frame
Focus area
The XF Viewfinder is equipped with focus sensor indicators in
the center.
Two rectangles are marked, which corresponds to the focus
area setting in the camera.
The Focus rectangle in use is marked on the XF screen with the
focus icon. To change the focusing mode, touch the icon, and
change the value.
Viewfinder – Display, Symbols, Feedback
Inside the XF Prism Viewfinder you will find a display with indication of current capture parameters.
Please refer to the image to the left for an explanation of each
possible viewfinder display indication.
ISO value indicator
During actual use, only the relevant icons and indicators are displayed.
16
Prism Vewfinder display | XF Camera System
Setting Diopter in the viewfinder
Start by defocusing the camera manually
Look through the viewfinder and make sure that the focus
frame (Circle with Rectange inside) on the focusing screen is in
sharp focus. If it is not, turn the diopter adjustment dial counterclockwise if you are nearsighted or clockwise if you are farsighted.
If this is not sufficient you may require an optional diopter
correction lens:
Part # 70277 Diopter correction lens DE401 (Standard)
Part# 70278 Diopter correction lens DE402 (Near Sighted)
Part# 70279 Diopter correction lens DE403 (Far sighted)
Removing the eye-cup
Release the eye-cup by pulling the small metal latch in the top,
back towards you.
Then slide the eye-cup up and out of the eye-cup rail.
Changing the Viewfinder Diopter lens
Eye cup release
To change the diopter lens, gently slide the diopter down, and
out of the diopter rail after removing the eye-cup.
Reinstall the new diopter, and make sure it is positioned back
correctly with the small click-lock tab facing up on the lefthand
17
XF Camera System | IQ Navigation
Touch Screen Operation
Upper Left Key
Upper Right Key
All IQ backs are equipped with a 3.2 inch touch screen. The
screen lets you zoom, pan and browse through images quickly,
making it is easy to navigate between different menus and features. Operation is done using the touch screen display or the
well known and intuitive, 4-key navigation.
Menu Keys
The IQ back is equipped with four external keys.
The keys will change function to match the menu shown on the
display. The function of the four keys changes once one of the
Menu, ISO and WB options has been selected. In general, the two
keys to the left are used to exit the screen and select a menu option. The two keys to the right are used to navigate up and down.
Home Screen
The IQ Home Screen is the first navigate view users will see
as soon as the back is switched on. This is the back’s default
screen and the starting point from which to negotiate the
menu system. It enables direct access to the Play mode to view
captured images, the Menu to configure the IQ back’s features,
the ISO sensitivity and White Balance (WB) settings.
Info Bar
Lower Left Key
18
Lower Right Key
In the bottom of the screen you will find the Info Bar - the Info
Bar is visible all the time, except when you look at images in full
screen preview.
Info bar lists from left to right: Remaining captures on CF card,
Battery status, WiFi status (if available and turned on), CF card
inserted. - a flashing icon means the function is not avalable.
For instance “No CF-card” - or “No WiFi connection”.
Far most to the right is the contextual menu. This gives access to
many other functions, depending on which back you are using
and where you are in the menu context.
IQ Navigation | XF Camera System
Important logic that will help you navigate with ease:
Home key
Long press on the upper left key will always bring you back to
the main menu.
Home Key
Double tap the screen
To enlarge an image that you are viewing to 100%
Contextual Menu
The Contextual menu icon in the lower right corner provides access to a palette of options, depending on where in the menu
system you are.
At the home screen for instance, pressing the contextual menu
icon will give you access to setup WiFi, Lock the screen/keys,
setup your camera body, View thumbnails and preview images
at full screen or access Live View.
Key lock shortcut
Hold down the upper-left (Play) key whilst the Home Screen is
displayed and double press the lower right key. A “key” icon will
appear at the bottom of the screen and turn red to confirm that
the four (external) menu keys and touch screen func-tionality has
been locked. Repeat the procedure to unlock the keys and screen.
Contextual Menu
19
XF Camera System | IQ Navigation
Viewing images (Image Playback)
Tool View Tools
After capture, an image is shown on the rear screen. Image playback can also be accessed at any time from the upper-left key on
the Digital Back (this is particularly useful if the screen is in sleepmode), or directly from the Play icon on the Home screen.
The default screen is the Tool view mode and is one of three
playback modes available: Tool view, Full Screen view and
Thumbnail view.
Display Single Image (Tool View)
1. Capture an image, or press the top left ‘Play’ key from the
Home screen on the rear touch display.
2. A single image is displayed in the Tool view mode. This
mode displays a number of small thumbnail views to the
right within which a number of tools are offered.
Display Single Image (Full Screen View)
From the default Tool View, tap the main image to display full
screen. A zoom scale is displayed to the left of the image, allowing touch screen zooming up to 400%. The Context menu
icon is also displayed at the bottom right. This menu provides
access to several tools within the Full Screen View.
Display Multiple Images (Thumbnail View)
Press the top left key on the back to scroll through the playback modes until the Thumbnail view is displayed. Alternatively, access the context menu from the icon in the lower right of
the playback screen and tap the Thumbnail icon on the lower
row of menu icons.
Tap the main view to go to full screen, double tap to zoom to 100%
20
IQ Navigation | XF Camera System
Swiping between images
Selected thumbnail
In both Tool View and Full Screen View, it is very easy to swipe
between images by sliding your finger left or right over the image. This will go forward or back in the image range.
Zooming on an image
In full screen, clicking on an image will bring up a zoom slider
on the left side that can be used to zoom.
You can double tap an image in either Tool View or in Full
Screen View, to display that image at 100%.
Tap one image to view at full screen
NOTE:
When the shutter is released, an image is displayed on the rear screen
for approximately 60 seconds, by default, providing no keys are
depressed in the meantime. The display time can be altered Under
Menu>Display
21
XF Camera System | Camera Defaults
Camera pre-set from factory or after “Reset to Default”:
Shutter Speed: Front dial
Shutter Speed can be adjusted using the Front dial (CW and CCW)
Aperture: Side dial
Aperture can be adjusted using the Side dial (CW and CCW)
ISO Selection: Rear dial
ISO can be adjusted using the Rear dial. (CW or CCW)
AF Drive mode:
Single (default), Continuous.
AF drive mode can be changed by pushing the Rear Key to
enter the menu and selecting Camera operation.
Manual focus is selected using the physical Auto/Manual collar
on the lens.
Capture Mode: Single capture (default), Continuous capture, Vibration Reduction,
and Bracketing.
Capture mode can be changed by selecting the Capture Mode on
screen and selecting the required capture mode on the screen.
White Balance
Auto (default), Daylight, Fluorescent, Tungsten and Flash.
White Balance can be selected in the IQ back WB menu.
Exposure Mode:
NOTE:
The XF Camera can be reset to factory defautl settings from the camera menu.
Press the Rear Key and using the front dial or Rear Key again, scroll down to Restore to Default. Select the option using the rear dial, and confirm selection with
rear key.
22
Manual (default), Aperture Priority, Time Priority and Program.
Exposure mode can be changed by selecting the Exposure
Mode on screen and adjusting the Side dial.
HAP-1 AF Focusing System | XF Camera System
Autofocus Drive
There are two AF Drive options: Single or Continuous. These
drive options can be set by selecting Camera Operation>AF
Drive on the XF top screen or in the XF menu on the IQ back.
Single:
Focuses the lens once, after pressing the release button halfway. Half-pressed stage locks the focus, allowing the photographer to recompose the image before fully depressing the shutter. Autofocus is reactivated anytime by releasing and pressing
the half-press shutter release button again.
Continuous:
On half-press of the shutter release button the lens focuses,
while the AF system continues to monitor the subject. If the
subject moves, the lens will refocus to follow the subject. Pressing the release button to the second stage releases the shutter,
regardless of whether the subject is in focus or not.
AF Priority:
The AF priority can be set to prevent shutter release until the
subject is in focus. To change AF Priority access the Camera
Operation>AF Priority on the XF top screen or from the XF Menu
on the IQ back.
Focus Area:
To change from the default size AF area (outer rectangle) to
the smaller, center area AF, select the AF Area icon from the
XF top screen.
NOTE:
Depending on which lens you are using, the focus mode can be set on
the lens, either by turning the focus selector ring or by moving the AF/
MF focus ring forwards or backwards.
23
XF Camera System | Capture Modes
Single capture
One image will be captured when fully pressing the shutter
release button. Holding the button down will NOT result in
additional captures.
Continuous capture
The camera will capture images continuously to the fastest
possible frame rate with the release button held down.
Vibration Reduction (with mirror lock up)
The mirror is locked up for reduced vibration and the shutter is
released after a delay of 4 seconds (default). The delay can be
adjusted between 0.5-8 seconds by accessing the XF [Camera
Operation>Vibration delay] or from the XF Menu on the IQ
back. [Drive>Vibration Delay]
Exposure Bracketing
The camera will capture 3 shots (by default) in succession: one
1-stop under, one at the correct exposure and one 1-stop over.
Different EV values can be selected and three steps are offered: 1, 1/2 and 1/3 EV, with the option for 2, 3, 4 or 5 captures.
Bracketing is accessed by tapping the Drive icon on the XF
top screen, or from the XF menu on the IQ [Drive>Exposure
Bracketing]
Exposure Mode
The default setting from the factory is Manual (M). However
there are 4 exposure modes available: Manual (M), Aperture
Pri-ority (Av), Shutter Priority (Tv), and Program (P). In Classic
screen layout, the Exposure Mode can be changed by tapping
the icon on the top touch screen, followed by then toggling the
rear dial or side dial.
24
ISO and White Balance | XF Camera System
Setting ISO in the IQ digital back
ISO sensitivity can be set either by scrolling the side dial on the
XF camera or by selecting ISO with the top right key of the IQ
digital back. ISO Range is dependent on the IQ digital back you
have attached to the system.
White Balance (WB)
The default WB setting is Auto, which is usually sufficient for
most situations. However there are 4 standard white balance
settings to match various light sources: Daylight, Fluorescent,
Tungsten and Flash.
The standard white balance settings can be selected with the
IQ backs lower right key.
Custom White Balance
3 Custom white balance options are available. Selecting one
of these will make it possible to create a custom white balance
on the spot.
Create a Custom White Balance
NOTE:
It is a good practice to have at least one image in each shooting scenario
include a gray. In this workflow it will be possible to precisely tune the white
balance in the image from inside Capture One Pro, or with a custom white
balance, at a later time.
1. Shoot one image including a gray patch or other color
neutral area, that you want to use for neutral setting
2. View the image in full screen and click the lower right
corner to activate contextual menu
3. Select the White Balance picker in the contextual menu.
4. Click on the gray patch with the on-screen picker and the
custom white balance will be set accordingly.
Long pressing the picker tool in the contextual menu, will bring
up the “White balance Picking” where it is possible to choose
if custom white balance should be stored to either Custom 1,
Custom 2 or Custom 3.
if the Auto Save mode is unchecked in the White Balance Picking settings, the custom white balance will only be applied to
the current image, and not set for future images.
25
XF Camera System | Exposure Compensation
Exposure Compensation
The Exposure Compensation function is available primarily for
the automatic exposure modes (Av, Tv, and P), but it can also
be used in Manual exposure mode. Compensation can be set
from -5 to +5 EV in either 1/3, 1/2 or 1 EV increments. By default, exposure compensation is applied in 1/3 EV increments.
Apply Exposure Compensation
Exposure Compensation can be selected from the camera’s
top-screen by tapping the Exposure Compensation scale and
scroll through the value (EV value) using the rear or side dials.
If, for some reason you want to avoid using touch, an alternative method can be applied using Keys and Dials:
1. Press and release the Front Key on the XF top. This will
highlight the last chosen feature in the control panel displayed on the top touch-screen.
2. Rotate the Front Dial to scroll through the Function icons
on the control panel. Note, each function selected is highlighted in-turn and remains active for 3 seconds.
3. Select the Exposure Compensation function, and scroll
using the Rear or Side Dial to increase or decrease the
setting. The EV value applied is displayed on the Top
Touch Screen and in the viewfinder display and remains
fixed, regardless of the number of captures. To remove
any exposure compensation applied, access the function
again and set the value to 0 (zero).
26
Long Exposure | XF Camera System
Long Exposure and Bulb mode
The IQ backs a quite capable when it comes to long exposure.
Long Exposure mode
Using the Time setting, the focal plane shutter of the XF stays
open for a predetermined time (displayed in seconds).
1. Rotate the Front Dial and select Shutter Speed; 30, 60,
120 or 240.
2. Select the aperture using the Side Dial.
3. Compose using the viewfinder or Live View, focus and then
trigger the shutter release. The shutter remains open for the
allotted time, the Display on the IQ back as well as the top
screen of the XF, will show the elapsed time (in secs).
Bulb mode
To capture an image in excess of the exact Shutter Speeds
available on the XF camera, select Bulb.
1. Select the Manual Exposure mode from the Top Touch
Screen.
2. Rotate the Front Dial to select Bulb, and the Side Dial to
select the aperture value.
3. Compose using the viewfinder or Live View, focus and
then trigger the shutter release. The shutter remains open
as long as the shutter release is depressed.
27
XF Camera System | Live View
Live View
All IQ backs are capable of displaying a live preview of your
scene on the rear LCD. Live View is supported in Aperture Priority and Manual Exposure modes only. All IQ backs also support tethered Live View using FireWire 800 or USB 3.0, except
for the 50MP IQ backs which only have Live View on USB 3.
Starting Live View
In Home position, touch the context menu icon in the lower
right corner on the IQ screen. The contextual menu pop-up is
displayed. Touch the Movie-camera icon to initiate Live View.
The XF opens the shutter and a live preview (Live View image)
is displayed on the IQ screen.
Check Focus
Select manual focus (MF) from the Lens Selector Ring.
Focus on the subject using the Live View image.
Tap the screen to enter Full Screen mode, and then slide your
fingertip up on the Zoom slider displayed on the left-hand side
to zoom into the subject. (Slide your fingertip down to zoom
back out). Drag the image with your fingertip to examine the
subject and confirm focus.
Capture an Image
Follow the steps above to start Live View and confirm focus.
Note AF is not available during Live View.
Release the Shutter while in Live View to capture an image.
Accessing Live View
28
NOTE:
All IQ3 backs support tethered Live View using FireWire 800 or USB 3.0,
except for the IQ 50MP backs which supports Live View on USB 3.0 only.
Custom Presets | XF Camera System
Camera custom presets
Three (3) Custom presets can be set on the XF camera.
This allows you to Save and Load the settings you have made
to the system.
Changing between custom sets
The Presets are intended to provide a rapid change between
groups of settings and features. Presets also minimize inadvertent use of settings, where the same camera may be adopted
for several very different assignments or commissions throughout the day.
Changing parameters on Custom Sets
All of the settings used by a Preset can be changed to suit the
particular requirements of the day, but only the Save Custom
Set option allows for the settings to be stored and saved for
further use after powering the camera off.
Saving Custom Settings
To save a custom preset, press the Rear Key on the XF top and
select [Save Custom Set] with the rear dial.
Select if you want to store the setting as [Custom 1], [Custom
2] or [Custom 3].
29
XF Camera System | Flash Photography
Build in Profoto Air flash
The XF camera has a build in Profoto wireless flash trigger
The Wireless flash trigger can pair any Profoto Air enabled
flash system or accessory.
For third party flash systems a Profoto Air Sync Transceiver
can be used (Phase One Part# 70263)
Enabling Profoto Air flash
Profoto Flash has to be enabled in the Camera Operation menu
of the XF camera - Wireless channel can be selected in the
same menu - select between channels 1 to 8
Channel selection is shown at the main screen, and should
correspond to the channel selected on the Profoto flash system or Transceiver.
Flash Synchronization range
Phase One focal plane lenses have the capability to synchronize
with flash up to 1/125th of a second Shutter Speed.
Schneider Kreuznach LS lenses can synchronize flash up to
1/1600th or 1/1000th depending on which lens is used.
Synchronization capability is indicated on the top screen with a
small flash icon placed right under the Shutter Speed setting - if a
flash icon is not visible the Shutter Speed setting is outside range
of the attached lens or manually selected shutter (FPS or LS).
Wired manual flash
Wired manual flash is possible through the sync port on the
XF 90°Prism Viewfinder or IQ digital back. On camera manual
flash is also possible through the hot shoe on top of the camera, or through the sync port on the XF 90° Prism Viewfinder
or IQ digital back, with appropriate cable.
30
Focal Plane Shutter and Leaf Shutter Lenses | XF Camera System
Phase One Focal Plane lenses
The XF camera has a build in focal plane shutter (FPS).
The range of the shutter is 1/4000s to 1 hour (determined by
the specific IQ back used), but flash sync is limited to a maximum of 1/125th of a second Shutter Speed.
Schneider Kreuznach LS lenses
The Schneider Kreuznach lenses have a build in leaf shutter
(LS). The Leaf shutters have a capability to synchronize flash
up to 1/1600th of a second Shutter Speed.
If using LS lenses, the camera will indicate if LS or FPS is active
by displaying it on the top screen. Priority of which shutter you
wish to use can be set in the Camera Operation menu on the
top screen, or from the XF menu on the IQ digital back.
Advantages of FPS
One notable advantage of FPS is ability to shoot up to a
1/4000th of a second.
Another advantage is the shutter response time, which is almost twice as fast as the Leaf shutter.
This means that if you are photographing objects or persons
within range of the FPS flash sync speed, or without flash, you
will be able to get a notable faster response to the finger press
of the shutter release using FPS.
Advantages of LS
If you want to synchronize at a Shutter Speed faster than 1/125th
of a second, the LS lens shutter can facilitate your requirement.
Another advantage of the LS is less vibration during the capture due to the circular movement of the shutter.
The issue of vibration however, is addressed even on non-LS
lenses with the XF vibration delay feature of the XF camera
operation menu, available on the top screen.
31
XF Camera System | Capture One Pro
The XF camera is bundled with Capture One Pro.
Installing on Mac
Capture One software includes an easy-to-use installer that will
install all the software necessary to run the application on a
Mac running OS X 10.9 (Mavericks) or 10.10 (Yosemite).
1. Connect the supplied USB flash drive to your computers
USB port and navigate to the Capture One installer. Alternatively you can download the latest version of the application from the Phase One website: www.phaseone.com.
2. Open the Capture One Disk Image.
3. Drag the Capture One icon to the Applications folder.
4. Open Capture One from your Applications folder.
Installing on Windows
Capture One includes an easy-to-use installer that will install
all the software you need to run the application on a Windows
based computer.
1. Connect in the supplied USB flash drive to your computers USB port and navigate to the Capture One install file.
Alternatively you can download the latest version of the
application from the Phase One website: www.phaseone.
com.
2. Run the executable software install file.
3. Read and accept the license agreement presented.
4. Follow the on-screen instructions to complete the installation.
32
Activating Capture One Pro | XF Camera System
Activating Capture One Pro
An Internet connection is required to activate and update Capture One Pro.
1. Open the license activation dialogue box from the main
menu: Capture One>License. (Help>License Info on Windows PC)
2. Enter the license code provided and your personal details
in the required fields. (Capture One Pro license code is
placed inside the Capture One Pro box).
3. Once you have entered the information, press the Activate button and Phase One’s activation server will validate
the software.
4. Capture One should now be activated and ready for use.
Troubleshooting
If you are experiencing problems activating the software, follow
the instructions provided in the application, read the Capture
One help manual online, or visit our website for inspiration and
troubleshooting: http://www.phaseone.com/support
33
XF Camera System | Capture One Pro Tethered Capture
Shooting Tethered
As a professional tool for working photographers, the Phase
One XF medium format camera system can be tethered to a
Mac or PC running Capture One Pro RAW workflow solution.
In addition to being able to control basic camera functions,
captures are saved to the computer’s hard disk or they can be
saved to the CF-card instead.
Connecting to a Computer
The XF can be tethered to a computer using either FireWire
800 (IEEE 1394b) or USB 3.0 interface cables.
Online Support
For more information on shooting tethered with Capture One
please consult the online user guide available in the Capture
One Help menu or go direct to http://help.phaseone.com/en/
CO8/Capture/Tethered- Shooting.aspx
NOTE:
The XF/IQ3 is compatible with FireWire cables up to 4.5 meters in length and
USB 3.0 cables up to 3 meters in length. Longer cables might require a third
party power
34
Import Images into Capture One Pro | XF Camera System
Import Images
Inserting a memory card into a card reader will automatically
bring up the Import Images dialog window, when Capture
One Pro is running.
Manual Import of images
1. Go to File and select “Import Images…” The dialog box will
open to browse files.
2. Navigate to the “Import From” folder, card or disk in the
Locations tool.
3. Select Capture folder (import location) and type in the
job name and Metadata (copyright, caption) if desired.
4. If you want to select a naming format for the imported
files, press “Format” in the Naming tool.
5. You can select all or specific images to import.
6. Press “Import” or “Import All”. You can continue working
while images are imported in the background.
Capture One User Guide
Available in the Capture One Help menu or go direct to
http://help.phaseone.com/
35
XF Camera System | IQ Backs for Mamiya RZ PRO IID
IQ back on a Mamiya RZ PRO IID
The IQ backs with XF mount or 645DF+ mount are compatible
with the Mamiya RZ Pro IID camera, however this will require
an adaptor plate. (Phase One Part # 70994)
It is possible to use a Hasselblad V mount IQ back on the
Mamiya RZ67 PRO IID by getting the back mount plate modified
with the following Mamiya service part number: Y22995-RZ.
IQ back on older Mamiya RZ PRO II
Only the Hasselblad V version of an IQ back can be used on
the older version Mamiya RZ PRO II with a Mamiya RZ Pro II
adaptor. (Phase One Part# 70964)
Mounting IQ Back on the Mamiya RZ PRO II
Viewfinder Mask
Please check the relevant Mamiya RZ67 manual regarding how
to dismount the viewfinder and remove the focus screen.
1. Remove the protection tape from the mask.
2. Dismount the prism/waist-level finder and remove the
focus screen.
3. Place the viewfinder mask in the bracket that holds the
focusing screen.
4. Re-mount the viewfinder focus screen followed by the
Viewfinder.
Mamiya RZ Pro II mode selector
The mode selector on the trigger button should be turned to the
white dot when used with the IQ back. The selector should be set
to the orange dot to avoid draining the small battery of the RZ
camera when the IQ back is attached to the body and not in use.
IQ Camera Mode
Select the special Mamiya RZPRO IID camera mode in the IQ
back Menu>Camera mode, this will ensure that the IQ knows it
is mounted to a Mamiya RZ PRO II.
36
IQ backs For Hasselblad H | XF Camera System
Viewfinder Mask
Please check the relevant Hasselblad H-series manual regardinghow to dismount the viewfinder and remove the focus
screen. Change of viewfinder mask is only needed for the
50MP or 40MP IQ backs
1. Remove the protection tape from the mask.
2. Dismount the Viewfinder and remove the focus screen.
3. Place the viewfinder mask in the bracket that holds the
focusing screen.
4. Re-mount the focus screen, followed by the viewfinder.
Hasselblad H Camera Display
The Hasselblad display can display some IQ back information.
For example, error messages including ”Digital back storage
media is full” and also ISO Setting in the IQ back
ISO settings should be set from the IQ back or in Capture One
Pro software when shooting tethered.
All the Hasselblad H auto exposure modes are fully supported
by the IQ back. Please check the relevant Hasselblad H-series
manual for more information on exposure modes
37
XF Camera System | IQ Backs for Hasselblad V
Hasselblad V cameras
The Phase One IQ for Hasselblad V can be mounted most Hasselblad V cameras including Hasselblad 555 ELD, 553 ELX, 501
CM and 503 CW.
Viewfinder Mask
Please check the relevant Hasselblad camera manual instructionsbefore removing the focus screen.
1. Remove the protection tape from the mask.
2. Dismount the finder and remove the focus screen.
3. Place the mask in the bracket that holds the screen.
4. Re-mount the focus screen, followed by the Viewfinder.
Sync Cable
A sync cable must be connected from the lens to the small connector port in the front plate on either the left or right side of the
IQ back regardless of which Hasselblad V type camera used.
Motor cable
For ELX or ELM bodies a motor cable is supplied to enable users to fire the camera from within Capture One Pro. This is not
required with the Hasselblad 555 ELD body.
Flash Lead Connection
A flash cable can be connected to the Flash port connector
on the IQ.
Hasselblad 555 ELD
Ensure that the shutter release on the front of the 555
ELD is in the DIG position
Shutter Latency Setting
NOTE: DO NOT MOUNT WHILE IN S OR RS MODE
The camera should be set to AS, A or 0 mode. Also ensure that the lens is not
jammed when connecting the flash sync cable to the Phase One IQ back.
38
The IQ back can be used with both Normal and Zero latency.
Set the latency setting to Zero if using the Mirror Up function
or if you need to rapidly press the shutter button. Do not to
trigger the shutter too fast when using Normal latency. On 903
CW and 905 CW set the IQ back latency to Zero .
IQ General Technical Camera Use | XF Camera System
IQ Back and mechanical shutters
The IQ back can be used with mechanical shutters that can be
fired twice within four seconds. The first release of the shutter activates the IQ back (wake up signal); the second release is for the
exposure. If the time limit of four seconds is exceeded, the camera
gives a warning ‘beep’ followed by a ‘two shoot error’.
There are several automatic or semi-automatic two shoot
solutions available from third parties manufacturers to use
with a mechanical shutter.
Please ask your dealer for more information.
Typical use of 2-shot release
1. Connect a two shot cable to the multi-pin port on the IQ
back, connect the other end of the cable to the flash sync
port of the mechanical lens. If flash is required, connect a
flash sync lead to the the IQ back.
2. Close the shutter if necessary.
3. Push the trigger on the shutter slowly down - The two
shoot cable will ready (wake-up) the IQ back and the take
a shot when it is pushed all the way down.
4. Adaptors for technical camera are available from most
camera vendors.
Electronic shutters
Several vendors make automatic lens controls that are compatible with the IQ backs - Please ask your dealer for more
information.
More information is available by searching for specific camera
names in the Phase One Knowledge base at:
support.phaseone.com
39
XF Camera System | System Maintenance
Maintenance
Your XF camera System generally needs very little maintenance.
However, as this is a professional tool it should be treated with
proper care and caution. Always perform test shots before a photographic session if the camera, for any reason, has not been used
for a long period of time.
Lenses
Never touch the optics of the lens with your fingers. Keep the optics perfectly clean with air, a lens brush and/or the dry lens cloth
(delivered with the lens). Do not touch the contacts.
Keep the contact interface of the XF camera system lens clean
with either a dry cloth or by using a fiberglass brush. Do not use
any other tools on the lens. The lens is not waterproof. It should
be immediately dried with a cloth if it becomes wet. If it is exposed to salt, moisten a cloth and carefully clean the lens.
Digital backs
The Phase One IQ back must have the protection plate fitted
when it is not attached to a camera. Dust may accumulate on
the IR filter of the IQ back, which will degrade the image quality if not removed. Please follow the directions included in the
Sensor Cleaning Kit that comes with the IQ back.
IR Filter on the sensor
NOTE:
A frequently used product should be inspected periodically at the nearest official Phase One repair center. Do NOT try to repair any camera,
lens or back errors or malfunctions – Please consult your local dealer.
40
The IR filter (Infrared Reduction Filter) is permanently mounted on
top of the sensor. The filter may not be removed for several reasons:
1. The focusing of the IQ back camera back is dependent on
the presence of the IR filter.
2. It is only possible to remount the filter without dust obstructing the Sensor if you have access to special clean
room facilities
3. The Phase One Product Warranty will be terminated
Learning More | XF Camera System
Phase One Customer Service
The Phase One XF is a high-performance camera designed to
endure the rigors of daily professional use under a wide range
of environments. However as a precision made optical and
mechanical device it should be protected from harsh use, and
stored carefully away from extremes of temperature and humidity
when not in use.
If the camera is to be stored for an extended period, remove
the batteries and store them safely (to prevent shorting and
the risk of fire).
In the event of damage, or if your Phase One equipment requires
servicing, please either contact Phase One or a Phase One
subsidiary at www.phaseone.com/contact
or your Phase One Partner at www.phaseone.com/partners
Phase One Technical Support
For support concerning Phase One hardware or Capture One
software, including license and activation issues, please contact
a member of the Phase One Technical Support team online at:
support.phaseone.com
If you are not a registered user, please sign up. If you have
downloaded and registered Capture One previously, you may
already have a user account with us.
Phase One Information
For various articles on Phase One products, including system
and software documentation, as well as additional resources
such as training and tutorials, or the user forum, please consult
the online Knowledge Base at support.phaseone.com
41
XF Camera System | Warranty and Uptime Guarantee
Warranty and Uptime Guarantee
Phase One camera systems come with a 1 Year Warranty or a 5 Year Warranty.
In some areas an additional 5 Year Uptime Guarantee is also available together with
the 5 Year Warranty.
Whether you have 1 Year, 5 Years and/or Uptime Guarantee is depending on your purchase.
1 Year Warranty
Items covered by the 1 Year Warranty:
Phase One XF camera body, IQ digital back, XF viewfinders, Phase One and Schneider Kreuznach lenses, when purchased as stand alone items.
Phase One XF IQ systems including:
Phase One IQ1 digital back
Phase One XF camera body
XF Prism Viewfinder or XF waist level finder
Phase One or Schneider Kreuznach lenses.
To activate the Phase One warranty, customers are required to make an online registration of the product at www.phaseone.com or through the registration option when
the camera is tethered through Capture One Pro.
General conditions
Subject to the terms contained here and below, Phase One warranties above mentioned
products manufactured by Phase One against defects in materials and workmanship for
a period of 1 year or 100.000 captures, whichever comes first from the date of purchase,
covering parts and labor for repairs. This warranty gives you specific legal rights and you
may have other rights that vary from region to region. You are urged to verify whether
any additional rights may or may not exist dependent upon your jurisdiction. However,
Phase One shall not be liable for consequential damages or loss of data. During the warranty period, Phase One undertakes at its discretion to repair or replace defective items
at no charge to the customer, when such defects are reported to Phase One within the
warranty period, and the defective part(s) are returned to Phase One no later than 30
working days after expiry of the warranty period. The customer shall cover the cost of
transportation to Phase One and Phase One shall cover the transportation costs for
returning the products after repair.
42
5 Year Warranty
Items covered by the 5 Year Warranty and 5 Year Uptime Guarantee:
Phase One XF IQ3 or XF IQ2 system, including:
Phase One IQ3 or IQ2 digital back
Phase One XF camera body
XF Prism Viewfinder or XF waist level finder
An optional number of Phase One or Schneider Kreuznach lenses purchased on the
same system order.
To activate the Phase One warranty, customers are required to make an online registration of the product at www.phaseone.com or through the registration option
when the camera is tethered through Capture One Pro.
General conditions
Subject to the terms contained here and below, Phase One warranties above mentioned
products manufactured by Phase One against defects in materials and workmanship for
a period of 5 years or 250.000 captures, whichever comes first from the date of purchase, covering parts and labor for repairs. This warranty gives you specific legal rights
and you may have other rights that vary from region to region. You are urged to verify
whether any additional rights may or may not exist dependent upon your jurisdiction.
However, Phase One shall not be liable for consequential damages or loss of data. During
the warranty period, Phase One undertakes at its discretion to repair or replace defective
items at no charge to the customer, when such defects are reported to Phase One within
the warranty period, and the defective part(s) are returned to Phase One no later than
30 working days after expiry of the warranty period. The customer shall cover the cost
of transportation to Phase One and Phase One shall cover the transportation costs for
returning the products after repair.
The warranty is limited to the repair or replacement of the faulty part. The warranty
does not cover faulty items, where the customer or a third party has attempted
without authorization from Phase One to make alterations or repairs, or if the fault is
caused by any other circumstances or equipment than the Products themselves or if
it is determined that the cause of a failure is the result of customer action or neglect
(e.g., dropping or other accident), in which case all costs will be invoiced to the
Warranty and Uptime Guarantee | XF Camera System
customer. The warranty shall cover only such defects that are due to faulty materials
or workmanship. Phase One carries no responsibility for any indirect loss, e.g. consequential loss; loss of profit; loss of data; additional costs etc. as a consequence of
deficiencies in Phase One’s deliveries.
Phase One shall have no obligation to make repairs or replacements required through
normal wear and tear or necessitated in whole or in part by catastrophe, fault or negligence of the user, improper or unauthorized use of or attempt to repair the Products
by user or others, or by causes external to the products of part thereof such as, but not
limited to, power failure or unusual environmental conditions.
Procedure for Warranty Repairs
Upon experiencing a problem with a Phase One product, an authorized Phase One
Dealer must be contacted by you to assist you in troubleshooting the problem and
if necessary in obtaining a Return Merchandise Authorization (RMA) number from
Phase One. Upon receipt by Phase One, Phase One reserves the right to determine
and will determine whether the problem lies within the warranty. When you deliver
the product to the Dealer, you must bring the original purchase information and serial
numbers, including a copy of the sales invoice. The product must be shipped for
the attention of the RMA number. Shipping costs to Phase One for RMA warranty
repair are borne by you, and any damages in shipping will be billed to you. We recommend that you obtain insurance to cover potential damages during transportation. RMA
numbers are only valid for 4 business days from the date of issuance so you must ship
within that period. If a product is returned to Phase One (a) without an RMA number
from Phase One; or (b) beyond the 4-business day period; or (c) without proper packaging, Phase One retains the right to refuse delivery of such return and thereby to void
the warranty. Thus, we suggest that you exercise great care in this process. If product is
within warranty, shipping costs in connection with the shipping of the repaired product
to you will be borne by Phase One. Otherwise shipping costs are borne by you. If you are
having image quality problems, you should always enclose image samples so that Phase
One can determine the reason underlying the problem you believe you are having. All
repairs done within warranty are covered by a normal 90-day guarantee or the balance
of the original or extended warranty, whichever is longer. Repairs done outside warranty
are covered by six (6) months warranty on the repaired part.
5 Year Uptime Guarantee - general conditions
Using the Uptime Guarantee you may request a component loan unit be sent to you
within 24 hours*. We will ship the loan unit to you using next business day morning
service at our expense.
Phase One allows you one (1) business day to verify the operation of the loan unit
and return the defective product to Phase One.
If the defective product is not returned within 1 business day, a penalty fee of
USD250/EUR200 per day for using the loan unit will be invoiced.
Under the Digital Lifetime Warranty and Uptime Guarantee, a digital back loan unit
will be available as long as the repair lasts.
After the repaired product is returned to you, the loaned product must be returned
to Phase One. Instructions for shipping the loaned product will be included with your
repaired product. Shipping and insurance costs in connection with the shipping of
the repaired product to you will be borne by Phase One. Return shipping costs of the
loaned product are borne by you and must be made within 48 hours after delivery
of the repaired product. Failure to return the loaned product in a timely manner will
result in Phase One invoicing for the loaned product in accordance with our current
list price.
*Uptime Guarantee might not be practically possible to carry out due to heavily
enforced tax regulations, in some countries. Phase One will not be liable for carrying
out the Uptime Guarantee shipments to countries where such taxation is enforced.
Please ask you Phase One representatives if you are in doubt.
Coverage of Warranty
This Warranty is the complete and exclusive statement of warranty coverage, and it
supersedes all prior oral, written, express or implied proposals and communications
pertaining to the subject matter hereof. ALL EXPRESSED
OR IMPLIED WARRANTIES FOR PHASE ONE PRODUCTS INCLUDING THE IMPLIED WARRANTIES OF MERCHANTABILITY AND FITNESS FOR A PARTICULAR
PURPOSE ARE HEREBY WAIVED subject solely to the limited warranties indicated
in this document. No warranties, express or implied, will apply after the warranty
period has lapsed.
43