1
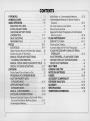
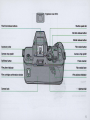
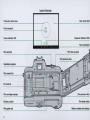
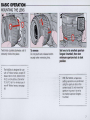
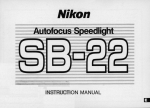
Nikon
INSTRUCTION MANUAL
~------------------ CONTENTS ------------------~
FOREWORD ........ ....... ... ...
... .......... 3
NOMENCLATURE ... ........ .... ...
... ... 4-6
BASIC OPERATION
...... 7-15
MOUNTING THE LENS ....................... . . .............. 7
INSTALLING BATTERIES ................ ....... ...
.8
CHECKING BATTERY POWER .......... .. . ... ........ 9
LOADING FILM ............................... .
..... 10-11
BASIC SHOOTING ..
... ...... 12-14
REWINDING FILM
........ ............. 15
FOCUS ..... ... .. ...
.. ...... 16-21
AUTOFOCUS ..
................. . .... 16-17
Taking Pictures with an Off-Center Main Subject.. .. . 16
Autofocu sing with AF Illuminator .............................. 17
MANUAL FOCUS WITH ELECTRONIC
FOCUSING CONFIRMATION .............................. 18
MANUAL FOCUS USING CLEAR MATTE FIELD ... 19
SPECIAL FOCUSING SITUATIONS .. .
. ... 20-21
EXPOSURE
.... 22-39
.......... 22
Shutter Speed Dial and Aperture Dial ..
PROGRAM AUTO EXPOSURE MODE .
......... 23
SHUTTER-PRIORITY AUTO
..24-25
EXPOSURE MODE ............................ .
APERTURE-PRIORITY AUTO
EXPOSURE MODE ..
....... ......... ..... . ..... 26-27
MANUAL EXPOSURE MODE ..
.28-29
EXPOSURE METERING SYSTEM ................ 30-39
Advanced Automatic Exposure Con trol with Nikon 's
Exclusive Multi-Sensor Metering System ...
...30-31
Centerweighted Metering . ... .. .. ... .. .....
....... .... 31
2
Multi-Sensor vs. Centerweighted Metering ..
.. 32 -35
Centerweighted Metering for Special Exposure
... 36-37
Situations. .............................................
AEL (Auto Exposure Lock) Button ............................ 36
Manual Exposure Mode . ....... ... .. .. ........ ...... ... ....... ... 37
Balanced Fill-Flash Photography with MUlti-Sensor
Metering System.
........ 38-39
FLASH PHOTOGRAPHy . . . . .. . . . .... . ..... 40-44
......................... 40-41
BUILT-IN TTL FLASH
Shooting Dark Subjects. ........
............................ 40
. 41
Automatic Balanced Fill-Flash Photography .. .
FLASH PHOTOGRAPHY USING EXTERNAL
SPEEDLIGHT ..
... 42 -43
SHUTTER SPEED - FLASH MODE COMBINATIONS FOR EACH EXPOSURE MODE ............ 44
READY-LIGHT WARNINGS
....................... 44
SELF-TIMER ... ......... ..... ...
... ..... ..... 45
CAMERA CARE TIPS .. ............... ............... ... .. 46-47
NOTES ON BATTERIES .... ... .. .. ....... ... .. .... , ............ .. .. 48
LENSES ...... .. ....... ... ..................... ........ .. ... .. ........... 49-50
ACCESSORY COMPATIBILITy..................
... .. . 51
EXPOSURE VALUE (EV).. .. ... ... .... .... ....... .. .. .... 52-53
GLOSSARY ... ... ...... .. ..... ... ... ... ..... ... .. .. ... .. .. ..... .. .. ... 54-55
.56-58
SPECiFiCATIONS ......... ... ....................
VIEWFINDER INFORMATION .......... .. .......... .. .... ... ... 59
~--------FOREWORD --------~
Thank you for purchasing this Nikon product. We hope you enjoy
the Nikon N4004s, and we're sure it will make photography a
bigger part of your life. For the first time ever, we are incorporat·
ing Nikon's exclusive Decision Master System, a complete system
that integrates camera and lens computers to give you automatic
control of all picture taking operations, and makes the Nikon
N4004s an absolute joy to use.
Get to know your N4004s, but before using it, be sure to read
this manual thoroughly.
Nikon cannot be held responsible for malfunction resulting
from the use of the Camera other than as specified in this manual.
Your Nikon camera requires precise electronic and mechanical matching
between component products -such as lenses and electronic flash. Nikon
brand lenses and electronic flash units are made to Nikon's factory specifica·
tions and will operate properly and in accordance with the Nikon Limited
Warranty that was provided with your products.
Damage to your Nikon product, as a result of malfunction or improper connections, caused by the use of Non-Nikon brand products, is not covered
under the terms of the Nikon Limited Warranty and will void the Nikon
warranty.
3
NOMENCLATURE
Focusing ring
Distance scale window
Focal length scale
Aperture indexes
Aperture ring
Meter coupling ridge
Lens (AF Zoom·Nikkor 35 - 70mm fl3.3 - 4.5)
Distance scale
Distance/local length index line
Zoom ring
Aperture scale
Minimum aperture lock
AF contacts
Flash head
Self·timer indicator LED
AEL (Auto Exposure Lock) button
Aperture coupling lever
Handgrip
Battery ohamber
Minimum aperture lever
AF coupling
Tripod socket
4
AF contacts
Lens mounting index
Lens release button
Focus mode selector
Camera back lock release
Lens release pin
Lens mounting flange
Reflex mirror
[[QJ]
Flash lock-release buttons
Eyepiece cover DK-5
Shutter speed dial
Dial lock-release button
Shutter release button
Accessory shoe
Camera strap eyelet
Self-timer button
Film plane indicator
Film cartridge confirmation window
Camera back
Film rewind button
Camera strap eyelet
Frame counter
Film rewind lever
Film advance indicator
Aperture dial
5
Inside Viewfinder
12mm·dia. central area
Clear matte field
Focus brackets
Focus indicator LED
Exposure indicator LEOs
Flash ready·light
Film sprocket
Film take·up spool
Film pressure plate
Viewfinder eyepiece
Film rewind fork
OX contacts
Film cartridge chamber
Shutter curtains
Film guide rails
6
Film pressure roller
Film leader index
Battery chamber lock release
BASIC O P E R A T I O N - - - - - - - - - - - - - - - - - MOUNTING THE LENS
Twist lens counterclockwise until it
securely clicks into place.
To remove
Do not push lens release button
except when removing lens.
Set lens to its smallest aperture
(largest f·number), then turn
minimum aperture lock to lock
position .
••••••••••••••••••••••••
••
•••
•
••
••
••
••
•
••••••••••••••••••••••••••••
The N4004s is designed for use
with AF Nikkor lenses, except AFNikkor BOmm f/2 .B, 200mm f/3 .5
IF-ED, and Autofocus Converter
TC-16ITC-16A. For limited use of
non-AF Nikkor lenses, see page
49.
••••••••••••••••••••••••
:
:
•
:
•
:
•
With the N4004s, all aperture
setting operations are performed
using the aperture dial on the
camera body. Do not move lens '
aperture ring once it is set to
its smallest aperture (largest
I-number).
••
•••••••••••••••••••••••••
7
INSTALLING BATTERIES
3
Open the battery chamber lid by
sliding the lock release.
Install four fresh AA-type batteries
with "+ " and " - " ends positioned as
shown inside the battery chamber.
••••••••••••••••••••••••
•
Batteries with a "+ " terminal ex:
ceeding 6mm in diameter cannot
be used.
•
:
•
••
•
••••••••••••••••••••••••
8
Close the battery chamber lid.
CHECKING BATTERY POWER
6
~-----------
Exposure indicator LED(s) lights up or
blinks if power is sufficient, and stays
on approx. 8 sec. after you take your
finger off the button.
Lightly press shutter release button
and check viewfinder exposure indicator LED(s) to make sure battery
power is sufficient.
•••••••••••••••••••••••••
:
:
•
:
•
:
Battery power can also be
checked by film advance speed,
operation speed of autofocus lens
or flash recycling time. When
these become noticeably slower,
c hange batteries.
:
:
•
:
•
:
If LED goes off approx. 2 sec. after finger is removed
from button, batteries need replacement.
No LED, and shutter locks.
Check battery installation
or change batteries.
•
• • ••••••••••••••••••••••••••••••••••••••••••••••••••
••
• : The microcomputer in the N4004s may turn the camera off, even when
:
:
•••••••••••••••••••••••••••• : batteries with sufficient power are properly installed. To start or resume
•
operation , remove batteries and install again.
•
••
••
•••••••••••••••••••••••••••••••••••••••••••••••••••
9
LOADING FILM
7
Slide down camera back lock release
to open camera back.
Insert film cartridge.
• •••••••••••••••••••••••
• Use on ly OX-coded fi lm.
• Usable film speed range for
OX-coded film is ISO 25 to 5000 .
• All non-OX-coded films are
automatically set to ·ISO 100.
• Avoid loading/unloading in direct
sunlight.
•••••••••••••••••••••••
10
Pull film leader out to red index mark.
Check to make sure film is positioned
properly, with no slack.
Close camera back and confirm lockrelease snaps closed .
Fully depress shutter release button
to automatically advance film to
frame "1 ."
Observe film advance indicator rotation to confirm proper film installation
and transport.
11
BASIC SHOOTING
The Nikon N4004s offers both auto
and manual focusing. It also gives
you three auto exposure modesprogram auto, aperture-priority auto,
shutter-priority auto-plus manual
exposure control.
The following instructions are for
autofocus shooting in program auto
exposure mode with an AF Nikkor
lens. Program mode is the easiest to
use and most automatic exposure
mode.
For details about other focusing
methods and exposure modes, see
pages 18 to 21 and 24 to 29,
respectively.
••••••••••••••••••••••••
••
:
•
••••••••••••••••••••••••
•••
•••
••
••
••
••
•
•
When both A and S are set,
program auto mode is in
operation.
12
•
••
••
The shutter dial locks at the A or L
position, and the aperture dial
locks at the S position. To release
them , rotate the shutter or
aperture dial while pressing the
dial lock-release button.
••
•••
••
•••
•
••••••••••••••••••••••••• ••••••••••••••••••••••••
Confirm lens is set to smallest
aperture (largest f-number); if
lens is incorrectly set, the
shutter release locks and +
and - LEOs blink alternately.
Set focus mode selector to A
(autofocus ).
If the lens in use has an A-M switch ,
set the switch to A.
Set shutter speed dial to A, and
aperture dial to S.
Aim camera at the subject.
16
Lightly press the shutter release
button .
Position the viewfinder focus
brackets on the main subject.
Confirm the green focus indicator
LED . and the red exposure
indicator LED 0 light up .
••••••••••••••••••••••••••••••••••••••••••••••••••••••••••••••••••••••••••••••
••
•
••
••
••
••
•
••
+
••
•
•
••
••
••
•
••
•
•
* Shutter is locked.
•
•
••
•
••
•••••••••••••••••••••••••••••••••••••••••••••••••••••••••••••••••••••••••••••••••
••
•••
•
•••
•
••
•••
•
• If focus indicator LED • blinks,
see page 20.
• If subject moves and the focusing
distance changes , refocus by
briefly removing finger from
shutter release button and lightly
pressing again to reactivate
autofocus function .
•
Picture blur possibility (shutter speed is 1/30 sec. or
slower). Use tripod to avoid camera shake, or use built·in
TTL flash or accessory Nikon speedlight to synchronize
shutter speed at 1/100 sec.
2)
lights up' Overexposure warning. Too brigh~-very rare condition ;
use film with lower ISO speed.
3) - lights up' Underexposure warning. Too dark-use built'in flash or
accessory Nikon speed light.
4) J blinks
Use built·in TTL flash or accessory Nikon speedlight.
1) 0 blinks
13
••••••••••••••••••••••••••••••••••••••••••••••••••••
:
Flash shooting with built·in TTL flash
•••
••
••
••
••
:
•••
•••
•
•
1. Push flash lock release
buttons to release built-in flash.
Check to make sure subject is
within proper flash shooting range
for film speed in use. If subject is
beyond flash shooting range,
ready-lig ht LED blinks for approx.
3 sec. after releasing the shutter.
For details, see page 40.
3. Wait a few seconds for readylight to come on , then shoot.
••••••••••••••••••••••••••••••••••••••••••••••••••
14
Fully depress shutter release button
to take picture. This automatically
advances film by one frame .
2. Lightly press shutter release
button to turn on the N4004s.
••••••••••••••••••••••••
•
• Upon shutter release, the exposure indicator LED(s) turns off
approx. 2 sec. after you remove
your finger from the button .
-I f camera detects abnormality
during fi lm advance (when film
is loaded), the self-timer indicator LED lights up for a few
seconds. If this happens, set
the shutter speed dial to L
(lock), then proceed as usual.
•••
•
•••
••• •••••••••••••••••••••••
••
••
•••
•
--
REWINDING FILM
The film advance stops automatically at the end of the roll.
Then, the self-timer indicator LED
lights up for a few seconds and the
shutter locks .
While sliding film rewind lever, push
the film rewind button .
After rewinding stops (automatic),
confirm film frame counter has
returned to "S".
•••••••••••••••••••••••••
•••
•
••
••
•
•••
•
••
••
••
••
••
••
••
•
•
•
•••••••••••••••••••••••••
If you do not rewind the film when
you come to the end of the roll ,
each time the shutter rel ease
button is depressed, the self-timer
indicator LED lights up for a few
seconds to remind you to rewind
it.
Open camera back and remove film
cartridge.
15
FOCUS,---------------------------------------------
AUTOFOCUS
In autofocus mode, the shutter cannot be
released until the subject is correctly
focused , and once in focus , the foc us is
locked as long as the shutter release
button remains lightly pressed.
Taking Pictures with an Off· Center Main Subject
1. Center the focus brackets on the subject and lightly press the
shutter release button.
2. Confirm the focus indicator LED lights
up.
16
3. Keeping the shutter release button lightly pressed, recompose
and fu lly depress the shutter release button.
Autofocusing with AF Illuminator
II existing light is insufficient lor autolocus operation:
1. Mount Nikon Autolocus Speed light S8·24/S8·23/S8-22/
S8-20 on the accessory shoe 01 the N4004s.
2. Lightly press the shutter release button.
3. The speedlight's AF illuminator lights up to start autofocus
operation. For details, see speedlight instruction manual.
17
MANUAL FOCUS WITH ELECTRONIC FOCUSING CONFIRMATION
~------------------------~
1. Set focus mode selector to M (manual).
If the lens in use has an A-M switch, set
the switch to M.
2. Look inside vewfinder and center the
4. Keeping the shutter release button lightly pressed, watch the focus indicator LED in
the viewfinder and rotate the lens focusing ring manually until the focus indicator
LED lights up.
18
3. Lightly press the shutter release button.
focus brackets on the main subject.
5. Fully depress the shutter release
button.
MANUAL FOCUS USING CLEAR MATTE FIELD
1. Set the focus mode selector to M
(manual).
2. Focus subject using the clear matte field.
19
SPECIAL FOCUSING SITUATIONS
Autofocus operation and electronic focusing con firmation
depend upon the general lighting of the scene, subject contrast
and details, and other technical points. Under certain conditions,
the au tomatic focusing system /elec tronic focusing confirmation
may experience difficulty. In these ci rc umstances, we recom·
mend you focus manually using the clear matte field.
Focus indica tor LED blinks or disappears wi th the following
subjects:
1) Very dark subject
Focu s manually, or for autofocus, focu s on another, brighter
subject located at the same distance , or use accessory Nikon
Autofocus Speedlighl S8 ·24, S8 ·23, S8 ·22 or S8 -20. (No other
flash unit can be used.)
2) Low·contrast subject
Focus manually, or for autofocus, focus on another subject
located at the same distance-but with more con trast-un til
the green focus indicator LED appears.
20
3) Subject with no v~rtical lines
Turn the camera sideways to focus, or focus manually. You
may also select autofocus, then focus on another subject
with vertical lines located at the same distance.
In the following situations, ignore focus-indicator LED and focus
manually using the c lear matte field.
1) When shooting the following :
• Very bright subject with shiny surface, such as silver or
aluminum.
• Strongly backlit subject.
• Scene with subjects located at different distances.
2) When using a polarizing filter. (Circular polarizing filter can
be used for autofocus operation.)
21
EXPOSURE----------------------------------------Exposure control consists of two parts-aperture control and
shutter speed control. The aperture works basically the same
way as the iris of the human eye and controls the amount of
light passing through the lens. The shutter, located in the
camera body, varies the amount of light admitted to the film by
opening and closing at different speeds. Together, these two
controls determine the amount of light that strikes the film,
resu lting in exposure control.
Using the shutter speed and aperture dials of the N4004s, you
can select three different automatic exposure control modes
and one manual mode.
Shutter Speed Dial and Aperture Dial
Always set dials at click-stop positions-never in-between.
The shutter dial locks at the A or L position, and the aperture
dial locks at the S position . To release them, rotate the shutter
or aperture dial while pressing the dial lock-release button.
Shutter Speed Dial
Lock shutter releasel
turn off power
Shutter speed settings
(1-1/2000 sec .)
Time exposures
Aperture Dial
Aperture settings
(t/l.4-32)
Intermed iate settings
Shutter speed dial
A
1-2000
22
Aperture dial
Exposure mode
S
Program auto
S
Shutter-priority auto
A
1.4 - 32
Aperture·priority auto
S,I-2000
1.4 - 32
Manual
PROGRAM AUTO EXPOSURE MODE
Program auto is the easiest exposure mode to use, since it
controls both aperture and shutter operation. The microcomputer
in the N4004s automatically sets the best combination of
shutter speed and lens aperture, and matches these with the
correct dual program (normal or high speed) for the lens in
use. Normal program is selected for lenses with focal lengths
shorter than 135mm. High -speed program is selected for lenses
with longer focal lengths to reduce the possibility of blurred
pictures due to subject movement or camera shake. With zoom
lenses, either normal or high-speed program will be selected,
depending on the focal length setting.
The EV (Exposure Value) chart demonstrates the difference
between normal and high-speed programs of the N4004s.
Follow either colored line to where it intersects a diagonal line.
This shows the combination of aperture (vertical line) and
shutter speed (horizontal line). For example, at a brightness of
EV10, the N4004s selects f/2 .8 and 1/125 sec. with AF 180mm
f/2 .8 lens at ISO 100, or f/4 and 1/60 sec. with an AF 50mm
f/1.4 lens at ISO 100.
Dual program chart
10
II
12
13
14
15
16
17
IB
19
20
21
(Shutter speed)
- - - Normal program (with AF 50mm 1/1.4 lens at ISO 100)
- - - High-speed program (with AF 180mm 1/2.8 lens at ISO 100)
23
SHUTTER-PRIORITY AUTO EXPOSURE MODE
This mode lets you choose shutter speeds manually, so you can freeze the action with
sharp, clear outlines using fast shutter speeds, or create motion effects by choosing
slower shutter speeds. The microcomputer in the N4004s automatically selects the
correct aperture to match the shutter speed you set.
At a fast shutter speed
1. Set aperture dial to S.
2. Set shutter speed dial to desi red speed.
At a slow shutter speed
24
3. Look inside viewfinder and lightly press the shutter release
button .
4. When the exposure indicator LED lights up, fully depress the
shutter release button .
If exposure indicator LED 0 does not light up:
+
lights up"
Select a higher shutter speed
lights up"
Select a slower shutter speed, or use built·in flash or
speedlight
+ /- blink alternately"
+ /- disappear"
Set lens to its smallest aperture setting
Shutter dial is set to "8" ; select other position
• Shutter is locked.
25
APERTURE-PRIORITY EXPOSURE MODE
The microcomputer in the N4004s automatically selects the correct shutter speed to
match the aperture you set. This is the recommended mode when depth of field is
your prime consideration. To create softer, less distinct backgrounds, as in portraitures,
use wider apertures. For overall sharp, clear pictures, such as scenic photography,
use smaller apertures.
At wide aperture
1. Set shutter speed dial to A.
2. Set aperture dial to desired f·number.
At small aperture
26
3. Look inside viewfinder and lightly press shutter release button .
4. When the exposure indicator LED lights up, fully depress the
shutter release button.
•••••••••••••••••••••••••••••••••••••••••••••••••••••••
•
••
••
••
••
••
••
••
••
If exposure indicator LED O does not light up:
o
blinks
Picture blur possibility (shutter speed is 1/30 sec. or
slower). Select faster aperture setting (smaller f·number),
or use a tripod to avoid camera shake.
+
lights up'
Select slower aperture setting (larger f·number)
lights up'
Select a faster aperture setting, or use built·in flash or
speedlight.
+ /- blink alternately'
Set lens to its smallest aperture setting.
•• • Shutter is locked.
••
•
•••••••••••••••••••••••••••••••••••••••••••••••••••••••••••
• ••••••••••••••••••••
•
••
••
••
••
••
•••
•
•
••
••
••
•
••
••
••
•
••••••••••••••••••••••
•
••
••
If aperture dial is set beyond
lens' aperture range ,
aperture is automatically
adjusted to minimum or
maximum setting , which·
ever is nearest, and correct
shutter speed is selected
accordingly.
27
MANUAL EXPOSURE MODE
In manual exposure mode, both shutter
speed and aperture can be set manually
according to the desired effect. Use fast
shutter speeds to stop the action, slower
speeds to create motion effects or less
distinct outlines. Manually setting the
exposure mode also lets you control
depth of field, either by softening the
background so the main subject of the
picture stands out, or by creating overall
uniform sharpness.
,----------------,
1. Set shutter speed dial to desired speed.
2. Set aperture dial to desired f-number.
3. With your eye on the viewfinder, lightly press the shutter release button.
28
4. Rotate either shutter speed dial or aperture dial until exposure indicator LED lights
up .
button .
••••••••••••••••••••••••••••••••••••••••
•
5. Fully depress the shutter release
• ••••••••••••••••••••
• If aperture dial is set be•
••
•
•
lens' aperture range,
+ Overexposure warning + 1EV• yond
•
aperture is automatically
+ 0 Overexposure warning + 1/3EV - + 1EV
•• adjusted to minimum or
•
o Correct exposure
- 1/3EV- +1/3EV
maximum setting, which••• ever is nearest.
o - Underexposure warning -1 EV- - 1I3EV
••
- Underexposure warning -1EV
•
'Shutter does not lock in any of these cases.
••
•
•
•••••••••••••••••••••••••••••••••••••••••••••••••••••••••••••••
•• ••
+ or -
LED lights up in the following cases' :
29
EXPOSURE METERING SYSTEM
Advanced Automatic Exposure Control wit.h
Nikon's Exclusive Multi-Sensor Metering System
Total Light Control
YES
Multi-Sensor
Light Metering
NO
The automatic exposure control system of the N4004s uses
Nikon 's exclusive new light metering system featuring a multi
sensor that ensures correct automatic operation in program,
shutter-priority and aperture-priority modes. Light is evaluated
froin three separate areas of the picture : left, right and center,
The camera 's microcomputer then classifies the light pattern
into one of several groups and sets the correct exposure.
For scenes with low lighting (below EV10), the ready-light in the
viewfinder blinks to recommend you use the built-in flash or an
accessory speedlight. If you accept this recommendation and
decide to use the flash , the flash will be controlled by the
camera's precise TIL (Through The Lens) measuring system.
You may also ignore the recommendation and choose to take
the picture using available light.
The ready-light also blinks to recommend flash use for bright
scenes (EV10 or higher at ISO 100) where the sun is behind the
subject (subject is silhouetted and at least approx. 1.5 EV darker
than the background). When the flash is used under these conditions, we call it " balanced fill-flash. " Automatic balanced fillflash can be used at your discretion, even when the viewfinder
ready-light does not blink. You may also ignore the blinking flash
ready-light, and take an available-light picture.
30
O
Judged automatically
by DeciSion Master
System
Of"
Photographer's
Choice
~
NO
~
#Flash~
NO
Recommended : YES
E-------+--------
~¥
NO
In short, just by composing the picture and pressing the shutter
release, the N4004s automatically gives you excellent results,
even in difficult lighting situations which might otherwise require
complicated exposure techniques.
Centerweighted Metering
~~~
Rec~mmen~ed: YES
--~ev
not?
Activate Built-in
Flash (~r optional
5peedhght 5B-24,
5B-23, 5B-22,
5B-20 etc.)
f---
Balanced
Fill-Flash
NO
Activate Built-in
Flash (or optional
5B-23, 5B-22,
5B-20 etc'>
Automatic
TTl Flash
o
In manual exposu re mode or when the AEL button is used in
program , shutter-priority or aperture-priority auto exposure
mode, the camera automatically switches to centerweighted
metering. Centerweighted metering places special emphasis on
brightness within the 12 mm-diameter central area of the viewfinder, and is recommended for creating special effects.
Multi5ensor Auto
Exposure
Metering
31
Multi·Sensor Vs. Centerweighted Metering
Scene containing the sun
In scenes with both very bright and very dark areas, these two
metering systems produce va rying results . For example:
1. Scene containing the sun or with high reflectivity
If a scene contai ns highlights, such as the sun, snow or bright
reflections, centerweighted metering renders the main subject
as a silhouette. With Nikon 's advanced multi-sensor metering,
however, the light value of darker parts is evaluated, resu lting in
an overall well-balanced exposure.
2. Outdoor backlit subject
With centerweighted metering, a backlit subject or scene with
people against a bright sky and/or clouds may lead to an
underexposed shot. With multi· sensor metering, however, the
camera automatically gives more exposure to dark subjects to
ensure a correct overall exposure.
3. Front·lit subject against dark background
If a brightly lit off-center subject is positioned against a dark
background, centerweighted metering places too much
emphasis on the dark center of the picture. So although the
background is correctly exposed, the main subject will be
overexposed. Multi-sensor metering, however, automatically
integrates the dark background with the bright subject to
ensure the best overall exposure.
Centerweighted metering
32
Outdoor backlit subject
Front-lit subject
Centerweighted metering
Centerweighted metering
33
4. Small dark subjects against a bright background
A subject significantly smaller than anyone of the multi-sensor
areas may not be recognized and integrated into the automatic
exposure evaluation . For such subjects, we recommend you
use either the AEL or manual exposure control for centerweighted metering .
Centerweighted metering (w/AEL button)
Main subject is correctly exposed. For details,
see page 36.
Centerweighted metering (w/o AEL button)
34
5. Sunset scenes
When you want to emphasize a dramatic sunset, but don't want
the Decision Master System to lighten the scene for dark fore ·
ground subject, use the AEL or manual exposure control for
centerweighted metering.
Centerweighted metering
35
Centerweighted Metering for Special Exposure Situations
AEl (Auto Exposure lock) Button
1. Center main subject inside viewfinder
or move in closer.
2. Lightly press shutter release button .
3. While lightly pressing shutter release
4. Recompose and shoot.
button, depress the AEL button and
hold it in.
36
Manual Exposure Mode
1. Center main subject inside viewfinder, and lightly press the
shutter release button.
3. Confirm the exposure indicator LED
2. Adjust the shutter speed and aperture for correct exposure.
4. Recompose and shoot.
lights up.
37
Balanced Fill-Flash Photography with
Multi·Sensor Metering System
Other automatic fill-flash systems do not consider background
lighting. Although they often result in we ll exposed subjects, the
background may be terribly washed out or dark.
The N4004s Decision Master System uses special multi-sensor
light metering to evaluate such conditions and perform "Balanced
Fill-Flash." This means it controls the flash exposure so the
main subject is well exposed, and at the same time controls the
background exposure. With this system, both the main subject
and the background are correctly exposed, producing a much
more pleasing picture.
To avail yourself of this feature and brighten a subject which
might otherwise come out dark due to available light conditions,
simply use the Decision Master System 's automatic balanced
fill-flash capabi lity. This system produces balanced fi ll-flash
when shooting within the flash's normal operating range .
Centerweighted meteri ng
Balanced fill-flash
-
Conventional fill-fl ash
38
Here's how it works. In program, aperturepriority or shutter-priority auto exposure
mode, metering system of the N4004s
automatically detects situations which
benefit from balanced fill-flash and
activates the blinking viewfinder ready-light
indication to recommend you use the
camera's built-in flash or an accessory
Nikon speedlight. For automatic balanced
fill-flash , first set the camera in program
auto exposure mode, then follow these
procedures :
1. Push flash lock-release buttons to
release built-in flash .
2. Lightly press shutter release button to
turn on the N4004s.
••••••••••••••••••••••••
Check to make sure the subject is
within proper flash shooting range
for film speed in use. For details,
see pages 40 and 41 .
••
•
••
••
••
•
••••••••••••••••••••••••
.,-...
3. Confirm ready-light comes on, and
shoot.
39
FLASHPHOTOGRAPHY-------------------------------When existing light is insuffic ient for normal shooting or when
shooting a dark subject against a bright background (i.e., subject
positioned against a bright window), the ready-light indicator LED
inside the viewfinder blinks to indicate you should use the built-in
TTL flash or an accessory Nikon speedlight.
Shooting Dark Subjects
BUILT-IN TTL FLASH
In programmed TTL auto flash photography, the N4004s automatically adjusts the shut1er speed to 11100 sec'. and selects
the appropriate aperture according to the speed of the film in
use (ISO).
The built-in TTL flash of the N4004s performs as follows:
Guide number : 12 (ISO 100, meters)
Angle of coverage: 35mm lens or longer
Usable lenses :
AF
AF
AF
AF
AF
AF
AF
AF
3Smm 112
AF 50mm 111.4
AF SO mm 111 .8
8Smm 111 .8 AF 180mm 112.8 AF 300mm 114
24 -SOmm 113.3-4.S (local length 35 mm or longer)
28-8Smm 113.S-4.S (focal length 3Smm or longer)'
3S- 70mm 112.8"
AF 3S- 70mm 113.3-4.S
3S-10Smm 113.S-4.S·"
AF 3S-135 mm 113.5-4.S·· ..
70-210mm 114-S.6
AF 75-300mm 114 .5-5.6
80-200mm 112.8·....
AF Micro 55mm 112.8
'Cannot be used lor shooting a subject at 2m or closer at
35mm local length. Macro locusing is impossible.
"Cannot be used at 50 mm or shorter local length because
vignetting occurs.
... Macro locusing is impossible.
.... Cannot be used near the closest locusing distance (1.5 m) at
35 mm local lenth because vignetting occurs. Macro locusing is
impossible.
• .... Cannot be used lor shooting a subject at 2m or closer at
80mm local length .
• Do not use a lens hood ; it could cause slight vignetting .
• All lenses above cannot be used at locusing distance shorter than the
flash shooting range.
40
In all exposure modes, with a subject darker than EV10 at ISO
100, the ready-light LED blinks.
Programmed TTL auto flash photography in program and
shutter-priority auto exposure modes
' 11 shutter speed is set to S, or to 1160 sec. or slower in shutter-priority
exposure mode, shutter lires at the speed set, and correct aperture is
selected accordingly.
The usable ranges for film speed, aperture and shooting distance in programmed TTL mode are as follows.
ISO
2S
I so I
100
Aperture
1.4
I
2.8
Shooting Range
2
I
I
I
200
4
I
I
400
5.6
Approx . 1.4-4 .2 m
• Ready-light blinks when using lilm with ISO speed over 400.
"When using a lens with a slower maximum aperture (la rger
F-number) than the numbers listed above, the aperture will be
automatically set to the lens' maximum aperture, thus shortening
the shooting range. (i.e., il maximum aperture is 113.5 and lilm speed
is ISO 100, aperture is set to 3.5 instead 01 11 2.8). For longer Ilash
shocting distances (up to 4.2 m), use lilm with a speed 01 ISO 400.
TTL auto flash photography in aperture-priority auto and
manual exposure modes
In aperture-priority auto mode, the N4004s automatically
adjusts the shutter speed to 11100 sec _In manual mode, when
shutter speed dial is set at from 1/125 to 1/2000 sec., the shutter
is automatically set to 11100 sec., and if set below 1/60 sec.,
the shutter operates at the speed set. To perform TTL auto flash
photography, set the camera 's aperture dial to the correct
aperture for flash-to-subject distance and depth of field.
Usable apertures/shooting distance range in TTL mode
ISO film speed
Q.
0
~
400
200
100
50
25
2
2.B
4
5.6
-
-
-
-
2
2.B
4
B
5.6
11
B
16
11
22
16
-
22
Shooting distance range
(m)
2
2.B
B
2.B
4
5.6
11
B
5.6
4-12
2.B-B.5
2-6
1.4 - 4.2
1-3
0.7-2.1
0.6-1 .5
0.6-1 .1
16
11
B
0.6-0.B
2
2.B
4
5.6
2
-
4
The maximum shooting distance is estimated by guide
number:
Guide Number (GN)
Full Aperture
Maximum shooting distance
i.e., f/3.5 lens at ISO 100, Guide Number 12:
12
3:5=3.4m
Automatic Balanced Fill-Flash Photography
In program, aperture-priority or shutter-priority auto exposure
mode, when shooting a scene with a brightness of EV10 or
higher (at ISO 100) where the subject in the central area of the
triple sensor is darker than other areas by more than approx.
1.SEV, the ready-light LED blinks to tell you to use built-in TTL
flash or accessory Nikon speedlight for fill-in lighting.
For automatic balanced fill-flash photography, first set the
camera in program auto exposure mode so correct aperture
is automatically selected for the scene's background, using a
synchronized camera shutter speed of 1/100 sec. The multisensor meter of the N4004s measures contrast and brightness
for both subject and background, and automatically adjusts
speed light output so you get good overall pictures without
complicated techniques.
Maximum shooting distance for balanced fill-flash
photography
Near a window
Approx.3m
Approx.2 m
Normal outdoor shot
Approx. 1.5 m
Scene con taining the sun
• For scenes where the sun, a shining sea or a bright sky covers
a large part of the background, the camera automatically
selects smaller apertures, and because the power of the builtin flash is limited, the results may be insufficient. If the readylight blinks after shooting, move closer to the main subject or
use an external speedlight with a larger guide number.
• With scenes where the background is extremely bright, the
ready-light may not blink after the shot, even if the flash is
insufficient for correct exposure.
41
FLASH PHOTOGRAPHY USING EXTERNAL SPEEDLIGHT
The accessory shoe of the N4004s enables you to directly
mount Nikon dedicated electronic flash (speedlights). Nikon
Speedlights S8 -24, S8 -23, S8 -22, S8 -20, S8 -15, S8 -168 or
S8 -18, enable you to use programmed TTL auto mode in
program or shutter-priority auto exposure mode. In aperturepriority auto or manual mode, you can use TTL automatic
mode. Automatic balanced fill-flash is also possible with
external speedlight.
An external speedlight cannot be used when the built-in speedlight of the N4004s is turned on. (They cannot be used
simultaneously.)
••••••••••••••••••••••••••••••••••••••
• • For details on speedlight operation, see instruction
•••
••• manual for speedlight.
•
•• • Use Nikon Speedlights. Other units may damage the ••
ra 's electrical circuit due to incompatible voltage
•• came
••
requi rements.
•
••
••
••
•••••••••••••••••••••••••••••••••••••••
42
Nikon N4004s/Speedlight Unit Combination Chart
Nikon Speed light
Connection
Usable Flash Mode
SB-24'
SB-22'
SB-20'
SB-15
SB -16B
Direct
Programmed TTL auto ,
TTL auto, non-TTL auto,
manual
SB-23'
Direct
Programmed TTL auto,
TTL auto, manual
SB-19
Direct
Non-TTL auto
SB-17
SB-16A
Via flash unit coupler
AS-6
Non-TTL auto, manual
SB-l1
SB-14
SB-140*'
Via SC-13 Sensor
Remote Cord or AS-15
Hot-Shoe Adapter
Non-TTL auto, manual
SB-21A121B
Direct
Manual
Medical-Nikkor
120mm f/41F
Vi a 3-pin sync cord
SC-22 (provided)
Guide number system
, Autofocus flash photography pOSSible .
"For ultraviolet or infrared photography, use manual mode.
The following instructions are for programmed TTL auto and
TTL auto flash shooting only.
Programmed TTL Auto Flash Photography
••••••••••••••••••••••••••••••••••••••
•
• Usable film speed range for TTL flash photography is
ISO 25 to 400.* Ready-light blinks when film speed is
beyond ISO 400.
• The AF illuminator on the S8-24, S8-23, S8 -22 and
S8-20 enables the N4004s to perform autofocus
operation even in total darkness.
• For non-TTL auto or manual flash shooting with
external speedlight, set camera to either aperturepriority auto or manual exposure mode. If camera is
set to program or shutter-priority auto mode, aperture
cannot be set manually, and the shutter locks.
In this mode, the camera automatically selects the correct
programmed aperture for the film speed in use.
1. Set the N4004s to program or shutter-priority auto
exposure mode.
2_ Set the speedlight's mode selector to " TTL".
3. Turn speedlight on.
4. Compose and lightly press the shutter release button.
5. Confirm the following viewfinder information, and shoot.
Focus indicator LED Lights up (autofocus mode).
Ready-light LED lights up.
TTL Auto Flash Photography
••
•
* ISO 25 to 1600 for non-TTL and manual flash
••
photography.
•••
•••
•••••••••••••••••••••••••••••••••••••
1. Set the N4004s to aperture -priority auto or manual
exposure mode.
2. Set the speedlight's mode selector to "TTL".
3. Turn speedlight on.
4. Select appropriate aperture referring to speed light's
indication, and set the aperture dial.
5. Lightly press the shutter release button to turn on the camera.
6. Confirm ready-light lights up, and shoot.
The usable ranges for film speed and aperture in TTL mode are
as follows :
ISO
25
50
100
200
400
Aperture
2.8
4
5.6
8
11
43
SHUTTER SPEED-FLASH MODE
COMBINATIONS FOR EACH EXPOSURE
MODE
Exposure mode
Program auto
Aperture
diat
Shutter diat
Shutter
speed
setting
S
A
1/ 100'
1/ 125- 1/ 2000
1/100'
Shutter-prlOlity
auto
S
Aperture-pllollty
auto
1.4 - 32
Manual
1 4 - 32
B. 1 - 1/ 60
A
1/ 125-112000
B. 1 -1 / 60
Auto fl ash mode
Programmed TTL auto
(auto aperture setting )
Before shooting
J disappears
Recharging (with built-i n flash, shutter locks ;
does not lock with external speedlight)
J blinks
8eyond acceptable fi lm speed range for TTL
photography (ove r ISO 400)
S8 -19's camera selector is set to 8 or 8
(EM)'
J lights up
External speedligh t not set to TTL *
as set
1/ 100' TTL auto
(man ual aperture
1/ 100' sett ing)
as set
* Automatically set by camera .
The above chart applies to both built-in TTL flash and external
speedlights.
44
READY-LIGHT WARNINGS
When using the built-in TTL flash or accessory Nikon speedlights,
the ready-light LED in the viewfinder of the N4004s lights up
when the flash is recycled _The following ready-light indications
are used for warnings :
After shot
* For details, see page 59.
J blinks
Light may be insufficient for correct
(approx. 3 sec.) exposure ; con firm shooting distance range
SELF·TIMER----------------------------------------
1. Compose picture and confirm focus
2. Press self·timer button . Self·timer indicator LED starts blinking and shutter is
and exposure.
released after approx. 10 sec. For final two seconds, the LED lights up.
• ••••••••••••••••••••••••••••••••••••••••••••••••••
••
••
••
••
•
•••••••••••••••••••••••••••••••••••••••••••••••••••
~
o
III
••
3. To cancel self·timer after activating,
press button again.
In program, shutter'priority, or aperture'priority auto exposure
mode, use eyepiece cover DK·5 to prevent stray light from
entering the viewfinder.
<I>
•••••••••••••••••••••••••••••••••••••••••••••••••••
••
••
:
••
•
•••••••••••••••••••••••••••••••••••••••••••••••••••••••
In self·timer operation, the shutter is released whether subject is in focus or not.
To assure focused image, focus the subject before pressing the self-timer button.
45
CAMERA CARE T I P S - - - - - - - - - - - - - - - - -
1. Never touch the reflex mirror. focusing
screen or AF contacts. Remove dust
with a blower brush.
2. Never touch the shutter curtains.
3. Never touch the OX-contacts. Keep
clean with blower brush .
in a spiral motion from center to periphery. Be careful not to leave traces.
7. Clean the viewfinder eyepiece with a
soft , clean cloth. Do not use alcohol.
46
8. Clean glass surfaces such as the lens
with a blower brush ; avoid using lens
tissue as much as possible. To remove
dirt and smudges, use soft cotton
moistened with pure alcohol and wipe
Caution
A spray gun-type blower may damage
the glass if used to clean the lens,
especially when ED glass is used for
the front lens element. To avoid
damage, hold the blower upright with
its nozzle more than 30cm (12 in .)
from the lens surface and keep the
nozzle moving so the stream of air is
not concentrated in one spot.
4. Do not leave the camera in an
excessively hot place.
9. Do not lubricate the camera.
5. If the camera is exposed to rain or
mist, or after shooting near the sea,
wipe with a clean , soft cloth.
10. Store the camera in a cool, dry place
away from naphthalene or camphor
(moth repellents).
In a humid environment, store the
camera inside a vinyl bag with a
6. If the camera malfunctions, take it
immediately to an authorized Nikon
dealer or service center.
desiccant to keep out dust, moisture and
salt.
Note, however, that storing the leather
case in a vinyl bag may cause the leather
to deteriorate.
47
NOTES ON BATTERIES- - - - - - - - - - - - - - - -
1. When not using the camera for a long
period, remove batteries.
2. Battery power falls off in extremely
cold temperatures-make sure bat·
teries are new and keep the camera
body wrapped in something warm.
3. When replacing batteries, be sure to
replace all batteries at the same time.
Always use fresh batteries of the
same brand.
• ••••••••••••••••••••••••
4. Do not throw used batteries into a fire .
5. If the battery chamber is contaminated
by battery leakage, take the camera to
an authorized Nikon dealer.
48
•
••
•
••
•
••
•••
•
•
••
••
•••
•••
•
•••
••
•
••••••••••••••••••••••••••••
Compared with regular batteries,
NiCd batteries provide greater effi·
ciencyat low temperatures. Before
charging NiCd batteries, throughly
read the instructions for batteries
and battery charger.
LENSES--------------------------------------------Nikon N4004s is designed for autofocus photography with AF
Nikkor lenses (except AF-Nikkor lenses for F3AF). To take full
advantage of N4004s convenience, it is recommended that you
should use AF Nikkor lenses.
However, the following lenses can be used with the Nikon
N4004s for manual focusing and manual exposure control. in
line with the conditions listed at right.
Mountable non·AF Nikkor lenses
AI -P Nikkor lenses
All AI-type Nikkor lenses (including AI-8 and AI-modified)
Nikon 8eries E lenses
Reflex Nikkor lenses 500mm f/8
1000m f/11 (No. 142360 or smaller,
or No. 143001 or larger)
2000mm f/11 (No. 200311 or larger)
PC-Nikkor lenses
28mm f/3 .5
28mm f/4 (No. 180901 or larger)
35mm f/2.8 (No. 851000 or smaller,
or No. 906201 or larger)
Medical-Nikkor 120mm 114
Teleconverters (except TC -16/TC-16A; they cannot be mounted)
When mountable non-AF Nikkor lenses are used :
* Exposure indicator LEDs do not appear. Use external exposure
meter, then set the exposure using lens aperture ring and
shutter speed dial. Ignore the aperture set on camera's
aperture dial.
* If the shutter speed dial is set to L or A, or the aperture dial is
set to 8 , the shutter locks.
TTL auto flash is possible with built-in TTL flash or accessory
Nikon 8peedlights 88-24,88-23,88-22,88-20, 88-15,88-168.
(Programmed TTL auto flash is not possible.) To use flash or
speed light, set shutter speed dial to 1/60 sec. or slower, then
set the aperture using the lens aperture ring . For speedlight
settings and shooting distance range, see speedlight instruction manual. Except for flash recommendation , ready-light functions as normal. Fill-flash cannot be controlled automatically.
When using the N4004s with an AI-P Nikkor lens, automatic
exposure control is available but automatic focusing is not.
*
*
Use of other lenses may damage the camera.
49
Lens Compatibility
Exposure Control
Focusing
AF Nikkor lenses
(except AF Nikkor lenses for F3AF)
AI-P Nikkor lens
AI-type Nikkor lenses
Series E lenses
Retlel( Nikkor lenses.)
PC-Nikkor lenses.)
Medical-Nikkor 120mm f/4
Teleconverters
(except TC-16/TC-16A)
0
0
0
0
0
Ll.l)
0
0
0
0
0
Ll.l )
0
0
x
0
0
0
0
0
Ll.3 )
0
0
x
x
x
x
x
x
x
1) With maximum aperture of f/5.6 or faster.
2) Unless lenses are shifted.
3) With maximum effective aperture of f/ 5.6 or faster.
4) Some lenses cannot be used_
50
0
Autolocus
Ll.2)
Shutter-priority
auto
Aperture-priority
auto
Manual
Program
auto
Manual w/electronic
focusing confirmation
Manual
Camera's exposure meter does not operate and
exposure indicator LEDs do not appear. Set
exposure using the lens aperture ring and
camera 's shutter speed dial
ACCESSORY COMPATIBILITYThe following accessories cannot be used with the Nikon
N4004s.
Cords that connect to sync terminal
Accessories that connect to remote terminal
Cable releases
* Neckstrap AN-1 (leather)
Others:
.
PF-1-3, PH-3, P8-2 , PK-1-3, PN-1, K-2 , 8R-2
Accessories exclusively designed for other cameras
*
*
*
*
- If accessories such as close-up attachments are mounted
- -- --
-
- -- - - -
- Programmed TTL auto flash and TTL auto flash , including
automatic balanced fill-flash, are not possible with S8-21 ,
S8-11, S8-14 or S8-140-even with a TTL remote cord or TTL
multi-flash sync cord.
- PK-1 , PK-11 , 8R-4 and K-1 Rings cannot be mounted directly
on AF Nikkor lenses.
- Polarizing fi lters cannot be used for autofoeus or auto exposure ; use a circular polarizing fi lter.
- Special filters, such as soft focus fi lters, cannot be used for
autofoeus or for manual focus with electronic focusing
confirmation.
directly on the lens mount of the N4004s, exposure indicator
LEDs do not appear. Set aperture using lens aperture ring .
- Filters with a large exposure factor may affect the camera's
multi-sensor metering. Use centerweighted metering (AEL
button or manual exposure mode).
51
EXPOSUREVALUE(EV)-----------------------------Exposure consists of shutter control and aperture control.
The N4004s olfers a range of speeds from 1/2000 second to 1
second, with each setting twice as fast as the next slower speed.
Faster speeds allow less light to pass; slower speeds admit more
light.
Aperture control enables you to vary the lens aperture opening
from large to small , with larger apertures allowing more light to
pass, and smaller apertures allowing less light to pass.
The standard aperture settings are fl.4 , f2, f2 .B, f4, f5.6, fB, fll,
f16, f22, 132, etc.
For simplicity, shutter/aperture gradations are uniform . A change
in shutter speed from 1/125 to 11250 second, for example, re duces the light by 1/2 . Similarly, changing aperture from f4 to
f5 .6 reduces the light by 1/2. Each film used has a particular
sensitivity to light, indicated by the ISO number shown on the
film cartridge. To achieve th~ correct exposure for any particular
light value , the camera's Image Master Control adjusts the
shutter speed and aperture control so just the right amount of
light reaches the film to produce the correct exposure. That
amount of light is referred to as the Exposure Value or EV and
is assigned a number such as EV10, EV15, etc. The brighter the
light, the higher the EV number.
52
Each EV number can be applied to a variety of shutter and
aperture combinations. If the correct exposure is 11125 f5 .6, for
example, a setting of 1/250 f4 would produce the same exposure.
The same EV number would represent both settings.
The preceding explanation should help you understand the charts
found in different parts of this manual. But don't worry about the
details-the Decision Master System of the N4004s takes care
of all calculations and automatically sets the exposure control.
This information is provided only for your reference and a fuller
understanding of photography.
EV chart with 50 mm fl1 .4 lens
ASA/ ISO 12
I
ASA/ ISO 25
ASA/ ISO 50
ASA/ ISO 100
ASA/ ISO 200
ASA/ISO 400
ASA/ ISO 800
ASA/ ISO 1600
ASA/ ISO 3200
~
f/
1.4
2
-
2. 8
-
-
4
5.6
8
11
16
1
2
3
4
5
6
1
1/2
1
7
8
9
10
1/4
1/8
1/15
1/2
1/4
1/8
1
1/2
1
11
12
13
14
15
16
18
1/30
1/60
1/125
1/250
1/500
1/1000 1/2000
1/15
1/30
1/60
1/125
1/250
1/500
1/1000 1/2000
1/4
1/8
1/15
1/30
1/60
1/125
1/250
1/500
1/1000 1/2000
1/2
1/4
1/8
1/15
1/30
1/60
1/125
1/250
1/500
1
1/2
1/4
1/8
1/ 15
1/ 30
1/60
1/125
1/250
1/500
1/1000 1/2000
1
1/2
1/4
1(8
1(15
1/30
1/60
1(125
1(250
1/500
1(1000 1/2000
1
1/2
1/4
1(8
1/15
1/30
1/60
1/125
1/250
1/500
1/ 1000 1/2000
1
1/2
1(4
1/ 8
1/15
1/30
1/60
1/125
1/250
1/500
17
19
(shutter speed)
1/1000 1/2000
1/1000 1(2000
53
GLOSSARY-----------------------------------------AEL (Auto Exposure Lock): AEL is recommended for shooting
small dark subjects against a bright background or for shooting
dramatic sunset scenes. When AEL is used in program, shutterpriority or aperture-priority auto exposure mode, camera automatically switches to centerweighted metering.
AF illuminator: When existing light is below a certain level
and the camera is set for autofocus mode, the S8-24/S8-23/
S8-22/S8 -20's AF illuminator turns on automatically and
provides enough subject contrast to enable the N4004s
autofocus system to function as though it were daytime.
Depth of field: The zone of acceptable sharpness in front of
and behind the subject on which the lens is focused . Depth of
field can be increased by using small apertures (large f-numbers)
or short focal-length lenses, or by taking the picture from farther
away. To reduce depth of field use large apertures (small
f-numbers), long focal-length lenses, and/or near subjects.
OX-code: Film information code printed on the fi lm cartridge.
The N4004s automatically senses the film speed (ISO 25 to
5000) of OX-coded film the instant film is loaded.
EV system : See page 52 and 53.
Centreweighted metering: In manual mode, or when the AEL
button is used in auto exposure modes, the camera automatically switches to centreweighted metering. This secondary
metering system places special emphasis on brightness within
the 12mm-diameter central area of the viewfinder, making the
N4004s exceptionally versatile for a wide variety of subjects.
Decision Master System: Nikon's exclusive optoelectronic
system integrates camera and lens computers to provide full
automatic control of all camera and lens operations, from autofocus to auto exposure, built-in TTL flash, built-in motor drive,
OX film setting, film loading and power rewind . It even automatically carries out such advanced techniques as exposure
compensation and balanced fill-flash .
54
Balanced fill-flash: Subjects lit from behind or near a window
normally appear too dark in photographs, so it is recommended
you use a flash for fill-in lighting. Although conventional automatic fill-flash system often result in well -exposed subjects, the
background may be washed out of dark. The Decision Master
System of the N4004s performs balanced fill-flash with the
multi-sensor metering, so both subject and background are
correctly exposed, to produce a well-balanced picture.
f-number: Number which indicates brightness of film plane
image. The f-number series is 1.4, 2, 2.8, 4, 5.6, 8, 11 , 16, 22,
32, etc. Changing one step to the next largest number (i.e., from
f11 to f16) decreases image brightness by 1/2; moving to next
lower number doubles brightness.
Guide numbers: The number given to a flashbulb or electronic
speedlight unit to indicate its power. A guide number may be
quoted in meters or feet, and depends on the speed of the film
being used . Quoted guide numbers assume a relatively efficient
reflector surrounding the flash source, in an average -sized room.
ISO: The international standard for representing film sensitivity
(speed with which it reacts to light). The ISO film speed scale is
arithmetical, with a film speed of IS0200 being twice as fast as
IS0100, and half the speed of IS0400 film.
LED: Abbreviation of Light-Emitting Diode. Used to provide
indications inside the camera viewfinder.
Multi-sensor metering: Nikon 's exclusive metering system .
Drawing on its rich experience of auto exposure technology,
Nikon has incorporated a unique multi-sensor light meter into
the N4004s. The multi sensor provides additional information
to Decision Master System by dividing the scene into three
areas to instantly and automatically gauge brightness and
contrast. This enables the N4004s to handle all kinds of
lighting situations , including high-contrast or backlit scenes,
or scenes with a bright sun in the picture.
TTL: Abbreviation of Through-The-Lens. Most SLR cameras
have built-in meters which measure light after it has passed
through the lens, a feature that enables exposure readings to
be taken from the actual image about to be recorded on film,
whatever the lens' angle of view and regardless of whether
a filter is used.
TTL auto flash mode: In this mode, the camera 's light sensor
measures flash light, as reflected by the subject on the film, and
shuts off the flash when measurement indicates correct exposure. Because the sensor that controls the flash receives light
through the lens, this mode can be used for bounce photography,
fill-in flash, multiple flash photography, etc. The major advantage
of this mode is that you can use a wide range of aperture
settings that will give correct exposure.
55
SPECIFICATIONS-----------------Type of camera
Picture format
Lens mount
Lens
Focus modes
Autofocus
Autofocus detection
system
Autofocus detection
range
Autofocus actuation
method
Autofocus lock
Focusing confinnation
56
Integral-motor autofocus 35mm singlelens reflex with built-in TTL flash
24 mm x 36 mm (standard 35 mm film
format)
Nikon bayonet mount
AF Nikkor lenses (except AF-Nikkor
80mm f/2 .8, 200mm f/3 .5 IF-ED, and
autofocus converter TC-16/TC-16A),
and non-AF Nikkor lenses (with limitation) available
Autofocus, and manual focus with
focusing confirmation
TTL phase detection system using
Nikon Advanced AM 200 sensor
Approx. EV -1 to EV17 (at ISO 100)
Single servo
Possible
Available in manual focus mode with
an AF Nikkor, mountable Nikkor and
Series E lens with a maximum
aperture of f/5 .6 or faster.
Multi-sensor metering (for ensuring
correct automatic operation in
program , shutter-priority and aperture priority modes) ; Centerweighted
exposure measurement (tor manual
exposure mode or when using the
AEL button in program , shutter-priority
or aperture-priority auto exposure
mode)
Exposure meter switch Activated by lightly pressing shutter
release button ; stays on for approx.
8 sec. after lifting finger from button
Metering range
EV1 - EV19 at ISO 100 with f/1.4 lens
Exposure modes
Program auto, shutter-priority auto,
aperture -priority auto and manual
exposure modes
Normal or high-speed programs autoProgram auto
matically selected; both shutter speed
exposure control
and aperture are set automatically
Aperture automatically
Shutter-priority auto
exposure control
selected to match manually set
shutter speed
Aperture-priority auto Shutter speed automatically selected
exposure control.
to match manually set aperture
Manual exposure
Both aperture and shutter speed are
control
set manually
Shutter
Electronically controlled vertical -travel
focal-plane shutter
Shutter release
Electromagnetic
Exposure metering
Shutter speeds
Step less speeds from 1/2000 to 1sec.
on program auto and aperture-priority
auto ; lithium niobate oscillator-controlled discrete speeds from 112000 to
1 sec. on shutter-priority auto and
manual; electronically controlled long
exposure at B setting
Viewfinder
Fixed eyelevel pentaprism type : 0.8 x
magnification with 50mm lens set at
infinity ; 92% frame coverage
Eyepiece cover
Model DK-5 prevents stray light from
entering viewfinder
Focusing screen
Nikon new BriteView screen with
central focus brackets for autofocus
operation
Viewfinder information Green focus indicator LED for focusing, red exposure indicator LED shows
over- and underexposure warning,
and correct exposure ; red flash readylight for flash photography
Available via pressing the AEL button
Auto exposure lock
while the meter is on (centreweighted
metering selected when the AEL
button is pressed)
Film speed range
ISO 25 to 5000 for DX-coded film
Film speed setting
Automatically set by DX-coded film
(ISO 100 is automatically set for all
non-DX-coded films)
Film loading
Film advance
Frame counter
Film rewind
Self-timer
Reflex mirror
Camera back
Accessory shoe
Built-in TTL flash
Film automatically advances to frame
1 when shutter release button is depressed once ; fi lm advance indicator
rotates to show that film is loaded and
being advanced properly
Film automatically advances one
frame at approx. 0.4 seconds when
shutter is released ; fi lm advance
stops automatically at end of film roll
Accumu lative type: automatically
reset when camera back is opened
Automatically rewound by built-in
motor
Electronically controlled ; approx. 10 sec .
exposure delay ; blinking LED indicates
self-timer operation; cancellable
Automatic, instant-return type
Hinged back; fi lm cartridge confirmation window and film advance
indicator
Standard ISO-type with hot-shoe
contact, ready-light contact, TTL flash
contact, monitor contact
Guide number: 12 (at ISO 100, 20°C
and meters) ; angle of coverage :
35mm lens or longer ; programmed
TTL auto flash is possible in program
and shutter-priority auto modes ; TTL
auto flash is possible in aperturepriority auto and manual modes
57
Flash synchronization
Flash indication
Autofocus flash
photography
Power source
58
Automatically set to 1/100sec. in
program auto or aperture -priority auto
mode, or when shutter is set to
1I125sec. or faster in shutter-priority
auto or manual mode ; if shutter speed
is set to 8 , or 1/60sec. or slower in
shutter-priority auto or manual mode,
shutter fires at speed set.
Flash ready-light blinks when flash is
recommended (scene darker than
EV10 at ISO 100, or a scene with
brightness of EV10 or higher at ISO
100 where the center portion is darker
than other areas by more than 1EV)
and lights up when built-i n TTL flash or
accessory Nikon speedlight is ready
to fire
Possible only with Nikon Autofocus
Speedlight S8 -24, S8-23, S8-22 and
S8-20
Four AA-type batteries
Number of 36·exposure film rolls per set of fresh batteries
(approx.)
For Autofocus operation with AF Nikkor lens covering the full
range from infinity (00) to the closest distance and back to
infinity (00) before each shot
With AF Nikkor 35-70mm 113_3·4_5
or 50mm 111 _8
Batteries
Without flash
at 68°F
With 50% flash
at 14° F
at 68°F
at 14°F
AA-type Alkalinemanganese (LR06)
50
8
20
5
NiCd (KR-AA)
16
15
7
4
Zinc -carbon (SUM-3)
20
1
8
Dimensions
Weight (body only)
-
154(W) x 102(H) x 65.5(D)mm
[6.1 (W) x 4.0(H) x 2.6( D) in.]
Approx . 650g (22.9 oz.)
Specifications and designs are subject to change without notice.
VIEWFINDER I N F O R M A T I O N - - - - - - - - - - - - - Exposure mode
Program auto
I
Shutter·priority auto
. Iights up
Focus indicator LED
Autofocus impossible
Rear/front focus (shutter does not lock In manual focusing)
. disappears
O lights up
Exposure indicator LEOs
Correct exposure
Camera shake
warning
I
-
I
-
Too bright for auto exposure
Over ( + 1EV - )
- lights up
Too dark for auto exposure
Under ( - - EV)
Lens aperture not set to minimum
+Olight up
-
Over (+ 1- + 1/3EV)
O-light up
-
Under (-1I3- -1 EV)
J blinks
(before shooting)
Flash recommended (when built·in flash or external speedlight is OFF)
8eyond acceptable film speed range for TTL photography (over IS0400)
S8·19 is set to 8 or 8 (EM)
J disappears
J lights up
J blinks
(after shot)
c=::::J
Camera shake
warning
+ lights up
+ - blink
alternately
Ready·light LED
Manual
Aperture ·priority auto
In focus
. blinks
O blinks
I
I
S8·19 is set to 8 or 8 (EM)
Recharging (shutter does not lock with external speedlight)
Recharged
External speedlight not set to TTL
J
External speedlight not set to TTL
Insufficient light for correct exposu re
Shutter is locked
59
No reproduction in any form of this manual, in
whole or in part (except for brief quotation in critical
articles or reviews) , may be made without written
authorization from NI KON CORPORATION.
Nikon
NIKON CORPORATION
FUJI BLDG ., 2-3, MARUNOUCHI 3-CHOME, CH IYODA-KU, TOKYO 100, JAPAN
PHONE: 81-3-214-5311 TELEX: J22601 (NIKON) FAX: 81-3-201-5856
Printed in Japan 9&130-A012 (S063)