1
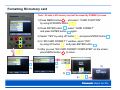
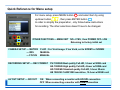
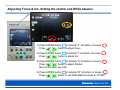
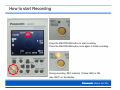
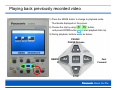
Full HD 3MOS Camera & Recording system
POVCAM (AG-MDC10, AG-MDR15)
Quick Reference Guide
HD
l
l
u
F
Recording with AG-MDC10 Camera
Connecting Camera to the Recorder
Insert the SD Memory Card into the card slot
and close the door.
Note : POVCAM supports up to 32GB SDHC card.
Preparation #2
Note : Watch the angle of connector which has a key slot.
Connect the AG-MDC10 Camera with AG-C20003 (3m) or AG-C20020 (20m) Cable.
Note : Connect camera before turning the power. AG-MDR15 needs to detect camera
connection to select the camera input.
Connecting monitor via HDMI cable or HD-SDI output
HDMI connection
(HDMI cable)
HD-SDI connection
(BNC cable)
Monitor
Either
Or
Note : Menu setting must be as follows ;
When using HDMI connection, MENU > AV OUT SETUP > SDI OUT > OFF
When using HD-SDI connection, MENU > AV OUT SETUP > SDI OUT > ON
Preparation #4
Turn the power on !
Press the POWER button for 2 seconds or longer.
The POWER lamp (green) illuminates and the power turns on.
Note : For turning the power off, press the POWER button
for 2 seconds or longer when the power is on.
The POWER lamp flashes, the power turns off,
and then the lamp goes off.
Formatting SD memory card
Note : All data in SD memory card will be erased by FORMAT process.
1) Press MENU button
, and select “CARD FUNCTION”
by using UP/DOWN button
.
2) Press ENTER button
, select “CARD FORMAT”
and press ENTER button
again.
3) Select “YES” by using UP button
and press ENTER button
4) In “SD CARD FORMAT ?” window, select “YES”
by using UP button
and press ENTER button
.
5) After you see “SD CARD FORMAT COMPLETED” on the screen,
press MENU button
to return.
1)
2)
5)
2)
3)
4)
.
Quick Reference for Menu setup
For menu setup, press MENU button
and select item by using
up/down button
, then press ENTER button
.
In order to simplify the preparation, only follow below instructions
for recording. The other selections doesn’t have to be changed.
OTHER FUNCTIONS --- MENU INIT NO-->YES, then POWER OFF-->ON
Returning to factory initial set
CAMERA SETUP --- MATRIX
--- IRIS
--- FOCUS
FLUO : For Vivid image. If too Vivid, set to NORM1 or NORM2
MANUAL
MANUAL
RECORDING SETUP --- REC FORMAT
AV OUT SETUP --- SDI OUT
PH 1080/60i Best quality Full-HD, 3-hour w/32GB card
HA 1080/60i High quality Full-HD, 4-hour w/32GB card
HG 1080/60i Standard quality Full-HD, 5-hour 20-min
HE 1080/60i 1440X1080 resolution, 12-hour w/32GB card
ON When connecting a monitor with HD-SDI connection
OFF When connecting a monitor with HDMI connection
Adjusting Focus & Iris, Setting the shutter and White balance
1) Press ENTER button
to indicate “F” at bottom of screen
Press
button to adjust focus.
2) Press ENTER button
to indicate “I” at bottom of screen
Press
button to adjust Iris.
3) Press ENTER button
to indicate “S” at bottom of screen
Press
button to adjust Shutter.
Most of the case, set 1/60.
4) Press ENTER button
to indicate “W” at bottom of screen
Press
button to set White Balance mode to “W.SET”.
.
How to set White balance under the OR lighting condition
Surgical Light
In order to reproduce the white accurately,
white balance should be adjusted properly
under the actual lighting condition.
White paper
1) During shooting white pattern such as white paper under the actual lighting condition in OR,
press SHIFT/EXEC button
and UP button
simultaneously, and keep pushing
for 2 seconds or longer.
2) The screen change to black with “AWB ABB ACTIVE”.
3) If returning to camera picture with “AWB ABB OK”, it is completed to fix white balance.
If returning to camera picture with “AWB ABB NG”, try once again from 1) on this page.
How to start Recording
Press the REC/PAUSE button to start recording.
Press the REC/PAUSE button once again to finish recording.
During recording, REC indicator (Yellow LED) is ON,
also “REC” on the display.
Playing back previously recorded video
1) Press the MODE button to change to playback mode.
Thumbnails displayed on the screen.
2) Choose the clip by using
and press ENTER button
button,
to start playback that clip.
3) During playback, buttons works as below ;
PAUSE /
PAUSE Release
REWIN
D
PLAY
STOP
Fast
Forward