1
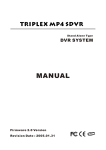
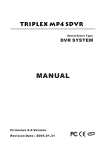
TABLE OF CONTENTS
Oricom M2400 Series
DECT Cordless phone with answering machine
Multi-handset capable
User Guide
SAFETY INFORMATION ............................................................................................ 3
GETTING STARTED................................................................................................... 3
Contents of Pack........................................................................................... 3
Your handset................................................................................................. 4
LCD display on the handset .......................................................................... 4
Basic steps to install...................................................................................... 5
Charging the handset.................................................................................... 5
BASIC OPERATIONS................................................................................................. 5
During standby .............................................................................................. 5
Answering an incoming external call ............................................................. 5
Making an external call ................................................................................. 5
Normal dialing................................................................................. 5
Predialing........................................................................................ 6
Dialing from a phonebook record.................................................... 6
Redialing a stored dialed number ................................................... 6
Redialing the last dialed number..................................................... 6
During an external call .................................................................................. 6
Call timer......................................................................................... 6
Hands free mode ............................................................................ 6
Adjusting the volume....................................................................... 6
Muting the call................................................................................. 6
Chain dialing ................................................................................... 6
Call Waiting Caller ID .................................................................................... 7
CALLER ID ................................................................................................................. 7
Reviewing CID records ................................................................................. 7
Call back from a CID record .......................................................................... 7
Saving a CID record to phonebook ............................................................... 7
Deleting a CID record.................................................................................... 7
Deleting the entire call log............................................................................. 7
DIALED NUMBERS .................................................................................................... 8
Viewing the redial list .................................................................................... 8
Storing a previously dialed number into phonebook...................................... 8
Deleting a previously dialed number ............................................................. 8
Deleting the entire redial list .......................................................................... 8
USING THE PHONEBOOK ........................................................................................ 8
Adding phonebook records ........................................................................... 8
Editing phonebook records ........................................................................... 8
Deleting a phonebook record ........................................................................ 9
Deleting the entire phonebook ...................................................................... 9
MENU PROGRAMMING............................................................................................. 9
Ringer menu ................................................................................................. 9
Handset / base ringer melody ......................................................... 9
Handset / base ringer volume ......................................................... 9
Settings menu ............................................................................................... 9
Handset Key tone ........................................................................... 9
Backlight ......................................................................................... 9
Recall duration................................................................................ 9
Register ........................................................................................ 10
Deregister ..................................................................................... 10
PIN code ....................................................................................... 10
Reset ............................................................................................ 10
ANSWERING MACHINE .......................................................................................... 11
Display ........................................................................................................ 11
Getting started............................................................................................. 12
Time announcement ..................................................................... 12
Adjusting the clock ........................................................................ 12
Turning on/off the answering machine .......................................... 12
Outgoing messages (OGM) ........................................................................ 12
Recording your Greeting (OGM)................................................... 13
Playing an OGM ........................................................................... 13
Deleting an OGM .......................................................................... 13
Memo .......................................................................................................... 13
Recording a memo ....................................................................... 13
Playing a memo ............................................................................ 13
Deleting a memo........................................................................... 13
Incoming messages (ICM) .......................................................................... 13
Playing ICM .................................................................................. 14
Deleting ICM ................................................................................. 14
Deleting all old ICM and Memo..................................................... 14
Answering machine features ....................................................................... 14
Volume adjustment ....................................................................... 14
Ring delay..................................................................................... 14
Message alert ............................................................................... 15
Call screening ............................................................................... 15
Remote access ........................................................................................... 15
The remote access menu ............................................................. 15
Security PIN ................................................................................................ 16
OTHER FEATURES ................................................................................................. 16
Key lock ...................................................................................................... 16
Shortcut to turn handset ringer on/off.......................................................... 16
Voice Services ............................................................................................ 16
Message waiting indication (VMWI) ............................................................ 16
Torch........................................................................................................... 16
Paging the handsets ................................................................................... 17
Out of range warning................................................................................... 17
MULTI-HANDSET OPERATION............................................................................... 17
Making an internal call ................................................................................ 17
Answering an internal call ........................................................................... 17
During an external call ................................................................................ 17
Inquiry call..................................................................................... 17
Call transfer .................................................................................. 17
Conference call............................................................................. 17
DEFAULT SETTINGS............................................................................................... 17
TROUBLESHOOTING .............................................................................................. 18
WARRANTY INFORMATION ................................................................................... 19
NOTES FOR OPERATION IN NEW ZEALAND
The grant of a Telepermit for any item of terminal equipment indicates only
that Telecom has accepted that the item complies with the minimum
conditions for connection to its network. It indicates no endorsement of the
product by Telecom, nor does it provide any sort of warranty. Above all, it
provides no assurance that any item will work correctly in all respects with
another item of Telepermitted equipment of a different make or model, nor
does it imply that any product is compatible with all of Telecom’s network
services. This device may be subject to ringing or bell tinkle when certain
other devices are connected to the same line. If this occurs, the problem
should not be referred to the Telecom Faults service.
This equipment shall not be set to make automatic calls to the Telecom “111”
Emergency Service. This equipment may not provide for the effective handover of a call to another device connected to the same line.
REN (RN for New Zealand)
The REN (Ringer Equivalence Number) or (RN) is of significance only if you
wish to connect more than 1 telephone to your telephone line. A standard
telephone line has a maximum REN capacity of 3 (RN of 5). It is possible to
connect 3(5) devices with a REN of 1 (RN of 1) with no degradation to the
product’s performance. Exceeding this limit may cause the volume of the
ringer in any phone to decrease or not ring at all.
Caller ID
Customers using non Telecom toll services should not use the dial back
feature for local calls as this will incur a charge only the 7 digit number
should be dialled. Some of the CID services listed may not be available in
New Zealand.
2
SAFETY INFORMATION
•
•
•
•
•
•
•
•
•
•
GETTING STARTED
Contents of Pack
Avoid exposure of this telephone to moisture or liquid.
To prevent electric shock, do not open the handset or base cabinet.
Avoid metallic contact (e.g. metal clips, keys) between the battery
contacts and charging conductors.
Do not use the handset in an explosive hazard area such as where there
is gas leaking.
There is a chance that the telephone could be damaged by an electrical
storm. It is recommended that users unplug the phone from the mains
supply and telephone socket during a storm.
Follow the local regulations regarding the disposal of your packing
materials, exhausted batteries and used phone. Wherever possible,
recycle those materials.
We advise that this phone should not be used near intensive care
medical equipment or by persons with pacemakers.
Clean with a dry, soft, lint-free cloth. Never use cleaning agents,
particularly aggressive solvents.
Because the phone works by sending radio signals between base station
and handset, wearers of hearing aids may experience interference in the
form of a humming noise.
Your phone can interfere with electrical equipment such as answering
machines, TV and radio sets, clock radios and computers if placed too
close. It is recommended that you position the base unit at least one
metre from such appliances.
Depending on the model you have purchased the pack should contain the
following items:-
Number of Base units
Number of Handsets
Number of charger adaptors
Number of main adaptors
Number of phone cord
Handset Batteries
M2400
M2400+1
M2400+2
1
1
1
1
2
3
NIL
1
2
1
1
1
1
1
1
2 x AAA
4 x AAA
6 x AAA
Rechargeable Rechargeable Rechargeable
Ni-MH
Ni-MH
Ni-MH
Batteries
Batteries
Batteries
(1.2V
(1.2V
(1.2V
650mAh)
650mAh)
650mAh)
And this user guide. If any of these items are missing, please contact the
retailer were you purchased the product from.
Additional handsets
You may expand your M2400 by adding more handsets (M2450). These may
be purchased separately. The M2400 can accommodate a total of 5
Handsets.
CAUTION
This telephone is not designed for making emergency telephone calls
when the mains power fails. Always have a corded phone available to
be able to make and receive calls to emergency services if the mains
power fails.
Do not use your telephone during an electrical storm thunderstorm as it
is possible to get an electric shock. Refer to information contained in
Telstra White pages directory.
3
Your handset
LCD display on the handset
Flashlight
Message
Mute
CID
Phonebook
Speaker
Phone On
Ringer Off
Battery
Signal
Flashlight
on/off
Character
Display
LCD Display
Menu /
Scroll up
Menu
up/down
Right Arrow
Left Arrow
Talk /
Speaker
Off / Exit
New call
Phonebook
Repeated call
Displays the current battery level. It scrolls during charging.
OK / Redial
CID /
Scroll down
The phone is in use. It blinks when phone rings.
There is a new message (Subscription to network message
service may be required)
# / Keylock /
Pause
The microphone is muted
There is a new Caller ID (CID) or CID records are being
reviewed
¿/
Ringer On-Off
Phonebook records are being reviewed
Delete /
Mute
Intercom /
Conference
Hands free speakerphone is turned on
Recall
The ringer is turned off
The handset is linked to the base
There are more digits to the right
Charge LED
There are more digits to the left
The CID being reviewed is a new call
The CID being reviewed is a new and repeated call
More menu options are available upward
More menu options are available downward
4
Basic steps to install
1. Connect the plug of the mains adaptor to the socket on the back of the
base unit and the mains adaptor to the wall mains supply.
2. Plugs the mains adaptor of the additional handset charger to the wall
mains supply.
3. Insert 2 rechargeable batteries (included) in each handset observing the
polarity, into the battery compartment of each handset.
4. Slide the battery door into place on each Handset.
5. Place the handsets on the chargers and let the batteries charge for a full
14 hours before using for the first time.
6. Connect one end of the telephone lead to the socket on bottom of base
unit and the other to the phone socket on the wall.
7. Check both handsets for dial tone by pressing
8. Handset may get warm during initial charge. This is normal.
BASIC OPERATIONS
During standby
1
When the phone is in standby, the LCD displays the handset label. The
handset number related to the connected base will also be displayed right
justified. The battery icon reflects the current battery level and the signal
icon indicates the handset is linked to the base.
Answering an incoming external call
6042417995
Caution
Use only the mains adaptor supplied with this telephone. Incorrect adaptor
polarity or voltage can seriously damage the unit.
Adaptor Model No.:
Input: 230 VAC 50 Hz
Output: 9 VDC 500 mA
When there is an incoming call, the phone rings and flashes. If a CID
turns on and the caller information is displayed.
record is received,
turns on if the phone number contains more than 12 digits. In this case,
only the last 12 digits are displayed.
when the phone is ringing, the handset ringer will be
If you press
turned off for this incoming call.
1. Pick up the handset from the base cradle to answer the call, or press
if the handset is off cradle. turns on.
2. Call timer is displayed 10 seconds after the call is connected
or place handset on cradle to disconnect.
3. Press
Caution
RISK OF EXPLOSION IF BATTERY IS REPLACED BY AN INCORRECT
TYPE. Refer to the original type supplied with this telephone. Ni-MH
batteries must be disposed of in accordance with applicable waste disposal
regulations.
Charging the handset
An empty battery icon
indicates the batteries need recharging. Place the
handset on the base unit or the charger to recharge the batteries. The
charge LED will be steadily lit. If a handset reaches a very low charge level it
will go into sleep mode, displaying LOW BATT on the screen.
Making an external call
Your phone allows you to dial out a phone number in various ways.
Normal dialing
and wait for the dial tone.
1. Press
2. Use the number pad to dial the phone number. The display shows the
digits as you enter them.
3. When you enter more than 12 digits, turns on. In this case, you only
see the last 12 digits on the screen.
We suggest you put the handset back onto the he base unit to charge when
it is not in use to ensure the handset is always fully charged
5
During an external call
Predialing
Pre-dial allows you to enter a telephone number and verify it on the screen
before you place the call. The screen displays the last 12 digits dialed but
you can enter up to 20 digits.
1. Enter the phone number.
. A pause is displayed as “P”.
2. To enter a pause, press and hold
3. When you enter more than 12 digits, turns on. If you attempt to enter
more than 20 digits, you’ll hear a reject tone.
4. If you make a mistake, press DEL to erase one digit at a time. Or you
can press and hold DEL to clear the entire number and return the
phone to standby.
to dial out the number.
5. Press
Call timer
01-10
The call timer will be displayed a short while after your call is connected. It
shows the duration of the call. This timer is shown in minutes and seconds
(MM-SS) in the first hour. After that, it will be shown in hours and minutes
(HH-MM) with the “-“ blinking to indicate the seconds.
When you end a call, the timer will be displayed for 5 more seconds before
the screen returns to the handset label.
Dialing from a phonebook record
during standby.
in the display turns on.
1. Press
2. Press
and
to search for the record that you would like to
edit. Or you can use the number keys to jump directly to the record
starting with the corresponding letters of that key.
3. Pressing OK repeatedly will show the name and number of the record
accordingly.
to dial out the number.
4. Press
Hands free mode
for hands free conversation during a call. You can now talk in to
Press
the microphone without holding the handset to your ear.
in the LCD turns
on to indicate that you are now in hands free mode.
again to return to normal TALK mode.
Press
Adjusting the volume
Press
and
to adjust the receiver/speaker volume. The display
shows the volume level of high, medium or low.
Redialing a stored dialed number
. The last number dialed is displayed.
1. Press
2. Press
and
to scroll through the last 5 dialed numbers.
turns on when the number contains more than 12 digits. Press OK to
view the off-page digits.
to dial out the number.
3. Press
Muting the call
to mute the call.
turns on. The caller will not be able to
1. Press
hear you but you can still be able to hear the caller.
again to unmute the call.
2. Press
Chain dialing
You can dial out numbers from the phonebook even after you have seized
the phone line. And there is no limit to the number of times chain dialing is
accessed.
.
turns on.
1. Press
2. Press
and
to scroll through the phonebook records. Or
you can use the number keys to jump directly to the record starting with
the corresponding letters of that key. If you decide to quit using chain
again to exit.
dialing, simply press
3. Press OK to dial out the number.
Redialing the last dialed number
and wait for the dial tone.
1. Press
to dial out the last number dialed.
2. Press
6
Reviewing CID records
when the phone is in standby. If the call log is not empty,
1. Press
turns on and the caller name of the most recent CID record is displayed.
2. Press OK to view the number.
3. Press OK again to see the date / time when the call was received.
4. Whether you are viewing the name, number or date/time, pressing
will display the next older record and
the next newer
record.
Call Waiting Caller ID
If you have subscribed your telephone network operators Call Waiting Caller
ID service, your phone will display the number of the other incoming call for
around 7 seconds while you are talking on the phone.
•
While the handset is on an external call, a series of short beeps is heard.
•
then
Press
the 2nd call.
•
Press
then
to place the first external call on hold and answer
When turns on, it means that received number is a new number. When
turns on, this new call is also a repeated call.
to toggle between two calls.
(Please consult your telephone service provider for details about the service).
Call back from a CID record
While you are viewing a CID record, you can return the call provided that it
contains a valid phone number by pressing
.
CALLER ID
If you subscribe (charges may apply) to your telephone service providers
Caller ID service, numbers of the incoming calls will be displayed on the
screen and stored in the call log. (Please consult your telephone service
provider for details about the service). If you subscribe to the Caller ID
service, your phone automatically stores the last 20 incoming calls. Each
record holds up to 20 digits.
Saving a CID record to phonebook
You can save a CID record into the phonebook provided that it contains a
valid phone number and the phonebook is not full.
While you are viewing the CID record that you would like to save,
.
1. Press
2. If there is caller name in the CID record, the first 8 characters are
displayed for you to edit. If no caller name is available, you will be
prompted to enter a name.
3. Press OK to save the name. You will not be able to save it if this name
already exists in the phonebook. Edit the name and try again.
4. Edit the number if necessary and press OK to save it.
The record is now saved into the phonebook. The original CID record in the
call list will now show the new name that you have entered.
When an external call comes in, the display will show either:
•
•
•
•
•
The name of the phonebook entry if the number of the incoming number
is the same as the number of the phonebook entry, or
The first 8 characters of the name of the phone book entry, or
The last 12 digits of the number of the phone book entry if the name is
unavailable
If there is an identical phone number stored in the phonebook, that
phonebook name will be displayed instead of the CID name, or
NOT AVAIL for Out of Area calls and PRIVATE for Private calls
When you have new/unanswered calls, the
be turned on.
Deleting a CID record
While you are reviewing the CID record that you would like to delete,
1. Press DEL .
2. Press OK to confirm.
icon on all the handsets will
Deleting the entire call log
While you are viewing any CID record,
7
Deleting the entire redial list
While you are viewing any previously redialed number,
1. Press and hold DEL until you are prompted to confirm the action.
2. Press OK .
The redial list is now empty.
1. Press and hold DEL until you are prompted to confirm the action.
2. Press OK .
The call log is now empty.
DIALED NUMBERS
Viewing the redial list
Your phone stores the last 5 external numbers dialed, up to 20 digits each.
during standby. The last number dialed, if any, is displayed.
1. Press
2. Press
and
to scroll through the last 5 dialed numbers. If a
redial number matches a phonebook record, the phonebook name will be
displayed instead. Press OK to view the number.
3.
turns on when the number consists of more than 12 digits long. You
can press OK to view the off page digits.
USING THE PHONEBOOK
Your phone can store up to 30 phonebook records. Each record can hold up
to 8 characters for name, and up to 20 digits for phone number.
A record may contain no name but when it does, the name is unique.
To add, edit, or delete the records, you need to enter phonebook menu.
during standby.
1. Press
2. Press OK when PHONE BK is displayed.
At any time during phonebook programming, you can press EXIT to quit the
programming or cancel the confirmation
Storing a previously dialed number into phonebook
While you are reviewing a previously dialed number that you would like to
save,
.
1. Press
2. Use the number keys to enter the name. If you make a mistake, use
DEL to do the editing. A name can contain up to 8 characters.
If there’s already a phonebook record matching the number, that
phonebook name will appear and you can edit it.
3. Press OK to save the name. You will not be able to save it if this name
already exists in the phonebook. Edit the name and try again.
4. Edit the number if necessary and press OK to save it.
You have saved the number as a phonebook record. This record in the
redial list will now show the name that you have assigned to this number.
Adding phonebook records
and
to select ADD and press
1. In phonebook menu, press
OK .
2. You are prompted to enter the name for this record. Use the number
keys to enter the name. If you make a mistake, use DEL to do the
editing. A name can contain up to 8 characters.
3. Press OK to confirm the name. You will be alerted to edit the name if it
is a duplicated name in the existing phonebook records.
4. You are now prompted to enter the phone number. A phone number can
contain up to 20 digits.
5. Press OK to save the number.
The phonebook record is now successfully stored. Repeat steps 1 to 5 to
add another record.
Deleting a previously dialed number
While you are viewing a previously dialed number that you would like to
delete,
1. Press DEL
2. Press OK to confirm.
Editing phonebook records
and
to select EDIT and press
1. In phonebook menu, press
OK .
2. Press
and
to search for the record that you would like to
edit. Or you can use the number keys to jump directly to the record
starting with the corresponding letters of that key.
8
3. Press OK to select the record and edit the name.
4. Press OK to confirm name change and edit the number.
5. Press OK to confirm number change.
Repeat steps 1 to 5 to edit another record.
2.
3.
4.
5.
Select HANDSET or BASE and press OK .
Press OK when MELODY is displayed.
Press
and
to listen to and select from the 9 melodies.
Press OK to confirm your selection.
Handset / base ringer volume
1. In main menu, select RINGER and press OK .
2. Select HANDSET or BASE and press OK .
3. Press
to select VOLUME and press OK .
4. Press
and
to listen to and select from the different volume
levels.
will turn on if the handset ringer
5. Press OK to confirm your selection.
is turned off.
Deleting a phonebook record
and
to select DELETE and
1. In phonebook menu, press
press OK .
2. Press
and
to search for the record that you would like to
edit. Or you can use the number keys to jump directly to the record
starting with the corresponding letters of that key.
3. Press OK to select the record to be deleted. Press OK repeatedly to
view the rest of the record information until you are prompted to confirm
deleting it.
4. Press OK to confirm.
Repeat steps 1 to 4 to delete another record.
You cannot program the base ringer if the handset has lost the link with the
base. If this happens UNAVAIL will be displayed. Re-establish the link and
try again.
Settings menu
In main menu, select SETTINGS and press OK . You are now in Settings
menu.
Deleting the entire phonebook
and
to select DEL ALL and
1. In phonebook menu, press
press OK .
2. Press OK when prompted to confirm the action.
The phonebook is now empty.
Handset Key tone
When the handset key tone is turned on, you will hear a tone whenever you
press a key on the handset.
1. In Settings menu, select KEY TONE and press OK . The current setting
is now displayed.
2. Select ON or OFF and press OK to confirm.
MENU PROGRAMMING
during standby to enter program mode. The first menu item will
Press
appear.
and
to select the menu
In Menu mode, you can then press
items you would like to program.
During programming, you can press EXIT to exit the current menu or cancel
the confirmation. Press and hold EXIT at any time to exit the program
mode and return to standby.
Backlight
Backlighting for LCD and keypad can be turned ON or OFF in this menu.
1. In Settings menu, select BACKLIT and press OK . The current setting
is now displayed.
2. Select ON or OFF and press OK to confirm.
Recall duration
Ringer menu
Recall timing default Recall settings are; Australia 100ms and New Zealand
600ms. You should not need to change these settings.
Handset / base ringer melody
1. In main menu, select RINGER and press OK .
9
Reset
If you reset the phone, all the settings will return to the factory default
settings.
1. In Settings menu, press
and
until RESET is displayed and
press OK .
2. Press OK again when you are prompted to confirm the action.
You cannot reset the phone if the handset has lost link with the base.
UNAVAIL will be displayed. Re-establish the link and try again.
button does not
If when you are using network services or a PBX the
work you can select a different setting.
1. In Settings menu, select RECALL and press OK . The current duration
will be displayed.
2. Select RECALL 1 or RECALL 2 and press OK to confirm.
Register
Each handset can be registered to only one base at a time . The current
base will be deregistered when a new base is registered.
Each base can register up to 5 handsets.
1. In Settings menu, select REGISTER and press OK .
.
key on the base for 4
2. Before you enter the PIN, press and hold
seconds until a registration tone is emitted. The base is now in the
registration mode. (If the base is full and cannot take on any more
handset, it will emit a reject tone instead. See the section of Deregister
to delete a currently registered handset.)
3. Enter the PIN of the base and press OK
You will hear a confirmation tone if the registration is successful. The
handset label and the handset number will be displayed.
If the registration is not successful, you will see NOT REG on the handset.
Follow the procedure and try again.
Deregister
A handset can deregister another handset registered to the same base. It
cannot deregister itself.
1. In Settings menu, select DEL HS and press OK .
2. Press
and
to select the handset you would like to
deregister and press OK .
3. Enter the PIN and press OK to confirm.
PIN code
A PIN code is required for registration and deregistration. The factory set
PIN code is 0000 but you can change this code.
1. In Settings menu, select PIN CODE and press OK to confirm.
2. Enter the current PIN and press OK .
3. Enter the new PIN. It can contain up to 8 digits. Press OK .
4. Repeat the new PIN and press OK to confirm the new code. You will
hear a confirmation tone if it is successful, or a reject tone if the same
PIN is not entered.
10
Display
ANSWERING MACHINE
The following table describes what the display symbols mean.
LED 1:
In-Use, Paging
Page
Time
OGM
Display
CL
FU
A
P
d1
d2
d3
d4
d5
d6
d7
Ring
LED 2:
Answer Machine
LED 3:
Charging
Volume Up /
Scroll Up
7-Segment
Display
-A
OG
$$
r2
r3
r4
r5
r6
r7
tS
dL
On
OF
L1
L2
L3
L4
L5
--
Volume Down /
Scroll Down
Answer
Machine
On / Off
Delete
Memo
PIN
Stop / Play
Call Screening /
Next Message
Message Alert /
Previous Message
11
Meaning
The clock is not set yet.
Memory is full. No new messages can be recorded.
AM
PM
Monday
Tuesday
Wednesday
Thursday
Friday
Saturday
Sunday
The answer machine is being accessed from an external
phone.
OGM (Your Greeting)
Memo
2 rings
3 rings
4 rings
5 rings
6 rings
7 rings
Toll saver
Delete
Answering machine is on.
Answering machine is off.
Volume level 1
Volume level 2
Volume level 3
Volume level 4
Volume level 5
Answer machine is busy.
To turn on the answering machine:
Getting started
1. Press ON/OFF during standby mode. The answer machine
LED will turn on.
2. After answering the call, the answering machine will play the
OGM and record an ICM.
It is very simple to set up the Answering machine. The answer machine is
equipped with voice prompt instructions to assist you.
There is a real time clock on the answering machine, and it is used to record
the time that each message was received. When the unit is turned on, the
clock will need to be set.
NOTE: When the answering machine is off, it will still answer incoming
call after 16 rings. This is the remote turn on feature.
Time announcement
To turn off the answering machine
1. Press TIME and the current day and time will be announced.
1. Press ON/OFF during standby mode. The answer machine LED will
turn off.
Adjusting the clock
1. Press TIME for 2 seconds during standby mode.
Note: Turning on/off the answer machine does not affect the functionality of
the normal phone operations such as making outgoing calls or receiving
incoming calls.
2. Use VOL UP/VOL DN to adjust the day.
3. Press TIME to confirm the day and adjust the hour.
The answer machine can only record the incoming message when the
memory has enough space. Memory is full when there are already 60
messages recorded or the recorded messages take up all the memory
available (up to 11 minutes). When the memory is full, the answering
machine will announce “Hello, we’re sorry your call cannot be taken at the
moment, and you cannot leave a message, so please call later.” and then
releases the line.
4. Use VOL UP/VOL DN to adjust the hour.
5. Press TIME to confirm the hour and adjust the minute.
6. Use VOL UP/VOL DN to adjust the minute.
7. Press TIME to confirm.
The new day and time will be announced.
Outgoing messages (OGM)
Turning on/off the answering machine
The answering machine announces the Greeting (OGM) when it answers the
call. There is already a prerecorded OGM. You can also record your own
greeting if you like. The default OGM plays to the caller:
“Hello, your call cannot be taken at the moment, so please leave your
message after the tone.”
When the answering machine is on, it will answer the call after a certain
number of rings depending on the rings setting (See Ring Delay for how to
change the number of rings). After answering the call, the answering
machine will play your greeting the outgoing message (OGM) and record the
callers incoming message (ICM).
When you record your own OGM, it will be used when the answering
machine answers the call. If you delete your OGM the default OGM will be
restored automatically.
The answering machine LED display will show the current status of the
answer machine. The LED will be on when the answer machine is turned on.
12
Recording your Greeting (OGM)
Memo
The maximum recording time for your Greeting (OGM) is 40 seconds. Once
you record a new OGM, the old one will be overwritten.
Recording a memo
You can record one memo for other users of the system to hear. The
maximum recording time is 2 minutes. You must delete the first memo before
recording a new memo.
To record your own Greeting (OGM):
1. Press and hold GREETING for 2 seconds. Follow the voice
instruction to record your OGM. OG will flash during recording.
To record memo:
2. Speak into the microphone after the tone .
1. Press MEMO for 2 seconds. Follow the voice instruction to record
the OGM. $$ will be blinking during the recording.
to stop recording or recording will stop after 40
3. Press
seconds.
The recorded message will play back automatically for review.
2. Speak into the microphone after the beep.
3. Press
to stop recording or recording will stop after 2 minutes.
The recorded memo will play back automatically for review.
Note: If you are not satisfied with your OGM that you recorded, follow the
steps above and record a new OGM overwriting the previous one
Playing an OGM
Playing a memo
To listen to the current OGM:
The recorded memo can be played back separately by pressing the MEMO
key. The memo will also be played back together with the incoming
messages (ICM).
1. Press GREETING.
1. Press MEMO during standby mode.
to stop message or it will stop when the OGM is finished.
2. Press
2. Press
finished.
Deleting an OGM
to stop playback or it will stop when the memo is
To delete recorded GREETING:
Deleting a memo
1. Press GREETING
2. Press
1. Press
while listening to the OGM.
while listening to the memo.
Note: Default the Pre recorded OGM cannot be deleted.
Incoming messages (ICM)
The answering machine can record maximum up to 60 messages, and each
message can reach up to 2 minutes.
13
If a user on a parallel phone picks up while the OGM is playing, pressing #
will stop the playback.
If a user on a parallel phone or the cordless handset picks up during recoding
of the callers message the recording will stop.
1. Press
while listening to a message.
Note: The messages deleted can’t be recovered. The message will be
permanently deleted on the first press of
The number of unheard message numbers will be blinking on the display,
and they will stop blinking after all the messages are reviewed.
Deleting all old ICM and Memo
Playing ICM
1. Press
When there is a memo, the memo will be played back first before the ICM’s.
2. Press
ICM’s will be played back in the sequence they were recorded. Day and time
of the recording will be announced before each message.
for 2 seconds. A voice prompt will be announced.
again to permanently delete all old messages or press
to cancel the deletion.
Note: Only old messages would be deleted. Any unheard messages will
remain in the answering machine. The messages deleted cannot be
recovered.
When there are new messages, only the new messages will be played back.
Old messages can be played back only when all new messages are played
back.
during standby mode. Total number of new or old
1. Press
messages will be announced and the memo or oldest new message
will begin.
Answering machine features
2. During day/time announcement,
Volume adjustment
Press
OR
Press
The answering machine has the following features.
You can adjust the volume for call screening and message playback.
to skip current message and play the next message,
To adjust the volume,
to play the previous message, if any.
1. During standby or call screening or message playback,
3. During message playback,
Press
OR
Press
4. Press
.
Press VOL UP to increase the volume,
OR
Press VOL DN to decrease the volume.
to skip current message and play the next message,
to repeat the current message.
Ring delay
to stop playing messages.
You can set the number of times the answering machine would ring before it
answers the call. This only applies when the answering machine is turned on.
Deleting ICM
You can set the number of rings starting from 2 rings to 7 rings or Toll saver.
14
When Toll saver is selected, the answering machine will ring four times if no
messages are recorded or two times if there is a new message.
Remote access
To review the current ringer delay setting,
You can access your answering machine when you are away by using any
touch tone phone.
1. Press RING during standby.
To change the ringer delay setting,
Note: You have to enter the Security PIN to access the answering machine.
Refer to the section below on how to check the PIN.
1. Press and hold RING for 2 seconds follow voice instructions.
2. Use VOL UP/VOL DN to adjust the number of rings.
3. Press RING again to confirm.
The new setting is announced.
To remote access the answer machine,
1. Place a call to your answering machine.
When the answering machine answers the call, it will play the OGM.
Message alert
2. Before the OGM ends, press ¿, and then enter the PIN.
The answering machine can be set to sounds an alert every minute when
there is new message(s) or memo.
Once a correct security code is entered, the remote access menu will
be announced. If you forget the menu options during remote access,
press 5 to stop current operation and press # to listen to the menu
again.
To turn on the message alert,
1. Press
during standby if message alert is currently off.
You have three attempts to enter the correct PIN or the answering
system will drop the line.
To turn off the message alert,
1. Press
3. Press a button anytime while the remote access menu is playing to
carry out the desired function.
during standby if message alert is currently on.
The connection will be lost if there is no activity for 8 seconds.
Call screening
The remote access menu
The answering machine’s speaker turns on when it answers a call. It allows
you to hear the caller on the base before you pick up the call.
This is the remote access menu
To turn on the call screening,
1. Press
To play messages, press 2,
To play memo, press 4,
To record memo, press 7,
To play OGM, press 6,
To record OGM, press 9,
To stop, press 5,
To stop or activate the answer machine, press 8,
To delete all old messages, press 0,
during standby if call screening is currently off.
To turn off the call screening,
1. Press
during standby if call screening is currently on.
15
While playing the message,
To play previous message, press 1,
To repeat current message, press 2,
To play next message, press 3,
To delete current message, press 0,
To listen to the options again, press #.
OTHER FEATURES
Key lock
Press and hold
LOCKED
during standby to lock the keypad.
1
When the keypad is locked, you can still answer an incoming call by picking
. During the call,
up the handset from the base cradle or by pressing
the keypad functions as normal. When the call is ended, the keypad will be
locked again.
To unlock the keypad, press any key and then press OK when you see
PRESS OK.
Security PIN
A three-digit PIN is required for remote access.
Note: This is different from the base PIN which is used to register/deregister
the handsets.
To review the Security PIN,
Shortcut to turn handset ringer on/off
You can use this shortcut to turn on/off the handset ringer when the phone is
.
appears whenever the handset
in standby. Simply press and hold
ringer is turned off.
1. Press PIN during standby mode.
To change the Security PIN,
1. Press PIN for 2 seconds during standby.
Voice Services
During standby mode, press and hold 0 . The handset will seize the
external line and the factory programmed services number “1#” will be dialed
out.
2. Use VOL UP/VOL DN to change the first digit.
3. Press PIN to confirm the first digit and change the second digit.
Message waiting indication (VMWI)
If you have subscribed to the voicemail service from your telephone
company,
turns on when you have a new message in your mailbox. If the
is on call your network operators service to get your messages.
After you’ve listened to all the new messages,
will turn off. You can also
turn it off by pressing EXIT for 2 seconds during standby.
4. Use VOL UP/VOL DN to change the second digit.
5. Press PIN to confirm the second digit and change the third digit.
6. Use VOL UP/VOL DN to change the third digit.
7. Press PIN to confirm.
The new security PIN is announced.
Torch
on the back of the handset will activate the torch. You need to
Pressing
keep the button depressed in order to keep the torch on.
16
You will be alerted with short beeps if you receive an external call during your
intercom. Caller information will be displayed if it is available. You need to
end the intercom first before you can answer the external call.
Paging the handsets
on the base. All
You can page or locate the handsets by pressing
handsets registered to the base will produce the paging tone for 30 seconds
and the screen displays blinking “oooo”.
You could stop the paging by pressing any key on each handset or pressing
During an external call
on the base again.
Inquiry call
1. Press INT to put the external line on hold.
2. Press the handset number that you want to call.
3. After the other handset has answered, you can press INT repeatedly to
switch between the external line and the intercom.
If the other handset does not answer, press INT again to cancel the attempt
and return to the external line.
Out of range warning
When you are talking on the phone and you take the handset too far away
from the base, you’ll hear an alert tone through the speaker. You should
bring the handset back in range with the base. Failing to do so will result in
the call being disconnected.
When the handset is too far away from the base during standby, you will see
flashing.
Call transfer
While you are on an inquiry call with the other handset, press
handset on cradle. The call has now been transferred.
SEARCHNG
or place
Conference call
While you are in an inquiry call with the other handset, press and hold CONF
to set up a conference call between the external line and 2 handsets.
During the conference call, pressing CONF will put the external line on hold
and you can talk to the other handset in private. Press and hold CONF to
establish the conference call again.
Any handset hangs up during a conference call will leave the other handset
still connecting with the external call.
MULTI-HANDSET OPERATION
You have additional features if you have up to more than one handset
registered to the base.
Making an internal call
When the phone is in standby,
1. Press INT . turns on and you’ll hear an internal dialing tone.
2. Press the number of the handset that you want to call.
(Or you can press the handset number first, followed by INT .)
You will hear a busy tone if the other handset is not available.
or place handset on cradle.
To end an internal call, press
DEFAULT SETTINGS
Default settings are as follow:
Handset ringer melody: 1
Handset ringer volume: Level 3
Base ringer melody: 1
Base ringer volume: Level 3
Key tone: On
Backlit: On
Recall duration: Duration 1
Receiver/speaker volume: High
Handset Keypad lock: Off
Message waiting indication: Off
Answering an internal call
When you receive an intercom call, your handset will ring with blinking.
You can see the calling handset number on the screen.
when the phone is ringing, the handset ringer will be
If you press
turned off for this incoming internal call.
to answer.
Press
17
PIN for registration & deregistration: 0000
Answer machine: On
Base audio volume: 4
Call screening: On
Message alert: On
Greeting (OGM): Default
ICM/Memo: Empty
Time: Monday midnight
Ring Delay: Time saver
Security PIN for Answering System remote access: 000
CID does not work
properly
The CID Call waiting call
cannot be answered
Base charge light does
not work
The empty battery icon
appears soon after the
batteries are charged
The answering machine
does not record calls.
* Settings not listed here are not affected by resetting.
• Check with your local phone company that
you have the required services on your line.
• Let the phone ring at least once before
answering.
• Check with your Network operator to ensure
you have the service. Ensure the correct
recall duration is set.
• Make sure the handset is making contact in
the cradle.
• Replace the batteries with new ones.
• Make sure the answering machine is
connected to the power adaptor, and the
power adaptor is plugged into mains supply
which is switched on.
• Check to see if the answering machine is
full. If so, delete some or all of the
messages.
• Try switching off the power at the main
socket, and then turn it on again after 15
minutes.
Unable to record a memo • Check to see if there is already a memo. If
so, delete the old one.
• Check to see if the answering machine is
full. If so, delete some or all messages.
Unable to perform remote • Make sure you entered the correct security
operation
code.
• Use only a touch-tone phone.
TROUBLESHOOTING
Are you having trouble with your phone? Here are some of the most
common problems and solutions.
Problems
Solutions
The phone does not work • Make sure that adaptor and phone cord are
at all
connected properly.
• Check that the batteries are fully charged
and installed properly.
• This phone does not work during power
failure.
The phone does not ring • Make sure the adaptor and the phone cord
are connected properly.
• Move the handset closer to the base unit.
• Make sure the handset (or base) ringer has
not been accidentily turned off.
There is no dial tone
• Check that the phone cord is connected
properly.
• Check the handset is fully charged.
• Move the handset closer to the base unit.
• Try removing batteries from all handsets.
And disconnecting power on base. Leave for
2 minutes and replace batteries and restore
power to base.
• Try a corded phone in same telephone
socket and check for dial tone.
18
WARRANTY INFORMATION
This product is covered by a 12 month warranty against defective
workmanship or parts. The warranty does not extend to damage caused by
misuse, negligence, excessive voltage, faults on the telephone line or
lightning. This guarantee in no way affects your statutory rights. Full details of
the warranty are contained in the enclosed warranty card.
If you feel this product is not working correctly please consult the user guide
and ensure that you are using the product in accordance with the
instructions.
Remove all extra telephone equipment and connect only this telephone
directly to the telephone socket.
If the fault is still present, connect another telephone (if available) to the
telephone socket. The results will show you whether the fault lies with this
unit or with the telephone line. If the product is working correctly the fault is
on the telephone line. Please contact your network operator for assistance
To orders spare parts additional handsets, replacement batteries and
in case of any technical issues you may have with product please
consult our website for further information or send us an email for a
prompt response to your enquiry. In the unlikely event of a fault
developing, please contact us for assistance. If the product is then
found to be faulty you will be asked to return it directly to us with a
copy of the purchase receipt.
Australia
New Zealand
Oricom International Pty Ltd
PO Box 5681
South Windsor, NSW 2756
Atlas Gentech (NZ) Limited
Private Bag 14927,
Panmure, Auckland
Customer support
Customer support
Email: [email protected]
Web: www.oricom.com.au
Fax: (02) 4572 0939
Ph: 1300 889 785
Email: [email protected]
Web: www.atlasgentech.co.nz
Fax: (09) 574 2722
Ph: 0900 50 025 (Toll Call)
19