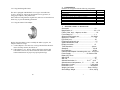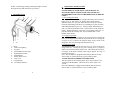
1
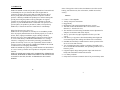
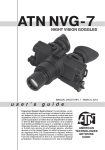
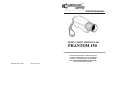
OPERATION MANUAL
NIGHT VISION MONOCULAR
PHANTOM 150
In USA: 3310 Prospect Ave. Cleveland, OH 44115
In Canada: 105 Sparks Ave, Toronto, ON. M2H 2S5
Canada Tel: (416) 663-6963 Fax: (416) 663-9065
Email: [email protected]
Internet: www.newcon-optik.com
NEWCON Optik™ 2005
Printed in Canada
IMPORTANT INFORMATION
Read prior to activation
ATTENTION!
Image quality of the object, which is being observed
when an image intensifier is functioning, depends
mainly upon operating characters
of this image intensifier.
Due to this fact black spots, which are inherent in the image
intensifier, may be seen in the field of view of a viewing device.
Field of view is shown below.
Central zone
You have just purchased a complicated electronic device. To operate it
properly, please read this manual carefully. Here are some common
Precautions that must be noted.
Boundary zone
• NEVER expose the opened objective lens of an active unit in
daylight. At daytime objective lens must be covered by caps. There
is a tiny hole in the cap to provide enough light for day time
operation. It is allowed to turn on the unit at daytime, but the lenses
must be covered by caps.
• NEVER aim active unit at intense light sources (i.e. lights,
headlamps, campfires, the moon, etc.)
• NEVER reverse the polarity of a battery
• NEVER disassemble the unit
Periphery zone
Permissible defects, which may be seen in the field of viewing device,
are given in the table
Type of
black spots
Immovable
Moving
2
Zone
Size of black spots,
mm
Number of
spots
Central
(circle of diameter
5.5 mm)
Up to 0.073
From 0.073 to 0.150
From 0.150 to 0.294
Not limited
5
1
Boundary
(circle of diameter
5.5-9.0 mm)
From 0.073 to 0.150
From 0.150 to 0.294
From 0.294 to 0.400
10
3
1
Periphery
(circle of diameter
9.0-11.0 mm)
Not limited
Not limited
Entire field
(circle of diameter
11.0 mm)
From 0.150 to 0.294
1
15
9. ACCEPTANCE CERTIFICATE
NIGHT VISION DEVICE PHANTOM 150
Serial Number _______________________________
Model
Phantom 150_____________________
• NEVER connect the unit to external power sources
• ALWAYS remove batteries when not in use for a long period
• ALWAYS keep the objective lenses covered when not in use
• ALWAYS store in a warm dry place when not in use
Corresponds to technical conditions ADSH 3.807.020 TU and is
admitted for use.
Date of production -___________________
Place for seal
Quality inspector ____________________
(Signature)
14
3
CONTENTS
1. Overview
i) Application and Features of Phantom 150
ii) Warning
iii) Precautions
2. Components
3. Specifications
4 .Construction
5. Operating Instructions
5.1 Pre-starting procedures
5.2 Testing of operation
5.3 Operation at night
5.4 Using interchangeable lenses
5.5 Using the camera / video adapter
6. Troubleshooting
7. Warranty
8. Customer support
9. Acceptance Certificate
THANK YOU FOR PURCHASING PHANTOM 150 NIGHT
VISION DEVICE. PLEASE DEMAND TO CHECK THE
DEVICE FOR PROPER OPERATION WHEN BUYING IT.
PLEASE READ ALL THE INSTRUCTIONS CAREFULLY
BEFORE USING.
THE SOLE OBLIGATION OF NEWCON UNDER THIS LIMITED
WARRANTY SHALL BE TO REPAIR OR REPLACE THE
COVERED PRODUCT, IN ACCORDANCE WITH THE TERMS
SET FORTH HEREIN.
NEWCON EXPRESSLY DISCLAIMS ANY LOST PROFITS,
GENERAL, SPECIAL, INDIRECT OR CONSEQUENTIAL
DAMAGES WHICH MAY RESULT FROM BREACH OF ANY
WARRANTY, OR ARISING OUT OF THE USE OR INABILITY TO
USE ANY NEWCON PRODUCT.
8. CUSTOMER SUPPORT
Should you experience any difficulties with your Newcon OPTIK
product, consult the enclosed manual. If the problem remains
unresolved, contact our customer support department at
(416) 663-6963. Our operating hours are 9am-5pm, Monday - Friday,
standard East time.
At no time should equipment be sent back to Newcon without
following the instructions of our technical support department.
Newcon accepts no responsibility for unauthorized returns.
To locate the NEWCON Authorized Dealer call:
Tel: (416) 663-6963 Fax: (416) 663-9065
E-mail: [email protected]
Internet: www.newcon-optik.com
The defective products should be shipped to:
1. OVERVIEW
In USA : 3310 Prospect Ave. Cleveland, OH 44115
Phantom 150 Night Vision monocular is a sophisticated opticoelectronic observation device designed to allow observations of
personnel and orientation in nighttime conditions. The unit is utilizing
an image intensifier which amplifies available moonlight, starlight or
man-made light. Waterproof, lightweight and compact - this advanced
system is the most affordable gen 2+ system on the market.
In Canada or from overseas: 105 Sparks Ave.
Toronto, ON. M2H 2S5 CANADA
13
4
7. WARRANTY
NEWCON OPTIK warrants this product against defects in material and
workmanship for one year from the date of the original date of
consumer's purchase, but no more than 18 months from the date of
delivery being indicated and stamped on the acceptance certificate
purchase. Should your NEWCON product prove defective during this
period, please bring the product securely packaged in its original
container or an equivalent, along with proof of the date of original
purchase, to your NEWCON Dealer. NEWCON will, repair (or at its
option replace), the product or part thereof, which, on inspection by
NEWCON, is found to be defective in materials or workmanship.
What This Warranty Does Not Cover:
NEWCON in not responsible for warranty service should the product
fail to be properly maintained or fail to function properly as a result of
misuse, abuse, improper installation, neglect, damage caused by
disasters such as fire, flood, and lightning, improper electrical current,
or service other than by a NEWCON Authorized Service. Postage,
insurance, or shipping costs incurred in presenting your NEWCON
product for warranty service are your responsibility. Please include a
cheques or money order made out to NEWCON OPTIK for the amount
of US$10.00 to cover shipping and handling.
NEWCON OPTIK may replace any product that has been discontinued
or is out of stock, by another current product of comparable value and
function.
NEWCON OPTIK DISCLAIMS ANY WARRANTIES, EXPRESS OR
IMPLIED, WHETHER OF MERCHANTABILITY OR FITNESS FOR
A PARTICULAR USE, EXCEPT AS EXPRESSLY SET FORTH
HEREIN.
Some of the typical activities where the Phantom 150 will be useful:
boating, search and rescue, law enforcement, wildlife observation,
security.
Features
•
•
•
•
•
•
•
•
•
•
•
•
•
Camera - video adaptable
Totally waterproof construction.
Rugged body.
High quality wide angle interchangeable lens ( m 42x1 ) .
The built in infra red illuminator allows observations in total
darkness (i.e. basement or cave);
The internal lens with focusing mechanism ensures adjustment for
sharpness for both near and remote objects;
The eye piece allows Dyoptric adjustment for the eyes of the
viewer;
Soft rubber eye-cap protects from the disturbing lateral light and
occasional impacts, thus making surveillance more comfortable;
Standard and commonly available batteries ensure operation of the
device of no less than 10 hours;
Two switch buttons ensure separate switching of the night vision
device and the IR LED illuminator, thus providing economic use of
batteries' power;
Original compact design and ergonomic shape make the device
handy and comfortable to hold with one hand
Low battery indicator
Delayed shot off ensures automatic shot off to prevent battery drain
12
5
Warning!
After transportation or keeping the device at temperature lower than 25°C (-13°F), the device must be warmed up to ambient temperature,
from -20°C (-4°F) to +40°C (104°F) during 2-3 hours.
Precaution
Phantom 150 is a precision optical instrument equipped with
electronics.
Therefore, it should be handled with due care.
• Keep your device away from direct sunlight, impacts, dust,
moisture, and sudden changes of temperatures.
• Do not touch the optical surfaces with fingers. Doing so may
damage the anti-reflection coating.
• Cleaning of optical surfaces is possible only with professional
camera lens cleaning supplies.
• To clean the exterior of the device, use only a soft clean cloth.
• Do not take the cover off the lens if not necessary.
• Keep away from heating appliances and central heating.
• Make sure to switch off the unit during periods of non-operation
and when storing the device for long period of time.
• Do not apply superfluous efforts at work with lens assembly, agile
elements and thread connections.
• Due to considerable optical magnification of the eye-piece some
small structures inside the tube coating in the form of dark and/or
white points may be seen in the field of view which does not affect
the serviceability of the device;
• The resolving power (resolution) may change in the direction from
the center towards the perimeter of the field of view. This is an
inherent feature of the image tube type utilized in the device. We
would recommend to place the scene of observation in the center of
the field of view.
• Make sure to remove the battery during periods of non-operating
and when storing the device for long period of time.
6.
TROUBLESHOOTING
The monocular does not work.
Check that the battery is installed properly.
Check the charge of the batteries.
Replace if it is weak.
The image does not appear in focus.
Bring the inspected object to the center of the image. Turning the eyepiece focusing lever (3) adjust to achieve the clearest image on the
screen. Then obtain the most clear-cut image of the object
The image doesn’t appear in focus. Bring the inspected object, if the
view still does not seem in focus, clean the lenses; they could be foggy
or dusty.
Unit flashes
It is normal for the unit to flash within the first 2 minutes of activation.
If the flashing continues afterwards the following is a possible cause:
bright environment (even with the cap closed !)
Condensation accumulates on the parts.
It is O.K. to use the monocular in cold. However, when the unit is
brought from the cold into a warm environment, it has to warm up for
up to 5 hours (not minutes !). Only then it is allowed to turn it ON
again.
Visibility decreases and / or disappears.
Bright light sources (moon, projectors or headlights) may cause
visibility to degrade or even completely disappear. Move the scope
away from the light source immediately. The image should be restored
in within 2 minutes.
Poor atmospheric conditions such as fog, haze or extremely dark
environments, will decrease the visibility distance of the unit.
6
11
2. COMPONENTS
Phantom 150 is supplied with the following components:
NAME
QUANT.
5.4 Using interchangeable lenses.
The unit is equipped with PENTAX “screw type” removable lens
F 50/1.2, M 42x1. It will accept most Pentax screw type lenses, or
using proper adapters, many other lenses.
Note: When screwing back the original lens, make sure to insert the lens
all the way, to prevent humidity penetration
5.5 Using the camera/video adapter.
Before using the adapter, remove carefully the rubber eyepiece, the
adapter consists of 2 rings:
a) Camera adapter is 52x1 mm size. It will go into the filter thread of
lenses for many cameras, lire Nikon etc.
b) Video adapter is 37 x 1mm. It will feet most Sony cameras and
some other as well. If not, check with local camera store and/or
camera manufacturer for proper step up/step down rings.
10
Phantom 150
Carrying strap
Case
Lenses (85/1.5, 300/4.5, 500/5.6, 1000/10 ) (optional)
Camera/video adapter (optional)
Lens cover
Manual
Warranty Registration Card
1
1
1
4
1
1
1
1
3. SPECIFICATIONS of Phantom 150
Generation ………………………………………… …2+
Magnification, X …. …………………………………2.3 ± 0.2
Field of View, angl.., degrees, not less......………….. 16°
Focus Range, m......……………. ………………….1 - ∞
Objective focal length, mm.. .. . . . . . . . . . . . . 50, M42x1
Objective F number …………………………………..1,2
Eye Relief, mm ……………………………………. …25
Eyepiece focal length, mm ……………………………15
System Resolution, mrad …………………………. …..1
Dioptric correction ……………………………….. ± 5
Tube Resolution, ………………………………..1p/mm
Standard ………………………………………. …..36-40
High Definition ……………………………….. …..45-64
Camera/video adapter connecting size, mm… 52x1/37x1
Power Supply …………………… …….3V Lithium CR2
Battery life, hours:
Without I/R ……………………………………… ……25
With I/R …………………………………………. ……10
Allowed illumination, lx …………. . . . . .5-10 -3 - 1x10 -1
Allowed external temperature, °C ……………-25 ÷ +40
Dimensions, inches …………………………..7.3x3.3x2,6
Dimensions, mm ……………………………..185x85x65
Weight, just viewer ………………………18oz; 0.535 kg
Gross Shipp. Weight ………………………..28 oz; 0,8 kg
7
NOTE : As the design is being continuously improved some
descriptions may differ from those given above.
4. CONSTRUCTION
3
4
5
1
2
8
7
9
12345678910-
6
10
Body
Lens Focusing Ring
Eye-piece
Switch Button for the Scope
IR Illuminator Switch
IR Illuminator
Battery House Cover
Lens Cover
Carrying Strap
Low battery indicator
8
5. OPERATION INSTRUCTIONS
WARNING!
NEVER OPERATE YOUR NIGHT VISION DEVICE IN
DAYLIGHT AREAS WITHOUT THE LENS COVER ON !
NEVER DIRECT THE LENS IN THE DIRECTION OF BRIGHT
LIGHT !
5.1 Pre-starting procedures.
1. Unpack the device. In order to replace the battery unscrew battery
house cover (7) and replace the battery observing the polarity
indicated; close cover (7). First, make sure the lens cap (8) is closed:
Check the functioning of the device by switching it on (click switch 4)
and looking through eye-piece (3). If power supply and the battery is
O.K., you will see greenish lit screen. If the screen is not lit, check the
battery. Replace the battery if necessary. If everything works, now is a
great time to fill the warranty card. You can find the unit’s serial
number on the button.
5.2. Testing of operation
Turn on the device using switch (4). Lens cap (8) must be on. Direct the
device on an object placed within 40-50 m from the viewer. Turning the
eye-piece (3) try to achieve the sharpest image on the screen of the
image tube. For close focusing rotate the front lens (2)
5.3. Operation at night
AT MOON LIGHT: Unscrew the lens cover (8). Turn on the device
using switch (4). Turning the eye-piece focusing lever (3) adjust to
achieve the most clear image on the screen. Then obtain the most clearcut image of the object focusing with ring,(2). Repeat the steps of
focusing if necessary.
Note: The ON button is equipped with automatic shut off circuitry.
After a while, it will shut itself off, to prevent battery drain.
AT INSUFFICIENT AMBIENT ILLUMINATION
Activate switch (4) for switching on the device. Press button (5) for
switching on IR illuminator. Direct the device on the object to be
viewed.
Note: The I/R button is equipped with automatic shot off circuitry.
After a while, it will shot itself off, to prevent battery drain.
9