1
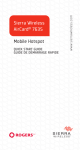
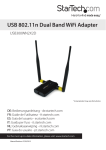
Quick Start
AirCard 785
Mobile Hotspot
Meet Your Hotspot
Before you connect your hotspot,
familiarize yourself with its LCD screen,
icons, buttons, and connectors.
Buttons and Connectors
Status LED
Micro USB port
Antenna connector
Status LED
The status LED indicates data connection
status:
•
•
•
Blue, slow blink. Ready.
Blue, double blink. Transferring data.
Amber, slow blink. The hotspot is not
connected to the network. For more
information, see Why can’t my hotspot
connect to the Internet? on page 15.
2
Navigation
button
Power button
Navigation Button
Press the Navigation button to cycle
through the LCD screens.
Power Button
Press and hold the Power button for two
seconds to power the hotspot on, five
seconds to turn the hotspot off.
LCD Screen
The LCD screen displays icons, data usage,
your WiFi name, and your WiFi password.
3
Icon
Description
1 bar. The hotspot signal is weak.
5 bars. The hotspot signal is strong.
Available network technology; varies
by service provider coverage.
Blue/white. WiFi offload is enabled
while the hotspot is connected to
WiFi.
Gray. WiFi offload is enabled while
the hotspot is not connected to WiFi.
Solid arrows display when the
hotspot is transmitting data.
System alerts require attention.
You received new SMS messages.
The percentage of remaining battery
charge.
The battery charge is less than 5%.
Purple. WiFi is active.
Gray. WiFi is inactive.
The number indicates the number of
devices that are connected.
4
Set Up Your Hotspot
Before you connect to your hotspot, you
must insert a micro-SIM card, power up the
hotspot, and charge your battery.
Note:  To obtain a micro-SIM card, contact
your Internet service provider.
¾¾ To insert the micro-SIM card:
1. Remove the back cover using the
thumb catch on the corner of the
hotspot.
2. Remove the battery.
3. Insert the micro-SIM card.
5
4. Ensure that the micro-SIM card is
seated securely.
5. Reinstall the battery.
If the battery does not install easily,
check the orientation.
6. Replace the cover.
¾¾ To power on your hotspot:
Press and hold the Power button until
the LCD screen lights.
¾¾ To recharge your battery:
1. Connect the micro-USB cable to your
hotspot.
2. Connect the other end of the cable
to the USB port on your computer or
other device.
Note:  Your battery comes partially
charged.
¾¾ To connect to your mobile hotspot:
1. Ensure that WiFi is enabled on your
computer or other device.
2. On your computer or other device,
search for WiFi networks:
• For Windows devices, click the
Internet Access icon.
• For Mac devices, from the WiFi
menu, select the network.
6
•
For tablets, look for a settings
option.
3. Select the WiFi name displayed on your
LCD screen.
4. Enter the WiFi password exactly as it
appears on the LCD screen.
Passwords are case-sensitive.
When a computer or mobile device
connects to the hotspot, a 1 displays
beside the WiFi icon on the LCD screen.
Note:  For you to connect to the
mobile broadband network, your SIM
account must be active. If you use a
prepaid or pay-as-you-go micro-SIM,
the account balance must be positive.
5. If desired, launch your web browser
and visit http://netgear.aircard to
personalize your settings.
The hotspot is completely secured
using its default security settings.
Note:  If you see a message indicating that
the mobile broadband is disconnected, you
might need to add an APN. For information
about adding APNs, refer to the user
manual.
7
Hotspot Web Page
On the hotspot web page, you can do the
following:
•
•
•
•
•
•
•
Change the WiFi SSID, WiFi password,
admin password, and WiFi encryption
Set autoconnect options
View data usage
Read SMS messages
View alerts
View and change other settings
Check device status
¾¾ To access your hotspot web page:
1. Launch a web browser from a
computer or WiFi device that is
connected to the network.
2. Enter http://netgear.aircard.
3. Enter the administrator login password.
The default password is password.
The hotspot web page displays.
8
Change Security Settings
The WiFi network name and admin
password provide security. Your mobile
hotspot comes with a randomly generated
and secured WiFi network name (SSID) and
password that you can continue to use as
is. Read this section if you want to change
your security settings.
¾¾ To change the WiFi network name:
1. Launch a web browser from a
computer or WiFi device that is
connected to the hotspot.
2. Enter http://netgear.aircard.
3. Enter the administrator login password.
The default password is password.
The hotspot web page displays.
4. Select WiFi > Options.
5. Enter a new WiFi network name.
6. Click the Submit button.
¾¾ To change the WiFi password:
1. Launch a web browser from a
computer or WiFi device that is
connected to the hotspot.
2. Enter http://netgear.aircard.
The hotspot web page displays.
9
3. Enter the administrator login password.
The default password is password.
The hotspot web page displays.
4. Select WiFi > Options.
The WiFi options screen displays.
5. Enter a new WiFi password.
If you change your password, be sure
to keep a record of it and store it in a
safe place.
6. Click the Submit button.
Your changes are saved.
10
Connect Devices
You can add devices to your network using
a WiFi network manager or WPS if the
device has WPS capability.
Note:  WPS enables you to connect WPSenabled devices to a WiFi network without
using a keyboard.
¾¾ To connect additional WiFi-capable
devices:
1. Open the WiFi network manager on
your computer or other WiFi device
(smartphones, tablets, media players,
cameras, and so on).
2. Select the WiFi network name
displayed on the LCD screen.
3. Enter the WiFi password displayed on
the LCD screen.
4. Launch your browser.
11
¾¾ To connect with devices using WPS:
1. Press the Power or Navigation button
to awaken the LCD screen.
2. Press the Navigation button until WPS
setup screen displays.
3. To activate WPS, press the Power
button.
4. Within two minutes, press the WPS
button on the device that you want to
connect to your WiFi network.
The hotspot and the WiFi device
automatically communicate and
establish a connection.
12
Monitor Data Usage
You can monitor data usage using either
the LCD screen or the web page. Visit
the hotspot web page to configure your
monthly data usage.
¾¾ To view data usage on the LCD
screen:
Awaken the LCD screen by pressing
either the Power or the Navigation
button.
¾¾ To configure your monthly data
usage:
1. Launch a web browser from a
computer or WiFi device that is
connected to the hotspot.
2. Enter http://netgear.aircard.
3. Enter the administrator login password.
The default password is password.
4. Under Billing Cycle, enter the monthly
start date when your monthly data
usage will automatically reset.
13
Frequently Asked Questions
Should I change my access point name
(APN)?
You do not need to change or set up your
APN if your mobile broadband service is
working.
You do need to change your APN if an
alert displays on the LCD screen either
prompting you to do so, or asking you to
confirm the APN settings by accessing the
hotspot web page.
Note:  For information about APNs, refer to
the user manual.
How do I go back to the hotspot web
page?
Launch a web browser from a computer
or WiFi device that is connected to the
network and enter http://netgear.
aircard or http://192.168.1.1.
What is my admin password?
The default administrator login password is
password.
14
What do I do if I changed the WiFi
password or administrator login
password and then forgot it?
Reset the hotspot to the factory defaults.
To reset the hotspot, press and hold the
Navigation and Power buttons for five
seconds.
Why can’t my hotspot connect to the
Internet?
Confirm that your device is able to connect
to your hotspot:
•
•
•
•
•
Verify that you are connecting with the
correct WiFi SSID and password.
Check WiFi card stability by turning the
WiFi on the computer or WiFi device
off and then back on.
Restart your computer and restart any
WiFi device that is connected to the
hotspot.
Connect with another computer or
WiFi device.
Turn off your hotspot, remove the
battery, wait 10 seconds, return the
battery, and power on your hotspot.
Confirm that your hotspot is connected
to the Internet.
15
Note:  If you do not see the data activity
icons , your hotspot is not connected to
the Internet.
If your hotspot is not connected to the
Internet, do the following:
•
•
•
•
Check the alerts screen and resolve
any outstanding issues.
If you are using a new micro-SIM card
for the first time, confirm that your
micro-SIM’s APN and credentials are
configured properly. Visit
http://netgear.aircard and check your
settings.
Check your account details with your
Internet service provider to see if your
recharge credit expired.
You might need to add an APN. For
more information, refer to the user
manual.
Why can’t I power on my hotspot?
Ensure that the battery is inserted in the
hotspot and that it is fully charged or is
charging.
16
Accessories
The availability of the following accessories
varies depending on your market:
Ethernet and antenna charging cradle.
A cradle provides in-dock hotspot charging
and an Ethernet port and can enhance
3G/4G performance in areas with poor
coverage.
Extended battery. The extended battery
is rechargeable and lasts for up to 16 hours
of active use.
WiFi range extender. An extender
broadens your network coverage so that
you can stay connected in every corner of
your home and office.
Antennas. Antennas extend signal strength
and range indoors or in fringe network
areas.
For more information, visit
http://www.netgear.com/
aircardaccessories.
17
Technical Specifications
Technical Specifications
Network
and band
frequency
LTE TDD. Band 40 (2300 MHz)
3G WCDMA. 2100 MHz
2G GSM. 900/1800 MHz
WiFi
Up to 15 users
connections
Dimensions 110 x 69 x 14.6 mm
(W×H×D) 4.3 x 2.7 x 5.75 inches
Weight
127 g
External
antenna
ports
TS9
Standby
time
Operating
systems
Up to 300 hours
Windows® 8.1, 8, Windows 7,
Vista SP2, and XP SP3
Mac OS 10.6.8 and later
18
NETGEAR AirCard App
Download the complimentary mobile app
from www.netgear.com/AirCardApps. Use
this app to view your hotspot’s settings,
connection status, and data usage
information from your smartphone or
tablet.
19
Support
Thank you for purchasing this NETGEAR product.
After installing your device, locate the serial number on the
label of your product and use it to register your product at
https://my.netgear.com.
You must register your product before you can use NETGEAR
telephone support. NETGEAR recommends registering your
product through the NETGEAR website.
For product updates and web support, visit
http://support.netgear.com.
NETGEAR recommends that you use only the official NETGEAR
support resources.
You can get the user manual online at
http://downloadcenter.netgear.com or through a link in the
product’s user interface.
Trademarks
© NETGEAR, Inc. NETGEAR and the NETGEAR Logo are
trademarks of NETGEAR, Inc. Any non-NETGEAR trademarks
are used for reference purposes only.
Compliance
For regulatory compliance information, visit
http://www.netgear.com/about/regulatory/.
See the regulatory compliance document before connecting
the power supply.
NETGEAR, Inc.
350 East Plumeria Drive
San Jose, CA 95134, USA
December 2014