1
Inaset
for NEAX 2000 IPS System
User Guide
NEC America, Inc.
November, 2002
Stock # 152026
NDA-30549, Issue 1.0
Liability Disclaimer
1(&$PHULFD,QFUHVHUYHVWKHULJKWWRFKDQJHWKHVSHFLILFDWLRQV
IXQFWLRQVRUIHDWXUHVDWDQ\WLPHZLWKRXWQRWLFH
1(&$PHULFD,QFKDVSUHSDUHGWKLVGRFXPHQWIRUWKHH[FOXVLYHXVHRI
LWVHPSOR\HHVDQGFXVWRPHUV7KHLQIRUPDWLRQFRQWDLQHGKHUHLQLVWKH
SURSHUW\RI1(&$PHULFD,QFDQGVKDOOQRWEHUHSURGXFHGZLWKRXW
SULRUZULWWHQDSSURYDOIURP1(&$PHULFD,QF
1($;DQG'WHUP DUHUHJLVWHUHGWUDGHPDUNVRI1(&&RUSRUDWLRQ
1(&$PHULFD,QF
3ULQWHGLQWKH86$
06'260LFURVRIW:LQGRZV:LQGRZV17DQG:LQGRZVDUH
UHJLVWHUHGWUDGHPDUNVRI0LFURVRIW&RUSRUDWLRQ0LFURVRIW:LQGRZV
DQG0LFURVRIW:LQGRZVDUHWUDGHPDUNVRI0LFURVRIW&RUSRUDWLRQ
$OORWKHUEUDQGRUSURGXFWQDPHVDUHRUPD\EHWUDGHPDUNVRU
UHJLVWHUHGWUDGHPDUNVRIDQGDUHXVHGWRLGHQWLI\SURGXFWVRUVHUYLFHV
RIWKHLUUHVSHFWLYHRZQHUV
END USER LICENSE AGREEMENT
PLEASE READ CAREFULLY THE FOLLOWING TERMS AND CONDITIONS BEFORE USING THE INASETTM: USING THE
PRODUCT SHALL INDICATE THAT YOUR COMPANY HAS ACCEPTED THE TERMS AND CONDITIONS OF THIS LEGAL
AGREEMENT. AS REFERENCED HEREIN, IF YOU DO NOT AGREE TO THESE TERMS AND CONDITIONS, YOU SHOULD
IMMEDIATELY RETURN THE PRODUCT UNUSED TO THE COMPANY FROM WHICH YOU PURCHASED IT WITHIN A
REASONABLE PERIOD OF TIME (NOT TO EXCEED ONE MONTH) FOR A FULL REFUND OF MONEY PAID FOR THE PRODUCT.
NEC Infrontia Corporation ("NEC-i") and its Licensor NEC
Infrontia, Inc. ("NECII") grants to sublicense to the end-user
("You") the use of the Software preinstalled in the InasetTM you
acquired ("Product") pursuant to the following terms and
conditions.
1. TERMS
(1) This Agreement is effective upon using the Product and
shall remain in force until terminated.
(2) You may terminate it voluntarily at any time by written
notice as indicated in Section 9.
(3) NECII may terminate this Agreement without notice upon
your failure to abide by this Agreement.
(4) All provisions of this Agreement relating to disclaimers of
warranties, limitation of liability, remedies, or damage, and
NECII or its supplier’s proprietary rights shall survive
termination.
2. LICENSE
NECII grants you a nonexclusive and royalty-free license to use
the software solely on the Product which is provided to you as
preinstalled in the Product ("Software").
3.RESTRICTIONS
(1) You may not rent or lease the Software, but you may
transfer the Product, the Software (not a part) and
accompanying documentation on a permanent basis,
provided that you retain no copies of the Software and the
recipient agrees to be bound by all of the terms and
conditions of this Agreement.
(2) You agree not to modify, alter, decompile, disassemble,
reverse engineer or otherwise attempt to derive the Source
Code of the Software.
(3) You may not copy the Software.
(4) You may not use the Software other than in connection
with the Product.
(5) You will not export or re-export the Software without the
appropriate United States or foreign government licenses.
4. TITLE
Title to and ownership of the Software, related documentation
and any reproduction thereof shall remain with NECII, its
affiliates and its suppliers and the trademarks are the property
of such trademark owners. This Agreement does not grant you
any right (whenever by license, ownership or otherwise) in or to
patents, copyrights, trade secrets, trade names, trademarks or
any other intellectual property right with respect to the Software.
5. COPYRIGHT
THE SOFTWARE IS COPYRIGHTED AND, EXCEPT AS
PERMITTED BY THIS AGREEMENT, YOU MAY NOT
DUPLICATE THE SOFTWARE OR DISCLOSE IT TO ANY
OTHER PARTY.
6. LIMITED WARRANTY
YOU AGREE THAT THE SOFTWARE IS PROVIDED AND
LICENSED "AS IS." TO THE MAXIMUM EXTENT PERMITTED
BY APPLICABLE LAW, NECII AND ITS SUPPLIERS
DISCLAIM ALL OTHER WARRANTIES, EITHER EXPRESS
OR IMPLIED, INCLUDING, BUT NOT LIMITED TO, IMPLIED
WARRANTIES OF MERCHANTABILITY, FITNESS FOR A
PARTICULAR PURPOSE AND NONINFRINGEMENT, WITH
REGARD TO THE SOFTWARE. YOU BEAR THE ENTIRE
RISK RELATING TO THE QUALITY OF THE SOFTWARE
AND, IF THE SOFTWARE PROVES TO HAVE ANY DEFECTS,
YOU ASSUME THE COST OF ANY NECESSARY SERVICING
OR REPAIRS. SOME STATES DO NOT ALLOW THE
EXCLUSION OF IMPLIED WARRANTIES, SO THAT THE
ABOVE EXTENSION MAY NOT APPLY TO YOU. THIS
WARRANTY GIVES YOU SPECIAL LEGAL RIGHTS AND
YOU MAY ALSO HAVE OTHER RIGHTS WHICH VARY FROM
STATE TO STATE.
7. LIMITATION OF LIABILITY
TO THE MAXIMUM EXTENT PERMITTED BY APPLICABLE
LAW, IN NO EVENT SHALL NECII OR ITS SUPPLIERS BE
LIABLE FOR ANY DAMAGES WHATSOEVER (INCLUDING,
WITHOUT LIMITATION, LOSS OF USE, LOSS OF PROFIT,
INTERRUPTATION OF BUSINESS, OR ANY INDIRECT,
SPECIAL, INCIDENTAL OR CONSEQUENTIAL DAMAGES OF
ANY KIND) REGARDLESS OF THE FORM OF ACTION
WHETHER IN CONTRACT, TORT (INCLUDING
NEGLIGENCE), STRICT PRODUCT LIABILITY OR
OTHERWISE, EVEN IF NECII HAS BEEN ADVISED OF THE
POSSIBILITY OF SUCH DAMAGES. IN NO EVENT SHALL
NECII BE LIABLE FOR ANY AMOUNT IN EXCESS OF THE
AMOUNT YOU ACTUALLY PAID FOR THE SOFTWARE
PORTION OF THE PRODUCT. BECAUSE SOME STATES DO
NOT ALLOW THE EXCLUSION OR LIMITATION OF LIABILITY
FOR INCIDENTAL OR CONSEQUENTIAL DAMAGES, THE
ABOVE LIMITATIONS MAY NOT APPLY TO YOU.
8. OTHERS
(1) This Agreement shall be construed and interpreted
according to the laws of Connecticut.
(2) The Software is a "commercial item" as that term is defined
in 48 C.F.R. 2.101, consisting of "commercial computer
software" and "commercial computer software
documentation" as such terms are used in 48 C.F.R.
12.212. Consistent with 48 C.F.R. 12.212 and 48 C.F.R.
227.7202-1 through 227.7202-4, NECII provides the
Software to U.S. Government End Users only pursuant to
the terms and conditions therein.
(3) You are hereby notified that Wind River K.K. and its
licensors ("Wind River") are a third-party beneficiary to this
Agreement to the extent that this Agreement contains
provisions which relate to your use of the software
provided by Wind River. Such provisions are made
expressly for the benefit of Wind River and are enforceable
by Wind River in addition to NECII.
9. NOTICE
NEC Infrontia, Inc.
6535 N. State Highway 161, Irving, Texas 75039-2402
Attn: CNG Contracts Administration
Main Telephone: 214-262-2000
i
Contents
Introduction
1-1
What is Inaset? . . . . . . . . . . . . . . . . . . . . . . . . . . . . . . . . . . . . . . . . . . . . . . . . . 1-1
How this Guide is Organized. . . . . . . . . . . . . . . . . . . . . . . . . . . . . . . . . . . . . . . 1-2
Phone Features
2-1
Feature Descriptions . . . . . . . . . . . . . . . . . . . . . . . . . . . . . . . . . . . . . . . . . . . . . 2-2
Setup Options
3-1
Setting Your Inaset Options. . . . . . . . . . . . . . . . . . . . . . . . . . . . . . . . . . . . . . . . 3-1
Entering Text Using the Dial Keys . . . . . . . . . . . . . . . . . . . . . . . . . . . . . . . . . . 3-2
Favorites . . . . . . . . . . . . . . . . . . . . . . . . . . . . . . . . . . . . . . . . . . . . . . . . . . . . . . 3-3
Setting Your Favorites . . . . . . . . . . . . . . . . . . . . . . . . . . . . . . . . . . . . . . . . . . . 3-3
DSS Speed Dial Keys . . . . . . . . . . . . . . . . . . . . . . . . . . . . . . . . . . . . . . . . . . . . 3-7
Setting the DSS Keys . . . . . . . . . . . . . . . . . . . . . . . . . . . . . . . . . . . . . . . . . . . . 3-7
Using the DSS Keys . . . . . . . . . . . . . . . . . . . . . . . . . . . . . . . . . . . . . . . . . . . . . 3-9
Display Screen Options. . . . . . . . . . . . . . . . . . . . . . . . . . . . . . . . . . . . . . . . . . 3-10
Back Light Level . . . . . . . . . . . . . . . . . . . . . . . . . . . . . . . . . . . . . . . . . . . . . . .
Font Size. . . . . . . . . . . . . . . . . . . . . . . . . . . . . . . . . . . . . . . . . . . . . . . . . . . . .
Language . . . . . . . . . . . . . . . . . . . . . . . . . . . . . . . . . . . . . . . . . . . . . . . . . . . .
Screen Saver . . . . . . . . . . . . . . . . . . . . . . . . . . . . . . . . . . . . . . . . . . . . . . . . .
3-10
3-11
3-12
3-13
Feature Options. . . . . . . . . . . . . . . . . . . . . . . . . . . . . . . . . . . . . . . . . . . . . . . . 3-14
Microphone On / Off . . . . . . . . . . . . . . . . . . . . . . . . . . . . . . . . . . . . . . . . . . . .
Select Ringer Tone . . . . . . . . . . . . . . . . . . . . . . . . . . . . . . . . . . . . . . . . . . . . .
Transmission / Receiving Volume. . . . . . . . . . . . . . . . . . . . . . . . . . . . . . . . . .
Activate Ringer . . . . . . . . . . . . . . . . . . . . . . . . . . . . . . . . . . . . . . . . . . . . . . . .
Inaset User Guide - Issue 1.0
3-14
3-14
3-14
3-15
ii
Contents
Security Password. . . . . . . . . . . . . . . . . . . . . . . . . . . . . . . . . . . . . . . . . . . . . . 3-16
Setting (or Changing) Your Password . . . . . . . . . . . . . . . . . . . . . . . . . . . . . . 3-16
Call Functions
4-1
Home Application Window . . . . . . . . . . . . . . . . . . . . . . . . . . . . . . . . . . . . . . . . 4-1
Line Status Icons . . . . . . . . . . . . . . . . . . . . . . . . . . . . . . . . . . . . . . . . . . . . . . . 4-2
Home Menu . . . . . . . . . . . . . . . . . . . . . . . . . . . . . . . . . . . . . . . . . . . . . . . . . . . 4-3
Phone Login . . . . . . . . . . . . . . . . . . . . . . . . . . . . . . . . . . . . . . . . . . . . . . . . . . . 4-4
Account /Authorization Codes . . . . . . . . . . . . . . . . . . . . . . . . . . . . . . . . . . . . . . 4-5
Account Code . . . . . . . . . . . . . . . . . . . . . . . . . . . . . . . . . . . . . . . . . . . . . . . . . . 4-5
Forced Account Code . . . . . . . . . . . . . . . . . . . . . . . . . . . . . . . . . . . . . . . . . . . . 4-5
Authorization Code . . . . . . . . . . . . . . . . . . . . . . . . . . . . . . . . . . . . . . . . . . . . . . 4-6
Answering a Call . . . . . . . . . . . . . . . . . . . . . . . . . . . . . . . . . . . . . . . . . . . . . . . . 4-7
Making a Call. . . . . . . . . . . . . . . . . . . . . . . . . . . . . . . . . . . . . . . . . . . . . . . . . . . 4-7
Putting a Call on HOLD . . . . . . . . . . . . . . . . . . . . . . . . . . . . . . . . . . . . . . . . . . . 4-8
Last Number Redial. . . . . . . . . . . . . . . . . . . . . . . . . . . . . . . . . . . . . . . . . . . . . . 4-8
Transferring a Call. . . . . . . . . . . . . . . . . . . . . . . . . . . . . . . . . . . . . . . . . . . . . . . 4-8
Callback. . . . . . . . . . . . . . . . . . . . . . . . . . . . . . . . . . . . . . . . . . . . . . . . . . . . . . . 4-9
Making a Conference Call . . . . . . . . . . . . . . . . . . . . . . . . . . . . . . . . . . . . . . . . . 4-9
Consult Third Party during a Call . . . . . . . . . . . . . . . . . . . . . . . . . . . . . . . . . . 4-10
Call Camp-On . . . . . . . . . . . . . . . . . . . . . . . . . . . . . . . . . . . . . . . . . . . . . . . . . 4-10
Call Park . . . . . . . . . . . . . . . . . . . . . . . . . . . . . . . . . . . . . . . . . . . . . . . . . . . . . 4-11
Call Forwarding . . . . . . . . . . . . . . . . . . . . . . . . . . . . . . . . . . . . . . . . . . . . . . . . 4-12
Save & Redial a Number. . . . . . . . . . . . . . . . . . . . . . . . . . . . . . . . . . . . . . . . . 4-13
Call Pick-Up. . . . . . . . . . . . . . . . . . . . . . . . . . . . . . . . . . . . . . . . . . . . . . . . . . . 4-14
Outgoing Trunk Queuing . . . . . . . . . . . . . . . . . . . . . . . . . . . . . . . . . . . . . . . . . 4-14
Paging . . . . . . . . . . . . . . . . . . . . . . . . . . . . . . . . . . . . . . . . . . . . . . . . . . . . . . . 4-15
Meet-Me Page . . . . . . . . . . . . . . . . . . . . . . . . . . . . . . . . . . . . . . . . . . . . . . . . 4-15
Inaset User Guide - Issue 1.0
Contents
iii
Paging Transfer . . . . . . . . . . . . . . . . . . . . . . . . . . . . . . . . . . . . . . . . . . . . . . . 4-16
Boss/Secretary Transfer . . . . . . . . . . . . . . . . . . . . . . . . . . . . . . . . . . . . . . . . . 4-17
Boss/Secretary Override . . . . . . . . . . . . . . . . . . . . . . . . . . . . . . . . . . . . . . . . . 4-18
Executive Override . . . . . . . . . . . . . . . . . . . . . . . . . . . . . . . . . . . . . . . . . . . . . 4-20
Do Not Disturb / Privacy . . . . . . . . . . . . . . . . . . . . . . . . . . . . . . . . . . . . . . . . . 4-20
Intercom . . . . . . . . . . . . . . . . . . . . . . . . . . . . . . . . . . . . . . . . . . . . . . . . . . . . . 4-21
Automatic Intercom . . . . . . . . . . . . . . . . . . . . . . . . . . . . . . . . . . . . . . . . . . . . . 4-21
Manual Intercom . . . . . . . . . . . . . . . . . . . . . . . . . . . . . . . . . . . . . . . . . . . . . . . 4-21
Dial Intercom. . . . . . . . . . . . . . . . . . . . . . . . . . . . . . . . . . . . . . . . . . . . . . . . . . 4-22
Timed Reminder . . . . . . . . . . . . . . . . . . . . . . . . . . . . . . . . . . . . . . . . . . . . . . . 4-22
Directory Application
5-1
Using the Directory Application . . . . . . . . . . . . . . . . . . . . . . . . . . . . . . . . . . . . . 5-1
Entering Text Using the Dial Keys . . . . . . . . . . . . . . . . . . . . . . . . . . . . . . . . . . 5-2
Directory Application Windows . . . . . . . . . . . . . . . . . . . . . . . . . . . . . . . . . . . . . 5-3
Directory Main Window . . . . . . . . . . . . . . . . . . . . . . . . . . . . . . . . . . . . . . . . . . . 5-3
Directory Detail Window . . . . . . . . . . . . . . . . . . . . . . . . . . . . . . . . . . . . . . . . . . 5-5
Placing Calls from the Directory . . . . . . . . . . . . . . . . . . . . . . . . . . . . . . . . . . . . 5-7
Place a Call from Directory Main Window. . . . . . . . . . . . . . . . . . . . . . . . . . . . . 5-7
Place a Call from Detail Window. . . . . . . . . . . . . . . . . . . . . . . . . . . . . . . . . . . . 5-7
Place a Call by Searching the Directory . . . . . . . . . . . . . . . . . . . . . . . . . . . . . . 5-7
Add, Modify, Delete a Directory Entry . . . . . . . . . . . . . . . . . . . . . . . . . . . . . . . . 5-9
Add a Directory Entry . . . . . . . . . . . . . . . . . . . . . . . . . . . . . . . . . . . . . . . . . . . . 5-9
Modify a Directory Entry . . . . . . . . . . . . . . . . . . . . . . . . . . . . . . . . . . . . . . . . . . 5-9
Delete a Directory Entry . . . . . . . . . . . . . . . . . . . . . . . . . . . . . . . . . . . . . . . . . 5-10
Managing the Directory . . . . . . . . . . . . . . . . . . . . . . . . . . . . . . . . . . . . . . . . . . 5-11
Download Data . . . . . . . . . . . . . . . . . . . . . . . . . . . . . . . . . . . . . . . . . . . . . . . .
Upload Data . . . . . . . . . . . . . . . . . . . . . . . . . . . . . . . . . . . . . . . . . . . . . . . . . .
Changing Directory Character Font Size . . . . . . . . . . . . . . . . . . . . . . . . . . . .
Sorting Directory List. . . . . . . . . . . . . . . . . . . . . . . . . . . . . . . . . . . . . . . . . . . .
Changing Item Name in Detail Window . . . . . . . . . . . . . . . . . . . . . . . . . . . . .
Browser Application
Inaset User Guide - Issue 1.0
5-11
5-11
5-12
5-12
5-13
6-1
iv
Contents
Using the Browser . . . . . . . . . . . . . . . . . . . . . . . . . . . . . . . . . . . . . . . . . . . . . . . 6-1
Entering Text Using the Dial Keys . . . . . . . . . . . . . . . . . . . . . . . . . . . . . . . . . . 6-2
Browser Application Window . . . . . . . . . . . . . . . . . . . . . . . . . . . . . . . . . . . . . . 6-3
Using Your Home Page. . . . . . . . . . . . . . . . . . . . . . . . . . . . . . . . . . . . . . . . . . . 6-6
Viewing the Home Page . . . . . . . . . . . . . . . . . . . . . . . . . . . . . . . . . . . . . . . . . . 6-6
Setting the Home Page. . . . . . . . . . . . . . . . . . . . . . . . . . . . . . . . . . . . . . . . . . . 6-6
Setting for a Proxy Server . . . . . . . . . . . . . . . . . . . . . . . . . . . . . . . . . . . . . . . . . 6-8
Using Application Pages . . . . . . . . . . . . . . . . . . . . . . . . . . . . . . . . . . . . . . . . . . 6-9
Viewing Application Pages . . . . . . . . . . . . . . . . . . . . . . . . . . . . . . . . . . . . . . . . 6-9
Setting the Application Page Presets . . . . . . . . . . . . . . . . . . . . . . . . . . . . . . . . 6-9
Go Menu . . . . . . . . . . . . . . . . . . . . . . . . . . . . . . . . . . . . . . . . . . . . . . . . . . . . . 6-11
Configure Control & Soft Keys . . . . . . . . . . . . . . . . . . . . . . . . . . . . . . . . . . . . 6-12
Changing the Control Key Functions . . . . . . . . . . . . . . . . . . . . . . . . . . . . . . . 6-12
Changing the Soft Key Functions . . . . . . . . . . . . . . . . . . . . . . . . . . . . . . . . . . 6-13
Viewing Telephony PBX Information . . . . . . . . . . . . . . . . . . . . . . . . . . . . . . . . 6-14
Inaset User Guide - Issue 1.0
Quick Start
7KLV4XLFN6WDUWFDQGLUHFW\RXWRWKHLQIRUPDWLRQ\RXQHHGWRTXLFNO\
DQGHDVLO\XVH\RXU1(&,QDVHWSKRQH
• Getting Started with Your Inaset Phone
%HIRUHILUVWXVLQJ\RXU,QDVHWSKRQHVHH&KDSWHU3KRQH)HDWXUHVIRU
DGHVFULSWLRQRIWKHFRQWUROVNH\VDQGGLVSOD\RI\RXU,QDVHWSKRQH
• Using Your Inaset Phone
<RXFDQSHUVRQDOL]HWKH,QDVHWGLVSOD\ZLWKRSWLRQVGHVFULEHGLQ
&KDSWHU6HWXS2SWLRQV
&KDSWHU&DOO)XQFWLRQVGHVFULEHVWKH+RPHDSSOLFDWLRQDQGKRZWR
DQVZHUDQGPDNHFDOOVZLWK\RXU,QDVHWSKRQH
• Using the Inaset Applications
7ZRDSSOLFDWLRQV'LUHFWRU\DQG%URZVHUDGGPDQ\H[SDQGHGIXQFWLRQV
WR,QDVHW6HH&KDSWHU'LUHFWRU\$SSOLFDWLRQWROHDUQKRZWRXVHWKLV
,QDVHWDSSOLFDWLRQ
7KH%URZVHUDGGVDQLQWUDQHWLQWHUQHWFDSDELOLW\WR,QDVHW7KLV
DSSOLFDWLRQLVGHVFULEHGLQ&KDSWHU%URZVHU$SSOLFDWLRQ
Inaset User Guide - Issue 1.0
Inaset User Guide - Issue 1.0
1-1
1
Introduction
7KLVJXLGHSURYLGHVWKHLQIRUPDWLRQQHHGHGWRRSHUDWHWKH1(&,QDVHW
SKRQH7KHWRSLFVLQWKLVFKDSWHULQFOXGH
Chapter Topics
:KDWLV,QDVHW"
+RZWKLV*XLGHLV2UJDQL]HG
What is Inaset?
7KH,QDVHWGHVNWRSSKRQHLVDQDGYDQFHGVWDWHRIWKHDUW,3
FRPPXQLFDWLRQVSURGXFW$VDQLQWHJUDOSDUWRIWKH1(211(&
(QWHUSULVH2SHQ1HWZRUNLWFDQEHXVHGLQDQ\DSSOLFDWLRQZKHUHD
WHOHSKRQHFDQEHXVHGDQGLVIXOO\LQWHJUDWHGZLWKWKH1(&OLQHRI,3
'WHUPRIIHULQJV
,QDVHWIXQFWLRQVDVDVWDQGDORQHVRIWZDUH,3SKRQHLQDSHHUWRSHHU
QHWZRUNZLWKD1(&3%;7KLVDOORZVIHDWXUHVVXFKDVVSHHGGLDO
QXPEHUVYRLFHPDLOLQGLFDWLRQRQOLQHGLUHFWRULHVDQGRWKHUH[SDQGHG
IXQFWLRQVFRQILJXUHGDQGUHDG\IRUDFWLYDWLRQLPPHGLDWHO\XSRQORJJLQJ
LQWRWKHQHWZRUN
,QDVHWEULQJV(QWHUSULVHIHDWXUHVWRWKHGHVNWRS
8VHUFRQQHFWVYLDWKH,QDVHWSKRQH
7KHXVHUKDVDVHOIFRQILJXUDEOHGLVSOD\IRUVHWWLQJVSHHGGLDOVDQG
IDYRULWHIXQFWLRQV
8VHUVDUHDEOHWRPDNHDQGUHFHLYHFDOOVZLWKLQDFRQYHUJHG
HQWHUSULVHQHWZRUN
([SDQGHGIHDWXUHVSURYLGH&RUSRUDWHDQG3HUVRQDO'LUHFWRULHVDQG
ZHEEURZVLQJ
$OWKRXJKWKH,QDVHWLVGHVLJQHGIRUFRPSDWLELOLW\ZLWKWKH,3QHWZRUNLW
DOORZVFRQWLQXHGXVHRIVWDQGDUG3%;VRIWZDUHIXQFWLRQV,WHQDEOHV\RX
WRSHUIRUPWKHWHOHSKRQHSURFHGXUHVLQPXFKWKHVDPHZD\DV\RX
ZRXOGRQD'WHUP6HULHV(
Inaset User Guide - Issue 1.0
1-2
Introduction
How this Guide is Organized
Chapter 1
Introduction
Chapter 2
Phone Features
7KLVFKDSWHUSURYLGHVDEULHIRYHUYLHZRIWKH,QDVHWSKRQHDORQJZLWK
KRZWKLVJXLGHLVRUJDQL]HG
&KDSWHUGHVFULEHVWKH,QDVHWSKRQHIHDWXUHVDQGFRQWUROV
Chapter 3
Setup Options
7KLVFKDSWHUGHVFULEHVKRZWRFRQILJXUHWKHXVHUVHWXSRSWLRQVIRU
,QDVHW
Chapter 4
Call Functions
&KDSWHUGHVFULEHVKRZWRXVHWKHEDVLFFDOOIXQFWLRQVDYDLODEOHRQWKH
,QDVHWSKRQH
Chapter 5
Directory Application
7KH'LUHFWRU\DSSOLFDWLRQIHDWXUHVDUHGHVFULEHGLQWKLVFKDSWHU
Chapter 6
Browser Application
&KDSWHUGHVFULEHVKRZWRXVHWKH%URZVHUDSSOLFDWLRQ
Inaset User Guide - Issue 1.0
2-1
2
Phone Features
7KLVFKDSWHULOOXVWUDWHVWKH,QDVHWSKRQHDQGGHVFULEHVLWVIHDWXUHVDQG
FRQWUROV5HIHUWR&KDSWHU&DOO)XQFWLRQVIRUDGGLWLRQDOLQIRUPDWLRQRQ
KRZWRXVHWKHVHIHDWXUHVDQGFRQWUROV
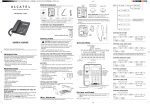
Inaset Phone Features and Controls
Ring Indicator
Display Screen
Control keys
Soft keys
Enter key
Level Control keys
Cursor key
Speaker
Microphone
Inaset User Guide - Issue 1.0
2-2
Phone Features
Feature Descriptions
7KHWDEOHSURYLGHVDGHVFULSWLRQRIDOOWKH,QDVHWIHDWXUHVDQGFRQWUROV
Feature
Description
Control keys
Use to select an associated screen menu item in one of the phone
applications.
Cursor & Enter keys
Use the four-way Cursor key to select options on the display
screen and then press the Enter key to complete the selection
action.
Directory key
Launches the Directory application.
Display Screen
Displays the various Inaset call functions and application
screens.
Exit key
Exit the soft key help menu.
Hold key
Places the current call on hold.
Home key
Starts the Home Application.
Menu key
Displays the phone main menu.
Mic key
Turns the built-in microphone ON or OFF (used in hands-free
speakerphone mode).
Microphone
Use in Hands-free Speakerphone mode.
soft keys
Used for various factory assigned features and to select the
associated application function displayed at the bottom of the
window.
Numeric keypad
Used when placing a call or for data input to an application
(Use for dialing a number with phone in Telephone mode. Use for
data input with phone in Application mode.
Call Indicator
Flashes when receiving an incoming call, lights steadily when a
message has been left.
Security key
Locks the Inaset and displays the Inaset screen saver. (With
Inaset locked, press this key to display the password window.)
Speaker
Use in Speakerphone mode.
Speaker key
Turns the built-in Speaker ON or OFF.
Transfer key
Use to transfer a call.
Use these keys for:
• with phone ringing, increase/decrease ringer volume
Level Control keys
• when using handset, increase/decrease handset volume
• during Speakerphone call, increase/decrease speaker volume
• with no call, increase/decrease LCD screen contrast
Inaset User Guide - Issue 1.0
3-1
3
Setup Options
7KLVFKDSWHUGHVFULEHVKRZWRFRQILJXUHWKHXVHUVHWXSRSWLRQVIRU
,QDVHW7KHVHRSWLRQVDOORZ,QDVHWWREHSHUVRQDOL]HGIRU\RXUXVH7KH
WRSLFVLQWKLVFKDSWHULQFOXGH
Chapter Topics
6HWWLQJ<RXU,QDVHW2SWLRQV
)DYRULWHV
'666SHHG'LDO.H\V
'LVSOD\6FUHHQ2SWLRQV
)HDWXUH2SWLRQV
6HFXULW\3DVVZRUG
Setting Your Inaset Options
$OO8VHU2SWLRQVIRUWKH,QDVHWSKRQHDUHDFFHVVHGIURPWKH6HWXS
DSSOLFDWLRQ3UHVVWKH0HQXNH\RQWKH,QDVHWORZHUSDQHOWRGLVSOD\WKH
PDLQPHQXZLQGRZVHHILJXUHEHORZ7KHQSUHVVWKHVRIWNH\IRU
6(783WRVWDUWWKH6HWXSDSSOLFDWLRQ
Inaset Main Menu window
Inaset User Guide - Issue 1.0
3-2
Setup Options
CAUTION
Only make changes to the Inaset options described in this manual. Changing other
options and settings not described in this manual could cause Inaset to not operate.
Should you encounter any problems changing options, contact your phone system
administrator.
Entering Text Using the Dial Keys
7KHGLDONH\VDUHXVHGWRHQWHUERWKWH[WDQGQXPEHUVLQWKH
YDULRXV,QDVHWGLVSOD\ZLQGRZV7KLVLVUHTXLUHGZKHQVHWWLQJWKH8VHU
2SWLRQVFKDQJLQJ3HUVRQDO'LUHFWRU\LQIRUPDWLRQDQGFRQILJXULQJWKH
%URZVHUDSSOLFDWLRQ
(DFKGLDONH\FDQEHSUHVVHGRQHRUPRUHWLPHVWRHQWHUWKHFKDUDFWHUV
PDUNHGRQWKHNH\7KHIROORZLQJH[DPSOHVKRZVWKHNH\VHTXHQFHXVHG
WRHQWHUWH[W
Example:
7RHQWHUWKHWH[WVPLWK
Step 1
Press 7 four times, then press cursor right.
Step 2
Press 6 once, then press cursor right.
Step 3
Press 4 three times, then press cursor right.
Step 4
Press 8 once, then press cursor right.
Step 5
Press 4 two times, then press cursor right.
2QDZLQGRZZKHUHWH[WFDQEHHQWHUHGD6RIW.H\DWWKHERWWRPRIWKH
ZLQGRZ&KDUFDQEHSUHVVHGWRDOWHUQDWHO\VHWWKHNH\VWRHQWHUHLWKHU
QXPEHUVRUWH[W7KHLQGLFDWRUORFDWHGLQWKHXSSHUULJKWRIDZLQGRZ
VKRZVZKHQWKHHQWU\PRGHLVVHWWR7H[WLQGLFDWRUDEF!RU1XPEHU
LQGLFDWRU!
3UHVVLQJWKHGLDONH\RQHRUPRUHWLPHVDVQHHGHGZLOOHQWHUWKH
FKDUDFWHUV#BaVSDFH
3UHVVLQJWKHGLDONH\RQHRUPRUHWLPHVDVQHHGHGZLOOHQWHUWKH
FKDUDFWHUV"¶´ !>?@Aµ^_`
Inaset User Guide - Issue 1.0
Setup Options
3-3
Favorites
BEFORE setting your Favorites, Inaset must be initially configured for call operation.
Ensure your Inaset has been configured by your phone system administrator before
proceeding with any Setup Options.
IMPORTANT
7KLVIHDWXUHDOORZV\RXWRVHOHFWXSWRVL[NH\IXQFWLRQVWKDWZLOODSSHDU
LQ\RXU)DYRULWHVOLVW7KHVHIXQFWLRQVFDQEHVL[RI\RXUPRVWIUHTXHQWO\
XVHG,QDVHWNH\VLQFOXGLQJ/LQHNH\VIXQFWLRQNH\VLH+ROG7UDQVIHU
HWFDQG'666SHHG'LDONH\V
7KH)DYRULWHVOLVWZLOOGLVSOD\ZKHQ\RXVHOHFWWKH)DYRULWHVIXQFWLRQRQ
WKH+RPHDSSOLFDWLRQ7KHH[DPSOH)DYRULWHVOLVWVKRZQEHORZ
LQFOXGHVWKHSULPDU\SKRQHOLQHWKH5HGLDOIXQFWLRQNH\DQGWZR'66
VSHHGGLDOQXPEHUV
Favorites List example
Setting Your Favorites
)ROORZWKHVHVWHSVWRVHW\RXU)DYRULWHV
Inaset User Guide - Issue 1.0
Step 1
Start the Setup application as described at the beginning of this chapter.
At the Setup menu, use the cursor key to select Terminal and press the
Enter key.
Step 2
Again use the cursor key to select Favorites and press the Enter key.
The Terminal Favorites window displays.
3-4
Setup Options
Terminal Favorites window
Step 3
At the Terminal Favorites window, press the control key for the Favorite
you want to add or change. The Favorites Set window displays (below).
Favorites Set window
Step 4
Press the control key for the selector box to display the four available
choices of Not Assigned, Line keys, DSS keys and Fixed keys.
—If selecting Line keys, the Favorites Line Key Select window will
display. Select the desired Line key that will appear as one of your
Favorites and press the soft key for OK.
Inaset User Guide - Issue 1.0
Setup Options
3-5
Favorites Line Key Select window
—If selecting DSS keys, a window will display showing the available
DSS keys. Select the desired DSS key that will appear as one of your
Favorites and press the soft key for OK.
—If selecting Fixed keys, the Favorites Fixed Key Select window will
display (below). Select the desired Fixed function you want to appear
as one of your Favorites and press the soft key for OK.
Favorites Fixed Key Select window
Step 5
Inaset User Guide - Issue 1.0
Repeat Steps 3-4 for any additional Favorites (up to six) you wish to set.
3-6
Setup Options
Step 6
When you have made all your selections for Favorites, press the soft key
for Back, then Press the soft key for Save to save your settings.
Step 7
Press the soft key for OK to confirm that you really want to save your
settings.
Step 8
Press the soft key for OK to confirm to reset your Inaset phone. (These
changes will not take affect until your Inaset phone has been reset.)
Step 9
When your Inaset phone has reset and reloaded, you can view your
Favorites by selecting the control key for Favorites on the Inaset Home
application.
Inaset User Guide - Issue 1.0
Setup Options
3-7
DSS Speed Dial Keys
BEFORE setting your DSS keys, Inaset must be initially configured for call operation.
Ensure your Inaset has been configured by your phone system administrator before
proceeding with any Setup Options.
IMPORTANT
7KH'66NH\VDOORZ\RXWRSUHVHWVSHHGGLDOQXPEHUVRQ\RXU,QDVHW
SKRQH7KHVHNH\VOHW\RXGLDODSUHVHWSKRQHQXPEHUE\SUHVVLQJRQO\
RQHRUWZRNH\V7KLVFDQEHPRVWKHOSIXOIRUIUHTXHQWO\FDOOHGQXPEHUV
7KH'66NH\VFDQEHVHWWRGLDODQ\LQWHUQDOH[WHQVLRQRUH[WHUQDOSKRQH
QXPEHU7KH'66NH\OLVWZLOOGLVSOD\ZKHQ\RXVHOHFWWKH'66.H\V
IXQFWLRQRQWKH+RPHDSSOLFDWLRQ7KHH[DPSOH'66.H\OLVWEHORZ
VKRZVWZR'66NH\VVHW-RKQDFFRXQWJDQGPDUNHWLQJ
DSS Keys List example
Setting the DSS Keys
)ROORZWKHVHVWHSVWRODEHO\RXU'66VSHHGGLDONH\V
Inaset User Guide - Issue 1.0
Step 1
Start the Setup application as described at the beginning of this chapter.
At the Setup menu, use the cursor key to select Terminal and press the
Enter key.
Step 2
Again use the cursor key to select DSS Keys and press the Enter key.
The Terminal DSS Keys window displays.
3-8
Setup Options
Terminal DSS Keys window
Step 3
At the Terminal DSS Keys window, press the control key for the DSS key
you want to add or change. The DSS Key Set window displays (below).
DSS Keys Set window
Step 4
Press the control key for the selector box to display Assigned (available
choices Not Assigned and Assigned).
Inaset User Guide - Issue 1.0
Setup Options
Step 5
3-9
Press the control key for Description and enter a description label for
this key using the dial keys. (This could be a person’s name, department,
office, or phone number.) (See Entering Text Using the Dial Keys in this
chapter.)
—This description will be displayed on the DSS Key list for this key.
—Press the soft key for OK to complete the settings for this DSS key.
Step 6
Repeat the previous steps to configure any additional DSS Keys.
Step 7
When all keys have been labeled, press the soft key for Back, then press
the soft key for Save to save the settings.
Step 8
Press the soft key for OK to confirm that you really want to save your
settings, then press the soft key for OK to confirm to reset your Inaset
phone. (These changes will not take affect until your Inaset phone has
been reset.)
)ROORZWKHVHVWHSVWRVHWWKHQXPEHUWKDWZLOOEHGLDOHGZKHQ\RXSUHVV
D'66VSHHGGLDONH\
Step 1
On the Home Application window, press the control key for Function
Keys.
Step 2
Press the control key for Feature, then press the control key for DSS
Keys.
Step 3
Press the control key for one of the DSS keys labeled in the previous
steps. Using the dial keys, enter the extension or external phone number
that will be dialed for the key.
Step 4
Once again press the control key for Function Keys, then press the
control key for Feature. The top of the window displays SPEED SET.
Step 5
Repeat these steps, as needed, for all DSS Keys that you previously
labeled.
It is necessary to perform this sequence of steps quickly, as the Feature mode will
automatically close after 1 minute.
NOTE
Using the DSS Keys
7RXVH\RXUSUHVHW'66NH\V
Inaset User Guide - Issue 1.0
Step 1
Lift the handset and hear dial tone.
Step 2
Press the control key for DSS Keys on the Home Application window.
Step 3
Press the control key for the desired DSS key. The preset number will be
dialed automatically.
3-10
Setup Options
Display Screen Options
9DULRXVIHDWXUHVRIWKHGLVSOD\VFUHHQFDQEHFKDQJHGWRPDNHWKH
GLVSOD\HDVLHUWRYLHZDQGXVH7KHEDFNOLJKWOHYHODQGIRQWVL]HFDQEH
DGMXVWHGDQGDQRWKHUODQJXDJHLIDYDLODEOHFDQEHVHOHFWHG$VFUHHQ
VDYHUIXQFWLRQFDQDOVREHVHWIRUWKH,QDVHWGLVSOD\
Back Light Level
)ROORZWKHVWHSVWRDGMXVWWKHGLVSOD\EDFNOLJKWOHYHO
Step 1
Start the Setup application as described at the beginning of this chapter.
At the Setup menu, use the cursor key to select LCD and press the
Enter key.
Step 2
Again use the cursor key to select Back Light Level and press the Enter
key. The LCD Setting Back Light Level window displays (below).
LCD Setting- Back Light Level window
Step 3
Press the control key for the desired level of display back light. Press the
soft key for OK when complete.
Step 4
When all changes have been made, press the soft key for Save to save
your settings.
Step 5
Press the soft key for OK to confirm that you really want to save your
settings. Your display settings have now been changed.
Inaset User Guide - Issue 1.0
Setup Options
3-11
Font Size
)ROORZWKHVWHSVWRDGMXVWWKHGLVSOD\IRQWVL]H
Step 1
Start the Setup application as described at the beginning of this chapter.
At the Setup menu, use the cursor key to select LCD and press the
Enter key.
Step 2
Again use the cursor key to select Font Size and press the Enter key.
The LCD Setting Font Size window displays (below).
LCD Setting- Font Size window
Inaset User Guide - Issue 1.0
Step 3
Press the control key for the desired size of the display font. Press the
soft key for OK when complete.
Step 4
When all changes have been made, press the soft key for Save to save
your settings.
Step 5
Press the soft key for OK to confirm that you really want to save your
settings. Your display settings have now been changed. (These changes
will not take affect until your Inaset phone has been reset.)
3-12
Setup Options
Language
)ROORZWKHVWHSVWRFKDQJHWKHODQJXDJHXVHGRQWKHGLVSOD\
Step 1
Start the Setup application as described at the beginning of this chapter.
At the Setup menu, use the cursor key to select LCD and press the
Enter key.
Step 2
Again use the cursor key to select Language and press the Enter key.
The LCD Setting Language window displays (below).
LCD Setting- Language window
Step 3
Press the control key for the desired language on the Inaset display.
(Only the available languages for Inaset will be displayed.) Press the soft
key for OK when finished.
Step 4
When all changes have been made, press the soft key for Save to save
your settings.
Step 5
Press the soft key for OK to confirm that you really want to save your
settings. Your display settings have now been changed. (These changes
will not take affect until your Inaset phone has been reset.)
Inaset User Guide - Issue 1.0
Setup Options
3-13
Screen Saver
7KH6FUHHQ6DYHUIXQFWLRQZLOODFWLYDWHRQWKH,QDVHWGLVSOD\DIWHUD
SUHVHWWLPHSHULRGRIQRDFWLYLW\:KHQWKH6FUHHQ6DYHUEHJLQV
SUHVVLQJDQ\,QDVHWNH\RUDFWLYLW\RQ\RXUPDLQSKRQHOLQHZLOOFOHDU
VDYHUPRGHDQGUHWXUQ,QDVHWWRQRUPDORSHUDWLRQ)ROORZWKHVWHSVWR
VHWXSWKHVFUHHQVDYHUIXQFWLRQIRUWKHGLVSOD\
Step 1
Start the Setup application as described at the beginning of this chapter.
At the Setup menu, use the cursor key to select LCD and press the
Enter key.
Step 2
Again use the cursor key to select Screen Saver and press the Enter
key. The LCD Setting Screen Saver window displays (below).
LCD Setting- Screen Saver window
Step 3
Press the control key for Enable to enable the Screen Saver function.
—If disabling this function, press the control key for Disable and skip to
Step 5 below.
Inaset User Guide - Issue 1.0
Step 4
Press the control key for Waiting Time, and enter the time period (in
minutes) before the Screen Saver begins. This would be the period of no
activity on Inaset before the Screen Saver would begin.
Step 5
Press the soft key for OK, then press the soft key for Save to save your
settings.
Step 6
Press the soft key for OK to confirm that you really want to save your
settings. Your display settings have now been changed. (These changes
will not take affect until your Inaset phone has been reset.)
3-14
Setup Options
Feature Options
7KH)HDWXUHNH\SURYLGHVYDULRXVRSWLRQVWKDWFDQEHVHWIRU\RXU,QDVHW
SKRQH
Microphone On / Off
7RWXUQWKH,QDVHWEXLOWLQPLFURSKRQH2Q2II
Step 1
On the Home Application window, press the control key for Function
Keys.
Step 2
Press the control key for Feature, and press the 1 dial key. The Mic lamp
will illuminate when the Microphone is on.
Step 3
Repeat the previous steps to alternately turn the microphone On/Off as
needed.
The built-in microphone can also be turned on/off be pressing the Mic key on the
Inaset lower panel.
TIP
Select Ringer Tone
,QDVHWFDQEHVHWZLWKWKUHHGLIIHUHQWULQJHUWRQHV7KLVFDQSURYLGHD
GLVWLQFWLYHULQJRQ\RXU,QDVHWSKRQH)ROORZWKHVWHSVWRFKDQJH\RXU
,QDVHWULQJHUWRQH
Step 1
On the Home Application window, press the control key for Function
Keys.
Step 2
Press the control key for Feature, and press the 3 dial key. A ringer tone
will be heard. Each additional press of the 3 key will sound a different
ringer tone. Stop on the desired ringer tone by pressing any key on the
dial pad (other than the digit 3).
Transmission / Receiving Volume
7RSHUPDQHQWO\FKDQJHWKH+DQGVHW7UDQVPLVVLRQ5HFHLYLQJYROXPH
Step 1
On the Home Application window, press the control key for Function
Keys.
Step 2
Press the control key for Feature, and press the 4 dial key. The Transmit
volume increases.
Step 3
Again press the soft key for Function Keys, then the control key for
Feature and press the 4 dial key to return the Transmit volume to
normal.
Inaset User Guide - Issue 1.0
Setup Options
3-15
Activate Ringer
7RDFWLYDWHWKH,QDVHWULQJHU
Inaset User Guide - Issue 1.0
Step 1
On the Home Application window, press the control key for Function
Keys.
Step 2
Press the control key for Feature, and press the 0 dial key. Ringer
activates.
3-16
Setup Options
Security Password
$6HFXULW\3DVVZRUGFDQEHVHWRQ\RXU,QDVHWWRDYRLGXQDXWKRUL]HG
XVH7KH6HFXULW\3DVVZRUGRSHUDWHVZLWKWKH6HFXULW\NH\RQWKHORZHU
SDQHORI\RXU,QDVHWSKRQH
Setting (or Changing) Your Password
)ROORZWKHVWHSVWRVHWRUFKDQJH\RXUSDVVZRUG
Step 1
Start the Setup application as described at the beginning of this chapter.
At the Setup menu, use the cursor key to select LCD and press the
Enter key.
Step 2
Again use the cursor key to select User and press the Enter key. The
User Setting window displays (below).
User Setting window
Step 3
NOTE
Press the control key for Old Password, and enter your current (old)
password you are now using.
When using this feature for the first time, their will be no Old Password.
Using the cursor key, delete the ***** characters in the Old Password field before
proceeding.
Step 4
Press the control key for New Password, and enter your new password.
Step 5
Press the control key for Re-enter New Password, and enter your new
password again to verify. Press the softkey for OK when finished.
Step 6
Press the soft key for OK to confirm that you really want to save your
settings. Press the Home key to return to the Home application.
Inaset User Guide - Issue 1.0
4-1
4
Call Functions
7KLVFKDSWHUGHVFULEHVKRZWRXVHWKHFDOOIXQFWLRQVDYDLODEOHRQWKH
,QDVHWSKRQH7KHWRSLFVLQWKLVFKDSWHULQFOXGH
Chapter Topics
+RPH$SSOLFDWLRQ:LQGRZ
3KRQH/RJLQ
&DOO)XQFWLRQV
Home Application Window
7KH+RPH$SSOLFDWLRQHQDEOHV\RXWRXVHPDQ\RIWKHIXQFWLRQV
VXSSRUWHGE\DFRQYHQWLRQDOPXOWLOLQH1(&'WHUPWHOHSKRQH
Home Application window
7KH+RPH$SSOLFDWLRQZLQGRZLVXVHGIRUDOOFDOOIXQFWLRQVDQGSURYLGHV
DYLVXDOGLVSOD\RIWKHVWDWXVRIWKHOLQHVDVVLJQHGWRWKH,QDVHWSKRQH
RQWKLVZLQGRZ
Inaset User Guide - Issue 1.0
4-2
Call Functions
Home Application window Description
Field / Key
Description
1
PBX Information
Display
Information from the PBX will display in this area. This would include
PBX time, date, and call status information.
2
Line Status
Shows a visual icon display of the status for all assigned Line Keys.
3
Settings
A visual indicator for the current settings of volume and display
contrast.
4
Soft Keys
Soft keys will appear in various operating modes.
5
Menu Control Keys
Control keys are used to select the various menu functions.
Line Status Icons
7KH/LQH6WDWXVDUHDRIWKH+RPH$SSOLFDWLRQZLQGRZGLVSOD\VYDULRXV
LFRQVLQGLFDWLQJWKHVWDWXVRIHDFKOLQHVHHEHORZ
Line Status Icons
7KHVWDWXVRIHDFK/LQHDQG'66.H\LVVKRZQIRUDOODVVLJQHGNH\V
,FRQVZLOODOVRLQGLFDWHZKHQ\RXU,QDVHWLVLQ$QVZHU&RQIHUHQFHRU
)HDWXUHPRGHV
Inaset User Guide - Issue 1.0
Call Functions
4-3
Home Menu
7KH+RPH$SSOLFDWLRQ0HQXEHORZDOORZV\RXWRVHOHFWDQGXVH
DGGLWLRQDOIHDWXUHVRQ\RXU,QDVHWSKRQH
Home Application Menu
Inaset User Guide - Issue 1.0
)DYRULWHV
8SWRVL[NH\VFDQEHFRQILJXUHGIRU\RXUPRVW
IUHTXHQWO\XVHGNH\V6HH&KDSWHURIWKLVJXLGH
IRULQIRUPDWLRQRQFRQILJXULQJ\RXU)DYRULWHV
5HFHQW.H\V
6HOHFWIURP\RXUPRVWUHFHQWO\XVHGNH\V/HWV\RX
HDVLO\UHSHDWDSUHYLRXVIXQFWLRQRUNH\
/LQH.H\V
(DFK/LQHNH\FDQEHFRQILJXUHGDVDGLDONH\
IXQFWLRQNH\RUVSHFLDOVHUYLFHNH\&KHFNZLWK
\RXUSKRQHV\VWHPDGPLQLVWUDWRUIRUWKHVSHFLILF
OLQHNH\VDQGIXQFWLRQVDVVLJQHGWR\RXU,QDVHW
'66.H\V
7KH'66NH\VSURYLGHDRQHNH\VSHHGGLDO
IXQFWLRQ7KLVDOORZV\RXWRGLDODQXPEHUE\RQO\
SUHVVLQJRQHNH\6HH&KDSWHURIWKLVJXLGHIRU
LQIRUPDWLRQRQFRQILJXULQJ\RXU'66.H\V
)XQFWLRQ.H\V
6HOHFWDGGLWLRQDOFDOOIXQFWLRQVDYDLODEOHRQ\RXU
,QDVHW
4-4
Call Functions
Phone Login
,QDVHWKDVDORJLQIHDWXUHWKDWDOORZVWKHSKRQHWREHORFNHGE\ORJLQ
QXPEHUDQGSDVVZRUGWRDYRLGXQDXWKRUL]HGXVH7KLVORJLQFDQEH
FRQILJXUHGDVDXWRPDWLFRUPDQXDOE\\RXUSKRQHV\VWHPDGPLQLVWUDWRU
,I\RXU,QDVHWKDVEHHQFRQILJXUHGIRUPDQXDOORJLQWKHQ\RXPXVW
PDQXDOO\ORJLQEHIRUHLWFDQEHXVHG6HH\RXUSKRQHV\VWHP
DGPLQLVWUDWRUIRU\RXUORJLQDQGSDVVZRUGQXPEHUV
:KHQPDQXDOORJLQLVUHTXLUHGWKH,QDVHW/RJLQZLQGRZGLVSOD\VZKHQ
,QDVHWLVILUVWVWDUWHGVHHEHORZ
NOTE
In automatic login mode, the Inaset Login window will not display. The phone system
will automatically login your Inaset phone for you. No additional login is required by
you.
Inaset Login window
Manual Login
)ROORZWKHVHVWHSVWRORJLQWR\RXU,QDVHWSKRQH
Step 1
Enter your login number using the Dialing keys (0-9, *, #). When your
number is entered, press the soft key for Set on the display. (If you make
an incorrect entry, press the soft key for Cancel to clear your entry and
then re-enter your number.)
Step 2
Now enter your password number using the Dialing keys (0-9, *, #).
When your number is entered, press the soft key for OK on the display.
(If you make an incorrect entry, press the soft key for Cancel to clear
your entry and then re-enter your number.)
Step 3
If login was successful, the time and date will display at the top of the
Home application window. The Inaset phone is now ready to use.
Inaset User Guide - Issue 1.0
Call Functions
4-5
Account /Authorization Codes
6RPH3%;V\VWHPVPD\UHTXLUHDQ$FFRXQWFRGHDQGRU
$XWKRUL]DWLRQFRGHZKLOHXVLQJ,QDVHW&RQWDFW\RXUSKRQH
V\VWHPDGPLQLVWUDWRUIRUWKHVSHFLILFDFFHVVDQGDFFRXQW
FRGHQXPEHUVQHHGHGIRU\RXUSKRQH5HYLHZWKHIROORZLQJ
VHFWLRQVIRUHQWHULQJ$FFRXQWDQG$XWKRUL]DWLRQFRGHV
Account Code
7R(QWHUDQ$FFRXQWFRGH
/LIWKDQGVHWRUSUHVV6SHDNHUNH\KHDUGLDOWRQH
Access Code
____________________________
(QWHUIHDWXUHDFFHVVFRGHXVLQJWKHGLDONH\VKHDU
VHUYLFHVHWWRQH
Account Code
____________________________
(QWHU$FFRXQW&RGHXSWRGLJLWVXVLQJWKHGLDO
NH\V
+HDUGLDOWRQHDQGGLDOGHVLUHGQXPEHU
7R(QWHU$FFRXQW&RGHDIWHUDQ$XWKRUL]DWLRQ&RGH
/LIWKDQGVHWRUSUHVV6SHDNHUNH\KHDUGLDOWRQH
Access Code
____________________________
(QWHUIHDWXUHDFFHVVFRGHIRU$XWKRUL]DWLRQ&RGH
XVLQJWKHGLDONH\VKHDUVHUYLFHVHWWRQH
Authorization Code____________________________
(QWHU$XWKRUL]DWLRQ&RGHXVLQJWKHGLDONH\VKHDU
VHFRQGVHUYLFHVHWWRQH
Account Code
(QWHU$FFRXQW&RGHXSWRGLJLWVXVLQJWKHGLDO
NH\V
____________________________
+HDUGLDOWRQHGLDOGHVLUHGQXPEHU
Forced Account Code
/LIWKDQGVHWRUSUHVV6SHDNHUNH\KHDUGLDOWRQH
Access Code
____________________________
Forced Account Code __________________________
(QWHUIHDWXUHDFFHVVFRGHXVLQJWKHGLDONH\VKHDU
VHUYLFHVHWWRQH
(QWHU)RUFHG$FFRXQW&RGHXSWRGLJLWVXVLQJWKH
GLDONH\V
+HDUGLDOWRQHGLDOGHVLUHGQXPEHU
Inaset User Guide - Issue 1.0
4-6
Call Functions
Authorization Code
7R(QWHUDQ$XWKRUL]DWLRQ&RGHZLWKRXWDQ$FFRXQW&RGH
3URFHGXUH
/LIWKDQGVHWRUSUHVV6SHDNHUNH\KHDUGLDOWRQH
Access Code
____________________________
Authorization Code____________________________
(QWHUIHDWXUHDFFHVVFRGHXVLQJWKHGLDONH\VKHDU
VHUYLFHVHWWRQH
(QWHU$XWKRUL]DWLRQ&RGHXSWRGLJLWVXVLQJWKH
GLDONH\V
+HDUGLDOWRQHGLDOGHVLUHGQXPEHU
7R(QWHUDQ$XWKRUL]DWLRQ&RGHZLWKDQ$FFRXQW&RGH
3URFHGXUH
/LIWKDQGVHWRUSUHVV6SHDNHUNH\KHDUGLDOWRQH
'LDOGHVLUHGQXPEHU
,IDQ$XWKRUL]DWLRQ&RGHLVUHTXLUHGFDOOHUKHDUV
VSHFLDOGLDOWRQH
Authorization Code____________________________
(QWHU$XWKRUL]DWLRQ&RGHRUFDOOZLOOEHGHQLHG
Procedure 2 is available only if your PBX phone system is programmed with Least
Cost Routing.
NOTE
Inaset User Guide - Issue 1.0
Call Functions
4-7
The top of the Inaset Home Application window shows call information as the call
progresses or when a call function is used. An example display of this information is
shown at left (when applicable) for all call functions described in the following.
NOTE
Answering a Call
Using the Handset
3KRQHULQJVULQJLQGLFDWRUIODVKHV'LVSOD\VKRZV
FDOOLQJSDUW\
Internal call
/LIWKDQGVHWWRDQVZHUDQGEHJLQFRQYHUVDWLRQ
Hands Free (Speakerphone mode)
External call
3KRQHULQJVULQJLQGLFDWRUIODVKHV
3UHVV6SHDNHUNH\WRDQVZHUWKHQSUHVV0LFNH\0LF
NH\OLJKW21DQGEHJLQFRQYHUVDWLRQ
Making a Call
Internal Call
/LIWKDQGVHWKHDUGLDOWRQH
'LDOGHVLUHGH[WHQVLRQQXPEHU'LVSOD\VKRZVGLDOHG
QXPEHU
/LVWHQIRUFDOOHGSDUW\WRDQVZHUDQGEHJLQ
FRQYHUVDWLRQ
External Call
/LIWKDQGVHWKHDUGLDOWRQH
Outside Access Code
________________________
'LDOWKHRXWVLGHOLQHDFFHVVFRGHHJ
'LDOGHVLUHGQXPEHU'LVSOD\VKRZVGLDOHGQXPEHU
/LVWHQIRUFDOOHGSDUW\WRDQVZHUDQGEHJLQ
FRQYHUVDWLRQ
Hands Free (Speakerphone mode)
3UHVV6SHDNHUNH\KHDUGLDOWRQH
'LDOGHVLUHGQXPEHU
/LVWHQIRUFDOOHGSDUW\WRDQVZHUSUHVV0LFNH\0LF
NH\OLJKW21DQGEHJLQFRQYHUVDWLRQ
Inaset User Guide - Issue 1.0
4-8
Call Functions
Putting a Call on HOLD
7HPSRUDULO\SODFHWKHFXUUHQWDFWLYHFDOORQKROG
l
,QGLFDWHWRWKHSDUW\RQWKHOLQHWKDW\RXZLOOEH
SODFLQJWKHPRQKROG
3UHVV+ROGNH\'LVSOD\VKRZVFDOOHURQ+ROG
To Retrieve a Call on Hold
/LIWKDQGVHWRUSUHVV6SHDNHUNH\
3UHVVFRQWURONH\IRU/LQH.H\V
3UHVVWKHOLQHNH\RUSUHVV1H[WDVQHHGHGIRUWKH
OLQHRQKROG
If Unanswered
$IWHUDSUHSURJUDPPHGWLPHZLWKDFDOORQKROG
$XWRPDWLF5HFDOOLVLQLWLDWHGLIHQDEOHG$YLVXDODQG
DXGLEOHVLJQDOOLQHNH\IODVKDQGULQJEXUVWLVVHQWWRWKH
VWDWLRQWKDWSODFHGWKHFDOORQKROG
Last Number Redial
5HGLDOWKHODVWQXPEHUGLDOHG
l
3UHVVFRQWURONH\IRU)XQFWLRQ.H\V
3UHVVFRQWURONH\IRU5HGLDO'LVSOD\VKRZVWKH
QXPEHUWRUHGLDO
5HSHDWWKHDERYHVWHSVXQWLOWKHGHVLUHGQXPEHULV
GLVSOD\HGIRUXSWRSUHYLRXVO\GLDOHGQXPEHUV
3UHVVWKHNH\7KHQXPEHURQWKHGLVSOD\LV
DXWRPDWLFDOO\GLDOHG
Transferring a Call
$IWHUFRQYHUVLQJDVNWKHSDUW\WRKROG
3UHVV7UDQVIHUNH\KHDULQWHUUXSWHGGLDOWRQH
'LDOGHVWLQDWLRQVWDWLRQH[WHQVLRQDQGKDQJXSRUZDLW
IRUGHVWLQDWLRQWRDQVZHU
Inaset User Guide - Issue 1.0
Call Functions
4-9
Callback
Contact your phone system administrator to determine if your Inaset has this function
configured and how to specifically access it.
NOTE
6HWDQDXWRPDWLF&DOOEDFNZKHQDFDOOHGQXPEHULVEXV\
3UHVVFRQWURONH\IRU/LQH.H\V
3UHVVFRQWURONH\IRU&DOOEDFN+HDUVHUYLFHVHWWRQH
+DQJXSKDQGVHW
:KHQERWKSDUWLHVEHFRPHLGOH\RXU,QDVHWZLOOULQJ
:KHQWKH,QDVHWLVDQVZHUHGWKHFDOOHGVWDWLRQZLOO
WKHQULQJ
Making a Conference Call
Using Programmed Soft Key
:LWKDFDOOLQSURJUHVVDVNSDUW\WRKROG
3UHVV7UDQVIHUNH\KHDULQWHUUXSWHGGLDOWRQH
'LDOGHVLUHGQXPEHU
$IWHUWKHFDOOLVDQVZHUHGSUHVVVRIWNH\IRU&RQI
7KH&RQIHUHQFHLFRQZLOOGLVSOD\RQWKH,QDVHW
VFUHHQ
$WKUHHZD\FRQIHUHQFHLVHVWDEOLVKHGEHJLQ
FRQYHUVDWLRQ
Using Function Key
:LWKDFDOOLQSURJUHVVDVNSDUW\WRKROG
3UHVV7UDQVIHUNH\KHDULQWHUUXSWHGGLDOWRQH
'LDOGHVLUHGQXPEHU
$IWHUWKHFDOOLVDQVZHUHGSUHVVFRQWURONH\IRU
)XQFWLRQ.H\V
3UHVVFRQWURONH\IRU&RQIHUHQFH$WKUHHZD\
FRQIHUHQFHLVHVWDEOLVKHGEHJLQFRQYHUVDWLRQ7KH
&RQIHUHQFHLFRQGLVSOD\VRQWKH,QDVHWVFUHHQ
Inaset User Guide - Issue 1.0
4-10
Call Functions
Consult Third Party during a Call
:KHQHQJDJHGLQDFDOODQG\RXZLVKWRFRQVXOWDWKLUG
SDUW\
3UHVV7UDQVIHUNH\2ULJLQDOFDOOHULVDXWRPDWLFDOO\
SODFHGRQKROG
'LDOWKHGHVLUHGWKLUGSDUW\WRFRQVXOW
3UHVV7UDQVIHUWRUHWXUQWRWKHRULJLQDOFDOOHU7KLUG
SDUW\LVDXWRPDWLFDOO\SODFHGRQKROG
$OWHUQDWHO\SUHVV7UDQVIHUNH\WRVZLWFKEHWZHHQ
\RXURULJLQDOFDOOHUDQGWKHWKLUGSDUW\
Call Camp-On
Contact your phone system administrator to determine if your Inaset has this function
configured.
NOTE
Answer a Camped-On Call
:KLOHHQJDJHGLQDFDOOUHFHLYHWKHFDPSRQWRQH
RQHVKRUWWRQHEXUVW
3UHVVFRQWURONH\IRU/LQH.H\VWKHQSUHVVFRQWURO
NH\IRU$QVZHU7KHRULJLQDODFWLYHFDOOLVSODFHGRQ
KROG&RQQHFWLRQWRFDPSHGRQFDOOLVHVWDEOLVKHG
7KH$QVZHULFRQGLVSOD\VRQWKH,QDVHWVFUHHQ
3UHVV$QVZHUWRUHWXUQWRRULJLQDOFDOO7KH&DPSHG
RQFDOOLVSODFHGRQKROG
5HSHDWSUHVVLQJWKHFRQWURONH\IRU)XQFWLRQ.H\V
DQGWKHFRQWURONH\IRU$QVZHUWRDOWHUQDWHEHWZHHQ
\RXURULJLQDOFDOOHUDQGWKHQHZFDOO'LVSOD\LQGLFDWHV
WKHFRQQHFWHGVWDWLRQRUWUXQNDWDQ\JLYHQWLPH
Set Camp-On (Transfer Method)
:KLOHHQJDJHGLQDFDOODVNSDUW\WRKROG3UHVV
7UDQVIHUNH\KHDUIHDWXUHGLDOWRQH
'LDOGHVLUHGVWDWLRQQXPEHUDQGKHDUEXV\
3UHVVFRQWURONH\IRU/LQH.H\VWKHQSUHVVFRQWURO
NH\IRU&DPSRQ&DPS2QWRQHVKRUWEXUVWVLV
VHQWWREXV\VWDWLRQ
+DQJXSKDQGVHW
Inaset User Guide - Issue 1.0
Call Functions
4-11
Set Camp-On (Call Waiting Method)
<RXFDOODVWDWLRQWKDWLVEXV\+HDUEXV\WRQHSUHVV
7UDQVIHUNH\
3UHVVFRQWURONH\IRU/LQH.H\VWKHQSUHVVFRQWURO
NH\IRU&DPSRQ&DPS2QWRQHVKRUWEXUVWVLV
VHQWWREXV\VWDWLRQ
Call Park
&DOO3DUNDOORZV\RXWRSODFHDFDOORQKROGRQ\RXUSKRQH
DQGUHWULHYHWKHFDOOIURP\RXUSKRQHRUDQRWKHUSKRQH
Park a Call
:KLOHHQJDJHGLQDFDOOSUHVV7UDQVIHUNH\
Call Park Access Code ________________________
'LDOWKH&DOO3DUNDFFHVVFRGHFDOOLVQRZSDUNHG
'LVSOD\VKRZV+/' SDUWORFDWLRQQXPEHUQQ Retrieve a Parked Call
Call Park Retrieval Code___________________
'LDO&DOO3DUNUHWULHYDOFRGH
'LDOWKHSDUNHGFDOOORFDWLRQQXPEHU
6WDWLRQLVQRZFRQQHFWHGWRWKHSDUNHGFDOO
Inaset User Guide - Issue 1.0
4-12
Call Functions
Call Forwarding
Contact your phone system administrator to determine if your Inaset has this function
configured.
NOTE
Forward All Calls
$OOLQFRPLQJFDOOVWR\RXU,QDVHWZLOOEHIRUZDUGHG
/LIWKDQGVHWDQGSUHVVFRQWURONH\IRU/LQH.H\V
l
3UHVVFRQWURONH\IRU)ZG$OO
'LDOWKHQXPEHUWKDW\RXUFDOOVZLOOEHIRUZDUGHGWR
'LVSOD\VKRZVFDOO)RUZDUGPRGHLVVHW
Forward - While Busy
,QFRPLQJFDOOVWR\RXU,QDVHWZLOOEHIRUZDUGHGRQO\ZKHQ
\RXUOLQHLVEXV\
/LIWKDQGVHWDQGSUHVVFRQWURONH\IRU/LQH.H\V
3UHVVFRQWURONH\IRU)ZG%XV\
'LDOWKHQXPEHUWKDW\RXUFDOOVZLOOEHIRUZDUGHGWR
'LVSOD\VKRZVFDOO)RUZDUGPRGHLVVHW
Forward - When No Answer
,QFRPLQJFDOOVWR\RXU,QDVHWZLOOEHIRUZDUGHGRQO\ZKHQ
WKHUHLVQRDQVZHURQ\RXUOLQH
/LIWKDQGVHWDQGSUHVVFRQWURONH\IRU/LQH.H\V
3UHVVFRQWURONH\IRU)ZG1R$QVZHU
'LDOWKHQXPEHUWKDW\RXUFDOOVZLOOEHIRUZDUGHGWR
'LVSOD\VKRZVFDOO)RUZDUGPRGHLVVHW
Cancel Call Forwarding
:KHQWKH,QDVHWLVLQ&DOO)RUZDUGPRGHWKH)'$VRIWNH\
GLVSOD\V
/LIWKDQGVHWDQGSUHVVVRIWNH\IRU)'$'LVSOD\
VKRZVWKDW&DOOIRUZDUGLVFDQFHOHG
l
While in Call Forward mode, press the soft key for FDA at any time to display the
number the Inaset is forwarded to.
TIP
Inaset User Guide - Issue 1.0
Call Functions
4-13
Save & Redial a Number
Contact your phone system administrator to determine if your Inaset has this function
configured.
NOTE
<RXFDQVDYHDGLDOHGQXPEHUIRUODWHUXVH7KLVLVKHOSIXO
ZKHQDUHFHQWO\GLDOHGQXPEHUPXVWEHUHGLDOHG
Save a Dialed Number
/LIWKDQGVHWRUSUHVV6SHDNHUNH\
'LDOGHVLUHGQXPEHU
3UHVVFRQWURONH\IRU/LQH.H\V
3UHVVFRQWURONH\IRU65'LDOHGQXPEHULVQRZ
VWRUHG
Verify a Saved Number
:LWK,QDVHWLGOHSUHVVFRQWURONH\IRU/LQH.H\V
3UHVVFRQWURONH\IRU65'LVSOD\VKRZVVWRUHG
QXPEHU
Redial a Saved Number
/LIWKDQGVHWRUSUHVV6SHDNHUNH\
3UHVVFRQWURONH\IRU/LQH.H\VWKHQSUHVVFRQWURO
NH\IRU651XPEHULVGLDOHGDXWRPDWLFDOO\
If the saved number is busy or did not answer when dialed, press the control key for
S&R to save the number again before hanging up.
NOTE
Inaset User Guide - Issue 1.0
4-14
Call Functions
Call Pick-Up
Contact your phone system administrator to determine if your Inaset has this function
configured.
NOTE
&DOO3LFN8SDOORZV\RXWRDQVZHUDQRWKHUULQJLQJSKRQHLQ
\RXUFDOOSLFNXSJURXSIURP\RXU,QDVHWSKRQH
:KHQDSKRQHULQJVLQ\RXUFDOOSLFNXSJURXSOLIW
KDQGVHWDQGSUHVVFRQWURONH\IRU/LQH.H\V
3UHVVFRQWURONH\IRU&DOO3LFNXS%HJLQ
&RQYHUVDWLRQ
If Currently on a Call
3UHVV7UDQVIHUNH\WKHQSUHVVFRQWURONH\IRU/LQH
.H\V
3UHVVFRQWURONH\IRU&DOO3LFNXS<RXURULJLQDOFDOOLV
SODFHGRQKROGEHJLQFRQYHUVDWLRQZLWKWKHFDOOSLFNXS
FDOOHU
3UHVV7UDQVIHUDJDLQWRUHWXUQWR\RXURULJLQDOFDOOHU
Outgoing Trunk Queuing
<RXFDQTXHXH\RXURXWJRLQJFDOOZKHQDOO3%;V\VWHP
WUXQNVDUHEXV\
'LDODQRXWJRLQJWUXQNFDOODQGKHDUDWUXQNVEXV\
LQGLFDWLRQSUHVVFRQWURONH\IRU/LQH.H\V
3UHVVFRQWURONH\IRU&DOOEDFN5HSODFHKDQGVHW<RXU
FDOOLVSODFHGLQTXHXHIRUQH[WDYDLODEOHWUXQN
:KHQDWUXQNLVDYDLODEOH\RXU,QDVHWZLOOULQJ/LIW
KDQGVHWGLDOWRQHLVKHDUG'LDOGHVLUHGQXPEHU
Inaset User Guide - Issue 1.0
Call Functions
4-15
Paging
Contact your phone system administrator to determine if your Inaset has this function
configured.
NOTE
Meet-Me Page
7KLVDOORZV\RXWRUHFHLYHDSDJHDQGWKHQFRQQHFWZLWKD
FDOOXVLQJDQDQVZHUFRGH
Example:
6WDWLRQ$FDQSDJH6WDWLRQ%:KHQ6WDWLRQ%
GLDOVDQDQVZHUFRGHWKH\DUHFRQQHFWHG
To Page (Station A)
Paging Access Code
________________________
'LDO3DJLQJ$FFHVVFRGHKHDUFRQWLQXRXVULQJEDFNIRU
RQHVHFRQG
3DJH6WDWLRQ%
5HPDLQRIIKRRNRUKDQJXSKDQGVHW
To Answer (Station B, if Station A remains off hook)
Meet-Me Answer Code ________________________
'LDO0HHW0HDQVZHUFRGHDQG\RXDUHLPPHGLDWHO\
FRQQHFWHGZLWK\RXUFDOO
To Answer (Station B, if Station A has hung up)
Meet-Me Answer Code ________________________
'LDO0HHW0HDQVZHUFRGHDQG6WDWLRQ$,QDVHWULQJV
6WDWLRQ$OLIWVKDQGVHWDQG\RXDUHFRQQHFWHG
Inaset User Guide - Issue 1.0
4-16
Call Functions
Paging Transfer
3DJLQJ7UDQVIHULVXVHGZKHQ\RXUHFHLYHDQLPSRUWDQWFDOO
IRUDQRWKHUSDUW\KRZHYHUWKH\DUHQRWDWWKHLUGHVN
Example:
6WDWLRQ$UHFHLYHVDFDOOIRU6WDWLRQ%ZKRLV
DZD\IURPWKHLUGHVN6WDWLRQ$SDJHV6WDWLRQ%
:KHQ6WDWLRQ%GLDOVWKHSDJLQJDQVZHUFRGH
6WDWLRQ$FDQDQQRXQFHWKHFDOODQGWUDQVIHULWWR
6WDWLRQ%WRZKDWHYHUSKRQH6WDWLRQ%PD\EH
XVLQJ
Paging (Station A)
$VNFDOOLQJSDUW\WRKROGSUHVV7UDQVIHUNH\DQGKHDU
LQWHUUXSWHGGLDOWRQH
Paging Access Code
________________________
'LDO3DJLQJ$FFHVVFRGHKHDUFRQWLQXRXVULQJEDFNIRU
RQHVHFRQG
3DJH6WDWLRQ%
5HPDLQRIIKRRNRUKDQJXSKDQGVHW
To Answer (Station B, if Station A remains off hook)
Paging Answer Code
________________________
'LDO3DJLQJ$QVZHUFRGHDQG\RXDUHFRQQHFWHGZLWK
WKH6WDWLRQ$6WDWLRQ$DQQRXQFHVFDOO
6WDWLRQ$KDQJVXSKDQGVHWDQG6WDWLRQ%LV
FRQQHFWHGZLWKWKHFDOOHU
To Answer (Station B, if Station A has hung up)
Paging Answer Code
________________________
'LDO3DJLQJ$QVZHUFRGH6WDWLRQ$,QDVHWULQJV
6WDWLRQ$DQVZHUVDQGDQQRXQFHVFDOO
6WDWLRQ$KDQJVXSKDQGVHWDQG6WDWLRQ%LV
FRQQHFWHGZLWKWKHFDOOHU
Inaset User Guide - Issue 1.0
Call Functions
4-17
Boss/Secretary Transfer
$SKRQHOLQHFDQEHDVVLJQHGWRPRUHWKDQRQH,QDVHWDV
PD\EHXVHGLQD%RVV6HFUHWDU\DUUDQJHPHQWZKHUHWKH
6HFUHWDU\DQVZHUVWKH%RVV¶SKRQHOLQH3URFHGXUHVVKRZQ
IRU6HFUHWDU\DQG%RVVERWKZLWK,QDVHWSKRQHV
Secretary
/LIWKDQGVHWSUHVVFRQWURONH\IRU/LQH.H\V
3UHVVVSHFLILFOLQHNH\IRUWKH%RVV¶ULQJLQJOLQH$VN
SDUW\WRKROG
3UHVVWKHFRQWURONH\IRU/LQH.H\VWKHQDJDLQSUHVV
OLQHNH\IRU%RVV&DOOLVDXWRPDWLFDOO\HVWDEOLVKHG
$QQRXQFHFDOOWR%RVV
Boss Accepts Call
6HFUHWDU\KDQJVXS%RVV¶OLQHDIWHUFDOOLVDQQRXQFHG
%RVVOLIWVKDQGVHWSUHVVHVKLVIODVKLQJ/LQHNH\DQG
EHJLQVFRQYHUVDWLRQ
Boss Refuses Call
6HFUHWDU\SUHVVHVWKHFRQWURONH\IRU/LQH.H\VWKHQ
SUHVVHV%RVV¶OLQHDJDLQWRUHWXUQWRFDOOLQJSDUW\
$QQRXQFHWRFDOOLQJSDUW\
Inaset User Guide - Issue 1.0
4-18
Call Functions
Boss/Secretary Override
Contact your phone system administrator to determine if your Inaset has this function
configured and how to specifically access it.
NOTE
7KH2YHUULGHIXQFWLRQDOORZVDFDOOEHWZHHQWZRSDUWLHVWR
EHLQWHUUXSWHGE\DWKLUGSDUW\7KLVFDQEHWKHFDVHZKHQD
ERVVLVRQWKHLUOLQHZLWKDFDOOHUDQGWKHVHFUHWDU\UHFHLYHV
DQRWKHUFDOOIRUWKHERVVRILPSRUWDQFHWRLQWHUUXSWWKH
ERVV
Setup Override Key
6HFUHWDU\SUHVVHVFRQWURONH\IRU)XQFWLRQ.H\VDQG
WKHQSUHVVHVFRQWURONH\IRU)HDWXUH
3UHVVHVFRQWURONH\IRU'66.H\VDQGSUHVVHVFRQWURO
NH\IRURQHRIWKH'66NH\V
Override Access Code ________________________
'LDOVWKH%RVV6HFUHWDU\2YHUULGHDFFHVVFRGH
3UHVVHV+RPHNH\RQWKH,QDVHWSDQHOWKHQSUHVVHV
FRQWURONH\IRU)XQFWLRQ.H\V
3UHVVHVFRQWURONH\IRU5HFDOO
'LDOVWKH%RVV¶VWDWLRQQXPEHUDQGSUHVVHVWKH
FRQWURONH\IRU)XQFWLRQ.H\V
3UHVVHVFRQWURONH\IRU)HDWXUH
Secretary
5HFHLYHVFDOOIRU%RVVDQGDVNVFDOOHUWRKROG
3UHVVHV+ROGNH\KHDUVGLDOWRQH
3UHVVHVFRQWURONH\IRU'66.H\VWKHQSUHVVHV
FRQWURONH\IRU%RVV6HF2YHUULGH+HDUVULQJEDFN
WRQH
Boss (Accepts Interrupt)
+HDUVWRQHEXUVWVSUHVVHVFRQWURONH\IRU)XQFWLRQ
.H\V
3UHVVHVFRQWURONH\IRU$QVZHUDQGFRQYHUVHVZLWK
6HFUHWDU\2ULJLQDOFDOOLVSODFHGRQKROG
6HFUHWDU\KDQJVXSDQG%RVVLVFRQQHFWHGWRQHZ
FDOOHU
%RVVFDQDOWHUQDWHEHWZHHQWKLVQHZFDOOHUDQGWKH
RULJLQDOFDOOHUE\SUHVVLQJ$QVZHU
Boss (Refuses Interrupt)
,I%RVVGRHVQRWUHVSRQGWRWRQHEXUVWV6HFUHWDU\
SUHVVHVFRQWURONH\IRU)XQFWLRQ.H\VWKHQSUHVVHV
FRQWURONH\IRU5HFDOO
6HFUHWDU\LVUHFRQQHFWHGWRQHZFDOOHU
Inaset User Guide - Issue 1.0
Call Functions
4-19
Boss (Refuses New Call)
3UHVVHVFRQWURONH\IRU)XQFWLRQ.H\V
3UHVVHVFRQWURONH\IRU$QVZHUDQGFRQYHUVHVZLWK
6HFUHWDU\2ULJLQDOFDOOLVSODFHGRQKROG
%RVVFRQYHUVHVZLWK6HFUHWDU\DQGUHIXVHVWRWDNH
QHZFDOO
%RVVSUHVVHV7UDQVIHUNH\WRUHWXUQWRRULJLQDOFDOO
Inaset User Guide - Issue 1.0
4-20
Call Functions
Executive Override
Contact your phone system administrator to determine if your Inaset has this function
configured.
NOTE
2YHUULGHLVXVHGWRLQWHUUXSWDFDOOHGQXPEHUZKHQLWLV
EXV\
3UHVVFRQWURONH\IRU/LQH.H\V
3UHVVFRQWURONH\IRU2YHUULGH7KHLQWHUUXSWHG
SDUWLHVKHDUDZDUQLQJWRQHWRLQGLFDWHWKHLUFDOOLV
EHLQJLQWHUUXSWHG
$WKUHHZD\FRQIHUHQFHLVHVWDEOLVKHG
Do Not Disturb / Privacy
Contact your phone system administrator to determine if your Inaset has this function
configured.
NOTE
7KLVIXQFWLRQDOORZV\RXWRUHVWULFWDOOLQFRPLQJFDOOVWR\RXU
,QDVHW
Phone Idle
l
3UHVVVRIWNH\IRU'1''LVSOD\VVKRZVWKH'1'
PRGHLVVHW7KH'1'PRGHUHPDLQVVHWXQWLOLWLV
FDQFHOHGVHHEHORZ
When Engaged in a Call
l
3UHVVVRIWNH\IRU'1''LVSOD\VVKRZVWKH3ULYDF\
PRGHLVVHW7KLVUHVWULFWVLQFRPLQJFDOOVRQO\GXULQJ
WKLVFXUUHQWFDOO
Cancel DND Mode
:KHQLQ'1'PRGHSUHVVVRIWNH\IRU'1''LVSOD\
VKRZVWKH'1'PRGHLVFDQFHOHG
Inaset User Guide - Issue 1.0
Call Functions
4-21
Intercom
Contact your phone system administrator to determine if your Inaset has this function
configured.
NOTE
,QDVHWDQGWKH3%;V\VWHPFDQSURYLGHDVWDWLRQWRVWDWLRQ
LQWHUFRPIXQFWLRQ7KUHHLQWHUFRPPRGHVDUHSRVVLEOH
GHSHQGLQJRQWKHSKRQHV\VWHPFRQILJXUDWLRQ
Automatic Intercom
7RLQLWLDWHDQ$XWRPDWLFLQWHUFRPFDOO
/LIWKDQGVHWRUSUHVV6SHDNHUNH\
3UHVVFRQWURONH\IRU/LQH.H\V
3UHVVFRQWURONH\IRU$,&0+HDUULQJEDFNWRQH
7RDQVZHUDQ$XWRPDWLFLQWHUFRPFDOO
3UHVVFRQWURONH\IRU/LQHNH\V
3UHVVFRQWURONH\IRU$,&0
/LIWKDQGVHWVWDUWFRQYHUVDWLRQ
Manual Intercom
7RLQLWLDWHD0DQXDOLQWHUFRPFDOO
3UHVVFRQWURONH\IRU/LQH.H\V
3UHVVFRQWURONH\IRU0,&0
/LIWKDQGVHWKHDUULQJEDFNWRQH
3UHVVFRQWURONH\IRU6,*IRUFDOOHGVWDWLRQWRUHFHLYH
ULQJLQJ
7RDQVZHUD0DQXDOLQWHUFRPFDOO
3UHVVFRQWURONH\IRU/LQHNH\V
3UHVVFRQWURONH\IRU0,&0
/LIWKDQGVHWVWDUWFRQYHUVDWLRQ
Inaset User Guide - Issue 1.0
4-22
Call Functions
Dial Intercom
7RLQLWLDWHD'LDOLQWHUFRPFDOO
/LIWKDQGVHWRUSUHVV6SHDNHUNH\
3UHVVFRQWURONH\IRU/LQH.H\V
3UHVVFRQWURONH\IRU',&0
'LDOGHVLUHGLQWHUFRPQXPEHU+HDUULQJEDFNWRQH
7RDQVZHUD'LDOLQWHUFRPFDOO
3UHVVFRQWURONH\IRU/LQHNH\V
3UHVVFRQWURONH\IRU',&0
/LIWKDQGVHWRUSUHVV6SHDNHUNH\VWDUWFRQYHUVDWLRQ
Timed Reminder
Contact your phone system administrator to determine if your Inaset has this function
configured.
NOTE
$UHPLQGHUFDQEHVHWWKDWZLOOULQJ\RXU,QDVHWDWD
VSHFLILHGWLPH7KLVFDQEHXVHIXODVDUHPLQGHUIRUD
PHHWLQJRUDSSRLQWPHQW$UHPLQGHUFDQRQO\EHVHWIRUD
WLPHRQWKHVDPHGD\
Set a Reminder
/LIWKDQGVHW
3UHVVFRQWURONH\IRU/LQH.H\VWKHQSUHVVFRQWURO
NH\IRU7LPHG5HPLQGHU
'LDOWKHGHVLUHGWLPHLQKRXUIRUPDWZKHQ\RX
ZDQWWKHUHPLQGHU
Cancel a Reminder
/LIWKDQGVHW
3UHVVFRQWURONH\IRU/LQH.H\VWKHQSUHVVFRQWURO
NH\IRU7LPHG5HPLQGHU
3UHVVWKHNH\7KHWLPHGUHPLQGHULVFDQFHOHG
Inaset User Guide - Issue 1.0
5-1
5
Directory Application
7KLVFKDSWHUGHVFULEHVKRZWRXVHWKH,QDVHW'LUHFWRU\DSSOLFDWLRQ<RX
FDQXVHWKH'LUHFWRU\DSSOLFDWLRQWRVHDUFKWKHUHJLVWHUHGGLUHFWRU\DQG
PDNHDFDOOWRDGLUHFWRU\HQWU\)RULQFRPLQJFDOOVWKHFDOOHUQDPHLV
GLVSOD\HGRQWKH+RPHDSSOLFDWLRQVFUHHQLIWKHFDOOHU¶VWHOHSKRQH
QXPEHULVUHJLVWHUHGLQWKH'LUHFWRU\7KHWRSLFVLQWKLVFKDSWHULQFOXGH
Chapter Topics
8VLQJWKH'LUHFWRU\$SSOLFDWLRQ
'LUHFWRU\$SSOLFDWLRQ:LQGRZV
3ODFLQJ&DOOVIURPWKH'LUHFWRU\
$GG0RGLI\'HOHWHD'LUHFWRU\(QWU\
0DQDJLQJWKH'LUHFWRU\
Using the Directory Application
7RVWDUWWKH'LUHFWRU\DSSOLFDWLRQSUHVVWKH0HQXNH\RQWKH,QDVHW
ORZHUSDQHOWRGLVSOD\WKH,QDVHW0DLQPHQX1RZSUHVVWKHVRIWNH\IRU
',5(&725<WRGLVSOD\WKH'LUHFWRU\0DLQZLQGRZ
Inaset Menu window
Inaset User Guide - Issue 1.0
5-2
Directory Application
Entering Text Using the Dial Keys
7KHGLDONH\VDUHXVHGWRHQWHUERWKWH[WDQGQXPEHUVLQWKH
YDULRXV,QDVHWGLVSOD\ZLQGRZV7KLVLVUHTXLUHGZKHQVHWWLQJWKH8VHU
2SWLRQVFKDQJLQJ3HUVRQDO'LUHFWRU\LQIRUPDWLRQDQGFRQILJXULQJWKH
%URZVHUDSSOLFDWLRQ
(DFKGLDONH\FDQEHSUHVVHGRQHRUPRUHWLPHVWRHQWHUWKHFKDUDFWHUV
PDUNHGRQWKHNH\7KHIROORZLQJH[DPSOHVKRZVWKHNH\VHTXHQFHXVHG
WRHQWHUWH[W
Example:
7RHQWHUWKHWH[WVPLWK
Step 1
Press 7 four times, then press cursor right.
Step 2
Press 6 once, then press cursor right.
Step 3
Press 4 three times, then press cursor right.
Step 4
Press 8 once, then press cursor right.
Step 5
Press 4 two times, then press cursor right.
2QDZLQGRZZKHUHWH[WFDQEHHQWHUHGD6RIW.H\DWWKHERWWRPRIWKH
ZLQGRZ&KDUFDQEHSUHVVHGWRDOWHUQDWHO\VHWWKHNH\VWRHQWHUHLWKHU
QXPEHUVRUWH[W7KHLQGLFDWRUORFDWHGLQWKHXSSHUULJKWRIDZLQGRZ
VKRZVZKHQWKHHQWU\PRGHLVVHWWR7H[WLQGLFDWRUDEF!RU1XPEHU
LQGLFDWRU!
3UHVVLQJWKHGLDONH\RQHRUPRUHWLPHVDVQHHGHGZLOOHQWHUWKH
FKDUDFWHUV#BaVSDFH
3UHVVLQJWKHGLDONH\RQHRUPRUHWLPHVDVQHHGHGZLOOHQWHUWKH
FKDUDFWHUV"¶´ !>?@Aµ^_`
Inaset User Guide - Issue 1.0
Directory Application
5-3
Directory Application Windows
Directory Main Window
6WDUWLQJWKH'LUHFWRU\$SSOLFDWLRQZLOORSHQWKH'LUHFWRU\0DLQZLQGRZ
EHORZ6HHWKHIROORZLQJWDEOHIRUDGHVFULSWLRQRIWKHNH\VDQG
IXQFWLRQVDYDLODEOHRQWKLVZLQGRZ
Directory Main window
Directory Main Window Description
Field / Key
Three directory types are available; Personal, Corporate, and
Group. (See also item 5.)
1
Directory Type
2
Search Condition
Three types of search conditions can be selected; keyword, last
name, and company.
3
Search Box
Enter the data you want to search on here. The directory will be
searched for a data match and the cursor will position to the data
entry when a forward match occurs.
4
Directory List
The Directory List is a quick reference list of the registered data.
Each of the three types of directory lists, Personal, Corporate and
Group, allows registration of up to 200 items.
5
Inaset User Guide - Issue 1.0
Description
Directory Type Selector Soft key to select another directory type.
6
Detail
7
Character
8
Dial
Soft key to open the Directory Detail window for the selected
(highlighted) Directory list entry.
Selects between Text and Numeric entry character modes.
Soft key to place a call to the selected (highlighted) entry on the
directory list.
5-4
Directory Application
Field / Key
Description
The control keys are used to select the Directory Main window
functions.
• Search -Scrolls through the three types of search criteria
(Keyword, Company, Last Name).
9
Directory Control keys
• File
-Opens the File menu. Save or load directory data or
upload and download data.
• Entry
-Opens the Entry menu. Create, modify, and delete
directory entry data.
• Display -The Display menu will open. Change the character
size of the directory data or sort directory list data.
• Setup
-Opens the Setup Tool menu. Change select Detail field
names.
• Exit
-Exit the Directory Application and open the Inaset Main
Menu window.
•
-Scroll up the directory list data.
•
-Scroll down the directory list data.
The Character Entry Mode shows the type of character that can
now be entered in the directory data search mode.
• <123> indicates Numeric
10
Character Entry Mode
Indicator
• <abc> indicates Text
(The type of character that can be used in the search mode can be
selected by the Character key.)
Inaset User Guide - Issue 1.0
Directory Application
5-5
Directory Detail Window
6HOHFWLQJDQHQWU\IURPWKH'LUHFWRU\0DLQZLQGRZDQGWKHQSUHVVLQJ
WKH'HWDLONH\ZLOOGLVSOD\WKH'LUHFWRU\'HWDLOZLQGRZEHORZ7KLV
GLVSOD\VKRZVWKHGHWDLOVIRUDVSHFLILFGLUHFWRU\HQWU\6HHWKHIROORZLQJ
WDEOHIRUDGHVFULSWLRQRIWKHNH\VDQGIXQFWLRQVDYDLODEOHRQWKLV
ZLQGRZ
Directory Detail window
Directory Detail Window Description
Field / Key
Inaset User Guide - Issue 1.0
Description
1
No
Directory data number. Choose any number from 1 to 500.
2
Name (First)
First name for the directory entry.
3
Name (Last)
Last name for directory entry.
4
Keyword
Associated keyword for this entry that can be used in a data search.
5
Business
Home
Mobile
Shows a registered directory number(s). Up to three numbers can
be assigned per person. You can place a call by selecting any of the
keys (Business, Home, Mobile) and then press the soft key for Dial.
(You can also change these 3 item names.)
6
Company
The associated company name for this person.
7
Character
Selects between Text and Numeric entry character modes.
8
Dial
Soft ley to place a call to the selected directory number.
5-6
Directory Application
Field / Key
Description
The control keys are used to select the Directory Detail window
functions.
9
10
Directory Control
Keys
Character Entry Mode
Indicator
•
-Selects the first data entry on the directory list.
•
-Selects the previous data entry (above) to the current
entry.
•
-Shows the following data entry (below) to the current
entry.
•
-Selects the data at the bottom of the directory list.
• Tab
-Use to move the focus between fields on the Directory
Detail window or to another entry detail window.
• Back
-Use the key to hide the detail window and go back to
the directly list.
• Delete
-Use the key to delete the piece of data now on display.
The Character Entry Mode shows the type of character that can
now be entered in the directory data search mode. The type of
character that can be used in the search mode can be selected by
the Character key.
• <123> indicates numeric character mode
• <abc> indicates text character mode
Inaset User Guide - Issue 1.0
Directory Application
5-7
Placing Calls from the Directory
Place a Call from Directory Main Window
)ROORZWKHVWHSVWRSODFHDFDOOIURPWKH'LUHFWRU\0DLQZLQGRZ
NOTE
Step 1
Using the Inaset cursor key, scroll to select the entry you want to call
from the main directory list.
Step 2
Press the soft key for Dial. The Directory Application will place a call to
the selected directory number.
After a call has been dialed from the Directory, Inaset will automatically change the
screen from the Directory menu to the Home screen. This allows the caller to use the
Dterm features of the Inaset while on a call (i.e. Conference, Hold, etc.).
Place a Call from Detail Window
<RXFDQVHOHFWRQHRIWKHQXPEHUVIURPWKH'HWDLOZLQGRZRIWKH
GLUHFWRU\DQGSODFHDFDOOWRWKHVHOHFWHGGLUHFWRU\QXPEHU)ROORZWKH
VWHSVEHORZ
Step 1
Using the Inaset cursor key, scroll to select the entry you want to call
from the main directory list.
Step 2
Press the soft key for Detail. The detail window for the selected entry will
display.
Step 3
Using the Inaset cursor key, select one of three numbers to dial and
press the Enter key.
Step 4
Press the soft key for Dial. The Directory Application will place a call to
the selected directory number.
Place a Call by Searching the Directory
)URPWKH'LUHFWRU\0DLQZLQGRZ\RXFDQVHDUFKWKH'LUHFWRU\/LVWIRUD
VSHFLILFHQWU\$IWHUORFDWLQJWKHGHVLUHGHQWU\\RXFDQSODFHDFDOOWR
WKDWGLUHFWRU\QXPEHU)ROORZWKHVWHSVEHORZ
Inaset User Guide - Issue 1.0
Step 1
Press the soft key to select the type of directory (Corporate, Group,
Personal) to search.
Step 2
Press the control key for Search to select Search mode.
Step 3
Continue to press the Search key to select the search criteria (Keyword,
Last Name, Company).
5-8
Directory Application
Step 4
Using the Inaset dial keys, enter the data to search (up to 41 characters).
(See Entering Text Using the Dial Keys in this chapter.)
Step 5
When a directory match is found, the entry will be highlighted. Press the
soft key for Dial. The Directory Application will then place a call to the
selected directory number.
—The number entered in the Business field of the Directory entry is the
number that will be dialed when pressing the Dial key.
—To dial one of the alternate numbers for this Directory entry, press the
soft key for Detail. Use the cursor key to select one of the three
numbers to dial and then press the Enter key. Press the soft key for
Dial to dial the selected number.
When exiting the Detail window, the number that can be dialed by pressing the ’Dial’
soft key will return to the default, which is the Business field
NOTE
Inaset User Guide - Issue 1.0
Directory Application
5-9
Add, Modify, Delete a Directory Entry
Add a Directory Entry
)ROORZWKHVWHSVWRDGGQHZGDWDWRDGLUHFWRU\OLVW
Step 1
Press the control key for Entry. The Directory Entry menu opens.
Step 2
Using the cursor key, select New and then press Enter (on the Inaset
lower panel). The Directory Data detail window opens.
Step 3
Enter the information in the appropriate fields for the new directory entry.
(See Entering Text Using the Dial Keys in this chapter.)
There is no need to enter a Number in the No field. This field will be automatically
populated with the next numerical entry.
NOTE
Step 4
When all data has been entered, press the soft key for Add and then
press the control key for Back to return to the Directory Main window.
Step 5
To save the new entry data, press the control key for File. The File menu
opens.
Step 6
Using the cursor key, select Save and then press Enter (on the Inaset
lower panel). If the data is saved without error, a message box displays.
Step 7
Press the soft key for OK to confirm and close the message box.
Modify a Directory Entry
)ROORZWKHVWHSVWRPRGLI\H[LVWLQJGDWDLQWKHGLUHFWRU\OLVW
Inaset User Guide - Issue 1.0
Step 1
At the Directory Main window, use the cursor key to highlight the
directory entry to modify from the entry list.
Step 2
Press the control key for Entry. The Edit Entry menu opens.
Step 3
Using the cursor key, select Modify and then press Enter (on the Inaset
lower panel). The Directory detail window opens.
Step 4
Modify the entry data as needed and press the soft key for OK when all
changes have been made. (See Entering Text Using the Dial Keys in this
chapter.)
Step 5
Press the control key for Back to return to the Directory Main window.
Step 6
To save the changes, press the control key for File. The File menu
opens.
Step 7
Using the cursor key, select Save and then press Enter (on the Inaset
lower panel). If the data is saved without error, a message box opens.
Step 8
Press the soft key for OK to confirm and close the message box.
5-10
Directory Application
Delete a Directory Entry
)ROORZWKHVWHSVWRGHOHWHD'LUHFWRU\HQWU\IURPWKHGLUHFWRU\OLVW
Step 1
At the Directory Main window, use the cursor key to highlight the
directory entry to delete.
Step 2
Press the control key for Entry. The Edit Entry menu opens.
Step 3
Using the cursor key, select Delete and then press Enter (on the Inaset
lower panel). A message box opens to confirm the delete.
Step 4
Press the soft key for OK to confirm the delete and close the message
box.
Step 5
To save the directory changes, press File. The File menu opens.
Step 6
Using the cursor key, select Save and then press Enter (on the Inaset
lower panel). If the data is saved without error, a message box opens.
Step 7
Press the soft key for OK to confirm and close the message box.
Inaset User Guide - Issue 1.0
Directory Application
5-11
Managing the Directory
Check with your phone system administrator before performing the following
procedures.
NOTE
Download Data
1HZGLUHFWRU\GDWDFDQEHGRZQORDGHGIURPWKH)73VHUYHU\RXU,QDVHW
SKRQHFRQQHFWVWR)ROORZWKHVWHSVWRGRZQORDGWKHGLUHFWRU\GDWD
VDYHGRQWKH)73VHUYHU
Step 1
Press the soft key to select the Directory to download (Personal,
Corporate, Group).
Step 2
Press the control key for File. The File menu opens.
Step 3
Using the cursor key, select Download and then press Enter (on the
Inaset lower panel).
Step 4
At the dialog box, enter the address (using the dial keys) of the FTP
server storing the data you want to download.
Step 5
Press the soft key for OK to start the data download from the designated
server and then press the control key for Back to close the download
window.
Step 6
When the data has been downloaded, it must be loaded into the Inaset
memory before use. Press the control key for File. The File menu opens.
Step 7
Using the cursor key, select Load and then press Enter (on the Inaset
lower panel). The directory data will be loaded and displayed.
Upload Data
'DWDFDQDOVREHXSORDGHGWRWKH)73VHUYHU\RXU,QDVHWSKRQHFRQQHFWV
WR)ROORZWKHVWHSVWRXSORDGGDWDIURP\RXU,QDVHWSKRQHWRWKH)73
VHUYHU
Inaset User Guide - Issue 1.0
Step 1
Press the soft key to select the Directory to upload (Personal, Corporate,
Group).
Step 2
Press the control key for File. The File menu opens.
Step 3
Using the cursor key, select Upload and then press Enter (on the Inaset
lower panel).
Step 4
At the dialog box, enter the address (using the dial keys) of the FTP
server to upload data to.
5-12
Directory Application
Step 5
Press the soft key for OK to start the data upload to the designated
server and then press the control key for Back to close the upload
window.
Changing Directory Character Font Size
)ROORZWKHVWHSVWRFKDQJHWKHGLUHFWRU\FKDUDFWHUIRQWVL]H
Step 1
Press the control key for Display. The Display menu opens.
Step 2
Using the cursor key, select Font Size and then press Enter (on the
Inaset lower panel).
Step 3
At the Change Font Size dialog box, use the cursor key to select the
Normal or Large font size and press the Inaset Enter key.
Step 4
Press the soft key for OK to complete the change. The character size of
the directory will now reflect the change.
Sorting Directory List
)ROORZWKHVWHSVWRVRUWWKHGLUHFWRU\OLVW
Step 1
Press the control key for Display. The Display menu opens.
Step 2
Using the cursor key, select Sort and then press Enter (on the Inaset
lower panel).
Step 3
At the Change Sort Key dialog box, select a condition for sorting list data:
—Use the cursor key to select Keyword, and press Enter to sort the
directory in alphabetical order by keyword.
—Use the cursor key to select No., and press Enter to sort the directory
in numeric order by entry number.
—Use the cursor key to select Company, and press Enter to sort the
directory in alphabetical order by company name.
Step 4
Select an order for the sort:
—Use the cursor key to select Ascending, and press Enter to sort data
in ascending order.
—Use the cursor key to select Descending, and press Enter to sort
data in descending order.
Step 5
Press OK to complete the sort. The data in the directory list is sorted in
the specified order.
Inaset User Guide - Issue 1.0
Directory Application
5-13
Changing Item Name in Detail Window
6RPHLWHPILHOGQDPHVFDQEHFKDQJHGRQWKH'LUHFWRU\'HWDLOZLQGRZ
)ROORZWKHVWHSVWRFKDQJHDQLWHPQDPH
Inaset User Guide - Issue 1.0
Step 1
Press the control key for Setup. The Setup menu opens.
Step 2
Using the cursor key, select Setting and then press Enter (on the Inaset
lower panel). The Change Item Name dialog box opens.
Step 3
Use the cursor to select the item field to change. Using the dial keys,
enter the new item name in the selected fields. (You can enter a
maximum of 10 single- or double-byte characters.) (See Entering Text
Using the Dial Keys in this chapter.)
Step 4
Press OK to complete the changes. The item names in the detail window
reflect the changes made.
5-14
Directory Application
Inaset User Guide - Issue 1.0
6-1
6
Browser Application
7KLVFKDSWHUGHVFULEHVKRZWRXVHWKH,QDVHW%URZVHUIHDWXUH
DSSOLFDWLRQ7KH%URZVHUHQDEOHV\RXWRYLHZWKH,QDVHWZHESDJHV
DYDLODEOHRQ\RXUFRPSDQ\,QWUDQHWRUWKHZHELQWHUQHW7KHWRSLFVLQ
WKLVFKDSWHULQFOXGHV
Chapter Topics
8VLQJWKH%URZVHU
8VLQJ<RXU+RPH3DJH
6HWWLQJIRUD3UR[\6HUYHU
8VLQJ$SSOLFDWLRQ3DJHV
*R0HQX
&RQILJXUH&RQWURO.H\V6RIW.H\V
9LHZLQJ7HOHSKRQ\3%;,QIRUPDWLRQ
Using the Browser
7RVWDUWWKH%URZVHUDSSOLFDWLRQSUHVVWKH0HQXNH\RQWKH,QDVHW
ORZHUSDQHOWRGLVSOD\WKH,QDVHW0DLQPHQX7KHQSUHVVWKHVRIWNH\IRU
%52:6(5WRGLVSOD\WKH%URZVHU0DLQZLQGRZ
Inaset Menu window
Inaset User Guide - Issue 1.0
6-2
Browser Application
Entering Text Using the Dial Keys
7KHGLDONH\VDUHXVHGWRHQWHUERWKWH[WDQGQXPEHUVLQWKH
YDULRXV,QDVHWGLVSOD\ZLQGRZV7KLVLVUHTXLUHGZKHQVHWWLQJWKH8VHU
2SWLRQVFKDQJLQJ3HUVRQDO'LUHFWRU\LQIRUPDWLRQDQGFRQILJXULQJWKH
%URZVHUDSSOLFDWLRQ
(DFKGLDONH\FDQEHSUHVVHGRQHRUPRUHWLPHVWRHQWHUWKHFKDUDFWHUV
PDUNHGRQWKHNH\7KHIROORZLQJH[DPSOHVKRZVWKHNH\VHTXHQFHXVHG
WRHQWHUWH[W
Example:
7RHQWHUWKHWH[WVPLWK
Step 1
Press 7 four times, then press cursor right.
Step 2
Press 6 once, then press cursor right.
Step 3
Press 4 three times, then press cursor right.
Step 4
Press 8 once, then press cursor right.
Step 5
Press 4 two times, then press cursor right.
2QDZLQGRZZKHUHWH[WFDQEHHQWHUHGD6RIW.H\DWWKHERWWRPRIWKH
ZLQGRZ&KDUFDQEHSUHVVHGWRDOWHUQDWHO\VHWWKHNH\VWRHQWHUHLWKHU
QXPEHUVRUWH[W7KHLQGLFDWRUORFDWHGLQWKHXSSHUULJKWRIDZLQGRZ
VKRZVZKHQWKHHQWU\PRGHLVVHWWR7H[WLQGLFDWRUDEF!RU1XPEHU
LQGLFDWRU!
3UHVVLQJWKHGLDONH\RQHRUPRUHWLPHVDVQHHGHGZLOOHQWHUWKH
FKDUDFWHUV#BaVSDFH
3UHVVLQJWKHGLDONH\RQHRUPRUHWLPHVDVQHHGHGZLOOHQWHUWKH
FKDUDFWHUV"¶´ !>?@Aµ^_`
Inaset User Guide - Issue 1.0
Browser Application
6-3
Browser Application Window
6WDUWLQJWKH%URZVHU$SSOLFDWLRQZLOORSHQWKH%URZVHU0DLQZLQGRZ
EHORZ6HHWKHIROORZLQJWDEOHIRUDGHVFULSWLRQRIWKHNH\VDQG
IXQFWLRQVDYDLODEOHRQWKLVZLQGRZ
Browser Main window - Normal View
Display Area
Control keys
Soft keys
Enter key
Cursor key
Inaset User Guide - Issue 1.0
6-4
Browser Application
Main Window Description
Field / Key
Display area
Description
Browser display area for selected web pages.
The Browser Soft Keys allow you to navigate the browser pages, similar
to your desk computer browser.
back
- Displays the previous browser page
forward - Displays the next browser page
Soft Keys
(Navigation Keys)
home
- Displays the preset home page
stop
- Stops loading the current page
Note: These Soft Keys can be reconfigured, as described later in this
guide. The navigation functions are the default configuration for the
Browser Soft Keys.
The control keys select the Browser Main window functions:
Control Keys
• Go
- Displays the Go menu.
• Edit
- Displays the Edit menu. Edit various browser keys and
options.
• #App1
- Selects a preset web page.
• #App2
- Selects a preset web page.
• #App3
- Selects a preset web page.
•
- Scroll from top to bottom between the different hot links
displayed on the web page.
•
- Scroll from bottom to top between the different hot links
displayed on the web page.
Enter Key
Selects the highlighted option.
Cursor Key
Scroll up/down and left/right on the displayed URL.
Inaset User Guide - Issue 1.0
Browser Application
6-5
Telephony (PBX) Display
$QDOWHUQDWLYHEURZVHUGLVSOD\EHORZVKRZVWHOHSKRQ\3%;
LQIRUPDWLRQDWWKHWRSRIWKHGLVSOD\DORQJZLWKWKHWHOHSKRQ\PRGHVRIW
NH\V6HHWKHVHFWLRQ9LHZLQJ7HOHSKRQ\3%;,QIRUPDWLRQODWHULQWKLV
FKDSWHU
Browser Main window - Telephony Display
Inaset User Guide - Issue 1.0
6-6
Browser Application
Using Your Home Page
$ZHE+RPH3DJHFDQEHSUHVHWDQGYLHZHGLQWKH%URZVHUDSSOLFDWLRQ
7KLV+RPH3DJHZLOOGLVSOD\DXWRPDWLFDOO\ZKHQWKH%URZVHUDSSOLFDWLRQ
LVVWDUWHG
Viewing the Home Page
)ROORZWKHVWHSWRYLHZDSUHVHW+RPH3DJH
Step
Press the soft key for Home. The Inaset preset web Home Page will open.
The Home soft key does not display in the Telephony view mode. To use the Home
key function in this mode, press the control key for Go, then the key for home.
NOTE
Setting the Home Page
$+RPH3DJHZHEDGGUHVVPXVWEHSUHVHWEHIRUHWKH+RPH3DJHZLOO
GLVSOD\LQWKHEURZVHUZLQGRZ)ROORZWKHVWHSVWRVHW\RXUKRPHSDJH
DGGUHVV
Step 1
From the Browser Main window, press the control key for Edit. The Edit
menu window opens.
Step 2
Press the control key for Options. The Browser Option Setting window
opens (below).
Browser Option Setting window
Inaset User Guide - Issue 1.0
Browser Application
Step 3
6-7
Using the dial keys on the Inaset lower panel, enter the Web address of
your Home Page in the Home Page URL field. (A maximum of 127
characters can be entered.)
(See Entering Text Using the Dial Keys in this chapter.)
—Selecting To a Default will set the home page URL address specified
by your phone system administrator as your current home page.
Step 4
Inaset User Guide - Issue 1.0
Press the soft key for OK to save your address.
6-8
Browser Application
Setting for a Proxy Server
<RXU,QWHUQHWRU,QWUDQHWDFFHVVPD\XVHDSUR[\VHUYHU)RU\RXU,QDVHW
%URZVHUWRSURSHUO\YLHZZHESDJHVLWPXVWEHFRQILJXUHGIRUWKLV
SUR[\VHUYHULIRQHLVXVHGDW\RXUIDFLOLW\
NOTE
Contact your phone or local network system administrator to determine if the proxy
server settings must be configured for your Inaset. (These settings may have already
been configured by your administrator.)
)ROORZWKHVWHSVWRFRQILJXUH\RXU,QDVHW%URZVHUIRUDSUR[\VHUYHU
Step 1
From the Browser Main window, press the control key for Edit. The Edit
menu window opens.
Step 2
Press the control key for Options. The Option Setting window opens
(below).
Browser Option Setting window
Step 3
Press the control key for Use Proxy Server to check the Proxy Settings
checkbox.
Step 4
Press the control key for Address, and enter the IP address for the proxy
server using the Inaset dial keys. (See Entering Text Using the Dial Keys
in this chapter.)
Step 5
Press the control key for Port Number, and enter the port number for the
proxy server using the Inaset dial keys. (If no or an invalid port number is
entered, Inaset will use a default port number of 80.) (See Entering Text
Using the Dial Keys in this chapter.)
Step 6
Press the soft key for OK to save the settings.
Inaset User Guide - Issue 1.0
Browser Application
6-9
Using Application Pages
,QDGGLWLRQWRD+RPH3DJHRWKHUZHESDJHVRILQWHUHVWFDQEHSUHVHW
DQGHDVLO\YLHZHGZLWKWKH,QDVHW%URZVHU7KHVHSUHVHW$SSOLFDWLRQ
SDJHVFRXOGEHZHDWKHUVLWHVQHZVSDJHVRURWKHUZHESDJHV\RX
IUHTXHQWO\YLHZ
Viewing Application Pages
)ROORZWKHVWHSVWRYLHZDSUHVHWDSSOLFDWLRQSDJH
Step 1
From the Browser Main window, press the control key for Go. The Go
menu window opens.
Step 2
Press the control key (#App1-8) to select the web page application to
view. The selected web page opens. (Press next to select additional
application pages.)
Setting the Application Page Presets
<RXFDQSUHVHWXSWRHLJKWDSSOLFDWLRQSDJHV7KLVPDNHVLWHDV\WRYLHZ
\RXUDSSOLFDWLRQSDJHVZLWKRXWKDYLQJWRUHHQWHUWKHLUZHEDGGUHVVHV
HDFKWLPH)ROORZWKHVWHSVWRVHW\RXUDSSOLFDWLRQSDJHDGGUHVVHV
Step 1
From the Browser Main window, press the control key for Edit. The Edit
menu window opens.
Step 2
Press the control key for Applications. The Application Setting window
opens (below).
Browser Application Setting window
Inaset User Guide - Issue 1.0
6-10
Browser Application
Step 3
Press the control key to select one of the eight applications. In the
Application Name field, use the dial keys to enter a title for the web
page. (You can enter a maximum of 32 characters.)
(See Entering Text Using the Dial Keys in this chapter.)
Step 4
Press the control key on this application to select the address field. Enter
the URL address for this web page in the URL field. (You can enter a
maximum of 127 characters.) (See Entering Text Using the Dial Keys in
this chapter.)
Step 5
Press the soft key for OK to save the settings.
6HHWKHVHFWLRQ&KDQJLQJWKH&RQWURO.H\)XQFWLRQVODWHULQWKLVFKDSWHU
WRDGG\RXUSUHVHWVWRFRQWURONH\VRQWKH%URZVHU0DLQZLQGRZ
Inaset User Guide - Issue 1.0
Browser Application
6-11
Go Menu
6HOHFWLQJ*RIURPWKH%URZVHU0DLQZLQGRZZLOOGLVSOD\WKH%URZVHU*R
PHQXZLQGRZEHORZ
Browser Go Menu window
3UHVVWKHFRQWURONH\IRUKRPH7KHSUHVHW+RPHSDJHZLOORSHQLQ
WKH%URZVHU0DLQZLQGRZ
3UHVVWKHFRQWURONH\IRUVWRSWRVWRSWKHDFFHVVRIWKHVHOHFWHG
85/
3UHVVWKHFRQWURONH\IRUUHORDGWRUHORDGWKHODVWVHOHFWHG85/
3UHVVWKHFRQWURONH\IRUDSSWRORDGWKHILUVWDSSOLFDWLRQSUHVHW
85/
3UHVVWKHFRQWURONH\IRUQH[WWRYLHZDGGLWLRQDODSSSUHVHWV
Inaset User Guide - Issue 1.0
6-12
Browser Application
Configure Control & Soft Keys
7KH%URZVHUPDLQZLQGRZVRIWNH\VDQGILYHRIWKHFRQWURONH\VFDQEH
UHFRQILJXUHGIURPWKHLUGHIDXOWWRFXVWRPL]HWKHGLVSOD\ZLQGRZ
Changing the Control Key Functions
)LYHFRQWURONH\VFDQEHUHFRQILJXUHGWRIXUWKHUFXVWRPL]HWKHGLVSOD\
7KHGHIDXOWNH\VHWWLQJVVKRZVWKHILUVWWKUHHDSSOLFDWLRQSDJHSUHVHWV
DSSDSSDSSDQGWKHWZRVFUROOIXQFWLRQV
7\SLFDOO\\RXPLJKWZDQWWRFKDQJHRULQFOXGHDGGLWLRQDODSSOLFDWLRQ
SDJHSUHVHWV7KLVDOORZV\RXJRWR\RXUSUHVHWDSSOLFDWLRQSDJHVVLPSO\
E\SUHVVLQJRQO\RQHNH\)ROORZWKHVWHSVWRVHWWKH0DLQZLQGRZ
FRQWURONH\IXQFWLRQV
Step 1
From the Browser Main window, press the control key for Edit. The Edit
menu window opens.
Step 2
Press the control key for Control Keys. The Control Key Configuration
window opens (below).
Browser Control Key Configuration window
Step 3
Press the control key for Control Key 1. Continue to press the adjacent
control key until the desired Application page name (or other key
function) appears in the field.
Step 4
Configure the remaining control keys as needed.
Step 5
When finished, press the soft key for OK to save these settings.
Inaset User Guide - Issue 1.0
Browser Application
6-13
Changing the Soft Key Functions
7KHQRUPDOGHIDXOWVHWWLQJDVVLJQVWKHSDJHQDYLJDWLRQIXQFWLRQVRI
%DFN)RUZDUG+RPHDQG6WRSWRWKHVHNH\V)ROORZWKHVWHSVWR
FKDQJHVWKHVHVHWWLQJV
These soft keys only display when the display is set to normal view mode.
NOTE
Step 1
From the Browser Main window, press the control key for Edit. The Edit
menu window opens.
Step 2
Press the control key for Soft Keys. The Soft Key Configuration window
opens (below).
Browser Soft Key Configuration window
Inaset User Guide - Issue 1.0
Step 3
Press the control key for the specific soft key to change. Repeatedly
press the control key as needed to select the desired key function.
Step 4
Configure the other soft keys as needed.
Step 5
When finished, press the soft key for OK to save these settings.
6-14
Browser Application
Viewing Telephony PBX Information
<RXFDQFRQILJXUHWKH%URZVHU0DLQZLQGRZWRGLVSOD\WKHWHOHSKRQ\
LQIRUPDWLRQIURPWKH3%;7KLVLQIRUPDWLRQLVWKHWLPHGDWHDQGFDOO
VWDWXVWKDWLVVHQWIURP\RXU3%;WHOHSKRQHV\VWHPWR\RXU,QDVHW
SKRQH
)ROORZWKHVWHSVWRVHOHFWWKH%URZVHUGLVSOD\YLHZ
Step 1
From the Browser Main window, press the control key for Edit. The Edit
menu window opens.
Step 2
Press the control key for View. The View Setting window opens (below).
Browser View Setting window
Step 3
Press the control key for Show Telephone Display (U/L) to set the
Browser to display telephone information.
Step 4
Press the control key for Normal to select the normal Inaset Browser
display.
Step 5
Press the control key for Save View Setting to select the checkbox if
you want this setting to be saved and used the next time you start the
Browser application.
Step 6
Press the soft key for OK to save the settings.
Inaset User Guide - Issue 1.0
)RUDGGLWLRQDOLQIRUPDWLRQRUVXSSRUWRQWKLV1(&SURGXFW
FRQWDFW\RXU1(&UHSUHVHQWDWLYH
,QDVHW8VHU*XLGH
6WRFN
1'$,VVXH